# Mushroom Growing Guide
## How to grow magic mushrooms at home
[How to grow magic mushrooms at home](https://shroomok.com/en/wiki/How_to_grow_magic_mushrooms_at_home)
Hey buddy!
You probably want to grow your first mushrooms at home. Honestly, It’s one of the most exciting journeys and the coolest (almost mysterious) things I’ve ever done. One day it brought a light into my life which is shining still. Since then, the Fungi world has accompanied me all the time!
A few years ago I was a person with a very basic mushroom cultivation experience. I’ve faced many challenges on my first growing attempts. It wasn't smooth sailing at all. But hey, that's what made the growing trip so worthwhile.
[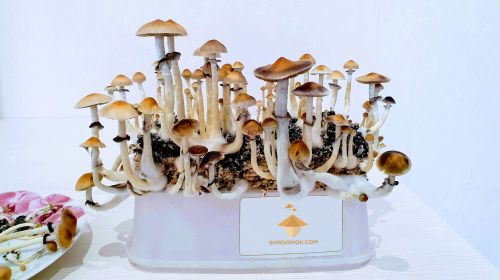](https://shroomok.com/en/wiki/File:Fruiting-psilocybe-cubensis-mushrooms-brazil-strain.jpg) For motivation! Psilocybe Cubensis BrazilI analyzed each step, played with different cultivation methods, struggled with contaminants, tried to experiment and find the best solutions for my home mycology hobby. Also, I’m running a Discord community which feeds me on a daily basis with a huge amount of information, tips and tricks, successes and failures (that is quite important) of mushroom cultivators from all over the world.
As a result, I've packed all the stuff together into a 20 steps guide to help junior growers to avoid as many mistakes as possible.
This manual is a tribute to the Fungi Kingdom. It is a desire to share all our experience with those who studied magic mushrooms cultivation, bit by bit, and continue to improve their skills.
[](https://shroomok.com/en/wiki/File:Working-in-SAB.jpg) Mycology at homeWe begin this journey with preparation step [**Let's get started! Stuff to buy**](https://shroomok.com/en/wiki/Stuff_to_buy_for_growing "Stuff to buy for growing") ▶️
## Stuff to buy for growing
[Stuff to buy for growing](https://shroomok.com/en/wiki/Stuff_to_buy_for_growing)
[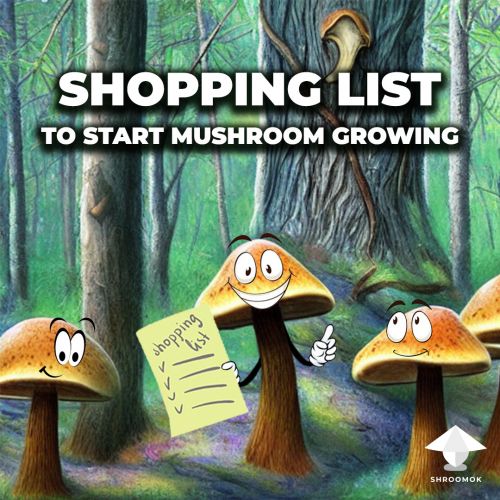](https://shroomok.com/en/wiki/File:Shopping-list-to-start-mushroom-growing.jpg) What do you need to buy for magic mushroom growing at home### **Shopping list for the start of magic mushroom growing at home**
#### **The main stages in magic mushroom life cycle**
Mushroom Cultivation process consists of **2 main stages:**
##### **Colonization period (first 2-6 weeks)**
It is vegetative phase when mushroom mycelium is formed. This mycelium grab the nutrients from grain substrate in jars or bags.
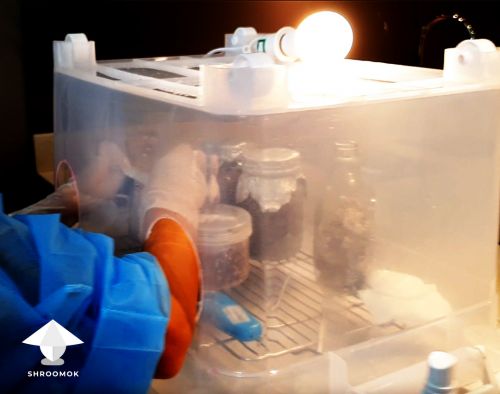
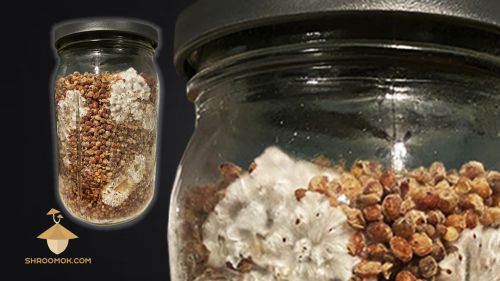
[](https://shroomok.com/en/wiki/File:Incubator-for-growing-psilocybe-cubensis.jpg) Incubator for psilocybin mushrooms colonization period
For this phase we need to prepare liquid spore syringe, spawn substrate, bags or jars for spawn substrate, make substrate sterilization, substrate inoculation, make mushroom cakes and cover them with casing layer, make an incubator (optional) and control the necessary microclimate conditions for this period:
- dark place, no light at all
- temperature 70-81°F or +21..+27°C
- low humidity (30-55%)
##### **Fruiting** **period (the next 6-8 weeks after colonization period)**
It is a phase of pinhead and primordia formation, mushrooms fruit bodies growth, harvesting and flushing (mushrooms produce 3-5 flushes)
[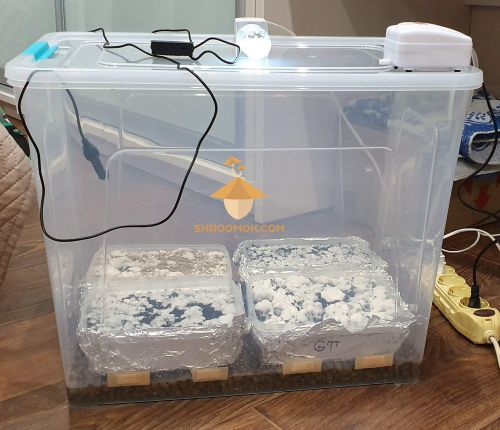](https://shroomok.com/en/wiki/File:Growbox-eqiupment-for-growing-psilocybin-mushrooms-psilocybe-cubensis.jpg) Fruiting chamber (aka growbox) for psilocybin mushrooms fruiting period
For this phase, we need to:
- prepare any kind of fruiting chamber (Growbox, MonoTub, Bottle Tek etc.)
- reduce temperature to 70-74°F or +21..+23°C
- maintain high humidity (90-95%)
- provide fresh air exchange (FAE)
- light
At first, it will be enough to prepare all stuff for the first stage — colonization period. If you succeed in it, then proceed for the second phase.
> Newbie cultivators often don't know about the separation of these two stages of mushroom cultivation and confused the climate conditions.
#### **Where do you start your magic mushroom cultivation? Alternatives and costs**
##### ❇️ **Option 1 — GrowKit**
Ready to use grow kit for beginners with basic stuff you need for the start can be found online **([Amazon](https://amzn.to/3ZGs4uf) $149.98)**. Anyway you need to buy some stuff for convenient and sterile work.
To be honest, such kits are "so-so" quality, but good enough for the very first attempt.
> For long term hobby better to make everything by your own. It's really worth it!
##### ❇️ **Option 2 — Do it yourself**
It's super easy, fun and exciting process! You can setup your incubator (which is optional) and fruiting chamber (GrowBox or MonoTub) by your own. You even can use a bucket or big plastic bottle as fruiting chamber.
You don't need to buy everything at once. You just need time, passion and patience.
> Our total costs were about $130 for the whole process described in this guide
Your very first growing can be organised cheaper. You can spend around 100$ for EVERYTHING you need. I'll show you how you can save money for the first time. My costs were **130$** for the whole growing process described in this guide, including equipment for simple Incubator, GrowBox and additional tools. This price doesn't include pressure cooker or autoclave, laminar flow hood and other expensive stuff for mycology.
> As a result, **it turned into 1883 grams of wet mushrooms** (details about yield by strains and by flushes in [**Growing Stats**](https://shroomok.com/en/wiki/Magic_mushrooms_growing_statistics_with_charts "Magic mushrooms growing statistics with charts") section) and about a hundred spore prints. But the most important were emotions gained from **10 weeks of an exciting GROWING trip!**
Let's move step by step and make a list of basic necessary stuff to start you own mushroom cultivation.
#### **List of required items for colonization period**
For the first stage of growing process you need to prepare:
##### **Mushroom genetic material**
Spore print in zip bag, or spore syringe, or liquid culture in syringe. This is the most important and indispensable participant of mushroom growing process.
[](https://shroomok.com/en/wiki/File:Psilocibe-mushroom-print.jpg) Psilocybin mushroom spore print (Psilocybe Cubensis)##### **Whole grain**
You need unhulled good quality grain suitable for food for people and animals. You can use organic grain or grain for sprouting for making grain substrate for inoculation.
> To prepare grain substrate you need about 2lbs (1kg) of DRY grain per 4-5 jars (16 oz) or 2-3 jars (32 oz)
**For grain substrate you can use:** wheat berry, oats, barley, rye, wild bird seeds, popcorn, corn, brown rice, millet, sorghum. I suggest to start with wheat, oats, brown rice or millet.
🌾 Whole wheat berries.
[](https://shroomok.com/en/wiki/File:Whole-wheat-for-psilocybe-cubensis-substrate.jpg) Whole wheat for preparing spawn substrate for psilocybin mushrooms growing 🌾 Whole oat with husk.
[](https://shroomok.com/en/wiki/File:Whole-oat-for-psilocybe-cubensis-substrate.jpg) Whole oat for psilocybe cubensis spawn substrate🌾 Brown rice.
[](https://shroomok.com/en/wiki/File:Brown-rice-for-spawn-and-brf-substrate.jpg) 🌾 Millet or wild bird seeds.
[](https://shroomok.com/en/wiki/File:Millet-for-spawn.jpg) Millet for mushroom spawn**Shroomok's Choice on Amazon:**
[Hard Red Winter Wheat Berries, 5 lbs](https://www.amazon.com/gp/product/B016VJ8XLQ?ie=UTF8&linkCode=ll1&tag=shroomok-20&linkId=082673cf073ee025aea6976c6fd47861&language=en_US&ref_=as_li_ss_tl) $17.95
[Organic Whole Oat, 2 Lbs](https://www.amazon.com/gp/product/B002V5PDOK?ie=UTF8&linkCode=ll1&tag=shroomok-20&linkId=bc1517e9f32dd33a1f7cc96ed847b946&language=en_US&ref_=as_li_ss_tl) $21.94
[Extra Long Brown Basmati Rice, 3.3 lbs](https://www.amazon.com/Pride-India-Basmati-Naturally-Healthy/dp/B01BPQ8TAA?crid=3SYGTZS7SVL1F&keywords=Brown%2BRice&qid=1650952526&s=grocery&sprefix=%2Cgrocery%2C325&sr=1-1-spons&spLa=ZW5jcnlwdGVkUXVhbGlmaWVyPUEzUUlKV1VCTFpROEJMJmVuY3J5cHRlZElkPUEwNTExNDMzMlhQTTk4RkdLOTMzSiZlbmNyeXB0ZWRBZElkPUEwNTAwOTM3MkdHU0VFMEM5NkpGTCZ3aWRnZXROYW1lPXNwX2F0ZiZhY3Rpb249Y2xpY2tSZWRpcmVjdCZkb05vdExvZ0NsaWNrPXRydWU&th=1&linkCode=ll1&tag=shroomok-20&linkId=61fa22bd35c109568201cd7d6f47f62e) $14.99
[Millet Proso, 10 lbs](https://amzn.to/3KLP4mO) $25.95
[Ready Sterilized Rye Berry Mushroom Grain Bag](https://amzn.to/3KOfmVH) $16.50
##### **Jars and Lids with injection port and air filter**
Use any jars for canning like Mason jars or heat resistant 5PP jars.
The optimal volume is 12-32oz or 350-1000 ml.
For lids use self-healing injection ports or RTV silicone and synthetic air filters
[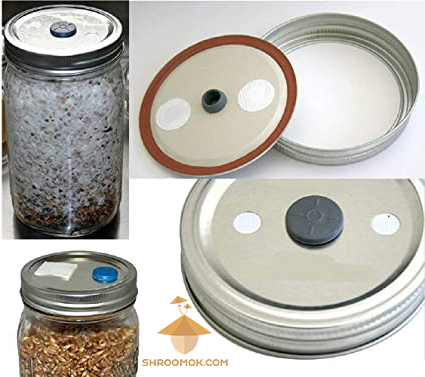](https://shroomok.com/en/wiki/File:Mason-jar-lid-with-filter-and-injection-port.jpg) Mason spawn jar. Lid with filter and injection port.Polypropylene (5PP) is heat resistant food plastic withstand temperatures up to +140°C (284°F).
[](https://shroomok.com/en/wiki/File:Polypropylene-spawn-jars.jpg) Polypropylene jars with twist-off polypropylene jars for mushroom spawn jars[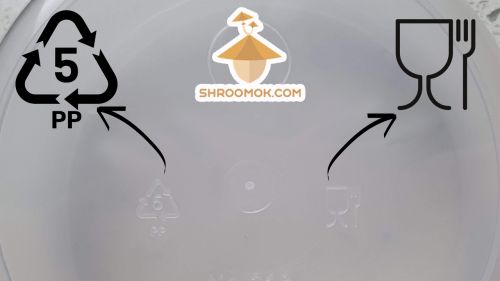](https://shroomok.com/en/wiki/File:Polypropylene-PP-jars-for-mushrooms.jpg) Polypropylene symbol> ♻️ Jars, lids and components are reusable!
**Shroomok's Choice on Amazon:**
[Mason Jars with Lids, 16/32 oz - 6 Pack](https://amzn.to/3UmUSqJ) $17.99
[Mason Jars Wide Mouth with Lids, 32oz - 12 Pack](https://amzn.to/3E4b4Ww) $27.99
[Polypropylene jars, 8-32oz](https://amzn.to/3nLsDWt) $11.97
[Air Filters 64 pcs. + Injection Ports 100 pcs.](https://amzn.to/437ZDZc) $12.99
##### **Incubation box**
> **Optional if your room temperature is 70°F or +21°C and higher**
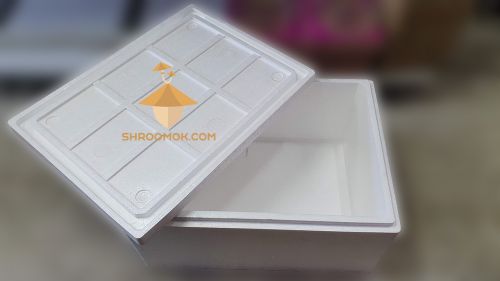
**Cardboard box** with thermal box liner or **Styrofoam shipping box** ([Amazon](https://amzn.to/40XwKNd)) or **Insulated bag**. Probably you already have something at home. This will be our incubator.
[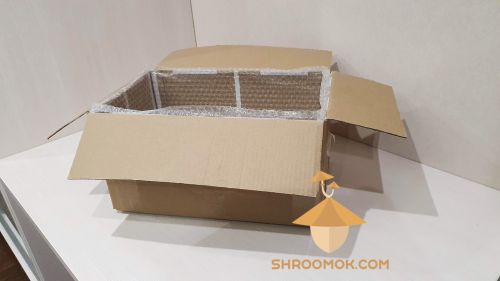](https://shroomok.com/en/wiki/File:Incubator-for-growing-psilocybin-mushrooms.jpg) Cardboard box with bubble PE sheeting as an incubator for growing psilocybin mushrooms Styrofoam box as an incubator for mushroom cultivation.
[](https://shroomok.com/en/wiki/File:Incubator-for-mushroom-colonization.jpg) Cabinet or cupboard shelf as an incubator for mushroom colonization period
[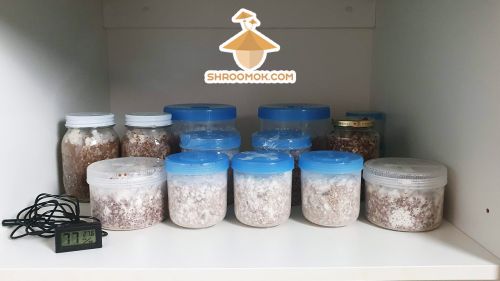](https://shroomok.com/en/wiki/File:Spawn-jars-in-incubator.jpg) ##### **Heater for incubator**
To maintain the temperature in the incubator +25°...+27°C or 77-81°F for the first 2 weeks helps to speed up mycelium growth. However it's not mandatory and depends on the season of the year and temperature conditions in your home. So, during the hot season you can proceed without it, but during the cold season you'll need additional heating to speed up mycelium colonization.
As a heater for incubation box you can use **shoe dryer.**
[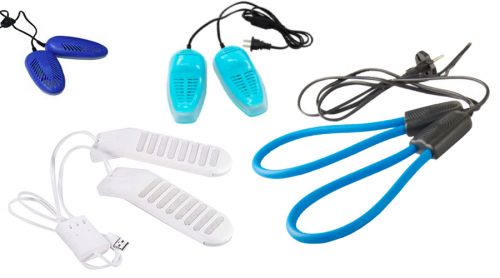](https://shroomok.com/en/wiki/File:Heater-for-incubator.jpg) Heater for incubatorOr **heating mat** (silicone mat heater, heat mat for terrarium, floor mat heater, plant and seed warming mat, hydroponic heating pad for indoor seedling and germination), animals bed heater, any household heater or any heating element, сorner near radiator or even your cat.
[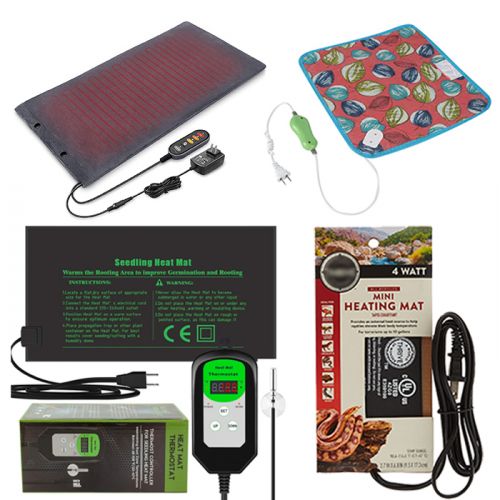](https://shroomok.com/en/wiki/File:Heating-mat-for-incubator.jpg) Heating mat examples for incubator**Temperature controllers** aka **Thermostat** to maintain stable temperature. Optional, but useful!
[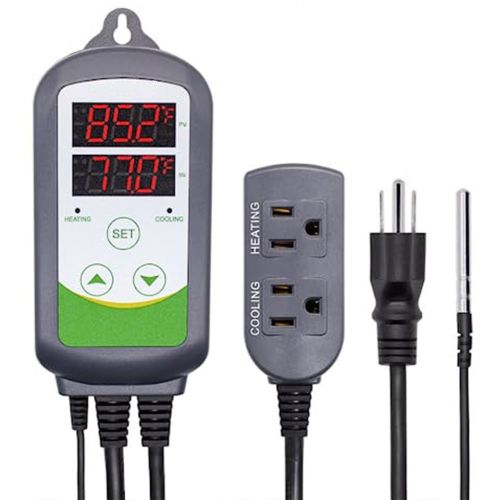](https://shroomok.com/en/wiki/File:Thermostat-for-mushroom-incubator.jpg) **All stuff on Amazon:**
[Shoe Dryer **with build in fan**](https://www.amazon.com/DryGuy-Travel-Boot-Dryer-Shoe/dp/B010A5JBPO?keywords=Shoe+Dryer&qid=1650950239&s=sporting-goods&sr=1-6&linkCode=ll1&tag=shroomok-20&linkId=b7748bf8586b355e4edf63cce73c054c) $47.08
[Seedling Heat Mat](https://www.amazon.com/gp/product/B00Y27FJ1C/ref=as_li_tl?ie=UTF8&tag=shroomok-20&camp=1789&creative=9325&linkCode=as2&creativeASIN=B00Y27FJ1C&linkId=0297ce712f3e6ed105af6b00eb3b02cf) $28.99
[Reptile Heating Pad with Temperature Adjustment](https://amzn.to/45McxMR) $19.98
[Inkbird Digital Temperature Controller](https://www.amazon.com/Inkbird-Max-1200W-Temperature-Controller-Greenhouse/dp/B01HXM5UAC?crid=1DFZBJGSB4LM7&keywords=Temperature+Controller&qid=1650951049&sprefix=temperature+controller%2Caps%2C338&sr=8-3&linkCode=ll1&tag=shroomok-20&linkId=4cb14de52f0a53193af64a71e6c4dd50) $35.00
##### **Thermometer and hygrometer**
Digital thermometer with a hygrometer to monitor temperature in the incubator and fruiting chamber as well.
[](https://shroomok.com/en/wiki/File:Thermometr-with-hygrometr-for-incubator-and-growbox.jpg) Electronic thermometer with hygrometer**Shroomok's Choice on Amazon:**
[Bluetooth Digital Hygrometer, Thermometer with Remote App](https://www.amazon.com/gp/product/B07Y36FWTT/ref=as_li_tl?ie=UTF8&tag=shroomok-20&camp=1789&creative=9325&linkCode=as2&creativeASIN=B07Y36FWTT&linkId=244415a8d89f306fb2c96ecc7f6b961f) $12.99
[Digital Hygrometer, Thermometer](https://www.amazon.com/gp/product/B07YY1FB9D/ref=as_li_tl?ie=UTF8&tag=shroomok-20&camp=1789&creative=9325&linkCode=as2&creativeASIN=B07YY1FB9D&linkId=4d946b984658d5478b46e13d1e17c38f) - $17.99
#### **List of required items for fruiting period**
For the second stage of growing process you need to prepare:
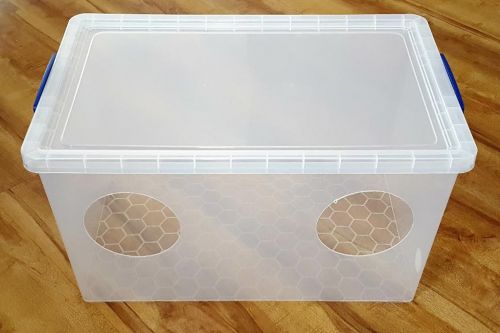
##### **Plastic container for fruiting chamber**
Detailed construction of the fruiting chamber is presented in the [DIY Grow Box for Magic mushrooms. Fruiting conditions](https://shroomok.com/en/wiki/DIY_Grow_Box_for_Magic_mushrooms._Fruiting_conditions "DIY Grow Box for Magic mushrooms. Fruiting conditions") section.
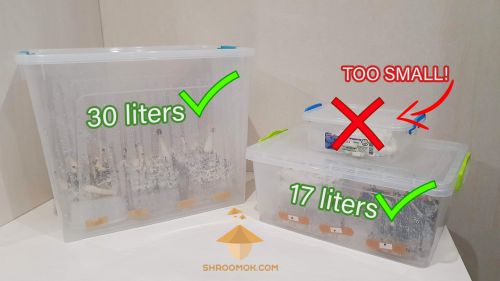
The volume should be about 30-40 liters (30-40Qt). You can use plastic boxes of larger (50-80L or about 50-80Qt) or smaller shoeboxes (15-20L or 15-20 Qt) as well. The bigger the better. Because the will be accumulated less carbon dioxide (CO2) during mushrooms growing. Bigger grow box can be ventilated rarely. It's easier to control the microclimate conditions.
[](https://shroomok.com/en/wiki/File:Grow-box-for-growing-psilocybe-cubensis-mushrooms.jpg) Plastic container for growbox preparation**Shroomok's Choice on Amazon:**
[Plastic Box for Growbox, Monotub, Shoebox or DubTub Tek 5/12/19/32/40/53 Qt](https://amzn.to/3KXfaDC) - $44.99
2️⃣ **LED lamp.** The lamp light should be weak in the blue range (~435 nm).
[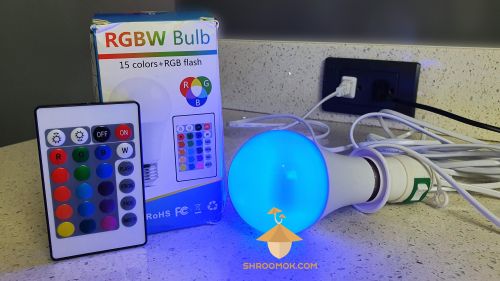](https://shroomok.com/en/wiki/File:Lamp-light-for-mushroom-cultivation.jpg) LED lamp for mushroom cultivation in blue range (~435 nm)> Mushrooms don't need powerful lamps for plants. You can use diode strip as additional light for fruiting chamber. Moreover, **natural light** is suitable as well, but **NOT direct sunlight** and only **diffused soft light.**
[](https://shroomok.com/en/wiki/File:Lamp-for-psilocybe-mushrooms-growbox.jpg) LED lamp in the blue range (~435 nm) for psilocybin mushrooms growbox**Shroomok's Choice on Amazon:**
[**Gooseneck** Lamp for mushroom growbox, Metal Large Clamp, Adjustable Light](https://www.amazon.com/gp/product/B07R17QP51/ref=as_li_tl?ie=UTF8&tag=shroomok-20&camp=1789&creative=9325&linkCode=as2&creativeASIN=B07R17QP51&linkId=f03535f6c1a35fdf68d95a6dd7f176fb) - $24.98
[White LED Strip Lights](https://amzn.to/3sviM9o) 19.99
[LED **Lamp** USB Charging Port, 2 AC Power Outlet, 1H Timer](https://www.amazon.com/gp/product/B088PCWS67/ref=as_li_tl?ie=UTF8&tag=shroomok-20&camp=1789&creative=9325&linkCode=as2&creativeASIN=B088PCWS67&linkId=3ee4a42908a8303b0046102ad9e5cf95) - $26.99
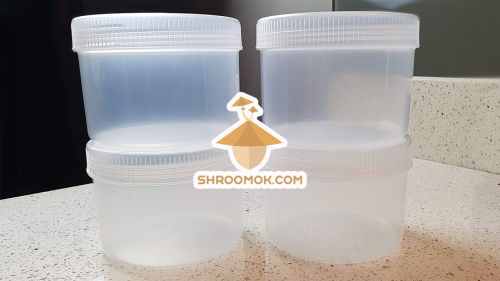
3️⃣ **Plastic Food Containers.** Any food flat container for making [small mushroom cakes and casing](https://shroomok.com/en/wiki/Making_mushroom_cake,_spawn_to_bulk,_and_casing "Making mushroom cake, spawn to bulk, and casing"). The volume about 1-3 liters can be used
[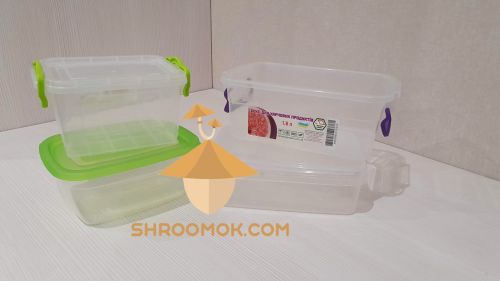](https://shroomok.com/en/wiki/File:Containers-for-psilocybe-mushrooms-cultivation.jpg) Plastic containers for mushroom cakes and casing**Shroomok's Choice on Amazon:**
[Lunch Boxes with Lids for mushroom cakes - 28 oz - 12/20 Pack](https://amzn.to/3Phev2u) - $10.99
[Seed Starting Plant Growing Trays for Mushroom Cakes - 10 pcs.](https://www.amazon.com/gp/product/B06XNYH4D3/ref=as_li_tl?ie=UTF8&tag=shroomok-20&camp=1789&creative=9325&linkCode=as2&creativeASIN=B06XNYH4D3&linkId=a8fa5a0f0139b42c756dfee68acc67bc) - $21.99
##### **Coconut coir for bulk substrate**
Use pressed **coconut fiber bricks.** Coconut fiber volume increases after adding water. One brick is enough for 4-8 small mushroom cakes, or 2 tubes (shoeboxes, monotub).
[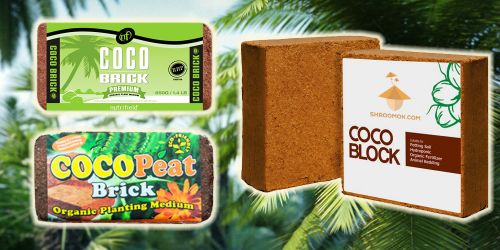](https://shroomok.com/en/wiki/File:Coco-brick-for-casing-layer-in-growing-psilocybe-cubensis.jpg) Coco brick for psilocybin mushrooms cakes (casing layer)**Shroomok's Choice on Amazon:**
[Coco Coir Brick 650 Gram Block](https://www.amazon.com/Coconut-Certified-Buffered-Organic-Garden/dp/B093CKN811?pd_rd_w=yscbg&pf_rd_p=1ed8df3a-0df8-4988-98b9-252e4c99c568&pf_rd_r=5QG3X4YWVKR0EN88QS6G&pd_rd_r=5156dbfb-d3b5-44dd-8321-8ba75fb74a44&pd_rd_wg=5Zk1c&pd_rd_i=B093CKN811&psc=1&linkCode=ll1&tag=shroomok-20&linkId=511373b2c390df4403c2d008eb0189b5) - $7.99
##### Vermiculite
We need a vermiculite for bulk substrate and grain jars (optional) to balance moisture.
[](https://shroomok.com/en/wiki/File:Vermiculite-perlite-for-growing-magic-mushrooms.jpg) Vermiculite and perlite as a drainage for substrate**Shroomok's Choice on Amazon:**
[Vermiculite 8 qt. - 1/2/5 Pack](https://www.amazon.com/gp/product/B001693Y3Y/ref=as_li_tl?ie=UTF8&tag=shroomok-20&camp=1789&creative=9325&linkCode=as2&creativeASIN=B001693Y3Y&linkId=aab8022c311d9913eb323603bea05da5) - $12.64
##### Additives to bulk substrate (optional)
**Gypsum (CaSO4)** for better substrate aeration and source of Calcium
[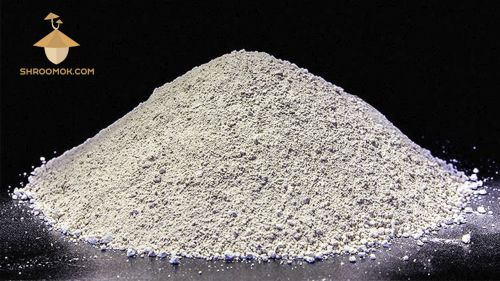](https://shroomok.com/en/wiki/File:Limestone-Flour_copy.jpg) Limestone flour for casing substrate**Shroomok's Choice on Amazon:**
[Organic Garden Gypsum Calcium Sulfate, 5 lb](https://www.amazon.com/gp/product/B07N2Y5NHM/ref=as_li_tl?ie=UTF8&tag=shroomok-20&camp=1789&creative=9325&linkCode=as2&creativeASIN=B07N2Y5NHM&linkId=3d844f424154e3e0f0723d1ccb2ed762) - $20.00
✅ You can buy ready to use sterilized compost with right water content (aka field capacity). No need to buy coco coir, vermiculite, gypsum and spend time for pasteurization or sterilization. Ready to use sterile coco coir mixed with vermiculite and gypsum (CVG substrate) you can use for making mushroom cakes.
**Shroomok's Choice on Amazon:**
[Ready Sterilized Compost Mushroom Substrate - 10 Pounds - 1 Bag](https://www.amazon.com/gp/product/B016IENOLI/ref=as_li_tl?ie=UTF8&tag=shroomok-20&camp=1789&creative=9325&linkCode=as2&creativeASIN=B016IENOLI&linkId=4c85d11ace21e356e0d65bcfeaabbff3) - $24.95
[Ready Sterile Coco Coir/Vermiculite Casing Substrate - 5 Pounds](https://www.amazon.com/gp/product/B083RJG4FF/ref=as_li_tl?ie=UTF8&tag=shroomok-20&camp=1789&creative=9325&linkCode=as2&creativeASIN=B083RJG4FF&linkId=283a900c2dadd61b858349822a9e7b8f) - $34.95
#### **List of required items to buy at the pharmacy**
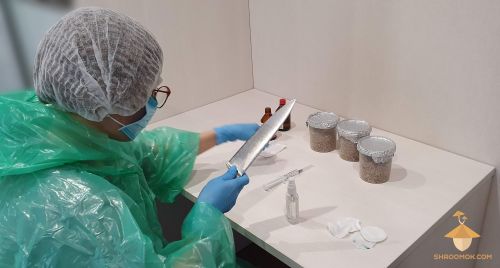
1️⃣ Growers outfit: face mask, gloves, medical cap, disposable medical gown or PE raincoat
[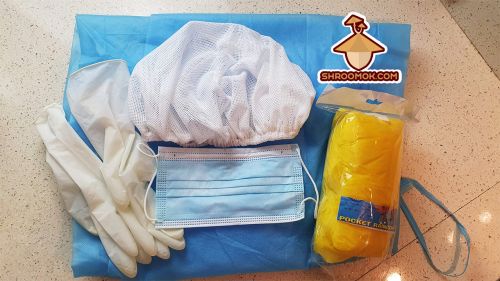](https://shroomok.com/en/wiki/File:Growers-outfit-for-mushroom-cultivation.jpg) Growers outfit for mushroom cultivation: face mask, gloves, cap, gown**Shroomok's Choice on Amazon:** [10 Gloves and 1 Mask Bundle](https://www.amazon.com/gp/product/B0865SSK9T/ref=as_li_tl?ie=UTF8&tag=shroomok-20&camp=1789&creative=9325&linkCode=as2&creativeASIN=B0865SSK9T&linkId=25f3f5e17e1e3b8bc0728cd3e50f0be9) - $7.99
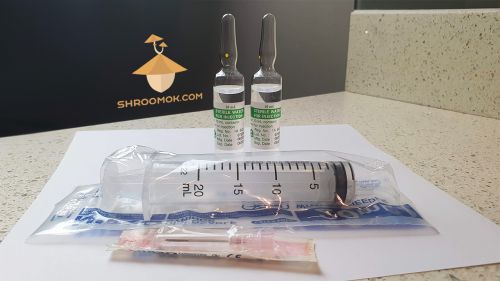
2️⃣ **Sterile syringe (5ml** or **10ml** or **20 ml) with needle** — 1 syringe per 1 spore print. Better to use a big volume syringe to prepare more liquid spore suspension.
[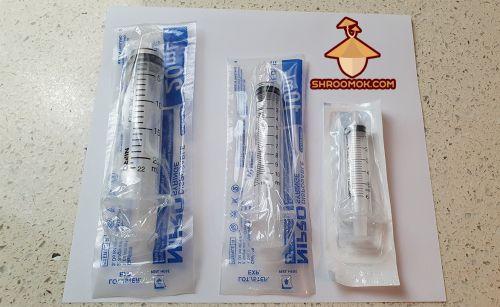](https://shroomok.com/en/wiki/File:Syringe-for-liquid-spore.jpg) Syringe for liquid spore suspension**Shroomok's Choice on Amazon:**
[Syringe Needle for LC or spore syringe, 18 ga - 50 Pack](https://www.amazon.com/Industrial-Dispensing-Accessories-Syringes-plastic-10Pack/dp/B07GTK2W7D?crid=366HOY3CSN0V0&keywords=syringe+needle&qid=1650966462&s=industrial&sprefix=syringe+need%2Cindustrial%2C337&sr=1-9&linkCode=ll1&tag=shroomok-20&linkId=bb4b47d127f15b496d69bd7bc0767e94) - $9.90
[Sterile Syringe for liquid spore or liquid culture 5/10/20/30/60 ml - 30Pack](https://www.amazon.com/dp/B09MLXNMZ9?_encoding=UTF8&psc=1&linkCode=ll1&tag=shroomok-20&linkId=28d6cdcedda77894feacb8c4b0b5c911) - $12.99
##### **Sterile injection water**
Minimum 10 ml per 1 spore syringe. If you use big volume syringes (20-30-50 ml), then you need more sterile water.
[](https://shroomok.com/en/wiki/File:Big-syringe-for-liquid-spore.jpg) Sterile injection water for liquid spore syringe**Shroomok's Choice on Amazon:** [Sterile Water 100ml 6 Bottles](https://www.amazon.com/Sterile-Water-Irrigation-Wound-Bottles/dp/B077VBTG8T?crid=VHUFJ7F5A28R&keywords=injection+water&qid=1648644814&sprefix=injection+wat%2Caps%2C343&sr=8-14&linkCode=ll1&tag=shroomok-20&linkId=ac5a2c1033721e2a90d139c01400b428) - $8.54
Isopropyl or Ethyl alcohol (70%)**Ethyl alcohol (70%)**
I recommend to use 70% alcohol in spray bottle. For all manipulations you need minimum 400-500 ml.
[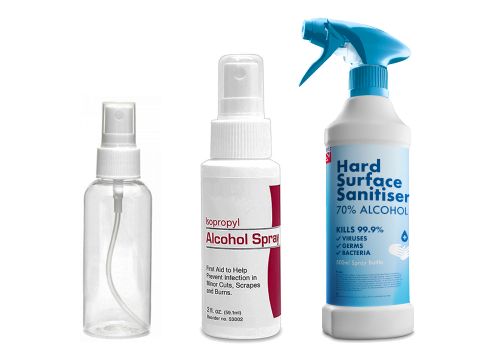](https://shroomok.com/en/wiki/File:Isopropyl-alcohol-spray.jpg) Ethyl alcohol 70% in spray bottle**Shroomok's Choice on Amazon:**
[Isopropyl Alcohol 70% USP Grade - One Quart Spray](https://www.amazon.com/gp/product/B08LW5P844/ref=as_li_tl?ie=UTF8&tag=shroomok-20&camp=1789&creative=9325&linkCode=as2&creativeASIN=B08LW5P844&linkId=de58e8e2a98ad37b75f875c879a5e62e) - $21.99
[Isopropyl Alcohol 70% USP Grade - 4 X 1 Quart Spray Bottle](https://www.amazon.com/gp/product/B08LW5RG3M/ref=as_li_tl?ie=UTF8&tag=shroomok-20&camp=1789&creative=9325&linkCode=as2&creativeASIN=B08LW5RG3M&linkId=dc95b7299dfa32d934d9d355223dcfc5) - $45.00
7️⃣ **Breathable bactericidal patch** — minimum 20-30 pcs. For 1 jar you will need 3 patches and 8-10 pcs. for the grow box. Or you can use **micropore, omnipore tape.**
[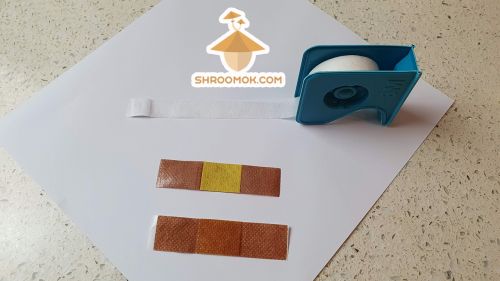](https://shroomok.com/en/wiki/File:Breathable-bactericidal-patch-or-micropore.jpg) Breathable bactericidal patch, micropore**Shroomok's Choice on Amazon:**
[3M Micropore Tape 1530-1 (2 rolls) 1 x 10 yards](https://www.amazon.com/gp/product/B06XNP8J4R/ref=as_li_tl?ie=UTF8&tag=shroomok-20&camp=1789&creative=9325&linkCode=as2&creativeASIN=B06XNP8J4R&linkId=f560bc0e72ed7903f3f49d7d03e8b38d) - $4.60
[Micropore Surgical Tape - 3m - 2" x 10 YD - 6 rolls](https://www.amazon.com/gp/product/B0082A9GS2/ref=as_li_tl?ie=UTF8&tag=shroomok-20&camp=1789&creative=9325&linkCode=as2&creativeASIN=B0082A9GS2&linkId=002675835f06b5070b42deeb3dc5867d) - $9.95
[Box of Flexible breathable bandages - 50 pcs.](https://www.amazon.com/gp/product/B08VR8YY8Q/ref=as_li_tl?ie=UTF8&tag=shroomok-20&camp=1789&creative=9325&linkCode=as2&creativeASIN=B08VR8YY8Q&linkId=1d81dce4b9ed29665c2177519b0ad0b9) - $14.99
8️⃣ **Cotton disks** — 1 pack (50-100 pcs.)
**Shroomok's Choice on Amazon:** [Cotton Rounds Organic, 100 Count](https://www.amazon.com/gp/product/B0747ZDVXS/ref=as_li_tl?ie=UTF8&tag=shroomok-20&camp=1789&creative=9325&linkCode=as2&creativeASIN=B0747ZDVXS&linkId=b718b93f2e81442c7d3260a0ee5404f6) - $3.79
#### **List of required kitchen and household items**
1️⃣ Pressure cooker, autoclave or multicooker.
[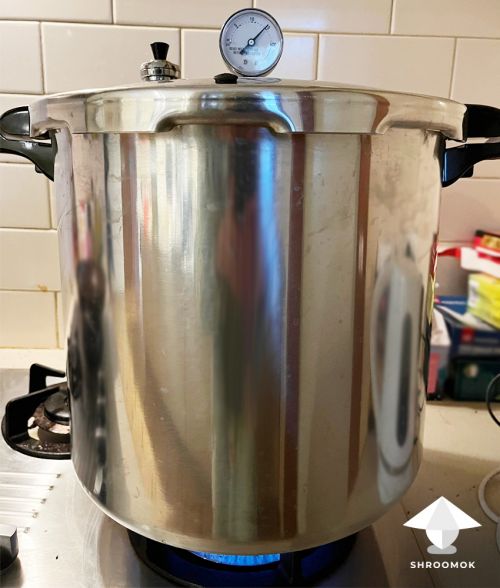](https://shroomok.com/en/wiki/File:Substrate-sterilization-for-mushroom-growing-in-autoclave.jpg) Pressure cooker or autoclave for grain substrate sterilization**Shroomok's Choice on Amazon:**
[T-fal Pressure Cooker, 3 PSI Settings - 22 Qt](https://www.amazon.com/gp/product/B01KWZEERC/ref=as_li_tl?ie=UTF8&tag=shroomok-20&camp=1789&creative=9325&linkCode=as2&creativeASIN=B01KWZEERC&linkId=1330c550fca531439c6a4630281d43b4) - $93.95
[Presto Pressure Cooker - 23 Qt](https://www.amazon.com/gp/product/B0000BYCFU/ref=as_li_tl?ie=UTF8&tag=shroomok-20&camp=1789&creative=9325&linkCode=as2&creativeASIN=B0000BYCFU&linkId=e1947250768579fb0b62a1b0b5f534c2) - $128.63
[All-American Pressure Cooker - 21/25/30/40 Qt](https://www.amazon.com/gp/product/B000X2H846/ref=as_li_tl?ie=UTF8&tag=shroomok-20&camp=1789&creative=9325&linkCode=as2&creativeASIN=B000X2H846&linkId=8b6398c55e5989c0050c2537f02bcdcf) - $419.29
[](https://shroomok.com/en/wiki/File:Household-supplies-psilocybe-mushrooms-growing.jpg) Household supplies for growing psilocybin mushrooms at home2️⃣ Saucepan (the volume about 3 liters).
3️⃣ Sieve or colander.
4️⃣ Aluminium foil.
5️⃣ Marker pen.
6️⃣ Teaspoon.
7️⃣ Tablespoon.
#### **Useful and helpful, but not necessary stuff**
These items will be helpful for cultivation process, but not necessary for the first growing experience.
1️⃣ **Aquarium air pump** for automatic ventilation and to maintain high humidity level. This gadget is useful for automatic fresh air exchange.
[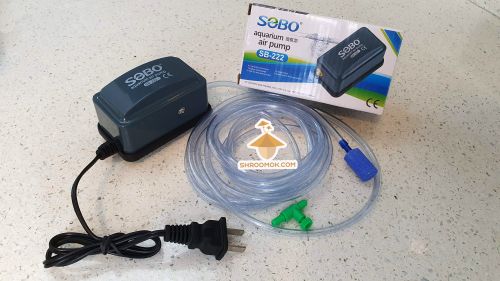](https://shroomok.com/en/wiki/File:Aquarium-air-pump-for-growbox.jpg) Aquarium air pump for growbox for mushroom cultivation. Productivity 180 L/hour[](https://shroomok.com/en/wiki/File:Air-pump-for-growbox-psilocibe-cubensis-cultivation.jpg) Aquarium air pump for automatic growbox ventilation. Productivity 150 L/hour**Shroomok's Choice on Amazon:**
[Quiet Oxygen Pump for 20-100 Gallon - 2 Outlets](https://www.amazon.com/gp/product/B07RJ3XLM8/ref=as_li_tl?ie=UTF8&tag=shroomok-20&camp=1789&creative=9325&linkCode=as2&creativeASIN=B07RJ3XLM8&linkId=a95f2e7fd5ddd905a223db6e6ef7b9e3) - $14.99
[Air Pump with Dual Outlets - up to 80 Gallon](https://www.amazon.com/gp/product/B0854CWH5M/ref=as_li_tl?ie=UTF8&tag=shroomok-20&camp=1789&creative=9325&linkCode=as2&creativeASIN=B0854CWH5M&linkId=acbc668376affda3932e9dc805f6ac01) - $16.98
[Adjustable Oxygen Pump for 20-100 Gallon - 2 Outlets](https://www.amazon.com/gp/product/B01EBXI7PG/ref=as_li_tl?ie=UTF8&tag=shroomok-20&camp=1789&creative=9325&linkCode=as2&creativeASIN=B01EBXI7PG&linkId=a0a86a19ba80cf22326ca33748ae2c6c) - $16.99
[Powerful Air Pump - for 20-200 Gallon - 2 Outlets](https://www.amazon.com/gp/product/B08HMZSH9J/ref=as_li_tl?ie=UTF8&tag=shroomok-20&camp=1789&creative=9325&linkCode=as2&creativeASIN=B08HMZSH9J&linkId=129cc0f3bc777d413baed339a79e2a6c) - $19.99
Your grow box can be ventilated and misted manually. Details are in the [DIY Grow Box for Magic mushrooms](https://shroomok.com/en/wiki/DIY_Grow_Box_for_Magic_mushrooms._Fruiting_conditions "DIY Grow Box for Magic mushrooms. Fruiting conditions") and [Pinhead initiation. Fruiting parameters](https://shroomok.com/en/wiki/Fruiting_period._Pinhead_initiation,_mushroom_pinning_and_mushrooms_growth_parameters "Magic mushrooms fruiting") sections.
2️⃣ **Humidifier for growbox.** Terrarium humidifier allows you to maintain a constant humidity level of the grow box automatically.
[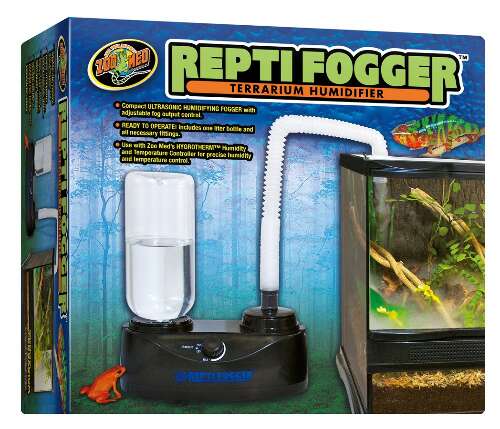](https://shroomok.com/en/wiki/File:Humidifier-for-growbox.png) Growbox humidifier**Shroomok's Choice on Amazon:**
[Cheap USB-Powered Mini Humidifier 250ml](https://www.amazon.com/gp/product/B08S16MQNN/ref=as_li_tl?ie=UTF8&tag=shroomok-20&camp=1789&creative=9325&linkCode=as2&creativeASIN=B08S16MQNN&linkId=8867d0b15e39b09c9656e1742b1e95e6) - $6.99
[USB Mini Portable Humidifier 350ml - Led Light](https://www.amazon.com/gp/product/B08MTX6Z2B/ref=as_li_tl?ie=UTF8&tag=shroomok-20&camp=1789&creative=9325&linkCode=as2&creativeASIN=B08MTX6Z2B&linkId=006835410fd8eacc58440a2381014080) - $10.99
[Portable Humidifying Unit - 0.7 L - Light and Auto Shut-Off](https://www.amazon.com/gp/product/B01NAAH6EL/ref=as_li_tl?ie=UTF8&tag=shroomok-20&camp=1789&creative=9325&linkCode=as2&creativeASIN=B01NAAH6EL&linkId=c198e2988366f7e1e670289f54faf556) - $29.99
[Professional Humidifier/fogger with Extension Tube - 4L Large Tank](https://www.amazon.com/gp/product/B08JLFVDP7/ref=as_li_tl?ie=UTF8&tag=shroomok-20&camp=1789&creative=9325&linkCode=as2&creativeASIN=B08JLFVDP7&linkId=2303c2ba6c8ac5845c0562c2506a473b) - $37.99
[Professional Humidifier, Fogger for GrowBox - 2 L Tank](https://www.amazon.com/gp/product/B01CO9582Y/ref=as_li_tl?ie=UTF8&tag=shroomok-20&camp=1789&creative=9325&linkCode=as2&creativeASIN=B01CO9582Y&linkId=7b14f986d98330bbf151fd3b1cbe85fd) - $45.99
3️⃣ **Carbon dioxide sensor (CO2 detector).** To control carbon dioxide level in growbox during mushrooms fruiting period. These sensors are also indicate temperature and relative humidity.
[](https://shroomok.com/en/wiki/File:Digital-CO2-sensor-air-quality-detector.jpg) Digital carbon dioxide sensor or CO2 detector for growbox**Shroomok's Choice on Amazon:**
[3-in-1: Portable CO2 Detector, Temperature, Humidity - LCD Display](https://www.amazon.com/gp/product/B08NP3L8JK/ref=as_li_tl?ie=UTF8&tag=shroomok-20&camp=1789&creative=9325&linkCode=as2&creativeASIN=B08NP3L8JK&linkId=52991b9f2ac0cf58a3d0a4aa387a483d) - $48.99
[Air Quality Monitor: CO2, Temperature Humidity - NDIR Channel Sensor, Rechargeable Battery](https://www.amazon.com/gp/product/B08X6T6T7Y/ref=as_li_tl?ie=UTF8&tag=shroomok-20&camp=1789&creative=9325&linkCode=as2&creativeASIN=B08X6T6T7Y&linkId=fca7e8e84f0dfeb07016f969bb1874cf) - $71.99
[3-in-1: CO2 Meter, Temperature, Humidity; USB Power & Battery](https://www.amazon.com/gp/product/B085VXM6P1/ref=as_li_tl?ie=UTF8&tag=shroomok-20&camp=1789&creative=9325&linkCode=as2&creativeASIN=B085VXM6P1&linkId=3c9274805e6d42e35604ea5be0d1b2d5) - $89.45
[Professional 6-in-1: CO2 Detector, Air Pollution, Temperature, Humidity](https://www.amazon.com/gp/product/B08Q7YMX9X/ref=as_li_tl?ie=UTF8&tag=shroomok-20&camp=1789&creative=9325&linkCode=as2&creativeASIN=B08Q7YMX9X&linkId=bfe4b8046f03e17c3256ec0004a763e6) - $89.99
[3-in-1: CO2, Temperature, Humidity, Tabletop & Wall Mountable](https://www.amazon.com/gp/product/B08KS2RRD8/ref=as_li_tl?ie=UTF8&tag=shroomok-20&camp=1789&creative=9325&linkCode=as2&creativeASIN=B08KS2RRD8&linkId=6fac84dbb2f4f7bb0226718c61841d65) - $129.99
[Smart Home - All-in-One - Radon & Air Quality Monitor](https://www.amazon.com/gp/product/B07JB8QWH6/ref=as_li_tl?ie=UTF8&tag=shroomok-20&camp=1789&creative=9325&linkCode=as2&creativeASIN=B07JB8QWH6&linkId=f1e572e1f38c19a710db868385ba4ecc) - $148.76
4️⃣ **Soil pH meter** to check and control acidity level of substrate.
[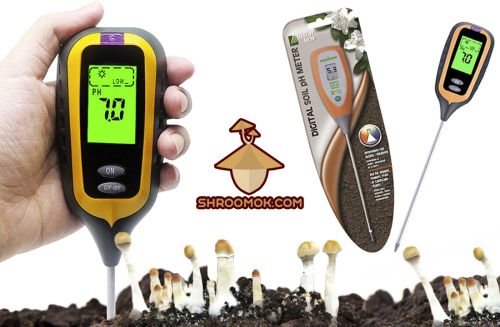](https://shroomok.com/en/wiki/File:Soil-pH-meter-for-psilocybe-mushrooms.jpg) pH meter**Shroomok's Choice on Amazon:**
[Digital Soil Ph Meter](https://www.amazon.com/gp/product/B0786YZMC8/ref=as_li_tl?ie=UTF8&tag=shroomok-20&camp=1789&creative=9325&linkCode=as2&creativeASIN=B0786YZMC8&linkId=de7e67fef9c7f4fc0110caee82018318) - $17.95
5️⃣ **UV Sanitizer Lamp.** Useful for preparing [conditionally clean spore prints from your harvest](https://shroomok.com/en/wiki/How_to_make_magic_mushrooms_spore_prints "How to make magic mushrooms spore prints") and for preparing working space for all mycological manipulations. This device can reduce contamination risks greatly!
[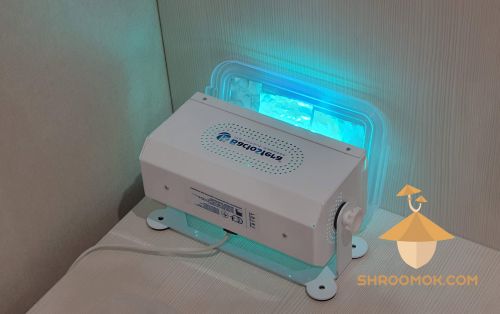](https://shroomok.com/en/wiki/File:Germicidal-bactericidal-lamp.jpg) Germicidal (bactericidal) lamp**Shroomok's Choice on Amazon:**
[Ozone UV Germicidal Light UVC Lamp Timer, for Home and Mycology](https://www.amazon.com/gp/product/B0959D7JYZ/ref=as_li_tl?ie=UTF8&tag=shroomok-20&camp=1789&creative=9325&linkCode=as2&creativeASIN=B0959D7JYZ&linkId=f238ebcd38048b95ff4392a4e203dc04) - $27.99
[UV Light Sanitizer - for Home and Mycology](https://www.amazon.com/gp/product/B08HS1MCJM/ref=as_li_tl?ie=UTF8&tag=shroomok-20&camp=1789&creative=9325&linkCode=as2&creativeASIN=B08HS1MCJM&linkId=9c6ca96c10828ee596fda8c0c3ebbe39) - $29.99
6️⃣ **Medical or jewelry pocket scales** for weighting mushroom crop, [microdoses](https://shroomok.com/en/wiki/Magic_mushrooms_microdosing "Magic mushrooms microdosing") and trip doses accurate to the 0.01 gram. Turned out to be very useful.
[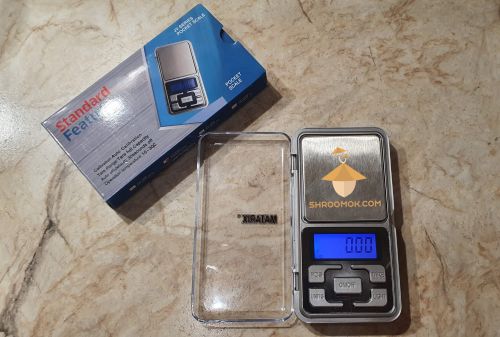](https://shroomok.com/en/wiki/File:Weighter-scales-for-weighting-magic-mushrooms.jpg) Medical or jewelry pocket scales for weighting psilocybin mushrooms crop, microdoses and trip doses (accurate to the 0.01 gram)**Shroomok's Choice on Amazon:**
[Digital Pocket Jewelry Scales - Scale Capacity 200 g, Scale Accuracy 0.01 g](https://www.amazon.com/gp/product/B091678KNF/ref=as_li_tl?ie=UTF8&tag=shroomok-20&camp=1789&creative=9325&linkCode=as2&creativeASIN=B091678KNF&linkId=6a106202fe009e78bcebbda93f5fa7b8) - $10.75
[Mini Digital Jewelry Scale - Capacity 500g, Accuracy 0.01g](https://www.amazon.com/gp/product/B07H3CCY59/ref=as_li_tl?ie=UTF8&tag=shroomok-20&camp=1789&creative=9325&linkCode=as2&creativeASIN=B07H3CCY59&linkId=c0230409c605193608d3f1bebfb48d59) - $10.99
[Professional USB Milligrams Scale - Capacity 50g, Accuracy 0.001g](https://www.amazon.com/gp/product/B07XXYHWJD/ref=as_li_tl?ie=UTF8&tag=shroomok-20&camp=1789&creative=9325&linkCode=as2&creativeASIN=B07XXYHWJD&linkId=0e26751f9eea9db98d26e35ffdaf0100) - $22.78
[All in One: Scales, Case, Tweezers, Calibration, Weighing Pans - Capacity 50 g, Acuracy 0.001g](https://www.amazon.com/gp/product/B011J88S8M/ref=as_li_tl?ie=UTF8&tag=shroomok-20&camp=1789&creative=9325&linkCode=as2&creativeASIN=B011J88S8M&linkId=162d89981048c3558625cdff8245135c) - $37.99
**And many other useful gadgets to optimize your growing process and make your mushroom cultivation automated.**
**The sky is the limit!**
Here are some helpful [tips and notes for newbie grower](https://shroomok.com/en/wiki/Psilocybe_growing_conclusions "Psilocybe growing conclusions").
#### **Where to buy everything you need**
Be ready to check:
- Shroomok's Choice on Amazon
- [Grow-Kits from Shroomok](https://kit.co/shroomok)
- pharmacy
- flower store
- pet store
- supermarket
- market
- grocery store with all sorts of household trivia.
- the vast expanse of the Internet to help you, where you can order online a lot of useful things to start growing.
Don't forget to check all stuff you've already had at home.
#### **Why is sterility so important for mushroom cultivation?**
In the process of psilocybin mushrooms cultivation we are simulating natural conditions. In these conditions there is a fierce competition and fight for the nutrient substrate between psilocybe spores, bacteria, molds and viruses.
It is very easy for psilocybin mushrooms to lose this battle. But we can help them win!
How? By maintaining sterility at all stages of growing process.
**Main sources of contamination with bacteria, molds and viruses are:**
🔴 **Grower himself** (hands, hair, breath, snot, saliva).
**Solution:** gloves, face mask, medical cap and medical gown (or PE raincoat).
🔴 **Workspace** (microorganisms on surfaces and flying in the air).
**Solution:** disinfect the space, avoid draughts and ventilation during mycological manipulations, treat all surfaces with alcohol, use a glovebox or [still air box (SAB)](https://shroomok.com/en/wiki/Still_Air_Box_for_Mycology "Still Air Box for Mycology").
🔴 **Instruments and tools.**
**Solution:** treatment with alcohol or sterilization.
🔴 **Spore print.**
**Solution:** use sterile [spore print](https://shroomok.com/en/wiki/How_to_make_magic_mushrooms_spore_prints "How to make magic mushrooms spore prints") or antibiotic application.
🔴 **Substrate.**
**Solution:** use antibiotic or hydrogen peroxide for spawn substrate preparation and thorough substrate sterilization.
#### **How to prepare work space for mycological manipulations?**
Let us remind you that in this guide we use only the simplest and most accessible methods to organize growing psilocybin mushrooms at home. **Our process was carried out without laboratory equipment, glove box and SAB** which are desirable but not necessary. Still, let's say a few words about the ideal conditions for growing psilocybin mushrooms. Such conditions minimize the probability of mold spores, bacteria and viruses entering the substrate during [liquid spore syringe preparation](https://shroomok.com/en/wiki/Liquid_psilocybe_spore_syringe "Liquid psilocybe spore syringe"), during [inoculation](https://shroomok.com/en/wiki/Inoculation_without_glove_box "Inoculation without glove box"), [casing](https://shroomok.com/en/wiki/Making_mushroom_cake,_spawn_to_bulk,_and_casing "Casing of magic mushrooms cakes") process and during [spore prints preparation](https://shroomok.com/en/wiki/How_to_make_magic_mushrooms_spore_prints "How to make magic mushrooms spore prints").
Still, let's say a few words about the ideal conditions for growing psilocybin mushrooms. Such conditions minimize the probability of undesirable spores penetration, which leads to substrate contamination.
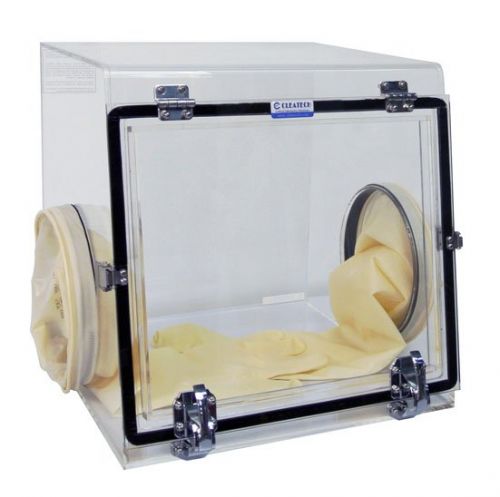
##### Laminar flow cabinet or Glove box
**Glove box or laminar flow cabinet** — a vacuum box, which is used in laboratories to ensure the sterility of the laboratory procedures carried out. The main disadvantages are its high cost, as well as a number of inconveniences arising from working with thin and fragile instruments while wearing thick gloves.
[](https://shroomok.com/en/wiki/File:Laboratory-glove-box.jpg) Laboratory glove box**Shroomok's Choice on Amazon:**
[Vertical Laminar Flow Hood, Clean Bench with Three Fans, HEPA-Filter for Cleanliness Dust Free Work](https://www.amazon.com/gp/product/B09B42WWT5/ref=as_li_tl?ie=UTF8&tag=shroomok-20&camp=1789&creative=9325&linkCode=as2&creativeASIN=B09B42WWT5&linkId=dff713563f87f717d35b8ca032368bd8) - $480.85
[YJINGRUI Vertical Laminar Flow Hood, 26x12x20 inch Working Area, HEPA-Filter for Mycology & Class 100 Cleanliness Dust Free Work with Three Fans (110V)](https://www.amazon.com/gp/product/B088BKPCSX/ref=as_li_tl?ie=UTF8&tag=shroomok-20&camp=1789&creative=9325&linkCode=as2&creativeASIN=B088BKPCSX&linkId=a149d791157a83d2aa921f481d67b57e) - $589.00
[YJINGRUI Vertical Laminar Flow Hood Air Flow Clean Bench with HEPA-Filter for Class 100 / ISO 5 Cleanliness Dust Free Work Single Use 110V (22.6'X22.6'X29 Workbench)](https://www.amazon.com/gp/product/B0875Y2LHB/ref=as_li_tl?ie=UTF8&tag=shroomok-20&camp=1789&creative=9325&linkCode=as2&creativeASIN=B0875Y2LHB&linkId=cf5f0fed43d078d193fccb9d1f8c525b) - $896.00
Simple mobile acrylic glovebox for mycological manipulations.
[](https://shroomok.com/en/wiki/File:Acrylic-glovebox.jpg) Acrylic glovebox
An alternative option is a **DIY sealed glovebox** made from a plastic container with a germicidal lamp and gloves. This is a simple and cheap option.
[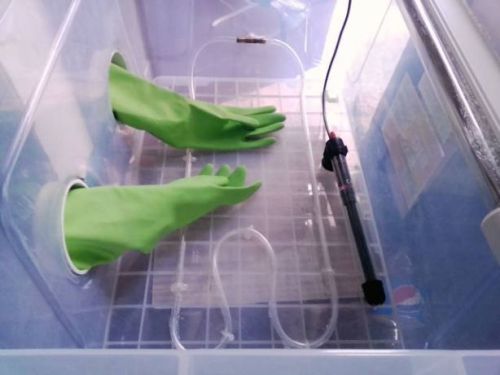](https://shroomok.com/en/wiki/File:Handmade-glove-box-for-inoculation.jpg) Handmade glove box for inoculation and growing magic mushrooms manipulations##### **Still air box (SAB)**
One more alternative simple option is [**still air box (SAB**)](https://shroomok.com/en/wiki/Still_Air_Box_for_Mycology "Still Air Box for Mycology") for all mycological manipulation. It's easy to make. SAB is not sealed, it does not eliminate the possibility of contaminants, but it helps greatly reduce the risks of contamination by bacteria and spores flying in the air or live on surfaces.
Moreover, you can use such box as SAB, then use it as a growbox or make a [monotub](https://shroomok.com/en/wiki/Forget_Monotub_Kit._DIY._How_to_make_Monotub_for_Mushrooms_by_your_own "Forget Monotub Kit. DIY. How to make Monotub for Mushrooms by your own"). So, no need to buy additional stuff.
[](https://shroomok.com/en/wiki/File:SAB-example.jpg) Ready to use still air box (SAB) for psilocybin mushrooms cultivation[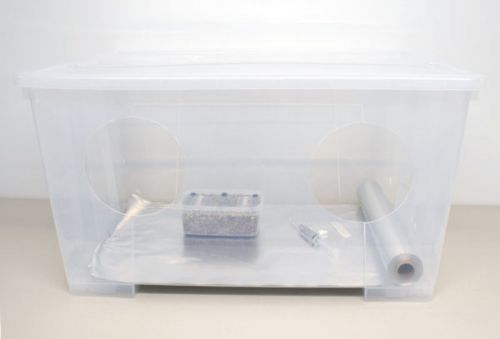](https://shroomok.com/en/wiki/File:Still-air-box-example.jpg) Still air box (SAB) example[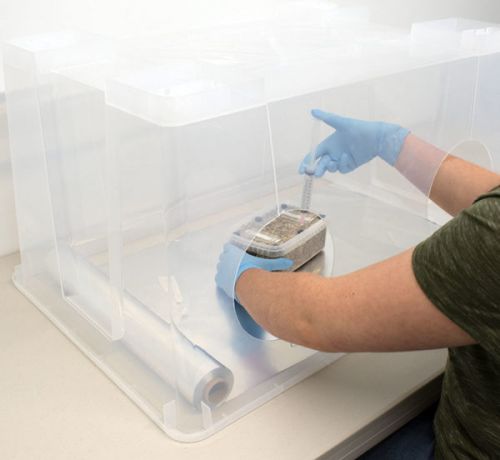](https://shroomok.com/en/wiki/File:Still-air-box-for-mycology.jpg) Still air box for mycological manipulations**Shroomok's Choice on Amazon:**
[SAB Mini Still Air Box | 32qt](https://www.amazon.com/gp/product/B091RCTB53/ref=as_li_tl?ie=UTF8&tag=shroomok-20&camp=1789&creative=9325&linkCode=as2&creativeASIN=B091RCTB53&linkId=dfab38e36b0933ee7046e484c430e897) - $99.95
##### What if there is no glovebox and SAB?
**If you don't have such devices** and don't want to bother with them for your very first growing experience, then take care about preparation the cleanest space at home, which isn't occupied by molds. Ideal for manipulation is a bedroom and a table thoroughly wiped with alcohol over the entire surface. Kitchen and bathroom are not recommended for mycological manipulations. Such places give more opportunities for further contamination.
**Now you need to do the following:**
1. Clean your room before mycological manipulations.
2. Turn off any ventilation or air conditioning, close windows and eliminate drafts.
3. Wipe a table with alcohol (70%).
4. Prepare your grower outfit: medical cap, face mask, gloves, and a PE raincoat or medical gown.
[](https://shroomok.com/en/wiki/File:Grower-look.jpg) Prepared space, place, table and growers outfit for mycological manipulations
It's sad and funny that after a while this look became normal on the streets of all cities and countries. Suddenly, covid-19 turned everyone into growers :)
We don't know about the corona virus, but in the case of growing psilocybin mushrooms, this outfit is must have! No doubts, from your hair, from your face, from your clothes, through snot and saliva can fall a lot of "uninvited guests", which won't let the magic mushrooms come into the world.
**Keep in mind! You should use your grower outfit at ALL stages of the growing!** Just change gloves, if necessary. You can neglect anything, but not a sterility!
❗️❗️❗️The first and **the most important rule of growing mushrooms is a STERILITY❗️❗️❗️**
For now, we have everything prepared according to the lists above. Bags for our growing trip are packed! It's time to begin exciting journey that will last for the next 10 weeks
Let's go! [**STEP 1. Day 1. Liquid spore syringe**](https://shroomok.com/en/wiki/Liquid_psilocybe_spore_syringe "Liquid psilocybe spore syringe") ▶️
## Liquid psilocybe spore syringe
[Liquid psilocybe spore syringe](https://shroomok.com/en/wiki/Liquid_psilocybe_spore_syringe)
[](https://shroomok.com/en/wiki/File:How-to-make-spore-syringe-mushroom-growing.jpg) How to make spore syringe### **How to make a magic mushroom spore syringe from spore print**
**STEP 1. Day 1.**
For now you already prepared everything you need according to the [lists of stuff for growing process](https://shroomok.com/en/wiki/Stuff_to_buy_for_growing "Stuff to buy for growing").
The very first step in cultivation process is making **spore syringe** for [grain substrate inoculation](https://shroomok.com/en/wiki/Inoculation_without_glove_box "Inoculation without glove box").
> \*Skip this step if you already have ready to use spore syringe or liquid culture syringe and move on [**STEP 2. Substrates for magic mushrooms**](https://shroomok.com/en/wiki/Choose_and_prepare_substrate_for_magic_mushrooms "Choose and prepare substrate for magic mushrooms")
#### What is spore syringe
***Liquid spore syringe*** ***or spore solution*** — consists of a syringe filled with mushroom spores in sterile water for spores hydration (rehydration). It is one of the method for transporting spores to a sterile substrate (aka [inoculation](https://shroomok.com/en/wiki/Inoculation_without_glove_box "Inoculation without glove box")). Spore syringe is the fastest and easiest way for inoculation.
##### Spore syringe VS Liquid culture
Spore syringe is often mistaken with liquid culture syringe. Liquid culture (or liquid mycelium) is the result of mycelium development in liquid nutrient broth based on honey, corn syrup, light malt extract etc.
Liquid culture (LC) is preferred over a spore syringe to inoculate grain spawn, because mycelium spread faster. Anyway you need to make spore syringe first, because it is a part of LC preparation.
LC is additional step, more complicated process in comparison with spore syringe and requires more time.
> Check out: [Liquid Culture Guide](https://shroomok.com/en/wiki/How_to_make_mushroom_Liquid_Culture "How to make mushroom Liquid Culture")
#### **Why we need a spore syringe**
Let's turn to nature for the answer, because the whole process of mushrooms cultivation is a simulation of natural conditions.
When mushroom cap are opened, the mushroom begins to spread spores. Such fresh spores are ready to germinate, they contain enough moisture. But after a short period of time they become dehydrated and the cell walls of the spores curl toward the center. So that, they go into a dormant state for a period of drought and wait for the rainy season.
In order to reproduce the rainy season, thereby awakening and preparing spores for vegetation, we put them in sterile water in a sterile syringe.
In addition, spore syringe is the easiest and most accessible method of substrate inoculation for newbie growers.
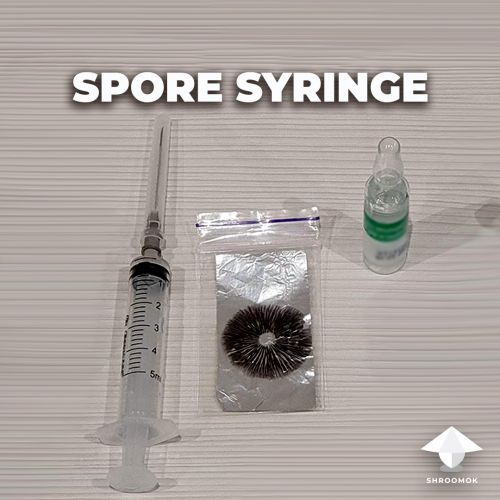
#### **Materials needed to prepare a Spore Syringe**
Gather necessary materials to prepare a liquid spore syringe by your own:
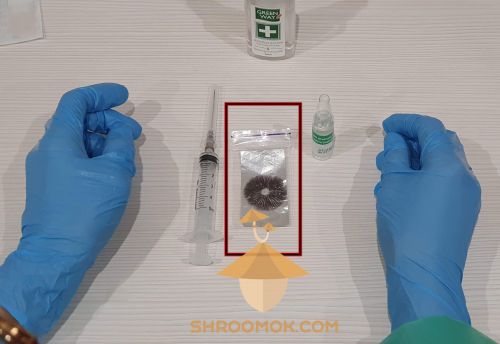
1. **Spore print in a zip bag**[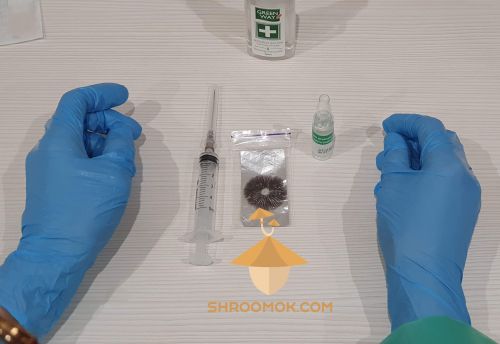](https://shroomok.com/en/wiki/File:Psilocibin-mushroom-liquid-spore-syringe-preparation.jpg) Psilocybe cubensis liquid spore syringe preparation
2. **Sterile disposable syringe.** One syringe per one spore print.[](https://shroomok.com/en/wiki/File:Syringe-for-liquid-spore.jpg) Disposable sterile syringe with needle> 💡 Tip: The syringe volume should be at least 5 cc/ml. Better to use syringe of medium and large volume 10-20-50 cc/ml, so that you can get more genetic material for inoculation, because each spore print has billions of active spores!
3. **Sterile injection water** in vial (minimum 5 cc/ml) and **ampoule cutter** (or kitchen knife) to open the ampoule.[](https://shroomok.com/en/wiki/File:Big-syringe-for-liquid-spore.jpg) Sterile injection water in vial and sterile syringe for liquid sporeIf you use big syringe or gonna dilute the spore solution you need additional injection water. Another 5-15-45 ml for 10-20-50 ml syringes, respectively.> 💡 Tip: If you don't have sterile injection water just boil clean drinking water for 10-15 mins in saucepan. Then fill the syringe with **hot boiling** water and wait till it cool down to room temperature before using it
4. **Ethyl** or **Isopropyl alcohol 70%** in a bottle or spray bottle.[](https://shroomok.com/en/wiki/File:Isopropyl-alcohol-spray.jpg) Ethyl alcohol (70%) in spray bottle> 💡 Tip: 70% alcohol is *more effective* than 91/96/99% for disinfecting. Why? At higher concentrations, the alcohol evaporates too quickly to completely disinfect. At 70% the water content helps the alcohol permeate the cell membranes of bacteria, mold spores and viruses
**Shroomok's Choice on Amazon:** [Isopropyl Alcohol 70% + Spray bottle](https://amzn.to/3PKNrt4) - 21.99
5. **Cotton pads** — 2-3 pcs.
6. **Personal protective equipment:** gloves, face mask, lab coat (PE raincoat), cap.[](https://shroomok.com/en/wiki/File:Growers-outfit-for-mushroom-cultivation.jpg) **Grower's outfit:** gloves, face mask, cap, medical gown (PE raincoat)**Shroomok's Choice on Amazon:** [10 Gloves and 1 Mask Bundle](https://www.amazon.com/gp/product/B0865SSK9T/ref=as_li_tl?ie=UTF8&tag=shroomok-20&camp=1789&creative=9325&linkCode=as2&creativeASIN=B0865SSK9T&linkId=b407149973fb1c02e23841c7abfd908d) - $7.99
#### **Preparation and materials sterilization before making Spore Syringe**
1. **Wash your hands and face.**
2. **Put on personal protective equipment:** face mask, medical cap, gloves, lab coat (or PE raincoat). This helps prevent contamination from your own body (hands, hair, breath) and clothing.
3. **Wipe the table with ethyl/iso alcohol 70%.** Soak cotton pad in alcohol and wipe the table; or spray the alcohol with spray bottle and wipe the surface.
4. **Spray the alcohol on your gloves.** Wipe your hands thoroughly over the entire surface of the gloves and between your fingers.
5. **Spray the alcohol on your hands** up to the elbows.
6. **Wipe with the alcohol all needed materials on the table:** the vial with injection water, zip bag with the spore print, the ampoule cutter (or kitchen knife), the syringe package and even the bottle with alcohol.
7. **Don't spare the alcohol for sterilization!**
#### **How to make Spore Syringe**
##### **Method 1. Making spore syringe** in zip bag
The following method of preparing the liquid spore syringe is the easiest and very simple. It **doesn't require perfect sterile conditions,** no need to use a glove box, still air box or laminar flow hood. However, it is rather **wasteful**, because you need to use the whole print at once.
The process of spore syringe preparation you can watch in the [video on Reddit](https://www.reddit.com/r/Shroomok/comments/serwy6/liquid_spore_in_zip_bag_without_sab_or_glovebox/)
Don't skip detailed guide below, because video shows only the main principles!
1. Open the ampoule with sterile water for injections.
2. Open the syringe pack. Put the needle on. Fill the syringe with sterile water from the ampoule.[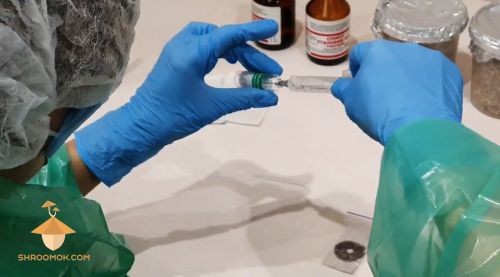](https://shroomok.com/en/wiki/File:Spore-syringe-preparation.jpg) Steps 1-2. Open the vial (ampoule) and fill in the syringe with sterile water for injections❗️Don't lean over the table with the whole your body during the process. Try to keep only your palms and hands above the table
3. **Don't open zip bag with spore print!** Wipe zip bag with alcohol again.
4. Pierce zip bag closer to the valve. Put the needle inside. Squeeze all water from the syringe into the zip bag.[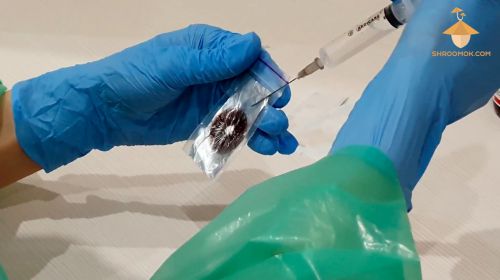](https://shroomok.com/en/wiki/File:Spore-syringe-no-glovebox.jpg) Steps 3-4. Don't open a zip bag! Squeeze all water from the syringe into the zip bag with spore print.
5. Don't pull the needle out of the zip bag. Just clamp the puncture point with one hand and rub the spore print through the zip bag with the other hand. So that, spores separate and mix with water.[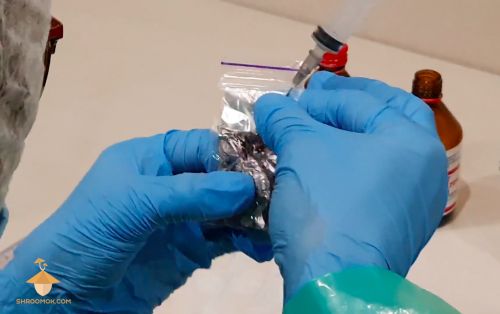](https://shroomok.com/en/wiki/File:Spore-syringe-psilocybe-cubensis.jpg) Step 5. Rub spore print to separate spores and mix them with water
6. Draw water with spores from zip bag back into the syringe.
7. Remove the needle from the zip bag. Wipe the syringe needle with alcohol (wipe by cotton pad soaked with alcohol or just spray it with alcohol). Put the protective cap over the syringe needle. Make sure opened syringe needle doesn't touch anything. Do not put the syringe on the table without the protective cap on the needle!
8. Shake the syringe to mix spores in water water. Put the syringe in dark place or wrap the syringe in a foil to ensure dark conditions.[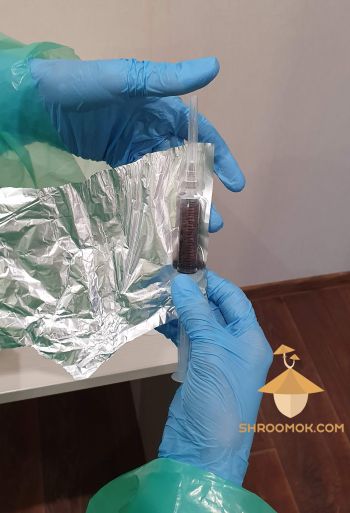](https://shroomok.com/en/wiki/File:Liquid-spore-syringe-psilocybe-cubensis-growing.jpg) Wrap liquid spore syringe in foil. You can see that water became black with mushroom spores
9. Sign the strain on a syringe or zip bag. Leave prepared liquid spore solution to rehydrate for 1-2 days at room temperature (+20+25°С or 68-77°F)[](https://shroomok.com/en/wiki/File:Liquid-spore-suspension-psilocybe-cubensis-mushroom-growing.jpg) Leave spore syringe for 24 hours for rehydration before substrate inoculation
##### How to get a larger volume of liquid spore? How to dilute it?
You can dilute the prepared liquid spore, thus increasing the volume of material for inoculation by several times. This way, you can inoculate more jars of substrate.
> Each spore print contains billions of spores (about 3-5% are capable of continuing life)
To make the dilution as sterile as possible and to avoid contact of the spore solution with contaminants **take a medium or large syringe to prepare more spore solution from the very beginning.** For example, 20-50 ml.
Make all manipulations for liquid spore syringe preparation in zip bag.
Then just add another 15-40 ml of water to fill in the whole volume of the syringe. So that you'll get 20-50 ml of spore syringe for inoculation.
Of course you can dilute it in a sterile disposable lab test tubes/containers in [still air box](https://shroomok.com/en/wiki/Still_Air_Box_for_Mycology "Still Air Box for Mycology") or with using [Fan Filter Unit](https://shroomok.com/en/wiki/How_I_built_my_first_laminar_flow_hood_for_home_mycology "How I built my first laminar flow hood for home mycology") or Laminar Flow Hood.
You can dilute the spore solution till it slightly colored with spores or almost transparent (share 1 spore print per 100-200 ml of water).
##### Method 2. Making spore syringe in still air box
In this way you can use half or 1/4 of spore print and save genetic material for the next attempts. The rest of spore print you can use any time you need. However, this method requires [SAB (still air box)](https://shroomok.com/en/wiki/Still_Air_Box_for_Mycology "Still Air Box for Mycology") or [Fan Filter Unit](https://shroomok.com/en/wiki/How_I_built_my_first_laminar_flow_hood_for_home_mycology "How I built my first laminar flow hood for home mycology") or Laminar flow hood.
1. Prepare **Spore Print** in zip bag and **SAB** (still air box)[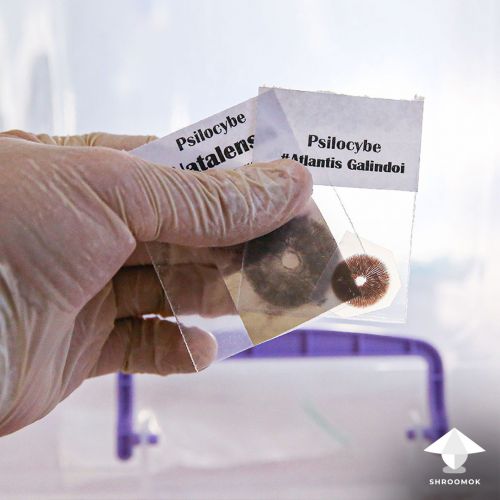](https://shroomok.com/en/wiki/File:Magic-truffles-spore-print.jpg) Mushroom spore prints for spore syringe
2. Put spore print, syringes with needles, sterile water, iso alcohol, scissors, scalpel and sterile plastic container for lab tests. Wipe all instruments and SAB with iso alcohol.
3. Open zip bag with spore print. Scrap some spores from a spore print with scalpel to sterile plastic container for lab tests or sterile shot glass.[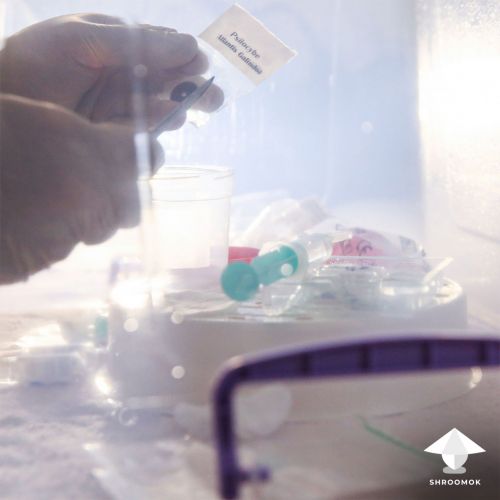](https://shroomok.com/en/wiki/File:Spore-print-to-spore-solution-syringe.jpg) Open spore print and scrap spores to sterile container
4. Add sterile injection water to spores in the container (you can use chilled boiled water, boil for 20 minutes and let it cool down before using). Fill the syringe (or few syringes) with spore solution.[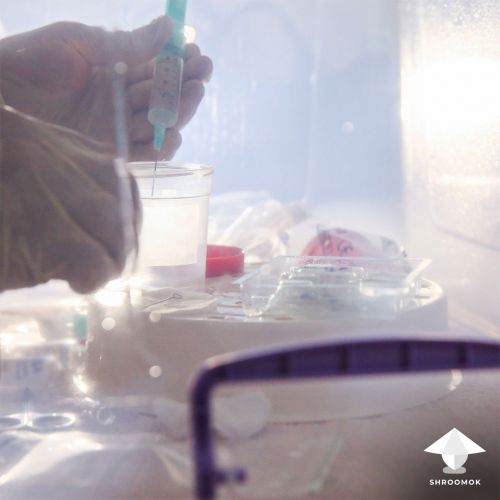](https://shroomok.com/en/wiki/File:How-to-make-spore-syringe-from-spore-print.jpg) Fill the syringe with spore solution
5. Ready! Add more sterile water in syringe to have full syringe.[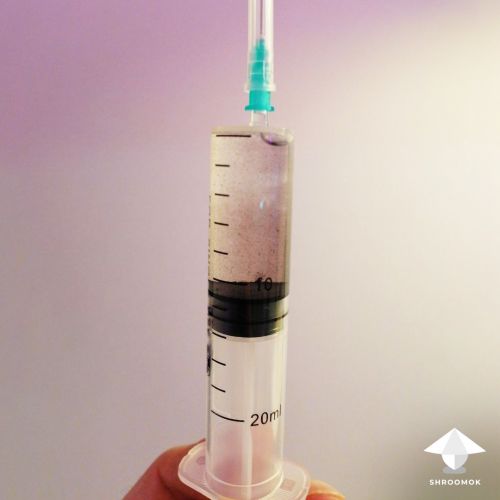](https://shroomok.com/en/wiki/File:Spore-syringe-from-spore-print.jpg) Ready spore syringe
#### How long liquid spore syringe can be stored
Longer storage is not a problem. Ready-made liquid spore syringe can be stored **up to 1 year** and spores stay viable.
You can leave spore solution for a **week or month at room temperature in a dark place** and use it when you are ready for inoculation.
**For long term storage (over 1 month)** put the syringe in the refrigerator **at 35-46°F or +2°..+8°C**.
Shake the spore syringe every 2-4 weeks and don't forget to shake it well right before inoculation, because spores may stick together over time.
Now move on — [**STEP 2. Day 1. Choose and prepare substrate for magic mushrooms**](https://shroomok.com/en/wiki/Choose_and_prepare_substrate_for_magic_mushrooms "Choose and prepare substrate for magic mushrooms") ▶️
## Choose and prepare substrate for magic mushrooms
[Choose and prepare substrate for magic mushrooms](https://shroomok.com/en/wiki/Choose_and_prepare_substrate_for_magic_mushrooms)
[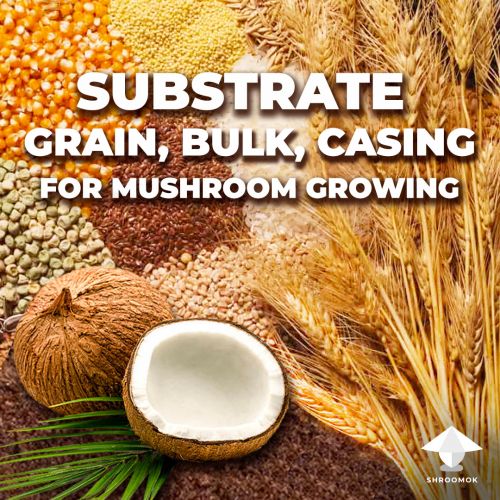](https://shroomok.com/en/wiki/File:Substrate-for-mushroom-growing-grain-bulk-casing-.jpg) Types of substrate for mushroom growing: grain, bulk substrate, casing### **STEP 2. Day 1. Choose the substrate for mushroom cultivation**
At this step, you've already prepared a [liquid spore syringe](https://shroomok.com/en/wiki/Liquid_psilocybe_spore_syringe "Liquid psilocybe spore syringe"). While it is languishing in a syringe (minimum for 24 hours) and waiting for [inoculation](https://shroomok.com/en/wiki/Inoculation_without_glove_box "Inoculation without glove box"), it's time to take care of the substrate for future magic mushrooms.
Before the next manipulations I'd like to explain you briefly some differences between substrates. Usually newbie growers confuse what is what.
> Each type of substrate has specific features, different content and it is used on different steps of mushroom cultivation process
This overview will help you to connect the dots. Please, don't skip it!
#### **Types of substrates for magic mushroom growing: grain substrate, bulk and casing**
##### 1️⃣ Grain substrate for mushroom spawn
> ***Spawn*** — culture of mycelium on grain substrate
The first substrate for mycelium growing is grain substrate. It is used for the first steps of cultivation process almost for all mushrooms, actives and edibles. In sterile grain substrate spores propagate and create mycelium network.
Grain is a highly nutrient, rich in carbohydrates substrate for rapid mycelium production. Until too much nutrients mycelium continue colonisation phase (mycelium formation) and don't produce mushroom fruits on this step.
**For spawn we should use whole grain (in husks) only!** The shell of the grain have cellulose (fiber) that protects each kernel against clumping, excess moisture and further bacteria contamination. Also cellulose is a common source of nourishment for cultivated fungi.
What grain we usually use for spawn?
> Wheat berries, oats, barley, corn, popcorn, brown rice, rye, wild bird seeds (WBS), millet, sorghum
Fungi love any grain from the list above. Choice is up to you!
> Newbie growers also choose substrate based on the brown rice flour (BRF). It is a mix of BRF (1 part), vermiculite (2 parts) and water (1 part). It is recommended substrate recipe for PF-tek growing we discussed later
##### 2️⃣ Bulk substrate for mushroom fruiting
> ***Bulk substrate*** — secondary substrate in mushroom cultivation also called fruiting substrate for producing mushrooms (after spawn to bulk). Bulk substrate is less nutrient than grain substrate. Fruiting substrate is a source of additional water and ingredients for mushroom metabolism and fruit development
***Spawn to Bulk*** — transfer grain spawn to secondary fruiting substrate (bulk) for further bulk colonisation (spawn run) and mushroom fruiting.Such transfer allows you to spread the mycelium (spawn run) for the next step of mushroom cultivation — mushroom fruiting period. Bulk substrate vary and depends on the mushroom genus and species (actives and edibles).
> In fact, for Psilocybe Cubensis spawn to bulk is optional, but it can significantly increase your yield. We'll discuss possible options in our guide later
What can be used for fruiting substrates?
> coconut coir, hay, straw, grain hulls, manure, compost, sawdust, paper products, wood pellets, wood chips, corncobs, coffee plants and waste, tea leaves, sugarcane bagasse, banana fronds; seed hulls (cottonseed, sunflower, and oil-rich seeds); almond, walnut, pecan, peanut hulls; soybean meal, roughage (okara), and soy waste; artichoke waste; cactus waste: saguaro and prickly pear, yucca, agave
For *Psilocybe cubensis* and *Natalensis* **coco coir mix** is the most popular bulk substrate.
For *Panaeolus* species is manure based substrate, also hay and straw can be added to the mix.
For *Psilocybe azurescens* — sawdust, paper products, wood pellets, wood chips.
Other substrates usually used for edibles. For *Oysters* — hay, straw. For *Hericium species aka Lion's Mane* — sawdust, bran, seed hulls. For *Shiitake* — sawdust, wood pellets, wood chips, seed hulls.
##### 3️⃣ **Casing substrate**
> ***Casing*** — a layer of substrate over bulk substrate
Casing is low nutrient substrate, usually the layer about 1/2 inch (1-1,5 cm). It is additional source of moisture, some kind of stress and sign for mycelium, that "no more nutrients further! Hurry up! Form fruit body, spread spores and save your genus!" And boom! Fruits are coming!
Some species are absolutely dependent upon casing layer (Panaeolus aka Copelandia).
Some aren't and casing is optional (Psilocybe Cubensis, Natalensis) or not required at all.
[](https://shroomok.com/en/wiki/File:Mushroom-species-casing-required-optional-not-required.jpg) Casing by species: optional, required or not requiredWhat usually used for casing substrate?
> cacti soil, peat moss aka sphagnum and vermiculite
Mix of cacti soil, sphagnum and vermiculite is the best casing layer for Panaeolus.
For *Psilocybe Cubensis* casing layer can be the same bulk substrate based on coco coir. It is used for making small mushroom cakes, when we skip spawn to bulk and just cover grain spawn with coco coir mix as a casing layer. We'll figure out it on the [Step 8. Spawn to Bulk and Casing. How to make mushroom cake](https://shroomok.com/en/wiki/Making_mushroom_cake,_spawn_to_bulk,_and_casing "Casing of magic mushrooms cakes")
#### Grain for mushroom spawn
##### Ready sterilised grain
Now let's start magic mushroom growing with grain substrate preparation for spawn.
You can buy ready sterile grain for mushroom spawn. Then skip the next 3 steps and move on [**Step 6. Inoculation**](https://shroomok.com/en/wiki/Inoculation_without_glove_box "Inoculation without glove box")
It's a great option if you want to try mushroom cultivation with ease, save your time and money for expensive pressure cooker, spawn jars/bags and some additional stuff.
**Shroomok's choice on Amazon:**
[Sterilized **Rye Berry** Substrate - 1 Bag](https://www.amazon.com/gp/product/B07CWHYKT2/ref=as_li_tl?ie=UTF8&tag=shroomok-20&camp=1789&creative=9325&linkCode=as2&creativeASIN=B07CWHYKT2&linkId=e1450adf12709f8c49544cf0fa650d82) - $9.69
[Sterilized **Milo Grain** Bag, 3 Lb - 1 Bag](https://www.amazon.com/BetterFungi-Sterilized-Grain-Injection-Port/dp/B07QZXWBDP?&linkCode=ll1&tag=shroomok-20&linkId=23b59df0d40a00fadfed41c6f573f6a0&language=en_US&ref_=as_li_ss_tl) 14.95
[Sterilized **Wheat Grain** Bag, 3 Lb - 1 Bag](https://www.amazon.com/gp/product/B07S1D16BB/ref=as_li_tl?ie=UTF8&tag=shroomok-20&camp=1789&creative=9325&linkCode=as2&creativeASIN=B07S1D16BB&linkId=084b181d07ff14acab600fb48e266524) $16.88
[Sterilized **Rye Grain** Jar - 1 Jar](https://www.amazon.com/gp/product/B0915PYR2B/ref=as_li_tl?ie=UTF8&tag=shroomok-20&camp=1789&creative=9325&linkCode=as2&creativeASIN=B0915PYR2B&linkId=29cff87c977d2efcecd1c8171c2c8797) $17.99
[Sterilized **Rye Grain** Jar - 2 Jars](https://www.amazon.com/gp/product/B07TQH1RYG/ref=as_li_tl?ie=UTF8&tag=shroomok-20&camp=1789&creative=9325&linkCode=as2&creativeASIN=B07TQH1RYG&linkId=39c8c5895d1b48605f58e4b21e962d11) $29.56
[Sterilized **Rye Berry** Grain Bag, 3 Lb - 2 Bags](https://www.amazon.com/gp/product/B07XPDJPSM/ref=as_li_tl?ie=UTF8&tag=shroomok-20&camp=1789&creative=9325&linkCode=as2&creativeASIN=B07XPDJPSM&linkId=922363eb6f92209cf0617561bb14cbb9) $38.74
[**All in One** Mushroom Grow Bag, 5 LBS - 1 Bag](https://www.amazon.com/dp/B09MZRJGR7?&linkCode=ll1&tag=shroomok-20&linkId=bbfcfe25d046bfc260906b7973b4a5b5&language=en_US&ref_=as_li_ss_tl) $42.50
[Sterilized **Rye Berry** Grow Bags, 1 Pound - 6 Bags](https://www.amazon.com/gp/product/B0055VCBUG/ref=as_li_tl?ie=UTF8&tag=shroomok-20&camp=1789&creative=9325&linkCode=as2&creativeASIN=B0055VCBUG&linkId=827a2a65512f16b0cf5a8e7feffffc13) $46.50
[**BRF Jars,** Brown Rice Flour Mushroom Substrate - 6 Jars](https://www.amazon.com/dp/B098C6SHBR?&linkCode=ll1&tag=shroomok-20&linkId=3f5e344ba28890f7ef93538e259566b2&language=en_US&ref_=as_li_ss_tl) $49.99
[Sterilized **Rye Berry** Jars - 1 Qt - 4 Jars](https://www.amazon.com/gp/product/B004GIOWOC/ref=as_li_tl?ie=UTF8&tag=shroomok-20&camp=1789&creative=9325&linkCode=as2&creativeASIN=B004GIOWOC&linkId=dcdf6c4581b83e0cd033665054926c1c) $59.95
##### Choose grain for DIY substrate
Actually Shroomok suggests to handle the whole process by your own. It will be cost effective for long term mushroom cultivation hobby. Moreover you totally control the content of the substrate, process of preparation.
You can use any kind of whole wheat, oats, barley, rye, brown rice, popcorn, corn, wild bird seeds, millet, sorghum.
It can be either expensive organic grain for healthy food or grain for feeding animals in pet stores, grain for sprouting for "cat grass".
> 🔴 Grain should be whole, organic, unhulled (hull intact), untreated with chemicals! Rolled, hulled, peeled grain is not suitable for substrate
Let's take a look some options!
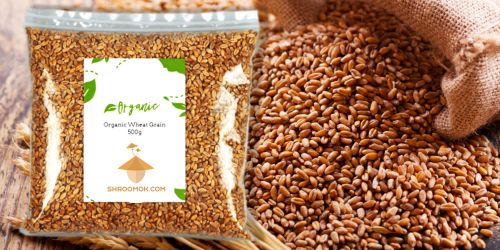
🌾 **Whole wheat berries.**
[](https://shroomok.com/en/wiki/File:Whole-wheat-for-psilocybe-cubensis-substrate.jpg) Whole wheat for grain substrate for mushroom spawn**Shroomok's Choice on Amazon:**
[Hard Red Winter Wheat Berries, 3 lbs](https://www.amazon.com/gp/product/B016VJ8XQQ?&linkCode=ll1&tag=shroomok-20&linkId=f17a199a696ff6354fd15981308782d4&language=en_US&ref_=as_li_ss_tl) - $13.95
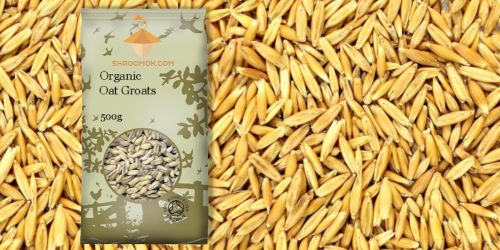
🌾 **Whole oat grain**
[](https://shroomok.com/en/wiki/File:Whole-oat-for-psilocybe-cubensis-substrate.jpg) Whole oat for grain substrate**Shroomok's Choice on Amazon:**
[Organic Whole Oat Grain Seeds (With Husk Intact), 2/5/10 Lb](https://www.amazon.com/dp/B07FN4T97F?&linkCode=ll1&tag=shroomok-20&linkId=f5cb8f97548ce259f31022a811e6f7a9&language=en_US&ref_=as_li_ss_tl) $15.99
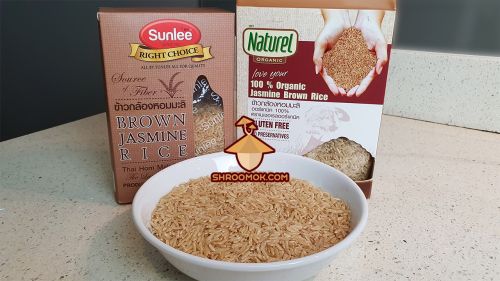
🌾 **Brown rice**
[](https://shroomok.com/en/wiki/File:Brown-rice-for-spawn-and-brf-substrate.jpg) Brown rice for mushroom spawn and BRF substrate**Shroomok's Choice on Amazon:**
[Brown Rice 5 lb](https://www.amazon.com/gp/product/B08C92WFWG/ref=as_li_tl?ie=UTF8&tag=shroomok-20&camp=1789&creative=9325&linkCode=as2&creativeASIN=B08C92WFWG&linkId=d50bf0c1077c16cfc517909f242dc149) $19.35
[Long Grain Brown Rice, 5 lb](https://www.amazon.com/dp/B091SQVDFX?&linkCode=ll1&tag=shroomok-20&linkId=6bbb1e501c43c91a2b626b86984e9b1c&language=en_US&ref_=as_li_ss_tl) $19.99
🌾 **Millet, WBS, Rye, Sorghum, Barley**
[](https://shroomok.com/en/wiki/File:Millet-for-spawn.jpg) Red millet for mushroom spawn**Shroomok's Choice on Amazon:**
[Wild Bird Seeds Mix, 4.4 lbs](https://www.amazon.com/Penn-Seed-Small-Parakeet-Budgie-Neo/dp/B01AG82544) $18.64
[Whole Grain Sorghum, 24 Ounce](https://www.amazon.com/Bobs-Red-Mill-Sorghum-24-ounce/dp/B00F5Y37AQ?&linkCode=ll1&tag=shroomok-20&linkId=8c1f6b770e98333cfcdf0d0b4641567f&language=en_US&ref_=as_li_ss_tl) $8.79
[Millet Grain, 3 lb](https://www.amazon.com/Organic-Hulled-Millet-3lb-Anthonys/dp/B01F7T3BKY?&linkCode=ll1&tag=shroomok-20&linkId=478d50267a178ca50b7e266b851ede0b&language=en_US&ref_=as_li_ss_tl) $13.99 (can be used hulled millet for spawn)
[Organic Rye Berries, 5 lbs](https://www.amazon.com/gp/product/B08TZWWL8Z/ref=as_li_tl?ie=UTF8&tag=shroomok-20&camp=1789&creative=9325&linkCode=as2&creativeASIN=B08TZWWL8Z&linkId=6cbe0754d796f340c5e2523ffbfbb12d) $21.95
[Unhulled Barley (Hull Intact), 12 Lbs](https://www.amazon.com/Josephs-Grainery-Unhulled-Non-GMO-Certified/dp/B003A162H6?&linkCode=ll1&tag=shroomok-20&linkId=abf7128e9acb1d986086d13d16de5843&language=en_US&ref_=as_li_ss_tl) $31.99
[**White** **Proso Millet**, 10 lbs](https://www.amazon.com/AA-Plus-Shop-White-Millet/dp/B084Z8D1Q7?&linkCode=ll1&tag=shroomok-20&linkId=1db7b0c14e2f60a218bf6eeaeea28432&language=en_US&ref_=as_li_ss_tl) $23.95
[**Red Proso Millet**, 20 lbs](https://www.amazon.com/SLEEK-SASSY-NUTRITIONAL-DIET-Natural/dp/B07SHWV64D?&linkCode=ll1&tag=shroomok-20&linkId=223d1771bfdfe8ffc9e9f01e0cfc3452&language=en_US&ref_=as_li_ss_tl) $49.79
#### **How much grain is needed for mushroom spawn**
With one liquid spore syringe or liquid culture syringe (10 ml) you can inoculate about 5-10 jars/bags with substrate.
Dry grain after soaking and cooking increase the volume by 25-35%.
Each jar/bag usually contain from 12 oz (350 ml) to 34 oz (1 liter) of **ready** grain substrate. It depends the volume of your jars or bags for substrate. Up to 34 oz (1 liter) is optimal.
Each jar filled up to 2/3 of the volume.
> That's why for calculation we are going to talk about volume of grain instead of weight! Usually 34oz = 1 liter = ~800g
Hence you need per one jar/bag:
16 oz (500 ml) jar = about 9-10 oz (250-300 ml) of DRY grain or about 250g of DRY grain
24 oz (700 ml) jar = about 12 oz (350 ml) of DRY grain or about 300g of DRY grain
34 oz (1000 ml) jar/bag = about 17 oz (500 ml) of DRY grain or about 400g of DRY grain
How to prepare jars/bags we'll discuss later on **[Step 4. DIY Jars & Bags for substrate](https://shroomok.com/en/wiki/How_to_make_jars_with_substrate_for_mushroom_spawn "Jars for substrate")**
But before we need to cook grain for substrate properly!
Let's move on the next step of our guide — [**STEP 3. Day 2. Cooking the substrate for spawn**](https://shroomok.com/en/wiki/Cooking_the_substrate_for_psilocybes "Cooking the substrate for psilocybes") 🔽
## Cooking the substrate for psilocybes
[Cooking the substrate for psilocybes](https://shroomok.com/en/wiki/Cooking_the_substrate_for_psilocybes)
[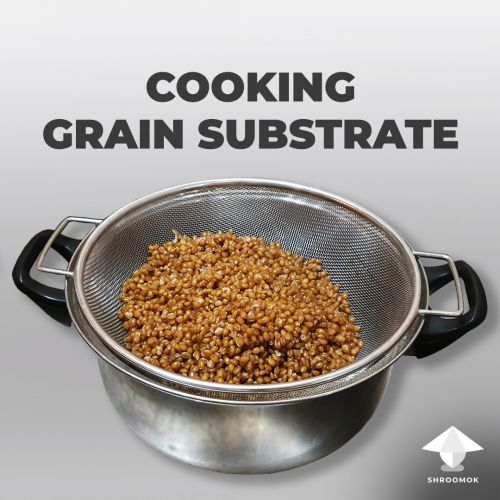](https://shroomok.com/en/wiki/File:Cooking-grain-substrate.jpg) Step 3. How to make grain substrate for mushroom spawn### **STEP 3. Day 1-2. How to cook grain substrate for magic mushrooms**
On the previous [Step 2. Types of substrates and Choose grain for spawn](https://shroomok.com/en/wiki/Choose_and_prepare_substrate_for_magic_mushrooms "Choose and prepare substrate for magic mushrooms") you've already chosen right grain and calculated the necessary volume. Now it's time to prepare substrate for spawn.
Let's get started!
#### What you need for grain substrate preparation
1️⃣ Any whole grain from the listed below:
**Hard** Red or White **Wheat** Berry ([Amazon](https://amzn.to/3Zy2pnd) or [Amazon](https://amzn.to/3lYiGUS))
**Oat** grain seeds with husk intact ([Amazon](https://amzn.to/3K7gnH4))
**Rye** Berry ([Amazon](https://amzn.to/40QekOq))
**Barley** ([Amazon](https://amzn.to/3zuOF1W))
**Sorghum** ([Amazon](https://amzn.to/3K4PX8O))
**Brown Rice** ([Amazon](https://amzn.to/3KqHhLq))
Corn or popcorn ([Amazon](https://amzn.to/3Zy1X8O))
Unhulled **White Millet** bird seeds ([Amazon](https://amzn.to/42X5UXq) or [Amazon](https://amzn.to/40WhOPB)) - don't use wild bird seeds with sunflower seeds!
**Hulled Millet** ([Amazon](https://amzn.to/3U3OCns))
2️⃣ **Optional!** Hydrogen peroxide solution H2O2 3% ([Amazon](https://www.amazon.com/Epic-Medical-Supply-Multipurpose-Irritations/dp/B0B2X56ZBV?&linkCode=ll1&tag=shroomok-20&linkId=2de72010e4015d1bf84429bef0b7a681&language=en_US&ref_=as_li_ss_tl)) or any antibiotic in pills (chloramphenicol or analogue)
3️⃣ Gypsum aka Calcium Sulfate ([Amazon](https://amzn.to/3nCCdLd))
4️⃣ Vermiculite ([Amazon](https://amzn.to/3zzfwIM))
5️⃣ Teaspoon and tablespoon
6️⃣ Pot with lid
7️⃣ Sieve or colander
#### Rinse and soak grain for spawn
This step can be applied for unhulled grain: wheat, oat, rye, barley, sorghum, corn.
> ❗️Skip this step for hulled/unhulled millet and brown rice
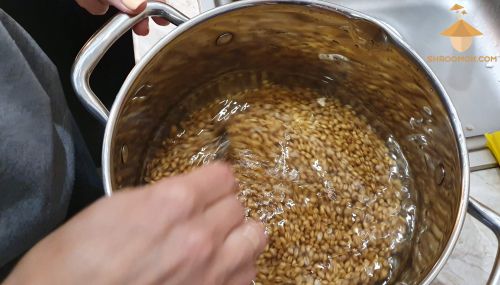
1️⃣ Rinse the grain (wheat, oat, rye, barley, corn, unhulled millet) thoroughly 2-3 times in cold tap water to get rid of dust, husks, dead bugs etc. until the water is pouring off reasonably clear
[](https://shroomok.com/en/wiki/File:Clean-grain-for-substrate-for-growing-mushrooms.jpg) Preliminary preparation of whole grain for substrate for growing psilocybin mushrooms2️⃣ Pour water in clean grain (tap water or clean drinking water). Add 1 leave it to soak for 12-24 hours at room temperature, about 60-80F or +15C..+25C. No problem if you leave it to soak even for 48 hours.
[](https://shroomok.com/en/wiki/File:Grain-cooking-for-mushroom-substrate.jpg) Soak grain for mushroom spawn (24 hours) before simmer (wheat berry)[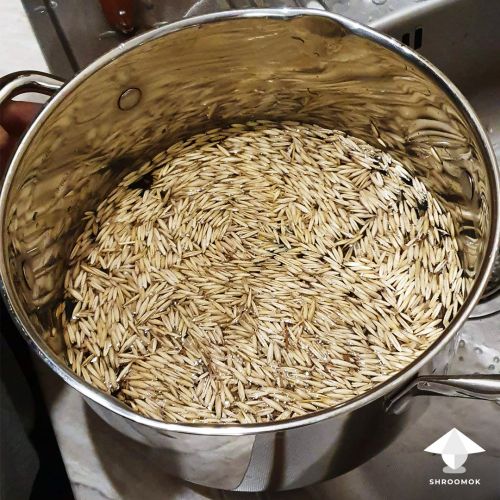](https://shroomok.com/en/wiki/File:Whole-oat-substrate-for-mushroom-growing.jpg) Soaking whole oats for mushroom spawn##### **Why it is necessary to soak grain for spawn**
> ❗️Skip this step for hulled millet and brown rice
It is optional, but I highly recommend step! Why?
First of all, grain is saturated with the necessary moisture and cooks faster.
Now the most important reason. As you know bacteria multiply by simple cell division. To do that they need water. During soaking in water bacteria and their endospores inside grain are activated, they sprout. To kill bacteria and endospores when they are woken up will be much easier and more effective.
And here we are with pressure cooker and sterilization!
After 12-48 hours of soaking you can feel a yeasty, sweet and sour smell, notice some fermentation bubbles.
[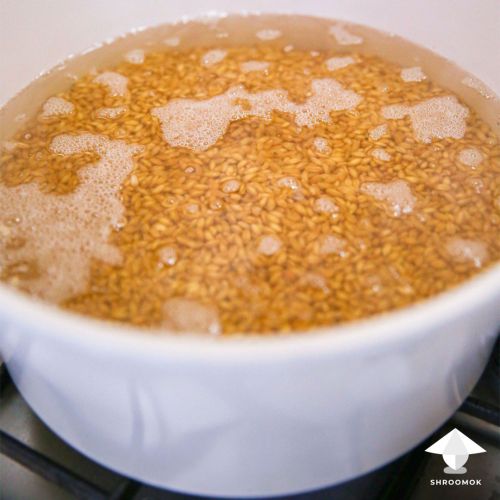](https://shroomok.com/en/wiki/File:How-to-prepare-grain-for-magic-truffles-growing.jpg) Fermentation bubbles appear after 24 hours of soaking
Don't worry, this is normal and great state to rid them off by simmer and the next sterilization process.
##### How to prevent grain substrate from sticking
Add gypsum ([Amazon](https://amzn.to/3nCCdLd)) to grain substrate. It is optional, but it helps to prevent the grains from sticking. For 1Qt of DRY grain add about 1-2 teaspoon of gypsum powder. Add it in water while cooking the grain or right in the grain if you use NSNS (no soak no simmer tek) as for millet.
#### Optional grain substrate disinfection
> **Optional** step to prevent bacteria contamination, however antibiotics don't prevent mold contamination
1️⃣ Rinse grain after soaking 2-3 times in clean water.
2️⃣ For an extra antibacterial effect add antibiotic pill before boiling the grain. You can use hydrogen peroxide 3% solution (H2O2) instead. Antibiotic or H2O2 help to get rid bacteria off.
If you use H2O2 : add 8 oz (230-250 ml) per 1 Quart (1 Liter) of grain and 1 Quart (1 Liter) of water.
If you use antibiotic (chloramphenicol or any analogue) add it in the following proportion: 1 pill/capsule (500 mg) per 1 Qt of grain and 1 Qt of water.
The dosage of the pill/capsule is indicated on the blister
[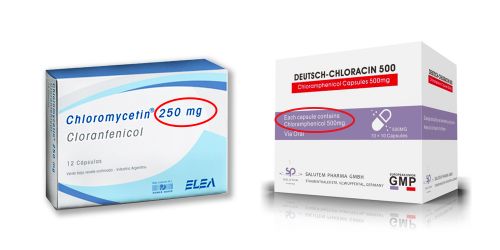](https://shroomok.com/en/wiki/File:Chloramfenicol.jpg) Antibiotic Chloramfenicol for substrate3️⃣ Grind a pill and turn it into powder. If you use antibiotic in capsules just open the capsule
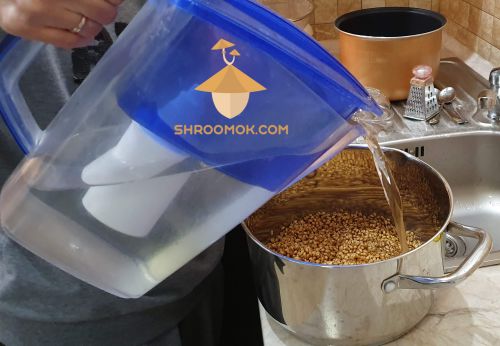
[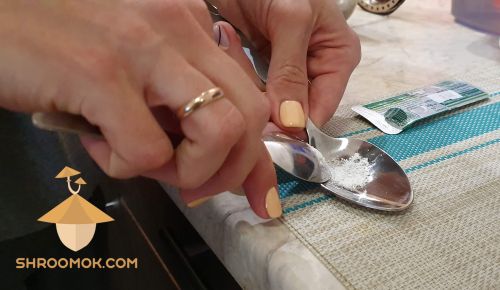](https://shroomok.com/en/wiki/File:Grinding-antibiotic-for-substrate-for-growing-pcilocibe-cubensis.jpg) Grinding antibiotic for substrate for cultivation Psilocybe Cubensis mushrooms4️⃣ Pour about 1Qt of clean drinking water into 1Qt of grain
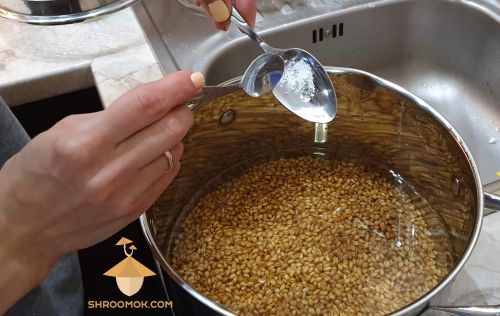
[](https://shroomok.com/en/wiki/File:Adding-water-for-antibiotic-for-growing-psilocybe-cubensis.jpg) Add clean water to the grain5️⃣ Add antibiotic powder (500 mg) or hydrogen peroxide (8oz or 230-250 ml)
[](https://shroomok.com/en/wiki/File:Adding-antibiotic-for-substrate.jpg) Adding antibiotic for preparing substrate6️⃣ Mix thoroughly so that the antibiotic or hydrogen peroxide is distributed evenly
[](https://shroomok.com/en/wiki/File:Substrate-preparation-with-antibiotic.jpg) Stir substrate with antibiotic or hydrogen peroxide7️⃣ Ready for cooking!
#### How to cook grain substrate for mushroom spawn
1️⃣ Put a pot with water and grain on the stove. Bring to a boil over maximum heat (or maximum power)
[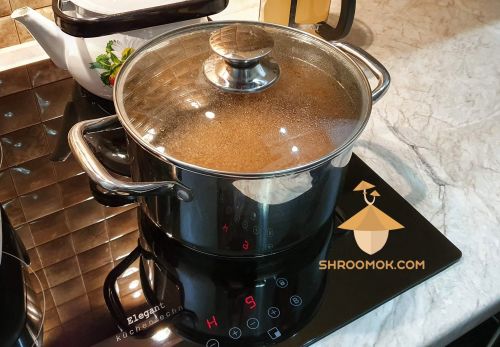](https://shroomok.com/en/wiki/File:Boil-grain-for-substrate-for-psilocybe-cubensis.jpg) Start to boil grain for substrate
2️⃣ Turn down the heat and continue to simmer. Count down the time from this moment!
##### **How long to simmer grain for mushroom substrate**
Cooking time of grain depends not only on the type of cereals, but also on the quality, variety, place of growth, storage conditions. Countdown the time since water started to boil:
⏰ Wheat, barley, rye — about 25 min
⏰ Oats — about 10-15 min
⏰ Brown Rice — about 15-20 min
⏰ Corn, popcorn — about 50-55 min
[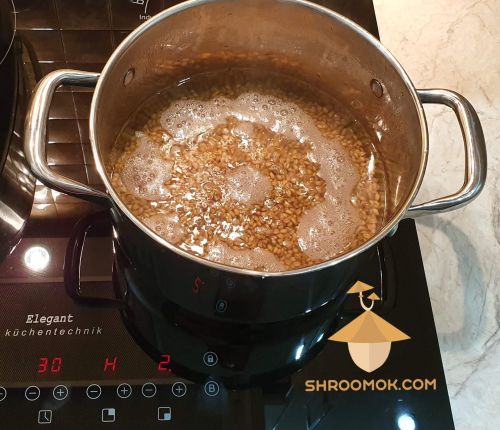](https://shroomok.com/en/wiki/File:Boil-grain-for-substrate-for-growing-psilocybe-mushrooms.jpg) Boil grain to prepare substrate> 🔴 **Make sure grain don't turn into mush!** Such grain should not be used. Subsequently, it will become sour and will be taken over by bacteria or mold. Better to have a little bit undercooked grains
##### Examples of wrong grain substrate preparation
**Boiled too long = too much water = too little air = bacteria contamination = trash**
Here is an example of too wet overcooked grain that quickly goes sour and bacteria contamination appear. Slime appear at the bottom
[](https://shroomok.com/en/wiki/File:Tenderized-substrate-psilocybe-cultivation-problem.jpg) Tenderized over boiled substrate for psilocybin mushrooms cultivation. Psilocybe cultivation problems> 🔴 **Too uncooked grain is also bad!** Then the grain will not get enough moisture and the mycelium will be weak, grow poorly or not grow at all
**Not enough moisture = weak growth of mycelium or no growth at all = trash**
Here is an example of too dry grain substrate
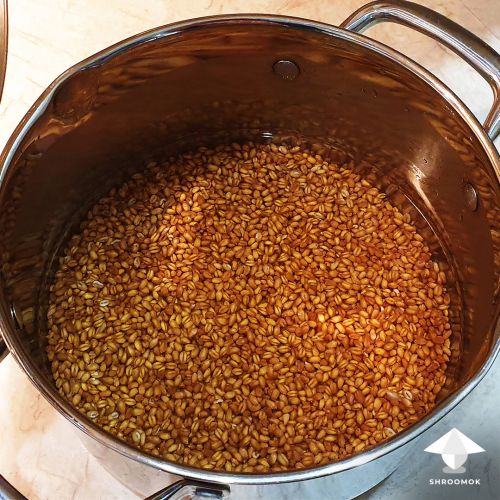
[](https://shroomok.com/en/wiki/File:Dry-substrate-psilocybe-colonization-problem.jpg) Very dry substrate for psilocybin mushrooms cultivation. Psilocybe cultivation problems##### Ideal cooked grain for mushroom spawn
The grain should be springy, but soft :)
[](https://shroomok.com/en/wiki/File:Grain-for-substrate-after-boiling.jpg) Wheat after boiling. Substrate preparation for magic mushroom spawn
In general, if you see the first grains start to burst, it's a sign to stop boiling.
[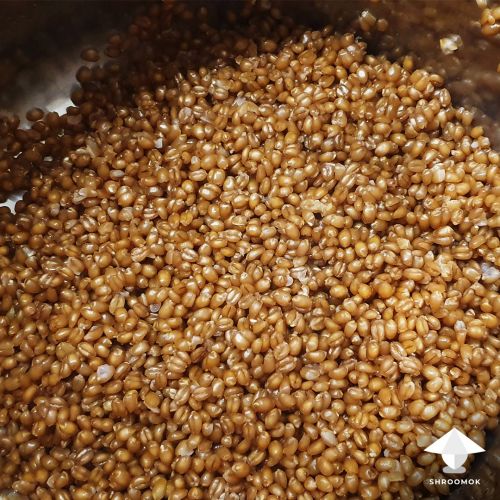](https://shroomok.com/en/wiki/File:Wheat-berry-cooking-for-mushroom-growing.jpg) Ready grain for mushroom growing (wheat berry). Single grains are openedOne more tip to check:
> 💡 Take a single grain, press it with your fingers, it should open easy. Grain is ready!
Grain should remain moderately dense and maintain the integrity of its shell. Such level of cooking should be for any type of grain: wheat, oats, barley, rye, rice, bird seeds, sorghum, millet, corn, etc.
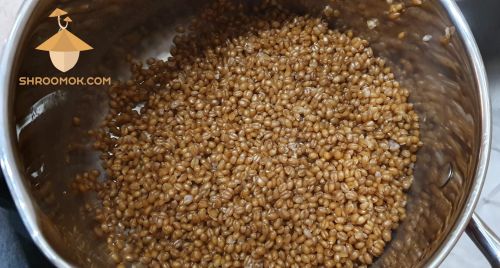
3️⃣ When grain is ready drain the water
[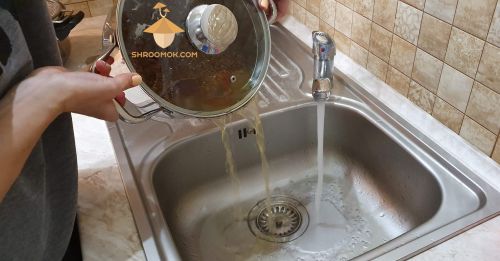](https://shroomok.com/en/wiki/File:Delete-water-from-boiled-grain.jpg) Drain water from grain after boiling
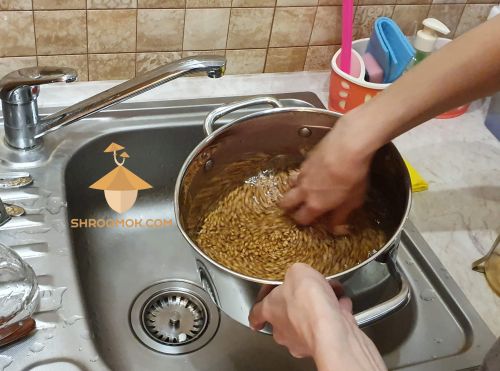
4️⃣ Rinse thoroughly in clean cold water
[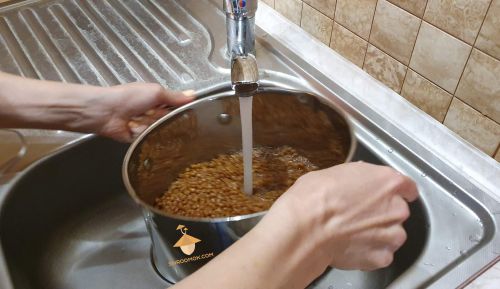](https://shroomok.com/en/wiki/File:Rinse-grain-for-substrate-for-magic-mushrooms.jpg) Rinse grain for substrate under running water
5️⃣ Throw ready grain into a sieve (or colander) to remove excess water
[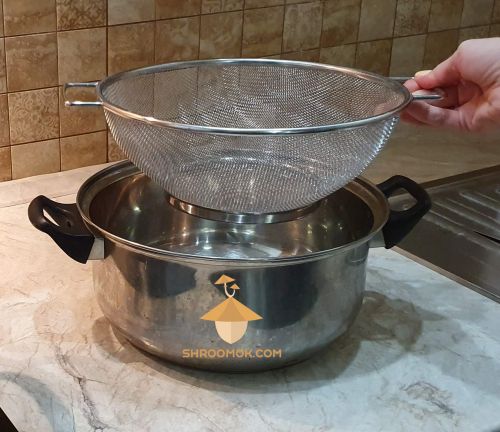](https://shroomok.com/en/wiki/File:Strainer-for-preparing-substrate-for-magic-mushrooms.jpg) Put the substrate to sieve[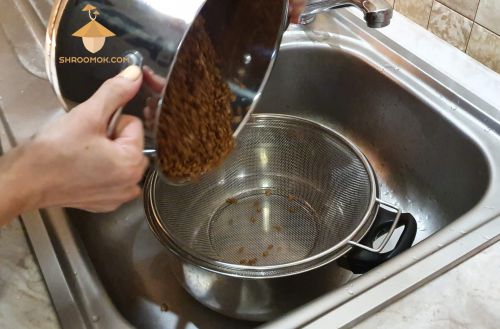](https://shroomok.com/en/wiki/File:Leave-grain-in-strainer.jpg) Move grain into the sieve6️⃣ Leave the grain in this way for 30-40 minutes, so that excess water comes out. After boiling **1 Qt of DRY grain** turns into about **1.2-1.4 Qt of cooked grain**
[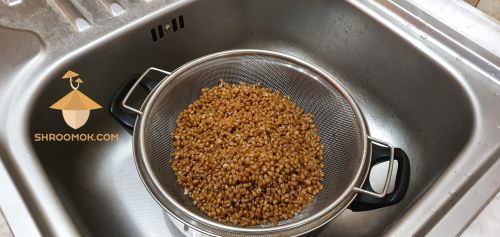](https://shroomok.com/en/wiki/File:Boiled-weat-for-substrate-psilocybin-mushrooms.jpg) Leave grain in sieve for 30-40 minutes[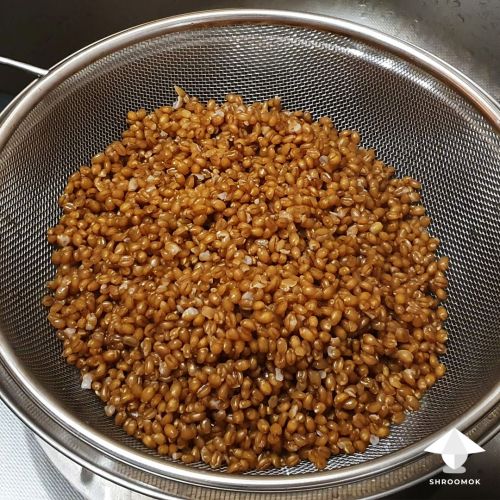](https://shroomok.com/en/wiki/File:How-to-prepare-wheat-berry-mushroom-substrate.jpg) Perfect grain for mushrooms. Let it sit for in sieve for 30 minsYou can spread the grain on a towel in a thin layer and it will absorb the excess moisture, it will be faster. I don't do this.
> ❓**How to determine if the grain is dry enough.** Take a hand full of grain and put it on a paper towel. If the grain does not leave obvious wet prints on the napkin — it's dry enough!
7️⃣ Move grain from the sieve back into the pot. **Optional!** Add 2-3 table spoons of vermiculite ([Amazon](https://amzn.to/3zzfwIM)) if grains are still too wet or you have about 20% of opened grains
[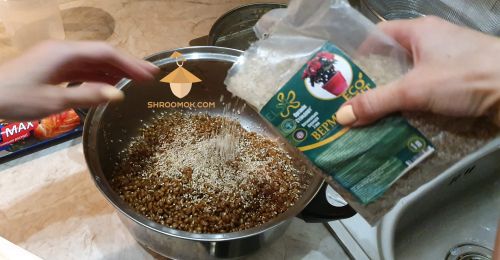](https://shroomok.com/en/wiki/File:Vermiculite-or-perlite-for-substrate-for-growing-psilocybin-mushrooms.jpg) Add vermiculite (or perlite) to make grain substrate> ❗️I usually add vermiculite to wheat berries and brown rice. For other types of grain (corn, millet, sorghum, oat, rye) don't use vermiculite!
Vermiculite works as a drainage for wet wheat or brown rice, helps to avoid clumping and sticking. It allows good regulation of substrate moisture. If the grain is too wet, it will absorb excess moisture. If the grain loses moisture and becomes dry, vermiculite will give back absorbed moisture to the grain
> 🔴 **Substrate should crumble in hands, be moist, but NOT WET, NOT DRY!** You'll find your optimum with experience. Just take a grain in hand. If you feel it is moist, but there are no drops of water, then it's perfect state
8️⃣ Mix thoroughly to have an even mass. As a result, substrate should look like this
[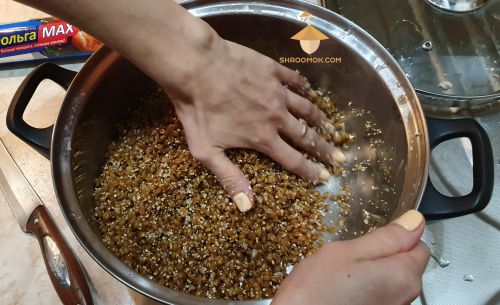](https://shroomok.com/en/wiki/File:Substrate-with-vermiculite-for-growing-psilocybin-cubensis-mushrooms.jpg) Stir substrate with vermiculite (or perlite)#### How to prepare Brown Rice grain for mushroom substrate or 10-10-15 method
I'd like to quote great tips and recipe by **astora☽** — our fungi fairy on [Shroomok Discord](https://discord.gg/ngKhQDmymD):
For anyone struggling with **Brown Rice**, I use the 10, 10, 15 method.
I let my water reach a boil on high heat for 10 minutes.
Then I turn it to medium heat and let my rice boil for the next 10 minutes.
After that I drain my rice and rinse with cold water and let it chill for 15 minutes before inserting into my jars.
Ready!
#### How to prepare Brown Rice Flour aka BRF substrate for mushroom growing
It's super simple recipe for beginners. You always have right moisture level here. Prepare as much BRF substrate as you need, just follow the right ratio:
> vermiculite 2 parts, brown rice flour 1 part, water 1 part
Mix 2 cups of vermiculite ([Amazon](https://amzn.to/3zzfwIM)) and 1 cup of brown rice flour ([Amazon](https://amzn.to/3WzqAQS)). Then add 1 cup of water.
[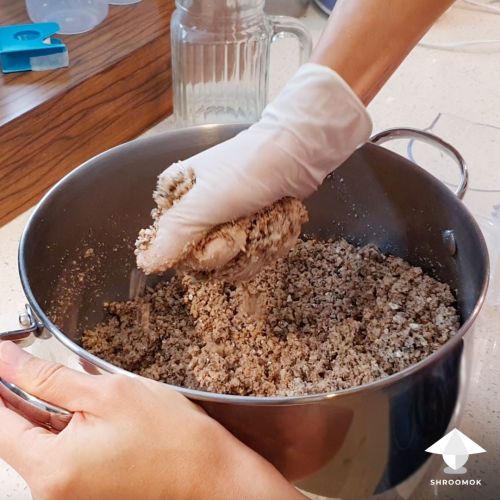](https://shroomok.com/en/wiki/File:How-to-prepare-brown-rice-flour-brf-substrate-for-mushroom-growing.jpg) BRF substrate for mushroom growingStir it thoroughly to have even mass.
You can grind brown rice ([Amazon](https://amzn.to/3kvOAa6)) in coffee grinder ([Amazon](https://amzn.to/3WBu6ub)) to get brown rice flour any time you need.
Ready!
#### No soak no simmer millet substrate for mushroom spawn
Fill the jar/bag with whole white millet grain ([Amazon](https://amzn.to/42X5UXq)) and just add water.
No soak. No simmer.
Water to Grain ratio: ~35-50% of water to grain (by volume).
A few examples shared by members of Shroomok Discord.
🔸 **trippy:** I use millet NSNS (no soak no simmer). Per each Quart jar I do 300ml millet, 150ml water with 1 tsp gypsum. Great results! Love it so far!
🔸 **3EyeFlames:** No soak no simmer white millet. Per each grow bag I add 1000 grams of millet (about 1300ml in volume) and 500ml of water.
#### How to prepare Hulled Millet for mushroom spawn
Yes, you can use **hulled** millet ([Amazon](https://amzn.to/3U3OCns)), it's not a mistake. It is one the easiest way to prepare substrate for mushrooms.
No wash. No soak. No simmer
Just pour hot boiling water in grain. Fill completely to cover the millet (about 1 inch from the top of grain or 2 cm). Close the pot with lid and leave millet for 20-30 minutes to soak.
Drain the water with millet through the sieve.
No need to dry the grain on towels or wait for all excess water to drain. The water will continue to soak in during sterilization process in pressure cooker.
I'd like to note about vermiculite for millet. Vermiculite is a cool absorbent for wheat or brown rice, however it dries the millet very much. **Don't add vermiculite to millet substrate!**
#### Ready sterilized grain for spawn
You can buy ready for inoculation sterile grain for mushroom spawn ([Amazon](https://amzn.to/3KqgfE5)) and skip this and the next few steps.
Such option can save your time greatly and money for expensive pressure cooker, jars/lids/bags, even grain. It's a great option if you want to try mushroom cultivation with ease.
If you have ready sterile grain move on [Step 6. Inoculation](https://shroomok.com/en/wiki/Inoculation_without_glove_box "Inoculation without glove box")
> However I suggest to handle the whole process by your own. It will be cost effective for long term mushroom cultivation hobby
#### What to do next
At this point grain substrate is ready for [Step 5. Grain substrate sterilization](https://shroomok.com/en/wiki/Substrate_sterilization_before_adding_psilocybe_spores "Substrate sterilization before adding psilocybe spores")
But we need right Jars or Bags for this.
Let's make one more preparation step — [**STEP 4. DIY Jars and Bags for grain substrate**](https://shroomok.com/en/wiki/How_to_make_jars_with_substrate_for_mushroom_spawn "Jars for substrate")
## How to make jars with substrate for mushroom spawn
[How to make jars with substrate for mushroom spawn](https://shroomok.com/en/wiki/How_to_make_jars_with_substrate_for_mushroom_spawn)
[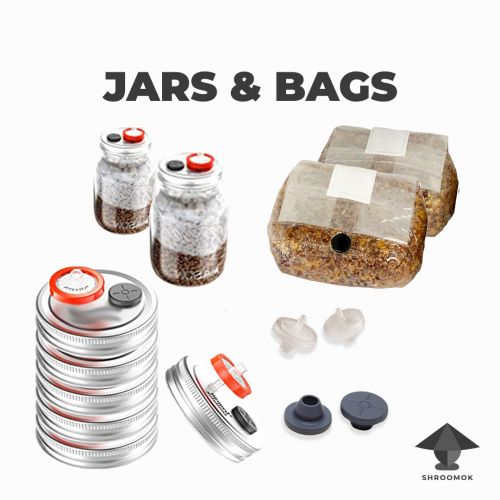](https://shroomok.com/en/wiki/File:Diy-spawn-jars-and-spawn-bags.jpg) Step 4. How to make spawn jars and spawn bags### **STEP 4. Day 2. How to make spawn jars and spawn bags**
On the previous step you've already [cooked the substrate for magic mushrooms](https://shroomok.com/en/wiki/Cooking_the_substrate_for_psilocybes "Cooking the substrate for psilocybes"). Now you need to prepare spawn jars or spawn bags in order to proceed with sterilisation process.
For this purpose growers use different kind of jars, containers or spawn bags for substrate with inoculation port and breathable air filter.
Let's figure out different options!
#### What is inoculation port and air filter?
Each container, either a polypropylene heat-resistant bag or any jar with lid should be equipped with an inoculation port and a breathable air filter.
***Inoculation port (aka injection port)*** — is an entry point for a syringe needle containing the liquid spore solution or liquid culture to inoculate the sterile substrate. It must be protected agains any competing microorganisms contamination through it. Bactericidal breathable patch, butyl rubber self-healing injection ports (aka bottle stoppers) or heat-resistant RTV-silicone sealant is used for this purpose.
***Breathable air filter*** — is a filter that provides gas exchange during the colonisation period. It must be protected by bactericidal layer to prevent any competing microorganisms from entering through it. Bactericidal breathing patch, Luer lock syringe filters, and synthetic filter disks are used for this purpose.
Mushroom cultivators practice in different ways. Someone makes two holes in the lid: one for injection port and one for filter. Someone makes several ports for inoculation and several filters for air exchange.
It is cheap and easy to make by your own or you can buy ready to use jars with lid components for mushroom spawn.
#### **Jars, lids and lid components for Spawn Jars**
There is a huge variety of materials that can make growing process easier. Let's take a look at the different options and alternatives.
##### ❇️ Mason jars for spawn
Glass Mason jars with metal lids. Each lid consist of two parts: a replaceable lid disc with a rubber seal around the rim and threaded ring
[](https://shroomok.com/en/wiki/File:Mason-jar-lid-with-filter-and-injection-port.jpg) Mason jar. Lid with injection port (butyl rubber) and air filter (micropore)**Glass Mason jars** with heat-resistant autoclavable **plastic lids.** You can prepare your own or buy ready-made lids. Inoculation port — butyl rubber injection port. Filter — laboratory funnel filter or substitute with a patch.
[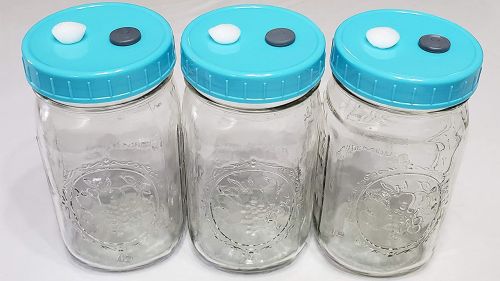](https://shroomok.com/en/wiki/File:Jars-and-lids-for-mushroom-growing.jpg) Glass spawn jars with heat-resistant polypropylene lids> 🔴 In fact you can use any glass jars for canning
**Shroomok's Choice on Amazon:**
[Ball Wide Mouth Mason Jars with Lids & Bands | 16-oz | 2-Pack](https://www.amazon.com/gp/product/B07MZF9J2G/ref=as_li_tl?ie=UTF8&tag=shroomok-20&camp=1789&creative=9325&linkCode=as2&creativeASIN=B07MZF9J2G&linkId=a307ae835b89a6b4a140ca52e76106d4) $12.00
[Ball Wide Mouth Mason Jars with Lids & Bands | 24 oz | 2-Pack](https://www.amazon.com/gp/product/B0725J3TXM/ref=as_li_tl?ie=UTF8&tag=shroomok-20&camp=1789&creative=9325&linkCode=as2&creativeASIN=B0725J3TXM&linkId=7dd861f0f8698471e79ac9a00a3c8c85) $10.00
[Ball Wide Mouth Mason Jars with Lids & Bands | 16-oz | 6-Pack](https://www.amazon.com/gp/product/B07RZVPM35/ref=as_li_tl?ie=UTF8&tag=shroomok-20&camp=1789&creative=9325&linkCode=as2&creativeASIN=B07RZVPM35&linkId=1edeb6dac4e1f02613bc4cf891d2e865) $22.99
[Ball Wide Mouth Mason Jars with Lids & Bands | 32 oz | 12-Pack](https://www.amazon.com/gp/product/B07HGG3DD1/ref=as_li_tl?ie=UTF8&tag=shroomok-20&camp=1789&creative=9325&linkCode=as2&creativeASIN=B07HGG3DD1&linkId=b95b386766eca38d63971c235dc51b47) $29.13
##### ❇️ Lid components for spawn jars
Each lid should be equipped with inoculation port (butyl rubber injection port) and a air filter (synthetic patch or micropore nylon lab filter).
[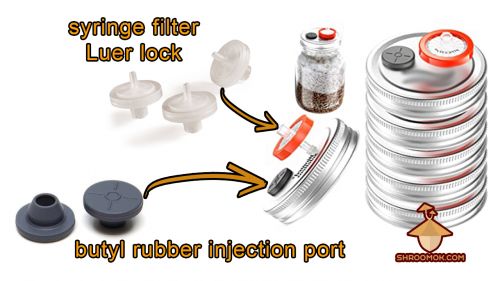](https://shroomok.com/en/wiki/File:Syringe-filter-with-luer-lock-and-self-healing-butyl-rubber-injection-port.jpg) Inoculation port - butyl rubber injection port, air filter - Luer lock syringe filterButyl rubber self-healing bottle stoppers is a great option for inoculation port.
Luer-lock syringe filter is a great option for air filter.
These components can be installed in any kind of lids (polypropylene or metal), polypropylene containers or spawn bags. All components are autoclavable and reusable!
> ❗️Use heat resistant RTV silicone to instal, glue and seal lid components!
**Shroomok Choice on Amazon**
**Plastic (5PP) or Stainless steel autoclavable lids:**
[Plastic Mason Jar Lids, Wide & Regular, 24 Pack](https://www.amazon.com/dp/B09MCVQYQY?&linkCode=ll1&tag=shroomok-20&linkId=4f0dcbb13520218dc975b64c93cd0831&language=en_US&ref_=as_li_ss_tl) $15.99
[Stainless Steel Mason Jar Lids and Rings, Wide & Regular, 48 Pack](https://www.amazon.com/dp/B08P1K4RKP?&linkCode=ll1&tag=shroomok-20&linkId=e6ff27a81b16f60202204791df565bdb&language=en_US&ref_=as_li_ss_tl) - $15.99
**Air filters for lids:**
[Synthetic Filter Disc for Air filter - 64/128/256 pcs.](https://www.amazon.com/gp/product/B08T1D3GY2/ref=as_li_tl?ie=UTF8&tag=shroomok-20&camp=1789&creative=9325&linkCode=as2&creativeASIN=B08T1D3GY2&linkId=e4c278c33050438f8dc11ee2b4800925) - $7.99
[Syringe Filters PTFE Hydrophobic - 25 pcs.](https://www.amazon.com/gp/product/B0754B99WH/ref=as_li_tl?ie=UTF8&tag=shroomok-20&camp=1789&creative=9325&linkCode=as2&creativeASIN=B0754B99WH&linkId=de50ca38d7174d57a10fa2756c5eb83a) - $14.49
**Inoculation port for lids:**
[Mushrooms Self Healing Injection Ports - 20mm, 100 pcs.](https://www.amazon.com/gp/product/B08MQGD4HN?th=1&linkCode=ll1&tag=shroomok-20&linkId=449726e9b878348d3518d47df98bfead&language=en_US&ref_=as_li_ss_tl) - $9.99
[2-in-1: Synthetic Filter Paper Stickers 64 pcs & 100 pcs Injection Ports](https://www.amazon.com/gp/product/B08T64N45N?th=1&linkCode=ll1&tag=shroomok-20&linkId=8d64ffa39aa6dc1b4a33a79ffd4128b4&language=en_US&ref_=as_li_ss_tl) - $9.99
**To glue and seal lid components:**
[High Temperature RTV Silicone and Sealant - Red - 3 oz.](https://www.amazon.com/gp/product/B00ID8IUJY/ref=as_li_tl?ie=UTF8&tag=shroomok-20&camp=1789&creative=9325&linkCode=as2&creativeASIN=B00ID8IUJY&linkId=c4365557a710aacb5c55c6f9380a7856) - $5.99
**Ready to use Jars with Lids + air filter + inoculation port:**
[Wide Mouth Mason Jar Plastic Lid + Syringe Filter + Self Healing Injection Ports - 3 pcs](https://www.amazon.com/gp/product/B09332562R/ref=as_li_tl?ie=UTF8&tag=shroomok-20&camp=1789&creative=9325&linkCode=as2&creativeASIN=B09332562R&linkId=c3314832b363fb6a7796ecf47afefdd9) - $13.99
[3-in-1: Ready to use Mason Jar Lid, Syringe Filter & Self Healing Injection Ports - 6 pcs](https://www.amazon.com/gp/product/B08ND6M648/ref=as_li_tl?ie=UTF8&tag=shroomok-20&camp=1789&creative=9325&linkCode=as2&creativeASIN=B08ND6M648&linkId=f4695f7effda5e7b43bef9bb87154c45) - $22.99
##### ❇️ Heat-resistant polypropylene spawn bags
You can make by your own or use ready-made bags with inoculation port and air filter.
[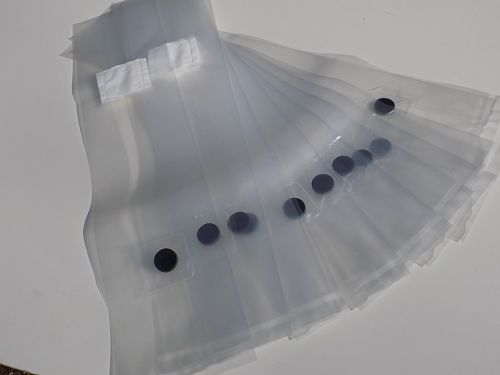](https://shroomok.com/en/wiki/File:Spawn-bag-example.jpg) Spawn bags for mushrooms cultivation[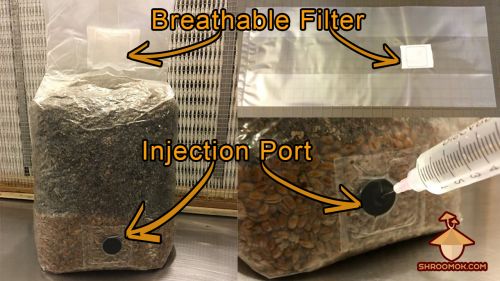](https://shroomok.com/en/wiki/File:Spawn-bag-for-mushroom-cultivation.jpg) Spawn bag with injection port and air filter**Shroomok's Choice on Amazon:**
[Middle Mushroom Spawn Bags with Filter -10/20/50/100 pcs.](https://www.amazon.com/gp/product/B071WX95JK/ref=as_li_tl?ie=UTF8&tag=shroomok-20&camp=1789&creative=9325&linkCode=as2&creativeASIN=B071WX95JK&linkId=c825f4c004f5bd7db0af470d9efd7c39) - $9.99
[Large Mushroom Grow Bags with Gas Filter - 10/25/100 pcs.](https://www.amazon.com/gp/product/B085JPLRNV?&linkCode=ll1&tag=shroomok-20&linkId=8421f950c5958cfd27bfa4a2bf488a53&language=en_US&ref_=as_li_ss_tl) - $11.89
[3-in-1: Autoclavable Grow Bag + Injection Port + CO2 Filter - 10 pcs](https://www.amazon.com/gp/product/B08L4K9DKQ/ref=as_li_tl?ie=UTF8&tag=shroomok-20&camp=1789&creative=9325&linkCode=as2&creativeASIN=B08L4K9DKQ&linkId=f2c967930fb687a55d38445cccca3749) - $28.49
##### ❇️ Glass canning jars for Spawn Jars
[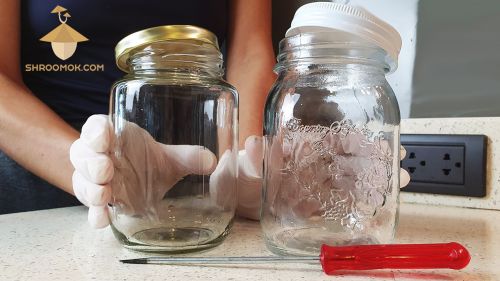](https://shroomok.com/en/wiki/File:Jars-for_substrate.jpg) Glass jars for substrate with metal lids. Spawn jars for psilocybin mushrooms cultivation##### ❇️ Heat-resistant polypropylene autoclavable jars for Spawn Jars
[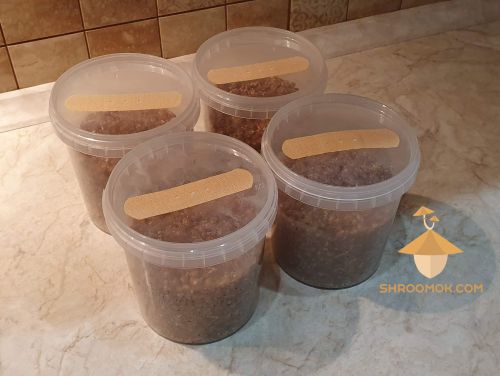](https://shroomok.com/en/wiki/File:Jars-with-substrate-for-growing-psilocybe-cubensis-mushrooms.jpg) Heat-resistant polypropylene jars for substrate. Lids with one hole for injection port and filter covered with bactericidal patch[](https://shroomok.com/en/wiki/File:Polypropylene-spawn-jars.jpg) Polypropylene jars for spawn#### How to identify heat-resistant autoclavable plastic for spawn jar?
Look for 5PP and "for food" labels
[](https://shroomok.com/en/wiki/File:Polypropylene-PP-jars-for-mushrooms.jpg) How to identify heat-resistant polypropylene jars for spawn. PP symbol**Shroomok's Choice on Amazon:**
[Polypropylene Jars for Grain Spawn & LC - 24 oz. (16 oz, 32 oz available) - 9 Sets](https://www.amazon.com/gp/product/B08LR3LKJF/ref=as_li_tl?ie=UTF8&tag=shroomok-20&camp=1789&creative=9325&linkCode=as2&creativeASIN=B08LR3LKJF&linkId=33eb456827c3fd9e11d6c137639f888c) - $11.97
[Polypropylene Jars with Lid for Grain Spawn or LC - 12/24/50-Pack 8/16/32 oz.](https://www.amazon.com/gp/product/B07SJ2S5MY/ref=as_li_tl?ie=UTF8&tag=shroomok-20&camp=1789&creative=9325&linkCode=as2&creativeASIN=B07SJ2S5MY&linkId=9c3bad8fe7783ad464c1da57e8ed53e3) - $15.99
[Autoclavable Reusable Polypropylene Jars with CO2 Filter in the Lid |17-oz | - 6 pcs](https://www.amazon.com/gp/product/B07KPYBPHZ/ref=as_li_tl?ie=UTF8&tag=shroomok-20&camp=1789&creative=9325&linkCode=as2&creativeASIN=B07KPYBPHZ&linkId=4a8cd22e7f18134674c6926e043e8fb3) - $22.99
#### How to make injection port with **RTV silicone**
You can use heat-resistant red **RTV silicone** for DIY self-healing injection port. This is a cheap alternative to butyl rubber bottle stoppers
[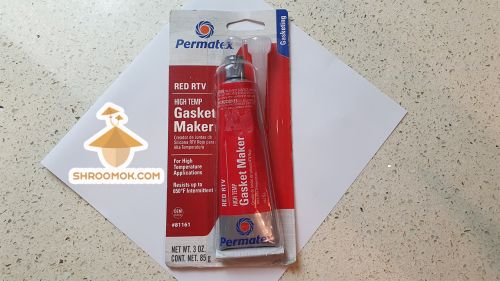](https://shroomok.com/en/wiki/File:Rtv-silicone-for-spawn-jars.jpg) Red RTV silicone sealant as injection port for spawn jar**Shroomok's Choice on Amazon:**
[High Temperature RTV Silicone Gasket Maker and Sealant - Red - 3 oz.](https://www.amazon.com/gp/product/B00ID8IUJY/ref=as_li_tl?ie=UTF8&tag=shroomok-20&camp=1789&creative=9325&linkCode=as2&creativeASIN=B00ID8IUJY&linkId=c4365557a710aacb5c55c6f9380a7856) - $5.99
Fill the hole for the inoculation port with heat-resistant silicone sealant (rtv silicone) on the both sides.
[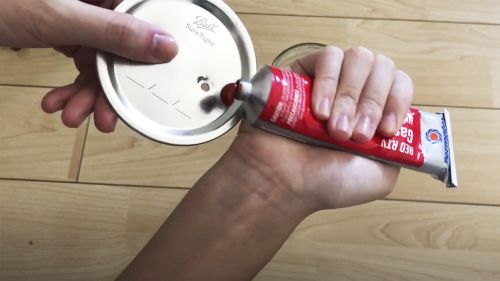](https://shroomok.com/en/wiki/File:Silicon-injection-port.jpg) Heat-resistant rtv silicone sealant as injection port[](https://shroomok.com/en/wiki/File:Rtv-silicone-injection-port.jpg) Fill inoculation port with rtv silocone on both sidesThe silicone that hasn't yet solidified should be pressed lightly with a napkin inside and outside of the lid. So that it takes the shape of a tablet or wax seal. Wait for the sealant to completely solidify.
[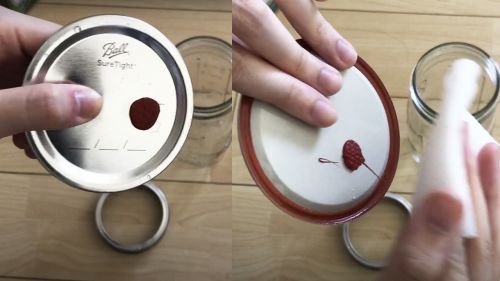](https://shroomok.com/en/wiki/File:Rtv-silicon-injection-port-for-spawn-jars.jpg) Press gently with a napkin inside and outsideDon't forget to make another separate hole in such lids for air filter and cover it with patch or filter disc.
[Synthetic Filter Disc for Air filter - 64/128/256 pcs.](https://www.amazon.com/gp/product/B08T1D3GY2/ref=as_li_tl?ie=UTF8&tag=shroomok-20&camp=1789&creative=9325&linkCode=as2&creativeASIN=B08T1D3GY2&linkId=e4c278c33050438f8dc11ee2b4800925) - $7.99
One more option as example. Spawn jar with modified lid, where inoculation port - rtv silicone, air filter - polyfill. It works, however less reliable IMAO
[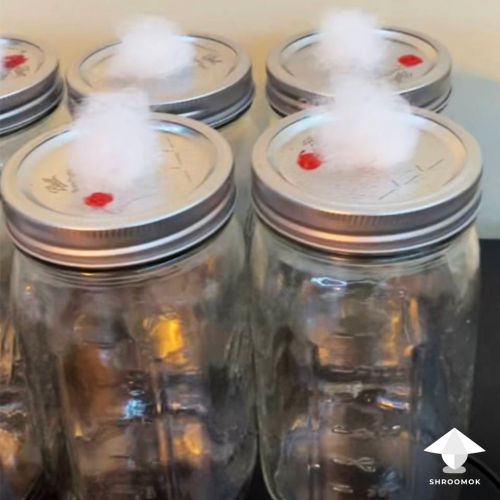](https://shroomok.com/en/wiki/File:Jar-for-mushroom-spawn-with-inoculation-port-polyfill-air-filter.jpg) Spawn jar with modified lid. Inoculation port - rtv silicone, air filter - polyfill[Polyester Fiber, 200g](https://amzn.to/3WC4Rri) $9.49
What to use is up to you!
#### DIY spawn jars
To make DIY jars and lids for substrate you need:
1. Jars with lids (volume, types of jars and lids we are going to discuss below).
2. Screwdriver/nail/awl/drill with a diameter of 5-10 mm.
3. Bactericidal breathing patch — 1-2 per lid.
4. Heat-resistant rtv silicone sealant — **optional.**
##### What volume for spawn jars is needed
Any jar that fits your pressure cooker (autoclave or multicooker) from 250 ml to 1 liter. We use 500 ml and 700 ml jars. For us these are the optimal volumes. The shape of the jars does not matter.
[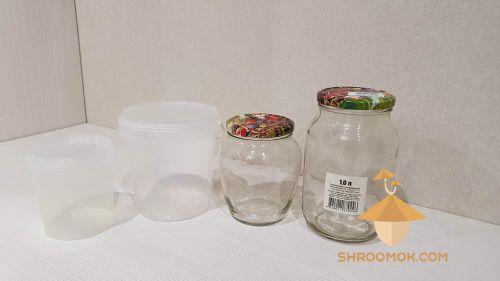](https://shroomok.com/en/wiki/File:Jars-for-substrate-psilocybin-mushrooms-growing.jpg) Polypropylene jars with polypropylene lids or glass jars with metal lids🔴 ***Note: The shape of the jars is important for PF-tek growing.** Use cylindrical or conic jars without narrow neck (neck should be wider than the bottom), so that you can take out the mushroom cake safe and sound or you can open it up with some extreme demonstarted in the video here: [How to remove mushroom cake from glass jar with narrow neck?](https://www.dailymotion.com/video/x841jtk)*
**Jars more than 1 liter or 1 Quart are not recommended. Why?**
- First, the jar may not fit in the pressure cooker (multicooker).
- Secondly, a large volume will require more time to colonize the substrate. Accordingly, more risk for souring and contamination, which can take over the substrate faster than the mycelium of psilocybin mushrooms.
- Third, it is better to share the risks and make more jars of smaller volume. So that, increase the chances of future mushroom survival.
- With more jars you can experiment and try different teks
##### **What kind of jars are needed**
We use **glass screw jars with metal twist-off lids** (withstand temperature over +160°C or 320°F) or **Mason jars.**
[](https://shroomok.com/en/wiki/File:Jars-for_substrate.jpg) Glass screw jars with metal twist-off lidsAnd heat-resistant **polypropylene jars with polypropylene lids** (withstand temperature up to +140°C or 284°F).
[](https://shroomok.com/en/wiki/File:Jars-with-substrate-for-growing-psilocybe-cubensis-mushrooms.jpg) Heat-resistant polypropylene jars for substrate
**Pros of glass jars:**
- Availability.
- Easily withstand higher temperatures than polypropylene jars. This point is especially important if your pressure cooker doesn't allow you to set a specific temperature.
**Cons of glass jars:**
- The jar can crack or break during the sterilization process. You can't use such jar and substrate in it for inoculation.
- It is more difficult to shake the substrate that has covered by mycelium.
**Pros of polypropylene jars:**
- Flexible and elastic (it will be easier to shake the substrate with mycelium in such jars)
- Don't crack or break during sterilization, as it can happen with glass ones.
**Cons of polypropylene jars::**
- Under the influence of temperature changes, the lid can open, then we can't use such substrate for inoculation. Make sure that the lid is tightly closed before and after sterilization.
In fact, we had no problem either with polypropylene (500 ml) or glass (700 ml) jars or spawn bags.
The choice is up to you!
**Step-by-step spawn jars and lids preparation**
1️⃣ Wash all jars and lids. You can use a dish detergent.
[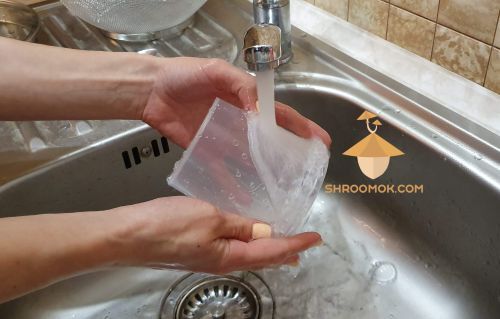](https://shroomok.com/en/wiki/File:Wash-jar-for-substrate.jpg) Wash all jars for substrate and lids to it
2️⃣ Make only one hole in each lid for the injection port and air filter. Diameter about 5-10 mm. Polypropylene lids can be burned through with a red-hot nail/awl or a screwdriver.
Or you can use hot gun.
[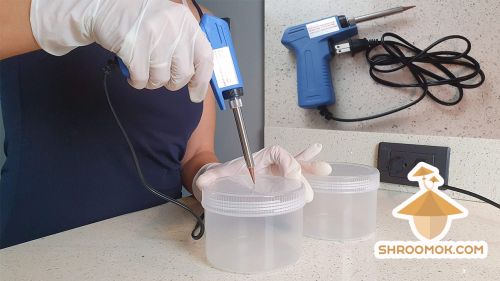](https://shroomok.com/en/wiki/File:How-to-prepare-spawn-jars.jpg) Polypropylene jars for mushroom grain spawn. How to make air filter and inoculation port with hot gun[](https://shroomok.com/en/wiki/File:Inoculation-port-and-filter-in-the-lid.jpg) Make inoculation port and filter in the lidTape inoculation port with a breathing bactericidal patch outside (omnipore or micropore tape). Try to stick the patch so that the breathing dots on the patch show you where the center of the inoculation port is. This will make inoculation more convenient.
[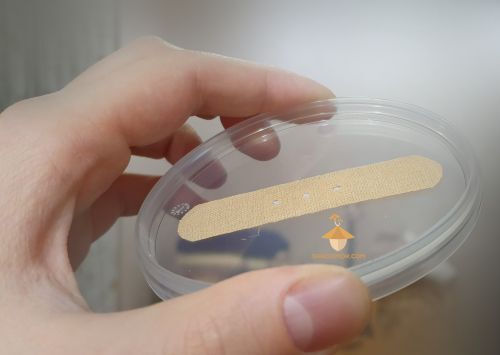](https://shroomok.com/en/wiki/File:Inoculation-port-with-filter-in-the-lid.jpg) Inoculation port with filter in the lid**Shroomok's Choice on Amazon:**
[3M Micropore Tape 1530-1 (2 rolls) 1 x 10 yards](https://www.amazon.com/gp/product/B06XNP8J4R/ref=as_li_tl?ie=UTF8&tag=shroomok-20&camp=1789&creative=9325&linkCode=as2&creativeASIN=B06XNP8J4R&linkId=f560bc0e72ed7903f3f49d7d03e8b38d) - $4.40
[Micropore Surgical Tape - 3m - 2" x 10 YD - 6 rolls](https://www.amazon.com/gp/product/B0082A9GS2/ref=as_li_tl?ie=UTF8&tag=shroomok-20&camp=1789&creative=9325&linkCode=as2&creativeASIN=B0082A9GS2&linkId=002675835f06b5070b42deeb3dc5867d) - $9.76
🔴 For metal lids you can use a drill or punched with a nail/awl/screwdriver.
[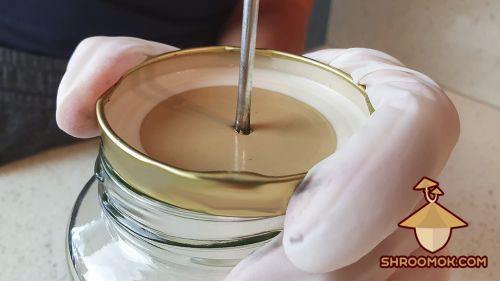](https://shroomok.com/en/wiki/File:Lid-preparation.jpg) Make one hole in metal lid for inoculation port and filter. Use drill or screwdriver[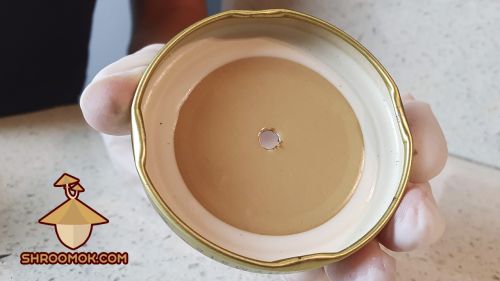](https://shroomok.com/en/wiki/File:Lid-with-port.jpg) Diameter of injection port and air filter is 5-10 mm> 🔴 **Important:** if you make a hole in the metal lid, it is necessary to bend the metal pieces on the back side and seal this place with a breathing bactericidal patch both - inside and outside! It is necessary, because water drops with rust from the lid accumulated there and contamination can easy get in. For polypropylene jars only one breathing bactericidal patch (outside) is needed
[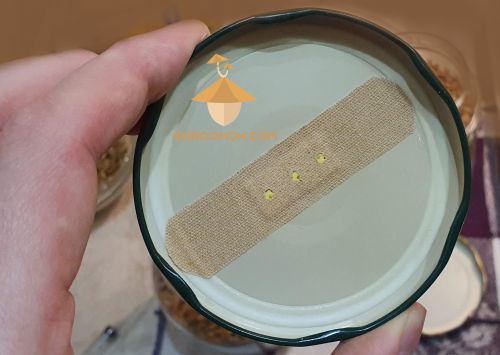](https://shroomok.com/en/wiki/File:Metal-lid-with-inoculation-port-and-filter-inside.jpg) Metal lid with inoculation port and filter (inside view)[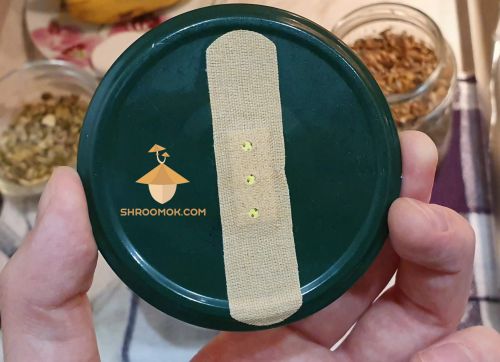](https://shroomok.com/en/wiki/File:Metal-lid-with-inoculation-port-and-filter-outside.jpg) Metal lid with inoculation port and filter (outside view)Jars for mushroom spawn are ready!
Move on the next stage — [**STEP 5. Grain substrate sterilization**](https://shroomok.com/en/wiki/Substrate_sterilization_before_adding_psilocybe_spores "Substrate sterilization before adding psilocybe spores")
## Substrate sterilization before adding psilocybe spores
[Substrate sterilization before adding psilocybe spores](https://shroomok.com/en/wiki/Substrate_sterilization_before_adding_psilocybe_spores)
[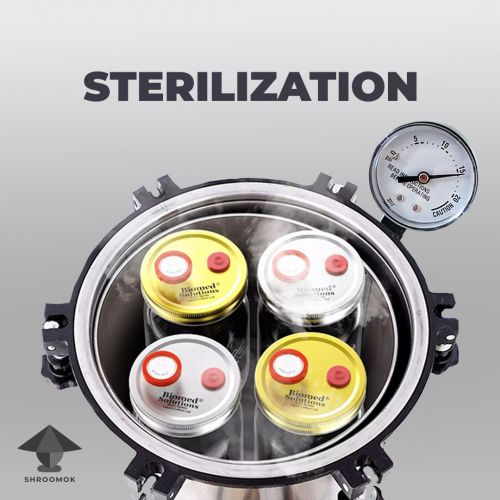](https://shroomok.com/en/wiki/File:Grain-substrate-sterilization-in-mushroom-cultivation.jpg) Step 5. Grain substrate sterilization before inoculation### **STEP 5. Day 2. Grain substrate sterilization for mushroom spawn**
At this stage, you've already have [prepared substrate](https://shroomok.com/en/wiki/Cooking_the_substrate_for_psilocybes "Cooking the substrate for psilocybes") and [jars/bags for substrate](https://shroomok.com/en/wiki/How_to_make_jars_with_substrate_for_mushroom_spawn "Jars for substrate") with injection port and air filter.
Now we need to make substrate sterilization.
#### **What is sterilization?**
> ***Sterilization*** — heat treatment that deactivates all forms of microorganisms in substrate, such as bacteria and mold spores. It is carried out at temperatures **above** 212°F (+100°C) for a certain period of time
You can buy ready for inoculation sterile grain for mushroom spawn, so that skip next steps and move on [**Step 6. Inoculation**](https://shroomok.com/en/wiki/Inoculation_without_glove_box "Inoculation without glove box")
Such option can save your time greatly and money for expensive pressure cooker, jars and lids accessories. It's a great option if you just want to try mushroom cultivation with ease.
**Shroomok's choice on Amazon:**
[Sterilized **Rye Berry** Mushroom Substrate with Self Healing Injection Port - 1/6/12/25 Bags](https://www.amazon.com/gp/product/B07CWHYKT2/ref=as_li_tl?ie=UTF8&tag=shroomok-20&camp=1789&creative=9325&linkCode=as2&creativeASIN=B07CWHYKT2&linkId=e1450adf12709f8c49544cf0fa650d82) - $16.50
[Sterilized **Wheat Grain** Bag with Injection Port - 3 Lb - 1 Bag](https://www.amazon.com/gp/product/B07S1D16BB/ref=as_li_tl?ie=UTF8&tag=shroomok-20&camp=1789&creative=9325&linkCode=as2&creativeASIN=B07S1D16BB&linkId=084b181d07ff14acab600fb48e266524) - $16.88
[Sterilized **Rye Grain** Berries for Mushroom Spawn | Quart Jars - 1 Jar](https://www.amazon.com/gp/product/B0915PYR2B/ref=as_li_tl?ie=UTF8&tag=shroomok-20&camp=1789&creative=9325&linkCode=as2&creativeASIN=B0915PYR2B&linkId=29cff87c977d2efcecd1c8171c2c8797) - $17.99
[Sterilized **Rye Grain** Mushroom Substrate in Injectable Jars - 2 Jars](https://www.amazon.com/gp/product/B07TQH1RYG/ref=as_li_tl?ie=UTF8&tag=shroomok-20&camp=1789&creative=9325&linkCode=as2&creativeASIN=B07TQH1RYG&linkId=39c8c5895d1b48605f58e4b21e962d11) - $29.56
[Sterilized **Rye Berry** Grain Bag with Injection Port - 3 lbs (2 Bags Each 1.5 lb)](https://www.amazon.com/gp/product/B07XPDJPSM/ref=as_li_tl?ie=UTF8&tag=shroomok-20&camp=1789&creative=9325&linkCode=as2&creativeASIN=B07XPDJPSM&linkId=922363eb6f92209cf0617561bb14cbb9) - $39.74
[Sterilized **Rye Berries** Substrate in Mushroom Grow Bags - 1 Pound - 6 Bags](https://www.amazon.com/gp/product/B0055VCBUG/ref=as_li_tl?ie=UTF8&tag=shroomok-20&camp=1789&creative=9325&linkCode=as2&creativeASIN=B0055VCBUG&linkId=827a2a65512f16b0cf5a8e7feffffc13) - $46.50
[Sterilized **Rye Berry** Mushroom Substrate in Injectable Quart Jars - 4 Jars](https://www.amazon.com/gp/product/B004GIOWOC/ref=as_li_tl?ie=UTF8&tag=shroomok-20&camp=1789&creative=9325&linkCode=as2&creativeASIN=B004GIOWOC&linkId=dcdf6c4581b83e0cd033665054926c1c) - $59.95
[**BRF Jars** Brown Rice Flour Mushroom Substrate - 6 Jars](https://www.amazon.com/gp/product/B07Q7R53TB/ref=as_li_tl?ie=UTF8&tag=shroomok-20&camp=1789&creative=9325&linkCode=as2&creativeASIN=B07Q7R53TB&linkId=6d03eea3925da714e9b45f3379a2d2c3) - $58.00
#### **All you need to prepare for grain sterilization**
1️⃣ Pressure Cooker, Autoclave, Pressure Multicooker or Instant Pot
[](https://shroomok.com/en/wiki/File:Substrate-sterilization-for-mushroom-growing-in-autoclave.jpg) Autoclave, pressure cooker for substrate sterilization [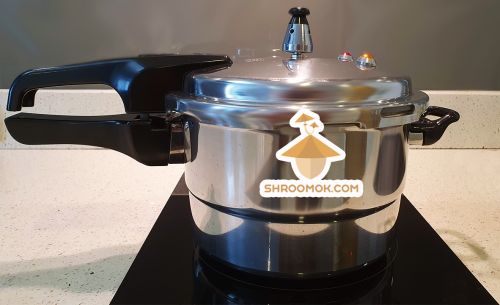](https://shroomok.com/en/wiki/File:Pressure-cooker-for-substrate-sterilization.jpg) Pressure Cooker for Grain Sterilization**Shroomok's Choice on Amazon:**
[T-fal Pressure Cooker, 3 PSI Settings - 22 Qt](https://www.amazon.com/gp/product/B01KWZEERC/ref=as_li_tl?ie=UTF8&tag=shroomok-20&camp=1789&creative=9325&linkCode=as2&creativeASIN=B01KWZEERC&linkId=1330c550fca531439c6a4630281d43b4) $93.95 - Budget PC
[Presto Pressure Cooker - 23 Qt](https://amzn.to/48w60HX) $124.99 - Best Seller!
[All-American Pressure Cooker - 21/25/30/40 Qt](https://amzn.to/3HfB96z) - $419.29
2️⃣ Prepared grain substrate (wheat, aots, milo, rye, barley, corn, brown rice, BRF substrate etc.)
[](https://shroomok.com/en/wiki/File:How-to-prepare-wheat-berry-mushroom-substrate.jpg) Ready grain substrate for further sterilization (wheat berry)[](https://shroomok.com/en/wiki/File:Substrate-with-vermiculite-for-growing-psilocybin-cubensis-mushrooms.jpg) Prepared grain substrate> 🔴 Check out: [Step 2. Choose right substrate for magic mushroom growing](https://shroomok.com/en/wiki/Choose_and_prepare_substrate_for_magic_mushrooms "Choose and prepare substrate for magic mushrooms")
> 🔴 Check out: [Step 3. How to prepare grain substrate for mushroom growing](https://shroomok.com/en/wiki/Cooking_the_substrate_for_psilocybes "Cooking the substrate for psilocybes")
3️⃣ Prepared Spawn Jars or Spawn Bags with inoculation port and air filter
[](https://shroomok.com/en/wiki/File:Syringe-filter-with-luer-lock-and-self-healing-butyl-rubber-injection-port.jpg) Spawn Jars with Injection Port and Air Filter [](https://shroomok.com/en/wiki/File:Spawn-bag-example.jpg) Spawn Bags> 🔴 Check out: [Step 4. Jars and Bags for grain substate](https://shroomok.com/en/wiki/How_to_make_jars_with_substrate_for_mushroom_spawn "How to make jars with substrate for mushroom spawn")
4️⃣ **Optional!** Vermiculite or Vermiculite/Perlite 50/50
[](https://shroomok.com/en/wiki/File:Vermiculite-perlite-for-growing-magic-mushrooms.jpg) Vermiculite and Perlite**Shroomok's Choice on Amazon:**
[Vermiculite 8 qt., 1/2/5 Pack](https://www.amazon.com/gp/product/B001693Y3Y/ref=as_li_tl?ie=UTF8&tag=shroomok-20&camp=1789&creative=9325&linkCode=as2&creativeASIN=B001693Y3Y&linkId=aab8022c311d9913eb323603bea05da5) - $14.60
[Organic Vermiculite 8 qt.](https://www.amazon.com/gp/product/B07N7PSQM1/ref=as_li_tl?ie=UTF8&tag=shroomok-20&camp=1789&creative=9325&linkCode=as2&creativeASIN=B07N7PSQM1&linkId=c3023b00d5abf25c441891496365d300) - $15.39
[Premium Perlite 8 qt.](https://www.amazon.com/gp/product/B01LZDOLRI/ref=as_li_tl?ie=UTF8&tag=shroomok-20&camp=1789&creative=9325&linkCode=as2&creativeASIN=B01LZDOLRI&linkId=d7d247f8698cb95cbffd7d7609b8db47) - $13.95
[Organic Perlite 8 qt.](https://www.amazon.com/gp/product/B07CND4WV9/ref=as_li_tl?ie=UTF8&tag=shroomok-20&camp=1789&creative=9325&linkCode=as2&creativeASIN=B07CND4WV9&linkId=6f7d2c2c5137ebca153ef3f89bf3c9eb) - $16.99
5️⃣ Aluminium Foil.
6️⃣ Water.
#### **Preparation before grain substrate sterilization**
1️⃣ Optional! Recommended for wheat berry and brown rice. Add 1 tablespoon of vermiculite on the bottom of each jar (just to cover the bottom). In case there will too much moisture in the substrate, this vermiculite will help to compensate. It will absorb the excess moisture.
[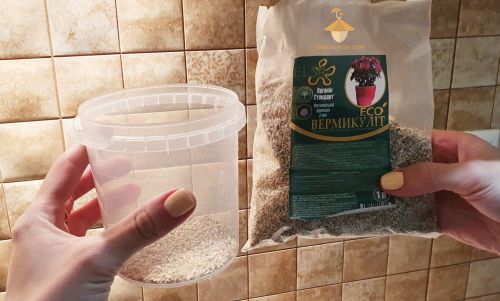](https://shroomok.com/en/wiki/File:Preparing-for-sterilization-substrate.jpg) Add 5-10 mm of vermiculite on the bottom of each jar2️⃣ Fill the jars with the prepared grain substrate, no more than 2/3 or 3/4 of the jar. In the future you'll need to shake the content of the jars without opening them. If you fill the jar to the top, you won't be able to shake the substrate. Additional space needed for gas exchange as well
[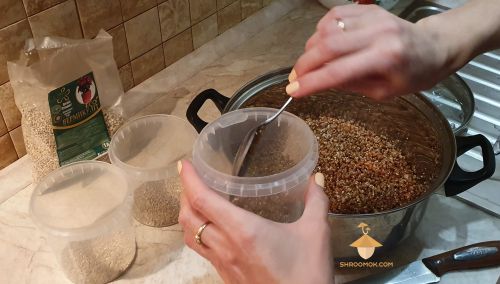](https://shroomok.com/en/wiki/File:Fill-jars-with-substrate-for-growing-psilocybe-cubensis.jpg) Fill 2/3 of each jar with prepared substrate
3️⃣ Close the jars tightly with modified lid (lid with inoculation port and filter). During sterilization lids on the jars may loosen under the influence of temperature. This applies to both metal and polypropylene lids. Make sure they are tightly closed before sterilization
[](https://shroomok.com/en/wiki/File:Jars-with-substrate-for-growing-psilocybin-mushrooms.jpg) Jars with substrate for further sterilization. Fill jars on 2/3 or 3/4.[](https://shroomok.com/en/wiki/File:Jars-with-substrate-for-growing-psilocybe-cubensis-mushrooms.jpg) Jars with substrate covered by lids with inoculation port and air filter
4️⃣ Wrap the lids of the jars with foil. So that water will not seep through the air filter on the lid during sterilization
[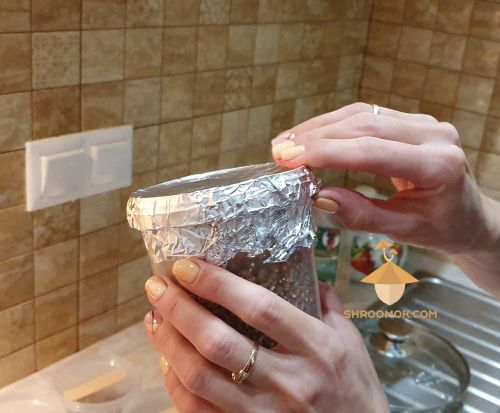](https://shroomok.com/en/wiki/File:Cover-lid-of-each-jar-with-foil.jpg) Wrap lids with foil[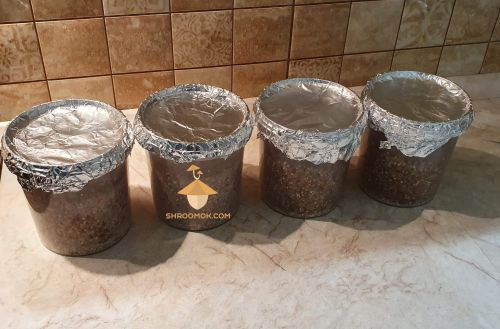](https://shroomok.com/en/wiki/File:Substrate-ready-for-sterilization.jpg) Substrate and jars ready for sterilization#### Grain substrate sterilization in multicooker, pressure cooker, autoclave
1️⃣ On the bottom of the pressure cooker (or multicooker) put a metal stand or cloth napkin. The jars and the bottom should not touch each other and less banging in the multicooker. This more concerned to glass jars, so that they do not break during sterilization
[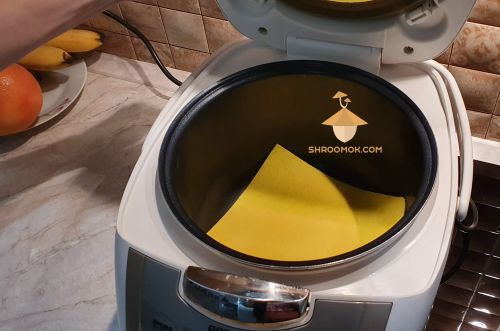](https://shroomok.com/en/wiki/File:Preparing-multicooker-for-substrate-sterilization.jpg) Preparing pressure cooker (multicooker) for substrate sterilization> ❗️If the jar cracks or breaks during sterilization, you can't use it for further inoculation!
2️⃣ Fill the multicooker (or pressure cooker) with water. The level of water should reach half of the jars or a little bit more. Just keep in mind that the water will boil and if you pour more water, the lids will be filled with water. We can't let it happen!
[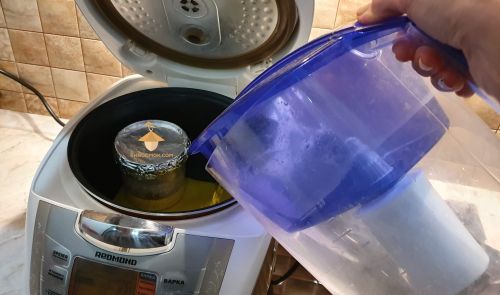](https://shroomok.com/en/wiki/File:Add-water-to-multicooker-for-substrate-sterilization.jpg) Fill the multicooker (or pressure cooker) with water for substrate sterilization
3️⃣ Put the jars in pressure cooker (autoclave, multicooker, instant pot).
Heat resistant polypropylene (5PP) jars with grain substrate for terilization in instant pot. Polypropylene jars can float because they lightweight. To prevent them from turning over, you can put a ceramic plate on top and close the lid of multicooker
[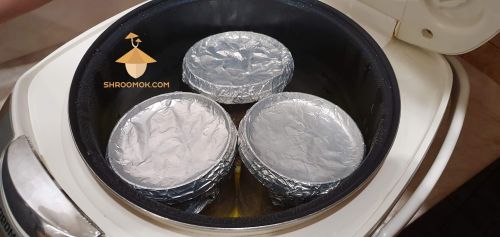](https://shroomok.com/en/wiki/File:Multicooker-for-sterilization-substrate-for-growing-psilocybe-cubensis.jpg) 5PP jars with grain substrate in instant pot (multicooker) for sterilizationGlass jars with grain substrate for sterilization in pressure cooker
[](https://shroomok.com/en/wiki/File:Grain-sterilization-for-mushroom-growing.jpg) Glass jars with grain substrate in pressure cooker for sterilizationAutoclavable 5PP grow bag with grain substrate for sterilization in pressure cooker
[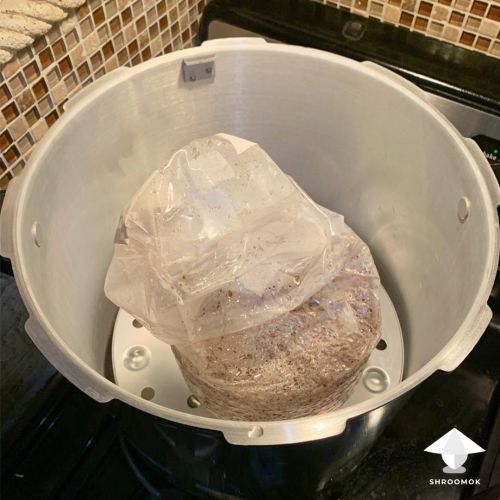](https://shroomok.com/en/wiki/File:Grow-bag-sterilization.jpg) Grow bag with grain substrate in pressure cooker
4️⃣ Set the temperature **250°F or +121°C** or **15 psi** for Pressure Cooker and Autoclave.
[](https://shroomok.com/en/wiki/File:Uatoclave-15-psi-mushroom-substrate-sterilization.jpg) Grain substrate sterilization in autoclave - **121°C or 250°F or 15 psi** - for mushroom grain spawn##### **Sterilization time** depends on the type of grain
⏰ Wheat berry, oats, barley, rye berry, BRF substrate, brown rice - 1 hour 30 minutes (15 psi)
⏰ Millet - 1 hour 20 minutes (15 psi)
⏰ Corn, popcorn, sorghum - 2 hours (15 psi)
##### **Sterilization duration** depends on the pressure and temperature
[](https://shroomok.com/en/wiki/File:Sterilization-pressure.jpg) Sterilization pressure/temperature and duration table> 🔴 **Pay attention!** The recommended temperature for grain sterilization **higher than +100°C or 212°F!** It gives more chances to destroy all bacteria and their endospores that still alive in grain 🔴 Sterilization is about bacteria contamination prevention, because mold spores die at 60°C or 140°F and higher during at least 30 minutes. However bacteria can withstand higher temperatures for longer
5️⃣ When sterilization is complete leave the substrate cool down slowly for at least 4-8 hours.
> ❗️Don't open PC, don't take the jars out immediately after sterilization is complete. Why?
⛔️ You can hurt yourself with hot steam.
⛔️ If you open the PC/Autoclave/Multicooker the glass jars can break because of the difference in pressure and temperature. Broken jars go straight to the trash. Polypropylene jars you can take out immediately, but it would be better to let them cool down a little without a sharp temperature changer
⛔️ Cold (not sterile air) come through air filter due to rapid temperature changes and pressure changes. It can provoke contamination in the future
6️⃣ When you take the sterile substrate out of the pressure cooker leave it to chill at room temperature. Jars/bags can be warm a little bit. **Do NOT remove the foil!**
[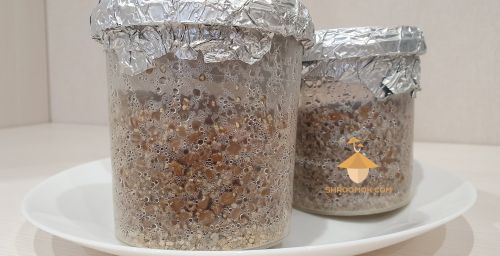](https://shroomok.com/en/wiki/File:Substrate-ready-for-inoculation-psilocybe-cubensis-spores.jpg) Sterile substrate ready for inoculation Psilocybe Cubensis spores[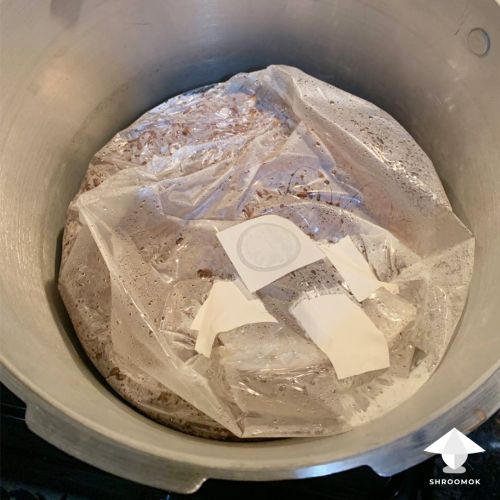](https://shroomok.com/en/wiki/File:Grain-substrate-in-bag-sterilization.jpg) Grain bag after sterilization in PC> Mild condensation can appear in jars/bags after sterilization. Don't worry, it's okay!
7️⃣ Repeat the same steps with the next bunch of jars/bags with grain substrate.
#### **Grain substrate sterilization without a pressure cooker or autoclave**
##### Grain sterilization in pot
Load jars in pot.
Add water (water level should be 1/2 of jars height).
Bring the water to boil. Close the lid.
Make heat treatment for 90-120 minutes.
Take out the jars. Let the grain cool down and wait for 24-48 hours.
Repeat heat treatment for the **same jars** with substrate for 90-120 minutes again.
Don't open the lid of pot. Let the jars cool down in pot.
Take out the jars. Be sure that jars cool down to room temperature.
Jars ready for inoculation!
##### How to make grain sterilization in the oven
This method is worst than heat treatment in pot, because grain usually dry out in the oven.
Sterilization in oven can be used for big grains like corn.
[](https://shroomok.com/en/wiki/File:Corn-for-mushroom-spawn.jpg) Corn grain for mushroom spawn> Wheat, rye, oats usually become too dry after oven sterilization
For corn sterilization in oven add 1 table spoon of water in each jar and close the lid. Cover each jar with foil.
Preheat oven at 150°C or 300°F.
Then load the oven with the jars sideways to have thiner water level we added before (extra 1 table spoon of water).
Leave the jars in the oven at 150°C or 300°F for 30 minutes.
After 30 minutes set the temperature 120°C or 250°F and sterilize for another 2 hours.
Turn off the oven, take out the jars. Let them cool till room temperature for about 8 hours.
Jars ready for inoculation!
##### Tyndalization
One more option if you don't have pressure cooker is *Tyndallization.* It is old school method and takes 3 days, but it works.
> *[Tyndallization](https://en.wikipedia.org/wiki/Tyndallization "wikipedia:Tyndallization")* essentially consists of heating the substance to boiling point 100°C or 212°F and holding it there for 15-30 minutes, three days in succession. After each heating, the resting period will allow spores that have survived to germinate into bacterial cells; these cells will be killed by the next day's heating.
If you are going to try tyndallization keep in mind you should start counting time after jar/bag with substrate reach max temperature **inside.** If you put jar with spawn inside boiling water it will take some time before center of jars reach required temperature. Use at least 30 minutes treatment.
#### Useful notes for grain sterilization process
✅ **Does it possible to sterilize substrate without a pressure cooker (PC)?** You can sterilize substrate in the oven. But PC/Autoclave is preferred because sterilization under pressure gives higher temperature in the substrate. Some mushroom growers sterilize jars with substrate just in a saucepan on the stove. This option is suitable for sterilizing secondary substrates (hay, coconut peat soil etc). Grain substrate requires higher sterilization temperatures to deal with bacteria. Therefore, in most cases, sterilization without a pressure cooker/multicooker leads to substrate contamination and all work done before will go to waste.
✅ **Make sure that the lids on the jars are tightly closed before and after sterilization.** It can happen that metal lids come loose and need to be tightened. If the lid is open at all (this happens with polypropylene lids), then the substrate must either be discarded or sterilized again.
✅ Ready **non-sterilized substrate in jars/bags can be stored in the refrigerator for 2-3 days.**
✅ Ready **sterilized substrate in jars/bags can be stored for 3-7 days before being inoculated.**
When all jars/bags cooled down to room temperature move on — [**STEP 6. Inoculation**](https://shroomok.com/en/wiki/Inoculation_without_glove_box "Inoculation without glove box") 🔽
## Inoculation without glove box
[Inoculation without glove box](https://shroomok.com/en/wiki/Inoculation_without_glove_box)
[](https://shroomok.com/en/wiki/File:Inoculating-grain-substrate.jpg) Step 6. Inoculation### **STEP 6. Day 2. How to inoculate sterile grain substrate in jars or bags**
At this point, you've already passed all previous steps:
- [liquid spore syringe](https://shroomok.com/en/wiki/Liquid_psilocybe_spore_syringe "Liquid psilocybe spore syringe")
- [choose and preliminary substrate preparation](https://shroomok.com/en/wiki/Choose_and_prepare_substrate_for_magic_mushrooms "Choose and prepare substrate for magic mushrooms")
- [cooking the substrate](https://shroomok.com/en/wiki/Cooking_the_substrate_for_psilocybes "Cooking the substrate for psilocybes")
- [jars for substrate and lids with inoculation port and air filter](https://shroomok.com/en/wiki/How_to_make_jars_with_substrate_for_mushroom_spawn "Jars for substrate")
- [sterile substrate](https://shroomok.com/en/wiki/Substrate_sterilization_before_adding_psilocybe_spores "Substrate sterilization before adding psilocybe spores")
Now you are ready to proceed with inoculation.
#### **What is inoculation?**
***Inoculation*** — is a process of introducing spores or mycelium culture to a sterile nutrient substrate. In our case we introduce liquid spore solution to sterile grain substrate.
#### **What is Liquid Spore?**
[Liquid spore syringe](https://shroomok.com/en/wiki/Liquid_psilocybe_spore_syringe "Liquid psilocybe spore syringe") is the simplest way of introducing spores into sterile substrate. It's not the fastest method in terms of mycelium growth in the substrate. However, it is the easiest and fastest way to start cultivation process for newbie mushroom grower.
Preparation of liquid spore solution is a basic skill that will be needed for other inoculation methods as well. This method we are going to use in this section — **inoculation of grain substrate with liquid spore syringe.**
#### **Video «Inoculating grain substrate with spore syringe»**
In the following clip I add antibiotic before grain substrate inoculation. Inoculation process took place without glovebox or SAB. [Watch video on Reddit](https://www.reddit.com/r/Shroomok/comments/si96f2/spore_syringe_or_liquid_culture_to_grain/)
**Now let's go over the details of the process!**
#### **List of required stuff for inoculation**
1️⃣ **Grower outfit:** face mask, gloves, medical cap, medical gown (or PE raincoat).
[](https://shroomok.com/en/wiki/File:Growers-outfit-for-mushroom-cultivation.jpg) Face mask, gloves, cap, gown**Shroomok's Choice on Amazon:** [10 Gloves and 1 Mask Bundle](https://www.amazon.com/gp/product/B0865SSK9T/ref=as_li_tl?ie=UTF8&tag=shroomok-20&camp=1789&creative=9325&linkCode=as2&creativeASIN=B0865SSK9T&linkId=25f3f5e17e1e3b8bc0728cd3e50f0be9) - $6.99
2️⃣ **Table sprayed with alcohol in a clean room.** Bathroom with mold on the walls, kitchen, basement etc. are not suitable! Prefer them a bedroom or living room with tightly closed windows and doors. There should be no drafts or open ventilation ducts or air conditioning during inoculation process.
3️⃣ **Ethyl alcohol (70%)** in spray bottle.
[](https://shroomok.com/en/wiki/File:Isopropyl-alcohol-spray.jpg) Ethyl alcohol in spray bottle**Shroomok's Choice on Amazon:**
[Isopropyl Alcohol 70% USP Grade - One Quart Spray](https://www.amazon.com/gp/product/B08LW5P844/ref=as_li_tl?ie=UTF8&tag=shroomok-20&camp=1789&creative=9325&linkCode=as2&creativeASIN=B08LW5P844&linkId=de58e8e2a98ad37b75f875c879a5e62e) - $21.99
[Isopropyl Alcohol 70% USP Grade - 4 X 1 Quart Spray Bottle](https://www.amazon.com/gp/product/B08LW5RG3M/ref=as_li_tl?ie=UTF8&tag=shroomok-20&camp=1789&creative=9325&linkCode=as2&creativeASIN=B08LW5RG3M&linkId=dc95b7299dfa32d934d9d355223dcfc5) - $45.00
4️⃣ **Antibiotic solution** (gentamicin or any analogue) or **Hydrogen Peroxide (H2O2) 3%** — **optional**
**Shroomok's Choice on Amazon:** [Amazon - Solimo Hydrogen Peroxide Topical Solution USP, 32 Fl Oz](https://www.amazon.com/gp/product/B07NFTM4ZY/ref=as_li_tl?ie=UTF8&tag=shroomok-20&camp=1789&creative=9325&linkCode=as2&creativeASIN=B07NFTM4ZY&linkId=4659633a55ce6fc7c433eb7e03dee3e6) - $4.49
5️⃣ **Ampoule cutter** or kitchen knife.
6️⃣ **Cotton disks.**
**Shroomok's Choice on Amazon:** [Cotton Rounds Organic, 100 Count](https://www.amazon.com/gp/product/B0747ZDVXS/ref=as_li_tl?ie=UTF8&tag=shroomok-20&camp=1789&creative=9325&linkCode=as2&creativeASIN=B0747ZDVXS&linkId=b718b93f2e81442c7d3260a0ee5404f6) - $2.56
7️⃣ **Jars with sterile substrate.** They should be chilled at room temperature.
8️⃣ **Sterile bactericidal patches** or **Micropore** or **Omnipore** — 1 patch per 1 jar.
**Shroomok's Choice on Amazon:**
[3M Micropore Tape 1530-1 (2 rolls) 1 x 10 yards](https://www.amazon.com/gp/product/B06XNP8J4R/ref=as_li_tl?ie=UTF8&tag=shroomok-20&camp=1789&creative=9325&linkCode=as2&creativeASIN=B06XNP8J4R&linkId=f560bc0e72ed7903f3f49d7d03e8b38d) - $4.50
[PATCH Eco-Friendly Bamboo Bandages Plastic Free, Zero Waste, Natural - 25 pcs.](https://www.amazon.com/gp/product/B079Q1737C/ref=as_li_tl?ie=UTF8&tag=shroomok-20&camp=1789&creative=9325&linkCode=as2&creativeASIN=B079Q1737C&linkId=bb12411d3e607b3ee366aa30e4afa42d) - $6.29
[Micropore Surgical Tape - 3m - 2" x 10 YD - 6 rolls](https://www.amazon.com/gp/product/B0082A9GS2/ref=as_li_tl?ie=UTF8&tag=shroomok-20&camp=1789&creative=9325&linkCode=as2&creativeASIN=B0082A9GS2&linkId=002675835f06b5070b42deeb3dc5867d) - $8.15
[Box of Flexible breathable bandages - 50 pcs.](https://www.amazon.com/gp/product/B08VR8YY8Q/ref=as_li_tl?ie=UTF8&tag=shroomok-20&camp=1789&creative=9325&linkCode=as2&creativeASIN=B08VR8YY8Q&linkId=1d81dce4b9ed29665c2177519b0ad0b9) - $11.99
9️⃣ **Liquid spore syringe.**
🔟 **Candle and/or lighter.**
1️⃣1️⃣ **Marker.**
#### **Why we add antibiotic to liquid spore before inoculation**
***Antibiotic*** — a class of natural and synthetic compounds that inhibit the growth or kill bacterial microorganisms.
Antibiotic has a bactericidal effect. It actively penetrates the bacterial cell membrane and thereby inhibits the protein synthesis of the pathogen. Thus, if bacteria got into liquid spore syringe with spores from the spore print they can be inhibited in the early stages with the help of antibiotic. Thus, we reduce the risk of developing a bacterial contamination during mycelium growth (colonization period).
The antibiotic is added 20-30 minutes before inoculation. It is not recommended to overexpose the liquid spore with the antibiotic. It acts not only on competing microorganisms. It can also radically affect the spores of psilocybin mushrooms. If an hour or two has passed, it's okay - go on, the necessary spores are quite tenacious.
We'd like to mention that an antibiotic can slow down the appearance of mycelium for several days. Don't worry if there is no mycelium in the jars by 4-6 days, it may appear by 10-14 days.
Once we had a forced experiment and had to leave the antibiotic in liquid spore for 3 hours. It didn't affect the spores and mycelium development in any way. It depends greatly on the quality of spores, viability, conditions and duration of their storage. Details and results in the [Growing Experiments](https://shroomok.com/en/wiki/Psilocybe_growing_experiments "Psilocybe growing experiments") section.
#### Does it possible to inoculate without antibiotic**?**
Yes, if you use a **sterile spore print** to prepare the liquid spore solution. In this case no need in the antibiotic. Some sellers guarantee the sterility of their spore prints.
If you are not sure you spore print is sterile, then an antibiotic is required.
As a result, you have 2 options to choose from:
1. Sterile spore print without antibiotic use.
2. Doubtful spore print with antibiotic use.
#### What antibiotic to use for liquid spore?
We use gentamicin solution for injection in the form of gentamicin sulfate, 40 mg/ml. Ampoule 2 ml.
In many countries antibiotics (gentamicin particularly) are available only by prescription. In this case, an analogue antibiotic is suitable, containing active substances with a similar mechanism of action and a similar release form (solution for injection).
**List of suitable antibiotics:**
- Aminoglycosides — amicacin, gentamicin, neomycin, streptomycin, tobramycin.
- Tetracyclines — tetracycline, lymecycline, doxycycline, tigecycline.
- Azalides — azithromycin.
- Cephalosporins — ceftriaxone.
- Lincosamides — clindamycin, lincomycin.
**If it is not possible to get an antibiotic try to buy sterile spore print, then an antibiotic is not required!**
#### Preparation for inoculating
1️⃣ Wash your hands and face.
2️⃣ Put on your outfit: face mask, gloves, cap, medical gown (or PE raincoat).
3️⃣ Wipe your gloved hands with alcohol (rub the alcohol well all over the gloves).
4️⃣ Wipe the entire table surface with alcohol (you can spray it on and wipe with a cotton pad).
5️⃣ Treat everything on your table with alcohol: jars with substrate, an ampoule with an antibiotic, liquid spore syringe, even a bottle with alcohol and everything on your table. Don't spare the alcohol!
6️⃣ Open the antibiotic ampoule.
7️⃣ Add 1 ml of antibiotic per 10 ml of liquid spore, no more! It's easy and convenient to measure this volume with the scale on the syringe.
8️⃣ Close the syringe cap.
9️⃣ Shake the syringe to mix liquid spore with antibiotic evenly.
🔟 Leave the liquid spore syringe with the antibiotic for 20-30 minutes. Then you can dilute the solution as described in the previous section [Liquid spore syringe](https://shroomok.com/en/wiki/Liquid_psilocybe_spore_syringe "Liquid psilocybe spore syringe") or start inoculation process immediately.
#### **Inoculation process step by step**
1️⃣ Treat everything with alcohol again: hands, table, syringes, jars etc.
[](https://shroomok.com/en/wiki/File:Inoculation-preparation-liquid-spore-of-psilocybin-mushrooms.jpg) Preparation to inoculation substrate with liquid spore of psilocybin mushrooms Psilocybe Cubensis
It's more convenient to use alcohol in a spray bottle. You can just pour the existing alcohol into such a bottle.
[](https://shroomok.com/en/wiki/File:Isopropyl-alcohol-spray.jpg) Ethyl alcohol in spray bottle
2️⃣ Put a jar with sterile substrate in front of you. Remove the foil from it. Do NOT touch or remove the patch on the lid!
3️⃣ Spray alcohol on the jar with substrate and inoculation port on the lid.
4️⃣ Take the liquid spore syringe and shake it. So that the spores are mix evenly in the water. Remove the cap from the syringe.
5️⃣ Light a lighter or candle. Heat the tip of the syringe needle over a candle until red.
[](https://shroomok.com/en/wiki/File:Needle-disinfection-under-fire-before-inoculation.jpg) Needle disinfection before inoculating grain substrate[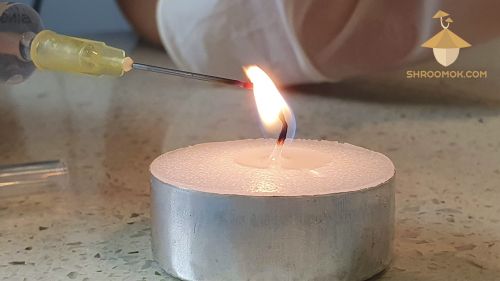](https://shroomok.com/en/wiki/File:Needle-on-fire.jpg) Needle tip over fire for disinfection before substrate inoculation
6️⃣ Dip the needle in alcohol and/or wipe the needle with a cotton pad soaked with alcohol. We need to do it not only for disinfection, but also cool down the needle.
[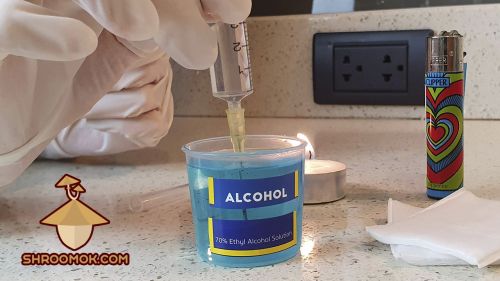](https://shroomok.com/en/wiki/File:Syringe-needle-disinfection-in-ethyl-alcohol-before-inoculation.jpg) Dip the needle in alcohol[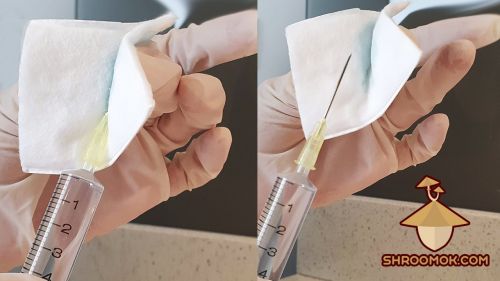](https://shroomok.com/en/wiki/File:Wipe-needle-with-cotton-pad-soaked-in-isopropyl-alcohol.jpg) Wipe syringe needle with cotton pad soaked in alcohol7️⃣ Insert the syringe needle through inoculation port (patch). Inject the liquid spore (1-1,5 ml per each jar). **Make sure the tip of the needle does NOT touch the grain!**
[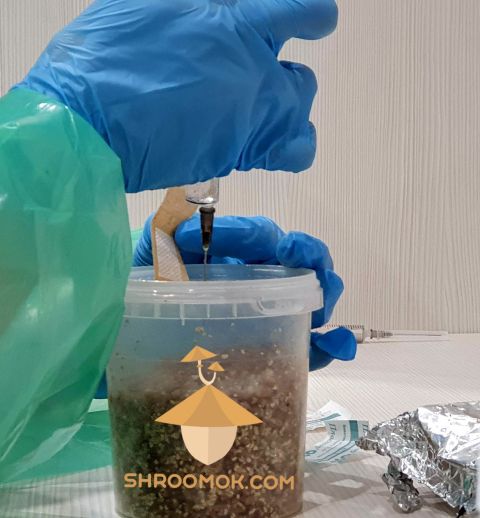](https://shroomok.com/en/wiki/File:Inoculation-process.jpg) Inoculation substrate with liquid spore syringe
8️⃣ Take the syringe out of the jar. Spray on the needle with alcohol and put on the protective cap.
9️⃣ Cover injection port with breathable bactericidal patch after inoculating. If the inoculation port is made of self-healing butyl rubber, then no need to cover it.
🔟 Gently shake the jar in one plane to spread the spores evenly over the substrate.
1️⃣1️⃣ Sign the strain of psilocybin mushrooms on the jar, put the date of inoculation, your special notes (e.g. experiments).
🔥 Be careful with fire and alcohol. Observe fire safety! 🔥
Repeat inoculation steps with each jar and liquid spore syringe.
Remember to disinfect the syringe needle with alcohol and over the fire **before each inoculation.**
**You can skip disinfection steps with fire. This is for extra treatment. It will be enough just to treat the syringe needle with alcohol before each inoculation.**
All inoculated magic jars should be placed in a totally dark, warm (+27..+29°C or 80-84°F) and dry place after inoculation. We need to make an incubator for such conditions. In incubator mycelium enjoy its vegetative period and devour everything it can reach.
#### **Other Inoculation methods**
✅ **[Liquid Culture (LC or Liquid Mycelium)](https://shroomok.com/en/wiki/How_to_make_mushroom_Liquid_Culture "How to make mushroom Liquid Culture")** — a technique of germinating spores and growing out cloned mycelium for use as inoculant.
Typically a simple 4% sugar solution such as dextrose, maltose, or honey is used. For this method you also need to make spore syringe.
Liquid culture has a higher vitality than the liquid spore solution. A lot of raw material can be prepared from it by multiplying it in nutrient solutions. The process of substrate colonization when inoculated with liquid culture starts faster and develops more actively. But the process of preparing a liquid culture is more laborious and takes time for mycelium development in a liquid nutrient medium.
✅ **[Grain to Grain transfer (G2G)](https://shroomok.com/en/wiki/Grain_to_Grain_Transfer_(G2G) "Grain to Grain Transfer (G2G)").** Inoculation of sterile grain by already colonized grain (grain spawn).
This method requires good sterility or using [SAB (still air box)](https://shroomok.com/en/wiki/Still_Air_Box_for_Mycology "Still Air Box for Mycology"). The process of grain colonization is fast and active. But to implement this method, there must be ready spawn grain.
✅ **Agar to Grain.** Agar — an extract from a Malt Seaweed (MEA) or potato dextrose (PDA) used to solidify in a Petri or slant grow media. The agar used in mushroom cultivation is usually available in powder and using sterile preparation poured into a petri dish or slant for spores to be inoculated in culture growing.
✅ Agar inoculation is carried out directly with spores from a **spore print (Spore Swabs to Agar)**, by **Liquid Culture (LC)**, by **transferring agar with mycelium to a new Petri dish** with agar, or by **mushroom cloning**.
Agar medium helps to identify the segmentation of different types of mycelium growth **(rhizomorphic and tomentose)**, to carry out selection, improve strains and isolate new strains from multispore.
Such processes require ideal sterile conditions, specific skills and understanding of basic mycological principles.
All these methods should be tried and mastered by every self-respecting mushroom cultivator to reach new level in mushroom cultivation. This methods applies not only psilocybin mushrooms, but also gourmet and medicinal mushrooms: cordyceps, lion's mane, reishi, maitake and others.
This is incredibly interesting part of mycology!
**All of these techniques will be demonstrated in additional sections to this guide for advanced level cultivators.**
But now let's move to the next step — [**STEP 7. Day 3 - 14. DIY Incubator. Colonization period**](https://shroomok.com/en/wiki/Magic_mushrooms_incubator_control "Magic mushrooms incubator control") 🔽
## Magic mushrooms incubator control
[Magic mushrooms incubator control](https://shroomok.com/en/wiki/Magic_mushrooms_incubator_control)
[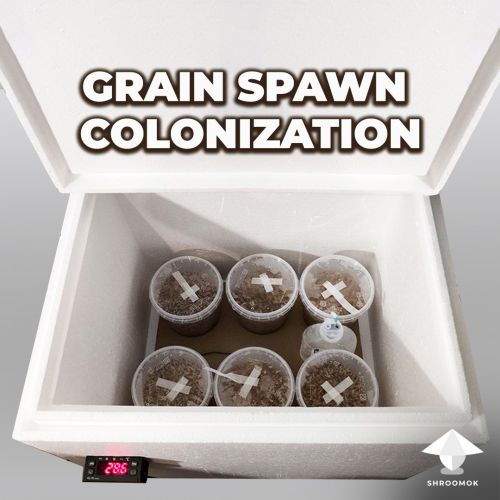](https://shroomok.com/en/wiki/File:Incubator-spawn-grain-colonization-period.jpg) Grain substrate colonization and simple incubator for mushroom growing. Problems during colonization period### **STEP 7. Day 3 - 14. Incubator for psilocybin mushrooms. Colonization conditions. Colonization problems**
After [inoculation](https://shroomok.com/en/wiki/Inoculation_without_glove_box "Inoculation without glove box") you need to prepare incubator for the first step of growing psilocybin mushrooms — **colonization period.** This will help mycelium formation and successful colonization of the substrate.
Those who are just starting their way in growing mushrooms make a lot mistakes, in particular — not observing the temperature. Temperature decrease in 4-5 degrees from the recommended temperature abruptly stops or completely stops the mycelium growth.
The right temperature can be achieved in an incubator.
#### **Stages of psilocybin mushrooms cultivation**
Let me remind you that the whole process of cultivation psilocybin mushrooms is divided into **2 main stages:**
1️⃣ **Colonization period (first 2-4 weeks).** It is vegetative phase when mycelium of psilocybin mushrooms is formed. This mycelium grab the nutrient substrate in the jars or spawn bags. We need an incubator for this phase.
2️⃣ **Fruiting** **and harvesting period (next 6-8 weeks after colonization period).** It is a phase of pinhead and primordia formation, mushrooms fruit bodies growth and harvesting. We need a [growbox (aka fruiting chamber)](https://shroomok.com/en/wiki/DIY_Grow_Box_for_Magic_mushrooms._Fruiting_conditions "DIY Grow Box for Magic mushrooms. Fruiting conditions") for this phase.
#### **Incubator vs Growbox. What is the difference between incubator and growbox?**
Very often newbies confuse an incubator with a growbox. That's why there is misunderstanding with the necessary conditions.
Growing conditions for each period are different. Let's sort it out right!
✅ **Incubator for mushrooms** — is a special box or cabinet used at the first stage of growing - **colonization period** of growing mycelium. In the incubator should be:
- **WARM** - it is simulation of hot dry season in a wild. The temperature is maintained at +27°...+29°C or 80-84°F. If it is lower - mycelium won't grow. If higher - it harm mycelium or substrate will be covered with a dense mycelium called [overlay](https://shroomok.com/en/wiki/Psilocybe_growing_problems_-_overlay,_abortions,_etc "Psilocybe growing problems - overlay, abortions, etc").
- **DRY** - low relative humidity, about 30-55%. In fact, it's room humidity without additional humidification. So that, we simulate a period of drought in nature.
- **DARK** - no light at all. Light can be harmful for mycelium during colonization period. Mycelium must "think" that it's natural underground conditions.
🔴 **Growbox (aka fruiting chamber) for mushrooms** — is a special box used at the second stage of growing - **fruiting period** of mushrooms growing - after incubator. In the growbox should be cool (+21°...+23°С or 70-73°F), high relative humidity (85-99%), diffused natural light or LED light (12-16 hours).
Misunderstanding and confusion, particularly with the temperature mode, is so common that some newbies criticize us for our advises. Like: it shouldn't be such a high temperature, in other guides and forums write otherwise.
Another part of the newbies often complains that he did everything according to the guides, keep the jars at a temperature of +21°...+23°C or 70-73°F, and mycelium does not grow at all or develop too sluggish and slow.
In fact, the confusion comes from misunderstanding and ignorance of the separation of growing periods. As a result, misunderstanding with growing conditions for each period.
**Dear Friends! These stages and different conditions for each stage were invented not by us, but by Nature thousands and thousands years ago.** To understand why the cultivation of psilocybin mushrooms is arranged in this way, it is enough to analyze the conditions of tropical and subtropical climates. The places where most of the strains of psilocybin mushrooms come from. Even their names speak for themselves: Mexican, Brazil, Amazonian, Hawaii, Thai, Cambodian, Nepal, Argentina, Panaeolus Cambodginiensis, Panaeolus Cyanescens Jamaica and others.
Therefore, a higher temperature **+27°...+29°C or 80-84°F is needed for colonization** period and it encourages vegetation. Thus, we mimic the hot dry period of the tropics/subtropics for the fungus. During this period mycelium develops in moist soil underground or in moist grain substrate in our jars.
While **for fruiting period, we decrease the temperature to +21°...+23°C or 70-73°F** and simulate a long rainy season with high humidity in the growbox and rehydration. Thus we phase out the vegetative growth of the fungus and provoke it to the pinhead and mushrooms formation. In the imitation of such conditions we are helped by a growbox. For the mushroom, damp air after a rain and a drop in temperature is a sign that it is time to release spores, and to do this it is necessary to form the mushroom fruit body.
We'll figure out how to make a growbox and provide the necessary conditions for fruiting in the [DIY Grow Box for Magic mushrooms](https://shroomok.com/en/wiki/DIY_Grow_Box_for_Magic_mushrooms._Fruiting_conditions "DIY Grow Box for Magic mushrooms. Fruiting conditions") and [Pinhead initiation and Growing parameters](https://shroomok.com/en/wiki/Fruiting_period._Pinhead_initiation,_mushroom_pinning_and_mushrooms_growth_parameters "Magic mushrooms fruiting") sections.
**But now substrate in the jars after inoculation needs an INCUBATOR!**
#### How to make simple Incubator for Psilocybin mushroom growing
As an incubator could be a closet, any cardboard box, cabinet, a plastic box, an old refrigerator, a bedside table, just a corner near radiator or even a shelf in your closet.
1️⃣ In our case, it is an ordinary cardboard box, which is completely closed, so that there is no light access. It is wrapped with bubble wrap inside to retain heat.
[](https://shroomok.com/en/wiki/File:Incubator-for-growing-psilocybin-mushrooms.jpg) Cardboard box with bubble wrap as an incubator for growing psilocybin mushrooms[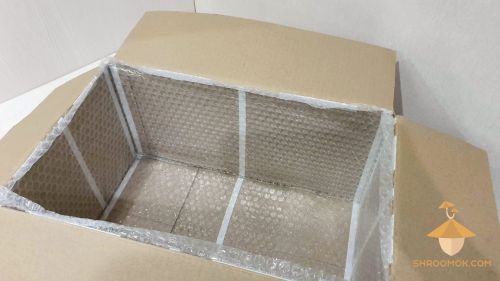](https://shroomok.com/en/wiki/File:Incubator-mushroom-cultivation.jpg) Simplest way to make incubator for colonization period
Styrofoam box as incubator for mushroom cultivation.
[](https://shroomok.com/en/wiki/File:Incubator-for-mushroom-colonization.jpg) Styrofoam box as incubator for mushroom cultivationCabinet shelf or cupboard shelf as incubator for mushroom colonization period in hot summer period.
[](https://shroomok.com/en/wiki/File:Spawn-jars-in-incubator.jpg) Cabinet shelf or cupboard shelf as incubator for mushroom colonization period
2️⃣ Place heater in incubator. For example, shoe dryer, thermal cord, electric spirals or any other option to maintain the incubator temperature **+27°..+29°C or 80-84°F. Optimal temperature is +28°C or 82°F.**
[](https://shroomok.com/en/wiki/File:Heater-for-incubator.jpg) Heater examples for incubator**Shroomok's Choice on Amazon:**
[Heater for incubator and Boot Dryer](https://www.amazon.com/gp/product/B01M5IXYXP/ref=as_li_tl?ie=UTF8&tag=shroomok-20&camp=1789&creative=9325&linkCode=as2&creativeASIN=B01M5IXYXP&linkId=339dd760d64a8b1b8a9b9f8fe84a93a0) - $15.99
[Heater for simple incubator and Shoe Dryer](https://www.amazon.com/gp/product/B010A5JBPO?&linkCode=ll1&tag=shroomok-20&linkId=f9cd3cca6694934e575c10cd4e7d7a4b&language=en_US&ref_=as_li_ss_tl) - $50.23
Any mat heater (silicone mat heater, heat mat for terrarium, floor mat heater, plant and seed warming mat, hydroponic heating pad for indoor seedling and germination), animals bed heater, any household heater or any heating element, сorner near radiator or even your cat.
[](https://shroomok.com/en/wiki/File:Heating-mat-for-incubator.jpg) Heating mat for incubator**Shroomok's Choice on Amazon:**
[Heat Mat and Digital Thermostat Combo Set - different sizes](https://www.amazon.com/gp/product/B016MKY7C8?&linkCode=ll1&tag=shroomok-20&linkId=31afde607fdc427e3c0a4bc71b943fa4&language=en_US&ref_=as_li_ss_tl) - $29.99
> 🔴 The heater may not be needed at all. It depends the season of the year and temperature conditions at home
3️⃣ Add thermometer to monitor the temperature. At first, we used an ordinary household thermometer (white on the photo), but this is not convenient.
[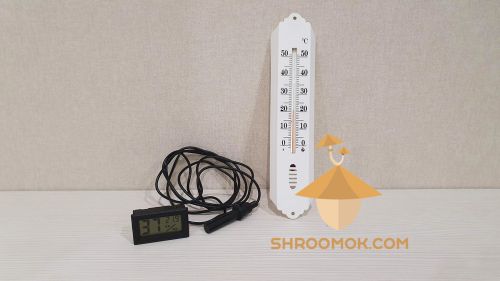](https://shroomok.com/en/wiki/File:Thermometer-and-hygrometer-for-psilocybe-cubensis-incubator-and-growbox.jpg) Thermometer for incubator for colonization step of growing magic mushroomsEvery time for checking the temperature we need to open the incubator. The temperature in incubator quickly decrease to room temperature. It was quite inconvenient for us and not good for mycelium.
That's why we recommend to use external electronic thermometer with hygrometer. The hygrometer will be very helpful later to control the humidity in the grow box. Or use Digital devices all-in-one.
[](https://shroomok.com/en/wiki/File:Thermometr-with-hygrometr-for-incubator-and-growbox.jpg) Thermometr and hygrometr for incubator**Shroomok's Choice on Amazon:**
[Bluetooth Digital Hygrometer, Thermometer with Remote App](https://www.amazon.com/gp/product/B07Y36FWTT/ref=as_li_tl?ie=UTF8&tag=shroomok-20&camp=1789&creative=9325&linkCode=as2&creativeASIN=B07Y36FWTT&linkId=244415a8d89f306fb2c96ecc7f6b961f) - $12.99
Or more complicated devices with CO2 detector. They are more expensive, but show the whole picture of air quality. Will be useful for fruiting period in the future.
[](https://shroomok.com/en/wiki/File:Digital-CO2-sensor-air-quality-detector.jpg) All-in-One: Air Monitor Detector**Shroomok's Choice on Amazon:**
[Digital Air Quality Monitor - Temperature, Humidity, CO2](https://amzn.to/44bNq4P) $45.99
Here is a simple DIY incubator box after inoculating the first batch of substrate.
[](https://shroomok.com/en/wiki/File:Incubator-for-growing-psilocybe-cubensis.jpg) Incubator for colonization step of growing psilocybin mushrooms Psilocybe Cubensis4️⃣ Put all jars in it after [inoculation](https://shroomok.com/en/wiki/Inoculation_without_glove_box "Inoculation without glove box"). Put the heater, thermostat and air quality sensor or thermometer inside the box as well.
[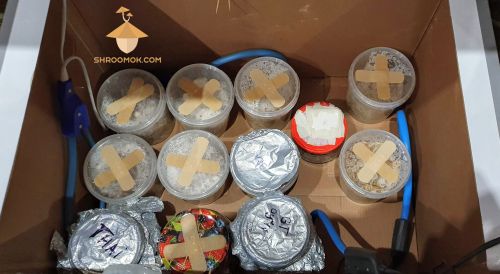](https://shroomok.com/en/wiki/File:Incubator-with-inoculated-substrate-psilocybe-cubensis-growing.jpg) Incubator with inoculated substrate. Colonization phase of growing psilocybin mushrooms Psilocybe Cubensis> ❗️**Heater or Heat Mat shouldn't contact with jars directly!**
5️⃣ Close the incubator to ensure dark and warm conditions in it. You can cover the incubator with a towel or blanket. It depends on season of the year and your temperature conditions at home.
**Incubator is ready!** All the fuss is behind. Now it's time for patience and observation. Control incubator conditions and just wait.
#### How to make Incubation Chamber with automated temperature control for mushroom growing
[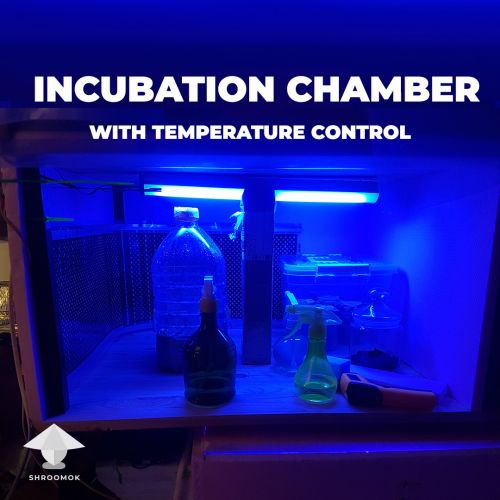](https://shroomok.com/en/wiki/File:Incubation-chamber-with-temperature-control-for-mushroom_growing.jpg) Incubator with automated temperature controlIncubator with thermostat for those who want to make great automated chamber for colonization period and use it for a long time
> 🔴 Check out guide: [How to build automatic incubation chamber for mushrooms](https://shroomok.com/en/wiki/How_to_build_automatic_incubation_chamber_for_mushrooms "MrZimm:How to build automatic incubation chamber for mushrooms")
#### **Peculiarities of colonization period**
At this stage, your main task is to keep a close eye on the temperature in the incubator. Starting from the 3rd day after inoculation carefully check the jars for the presence of mycelium or any other living creatures (look and smell).
Be careful with the jars at the very beginning. Excessive shaking can be harmful for mycelium and significantly prolong colonization period.
**How long does it take to fully colonize the substrate?** From 2 to 3 weeks after inoculation mycelium completely covers the entire substrate in the jars (if all necessary conditions are met).
COLONIZATION MUST PROCEED AS RAPIDLY AS POSSIBLE TO PREVENT OTHER ORGANISMS FROM BECOMING ESTABLISHED.
**When can you observe the first signs of mycelium?** In 5-7 days after inoculation you may notice the first signs of fungal life. If you used an antibiotic in a liquid spore, this process can take up to 10-14 days.
Here you can see the first signs of mycelium. 5 days after inoculation. Psilocybe Cubensis Thai on wheat substrate.
[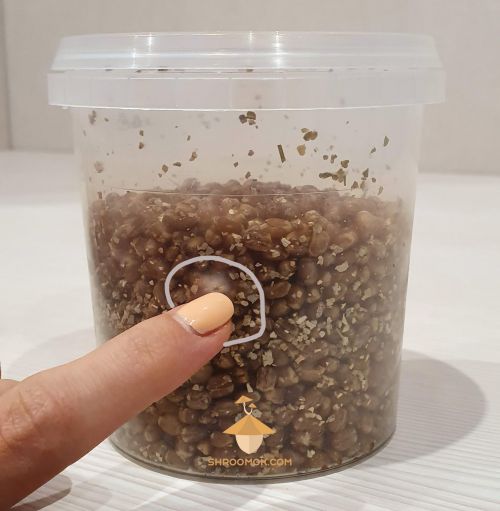](https://shroomok.com/en/wiki/File:Mycelium-psilocybe-cubensis.jpg) First signs of Psilocybe Cubensis mycelium on wheat substrate. Thai strain. 5 days after inoculation
**The results of the experiment "Antibiotic in liquid spore syringe 3 hours"!**
Mycelium in the jar with antibiotic (overdue 3 hours in liquid spore) appeared on the same day as the rest of the jars. To be exact on the 6th day after inoculation. Dynamic of grain coverage by mycelium with no difference from the other representatives.
In our case, antibiotic overexposure had no effect on mycelium overgrowth. Anyway, I don't recommend overexposing the antibiotic in the liquid spore more than one hour!
[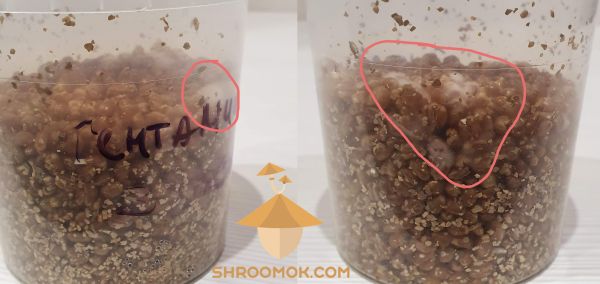](https://shroomok.com/en/wiki/File:Mycelium-gentamicin-experiment.jpg) Mycelium after antibiotic overexposure (3 hours in liquid spore)```
```
The first signs of Psilocybe Cubensis Golden Teacher appeared on the 6th day after inoculation (wheat substrate).
[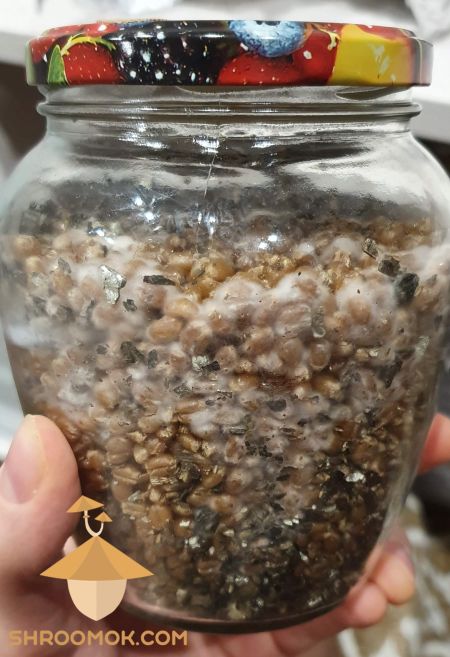](https://shroomok.com/en/wiki/File:First-mycelium-psilocybin-cubensis-golden-teacher.jpg) First mycelium on wheat berry substrate. Psilocybe cubensis Golden Teacher. 6 days after inoculation
The first signs of Psilocybe Cubensis Brazil, 7th day after inoculation (oat substrate).
[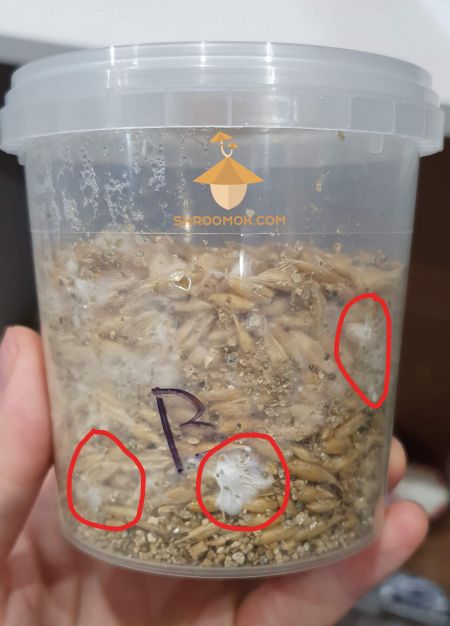](https://shroomok.com/en/wiki/File:First-mycelium-psilocybe-cubensis-brazil.jpg) First mycelium on whole oats substrate. Psilocybe cubensis Brazil. 7 days after inoculation with spore syringe
Mycelium covered 50-60% of the grain in 10 days after inoculation. As you can see, the mycelium covers the grain unevenly. It is mainly concentrated at the points where the liquid spore fell during inoculation. Therefore, it's time to shake such jars.
[](https://shroomok.com/en/wiki/File:Mycelium-on_substrate-psilocybe-cubensis-growing.jpg) Mycelium on wheat substrate. Psilocybe cubensis. 9-10 days after inoculation[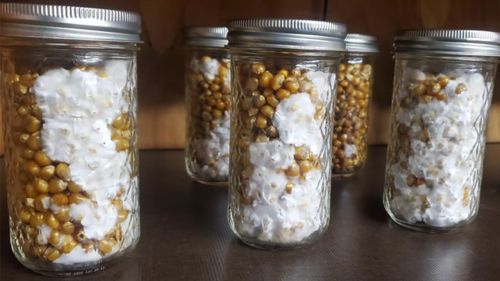](https://shroomok.com/en/wiki/File:Corn-mushroom-spawn.jpg) Mushroom spawn on corn[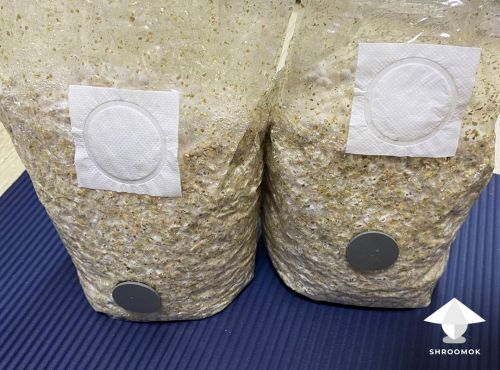](https://shroomok.com/en/wiki/File:Spawn-bag-colonization.jpg) Spawn bag colonization[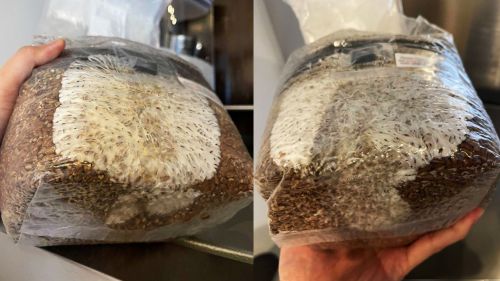](https://shroomok.com/en/wiki/File:Spawn-bag.jpg) Mycelium colonization on rye in spawn bag#### **Why do you need to shake the jars?**
It is necessary to spread mycelium evenly throughout the whole substrate. Uncovered grain cannot be used in the future. Without mycelium it will become sour and mold will settle on it.
**When we need to shake the jars?** When 50-70% of the substrate is already covered with mycelium. At this stage mycelium is already strong enough. If you shake it earlier (20-30%) - mycelium can be very weak, it will not survive after shaking and can stop its growth.
**How to shake?** Take a jar and methodically tap it on all sides with your palm or fist. You need to ensure that the mycelium clot breaks into individual grains and mixes evenly with uncovered substrate. This will be quite problematic if there are more than 3/4 of the grain in the jar. This is the main reason why we fill the jars no more than 2/3 or 3/4.
After shaking the grain, it may seem that there is no mycelium in the jars at all, but don't worry, it's ok. In 2-3 days mycelium completely fill all substrate in the jar.
[](https://shroomok.com/en/wiki/File:Substrate-with-mycelium-after-shaking-.jpg) Spawn jar after shakingIf the mycelium evenly covered the substrate then don't shake it. Here is an example of such jars below (strain F+):
[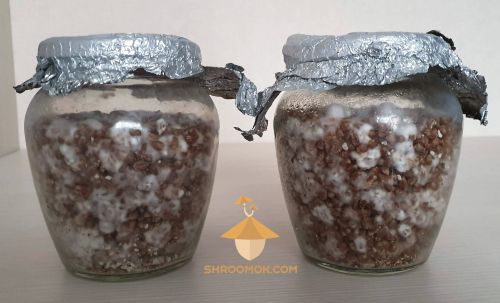](https://shroomok.com/en/wiki/File:F%2B-psilocybe-cubensis-mycelium.jpg) Mycelium on wheat substrate. Psilocybe cubensis, F+ strain. 10 days after inoculation### **Growing problems during colonization period**
**There are 2 main causes of growing problems in the colonization phase:**
1. Contamination.
2. Improper colonization conditions.
**The main types of psilocybin mushrooms contamination are:**
1. Bacteria.
2. Molds and parasitic fungi.
3. Viruses.
In this section, we share the most common problem cases in the colonization phase.
Check out our full guide of all possible contaminants and growing problems on all stages of mushroom cultivation in the Contams & Troubleshooting section
> 🔴 [Contaminations & Troubleshooting Guides](https://shroomok.com/articles:mushroom-growing-troubleshooting)
Now let's figure out what could go wrong during the colonization period.
#### Main causes of Bacterial contamination. How to recognize bacterial contamination
🔴 **Overcooked grain substrate** and improper conditions of [substrate cooking](https://shroomok.com/en/wiki/Cooking_the_substrate_for_psilocybes "Cooking the substrate for psilocybes"). As a result, the substrate can become sour. A small amount of overcooked and fully expanded grains can be handled by the psilocybe mycelium. If, however, bacterial contamination takes over the overcooked areas - throw away the whole jar! There is no chance to save it!
[](https://shroomok.com/en/wiki/File:Tenderized-substrate-psilocybe-cultivation-problem.jpg) Overcooked grain substrate for psilocybin mushrooms causes bacterial contamination. Many grains are opened and very wet
🔴 **Excessive moisture** in the substrate can cause bacterial and mold fungus contamination. A clear indication of excessive moisture is drips where the grains touch the jar, water drips and large drops above the substrate. Normal substrate moisture is considered to be the presence of light misting/sparking/fogging/aerosol in the jar.
[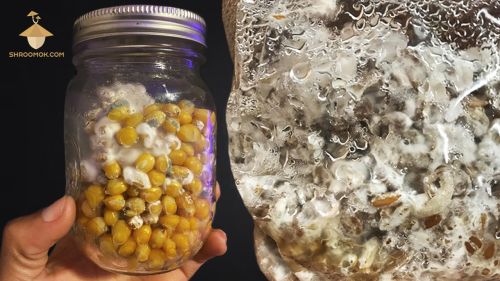](https://shroomok.com/en/wiki/File:Bacteria-wet-substrate-and-psilocybe.jpg) Too wet substrate causes mold contamination and bacterial contaminationIf the substrate is still healthy this situation is solved by shaking the jar. If there is enough vermiculite at the bottom of the jar (at least 5 mm), it will absorb excess moisture. That's why we recommended to cover the bottom of the jar with a layer of dry vermiculite, and then put the substrate in the jar (check the [Substrate sterilization](https://shroomok.com/en/wiki/Substrate_sterilization_before_adding_psilocybe_spores "Substrate sterilization before adding psilocybe spores") section).
However, if on the substrate, around the drips and on the bottom of the jar you can see cloudy bacterial halos, mold, or appeared barely perceptible sour-sweet smell from the air filter - throw it away!
🔴 **Slime on the mycelium or substrate** is a common sign of bacterial contamination. Yellow-gray-brown mucous rings are often formed in the areas where the substrate touches the jar and condensation is present. A gel like fluid or crust may be found, which is also a bacterial contamination sign. Move to trash such exhibits immediately!
The most common species is the Bacillus subtilis. It is the most resistant to high sterilization temperatures. As well as Bacillus cereus and other strains.
[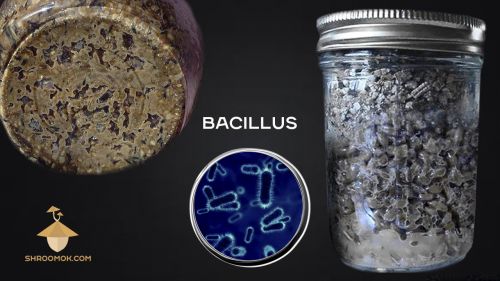](https://shroomok.com/en/wiki/File:Bacterial-contamination-bacillus-and-psilocybe.jpg) Bacterial contamination. Bacillus spp. Yellow, grey and brown slime in the substrate. Sweet-sour smell from air filter
🔴 **The odors in incubator** is a clear sign that one of the jars has to be thrown away. You open your incubator and you feel there's a spy somewhere. You should smell all air filters to check all jars for any odors that are **differ from the smell of forest mushrooms.**
If through the air filter you feel a smell of something **fermented/rotted/cider/sweet and sour/stale/ yeasty/smell of dirty socks** — those are clear signs of bacterial contamination, specifically Bacillus subtilis. Such jar should be trashed immediately to avoid contamination spreading to neighbor jars.
🔴 **Metabolites (aka mushroom exudate or mushroom piss).** It is a yellow-orange liquid without any odors. It is a natural immunity reaction of mushrooms to bacteria or any other competitors. Metabolites is not a contamination itself, but their presence means that mycelium struggle with competitive microorganisms.
[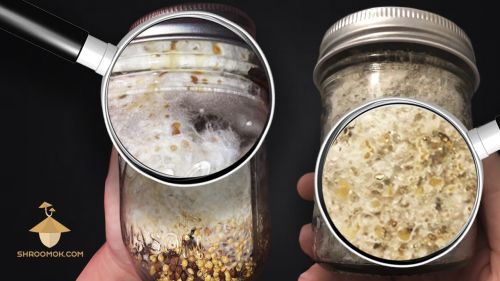](https://shroomok.com/en/wiki/File:Metabolites-psilocybe.jpg) Yellow, orange liquid on the mycelium. Mushroom metabolites (aka mushroom exudate or mushroom piss)Here I can reassure you. Presence of metabolites is not a reason to throw the jar away. Mycelium of psilocybin mushrooms can successfully deal with mild contamination. But if metabolites are accompanied by subsequent color/smell changes in the substrate and mycelium - alas, you have to say goodbye to such jar.
🔴 **Mycelium sectoring.** In this way, bacteria/molds and psilocybe mycelium can temporarily share territory and useful nutrients in the substrate. Since we are dealing with two different microorganisms that compete with each other, usually clear boundaries form between them where they cross (sectors). The bacterial contamination will look more dull and faded (beige-gray color) compared to the bright snow-white mycelium of psilocybe mushrooms. Unfortunately, you need toss such jar!
[](https://shroomok.com/en/wiki/File:Sectoring-bacteria-and-psilocybe.jpg) Sectoring: 1 - psilocybe mycelium, 2 - bacterial contamination
**How to prevent bacterial contamination?**
The cause of any bacterial contamination is neglect and improper preparation conditions for substrate.
Any bacterial contamination is the way to trash. It's impossible to treat it. But you can prevent cultivation problems are listed above. How?
We always recommend to soak grain for 24 hours, use an antibiotic or hydrogen peroxide solution in [Substrate preparation](https://shroomok.com/en/wiki/Choose_and_prepare_substrate_for_magic_mushrooms "Choose and prepare substrate for magic mushrooms") section, follow exactly [Cooking substrate](https://shroomok.com/en/wiki/Cooking_the_substrate_for_psilocybes "Cooking the substrate for psilocybes") section and thoroughly make [Substrate sterilization](https://shroomok.com/en/wiki/Substrate_sterilization_before_adding_psilocybe_spores "Substrate sterilization before adding psilocybe spores") - all these steps is a key to healthy and successful magic mushroom crop.
#### **How to recognize mold contamination**
🔴 Molds contamination is the most common failure in mushrooms cultivation, especially on the first attempts. How to identify molds during colonization period? Main signs of such contamination are:
⛔️ **Texture changes.** The presence of a powdery texture or powdery layer that coats the substrate or mycelium distinguishes mold from bacterial souring.
⛔️ **Color changes.** **Blue-green, green, olive, violet, red, pink, orange, brown, gray, black spots** on the substrate and mycelium are different kinds of mold. If you see it in a jar, throw it away immediately! Toss it with the jar, without opening!
Don't allow molds to spread in the air! Even if near mold there is healthy psilocybe mycelium in the jar - it's impossible to take healthy mycelium away and throw contaminated parts away! Mold spores spread easily and imperceptibly over the substrate, psilocybe mycelium, in the air, and on surfaces. Throw the whole jar away immediately to avoid contaminating neighboring jars!
**The following molds appear most often on the substrate:**
💢 **Blue-green mold is the Penicillium fungus.** One of the most widespread species. We can often see this mold on fruits and bakery. Some of its species are used in cheese-making. It is not toxic to humans.
[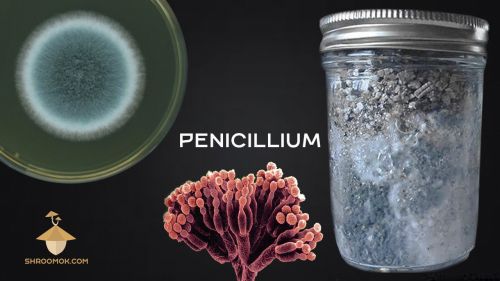](https://shroomok.com/en/wiki/File:Pennicilium-mold-and-psilocybe-mushrooms.jpg) Psilocybe mycelium contamination with blue-green mold Penicillium
💢 **Green mold is Trichoderma (Trichoderma viride particularly).** At first it forms a powdery or cotton-ester mass of white color. As the spores mature, they turn green. It is also called forest mold because of its ability to break down cellulose. There are about 15 other species of Trichoderma. Although, Trichoderma is less common indoors, but spores are quite aggressive. Which makes it one of the most common contamination in mushroom cultivation. It is not toxic to humans.
[](https://shroomok.com/en/wiki/File:Trichoderma-viride-and-psilocybe.jpg) Psilocybe mycelium contamination with green mold Trichoderma viride
💢 **Black mold is black Aspergillus.** Black mold can be found on the walls of damp rooms. It is toxic and causes human, animal and plant diseases. This mold usually very visible, it can't be confused with anything. As soon as you see it, throw the jar away immediately. Don't endanger other jars and your own health.
[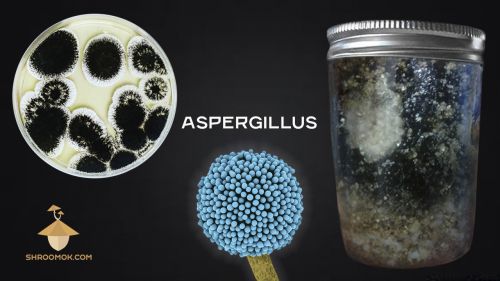](https://shroomok.com/en/wiki/File:Aspergillus-contamination-and-psilocybe.jpg) Psilocybe mycelium contamination with black mold Aspergillus.[](https://shroomok.com/en/wiki/File:Black-mold-aspergillus-niger-on-psilocybin-mycelium.jpg) Black mold Aspergillus on the psilocybe cubensis mycelium[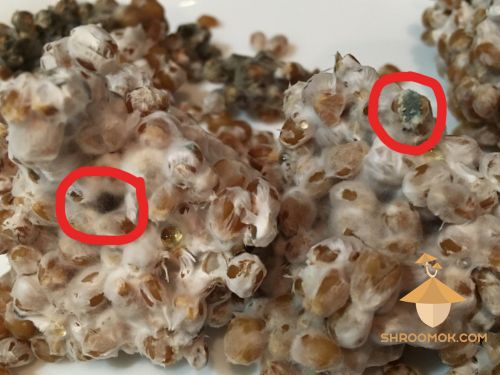](https://shroomok.com/en/wiki/File:Black-and-green-mold-on-psilocybin-mycelium.jpg) Black mold Aspergillus (to the left) and green mold (to the right) on the psilocybe cubensis mycelium**Causes of mold contamination and how to prevent molds**
Typically, molds contamination appear due to POOR STERILITY and neglect substrate preparation steps: [Substrate preparation](https://shroomok.com/en/wiki/Choose_and_prepare_substrate_for_magic_mushrooms "Choose and prepare substrate for magic mushrooms") section, [Cooking substrate](https://shroomok.com/en/wiki/Cooking_the_substrate_for_psilocybes "Cooking the substrate for psilocybes") section and [Substrate sterilization](https://shroomok.com/en/wiki/Substrate_sterilization_before_adding_psilocybe_spores "Substrate sterilization before adding psilocybe spores").
Only patience, pressure cooker and sterility!
> 🔴 Check out more guides: [Mushroom Growing Troubleshooting](https://shroomok.com/articles:mushroom-growing-troubleshooting)
#### **Mistakes and Improper colonization conditions**
🆘 **Why I can't get my mushroom to colonized? No signs of mycelium growth in 10-14 days after inoculation. Why mycelium grow too slow?**
The most probable causes:
⛔️ **Low incubation temperature. The t° in the incubator below +27°...+29° C, as well as sudden temperature changes and temperature fluctuations.** Growers often confuse the conditions of the colonization period (incubator) and fruiting period (growbox). Instead of the recommended temperature of +27°...+29°C, they wait for mycelium to appear at +21°..+23°C. Mycelium either does not appear at all, or develops too slowly. Because of the growth delay, mycelium does not have time to get stronger, and the substrate is taken over by competitive microorganisms. Let me remind you that the colonization period in an incubator requires a higher temperature of +27°...+29°C, which stimulates vegetation. If you delay with substrate colonization, it will be taken over not by psilocybin mycelium, but by contaminants.
⛔️ **Insufficient cooling the substrate before inoculation.** Inoculation into hot substrate leads to the death of spores. Spores and mycelium die at temperatures slightly above forty degrees. Therefore, it is highly important to cool the substrate to room temperature.
⛔️ **Too dry or undercooked substrate.** There is not even sweat on the jar. You can try to add sterile water with a syringe through the inoculation port and stir. This is a rather rare case. It is a serious disrupt of the process of preparing the substrate and sterilization. In such conditions, the mycelium may not grow at all or grow slowly, painfully and dry out.
[](https://shroomok.com/en/wiki/File:Dry-substrate-psilocybe-colonization-problem.jpg) Very dry grain substrate for psilocybe mushrooms spawn⛔️ **Too wet.** Free water and drips in the jar are bad. Misting/fog/aerosol on the sides of the jar is normal. If there is no vermiculite at the bottom to equalize the moisture balance, be ready to toss such jar or bag. Check out [Substrate preparation](https://shroomok.com/en/wiki/Choose_and_prepare_substrate_for_magic_mushrooms "Choose and prepare substrate for magic mushrooms") section, [Cooking substrate](https://shroomok.com/en/wiki/Cooking_the_substrate_for_psilocybes "Cooking the substrate for psilocybes") section and [Substrate sterilization](https://shroomok.com/en/wiki/Substrate_sterilization_before_adding_psilocybe_spores "Substrate sterilization before adding psilocybe spores").
[](https://shroomok.com/en/wiki/File:Bacteria-wet-substrate-and-psilocybe.jpg) Very wet substrate for psilocybe mushrooms spawn
⛔️ **Antibiotic in liquid spore syringe for a long time.** We've already mentioned that antibiotic affects not only the contaminants, but also the viability of psilocybin spores. That's why it's not recommended to keep the antibiotic in liquid spore solution for more than an 1 hour before inoculation. Usually 20-30 minutes is enough. Details in [Inoculation](https://shroomok.com/en/wiki/Inoculation_without_glove_box "Inoculation without glove box") section.
⛔️ **Excessive concentration of antibiotic in the liquid spore.** Recommended dosage: 1 ml of antibiotic per 10 ml of liquid spore solution. No more! See [Inoculation](https://shroomok.com/en/wiki/Inoculation_without_glove_box "Inoculation without glove box") section for details.
⛔️ **Excessive shaking** the jars in the first days can significantly prolong the colonization period.
⛔️ **Lighting and sunlight** are destructive for mycelium during colonization period.
⛔️ **Poor spore print quality.** Old spore print with non-viable spores, improper storage conditions of the spore print, degeneration of strain genetics.
⛔️ **Poor grain quality.** Grain that was treated with chemicals, pesticides and contains heavy metals is not suitable for food or for the mushroom cultivation.
⛔️ **A competing life form is stealthily developing in the jar.** It suppresses the growth of psilocybin mycelium. Contaminants could have gotten in at any stage: from the spore print, remaining in the substrate due to insufficient sterilization, or getting in during inoculation. There is nothing to be done here, sooner or later they will show themselves, and the jar will go to waste.
#### 🆘 **Why mycelium stop growing after shaking the jars?**
⛔️ This happens if the mycelium is still weak and not strong enough (20-30% of grain covered with mycelium). It is worth shaking the substrate when 50-70% of the grain is already covered by strong mycelium of psilocybin mushrooms.
⛔️ The second reason can be the activation of competing microorganisms after shaking, which are evenly distributed together with the mycelium of psilocybes and suppress it. Sooner or later, contaminations will show itself.
#### When Grain Spawn ready for Spawn to Bulk
Usually colonization period complete **in 2-3 weeks after inoculation.**
For the next step we need to choose jars with healthy 100% colonized mycelium. Grain substrate should be covered completely with healthy snow-white mycelium.
[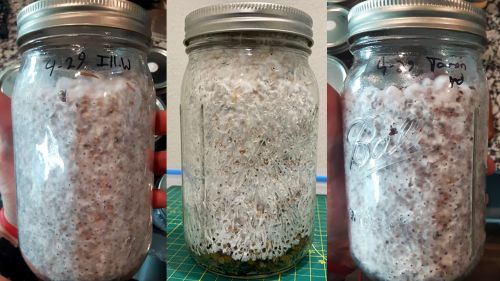](https://shroomok.com/en/wiki/File:Spawn-jars.jpg) Spawn jars are ready for spawn run and casingThen spawn jars/bags are ready for any tek for your choice: PF-tek cakes, small mushroom cakes or spawn to bulk for MonoTub, shoeboxes or bottle-tek growing. All these teks (except PF-tek) are required **Spawn to Bulk** step we are going to discuss.
Move on — **[Step 8. Making mushroom cake, spawn to bulk, and casing of mushroom cakes](https://shroomok.com/en/wiki/Making_mushroom_cake,_spawn_to_bulk,_and_casing "Casing of magic mushrooms cakes")** 🔽
## All you need to know about cold shock for magic mushrooms
[All you need to know about cold shock for magic mushrooms](https://shroomok.com/en/wiki/All_you_need_to_know_about_cold_shock_for_magic_mushrooms)
[](https://shroomok.com/en/wiki/File:Cold-shock-and-heat-shock-in-mushroom-cultivation.jpg) Cold shock and Heat shock in mushroom growing### Temperature shock: pros and cons
Before moving mushroom cakes in fruiting chamber, some growers proceed **Cold Shock (Cold Shocking)**, less common — **Heat Shock**. Another part of growers are vehement opponents of such approach.
Temperature shock method is used for pinhead initiation and for increasing yield.
There are a number of positive and negative effects of **temperature shock (cold shock and heat shock)**. That's why it's highly debated topic online.
For each «pro» and «contra» there is its own logical argumentation.
Let's figure out what is Cold Shock? What is Heat Shock? Why and how to proceed Cold Shock? Advantages and disadvantages of such methods.
#### **What is cold shock and heat shock?**
***Cold Shock*** — is a procedure when the colonized mushroom cake with a casing layer is stressed by a sudden drop in temperature — for 12-24 hours in the refrigerator at +2ºC to 4ºC (35-39°F) before introducing it to the fruiting conditions.
**Heat Shock** — is a procedure when the colonized mushroom cake with a casing layer is stressed by raising the temperature — for 3 hours at +35°C to +37°C (95-99°F) before introducing it to the fruiting conditions.
This works as some kind of trigger, so that the mycelium understands that it has been taken out of its comfort zone and needs to form the reproductive organ of the fungus — the fruit body to spread spores as soon as possible and continue its fungal lineage.
#### **Scientific studies on the effect of temperature shock**
Temperature is one of the most critical factors in cultivation of any kind of fungi as it affects survival, growth rate, time of fruiting, yields, molecular changes in protein structure and even mushroom morphology.
The survival of fungi is determined by temperature but also exposure time. Mycelium perishes at high temperatures around 45°C *(Tokimoto and Komatsu, 1978).* However, prolonged exposure at temperatures above 35°C can also kill the mycelium *(Tokimoto et al., 1982).*
Developing mushrooms will tolerate freezing temperatures for short periods of times, but can be damaged or killed by prolonged exposure *(Tokimoto et al., 1982).*
The limits of temperature sensitivity of different fungal species depends on their genetics. Including their natural climatic conditions where they grow in the wild.
The **cold shocking and heat shocking techniques** came from experiments of various kinds of stresses on edible mushrooms. In particular, various shiitake strains.
Many researchers indicated that temperature also plays a very important role in pinning and fruiting. *Komatsu (1961)* showed that pinning is induced by a sudden shift in temperature or by a period of fluctuating temperatures. The temperature during pinning is also critical for maximum yields and mushroom shape *(Ohira et al., 1982).*
A detailed study of stress factors can be found in ["Effect of Stress on Fruit Body Initiation of Shiitake Mushroom Lentinula edodes"](https://core.ac.uk/download/pdf/48538657.pdf) by professor Tjia Wai Mui (The Chinese University of Hong Kong, 2002).
P**rofessor Tjia Wai Mui used different strains of shiitake in his researches:**
🌞 warm-weather strains
❄️ cold-weather strains
💨 wide-range strains
He found the **stress gene,** which was a trigger for fruiting initiation. Thus, for shiitake, heat shock (at +37°C or 99°F for 3 hours) increased **the speed of pinhead formation,** while cold shock (at +4°C or 39°F for about 12 hours) increased the **number of pinheads** and overall yield (compared to the inhibitory effect of non-temperature stresses with salts and ethanol in his study).
He also found that the effectiveness of temperature shock depends on the genetics. The results vary from strain to strain. Temperature shock, whether it is a heat shock or a cold shock, affects the productivity of warm-weather strains and cold-weather strains differently.
But what about psilocybin mushrooms?
There are a million discussions about temperature shock for psilocybin mushrooms in forums. But often the conclusions are based on hypotheses and guesswork.
That's why we decided to conduct our own experiment **«Cold Shock by Shroomok»**. The conditions and results will be presented in this section.
#### **How to make cold shock?**
There are 2 options for implementing a cold shock.
1️⃣ Cover the mushroom cakes after colonizing the substrate and completing the colonization of the casing layer and place in the refrigerator at +2°C to +4°C (35-39°F) for 12-24 hours.
2️⃣ Pour cold water over the mushroom cakes, cover with a lid so the cakes are completely submerged, and place in the refrigerator at +2°C to +4°C (35-39°F) for 12-24 hours. In this way, cold shock and [rehydration](https://shroomok.com/en/wiki/Rehydration_of_psilocybe_cakes "Rehydration of psilocybe cakes") of the mushroom cakes is carried out at the same time. Such rehydration with cold shock is sometimes practiced before each flush of fruiting.
#### **Possible advantages of cold shocking**
✅ Cold shock stimulates the fruiting phase: pinheads and primordia formation.
✅ Pinheads and primordia form a few days earlier.
✅ Can be useful for mushroom cakes that continue vegetative phase in normal fruiting conditions. Thus, it is possible to prevent overlay and affect genetic stroma.
✅ Cold shock increases overall yield.
#### Possible disadvantages of cold shocking
⛔️ Cold shock can completely stop further mycelium and mushroom development.
⛔️ For warm-weather, tropical and subtropical psilocybin mushroom species, in particular, Psilocybe Cubensis, cold shock can be destructive.
⛔️ Cold shock can provoke abortions. [Aborts](https://shroomok.com/en/wiki/Psilocybe_growing_problems_-_overlay,_abortions,_etc "Psilocybe growing problems - overlay, abortions, etc") are mushrooms that completely stop their growth and never reach maturity.
⛔️ Cold shock can provoke an overlay or stroma. [Overlay](https://shroomok.com/en/wiki/Psilocybe_growing_problems_-_overlay,_abortions,_etc "Psilocybe growing problems - overlay, abortions, etc") (mycelium overgrowth) is a dense mycelium coat that forms on the surface of the substrate and prevents pinheads and primordia formation.
#### **Experiment «Cold shock by Shroomok»**
Considering all possible advantages and disadvantages are listed above, experiment was made with adjusting the temperature and duration of cold shock for the warm-weather Psilocybe Cubensis mushroom cakes. Strains are Thai Brazil and F+.
🔬 **Conditions for experiment**
Available:
🔸 Psilocybe Cubensis Thai - 2 mushroom cakes, tomentose mycelium (fluffy, cloudy).
🔸 Psilocybe Cubensis Brazil - 2 mushroom cakes, rhizomorphic mycelium (root-like, wiry-type structure).
🔸 Psilocybe Cubensis F+ - 3 mushroom cakes with stroma overlay.
Each strain from a single spore print.
**🔬 Cold shock conditions**
🍄 Psilocybe Cubensis Thai - 1 cake 🌡 +12°C (54°F) ⏰ for 6 hours 💧 WITHOUT rehydration
[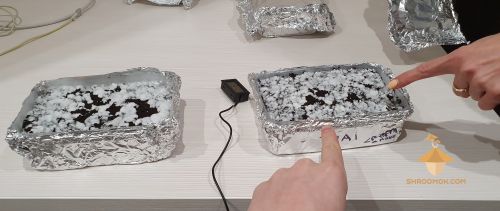](https://shroomok.com/en/wiki/File:Cold-shock.jpg) Cold shock for 6 hours at 12°C without rehydration. Psilocybe Cubensis Thai
🍄 Psilocybe Cubensis Brazil - 1 cake 🌡 +12°C (54°F) ⏰ for 12 hours 💧 WITH rehydration
[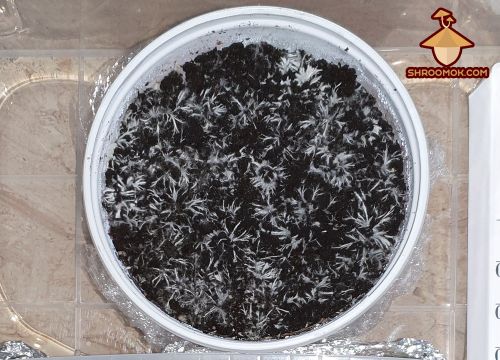](https://shroomok.com/en/wiki/File:Mushroom-cake-psilocybe-cubensis.jpg) Mushroom cake for cold shocking 6 hours at 12°C and rehydration. Psilocybe Cubensis Brazil
🍄 Psilocybe Cubensis F+ - 1 cake 🌡 +12°C (54°F) ⏰ for 6 hours 💧 With rehydration ❗️ Overlay was previously removed with a sterile fork.
[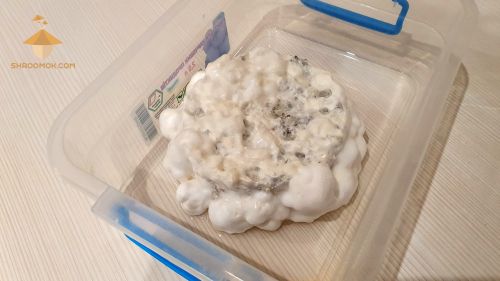](https://shroomok.com/en/wiki/File:Micelium-overlay-fix.jpg) Overlay. Psilocybe Cubensis F+ cake for cold shock
🍄 Other cakes (Thai, Brazil) were moved in fruiting conditions without temperature shock in order to compare the results with exactly the same mushroom cakes after cold shocking.
🍄 Cold Shock at +2°C to +4°C for 12-24 hours — no one mushroom cake was exposed!
🍄 Heat Shock at +35°C to +37°C for 3 hours — no one mushroom cake was exposed!
#### **Results of the experiment «Cold shock by Shroomok»**
Let's compare the results of the mushroom cakes that were subjected to cold shock with those cakes that were immediately moved to the growbox for fruiting phase without temperature shock.
**We ended up with the following results:**
🔶 On the cakes that were cold-shocked, pins and primordia formed 1-3 days earlier.
🔶 The number of pins, primordia and yield from cakes after cold shock in the first flush of fruiting was higher by 5-10% compared with cakes that were not stressed.
🔶 There were no abortions on cakes after cold-shock in any flush of fruiting.
🔶 There were no overlay or stroma on any of the Thai and Brazil cakes.
🔶 An attempt to "treat" stroma overlay by cold shocking and stop the vegetative growth of the mycelium was unsuccessful. After removing overlay and cold shock with rehydration mushroom cake was covered with a dense white coat of mycelium again without pins and primordia formation.
Psilocybe Cubensis Brazil. Only 5 days in the growbox after cold shock and rehydration. Mushroom cake has already produced pins and several primordia.
[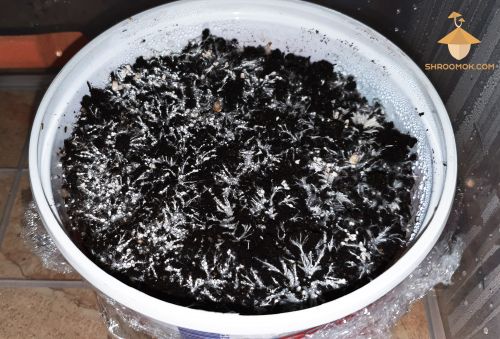](https://shroomok.com/en/wiki/File:Psilocybe-cubensis-brazil-28-days.jpg) Mushroom cake Psilocybe Cubensis Brazil. 5 days after cold shock and rehydration
The results of Psilocybe Cubensis Thai. 7 days after the cold shock and moving the cake in the growbox. Small primordias are already turned into small mushrooms.
[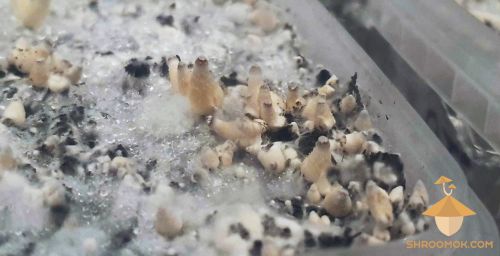](https://shroomok.com/en/wiki/File:First-psilocybe-cubensis-mushrooms-on-the-cake.jpg) Psilocybe Cubensis Thai after cold shocking. 7 days in the growbox.
To the fore mushroom cake after cold shock compared to the rest of the unstressed cakes. 7 days in the growbox after cold shocking.
[](https://shroomok.com/en/wiki/File:First-magic-mushrooms-growing.jpg) Psilocybe Cubensis Thai. 7 days after cold shocking
Psilocybe Cubensis Thai. 9 days in the growbox after cold shocking.
[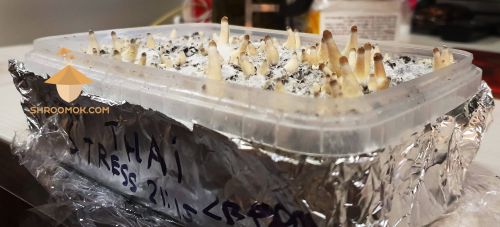](https://shroomok.com/en/wiki/File:Thai-psilocybe-cubensis-28-days.jpg) Mushroom cake after cold shocking. 9 days in growbox[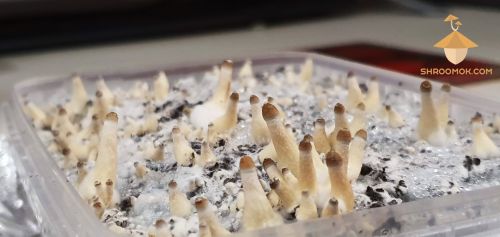](https://shroomok.com/en/wiki/File:Thai-strain-mushrooms-with-cold-shock.jpg) Psilocybe Cubensis Thai. 9 days after cold shock
Psilocybe Cubensis Thai (in the foreground). 10 days in the growbox after cold shock.
[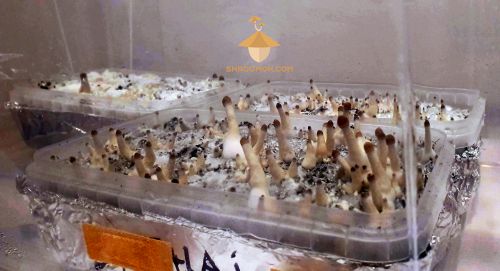](https://shroomok.com/en/wiki/File:Psilocybe-cubensis-thai-and-golden-teacher-day-29.jpg) Mushroom cake Psilocybe Cubensis Thai (to the fore). 10 days after cold shock
Psilocybe Cubensis F+ after removing the stroma overlay mycelium and cold-shock with rehydration was covered again with a new dense snow-white coat of mycelium.
[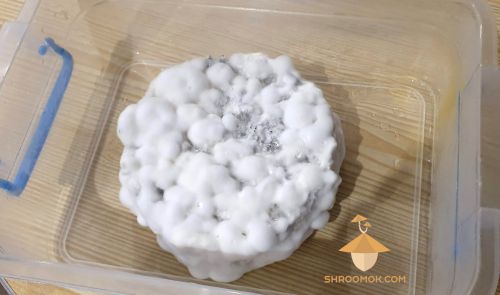](https://shroomok.com/en/wiki/File:Micelium-overlay-growing-psilocybe-cubensis.jpg) Stroma overlay. Psilocybe Cubensis F+#### **Conclusions and observations**
🔬 In fact, for the heat-loving Psilocybe Cubensis, the cold shock is a drop in temperature from +27...+29°C (in the incubator) to +21...+23°C (in the growbox). With this temperature difference, fruiting comes only 2-3 days later without any risk to the fungus.
🔬 A temperature drop of 10-15 degrees is not the same as a sharp drop of 25 degrees. The first option simply slows mycelial growth. And the second option can STOP further development of the fungus altogether. Therefore, it was decided to conduct the experiment at +12°C (54°F), not +4°C. And the time of cold-shock was reduced to 6 hours instead of 12-24 hours.
🔬 Experimental colld-shock with and without rehydration at +12°C (54°F) and a duration of 6 hours was successful and had positive effect on the number and rate of pin sets.
🔬 Cold shock for Psilocybe Cubensis Thai at +12°C (54°F) and lasting 6 hours without rehydration accelerated pinning and primordia formation by 2-3 days. And also increased the yield of the first wave of fruiting by 10% .
🔬Cold shock had a more significant "beneficial" effect on the felted mycelium of Psilocybe Cubensis Thai than on the rhizomorphic Psilocybe Cubensis Brazil. On rhizomorphic mycelium Psilocybe Cubensis Brazil, the formation of pins and primordia under the effect of the colldshock occurred 1 day earlier. The difference in yield was about 5%.
🔬Exposure to cold shock on the cake with cover overgrowth (overlay, stroma) had no positive results and did not stop vegetative growth of the mycelium. Details in the section [What is overlay? Aborts and mushroom metabolites](https://shroomok.com/en/wiki/Psilocybe_growing_problems_-_overlay,_abortions,_etc "Psilocybe growing problems - overlay, abortions, etc")
#### **Do we recommend cold shocking?**
As we mentioned before, for warm-weather psilocybin mushrooms cold shock would be a drop in temperature from incubator +27°...+29°C (80-84°F) to growbox temperature +21°...+23°C (70-74°F). This is quite enough!
Cold shock is not mandatory for warm-weather psilocybin mushroom species, in particular Psilocybe Cubensis. Perhaps for those psilocybe species that originate from temperate climates, this technique would be closer to the actual natural conditions and consequently more useful.
This kind of stress can have a devastating effect on Psilocybe Cubensis at low temperatures of +2°...+4°C (35-39°F) and a significant dramatic temperature change of 23-28°C (40-50°F) after incubation. But this state wasn't confirmed in our experiment, so the question remains open until the next mycological experiment.
Our experiment also didn't include a heat shock and didn't reveal the effect of increased temperature on pinhead formation and yield.
This experiment isn't completed and requires a larger sample. Our results and preliminary conclusions are just for your information. It's not an advice.
Updates to current experiment will be posted in this section.
Now it's time to check different types of fruiting chambers or teks for mushroom fruiting.
Let's start with [**STEP 9. DIY Grow Box. Fruiting conditions**](https://shroomok.com/en/wiki/DIY_Grow_Box_for_Magic_mushrooms._Fruiting_conditions "DIY Grow Box for Magic mushrooms. Fruiting conditions") 🔽
## DIY Grow Box for Magic mushrooms. Fruiting conditions
[DIY Grow Box for Magic mushrooms. Fruiting conditions](https://shroomok.com/en/wiki/DIY_Grow_Box_for_Magic_mushrooms._Fruiting_conditions)
[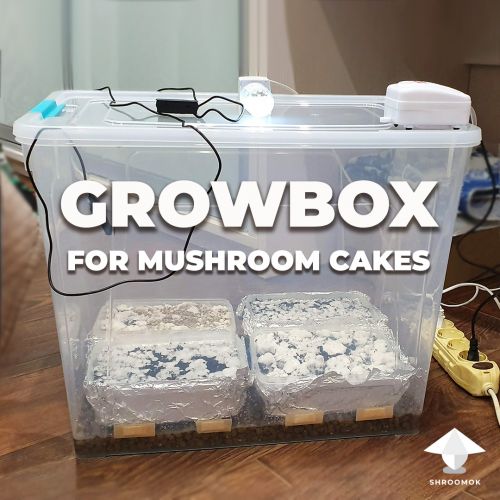](https://shroomok.com/en/wiki/File:Growbox-for-mushroom-growing.jpg) How to make automated growbox for mushroom growing### **STEP 9. Day 18-26. How to make Growbox for mushroom growing. Fruiting conditions**
You've successfully passed [Casing](https://shroomok.com/en/wiki/Making_mushroom_cake,_spawn_to_bulk,_and_casing "Making mushroom cake, spawn to bulk, and casing") stage. For now casing layer colonised by mycelium (70-100% of the surface).
It's time to prepare **growbox for the second phase of growing — fruiting and harvesting.**
This means we will stimulate mushroom mycelium to turn from the vegetative phase of mycelium growth to the generative state - pinhead aka primordia formation and fruit bodies growth.
> 🔴 Some growers practice "cold shock" in refrigerator before moving mushroom cakes to growbox. Another part of growers are vehement opponents of such approach. Check details: [Temperature shock. Pros and Cons of cold shocking in Mushroom Cultivation](https://shroomok.com/en/wiki/All_you_need_to_know_about_cold_shock_for_magic_mushrooms "All you need to know about cold shock for magic mushrooms")
#### **GrowBox construction for mushroom growing**
Follow step-by-step growbox preparation
1️⃣ You need **plastic container, aquarium or terrarium for making fruiting chamber (aka growbox).** The volume should be about 30 liters or 30Qt. You can use plastic boxes of larger (40-80 Qt) or smaller sizes (15-20 Qt) as well.
Don't use too small containers! The bigger volume of fruiting chamber the better. Because there will be accumulated less carbon dioxide (CO2) concentration during mushrooms growing. Bigger growbox can be ventilated a bit rarely and it's easier to control the microclimate conditions.
Wash your box thoroughly with any disinfectant detergent or bleach solution
[](https://shroomok.com/en/wiki/File:Grow-box-for-growing-psilocybe-cubensis-mushrooms.jpg) Container for growbox (choose the volume from 15 liters). Growing psilocybin mushrooms**Shroomok's Choice on Amazon:**
[Modular Stackable Storage Bins - 64 Quart - 2 Pack](https://www.amazon.com/gp/product/B081W3BS8P/ref=as_li_tl?ie=UTF8&tag=shroomok-20&camp=1789&creative=9325&linkCode=as2&creativeASIN=B081W3BS8P&linkId=086faefd070ce74811072a0c72669174) - $52.89
2️⃣ Make 6-8 holes (diameter about 1 inch or 2 cm) on the both sides of growing box, at 15-20 cm from the bottom. Cover them with sterile breathing patch or adhesive synthetic filter disc. It's necessary for natural air exchange in your GrowBox. Because during fruiting period mushrooms need fresh air and they produce carbon dioxide. Such air vents help with additional natural ventilation during fruiting period
[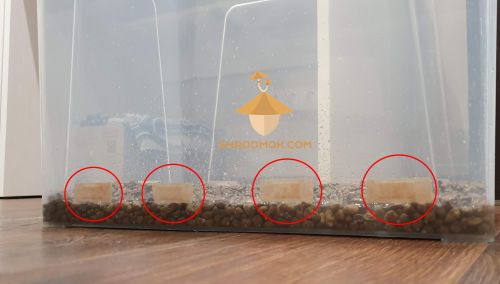](https://shroomok.com/en/wiki/File:Growbox-preparation-for-growing-psilocybin-mushrooms-psilocybe-cubensis.jpg) Growbox preparation for growing psilocybin mushrooms Psilocybe Cubensis**Shroomok's Choice on Amazon:**
[Synthetic Filter Discs - 16/30 Pieces](https://www.amazon.com/dp/B08RYNCZM7?&linkCode=ll1&tag=shroomok-20&linkId=b9e856c23dae70a417635f16d9400cf7&language=en_US&ref_=as_li_ss_tl) $14.99
3️⃣ Make a separate hole in the grow box to connect the aquarium air pump. We need it for automatic fresh air exchange
[](https://shroomok.com/en/wiki/File:Aquarium-air-pump-for-growbox.jpg) Air pump for FAE (180 L/hour)[](https://shroomok.com/en/wiki/File:Air-pump-for-growbox-psilocibe-cubensis-cultivation.jpg) Air pump for FAE (150 L/hour)**Shroomok's Choice on Amazon:**
[Quiet Oxygen Pump for 20-100 Gallon - 2 Outlets](https://www.amazon.com/gp/product/B07RJ3XLM8/ref=as_li_tl?ie=UTF8&tag=shroomok-20&camp=1789&creative=9325&linkCode=as2&creativeASIN=B07RJ3XLM8&linkId=a95f2e7fd5ddd905a223db6e6ef7b9e3) - $15.99
[Adjustable Oxygen Pump for 20-100 Gallon - 2 Outlets](https://www.amazon.com/gp/product/B01EBXI7PG/ref=as_li_tl?ie=UTF8&tag=shroomok-20&camp=1789&creative=9325&linkCode=as2&creativeASIN=B01EBXI7PG&linkId=a0a86a19ba80cf22326ca33748ae2c6c) - $14.99
[Powerful Air Pump - for 20-200 Gallon - 2 Outlets](https://www.amazon.com/gp/product/B08HMZSH9J/ref=as_li_tl?ie=UTF8&tag=shroomok-20&camp=1789&creative=9325&linkCode=as2&creativeASIN=B08HMZSH9J&linkId=129cc0f3bc777d413baed339a79e2a6c) - $22.89
Connect air pump hose.
[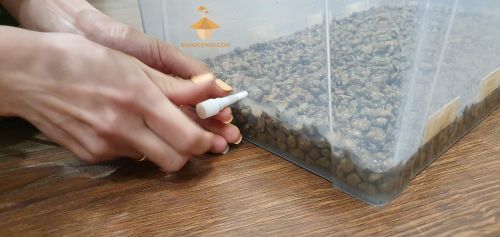](https://shroomok.com/en/wiki/File:Growbox-preparation-for-magic-mushrooms-growing.jpg) Air pump for ventilation grow box. Growbox preparation for growing magic mushrooms[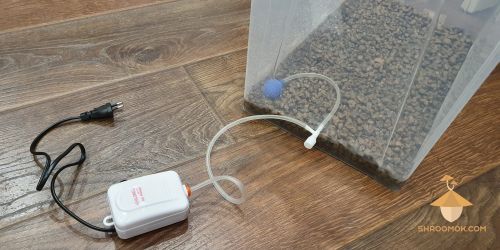](https://shroomok.com/en/wiki/File:Psilocybe-mushrooms-growbox-automatic-ventilation.jpg) Automatic ventilation and humidifier for growbox. Growbox preparation for growing psilocybin mushrooms Psilocybe Cubensis
There is a stone at the end of the aquarium air pump hose; put it in a jar with water. This will filter the incoming air and just a little maintain humidity
[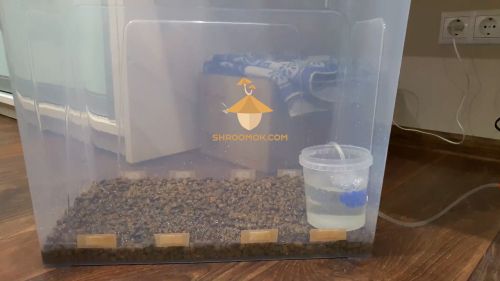](https://shroomok.com/en/wiki/File:Growbox-with-air-pump-for-air-exchange-and-humidification.jpg) Growbox with air pump for fresh air exchange and additional humidificationIf you have enough space in growbox you can place jar with water and air pump stone in it between mushroom cakes or make a podium between cakes
[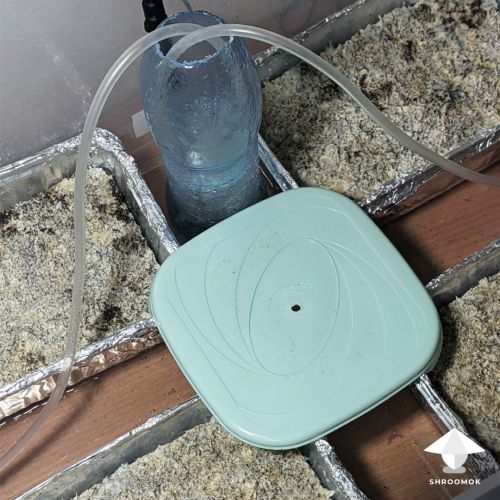](https://shroomok.com/en/wiki/File:Air-pump-in-bottle-between-mushroom-cakes.jpg) Air pump hose in bottle between mushroom cakes or can be placed on a plastic podium between cakes4️⃣ Some growers use exclay layer at the bottom of the grow box (about 1 inch or 2 cm). It maintain high humidity. At first we did so, but in the process we got a musty smell in our grow box. That's why **we don't recommend** to use exclay in the grow box!
5️⃣ Mix minimum 200-300 ml of chilled boiled water. Pour the water in the growbox. Water will evaporate and maintain humidity.
> **Optional!** You can add 10-15 ml of hydrogen peroxide 3% solution per 200-300ml of water
6️⃣ Put all cakes in GrowBox. Some growers use cold shock before placing cakes in growbox.
> 🔴 Check out: [Cold shock: pros and cons](https://shroomok.com/en/wiki/All_you_need_to_know_about_cold_shock_for_magic_mushrooms "All you need to know about cold shock for magic mushrooms")
We used cold shock only as an experiment that turned out to be successful. However, we don't recommend to use this method for warm-loving psilocybin mushrooms, that grow in the tropical and subtropical climate
[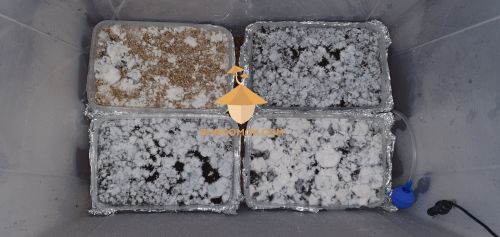](https://shroomok.com/en/wiki/File:Growbox-preparation-for-psilocybe-mushrooms-cakes.jpg) Psilocybin mushrooms cakes in growbox7️⃣ Close the lid of GrowBox.
8️⃣ Turn on the LED lamp. The lamp light should be weak in the blue range (~435 nm) or use fluorescent light 6500k lux power
[](https://shroomok.com/en/wiki/File:Lamp-light-for-mushroom-cultivation.jpg) LED Lamp for growboxNo need to use powerful lamp. Light is needed for pinhead initiation and to set the direction of growth for mushroom bodies. Diode strip or cold white lamp is also suitable for lighting your grow box.
[](https://shroomok.com/en/wiki/File:Lamp-for-psilocybe-mushrooms-growbox.jpg) LED lamp in the blue range (~435 nm) for growing boxNatural light is suitable as well, but **avoid direct sunlight!**
**Shroomok's Choice on Amazon:**
[**Desk Lamp** with Flexible Gooseneck 3 Level Brightness, Touch Control, Portable](https://www.amazon.com/gp/product/B076HLYF6L/ref=as_li_tl?ie=UTF8&tag=shroomok-20&camp=1789&creative=9325&linkCode=as2&creativeASIN=B076HLYF6L&linkId=9b598defdd55bcf3f61e8390dfba7250) - $15.78
[LED **Pool Light,** RGB Color Changing and Battery Powered Waterproof with Remote (3 Pack)](https://www.amazon.com/gp/product/B07P7N6MM6/ref=as_li_tl?ie=UTF8&tag=shroomok-20&camp=1789&creative=9325&linkCode=as2&creativeASIN=B07P7N6MM6&linkId=8af848e0a744316f9803fcf991a28619) - $13.99
[**Desk Gooseneck** Magnifier Lamp with Metal Large Clamp, Magnifying Glass with Adjustable Light](https://www.amazon.com/gp/product/B07R17QP51/ref=as_li_tl?ie=UTF8&tag=shroomok-20&camp=1789&creative=9325&linkCode=as2&creativeASIN=B07R17QP51&linkId=f03535f6c1a35fdf68d95a6dd7f176fb) - $24.98
9️⃣ Add **thermometer and hygrometer** in the grow box to monitor temperature and relative humidity (RH) level
[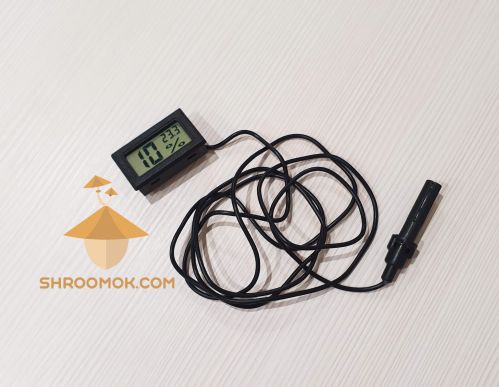](https://shroomok.com/en/wiki/File:Thermometr-with-hygrometr-for-incubator-and-growbox.jpg) Thermometr with hygrometr for growbox**Shroomok's Choice on Amazon:**
[Bluetooth Digital Hygrometer, Thermometer with Remote App](https://www.amazon.com/gp/product/B07Y36FWTT/ref=as_li_tl?ie=UTF8&tag=shroomok-20&camp=1789&creative=9325&linkCode=as2&creativeASIN=B07Y36FWTT&linkId=244415a8d89f306fb2c96ecc7f6b961f) - $12.99
[2-in-1: Professional Digital Hygrometer, Thermometer](https://www.amazon.com/gp/product/B07YY1FB9D/ref=as_li_tl?ie=UTF8&tag=shroomok-20&camp=1789&creative=9325&linkCode=as2&creativeASIN=B07YY1FB9D&linkId=4d946b984658d5478b46e13d1e17c38f) - $17.99
🔟 Fully equipped growbox with mushroom cakes is ready for fruiting and harvesting period!
Here is the 20th day of our growing cycle (starting from grain inoculation for spawn).
[](https://shroomok.com/en/wiki/File:Growbox-eqiupment-for-growing-psilocybin-mushrooms-psilocybe-cubensis.jpg) Eqiupped growbox for growing magic mushrooms Psilocybe Cubensis at home: plastic box, lamp, air pump, thermometer with hygrometer[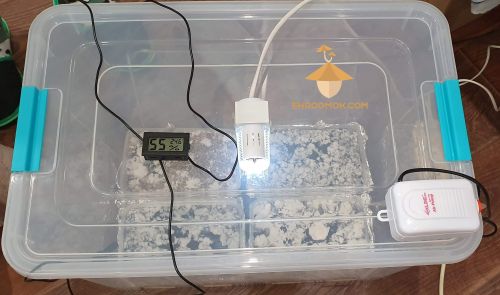](https://shroomok.com/en/wiki/File:Growbox-equipment-for-psilocybe-cubensis-growing.jpg) Fully equipped growbox for growing fungi Psilocybe Cubensis: grow box itself, lamp, air pump, thermometer and hygrometer[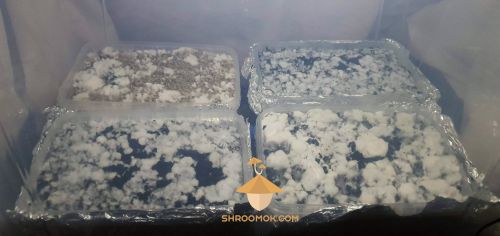](https://shroomok.com/en/wiki/File:Growbox-with-magic-mushrooms-cakes.jpg) First day in growbox. 20 days after substrate inoculation[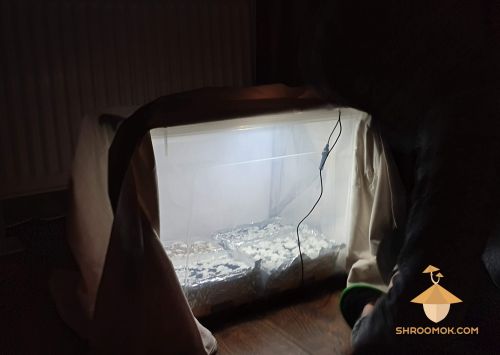](https://shroomok.com/en/wiki/File:Growbox-cultivation-psilocybe-cubensis-mushrooms.jpg) Waiting for magic mushrooms. Growbox for cultivation psilocybin mushrooms Psilocybe Cubensis at home
Here is the 24th day after inoculation. 2 cakes of Brazil strain. They did not seem to be sufficiently covered with mycelium. In fact, such **rhizomorphic mycelium** (root-like) cover is perfect and more productive than **tomentose (fluffy, cloudy)** mycelium
[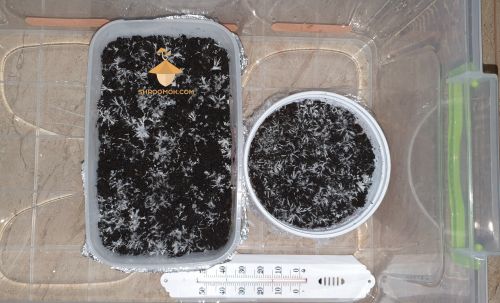](https://shroomok.com/en/wiki/File:Growbox-with-psilocybin-mycelium-cakes-brazil-strain.jpg) Growbox with psilocybin mycelium cakes. Growing Psilocybe Cubensis (Brazil strain)
Another small growbox (volume is 17Qt) for 2 Brazil cakes near bigger GrowBox
[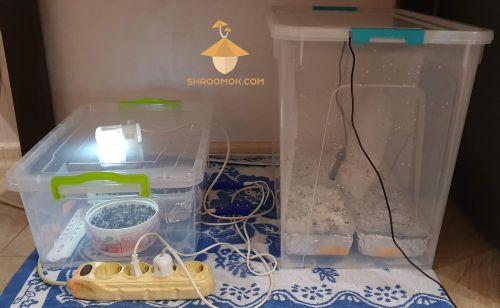](https://shroomok.com/en/wiki/File:Growbox-examples-for-growing-magic-psilocybin-mushrooms.jpg) Growbox examples for cultivation magic mushrooms: Golden Teacher, Thai, Brazil strains#### GrowBox for PF-tek mushroom growing
All steps are listed above applicable for PF-tek growing.
For the PF-tek make a layer of moist perlite at the bottom of the grow box, about 1 inch or 2 cm. Put PF-cakes on foil or any plastic surface. They shouldn't contact directly with moist perlite.
[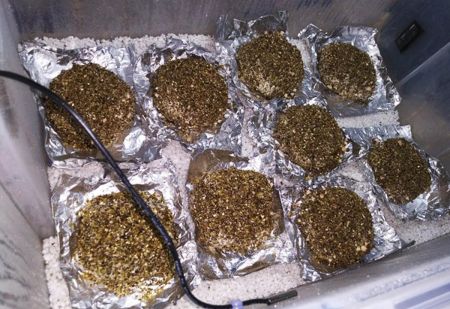](https://shroomok.com/en/wiki/File:Pf-cake-mushroom-cultivation.jpg) Pf-tek mushroom cakes in growbox
If you have several PF-cakes in your grow box, there should be at least 5 cm between them to let mushrooms grow from the sides
[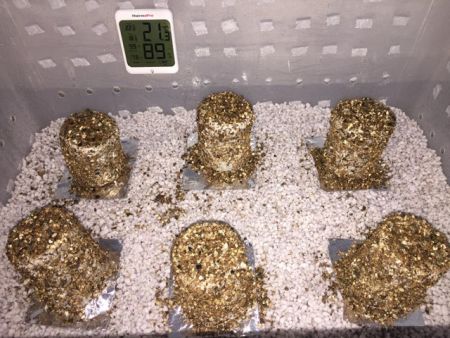](https://shroomok.com/en/wiki/File:Pf-tek-example.jpg) PF cakes in growbox. Perlite on the bottom. 5-10 cm distance between mushroom cakes
GrowBox for PF-tek cakes with air pump for fresh air exchange, light and digital thermometer/hygrometer/CO2 to control air temperature, humidity level and CO2 inside the growbox
[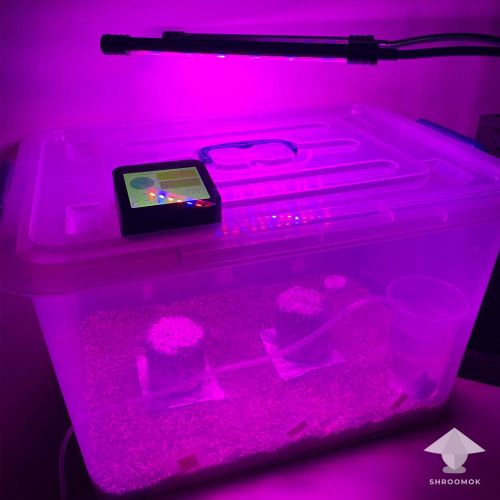](https://shroomok.com/en/wiki/File:Growbox-for-mushrooms.jpg) Growbox example for BRF mushroom cakes aka PF-tek cakes#### Growbox modification
Growbox modification with air pump for additional FAE in the corner. Mix of growbox and monotub tek.
[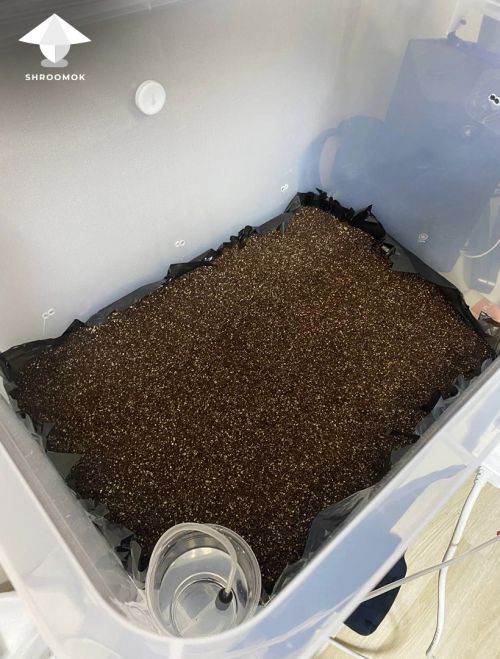](https://shroomok.com/en/wiki/File:Monotub-growbox-for-mushrooms-with-air-pump.jpg) Fruiting chamber for mushroom growing with air pump for FAE
Such fruiting chamber also works great!
[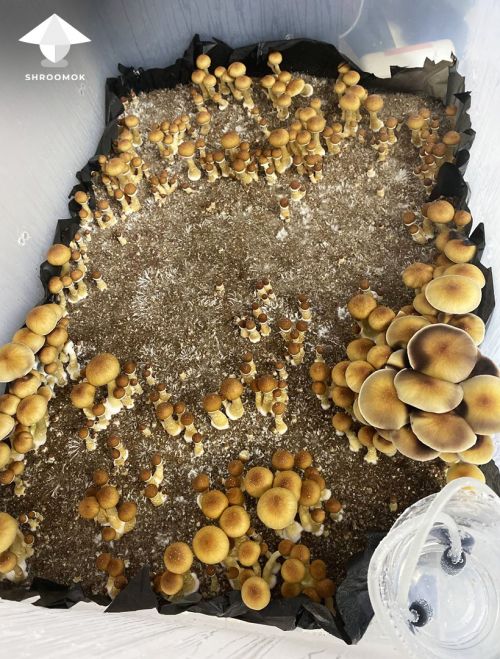](https://shroomok.com/en/wiki/File:Fruiting-chamber-for-mushrooms-with-air-pump-for-FAE.jpg) Growbox/Monotub modification and air pump for FAE in the corner#### **Fruiting conditions for Psilocybe Cubensis mushrooms**
To initiate fruiting, we need to low down the temperature, increase humidity, give the mushroom a breath of fresh air, and turn on soft diffused light in cloudy weather. Such conditions is a sign for mushrooms, that the dry period is over and the rainy season is started. This means that mycelium can run from underground and produce mushrooms on the surface.
The most important thing for the grower for the next few weeks is maintaining proper fruiting conditions in the GrowBox. This is a set of environmental factors. Only a combination of all these factors provides the ideal environment for the growth of mushrooms. The final yield totally depend on this tricky period.
Let's briefly consider the necessary fruiting conditions for the next 7-14 days.
##### ❇️ **Air temperature**
**+22°...+23°C or 72-73°F**
After incubation period we need to decrease the temperature by 5-10°C or 8-12°F to initiate the fruiting phase and pinhead development. The acceptable limits are +20..+25°C or 70-77°F. But at the lower limit the start and growth can be slowed down. At the upper limit there is a risk that mycelium will switch back to the vegetative phase. In addition, you should take into account that the mycelium itself warms up during growth, and the temperature in the substrate itself will be 1-2° higher.
At this stage, it will be enough to continue cultivation at room temperature. Of course, everything depends on the temperature in your room. During cold winter season you may need a heater (the same one you use for the incubator). And in the summer months, it may be too hot and you'll need cooling.
Measure the temperature with an ordinary thermometer.
[](https://shroomok.com/en/wiki/File:Thermometer-and-hygrometer-for-psilocybe-cubensis-incubator-and-growbox.jpg) Thermometer for growbox**Shroomok's Choice on Amazon:**
[Bluetooth Digital Hygrometer, Thermometer with Remote App](https://www.amazon.com/gp/product/B07Y36FWTT/ref=as_li_tl?ie=UTF8&tag=shroomok-20&camp=1789&creative=9325&linkCode=as2&creativeASIN=B07Y36FWTT&linkId=244415a8d89f306fb2c96ecc7f6b961f) $11.99
[2-in-1: Professional Digital Hygrometer, Thermometer](https://www.amazon.com/gp/product/B07YY1FB9D/ref=as_li_tl?ie=UTF8&tag=shroomok-20&camp=1789&creative=9325&linkCode=as2&creativeASIN=B07YY1FB9D&linkId=4d946b984658d5478b46e13d1e17c38f) $17.99
##### ❇️ **Relative humidity**
**The optimal RH is 90-95%**
To maintain required humidity manually spray the walls of the growbox 1-2 times a day with clean water after fanning. When doing so, use cheap ultra fine spray-bottle. The smaller water drops the better
[](https://shroomok.com/en/wiki/File:Mist-spray-bottle-for-mushroom-growing.jpg) Good spray bottle[Mist spray bottle, 10 oz., White/Black/Clear](https://www.amazon.com/dp/B08LZQB5S1?pd_rd_i=B08LZQB5S1&pd_rd_w=X8Rpr&content-id=amzn1.sym.999c0877-3704-4f0f-9726-eebf80846a35&pf_rd_p=999c0877-3704-4f0f-9726-eebf80846a35&pf_rd_r=VRTN1WFRD2MQAV9Q4GBH&pd_rd_wg=3Gble&pd_rd_r=43b4dc64-94d6-44f4-a699-4ad83b9d395c&s=beauty&spLa=ZW5jcnlwdGVkUXVhbGlmaWVyPUFWTlVEQUZKNEM1SksmZW5jcnlwdGVkSWQ9QTA4NDkxNzUzVlk5N1hVSkJZR1oxJmVuY3J5cHRlZEFkSWQ9QTA2ODU4MDAyNVRRQUpJT1E1Nzk4JndpZGdldE5hbWU9c3BfZGV0YWlsJmFjdGlvbj1jbGlja1JlZGlyZWN0JmRvTm90TG9nQ2xpY2s9dHJ1ZQ&th=1&linkCode=ll1&tag=shroomok-20&linkId=c9e6045925412eb50dc2ef392195a8ed&language=en_US&ref_=as_li_ss_tl) $6.99
> ❌ Don't spray water directly on the mycelium. Avoid puddles on top layer!
> ❗️At the same time make sure top casing layer of the mushroom cake is moist enough. Casing layer and mycelium shouldn't be dry!
You can use a terrarium humidifier for any fruiting chamber, whether automated growbox or monotub. It should be built on top of your growbox. The intensity and frequency of spraying can be programmed. It helps to maintain constant relative humidity (RH) 90-95% automatically. Check RH level with hygrometer.
Or you can turn it on when airing your growbox.
[](https://shroomok.com/en/wiki/File:Humidifier-for-growbox.png) Humidifier for growbox**Shroomok's Choice on Amazon:**
[Humidifier/fogger with Extension Tube - 4L Large Tank](https://www.amazon.com/gp/product/B08JLFVDP7/ref=as_li_tl?ie=UTF8&tag=shroomok-20&camp=1789&creative=9325&linkCode=as2&creativeASIN=B08JLFVDP7&linkId=2303c2ba6c8ac5845c0562c2506a473b) - $31.99
[Humidifier, Fogger for GrowBox - 3 L Tank](https://amzn.to/47FYQ3A) - $49.77
##### ❇️ **Fresh Air Exchange**
As you know, mushrooms breathe oxygen and emit carbon dioxide (CO2). After the temperature drops, the fungus will adapt to the new conditions, mycelium growth will slow down and it will emit less carbon dioxide.
At this stage you should introduce fresh air at least 3-4 times a day. Just open the growbox for 2-3 minutes and make a few winks with lid over the mushroom cakes. The smaller the growbox the more often you need to introduce fresh air.
You can also use PC fan for FAE in a growbox. Install it on the lid or on the side.
You can use an air pump for FAE in the growbox on a regular basis. You can use it 24/7 on slow mode or turn on every 4-6 hours for 1-2 hours. Or use it for day time and turn off for a night time to have total silence. All these options are suitable for Psilocybe Cubensis growing
[](https://shroomok.com/en/wiki/File:Aquarium-air-pump-for-growbox.jpg) Air pump for FAE
**Shroomok's Choice on Amazon:**
[Quiet Oxygen Pump for 20-100 Gallon - 2 Outlets](https://www.amazon.com/gp/product/B07RJ3XLM8/ref=as_li_tl?ie=UTF8&tag=shroomok-20&camp=1789&creative=9325&linkCode=as2&creativeASIN=B07RJ3XLM8&linkId=a95f2e7fd5ddd905a223db6e6ef7b9e3) - $15.99
[Adjustable Oxygen Pump for 20-100 Gallon - 2 Outlets](https://www.amazon.com/gp/product/B01EBXI7PG/ref=as_li_tl?ie=UTF8&tag=shroomok-20&camp=1789&creative=9325&linkCode=as2&creativeASIN=B01EBXI7PG&linkId=a0a86a19ba80cf22326ca33748ae2c6c) - $14.99
[Powerful Air Pump - for 20-200 Gallon - 2 Outlets](https://www.amazon.com/gp/product/B08HMZSH9J/ref=as_li_tl?ie=UTF8&tag=shroomok-20&camp=1789&creative=9325&linkCode=as2&creativeASIN=B08HMZSH9J&linkId=129cc0f3bc777d413baed339a79e2a6c) - $22.89
##### ❇️ **CO2 level**
**Carbon dioxide level should be no more than 600-800 ppm**
To measure carbon dioxide levels, you can use a CO2 detector. This device is very helpful, but unfortunately, not cheap. To compare, normal CO2 level outdoor is 400-450 ppm. In general, 600-800 ppm it's CO2 level in room, where breath a few people.
[](https://shroomok.com/en/wiki/File:Digital-CO2-sensor-air-quality-detector.jpg) Digital carbon dioxide detector**Shroomok's Choice on Amazon:**
[3-in-1: CO2 Meter, Temperature, Humidity; USB Power & Battery](https://www.amazon.com/gp/product/B085VXM6P1/ref=as_li_tl?ie=UTF8&tag=shroomok-20&camp=1789&creative=9325&linkCode=as2&creativeASIN=B085VXM6P1&linkId=3c9274805e6d42e35604ea5be0d1b2d5) - $109.45
[Professional 6-in-1: CO2 Detector, Air Pollution, Temperature, Humidity](https://www.amazon.com/gp/product/B08Q7YMX9X/ref=as_li_tl?ie=UTF8&tag=shroomok-20&camp=1789&creative=9325&linkCode=as2&creativeASIN=B08Q7YMX9X&linkId=bfe4b8046f03e17c3256ec0004a763e6) - $79.99
[Smart Home - All-in-One - Radon & Air Quality Monitor](https://www.amazon.com/gp/product/B07JB8QWH6/ref=as_li_tl?ie=UTF8&tag=shroomok-20&camp=1789&creative=9325&linkCode=as2&creativeASIN=B07JB8QWH6&linkId=f1e572e1f38c19a710db868385ba4ecc) - $211.11
**❇️ Light 12 hours on/off cycle**
Turn on the light for 12 hours a day. Natural light is good as well, but only diffused light.
> ❗️**Avoid direct sunlight!**
[](https://shroomok.com/en/wiki/File:Lamp-light-for-mushroom-cultivation.jpg) RGB Led Lamp for growbox (blue range ~435 nm)**Shroomok's Choice on Amazon:**
[Desk Lamp with Flexible Gooseneck - Portable, Touch Control](https://www.amazon.com/gp/product/B076HLYF6L/ref=as_li_tl?ie=UTF8&tag=shroomok-20&camp=1789&creative=9325&linkCode=as2&creativeASIN=B076HLYF6L&linkId=6912dfb7b4498961500d8b54d0b3cfc4) - $15.78
[Cold White **LED light bar**, Under Cabinet with Memory Function](https://www.amazon.com/dp/B08VDH1GJV?&linkCode=ll1&tag=shroomok-20&linkId=bbb0c451b36f1f72dc057abedd0ffb0d&language=en_US&ref_=as_li_ss_tl) $16.99
[LED White **Light Strip,** 6500K - 16.4ft](https://www.amazon.com/gp/product/B07XHLGSXN?&linkCode=ll1&tag=shroomok-20&linkId=8dbdf23e2926f9bc38001f7b42ffd5d4&language=en_US&ref_=as_li_ss_tl) $19.99
[**LED light bar** Under Cabinet Lighting with Touch Switch](https://www.amazon.com/gp/product/B09QHZXP34?&linkCode=ll1&tag=shroomok-20&linkId=828137bfdc88db612aa5e21d7bbaffdb&language=en_US&ref_=as_li_ss_tl) $22.99
[Desk Gooseneck Magnifier Lamp - Metal Large Clamp - Black](https://www.amazon.com/gp/product/B07R17QP51/ref=as_li_tl?ie=UTF8&tag=shroomok-20&camp=1789&creative=9325&linkCode=as2&creativeASIN=B07R17QP51&linkId=3ffdd06ed2923faefc644ed775d00281) - $25.98
[**LED Desk Lamp**, 1 USB Charging Port, 2 AC Power Outlet - Black](https://www.amazon.com/gp/product/B088PCWS67?&linkCode=ll1&tag=shroomok-20&linkId=b607edcd3f16179a39c59261735c2389&language=en_US&ref_=as_li_ss_tl) $25.99
[LED **Rope Lights Waterproof,** 6500K, 150ft](https://www.amazon.com/dp/B0874QP3YW?th=1&linkCode=ll1&tag=shroomok-20&linkId=898f2d802c9ee0b2af4c5ae8dd72189b&language=en_US&ref_=as_li_ss_tl) $83.99
#### How to make automated G**rowBox for mushroom cultivation**
To improve your growing process and make **automated growbox** you can use different sensors, timers and all sorts of gadgets. It's up to you. The sky is the limit!
**Humidity Controller and Timers** are great things to use. Humidity controller will turn on/off humidifier to maintain humidity range automatically. Don't fear to dry out mycelium or overmist your mushroom cake or even leave it for a few days without your personal control. Timer will turn on/off light or fan/air pump according to required schedule you set automatically.
**Shroomok's Choice on Amazon:**
[Digital Humidity Controller](https://www.amazon.com/SCGK-Digital-Humidity-Controller-WH-1803H-15A-110VAC-1650W-1-99-Air-High-Precision-Humidity-Sensor-Suitable-for-Home-Brewing-Refrigerator-Fermentation-Greenhouse-Glass-Container-Reptile-Meat-Storage/dp/B09N6M5NSF?&linkCode=ll1&tag=shroomok-20&linkId=64e54f55ccbd85d1db1d5a7986953faa&language=en_US&ref_=as_li_ss_tl) $25.12
[Humidity Controller IHC200 Humidistat Mushroom GrowBox](https://www.amazon.com/Humidity-Controller-Inkbird-Humidistat-Pre-wired/dp/B01J1E5LWM?&linkCode=ll1&tag=shroomok-20&linkId=98cf4ce93c9ffdc85f6696cd06876990&language=en_US&ref_=as_li_ss_tl) $42.99
[3 in 1 Temperature, Humidity & Timer for Light or FAE](https://www.amazon.com/gp/product/B07RDDQJX1?&linkCode=ll1&tag=shroomok-20&linkId=143408ae0717bd80effed11183598796&language=en_US&ref_=as_li_ss_tl) $67.99
Great thing to use is a **Smart Plug. Y**ou can connect your devices (air pump, light, humidifier) and use **Remote Control** with mobile app.
**Shroomok's Choice on Amazon:**
[Smart Plug, Smart Home - 2 Pack](https://www.amazon.com/gp/product/B07B8W2KHZ/ref=as_li_tl?ie=UTF8&tag=shroomok-20&camp=1789&creative=9325&linkCode=as2&creativeASIN=B07B8W2KHZ&linkId=86c5a8db36ea446bb7b5f9dc6827081a) - $14.69
[Smart WiFi Heavy Duty Outdoor/Indoor Outlet, Timer - 3 Outlets](https://www.amazon.com/gp/product/B07JQSX11M/ref=as_li_tl?ie=UTF8&tag=shroomok-20&camp=1789&creative=9325&linkCode=as2&creativeASIN=B07JQSX11M&linkId=fdcf598fa9d84c9781e945a2411b65af) - $19.99
[Outdoor/Indoor Smart Plug Smart Home - 2 Sockets](https://www.amazon.com/gp/product/B07M6RS2LC/ref=as_li_tl?ie=UTF8&tag=shroomok-20&camp=1789&creative=9325&linkCode=as2&creativeASIN=B07M6RS2LC&linkId=652312614a22e1854e71086cf045c7ba) - $21.99
#### Let's sum up!
It's just a brief overview of the necessary conditions for the next few weeks after moving mushroom cakes in fruiting chamber.
> 🔴 Recommended article: [Bottle-tek or How to grow mushrooms in plastic bottles](https://shroomok.com/en/wiki/Bottle-tek_or_how_to_grow_mushrooms_in_plastic_bottles "Bottle-tek or how to grow mushrooms in plastic bottles") is newbie-friendly guide, super easy and cheap tek. You can grow your mushrooms in plastic bottle without any equipment at all!
>
> 🔴 Recommended article: [Forget Monotub Kit. DIY. How to make Monotub for Mushrooms by your own](https://shroomok.com/en/wiki/Forget_Monotub_Kit._DIY._How_to_make_Monotub_for_Mushrooms_by_your_own "Forget Monotub Kit. DIY. How to make Monotub for Mushrooms by your own")
**In the next section we are going to figure out:**
🔸 fruiting parameters and their combination
🔸 pinhead initiation
🔸 what can go wrong: problems during fruiting period with examples
🔸 contamination during fruiting period with examples
Now move on — [**STEP 10. Pinhead Initiation. Growing Parameters for Fruiting period**](https://shroomok.com/en/wiki/Fruiting_period._Pinhead_initiation,_mushroom_pinning_and_mushrooms_growth_parameters "Magic mushrooms fruiting") 🔽
## Fruiting period. Pinhead initiation, mushroom pinning and mushrooms growth parameters
[Fruiting period. Pinhead initiation, mushroom pinning and mushrooms growth parameters](https://shroomok.com/en/wiki/Fruiting_period._Pinhead_initiation,_mushroom_pinning_and_mushrooms_growth_parameters)
### **STEP 10. Day 26-33. Pinhead initiation. Growing parameters for Psilocybe Cubensis**
You've already made [Spawn to Bulk](https://shroomok.com/en/wiki/Making_mushroom_cake,_spawn_to_bulk,_and_casing "Casing of magic mushrooms cakes") and prepare your fruiting chamber: [Growbox](https://shroomok.com/en/wiki/DIY_Grow_Box_for_Magic_mushrooms._Fruiting_conditions "DIY Grow Box for Magic mushrooms. Fruiting conditions"), [MonoTub](https://shroomok.com/en/wiki/Forget_Monotub_Kit._DIY._How_to_make_Monotub_for_Mushrooms_by_your_own "Forget Monotub Kit. DIY. How to make Monotub for Mushrooms by your own"), [Bottle-tek](https://shroomok.com/en/wiki/Bottle-tek_or_how_to_grow_mushrooms_in_plastic_bottles "Bottle-tek or how to grow mushrooms in plastic bottles") or any other tek for your choice.
Now let's figure out how mycelium will change further.
What factors affect pinhead initiation, fruiting and yield?
What can go wrong during this so important and challenging period?
#### Mushroom life cycle
Let's start from mushroom life cycle basics to understand the process and terminology
[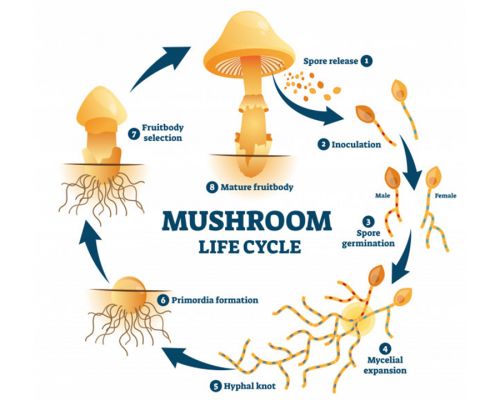](https://shroomok.com/en/wiki/File:Mushroom-life-cycle.jpg) Mushroom life cycleAs you know, mushrooms start their growth from spores after substrate inoculation.
Then spores germinate and they have male and female spores! They literally create lovely pairs, connect and then form mycelium network. It lasts till there are enough nutrients for mycelium and mycelium wait for fruiting conditions.
The change from the vegetative growth (mycelium growth or colonisation period) to the fruiting period (knots, pinheads and mushroom fruit bodies development) is called ***knotting***, ***pinning, pin setting or pinhead initiation period***.
Pinheads or primordia are knots of mycelium that proceed their development into small mushrooms. That's why it is the most important phase in mushroom cultivation each grower waiting for it
> Hypha, hyphae — individual cells of mycelium
>
> Hyphal knot — individual strands of hyphae bundle together and prepare to grow a fruit body
>
> Pin, pinhead — a very young mushroom, so-named for the pin-sized developing cap. Synonym with "primordium"
>
> Primordium (pl. primordia) — the initial fruiting body, the first recognizable but undifferentiated mass of hyphae that develops into a mushroom fruitbody. Synonym with "pinhead"
>
> 🔴 Check out: [Mycology Glossary & Mushroom Growing Abbreviations](https://shroomok.com/en/wiki/Mycology_Glossary_and_common_Mushroom_Growing_Abbreviations "Mycology Glossary and common Mushroom Growing Abbreviations")
All species require a set of conditions for pinning. They are quite different from the conditions for mycelial growth. Mushroom grower should understand the basic principles of pinning process and control changes.
Pinhead initiation in nature depends on climate conditions and seasons of the year.
In temperate and continental climates most mushrooms fruit during cool rainy spring and autumn. In tropical and subtropical climates mushrooms fruit during the rainy season, Psilocybe Cubensis and Panaeolus particularly.
The fruiting period is finished, when the season changed and climate conditions become too dry, too hot, or too cold. Then mycelium goes dormant, continue creating mycelium network underground and wait for better times. Mycelium wake up again when the relative humidity rises and temperature is suitable for fruiting.
> Unfavorable conditions is the best time to expand mycelium network, absorb nutrients and restore energy reserves. As soon as tropical rains start again and temperature decrease these reserves are used for supporting mushroom fruit bodies development; and releasing spores to start the new cycle again
#### **Basic principles of pin setting**
Mushroom fruiting indoor response to the same conditions that trigger fruiting in the wild. Most of mushroom species require a few basic fruiting conditions:
✅ **Fresh air exchange (FAE)** is a main trigger for mushroom fruiting indoor
✅ **Lower temperature** than optimal for colonisation period in incubator. Usually, temperature drop is accompanied by rain in nature and increasing humidity level
✅ **High relative humidity** is necessary for pin setting and normal fruit bodies development
✅ **Evaporation** from top layer of mushroom cake/block. This process creates proper microclimate, maintain high humidity and one of the triggers for pinhead initiation
✅ **Light.** Although mycelium doesn't need the same light as plants, however photosensitive species require light for pin setting and normal mushroom metabolism
> 🔴 **Pinning and mushroom development proceed if all these factors are in balance and coincide!**
#### The relationship between primordia formation and yield
The pinning and primordia period is extremely important stage. Certain relationships exist between the pinning process and yields:
📍 **During the primordia formation period, pinheads for the first and second flush are being generated.**
About 60-75% of the total yield is normally harvested from the first two flushes. That's why the first 7-14 days in growbox for pinhead initiation are the most critical in the growing of mushrooms.
📍 **The greater the number of pins set for the first flush, the higher the yield.**
However, with more pinheads competing for the same nutrient base, the smaller are the mushrooms arising from it. Fewer pinheads result in larger mushrooms, but lower total yields.
📍 **The substrate will only support the development of a certain number of primordia per flush.**
Under normal circumstances with an even pin-set, pinheads may "abort" because of insufficient nutrients or late formation.
📍 **Pins that form early delay the growth of neighboring primordia.**
This can often be seen along the boundaries of the substrate container where primordia form or along the edges of the cake. At the same time, the rest of the mushroom cake remains completely bald. Sometimes these single primordia are removed to allow for even pin formation over the entire surface of the cake and to obtain a greater yield
#### Fruiting chamber for mushroom growing
Changing any of fruiting parameters can slow down or stop growing process at all. Therefore, grower should control fruiting conditions.
That's why we use different types of fruiting chambers to make it easier: [GrowBox](https://shroomok.com/en/wiki/DIY_Grow_Box_for_Magic_mushrooms._Fruiting_conditions "DIY Grow Box for Magic mushrooms. Fruiting conditions"), [MonoTub](https://shroomok.com/en/wiki/Forget_Monotub_Kit._DIY._How_to_make_Monotub_for_Mushrooms_by_your_own "Forget Monotub Kit. DIY. How to make Monotub for Mushrooms by your own"), [Bottle-Tek](https://shroomok.com/en/wiki/Bottle-tek_or_how_to_grow_mushrooms_in_plastic_bottles "Bottle-tek or how to grow mushrooms in plastic bottles"), shoeboxes, SGFC (shotgun fruiting chamber), Martha tent or Grow Tent etc. All of them work great!
The choice is up to you!
Automated Growbox for small mushroom cakes or PF-tek mushroom cakes
[](https://shroomok.com/en/wiki/File:Growbox-for-mushroom-growing.jpg) Growbox with automation> 🔴 Detailed guide: [DIY Grow Box for magic mushroom growing](https://shroomok.com/en/wiki/DIY_Grow_Box_for_Magic_mushrooms._Fruiting_conditions "DIY Grow Box for Magic mushrooms. Fruiting conditions")
Automated or modified MonoTub fruiting chamber. Make it properly and forget about manual FAE and misting
[](https://shroomok.com/en/wiki/File:Monotub-guide-DIY-How-to-make-Monotub-for_mushrooms.png) How to make effective MonoTub> 🔴 Detailed guide: [How to make effective Monotub for Mushrooms by your own](https://shroomok.com/en/wiki/Forget_Monotub_Kit._DIY._How_to_make_Monotub_for_Mushrooms_by_your_own "Forget Monotub Kit. DIY. How to make Monotub for Mushrooms by your own")
One more option is Bottle-tek or growing in plastic bottles. This is a cheap alternative for Monotub and Growbox
[](https://shroomok.com/en/wiki/File:Bottle-tek-guide-mushroom-cultivation.png) Bottle-tek or how to grow mushrooms in plastic bottle> 🔴 Detailed guide: [Bottle-tek or how to grow mushrooms in plastic bottles](https://shroomok.com/en/wiki/Bottle-tek_or_how_to_grow_mushrooms_in_plastic_bottles "Bottle-tek or how to grow mushrooms in plastic bottles")
#### When you should start fruiting conditions
Keep air holes in fruiting chamber closed, keep you mushroom cakes closed. Don't provide fresh air and misting! Wait till the top layer of your mushroom cake will be colonised about 70-100%.
Let's check few examples to show you when it's time for fruiting conditions
[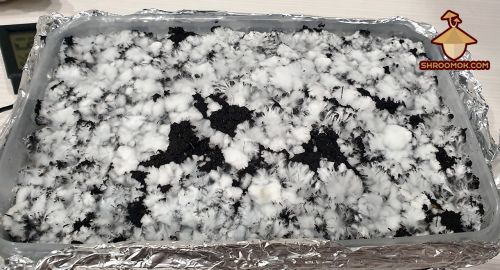](https://shroomok.com/en/wiki/File:Mushroom-cake-for-fruiting-period.jpg) Mushroom cake ready for fruiting conditions. Almost 100% of top layer is colonized[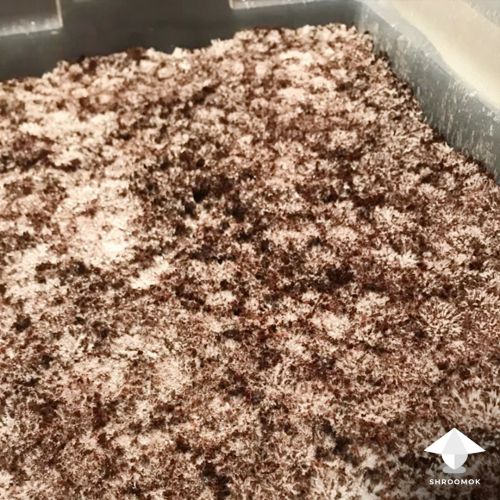](https://shroomok.com/en/wiki/File:Mushroom-cake-ready-for-fruiting-conditions.jpg) Mushroom cake in MonoTub ready for fruiting conditions. 100% colonization[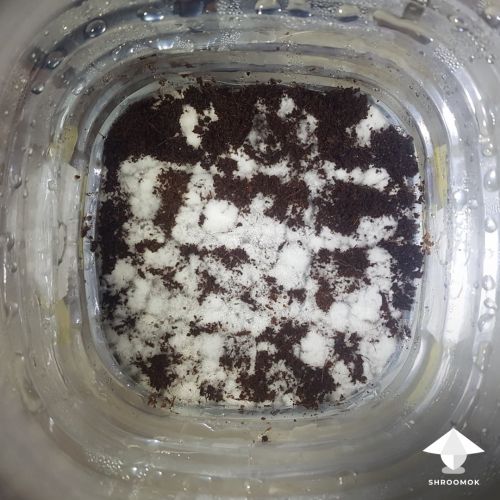](https://shroomok.com/en/wiki/File:Mushroom-cake-ready-for-fruiting-conditions-bottle-tek.jpg) Mushroom cake in bottle ready for fruiting conditions. About 80% colonization[](https://shroomok.com/en/wiki/File:Bottle-tek-ready-for-fc.jpg) Bottle-tek, mushroom cake ready for FC. About 90% colonization
After top layer colonization you can provide fruiting conditions (FC): fresh air exchange (FAE), high relative humidity and light.
If you start earlier it takes more time for pinning, hence fruiting. Also higher risks of mold contamination, because molds like uncolonised areas on top layer and develop faster than mycelium. Easy to catch mold contamination during fanning the fruiting chamber.
#### **Ideal fruiting conditions for pinning or primordia formation**
After starting fruiting conditions for the first 5-7 days the mycelium seem like stalled and stop growing at all. It's totally normal!
Mycelium need time for adaptation, for switching mushroom "system" from colonization to fruiting.
The main task for you for the first 2 weeks of fruiting period is maintaining proper fruiting conditions:
##### ❇️ A**ir temperature**
Optimum air temperature for **Psilocybe Cubensis** in the fruiting chamber is +21°..+23°C or 70-74°F. The acceptable range is +20°..+25°C or 68-77°F.
> For **Psilocybe Natalensis** +20°..+30°C or 68-86F and even up to 40C or 104°F. For **Panaeolus species** temperature range is +20°..+33°C or 68-91°F
At the lower temperature the growth can slow down significantly.
On the higher temperature there is a risk of activating contaminants and mycelium can switch back to the vegetative phase and provoke mycelium overgrowth aka [overlay](https://shroomok.com/en/wiki/Psilocybe_growing_problems_-_overlay,_abortions,_etc "Psilocybe growing problems - overlay, abortions, etc").
Due to mushroom metabolism mycelium itself heats up during the growing process. Temperature in the substrate can be 1-2° higher than air temperature in the fruiting chamber.
At this point, it will be sufficient to continue cultivation at room temperature. Of course, it depends on the temperature in your home. In the cold winter months heating may be needed (the same as for incubator). During summer months, it can be too hot and and you'll need cooling/air conditioning.
Control and measure temperature with an ordinary thermometer inside. Thermometer with hygrometer and CO2 sensor is really great to have.
[](https://shroomok.com/en/wiki/File:Thermometer-and-hygrometer-for-psilocybe-cubensis-incubator-and-growbox.jpg) Thermometer for growbox**Shroomok's Choice on Amazon:**
[Digital Hygrometer, Thermometer with Remote App](https://www.amazon.com/gp/product/B07Y36FWTT/ref=as_li_tl?ie=UTF8&tag=shroomok-20&camp=1789&creative=9325&linkCode=as2&creativeASIN=B07Y36FWTT&linkId=244415a8d89f306fb2c96ecc7f6b961f) - $11.99
[2-in-1: Professional Digital Hygrometer, Thermometer](https://www.amazon.com/gp/product/B07YY1FB9D/ref=as_li_tl?ie=UTF8&tag=shroomok-20&camp=1789&creative=9325&linkCode=as2&creativeASIN=B07YY1FB9D&linkId=4d946b984658d5478b46e13d1e17c38f) - $17.99
##### ❇️ **Relative humidity**
Optimal relative humidity **(RH) in fruiting chamber is 90-95%.**
The acceptable range is 85-99%.
Use **hygrometer** to check humidity level. If you don't have hygrometer, then water drops on the walls of the tub is your sensor
To maintain required humidity level spray the walls of the fruiting chamber 1-2 times a day after FAE.
[](https://shroomok.com/en/wiki/File:Condensation-in-growbox-monotub-for-mushroom-growing.jpg) Condensation in growbox or monotub as a sign of high relative humidity> ❌ Don't spray water on the mycelium and mushrooms directly! Control top layer of mushroom cake. It shouldn't be dry! At the same time avoid water pooling on mycelium. Skip misting if the walls of fruiting chamber are wet and/or you see small water drops on mycelium
The most simple and cheap method to maintain humidity is spray bottle with ultra fine water mist
[](https://shroomok.com/en/wiki/File:Mist-spray-bottle-for-mushroom-growing.jpg) Mist spray bottle for misting growbox or monotub**Shroomok's Choice on Amazon:**
[Ultra Fine Spray Bottle, 10 oz, 300ml, Different Colors](https://www.amazon.com/dp/B0948WBX9L?&linkCode=ll1&tag=shroomok-20&linkId=a089e5ab9e976d28e7aceeec31a5280f&language=en_US&ref_=as_li_ss_tl) $8.99
You can also use terrarium humidifier or fogger. It can be programmed according to the intensity and frequency of spraying to maintain a constant humidity 90-95%.
[](https://shroomok.com/en/wiki/File:Humidifier-for-growbox.png) Fogger for growbox**Shroomok's Choice on Amazon:**
[Fogger **with Humidity Controller**, Extended Hose, 4L](https://www.amazon.com/dp/B08NVLT6JK?&linkCode=ll1&tag=shroomok-20&linkId=680a074364c98f494a675162d8076fdc&language=en_US&ref_=as_li_ss_tl) $59.99
##### ❇️ **Fresh air exchange (FAE)**
As you know mushrooms breathe with oxygen (O2) and emit carbon dioxide (CO2). Right after starting fruiting conditions the mycelium growth slows down and it produces less carbon dioxide until active phase of fruiting "turns on". It is necessary to introduce fresh air to initiate pinning.
###### **Neglect tek**
Properly made MonoTub doesn't need extra fanning. If the walls of the Monotub are wet, but you can see dry circle around air vents it means natural FAE works good for your fruiting chamber. You don't need additional fanning.
[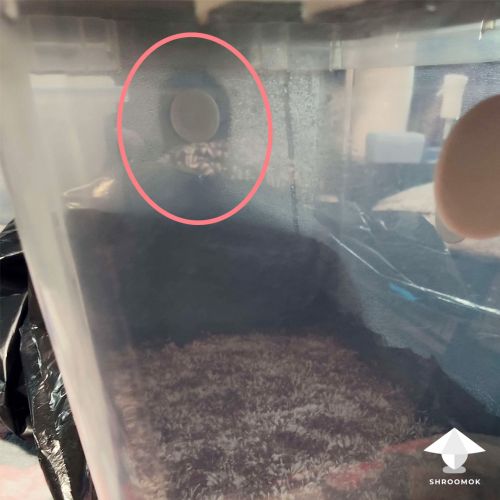](https://shroomok.com/en/wiki/File:Air-flow-in-monotub.jpg) Neglect tek monotub. Properly made monotub with natural FAE through air vents in monotubThe same for properly made Bottle-tek. FAE through air holes is enough for mushroom pinning and further development.
###### **Manual FAE**
However manual FAE 2-3 times a day required for Growbox or if natural FAE doesn't work for your Monotub. Just open the lid of your tub for 1-2 minutes and make a few light moves with lid over the cakes. The smaller the tub the more often your should introduce fresh air.
Lack of oxygen is a common issue in mushroom growing. It can provoke cloudy fluffy, cottony mycelium growing called [overlay or stroma](https://shroomok.com/en/wiki/Psilocybe_growing_problems_-_overlay,_abortions,_etc "Psilocybe growing problems - overlay, abortions, etc"). As a result you won't get mushrooms at all!
Stale air also provoke contamination. Mold contaminants mostly prefer stagnant air, while mushroom mycelium prefer fresh moving air. There is one more reason why you should provide constant FAE!
###### **Additional automated FAE with aquarium air pump**
Automated FAE in GrowBox (for PF-tek and small mushroom cakes tek) on a regular basis with aquarium air pump. Air pump also filter incoming air through water.
[](https://shroomok.com/en/wiki/File:Aquarium-air-pump-for-growbox.jpg) Aquarium air pump for automatic FAE (180 L/hour)
There is an aquarium stone at the end of the air pump hose, which must be dipped into water. In this way we filter incoming air.
[](https://shroomok.com/en/wiki/File:Growbox-with-air-pump-for-air-exchange-and-humidification.jpg) Growbox with connected air pump for FAE and humidification
You can place bottle with air pump between mushroom cakes or make a stand for bottle
[](https://shroomok.com/en/wiki/File:Air-pump-in-bottle-between-mushroom-cakes.jpg) Air pump in growbox between mushroom cakes
Here is an example of using air pump (in the bottom corner) for big mushroom cake in Growbox.
[](https://shroomok.com/en/wiki/File:Monotub-growbox-for-mushrooms-with-air-pump.jpg) Air pump for FAE placed in the corner of the tubFinally fruiting!
[](https://shroomok.com/en/wiki/File:Fruiting-chamber-for-mushrooms-with-air-pump-for-FAE.jpg) Air pump working for FAE in MonoTub/Growbox**Shroomok's Choice on Amazon:**
[Adjustable Oxygen Pump for 20-100 Gallon - 2 Outlets](https://www.amazon.com/gp/product/B01EBXI7PG/ref=as_li_tl?ie=UTF8&tag=shroomok-20&camp=1789&creative=9325&linkCode=as2&creativeASIN=B01EBXI7PG&linkId=a0a86a19ba80cf22326ca33748ae2c6c) - $14.99
[Quiet Oxygen Pump for 20-100 Gallon - 2 Outlets](https://www.amazon.com/gp/product/B07RJ3XLM8/ref=as_li_tl?ie=UTF8&tag=shroomok-20&camp=1789&creative=9325&linkCode=as2&creativeASIN=B07RJ3XLM8&linkId=a95f2e7fd5ddd905a223db6e6ef7b9e3) - $15.99
[Powerful Air Pump - for 20-200 Gallon - 2 Outlets](https://www.amazon.com/gp/product/B08HMZSH9J/ref=as_li_tl?ie=UTF8&tag=shroomok-20&camp=1789&creative=9325&linkCode=as2&creativeASIN=B08HMZSH9J&linkId=129cc0f3bc777d413baed339a79e2a6c) - $22.89
###### **PC fan for additional FAE**
**PC fan/cooler** can be installed on the lid or on the wall of GrowBox/MonoTub. Size 60-120 mm is good to use. You don't need big or high speed fan
[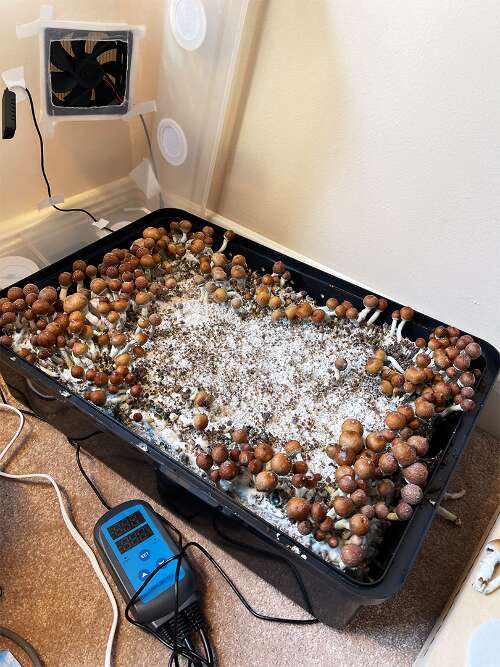](https://shroomok.com/en/wiki/File:Growing-set-up-shroomok-community.png) Monotub with fan for FAE**Shroomok's Choice on Amazon:**
[Quiet Fan with power plug cord](https://www.amazon.com/gp/product/B009OWVUJ0?&linkCode=ll1&tag=shroomok-20&linkId=bba94af92491130fefdb0242b324a204&language=en_US&ref_=as_li_ss_tl) $19.99
##### ❇️ **CO2 level**
CO2 level is directly related to fresh air exchange. For normal pinning process CO2 should be 600-800 ppm.
> ❗️For a rough comparison normal outdoor CO2 level is 400-450 ppm. 600-800 ppm is the CO2 level in a closed room where few people breathe
All-in-one air quality monitor can be used for measuring carbon dioxide level, relative humidity and temperature in any fruiting chamber for mushroom growing
[](https://shroomok.com/en/wiki/File:Digital-CO2-sensor-air-quality-detector.jpg) Digital CO2 detector**Shroomok's Choice on Amazon:**
[Mini CO2 Detector, Temperature, Humidity](https://amzn.to/3VGLizm) $45.99
[Air Quality Monitor: CO2, Temperature Humidity](https://www.amazon.com/gp/product/B08X6T6T7Y/ref=as_li_tl?ie=UTF8&tag=shroomok-20&camp=1789&creative=9325&linkCode=as2&creativeASIN=B08X6T6T7Y&linkId=fca7e8e84f0dfeb07016f969bb1874cf) $33.17
##### ❇️ **Light**
**Optimal is 12 hours on/off cycle**
Mushroom species that require light to form pins are considered photosensitive. Although light is not necessary for the induction of fruiting in fungi, some spectra have been found to be stimulating for the initiation of pins and are essential for the normal development of the fruiting body.
For example, Psilocybe Сubensis and Panaeolus are such photosensitive species.
> 🔬 A thorough investigation on the photosensitivity of Psilocybe Cubensis can be found in a master's thesis by E.R. Badham (1979). His work reinforces the conclusions of other researchers working with the Basidiomycetes: more pinheads are initiated upon exposure to blue and ultra-violet light with distinct peaks at 370, 440 and 460 nanometers
> 🔬 Badham showed that light stimulation at these wavelengths for as little as half a millisecond per day caused primordia to form. In contrast, red, infra-red and green light having wavelengths greater than 510 nanometers were ineffective
> 🔴 **Natural light is suitable, but only diffused soft light. Avoid direct sunlight!**
The optimal lighting cycle for psilocybin mushrooms during the pinhead initiation is 12 on/off cycle. Light should be **white-blue spectrum (~435-480 nm) or use fluorescent light 6500k lux power.**
[](https://shroomok.com/en/wiki/File:Lamp-light-for-mushroom-cultivation.jpg) RGB LED Lamp for growbox
Diode **LED lamp or LED light strip** is suitable
[](https://shroomok.com/en/wiki/File:Lamp-for-psilocybe-mushrooms-growbox.jpg) Diode LED lamp for growbox
**Any lamps with cold white light 6000-6500k** is suitable. No need to use powerful lamps for plants
[](https://shroomok.com/en/wiki/File:Light-for-mushroom-growing.jpg)
Use light inside or outside the fruiting chamber.
[](https://shroomok.com/en/wiki/File:Growbox-cultivation-psilocybe-cubensis-mushrooms.jpg) Light for growbox**Shroomok's Choice on Amazon:**
[**LED Desk Lamp** with Flexible Gooseneck](https://amzn.to/44S1e54) $16.99
[LED **Light Strip,** 6500K - 16.4ft](https://www.amazon.com/gp/product/B07XHLGSXN?&linkCode=ll1&tag=shroomok-20&linkId=8dbdf23e2926f9bc38001f7b42ffd5d4&language=en_US&ref_=as_li_ss_tl) $19.99
[**LED light bar** Under Cabinet Lighting with Touch Switch](https://www.amazon.com/gp/product/B09QHZXP34?&linkCode=ll1&tag=shroomok-20&linkId=828137bfdc88db612aa5e21d7bbaffdb&language=en_US&ref_=as_li_ss_tl) $22.99
**❇️** To improve your growing process and make automated air conditions monitoring in growbox you can use different sensors, humidity and temperature controllers, timers and all sorts of gadgets. It's up to you. The sky is the limit!
Great thing to use are **on/off timer** and **smart plug,** so that you can connect all your devices with **Remote Control** that helps to be informed and change growing conditions **from anywhere!** Most of them are **compatible with Alexa, Echo & Google Home. Or use on/off timers**
**Shroomok's Choice on Amazon:**
[Smart WiFi Heavy Duty Outdoor/Indoor Outlet, Timer - 3 Outlets](https://www.amazon.com/gp/product/B07JQSX11M/ref=as_li_tl?ie=UTF8&tag=shroomok-20&camp=1789&creative=9325&linkCode=as2&creativeASIN=B07JQSX11M&linkId=fdcf598fa9d84c9781e945a2411b65af) - $16.99
[BN-LINK Short Period Repeat Cycle Intermittent Timer](https://amzn.to/3OnhbLw) $26.99
[Digital Controller for Temperature, Humidity, Timer](https://amzn.to/3DmzxG8) $49.99
#### How to identify start of pinning and mushroom growing
##### Knots, pins, primordia examples
All this meditation take up to 2 weeks. As a rule, the first flush of fruiting starts on the 7-14th day.
During the first days in the growbox/monotub it seems like mycelium completely stalled and stop growing. It's totally normal! Because mycelium needs some adaptation period to new climate conditions
[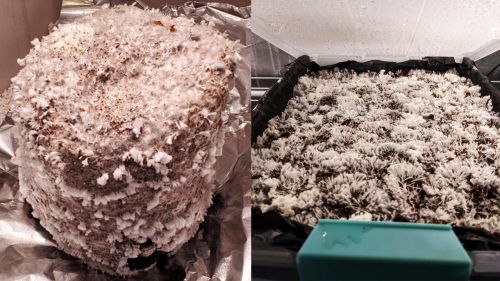](https://shroomok.com/en/wiki/File:Mushroom-cake-in-growbox.jpg) First days of fruiting periodOn the first stage (7-10 days after providing fruiting conditions) you can notice how the mycelium threads turn into small balls
[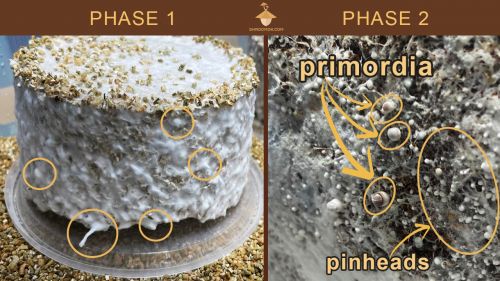](https://shroomok.com/en/wiki/File:Pinhead-and-primordia-formation.jpg) Phase 1 - knots, phase 2- pinheads aka primordia of different sizesAt the second stage (7-14 days days after providing fruiting conditions) knots become more tender and form pins aka primordia. Then these pins continue their development into full-grown mushrooms.
In the photo below, the 28th day after inoculation and only 4 days after providing FC. You can see small pins on the mushroom cake. Although the mycelium didn't cover the entire casing layer tightly, in fact, such mycelium (rhizomorphic type) is ideal!
[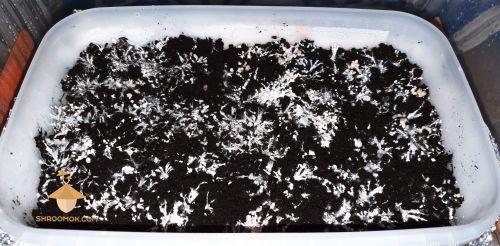](https://shroomok.com/en/wiki/File:Brazil-strain-psilocybe-mushrooms-day-28-copy.jpg) Psilocybe Cubensis Brazil (cake 1). 28 days after inoculation[](https://shroomok.com/en/wiki/File:Psilocybe-cubensis-brazil-28-days.jpg) Psilocybe Cubensis Brazil (cake 2). 28 days after inoculation. Cake after cold shock and rehydration before first flush[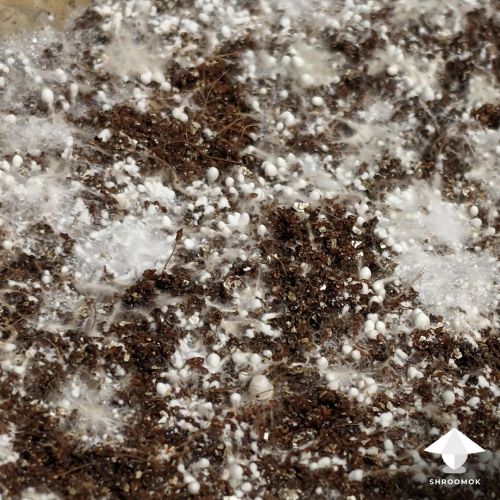](https://shroomok.com/en/wiki/File:Pinhead-initiation-mushroom-growing.jpg) Mushroom pinning in MonoTub[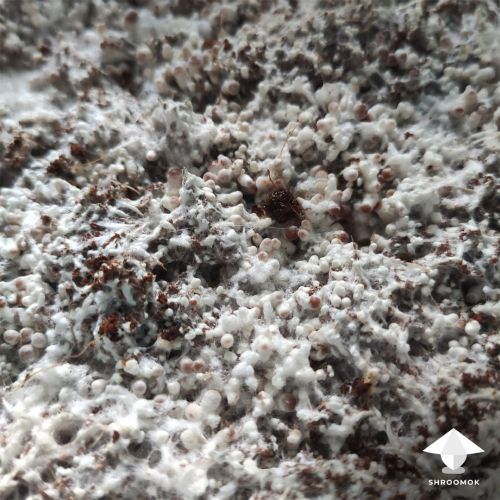](https://shroomok.com/en/wiki/File:Mushroom-pinning.jpg) Mushroom pinning aka primordia formation. Growing mushrooms in bottle aka bottle tek#### Cold shock for pinhead initiation
*Cold Shock* — is a procedure when the colonized mushroom cake is stressed by a sudden drop in temperature — for 12-24 hours in the refrigerator at +2ºC to 4ºC (35-39°F) BEFORE introducing fruiting conditions (FC).
This method has advantages and disadvantages for such warm-loving species like Psilocybe Cubensis.
Briefly, cold shocking is a trigger for pinheads and speed up fruiting.
At the same time cold shock can provoke many [aborted mushrooms](https://shroomok.com/en/wiki/Mushroom_aborts "Mushroom aborts"). That's why this method never used for Panaeolus and 50/50 for P. Cubensis.
> 🔴 Details: [All you need to know about cold shock for magic mushrooms](https://shroomok.com/en/wiki/All_you_need_to_know_about_cold_shock_for_magic_mushrooms "All you need to know about cold shock for magic mushrooms")
Don't use cold shock for all your cakes. Try to make an experiment with 1-2 cakes to see if it works good or bad in your case.
For example here is Psilocybe Cubensis Thai mushroom cake. 9 days after cold shock and providing FC. 28 days after grain inoculation for spawn and we already have small mushrooms.
[](https://shroomok.com/en/wiki/File:Thai-psilocybe-cubensis-28-days.jpg) Growing after cold shock (Thai strain). 28 days after inoculation[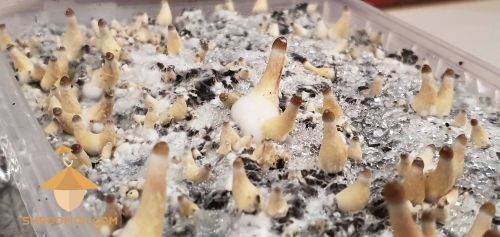](https://shroomok.com/en/wiki/File:Thai-strain-psilocybe-cubensis-mushrooms-28-days.jpg) Psilocybe cubensis Thai, 28 days after inoculation, 9 days after cold shock#### Blanket tek or bubble wrap for pinhead initiation
Sometimes you have such case in mushroom growing:
> 14 days passed after providing fruiting conditions, but you still don't have pins at all. Mushroom cake is totally healthy, there are no signs of contamination. You are sure there is no overlay or stroma. Fruiting conditions are perfect
In this case you can use blanket tek aka bubble wrap tek for your mushroom cake
[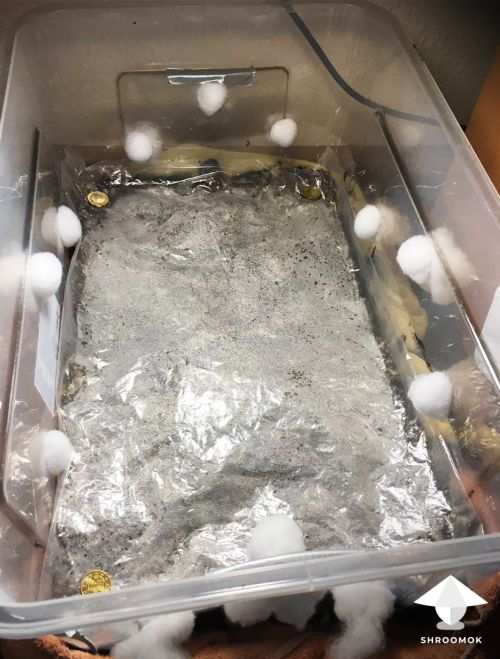](https://shroomok.com/en/wiki/File:Blanket-tek-for-pinhead-initiation.jpg) Blanket tek or bubble wrap for pinhead initiation in mushroom growingTake a food film or bubble wrap.
Spray water on film (use [Ultra Fine Spray Bottle](https://www.amazon.com/dp/B0948WBX9L?&linkCode=ll1&tag=shroomok-20&linkId=a089e5ab9e976d28e7aceeec31a5280f&language=en_US&ref_=as_li_ss_tl) to have small water drops)
Put film or bubble wrap on mycelium like blanket. Film can contact and touch mycelium, don't afraid to do this!
Keep temperature about +21°..23°C or 70-74°F, light 12 hours on/off cycle.
**Remove PE film twice a day** to introduce fresh air and check the mycelium.
Usually in 3-5 days you can see first pins. From this moment remove the film and provide normal fruiting conditions for pins development (FAE, high relative humidity, light).
This method also works great if you started fruiting conditions too early, or top layer becomes dry, or no pinning after 14 days of fruiting conditions
#### Fruiting parameters for mushroom growth
When primordia 3-5 mm in size are formed on the mushroom cake (usually this happens after 7-14 days), then the fruiting parameters should be slightly adjusted.
These conditions should be maintained until the harvest.
❇️ Air temperature in growbox remains stable within the range of **+21°..+23°C or 70-74°F** (for Cubensis).
❇️ Relative humidity a bit lower - 90-92%.
❇️ **FAE more frequent 3-6 times a day.** Under no circumstances should air stagnation be allowed. High humidity and lack of air movement are an excellent breeding ground for pathogenic microorganisms and infection of mushroom cakes. Ideally - the operation of the aquarium air pump or use PC fan every 2-3 hours for 2-3 minutes on slow mode
❇️ **CO2 level no more than 1000 ppm.** At the stage of growth of fruiting bodies, fungi emit more carbon dioxide, but a slight increase in the level of CO2 in the grow box is less critical than at the stage of pinning.
❇️ **12 hour on/off light cycle.** Diffuse natural light or exposure to a blue-spectrum LED lamp (~435-480 nanometers).
> 🔴 **The top layer of mushroom cake should be moist enough. At the same time avoid puddles!**
#### Mushrooms development in dynamic
I'd like to share some examples. Here is Golden Teacher in all its glory. This handsome shroom guy appeared the very first.
[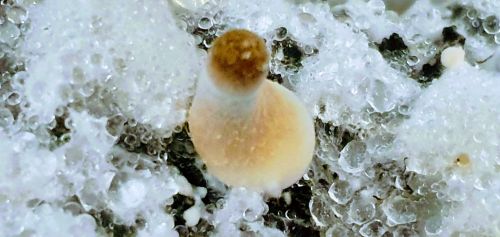](https://shroomok.com/en/wiki/File:Psilocybe-cubensis-golden-teacher-day-29.jpg) Psilocybe cubensis Golden Teacher7 days in the fruiting chamber after starting FC, 26 days after inoculation
[](https://shroomok.com/en/wiki/File:First-psilocybe-cubensis-mushrooms-on-the-cake.jpg) Psilocybe Cubensis Thai. 26 days after inoculation, 7 days in growbox[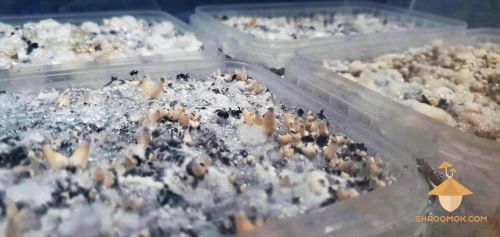](https://shroomok.com/en/wiki/File:First-magic-mushrooms-psilocybe-cubensis.jpg) Magic mushroom cakes Psilocybe Cubensis. 26 days after inoculation, 7 days in growboxMushroom meme with our funny fungi guy
[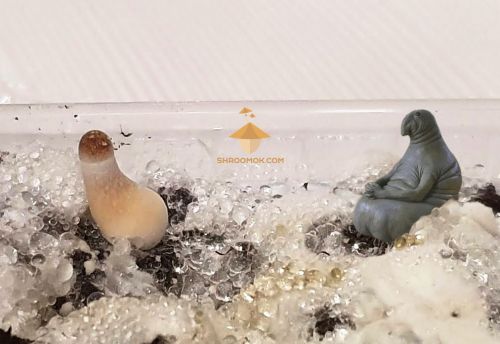](https://shroomok.com/en/wiki/File:Funny-psilocybe-mushrooms-2.jpg) Mushroom meme[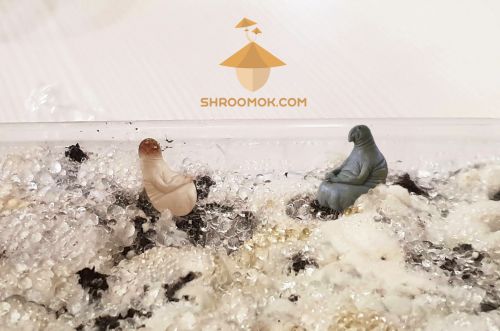](https://shroomok.com/en/wiki/File:Funny-psilocybe-mushrooms-3.jpg) Funny psilocybin mushroom meme10 days after FC, 29 days after grain inoculation
[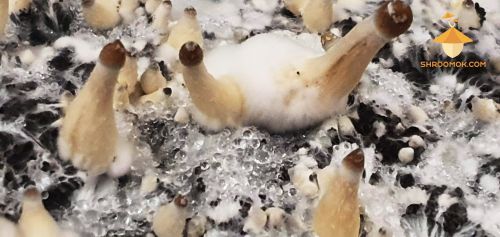](https://shroomok.com/en/wiki/File:Psilocybin-mushrooms-thai-day-29.jpg) Psilocybe Cubensis Thai strain. 29 days after inoculation and 10 days in growbox[](https://shroomok.com/en/wiki/File:Thai-strain-mushrooms-with-cold-shock.jpg) Psilocybe Cubensis (Thai strain). Growth after cold shock[](https://shroomok.com/en/wiki/File:Psilocybe-cubensis-thai-and-golden-teacher-day-29.jpg) Psilocybe Cubensis Golden Teacher and Thai. 29 days after inoculation and 10 days in growbox30th day after inoculation and 8th day of fruiting period:
[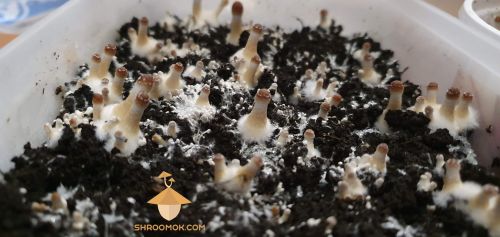](https://shroomok.com/en/wiki/File:Brazil-psilocybe-cubensis-day-30.jpg) Psilocybe Cubensis Brazil (cake 1). 30 days after inoculation, 8 days in growbox[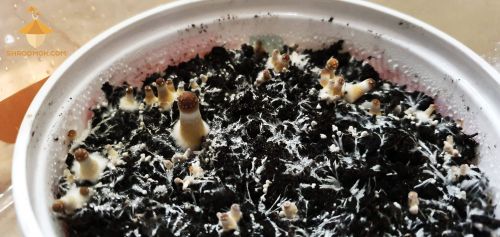](https://shroomok.com/en/wiki/File:Psilocybe-cubensis-brazil-day-30.jpg) Psilocybe Cubensis Brazil (cake 2). 30 days after inoculation and 8 days in growbox
Here you can see fluffy base of stems aka fuzzy feet. It is an exact sign of high CO2 concentration in fruiting chamber and your mushrooms need more FAE
[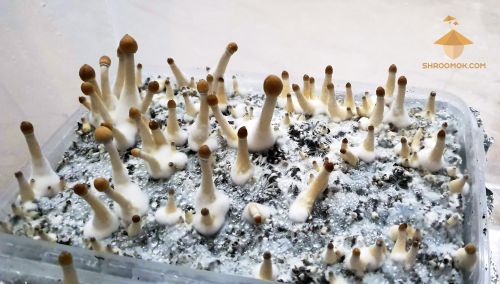](https://shroomok.com/en/wiki/File:Psilocybe-cubensis-thai-strain-day-30.jpg) Psilocybe Cubensis Thai. 30 days after inoculation and 11 days in growbox#### Growing problems during mushroom fruiting period
During fruiting period you can face with many problems. Most common are:
- Wrong fruiting conditions: problems with pin setting and primordia development, overlay, mushroom aborts, metabolites, abnormal development of fruit bodies
- Contamination with pathogenic microorganisms: molds, bacteria, viruses, parasites
- Genetic problems: mutation, abnormal development, strain degeneration, stroma
##### 🆘 **Why mycelium turned blue and have bruises**
Newbie cultivators often confuse mycelium oxidation and mushroom bruises with contamination. Bruises is a reaction between oxygen and psilocin in mushrooms and mycelium. Bruises are not contaminants and nothing to worry about.
Blue color can occur due to any damages or if you touch shrooms or mycelium. Bruises appear due to hard fanning as well
[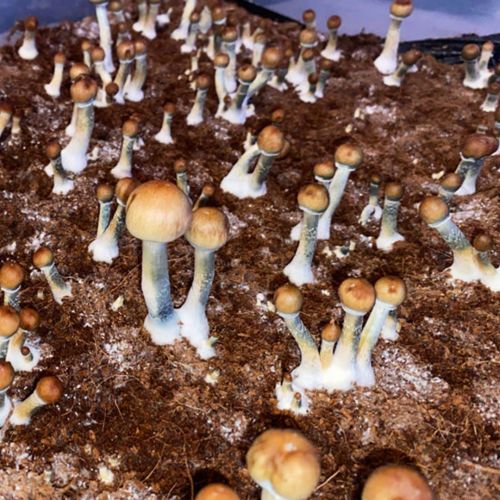](https://shroomok.com/en/wiki/File:Bruises-on-magic-mushroom-body.jpg) Bruises on mushroom stem after hard fanning (monotub)Bruises on mycelium can appear due to lack of moisture in the substrate or casing layer. As a result mycelium torn and become blue.
[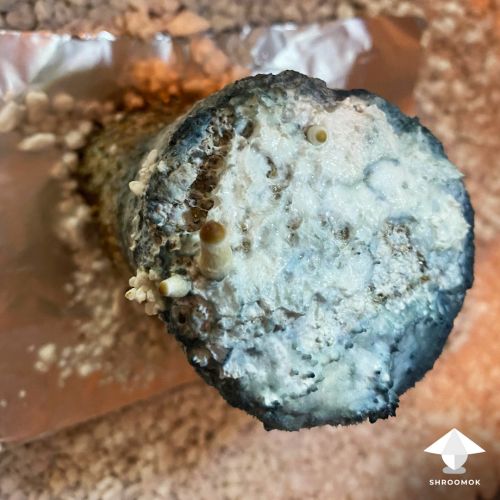](https://shroomok.com/en/wiki/File:Mycelium-bruising-after-hard-misting.jpg) Mycelium bruising due to hard misting (growbox)It's normal reaction when you crop mushrooms.
Bruises often confuse with green mold *Trichoderma* and blue mold *Penicillium*
> 🔴 Recommended: [Mycelium Bruises or Mold Contamination](https://shroomok.com/en/wiki/Mycelium_Bruises_or_Mold_Contamination "Mycelium Bruises or Mold Contamination")
##### 🆘 **Mycelium is cloudy, cottony, fluffy or crust-like**
Stroma and Overlay is a dense cottony mycelium forms on the surface of the casing layer.
[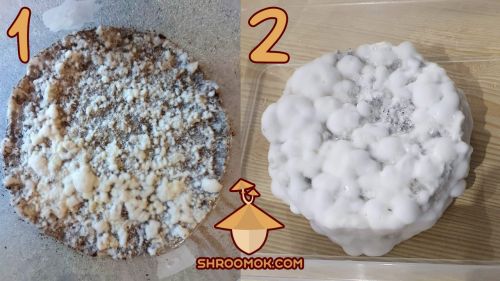](https://shroomok.com/en/wiki/File:Steps-of-mushroom-overlay.jpg) Mushroom cake in Growbox. 1- start of overlay, 2- overlay
Some time later it can turn into a crust. Such mycelium doesn't allow moisture and air to pass through and prevents pins and primordia formation.
[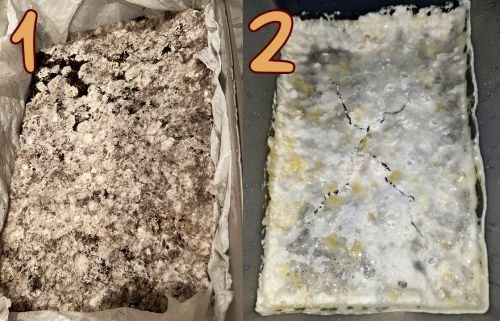](https://shroomok.com/en/wiki/File:Mushroom-overlay-monotube.jpg) Mushroom block in MonoTub. 1- start of overlay, 2 - overlayThe main cause of such situation is lack of fresh air in fruiting chamber with too low or too high relative humidity. Also dead zones in MonoTub due to improperly made MonoTub chamber
> 🔴 More examples and how to fix it: [Overlay and Stroma in mushroom cultivation](https://shroomok.com/en/wiki/Psilocybe_growing_problems_-_overlay,_abortions,_etc "Psilocybe growing problems - overlay, abortions, etc")
##### 🆘 Top layer and mycelium too dry
Dry mycelium can't form pins at all or pins can't develop mushroom fruit bodies. Dry mycelium usually has greyish color
[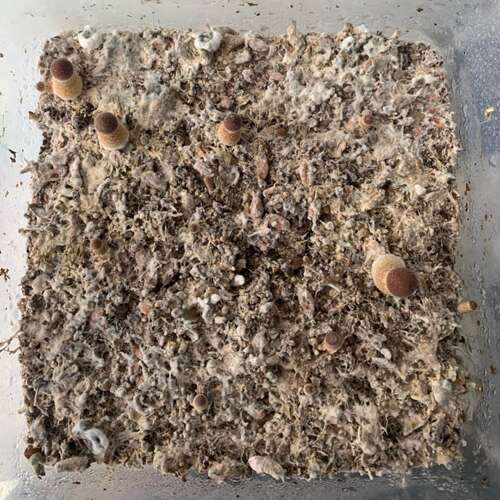](https://shroomok.com/en/wiki/File:Dehydrated-mushroom-cake-2.png) Too dry top layer and dry myceliumIn this case you have high relative humidity in fruiting chamber (sometimes 99%), but this high RH is maintained by high evaporation level from top layer. As a result your mushroom cake dry out.
One more reason is fanning without regular misting (or without using humidifier).
Also hard fanning or too much fanning with PC fan or air pump can provoke such issue.
Try to keep fruiting conditions in balance! If it doesn't work, then rehydration aka soaking in water is the best solution for dehydrated mushroom cakes
> 🔴 Recommended: [Rehydration or how to soak mushroom cake](https://shroomok.com/en/wiki/Rehydration_of_psilocybe_cakes "Rehydration of psilocybe cakes")
##### 🆘 "Dead zones" or ineffective MonoTub
It is a common issue for monotub configuration. If air holes or air gaps were made improperly, then natural airflow won't work. It cause:
Contamination due to poor air flow, contaminants prefer stagnant air
[Overlay](https://shroomok.com/en/wiki/Psilocybe_growing_problems_-_overlay,_abortions,_etc "Psilocybe growing problems - overlay, abortions, etc") due to high CO2 concentration and lack of FAE in fruiting chamber
Overlay in the corners of tub aka dead zones. Usually you can see dry mycelium in the centre, where hard fanning and overlaid parts where no air flow at all and too wet
Dry top layer, when relative humidity in monotub is high. This case is always confused, because hygrometer shows 90-99%, but top layer becomes dry. It means relative humidity maintained mainly by evaporation from top layer and goes away through air holes extremely fast. As a result we have dry top layer, dry mycelium, problems with pinhead initiation or problems with fruit bodies development
> 🔴 Recommended: [How to make effective Monotub for mushroom growing](https://shroomok.com/en/wiki/Forget_Monotub_Kit._DIY._How_to_make_Monotub_for_Mushrooms_by_your_own "Forget Monotub Kit. DIY. How to make Monotub for Mushrooms by your own")
##### 🆘 Too wet mycelium
Small amount of tiny water drops on mycelium is normal. But sometimes you can see excessive water drops or even puddles on mycelium after using humidifier.
Excessive moisture can cause bacteria blotch disease, overlay or inhibit pins development.
In this case don't mist and don't use humidifier for 1-3 days, but provide FAE as usual.
Sometimes fresh air or slow mode fanning for 10-20 minutes helps to dry out excessive water drops.
##### 🆘 **Mushroom caps turned black**
Mushroom aborts are primordia or young mushrooms that have stopped their development. A distinctive feature of aborted shrooms is black mushroom cap
[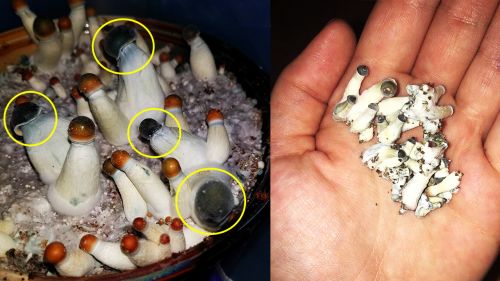](https://shroomok.com/en/wiki/File:Mushroom-abort-example.jpg) Mushroom aborts> 🔴 More details: [Mushroom aborts](https://shroomok.com/en/wiki/Mushroom_aborts "Mushroom aborts")
##### 🆘 **Yellow liquid on mushroom mycelium**
Transparent yellow-orange-brown liquid without slime and smell are secondary metabolites or waste products of the mycelium.
[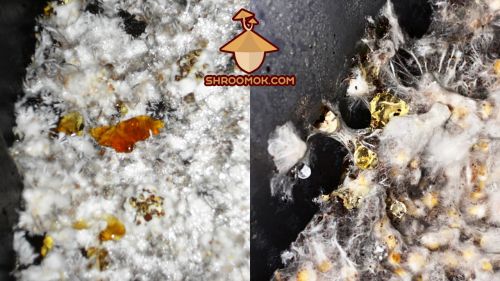](https://shroomok.com/en/wiki/File:Mushroom-secondary-metabolites-exudate.jpg) Mycelium metabolites or mushroom peeOften formed due to stress: temperature changes, drafts, direct sunlight.
Mycelium metabolites can be caused by minor contamination, usually bacteria. As a result of fighting between mycelium's immune system against competitors metabolites appear.
Metabolites are often confused with contamination called ***Mycogone (aka Wet Bubble).***
> 🔴 Details: [Mycelium metabolites or mushroom pee](https://shroomok.com/en/wiki/Mycelium_metabolites_or_mushroom_pee "Mycelium metabolites or mushroom pee")
##### 🆘 **Mycelium become yellow, beige or brown**
[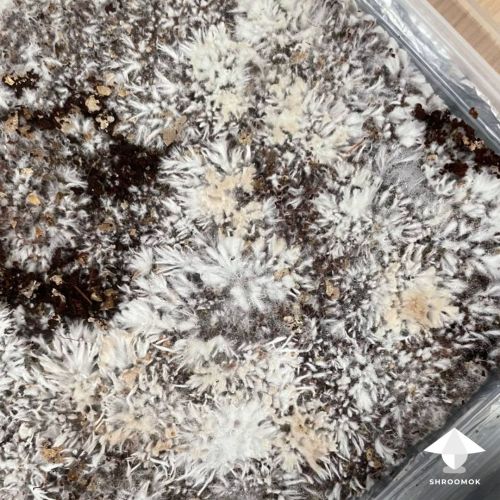](https://shroomok.com/en/wiki/File:Yellow-mycelium.jpg) Yellowish mycelium[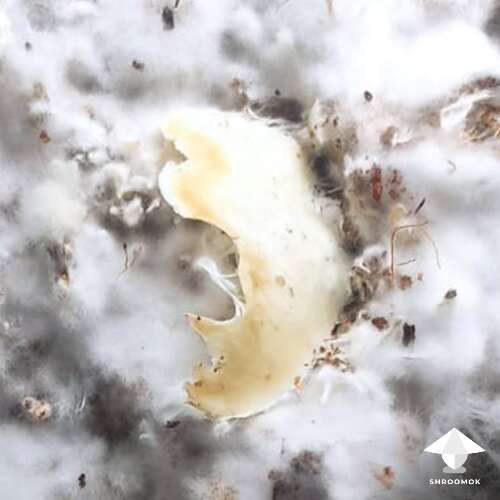](https://shroomok.com/en/wiki/File:Yellow-mycelium-contamination-or-not.png) Yellowish mycelium: contamination or not?Slight pigmentation (beige, yellow, brown mycelium) is a normal reaction due to release of mycelium waste products. Nothing to worry about. It's not contamination.
However, it is important to differ it from yellow mold and mycogone contamination
> 🔴 Details: [Mycelium metabolites or mushroom pee](https://shroomok.com/en/wiki/Mycelium_metabolites_or_mushroom_pee "Mycelium metabolites or mushroom pee")
##### 🆘 Fuzzy feet, white dots on mushroom caps and long stems
[](https://shroomok.com/en/wiki/File:Fuzzy-feet-caps-in-mushroom-cultivation.jpg) Fuzzy feet, fuzzy mycelium, long stems> 🔴 Check out: [Why Mushrooms too Leggy, Fuzzy Feet and White Dots on Caps](https://shroomok.com/en/wiki/Why_Mushrooms_too_Leggy,_Fuzzy_Feet_and_White_Dots_on_Caps "Why Mushrooms too Leggy, Fuzzy Feet and White Dots on Caps")
##### 🆘 **Dark spots on mushrooms and mycelium**
[](https://shroomok.com/en/wiki/File:Dark-spots-on-mushroom-caps-contam-or-not.jpg) Dark mushroom caps> 🔴 Check out details and examples: [Black spots on Mushrooms and Mycelium](https://shroomok.com/en/wiki/Black_spots_on_Mushrooms_and_Mycelium "Black spots on Mushrooms and Mycelium")
##### 🆘 Green Mold contamination
Green mold the most common contamination in mushroom growing. This mold is white form the very beginning, then turn green color. Actually it is easy to identify early Trichoderma contamination.
[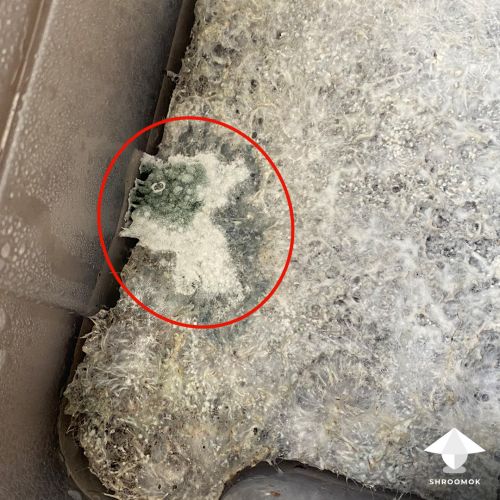](https://shroomok.com/en/wiki/File:Green-mold-trichoderma-contamination.jpg) Green mold contam[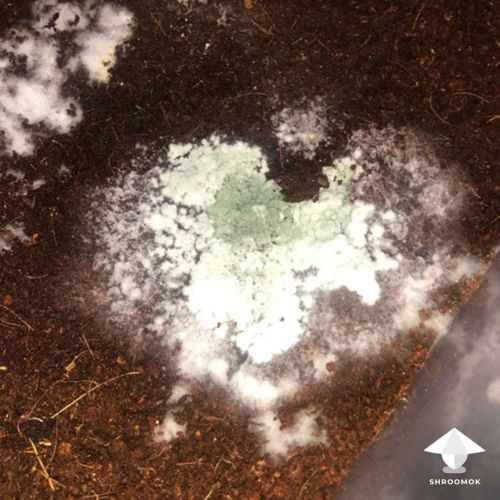](https://shroomok.com/en/wiki/File:White-to-green-trichoderma-mold-on-mushroom-cake.jpg) Green Mold contamination> 🔴 All about Trich contam: [Green mold contamination aka Trichoderma](https://shroomok.com/en/wiki/Green_mold_contamination_aka_Trichoderma "Green mold contamination aka Trichoderma")
##### 🆘 Cobweb Mold contamination
Thin greyish fast growing mold contamination on top layer
[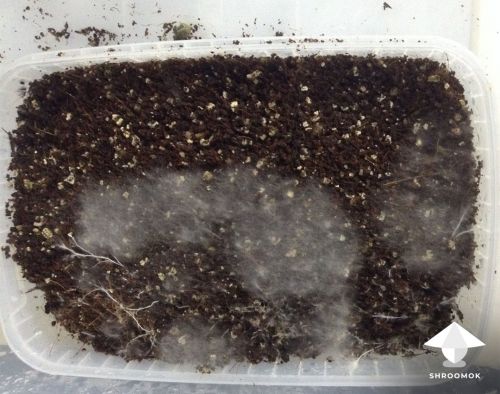](https://shroomok.com/en/wiki/File:Cobweb-on-casing-layer.jpg) Greyish thin cobweb mold contamination> 🔴 Check out details: [How to identify and get rid of Cobweb Mold](https://shroomok.com/en/wiki/How_to_identify_and_get_rid_of_Cobweb_Mold "How to identify and get rid of Cobweb Mold")
And 1000 more issues you can face with. Check out full Growing Troubleshooting and Contamination Library
> 🔴 Recommended: [Growing Troubleshooting and Mold Contamination Library](https://shroomok.com/articles:mushroom-growing-troubleshooting)
Stay tuned!
#### Wrap it Up!
Mushroom cultivation is about balance!
Pinning and mushroom development proceed if all fruiting conditions are in balance and coincide!
This is general overview of growing conditions and possible problems.
> Each case is unique in home cultivation. A lot of factors influence on your growing process: growing tek, the volume of fruiting chamber, temperature outside and inside your fruiting chamber, ventilation in your room, drafts, climate and season of the year in your country, contamination concentration and contam variety in your room etc.
For successful pin setting and mushrooms development you should maintain necessary microclimate in the fruiting chamber, avoid and prevent possible contamination.
Identify contamination in time!
Be patient and attentive to mushroom language, so that you can prevent or fix many growing problems.
The exciting harvesting moment are coming soon...
After primordia formation mushrooms are ready for harvesting in 5-10 days.
But before harvesting I suggest to prepare your own spore prints for new mycological experiments.
Move on — [**Step 11. Day 32-33. How to make spore print**](https://shroomok.com/en/wiki/How_to_make_magic_mushrooms_spore_prints "How to make magic mushrooms spore prints")
Join Shroomok Community on [Discord](https://discord.gg/ngKhQDmymD) and [Reddit](https://www.reddit.com/r/Shroomok) for questions and sharing your experience.
If you find this guide helpful support my work with subscription or one-time donation on ☕️ [buymeacoffee](https://www.buymeacoffee.com/shroomok)
Have a happy growing!
Peace, Shroomok ❤️
## How to make magic mushrooms spore prints
[How to make magic mushrooms spore prints](https://shroomok.com/en/wiki/How_to_make_magic_mushrooms_spore_prints)
[](https://shroomok.com/en/wiki/File:How-to-make-a-mushroom-spore-print.jpg) Make your own magic mushroom spore print### **Step 11. Day 32-33. How to make spore print?**
The excited day of [The first Psilocybe Cubensis harvest](https://shroomok.com/en/wiki/Magic_mushroom_harvesting_time,_first_flush "First flush of magic mushrooms harvest") is coming. But before cropping let's make spore prints for the future cultivation and mycological experiments.
Here is a video demonstration: [How to make a Spore Print](https://www.dailymotion.com/video/x8559wr)
#### What flush is the best for spore prints
There is no consensus which flush is better for spore prints. Some growers state you should gather spore prints from the first flush, some growers note that from the second flush or the most powerful flush or even from the last flush.
We decided to make spore prints from each flush and check them experimentally. It's so great to know you have your own spore print and you can start growing process any time.
When you look at the smallest cap under a microscope you can see a lot of spores on the mushroom blades of the caps.
[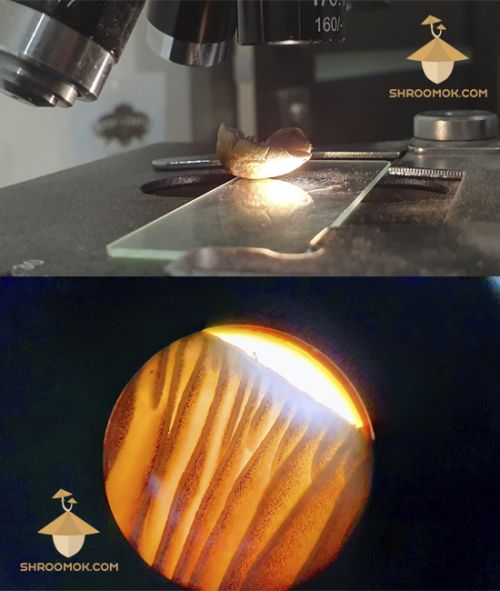](https://shroomok.com/en/wiki/File:Psilocybe-cubensis-mushroom-examination-under-microscope.jpg) Psilocybin mushroom cap with spores under a microscope
From flush to flush spore prints are different as mushrooms yield different as well. We'd like to demonstrate how spore prints differ on the most modest [1st flush of fruiting](https://shroomok.com/en/wiki/Magic_mushroom_harvesting_time,_first_flush "First wave of magic mushrooms harvest") and on the most powerful [3rd flush of fruiting](https://shroomok.com/en/wiki/Third_flush_of_magic_mushrooms_harvest "Third wave of magic mushrooms harvest").
There are spore prints from the 1st flush:
[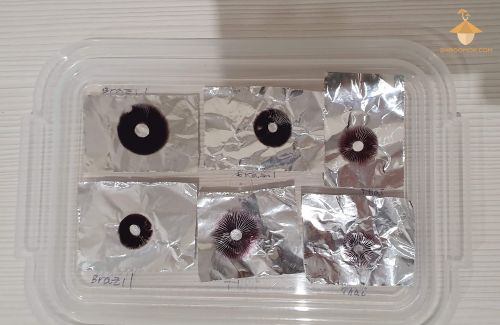](https://shroomok.com/en/wiki/File:Magic-mushrooms-spore-print.jpg) Psilocybe Cubensis spore prints from the first flush of fruiting and harvesting period[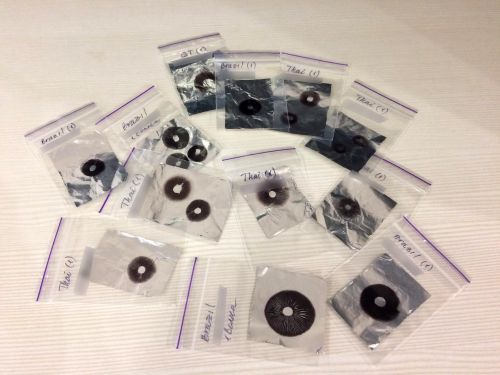](https://shroomok.com/en/wiki/File:Psilocybe-cubensis-spore-prints-ready-to-save.jpg) Ready to store and to use psilocybe cubensis spore prints from the first flush of fruiting
At first glance such spore prints are not perfect. But if we examine the poorest print under a microscope you can see it has poured so many spores that you could inoculate a dozen jars with them.
[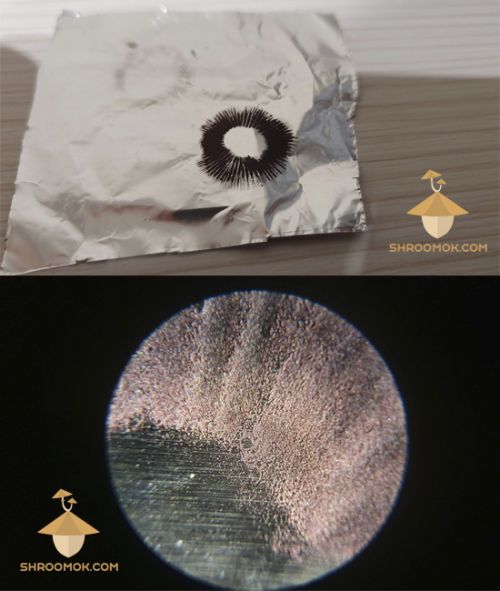](https://shroomok.com/en/wiki/File:Psilocybe-cubensis-mushroom-spore-print-examination-under-microscope.jpg) Psilocybin mushroom Psilocybe Cubensis spore print under microscope[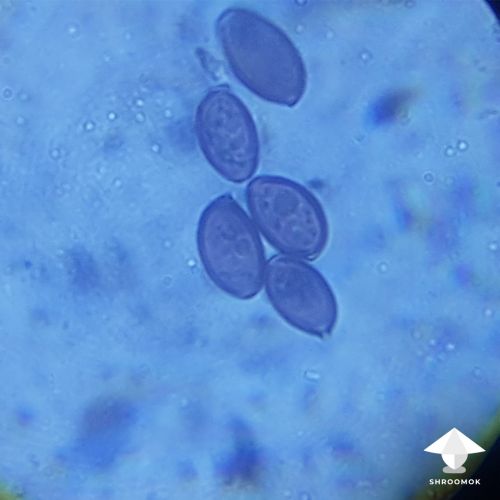](https://shroomok.com/en/wiki/File:Golden-teacher-mushroom-spores-microscopy.jpg) Spores of Golden teacher magic mushroom under microscope. Photo by **mrzimm** - Shroomok Growers Community on [Discord](https://discord.gg/ngKhQDmymD)
Now let's compare spore prints on [The Third flush of harvesting](https://shroomok.com/en/wiki/Third_flush_of_magic_mushrooms_harvest "Third wave of magic mushrooms harvest"): powerful, fulfilled, large and beautiful!
[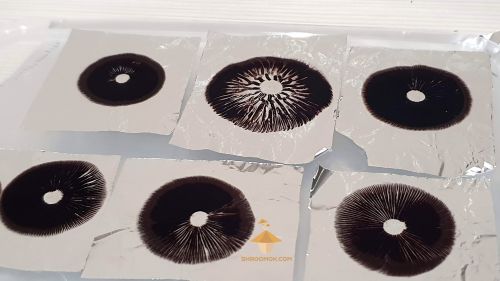](https://shroomok.com/en/wiki/File:Psilocybe-cubensis-spore-prints.jpg) Magic mushroom spore prints from the 3-rd flush of fruiting (Brazil strain)[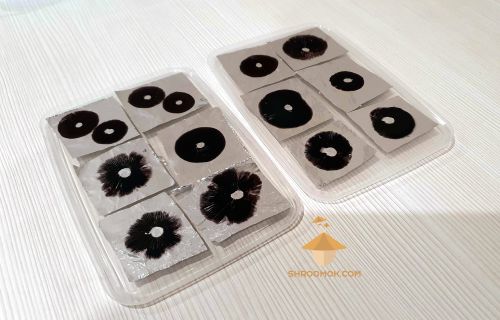](https://shroomok.com/en/wiki/File:Psilocybe-cubensis-mushrooms-spore-prints.jpg) Psilocybe Cubensis fungi spore prints from the third flush of fruiting and harvesting period (Thai - on the left, Golden Teacher - on the right)
The most powerful mushroom was grown on [The third flush of fruiting and harvesting period](https://shroomok.com/en/wiki/Third_flush_of_magic_mushrooms_harvest "Third flush of magic mushrooms harvest") (Psilocybe Cubensis Golden Teacher). Here is the biggest spore print of our growing.
[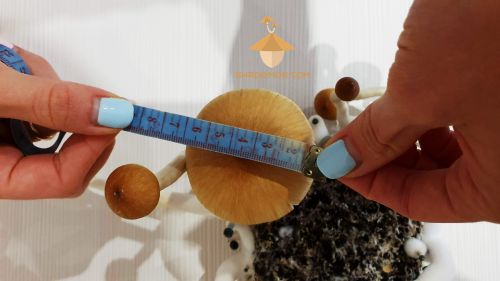](https://shroomok.com/en/wiki/File:Huge-psilocybin-mushroom-for-spore-print-third-flush-of-fruiting.jpg) The biggest magic fungi cap for spore print. Psilocybin cubensis Golden Teacher of the third flush[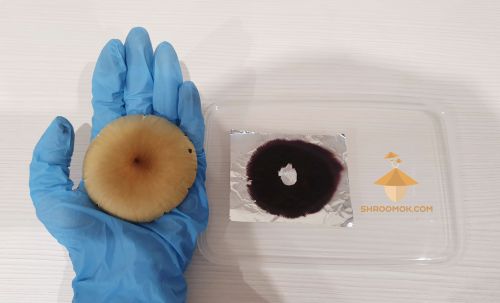](https://shroomok.com/en/wiki/File:Huge-psilocybe-cubensis-spore-print.jpg) The biggest psilocybe cubensis spore print. Golden Teacher of the third flush[](https://shroomok.com/en/wiki/File:Big-magic-mushroom-spore-print-golden-teacher.jpg) Big magic fungi and spore print. Golden Teacher of the third flush#### What you need for preparing mushroom spore prints
To make spore prints you need to prepare:
1️⃣ Healthy mature mushrooms on the cake right after torn veil.
2️⃣ Scalpel, blade or a sharp thin knife.
**Shroomok's choice on Amazon:**
[Surgical Grade Blades - 10 pcs.](https://www.amazon.com/gp/product/B07WTVF64Z/ref=as_li_tl?ie=UTF8&tag=shroomok-20&camp=1789&creative=9325&linkCode=as2&creativeASIN=B07WTVF64Z&linkId=3eaf405958cecfde1630a0b4736afd8f) - $6.99
[Disposable Scalpel Blades, #20 Sharp Carbon-Steel Blades - Pack of 100](https://www.amazon.com/gp/product/B095KGH4FJ/ref=as_li_tl?ie=UTF8&tag=shroomok-20&camp=1789&creative=9325&linkCode=as2&creativeASIN=B095KGH4FJ&linkId=901edfc343a54c42a22db7d0e6e20e18) - $13.50
[Premium Scientific Labwares Essential Lab Tools Starter Pack](https://www.amazon.com/gp/product/B0881Y333D/ref=as_li_tl?ie=UTF8&tag=shroomok-20&camp=1789&creative=9325&linkCode=as2&creativeASIN=B0881Y333D&linkId=16b1d5766754a93510974e8ce3e75b50) - $34.99
3️⃣ Pair of tweezers.
**Shroomok's choice on Amazon:**
[Curved Stainless Steel College Tweezers](https://www.amazon.com/gp/product/B01AKLJON2/ref=as_li_tl?ie=UTF8&tag=shroomok-20&camp=1789&creative=9325&linkCode=as2&creativeASIN=B01AKLJON2&linkId=ea49aca711d620df5bde660d43b1c56b) - $4.95
[4-Piece Hobby Tweezers Set](https://www.amazon.com/gp/product/B0045Z20EK/ref=as_li_tl?ie=UTF8&tag=shroomok-20&camp=1789&creative=9325&linkCode=as2&creativeASIN=B0045Z20EK&linkId=69b45b4e89f43f39c78fd1296a26cd32) - $7.95
4️⃣ Scissors.
5️⃣ Aluminium foil.
6️⃣ Small zip bags for spore print long-term storage.
**Shroomok's Choice on Amazon:**
[Small Clear Poly Zipper Bags - 2''x 3'' - 100 Pack](https://www.amazon.com/gp/product/B076WXLYZH/ref=as_li_tl?ie=UTF8&tag=shroomok-20&camp=1789&creative=9325&linkCode=as2&creativeASIN=B076WXLYZH&linkId=b367605aac210a92d6c813c88df9a74e) - $6.99
[Resealable Aluminum Foil Ziplock Bag, Rainbow Color (2.8 x 3.9 inch) - 100 Pack](https://www.amazon.com/gp/product/B07SH5GYTV/ref=as_li_tl?ie=UTF8&tag=shroomok-20&camp=1789&creative=9325&linkCode=as2&creativeASIN=B07SH5GYTV&linkId=bd75f4e9f735da4818aadd0650133e50) - $9.59
[Clear Plastic Zip Bags, 3 Assorted Sizes: 2x2 2x3 5x5 Inch - 500 Pack](https://www.amazon.com/gp/product/B091FXCCQY/ref=as_li_tl?ie=UTF8&tag=shroomok-20&camp=1789&creative=9325&linkCode=as2&creativeASIN=B091FXCCQY&linkId=e5844103d110cf0110fbf6bd29b64d70) - $12.99
7️⃣ Growers outfit: gloves, cap, gown.
**Shroomok's Choice on Amazon:** [10 Gloves and 1 Mask Bundle](https://www.amazon.com/gp/product/B0865SSK9T/ref=as_li_tl?ie=UTF8&tag=shroomok01-20&camp=1789&creative=9325&linkCode=as2&creativeASIN=B0865SSK9T&linkId=38ee8623dfeaa90b675fd85d6c71c0a8) - $6.99
8️⃣ Ethyl alcohol (70%).
**Shroomok's Choice on Amazon:**
[Isopropyl Alcohol 70% USP Grade - One Quart Spray](https://www.amazon.com/gp/product/B08LW5P844/ref=as_li_tl?ie=UTF8&tag=shroomok01-20&camp=1789&creative=9325&linkCode=as2&creativeASIN=B08LW5P844&linkId=d0e6665a740fcbc728478963e4bd2ba9) - $21.99
[Isopropyl Alcohol 70% - 1 gallon & a 32 oz Spray Bottles](https://www.amazon.com/gp/product/B08CS5H9S6/ref=as_li_tl?ie=UTF8&tag=shroomok01-20&camp=1789&creative=9325&linkCode=as2&creativeASIN=B08CS5H9S6&linkId=609a042946d5a21aec82a992aa88d6c9) - $37.98
9️⃣ Cotton pads.
**Shroomok's Choice on Amazon:** [Cotton Rounds Organic, 100 Count](https://www.amazon.com/gp/product/B0747ZDVXS/ref=as_li_tl?ie=UTF8&tag=shroomok01-20&camp=1789&creative=9325&linkCode=as2&creativeASIN=B0747ZDVXS&linkId=c81cd3f3dee108cfaa7d8e571182c860) - $3.79
🔟 Plastic box with lid or a glass.
**Shroomok's Choice on Amazon:**
[Aluminum Pan with Dome Lid, Environmentally Friendly - 2.25 Lb - 14 pcs.](https://www.amazon.com/gp/product/B07T24QVB9/ref=as_li_tl?ie=UTF8&tag=shroomok01-20&camp=1789&creative=9325&linkCode=as2&creativeASIN=B07T24QVB9&linkId=98baac6db819b38f4526a054596cbed4) - $5.49
[Reusable Lunch Boxes with Lids, BPA Free, Stackable - 28 oz - 20 pcs.](https://www.amazon.com/gp/product/B0742M47V5/ref=as_li_tl?ie=UTF8&tag=shroomok01-20&camp=1789&creative=9325&linkCode=as2&creativeASIN=B0742M47V5&linkId=fdad822df3926a6471f40a8217448c4c) - $16.99
[Durable Food Container Sets with Lids - BPA Free - Reusable Plastic - mix 26oz-40oz-70oz - 15 pcs](https://www.amazon.com/gp/product/B094Z99XSS/ref=as_li_tl?ie=UTF8&tag=shroomok01-20&camp=1789&creative=9325&linkCode=as2&creativeASIN=B094Z99XSS&linkId=a82187477b1720e37fdc52390213b11f) - $19.99
[Food Container with Lid - Black Box - Stackable - BPA Free - Reusable Storage - 38 oz - 50 pcs.](https://www.amazon.com/gp/product/B07L9JGZTD/ref=as_li_tl?ie=UTF8&tag=shroomok01-20&camp=1789&creative=9325&linkCode=as2&creativeASIN=B07L9JGZTD&linkId=efc93c002ce65ed31797124ec9aed341) - $27.99
1️⃣1️⃣ Water in a spray-bottle (boiled chilled water).
1️⃣2️⃣ Germicidal lamp, Glovebox or SAB — optional.
#### Step-by-step process for preparing mushroom spore prints
Ideally, all manipulations should be carried out in the glovebox or [still air box (SAB)](https://shroomok.com/en/wiki/Still_Air_Box_for_Mycology "Still Air Box for Mycology").
Without glovebox your spore prints are not sterile. They are prepared in relatively clean conditions. When you decide to make a [liquid spore syringe](https://shroomok.com/en/wiki/Liquid_psilocybe_spore_syringe "Liquid psilocybe spore syringe") from such prints **antibiotic is must have to use!**
Germicidal lamp is not necessary in this process. But it will help you get more clean prints without glovebox. You can do the same thing without the lamp, but don't forget about antibiotic in [liquid spore syringe](https://shroomok.com/en/wiki/Liquid_psilocybe_spore_syringe "Liquid psilocybe spore syringe") before [substrate inoculation](https://shroomok.com/en/wiki/Inoculation_without_glove_box "Inoculation without glove box").
Now let's move on the step-by-step instructions:
1️⃣ Wear a face mask and gloves before manipulations. Wipe the table and all tools with alcohol.
2️⃣ Cut rectangular pieces from the foil, so that they are fit the zip bags size. We used 6 cm by 8 cm zip bags. The foil pieces were about 5 cm by 6 cm. It's better to use thick foil. Wipe both sides of each piece of foil with alcohol.
3️⃣ Wipe the plastic box and its lid with cotton disk soaked in alcohol. Put the box under the germicidal lamp for 5 minutes (optional, if you don't have a germicidal lamp).
4️⃣ Wipe the lid from the plastic box with alcohol. Stick the foil to the lid. It glues itself easily after wiping it with alcohol. Put the lid with foil pieces under germicidal lamp for 5-10 minutes to sterilize the surface for spore prints (optional, if you don't have a germicidal lamp).
[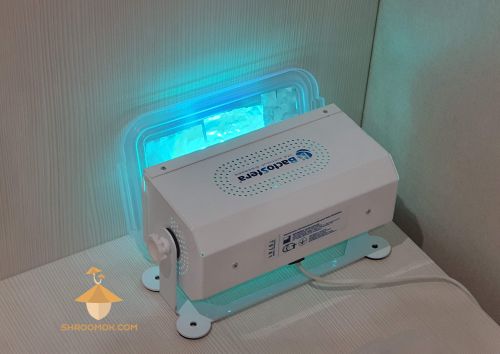](https://shroomok.com/en/wiki/File:Germicidal-lamp-for-spore-prints-preparation.jpg) Plastic lid with foil pieces on it. Using germicidal lamp for spore prints preparation.[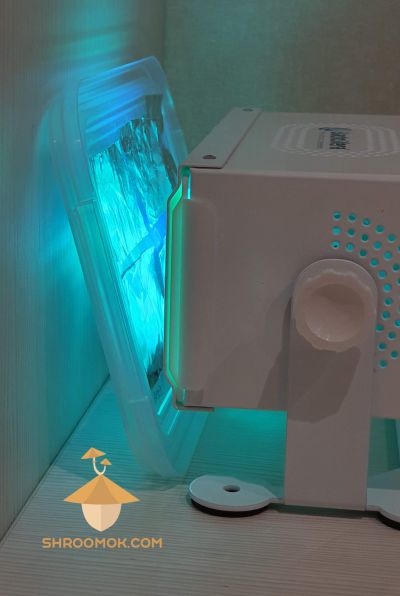](https://shroomok.com/en/wiki/File:Sterilizing-lamp-for-spore-prints.jpg) Sterilizing (quartz) lamp for spore print preparation. Plastic lid with foil pieces on it
5️⃣ 5-10 minutes after put the lid with foil pieces on the table.
6️⃣ Choose the most beautiful mushrooms on the cake. They should be the largest, most powerful. The veil under the cap should have torn.
7️⃣ Wipe the blade or scalpel and tweezers with alcohol.Carefully cut the cap from the stem at the highest possible point. Be sure not to touch the spores with scalpel. Use the tweezers to help with cap.
[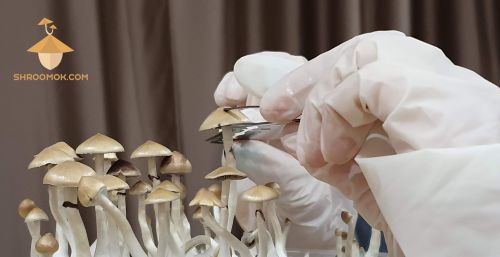](https://shroomok.com/en/wiki/File:Spore-print-preparation-cut-mushroom-cap.jpg) Cut the cap from the stem at the highest possible point with blade or scalpel. Magic mushroom spore print preparation8️⃣ Place the cap on the piece of foil with the spores facing down.
[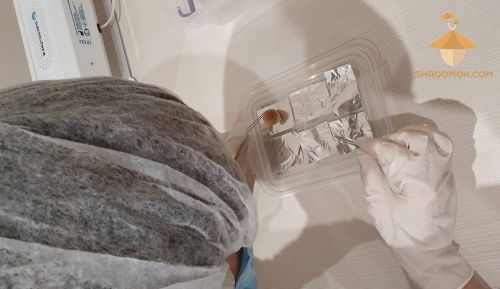](https://shroomok.com/en/wiki/File:Spore-print-preparation-2.jpg) Place mushroom caps on the pieces of foil with the spores facing down. Psilocybe Cubensis spore print preparation
9️⃣ Spray the plastic box (or clean glass) from the sprayer (1-3 times) with chilled boiled water. Cover prints with it.
**Why is it needed?** As you know, mushrooms are 90% consist of water. Caps become dry rapidly after we cut them off. Dry caps will shrink and won't throw spores. So we need to help them and keep humid environment. As a result, more spores will be accumulated on your spore print.
[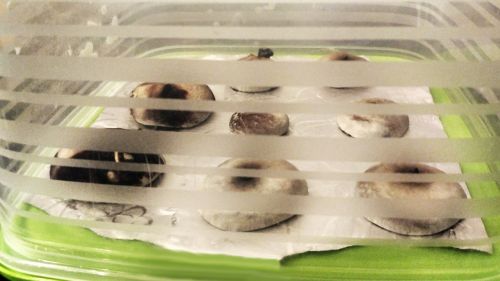](https://shroomok.com/en/wiki/File:How-to-make-spore-print.jpg) Cover mushroom caps with plastic box sprayed with water. Leave mushroom caps for 24 hours[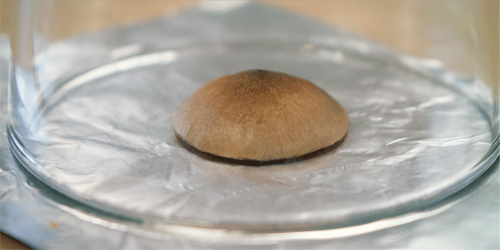](https://shroomok.com/en/wiki/File:Magic-mushroom-spore-print-preparation.jpg) Cover mushroom caps with plastic box or glass sprayed with chilled boiled water. Magic mushroom spore print preparation [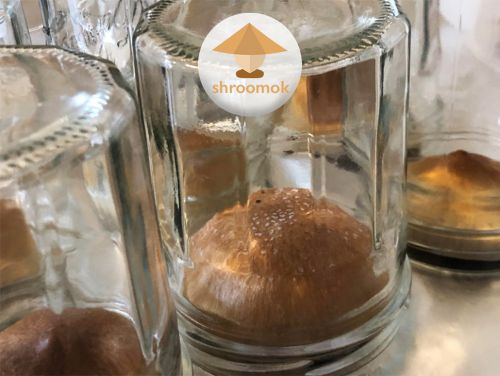](https://shroomok.com/en/wiki/File:Spore-print-how-to-make-at-home.jpg) Cover mushroom caps with glass jar and wait for 24 hours [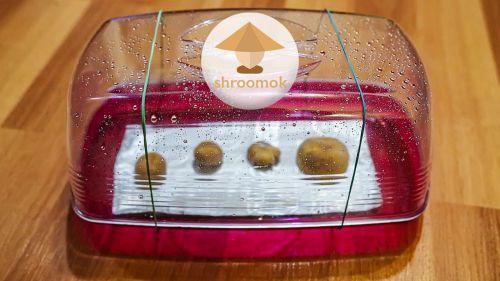](https://shroomok.com/en/wiki/File:How-to-make-spore-print-home-mycology.jpg) One more option: plastic box for spore print preparation🔟 After 24 hours under the box most of the spores will have fallen down. Remove the box. Remove the caps from the foil with tweezers. Take care not to smudge the prints.
[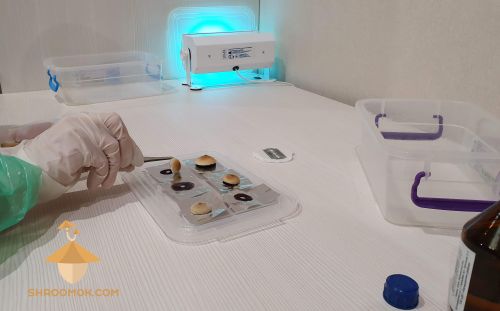](https://shroomok.com/en/wiki/File:Spore-print-preparation-4.jpg) After 24 hours open the box. Remove mushroom caps from the foil with tweezers. Psilocybin fungi spore print preparation[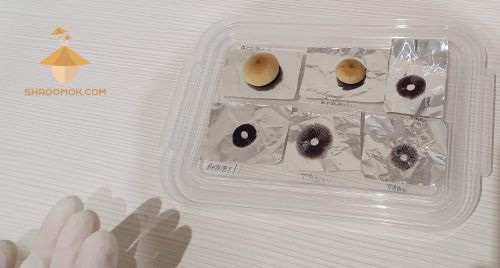](https://shroomok.com/en/wiki/File:Spore-print-preparation-3.jpg) Remove mushroom caps from the foil. Psilocybin fungi spore print preparation
1️⃣1️⃣ Prints will be moist a little, so you need to let them dry. For less contamination from the air we cover the prints with a dry box and let them dry for 10-15 minutes. In the meantime, you can put the zip-lock bags under a germicidal lamp for extra sterility.
1️⃣2️⃣ Pick up the spore printed foil with a pair of tweezers. Put it in a zip bag, close, sign with strain, flush, date. Zip bags are excellent to use here. It is very important the bags are 100% airtight. Ready!
[](https://shroomok.com/en/wiki/File:Psilocybe-cubensis-spore-prints-ready-to-save.jpg) Ready for storing spore prints#### [How long can spore prints be stored? Storage conditions for spore prints](https://shroomok.com/en/wiki/Mushroom_Spore_Print_Storage "Mushroom Spore Print Storage")
Spore prints in zip bags should be stored **in a cool and dark place,** preferably in the refrigerator.
The guaranteed shelf life of spore prints is **up to 5 years.** During the first 2 years spores almost completely retain their viability.
If the spore print has been stored for 2 years or more then the spores will be dehydrated. Such spores need a longer hydration in water when preparing a liquid spore suspension. Each year of storage increases the duration of rehydration by 1 day. 2 years of storage - 2 days of rehydration, 3 years - 3 days of rehydration, etc. or you can simply leave them in water for a week.
Such liquid spore syringe should be stored in a refrigerator at +2°..+8°C or 36-46°F.
Although each fresh spore print contains millions of spores. Only 3-5% of them are viable. The percentage of viable spores gradually decrease over time.
Now it's time for the most excited moment!
**[Step 12. First flush. When and How to harvest mushrooms](https://shroomok.com/en/wiki/Magic_mushroom_harvesting_time,_first_flush "Magic mushroom harvesting time, first flush")** 🔽
## Magic mushroom harvesting time, first flush
[Magic mushroom harvesting time, first flush](https://shroomok.com/en/wiki/Magic_mushroom_harvesting_time,_first_flush)
[](https://shroomok.com/en/wiki/File:First-flush-of-mushroom-fruiting-harvesting-time.jpg) Torn veil and time for harvesting### **Step 12. Day 31-33. Harvesting guide: how to harvest magic mushrooms**
#### **First flush of fruiting Psilocybe Cubensis mushrooms**
The most exciting moment for every mushroom cultivator! You couldn't even imagine the emotional spectrum at this moment. Amazing feelings... Take a look!
[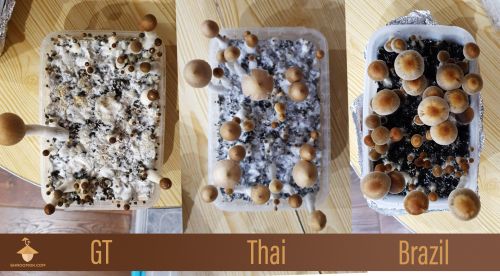](https://shroomok.com/en/wiki/File:Psilocybe-cubensis-mushrooms-growing-first-flush-of-harvest.jpg) 31-32 days after inoculation. First flush of fruiting period. Psilocybe Cubensis: GT, Thai, Brazil[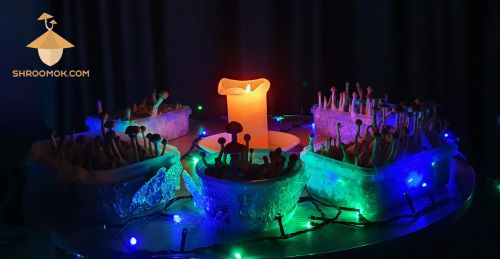](https://shroomok.com/en/wiki/File:Magic-mushrooms-psilocybe-cubensis-growing-first-flush-of-harvesting.jpg) First magic mushroom harvest[](https://shroomok.com/en/wiki/File:Psilocybe-cubensis-first-flush-of-fruiting.jpg) First flush of fruiting psilocybin mushrooms Psilocybe Cubensis[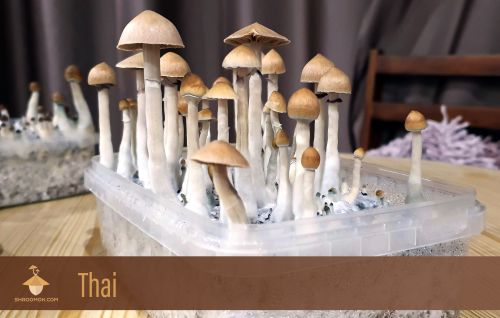](https://shroomok.com/en/wiki/File:Magic-psilocybe-mushrooms-thai-strain-first-flush-of_harvesting.jpg) Psilocybe Cubensis Thai (cake 1). 31 days after inoculation. First flush of fruiting period[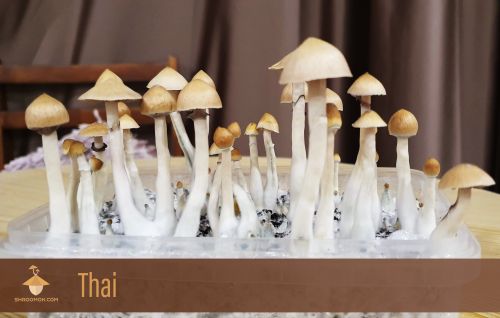](https://shroomok.com/en/wiki/File:Psilocybe-cubensis-thai-strain-first-flush.jpg) Psilocybe Cubensis Thai strain (cake 2). 31 days after inoculation. First flush of fruiting cycle[](https://shroomok.com/en/wiki/File:Psilocybe-cubensis-growing-brazil-first-flush.jpg) Psilocybe Cubensis Brazil strain (cake 1). 31 days after inoculation. First flush of fruiting magic mushrooms[](https://shroomok.com/en/wiki/File:Psilocybe-cubensis-Brazil-strain-first-flush-of-fruiting-and-harvesting.jpg) Psilocybe Cubensis Brazil strain (cake 1). 31 days after inoculation. First flush[](https://shroomok.com/en/wiki/File:Gt-harvest.jpg) Small mushroom cake of Golden Teachers ready for harvesting[](https://shroomok.com/en/wiki/File:Mushroom-growing-in-monotube.png) Magic mushrooms [MonoTub](https://shroomok.com/en/wiki/Forget_Monotub_Kit._DIY._How_to_make_Monotub_for_Mushrooms_by_your_own "Forget Monotub Kit. DIY. How to make Monotub for Mushrooms by your own") ready for harvesting#### **When to harvest magic mushrooms**
When mushrooms tear the veil and open their caps to release spores they stop their growth
[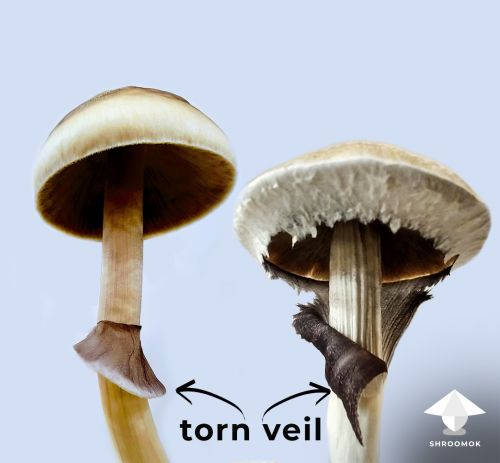](https://shroomok.com/en/wiki/File:Mushroom-veil.jpg) Torn veil as sign for mushroom harvestingFrom this moment mushrooms stop increasing the amount of psychoactive alkaloids. Opened caps is the exact sign for harvesting and the best time to prepare your own spore prints for future cultivations
> 🔴 Recommended guide: [How to make magic mushrooms spore prints](https://shroomok.com/en/wiki/How_to_make_magic_mushrooms_spore_prints "How to make magic mushrooms spore prints")
Sometimes mushrooms mature unevenly. All mushrooms (even small ones) should be picked during the peak of the harvest or the day after it.
You can also pick them partially. On the first day you can pick mushrooms with torn veil only and let small shrooms to grow for one more day.
For example, the first flush of fruiting and our first harvest we got in 2 steps. On the first day were harvested only mature mushrooms with torn veil. Small mushrooms were left on the cake.
For example, such shrooms better to leave in fruiting chamber for 1-2 days more
[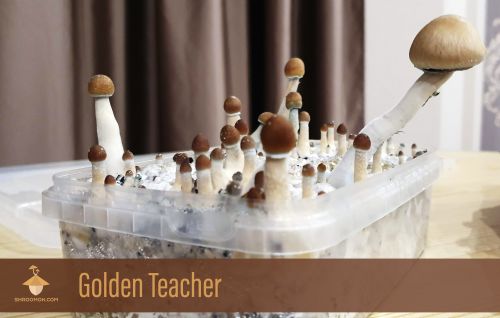](https://shroomok.com/en/wiki/File:Psilocybe-cubensis-golden-teacher-strain-first-flush-of-fruiting.jpg) Psilocybe Cubensis Golden Teacher. 32 days after inoculation. First flushThe next day absolutely all mushrooms were picked (including the smallest mushrooms).
> In fact we are waiting for "torn veil" moment to make spore prints with mature spores. If you don't need spore prints you can pick all mushrooms at once even before torn veil
There's no reason to wait until all the mushrooms are mature and tear the veil. The sooner the flush is harvested the faster the next flush appear, the shorter the total cycle. Small mushrooms should be removed as well.
[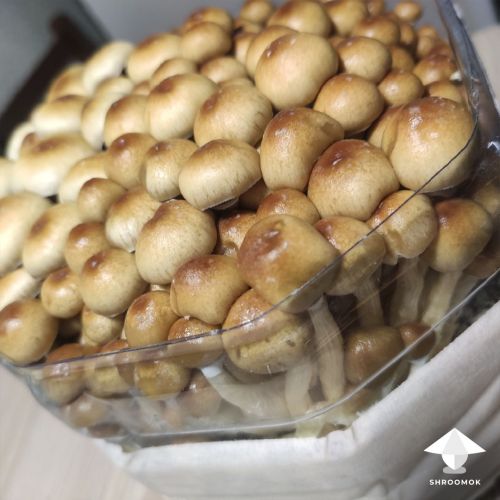](https://shroomok.com/en/wiki/File:Bottle-tek-mushrooms-ready-for-harvesting.jpg) All mushrooms are ready for harvesting. [Bottle-tek](https://shroomok.com/en/wiki/Bottle-tek_or_how_to_grow_mushrooms_in_plastic_bottles "Bottle-tek or how to grow mushrooms in plastic bottles")Some mutated strains of Psilocybe Cubensis, e.g. [Albino Penis Envy](https://shroomok.com/en/wiki/Mutant_strain_Albino_Penis_Envy_aint_just_APE_but_King_Kong_of_Magic_Mushrooms "Mutant strain Albino Penis Envy aint just APE but King Kong of Magic Mushrooms") don't open their caps as muсh as regular Cubes. Sometimes they keep caps closed or open just a little
[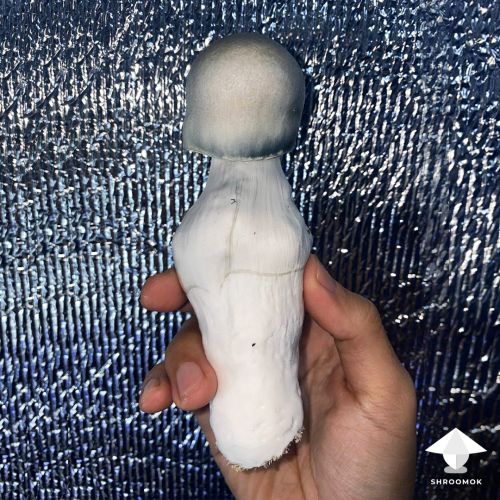](https://shroomok.com/en/wiki/File:Ape-huge-mushroom.jpg) APE mushroom. Photo by Costana Monovar - Shroomok Growers Community on [Discord](https://discord.gg/ngKhQDmymD)> 🔴 Check out: [Mutant strain Albino Penis Envy aint just APE but King Kong of Magic Mushrooms](https://shroomok.com/en/wiki/Mutant_strain_Albino_Penis_Envy_aint_just_APE_but_King_Kong_of_Magic_Mushrooms "Mutant strain Albino Penis Envy aint just APE but King Kong of Magic Mushrooms")
Usually the first flush (multiculture cultivation) isn't the most productive. The [**second**](https://shroomok.com/en/wiki/Second_flush_of_magic_mushrooms_harvest "Second flush of magic mushrooms harvest") and [**third**](https://shroomok.com/en/wiki/Third_flush_of_magic_mushrooms_harvest "Third flush of magic mushrooms harvest") flushes after soaking in water aka [**rehydration**](https://shroomok.com/en/wiki/Rehydration_of_psilocybe_cakes "Rehydration of psilocybe cakes") can be richer. Fruit bodies will be really cool!
> 🔴 As the nutrients in substrate decreasing there will be less mushrooms after 2-3 flush. On the last flush you'll find a few large or a few small strange mushrooms and [**aborts**](https://shroomok.com/en/wiki/Mushroom_aborts "Mushroom aborts")
#### How to harvest magic mushrooms: pick or cut?
[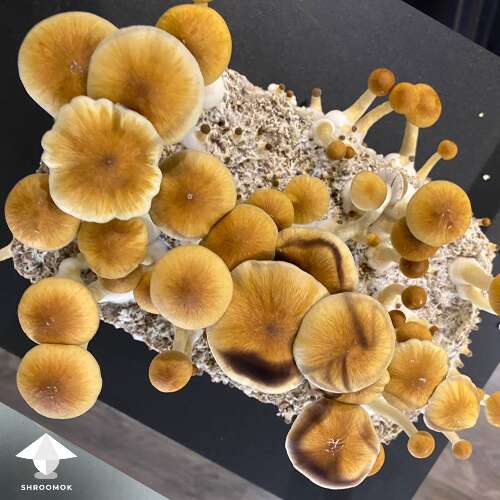](https://shroomok.com/en/wiki/File:Mushroom-harvest.png) Harvesting time**Twist mushrooms by rocking slightly to the sides and remove them gently.** So that you won't damage mushroom cake and reduce the risk of contamination.
Sometimes you remove the whole mushroom cluster (bush of mushrooms) easy without damaging the cake
[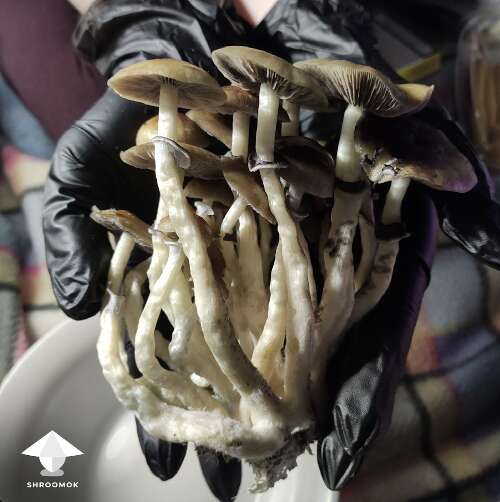](https://shroomok.com/en/wiki/File:Magic-mushroom-cluster.png) Magic mushroom cluster, Golden TeacherIf a piece of substrate comes off don't put it back. Just throw it away.
Try to remove all mushrooms and their stumps. Why? After rehydration such stumps can provoke contamination (wet rot). This is not a common case, just be aware.
> ❗️Be gentle with mushroom cake and casing layer when remove mushrooms. Don't damage mushroom cake
Leave small pinheads (2-3 mm) on the cake, they continue their development on the next flush.
> ❗️There is an opinion that pins after rehydration can rot and kill the entire cake. It has never happened in our experience, usually most pins continue their growth on the next flush. However we need to inform you
Pick as much as you can. If you leave small pinheads on the cake it's not a problem.
Results of the first flush of fruiting and harvesting period (5 mushroom cakes): **238.1g of wet shrooms = 21.62g of dry shrooms + 12 spore prints**
[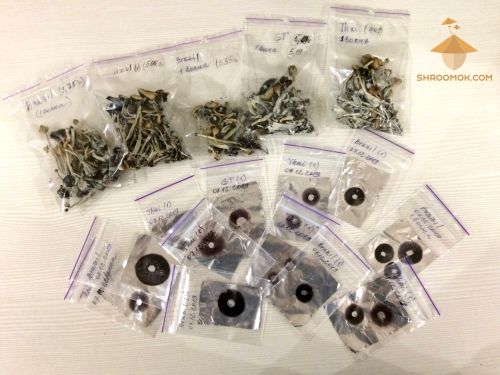](https://shroomok.com/en/wiki/File:Results-of-first-flush-of-growing-psilocybe-cubensis-mushrooms.jpg) Final results of the first flush of fruiting and harvesting period. Dried psilocybe cubensis (21,62 grams) and 12 spore prints for storingTo be honest, it's a pretty small crop. Nonetheless great result for such growing process. In additional guides we'll show you how to increase your yield, but for the first try keep it simple!
> 🔴 Detailed growing statistics with charts by strains and by flushes: [Mushroom grow report in numbers](https://shroomok.com/en/wiki/Magic_mushrooms_growing_statistics_with_charts "Magic mushrooms growing statistics with charts")
#### What happen if you leave magic mushrooms on the cake for a long time
Torn veil means spores are ready for spreading around. It is an endless process in nature. From this moment mushrooms stop increasing psilocybin, psilocin and baeocystin.
If you leave mushrooms for a long time to sporulate everything around will be covered with layer of spores
[](https://shroomok.com/en/wiki/File:Dark-spots-on-mushroom-caps-contam-or-not.jpg) Layer of spores on mushroom caps and myceliumWhen mushroom caps opened at night and what you can see in the morning
[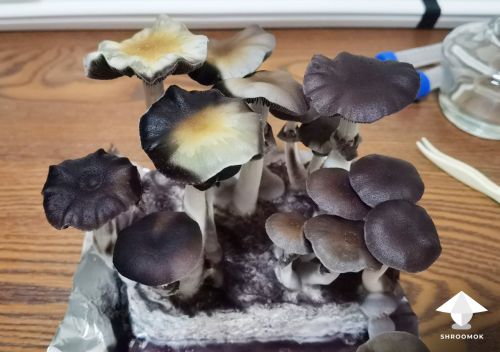](https://shroomok.com/en/wiki/File:Dark-mushroom-caps-sporulating.jpg) Hurry up! Photo by mrzimm - Shroomok Growers Community on [Discord](https://discord.gg/ngKhQDmymD)When you were out of home and can't harvest mushrooms in time. Two days after torn veil
[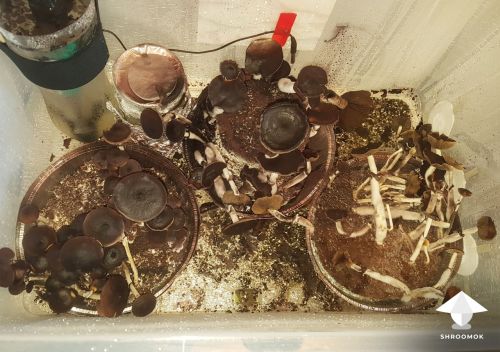](https://shroomok.com/en/wiki/File:Spores-on-mushroom-cake.jpg) When you failed to pick mushrooms in time. Photo by mrzimm - Shroomok Growers Community on [Discord](https://discord.gg/ngKhQDmymD)> 🔴 Check out more examples and additional info: [Black spots on Mushrooms and Mycelium](https://shroomok.com/en/wiki/Black_spots_on_Mushrooms_and_Mycelium "Black spots on Mushrooms and Mycelium")
Moreover, such mushrooms start to lose they alkaloids due to decomposition processes in mushroom cells. This can provoke rotting and contamination of the entire cake.
Harvest in time, grower!
#### What to do after mushroom harvesting?
The next 2 steps we usually make on a parallel.
At first let's prepare our harvest for a long time storage by drying them.
After this step we are going to make mushroom cake rehydration to promote the new flush of fruiting cycle.
Let's move on the next step of our growing guide — [**Step 13. How to dry and store psilocybin mushrooms**](https://shroomok.com/en/wiki/How_to_dry_and_store_psilocybe_mushrooms "How to dry and store psilocybe mushrooms") 🔽
## How to dry and store psilocybe mushrooms
[How to dry and store psilocybe mushrooms](https://shroomok.com/en/wiki/How_to_dry_and_store_psilocybe_mushrooms)
[](https://shroomok.com/en/wiki/File:How-to-dry-mushrooms-for-long-term-storage.jpg) Drying magic mushrooms and how to store properly### **STEP 13. Day 32-33. How to dry and store magic mushrooms: complete guide**
#### How to store fresh psilocybin mushrooms?
Right after harvesting fresh psilocybin mushrooms can be stored for a few days (5-7 days) in the refrigerator at +3°...+5°C (37-41°F). The same way as for edible mushrooms from supermarket.
#### How to store mushrooms for a long time?
Dried mushrooms is the the best way for long-term storage. This method has been tested for centuries on edible mushrooms, and psilocybin mushrooms aren't exception.
Dried mushrooms can be used for making capsules for microdosing or consuming for tripping in different ways like mushroom chocolate, mushroom tea, lemon-tek, blue honey, mushroom shake etc.
> Check out: [Mushroom Consumption Guides and Recipes](https://shroomok.com/articles:mushroom-consumption-recipes-and-tips)
Fresh magic mushrooms can be frozen, however you need to follow some recommendations to do it properly, because freezing is way to ruin your harvest and lose mushroom potency.
> Check out: [How to freeze fresh magic mushrooms](https://shroomok.com/en/wiki/How_to_freeze_fresh_magic_mushrooms "How to freeze fresh magic mushrooms")
#### Basic rules for drying mushrooms
- The less time mushrooms are exposed to oxygen the less potency is lost. Put mushrooms in sealed bags, ziplock bags or airtight jars/bags/boxes right after drying them out.
- Don't dry mushrooms on direct sunlight! UV light has negative effect on psilocybin and mushrooms lose their potency faster.
- Recommended optimal drying temperature around **122°F or +50°C.**
- Don't chop mushrooms into small pieces, dry them full. When you chop them the area of oxidation increase, hence potency loss increases. However no problem if you cut shrooms into 2-3 pieces to fit your dehydrator (sometimes we have really huge shrooms!)
- Don't put mushrooms on newspapers / magazines / prints. The ink contains heavy metals. Save yourself from an additional portion of toxic substances. Use baking paper or thick paper towels instead.
> Actually, about 10-50% of mushrooms activity is lost even dried them properly. This is considered normal!
#### Temperature for drying magic mushrooms
The recommended temperature range for drying mushrooms is **95-122°F or +35°..+50°C.**
> The optimal temperature is **122°F or +50°C**
At a lower temperature, they will dry too slowly and interact with oxygen for too long. This increasing the potency loss. The higher temperature over 140°F or 60°C is not critical for potency loss, but mushrooms are easy to burn and spoil (this happens very often with newbie growers).
Here you can see some experiments. Temperature and time accordingly for drying magic mushrooms. At 135°F or 57°C mushrooms turned almost black.
[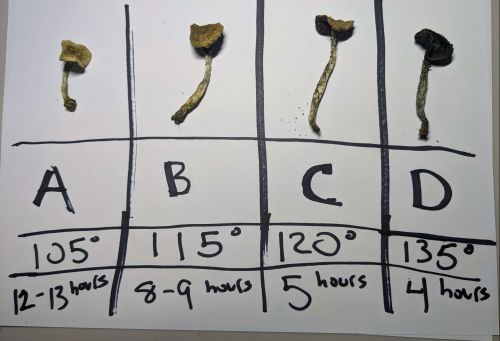](https://shroomok.com/en/wiki/File:Temperature-and-time-for-drying-mushrooms.jpg) Temperature and time accordingly for drying magic mushrooms. Experiment by **hottubfoot** - Shroomok Growers Community on [Discord](https://discord.gg/ngKhQDmymD)Drying mushrooms at optimal temperature takes a bit longer, but shrooms save not only their qualities, but also perfect color and good shape.
[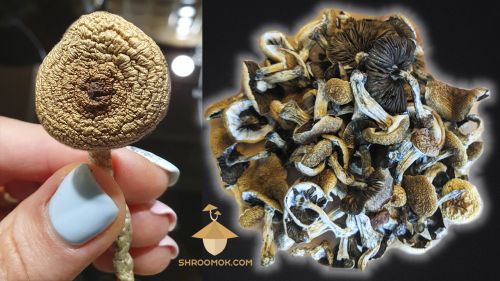](https://shroomok.com/en/wiki/File:Dry-psilocybe-mushrooms.jpg) Dry psilocybin mushrooms Psilocybe CubensisWhen heated above 280°F or +137°C or prolonged boiling, the psychoactive components of psilocybin mushrooms are completely destroyed. Mushrooms are still edible after that, but meaningless.
Anyway, even properly dried mushrooms lose from 10% to 50% of their psychoactivity. This can't be avoided, but proper drying can minimize these losses.
#### How do I make sure my mushrooms are dry
Mushrooms are 90% water. This means they dry out at least 10 times. Remains on average 7-10% of dry matter.
For long-term storage, we need to leave dry mass only. The mushrooms should be dried like cracker or fruit chips.
When you bent they should crack and break easily.
#### How to dry magic mushrooms
Let's check the most popular and easy methods on how to dry magic mushrooms at home.
##### **How to dry mushrooms in dehydrator**
The most common convenient and fast way to dry mushrooms. Shrooms in the dehydrator dry out evenly.
Put harvested mushrooms in a single layer in the dehydrator. You can lay them out on a thin cloth, so that small mushrooms do not fall through the dehydrator mesh during drying process.
[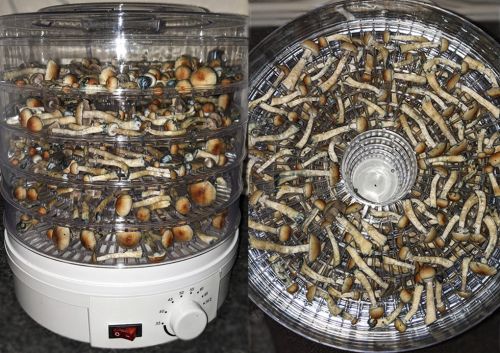](https://shroomok.com/en/wiki/File:How-to-dry-magic-mushrooms-in-dehydrator.jpg) Psilocybin mushrooms in dehydrator. t° +35..45°C or 95-115°F> **Check out the list of dehydrators on Amazon prepared by Shroomok here: [Proper Dehydrator for Mushroom Drying: from Budget to Premium](https://shroomok.com/amazon-kits/mushroom-dehydrator)**
Set the temperature in the range of 95-115°F (+35°..+45°C), but no more than 122°F (+50°C).
I prefer to dry at low temperature 95-105°F (+35..+40°C).
Drying time can be from 3 to 24 hours, depending on the weight of mushrooms and temperature.
The readiness «crisp, like chips» is determined empirically.
But what to do if you don't have such device? All methods are listed below for your help!
##### **How to dry mushrooms without dehydrator at room temperature**
Mushrooms can be dried at room temperature without dehydrator.
Put fresh mushrooms on a paper towel, parchment paper or a baking tray in a one layer, without piling them on top of each other. Leave them to dry out on any flat surface.
**Don't expose mushrooms to direct sunlight!** Put them in the shade in a draught or in ventilated room. Turn them over once a day to dry evenly.
[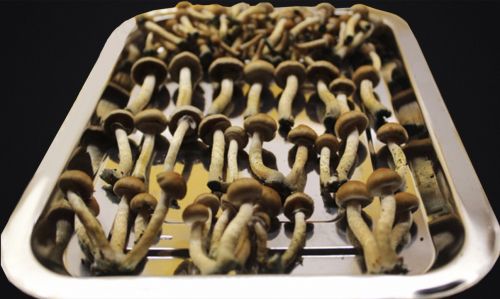](https://shroomok.com/en/wiki/File:Drying-psilocybe-mushrooms-process.jpg) Drying magic mushrooms at room temperature
Such natural drying process takes about 1-3 days, depending on the air temperature and relative humidity in the room.
If mushrooms remain soft after such drying, then try to dry them out with food grade silica gel, under fan, heat fan, heater or in the oven.
##### How to dry mushrooms with fan or heat fan
One more method for drying mushrooms without dehydrator is using fan or heat fan.
Put the harvested mushrooms in a sieve or on a flat surface in one layer. Place them under the air flow of regular fan or heat fan. This way you can significantly speed up the drying process or dry slightly soft mushrooms after natural drying
[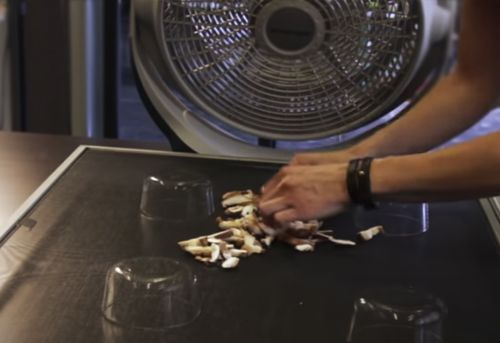](https://shroomok.com/en/wiki/File:Drying-psilocybe-mushrooms-without-dehydrator.jpg) Drying psilocybin mushrooms with fan[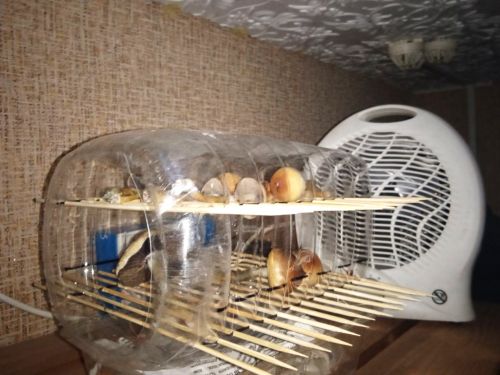](https://shroomok.com/en/wiki/File:Drying-mushrooms-with-heat-fan.jpg) Drying magic mushrooms with heat fanIf mushrooms remain soft during this drying process, try to dry out mushrooms with food grade silica gel.
##### **Drying mushrooms on radiator or heater**
During the heating season you can take advantage of warmth of household heating radiators and heaters.
Put mushrooms on a paper towel or parchment. Leave mushroom on a warm radiator or heater for 1-2 days. If the heater is too hot you can put a towel under the mushroom scrolls.
To check the temperature of the radiator/heater just put a thermometer on its surface.
From time to time turn mushrooms, so that they dry evenly.
[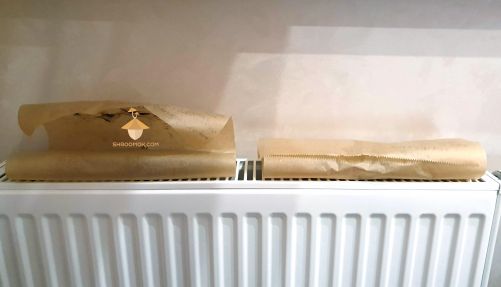](https://shroomok.com/en/wiki/File:Drying-psilocybe-mushrooms.jpg) Dehydrating psilocybin mushrooms on radiator at 105°F (+40°C)##### How to dry mushrooms in the oven
Modern ovens allow you to turn on convection (built-in fan in the oven) and set a minimum temperature 105-122°F (+40°C..+50°C) . This is a great way to dry mushrooms without dehydrator.
Better to place mushrooms on a mesh tray rather than a solid tray - this allows air to circulate evenly on all sides of the mushrooms.
[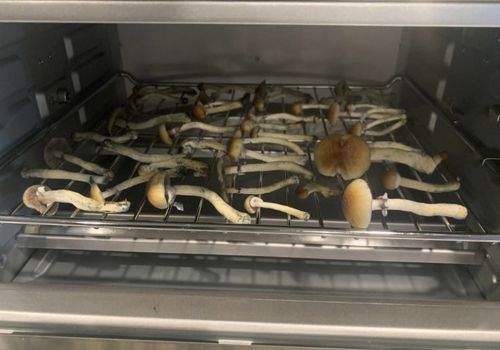](https://shroomok.com/en/wiki/File:How-to-dry-psilocybin-mushrooms-in-oven.jpg) Drying psilocybin mushrooms in the ovenIf your oven doesn't allow you to set such temperature +40°..+50°C or 105-122°F I'd suggest to use more safe drying methods described above.
With slightly heated oven you can finish drying soft mushrooms in a warm (not hot!) oven, preferably with open door. You can even check the temperature with a household thermometer because you don't want the temperature to go above 122°F (+50°C).
> Be careful with high temperature! Don't burn your harvest in hot oven!
**Moisture absorbers for drying mushrooms**
Food-grade silica gel is a water-absorbing agent in granules. It is often used in packs with spices, nuts, and various snacks. Silica gel desiccant packs are great to use for slightly soft mushrooms after drying them in open air without any devices and if your room humidity is relatively high for drying shrooms It will help to absorb residual moisture from dehydrated mushrooms.
Silica gel is also used for further storage. Put 1-2 packs in each jar/package with dried mushrooms.
[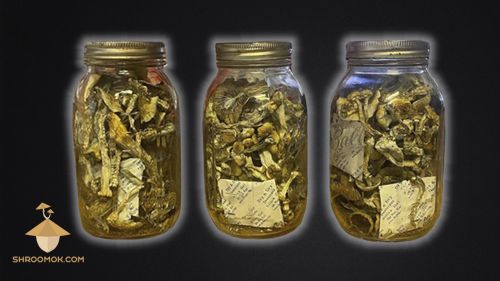](https://shroomok.com/en/wiki/File:Dried-psilocybin-mushrooms-with-silica-gel.jpg) Psilocybin mushrooms in jars with silica gel packs in them to keep mushrooms dry#### How to store magic mushrooms
- It is important to avoid contact with oxygen. That is the main key to save mushroom potency!
- Psilocybin dried mushrooms can be stored in the refrigerator or at room temperature 68-77°F (+20°..+25°C) in a dark corner of any cabinet.
- Avoid direct sunlight or UV light to save mushroom potency.
> **All you need to store shrooms for years (vacuum sealers, moisture and oxygen absorbers, airtight jars and bags) on Amazon: [Useful stuff for storing mushrooms long-term](https://shroomok.com/amazon-kits/store-dry-mushrooms)**
**Vacuum sealer machine** is my favourite option for mushroom storage. It will avoid mushrooms contact with oxygen for sure. It is convenient to make portions of 5-10 grams and open each pack, when you need it
[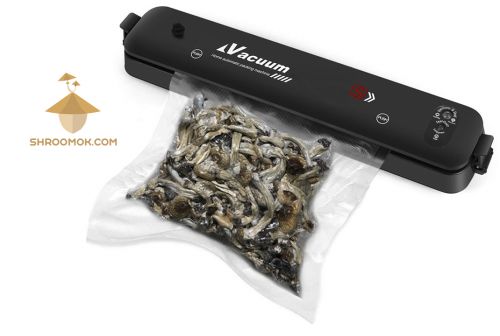](https://shroomok.com/en/wiki/File:Dry-psilocybin-mushrooms-in-vacuum-pack.jpg) Dried psilocybin mushrooms in vacuum packing
Store dried mushrooms in **airtight** glass jars for food with tightly closed lids.
[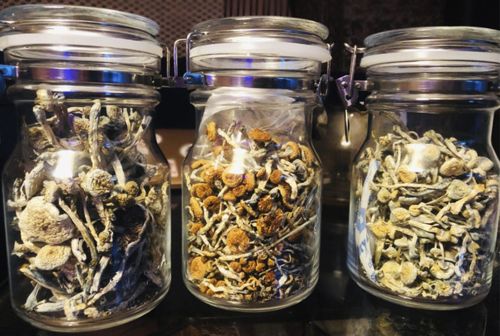](https://shroomok.com/en/wiki/File:Dry-psilocybin-mushrooms-to-store.jpg) Dry psilocybin mushrooms in jars with tightly closed lids for long-term storingMushrooms are stored good in tightly closed **ziplock bags.**
[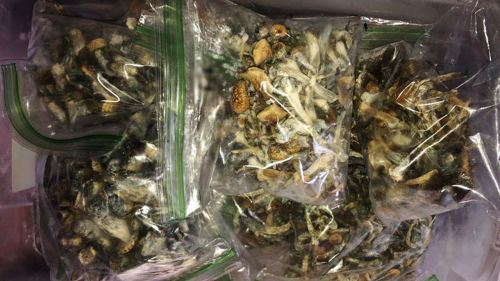](https://shroomok.com/en/wiki/File:Dried-psilocybe-mushrooms-in-zip-bag.jpg) Dry psilocybin mushrooms in zip bags for storageFood-grade **silica gel (desiccant, moisture absorbers)** helps to keep mushrooms dry and absorb the slight moisture in shrooms. Always add 1-2 sachets to each jar/bag with dried psilocybin mushrooms.
Also add 1-2 sachets of **oxygen absorbers** for preventing chemical reaction and extending mushroom shelf life.
[](https://shroomok.com/en/wiki/File:Dried-psilocybin-mushrooms-with-silica-gel.jpg) Psilocybin mushrooms in jars with silica gel to keep mushrooms dryLabel each pack, indicate strain, flush of fruiting, date, weight and any additional info on pack or sticker
[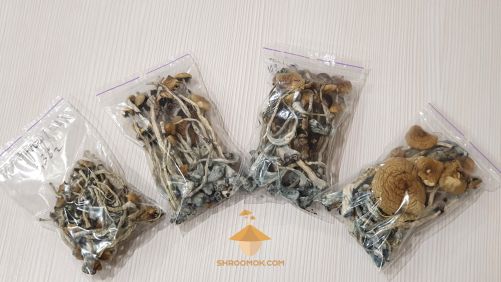](https://shroomok.com/en/wiki/File:Dried-psilocybin-mushrooms-psilocybe-cubensis-ready-for-storing.jpg) Dried psilocybin mushrooms psilocybe cubensis ready for long term storage#### How long mushrooms can be stored? Do mushrooms go bad over time?
If stored properly dried psilocybin mushrooms retain their quality and alkaloids **up to 2 years and even longer.**
After 2+ years, they don't spoil, don't get worse or go bad, they won't dangerous for consumption. As time passes, mushrooms slowly lose their magic. It means the concentration of alkaloids is decreasing over time.
> Check out FAQ section for more: [Mushrooms Q&A](https://shroomok.com/articles:mushroom-cultivation-faq)
If you find this guide helpful, please support me with cup of coffee on [☕️ buymeacoffee](https://www.buymeacoffee.com/shroomok) and say something nice!
Now it's time to move on the next step of our mushroom growing journey and initiate the new flush of fruiting.
[**STEP 14. Rehydration aka soaking/dunking mushroom cake in water**](https://shroomok.com/en/wiki/Rehydration_of_psilocybe_cakes "Rehydration of psilocybe cakes")
## Rehydration of psilocybe cakes
[Rehydration of psilocybe cakes](https://shroomok.com/en/wiki/Rehydration_of_psilocybe_cakes)
[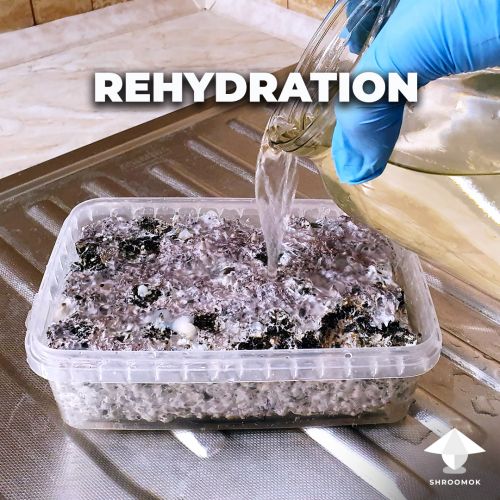](https://shroomok.com/en/wiki/File:Mushroom-cake-rehydration-soaking-for-new-flush.jpg) Mushroom cake rehydration to trigger new flush of fruiting### **STEP 14. Day 32-33. How to soak magic mushroom cake in water and initiate new flush of fruiting**
During the first flush and after harvesting you can see the mushroom cake is shrunk. Each container has from 1/2 inch to 2 inch gap from the sides of the tub. But they were flush at the beginning. What's going on?
> Mushrooms absorb water from your cake. A lot of moisture evaporate from the top layer. Hence, mushroom cake/block lost moisture and shrunk. Rehydration (aka soaking in water or spraying water on the top layer) makes up for the loss of moisture. It works for mushrooms as a trigger for fruiting in the same way as rain in nature
#### **Why magic mushroom cakes need rehydration**
1. As you know, **mushrooms consist of 90-95% water**. During colonisation period (in incubator) and fruiting period (in fruiting chamber) mushroom *substrate loses moisture* that is so important for development mushroom bodies. *No moisture - no shrooms.*
2. Spawn and Bulk substrate can be dry. Therefore some growers practice rehydration even before the first flush in case top layer isn't wet enough (improper field capacity, high evaporation rate, if colonisation period lasts more than 3 weeks).
3. *To start new phase of fruiting* we need to simulate a long rain for our mushrooms. Every mushroom hunter knows - the best time to set out to look for mushrooms - after a good rain. If nature already has everything in place and in right order, then in our simulated conditions we still have to work hard. The main purpose of rehydration is moisture compensation wasted by the mycelium. You need to fill all cakes with water, so that mushrooms really begin to grow like after rain. Rehydration *stimulates new flush* of fruiting, helps to harvest more mushrooms and more weight of shrooms.
4. Rehydration helps to wash out waste products of mycelium metabolism such as acids and waste enzymes;
5. Rehydration promotes nutrients and beneficial enzymes for further mushrooms growth.
#### **When do we need to soak mushroom cake?**
1. **Before the first flush,** if your cake is totally dry. Recommended for PF-tek cakes after colonization and small mushroom cakes if colonization lasts 2 weeks and more.
2. **After the first flush** of harvesting is must have for any tek of cultivation: pf-tek, small mushroom cakes, bottle-tek, shoeboxes, monotub.
3. **Repeat** rehydration after each harvesting to initiate new flush of fruiting.
#### **Prepare mushroom cake for dunking in water**
Remove all mushrooms (even the smallest ones) and their stumps from the cakes. Mushroom cake should be completely bald.
[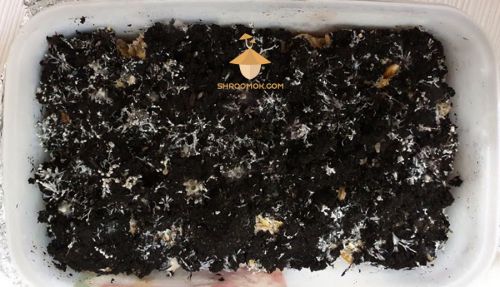](https://shroomok.com/en/wiki/File:Clean-psilocybe-cubensis-cake-before-rehydration.jpg) Mushroom cake preparation for rehydration (Brazil)> If you have dry crust of overlay on the cake, scrap it with sterile fork. It helps to provide access of air and water for further mushrooms development. Cake won't absorb water through the overlay! Details: [Overlay & Stroma](https://shroomok.com/en/wiki/Psilocybe_growing_problems_-_overlay,_abortions,_etc "Psilocybe growing problems - overlay, abortions, etc")
Check your cakes from all sides. If you take the cake out of the box you can find some mushrooms on the sides. Pick them also.
[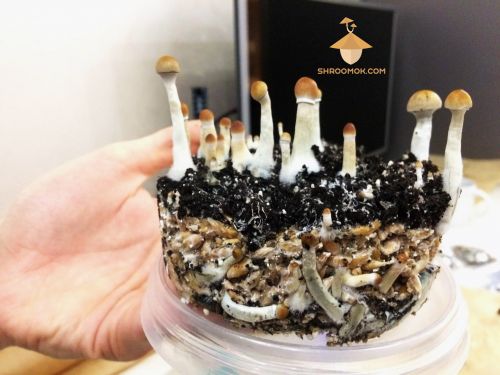](https://shroomok.com/en/wiki/File:Psilocybe-cubensis-cake-preparation-before-rehydrating.jpg) Mushroom cake preparation for rehydrating
Rinse each cake thoroughly under the running water.
[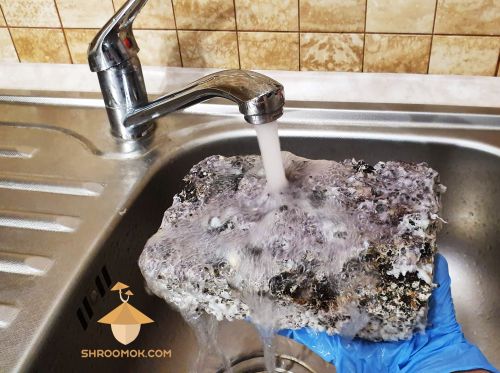](https://shroomok.com/en/wiki/File:Shower-for-psilocybe-mushrooms-cake-before-rehydration.jpg) Rinse mushroom cake under running water before rehydration
Put the cake back in the plastic container (wash this container before). You put the cake in a bigger plastic box, it is more convenient.
[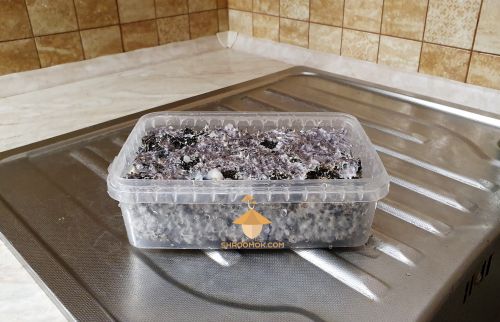](https://shroomok.com/en/wiki/File:Psilocybe-cubensis-cake-ready-for-rehydration.jpg) Magic mushroom cake ready for rehydrating#### **How to soak mushroom cake in water**
For soaking mushroom cake you can use just tap water. Clean drinking water is also great!
[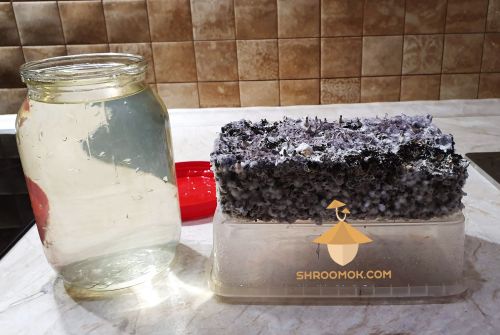](https://shroomok.com/en/wiki/File:Rehydration-process-for-psilocybe-cubensis-cake.jpg) Dunking magic mushroom cake
Pour water over the cake.
[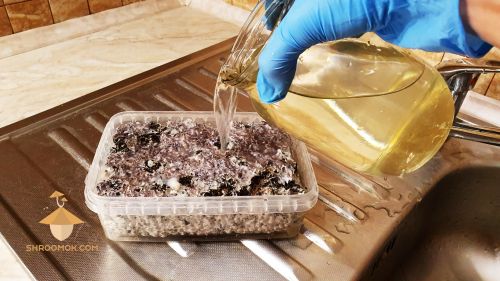](https://shroomok.com/en/wiki/File:Magic-mushrooms-cake-rehydration.jpg) Soaking mushroom cake. Pour water over the cakeCakes are lightweight. When you fill them with water they will float. You have to submerge each cake completely in water! Put something on top of the cake. This can be any jar or glass of water. Repeat it with each mushroom cake.
[](https://shroomok.com/en/wiki/File:Psilocybe-mushrooms-cake-rehydration.jpg) Submerge psilocybin cake completely in water. Put smth on the top to press the cake
Leave mushroom cakes for soaking in water for 3-4 hours at room temperature.
[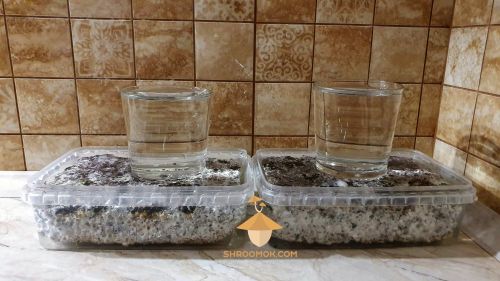](https://shroomok.com/en/wiki/File:Psilocybe-cubensis-mushroom-cake-rehydrating.jpg) Leave mushroom cake for soaking
Less attractive, but handy option to use larger containers for soaking cakes. Fill them with water, add cake and put a weight or a lid on top
[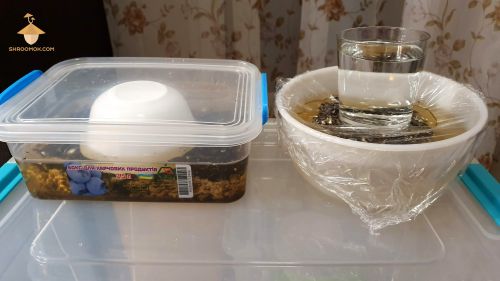](https://shroomok.com/en/wiki/File:Rehydration-mushroom-cake.jpg) Rehydration mushroom cake in bigger containers> Some growers provide [cold shock](https://shroomok.com/en/wiki/All_you_need_to_know_about_cold_shock_for_magic_mushrooms "All you need to know about cold shock for magic mushrooms") for cakes at this stage. They soak cakes in the refrigerator or add ice in water. This step is optional. Personally, I add ice occasionally, not always
After 3-4 hours of soaking drain the water from the container. Take cake out of the container. Rinse each cake thoroughly under running water once again.
[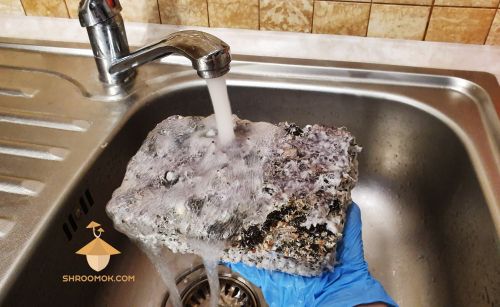](https://shroomok.com/en/wiki/File:Rinse-psilocybe-cubensis-cake-after-rehydration.jpg) Rinse mushroom cake after rehydration under running water
Don't put the cake back into the plastic container. Put it on the upside down container as a podium to allow mushrooms to grow from the sides. In such way cakes won't contact directly with water in growbox. Also it will be convenient to take them out for cropping.
Wash your fruiting chamber thoroughly before placing mushroom cakes for the new flush of fruiting.
Pour one glass of water in your growbox tub (Optional! You can add 5-10 ml of H2O2 hydrogen peroxide solution 3% in water) and put mushroom cakes inside.
[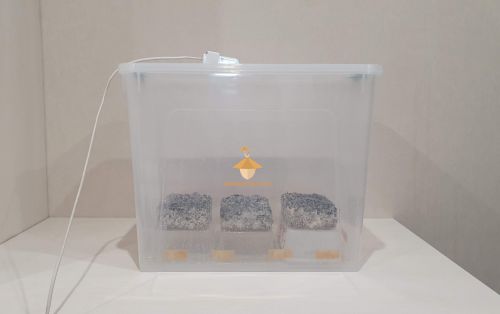](https://shroomok.com/en/wiki/File:Psilocybe-cubensis-cakes-in-growbox-after-rehydration.jpg) Psilocybe cubensis cakes in growing box after rehydration#### Dunking mushroom cake in honey water
[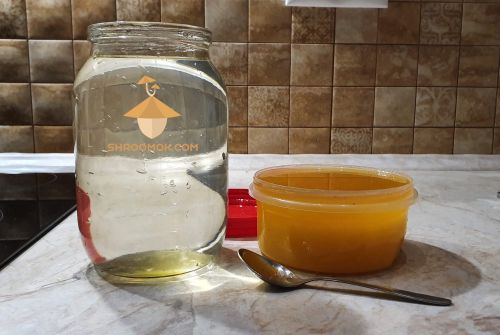](https://shroomok.com/en/wiki/File:Hydrating-with-honey-or-sugar-for-psilocybe-mushrooms-cake.jpg) Honey water recipe for soaking mushroom cakeI will say right away that such method has advantages and disadvantages!
##### Honey water recipe for soaking mushroom cake
Add only 1 teaspoon of honey per 1 Quart (1 liter) of clean water. Stir thoroughly!
[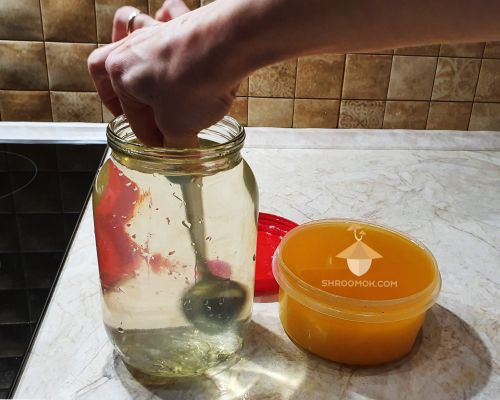](https://shroomok.com/en/wiki/File:Stir-honey-for-rehydration-psilocybe-cubensis-cake.jpg) Honey water for dunking mushroom cakePrepare as much as you need for dunking your cakes. Pour honey water over cake.
[](https://shroomok.com/en/wiki/File:Magic-mushrooms-cake-rehydration.jpg) Rehydration process. Pour water over the cakeFlush by flush mushroom cake loses nutrition resources. That's why honey water can be as additional support for mycelium and further fruiting, especially on the last flushes. As a result we can prolong fruiting period.
Benefits of soaking mushroom cake in honey water (or corn syrup, dextrose, malt extract) based on a few **practical** experiments.
However you can face with another issue. Bacteria/yeast love all types of sugars (carbohydrates) and you can provoke bacterial/yeast contamination. Although I didn't have contamination in my own experiments, but it's great potential to have them.
Moreover, mushroom metabolism can be 'confused', because mycelium need time for adaptation to another type of carbs (from substrate carbs to honey carbs, that have some differences). As it takes time, bacteria/yeast can use this moment.
Mycelium 'memory' works better if you inoculate jars with liquid culture based on honey/corn syrup or used drippy corn tek, so that mycelium can match previous early experience for metabolism.
All of the listed above are just my observations!
Please, share your thoughts, experience and scientific arguments regarding adding carbs (honey, LME, dextrose etc.) for soaking in comments to this article.
#### Soaking mushroom cake in alkaline water
Flush by flush mushroom cake is gradually acidified by mushroom waste products. Acid substrate (lower than 7.0) is extremely vulnerable for green mold contamination aka Trichoderma.
[](https://shroomok.com/en/wiki/File:PH-scale.jpg) pH scale> Most of molds, including Trichoderma green mold, prefer acidic soils pH 4-6. After the first flush substrate pH can change gradually from 7.5 from the very beginning to 5.0-6.5 after the first flush
That's why the risks to catch green monster is higher with the next flushes, when pH drop from 7.5-8.0 to 6.5 and lower
> 🔴 Recommended: [How soil pH affect Trichoderma](https://shroomok.com/en/wiki/Green_mold_contamination_aka_Trichoderma#How_soil_pH_affect_Trichoderma)
One of the methods to reboot pH level for mushrooms is rehydration in alkaline water pH 8.5 - 9.5 and adding new layer of pH adjusted casing (about 0,5 cm) after rehydration to protect mycelium.
By rehydrating the mushroom cake with pH adjusted water the pH back up to a level that is hostile for Trichoderma, but allows mycelium to thrive and produce fruits again. Although sudden changes in pH can damage the beneficial bacterial colonies in substrate!
##### How to prepare pH adjusted water for soaking mushroom cake
Your local tap water may be naturally hard and alkaline (containing calcium, magnesium, carbonate), which adds further to the higher pH (7.2-7.8). Tap water may be acidic (5.0-6.5). Distilled water has a neutral pH 7.0.
If you want to increase the pH of water use:
1 gallon (~4L) of water (tap or distilled)
1/8 to 1/4 tea spoon of hydrated lime (aka Calcium Hydroxide Ca(OH)2, Slaked Lime or Pickling Lime).
[Pure Calcium Hydroxide (Slaked Lime) 50g/2oz](https://amzn.to/3QKT74u) $7.99
[Laboratory-Grade Calcium Hydroxide 500g](https://amzn.to/3XDY6q8) $22.49
Shake it thoroughly and leave it for 12 hours.
Check the pH level. It should be around 9.0. If lower add just a pinch of hydrated lime, shake it well and leave for an hour before measuring pH level again.
> pH 10 and higher can be harmful for mycelium metabolism, also harmful for beneficial bacteria in substrate.
> Baking soda not allowed for fungi!
##### How to check water pH
Test the pH of your water with **pH test strips** or **pH meter:**
[pH Test Paper 1 to 14 for water, soil, body](https://amzn.to/3iJsxw6) $6.55
[pH Test Strips 0 to 14 for Water & Liquids](https://amzn.to/3Wc8eVW) $11.97
[Digital PH Tester for water](https://amzn.to/3Xyohyo) $12.99
#### How to make rehydration for mushroom cake in MonoTub or Shoebox or Bottle-Tek
Don't remove mushroom cake. Wash and pour cold water (or pH'd water) right in the plastic tub, shoebox or bottle.
##### How long to soak mushroom cake when rehydrating after a flush
It is debated topic. Let me share different options.
**Newbie growers** rehydrate cake **overnight (for 8-12 hours).** It's relatively fine, however it doesn't take that long. Prolonged soaking can cause fermentation issues. Although, I never had it, when I ran experiment with 8-12 hours of soaking shroom cakes.
Some growers hold mushroom cake under cold water with added ice only **for 10-30 minutes.** It is considered that mushroom cake like a sponge absorb water in the first minutes, it cannot absorb more and long soaking is not required.
There is also a **common rule** among mushroom growers: **1 hour per inch of substrate** for full soak immersion.
**Based on my experience,** I'd suggest dunking cake **for 3-4 hours.** More than enough. Right or wrong, but this timing always works great for my small and big cakes!
Maintain proper fruiting conditions and wait for the new flush. Ready!
##### Can I skip dunking mushroom cake and mist the surface instead
> Question: Hey, Shroomok! I usually avoid dunking (I see that as a high risk for contamination) and instead I just mist the surface until it's really well soaked.
Usually I dunk cake if the top layer is dry (always do this after the 1st flush, when cake really looses a lot of moisture).After the next flushes I act case by case. If cake wet enough I just mist the top layer. If cake produced huge rich flush, then I soak it again. Sometimes good misting or spraying water on the top layer till small puddles appeared is enough to trigger the new flush of fruiting. However full rehydration (soaking in water) has more benefits than risks!
> Full rehydration helps to wash out waste products of mycelium metabolism such as acids and waste enzymes. Rehydration promotes nutrients and beneficial enzymes for further mushrooms development. That's why I'd suggest full rehydration at least every other flush.
Avoid water pools on top layer AFTER rehydration, whether it was soaking in water or just misting. Water pools should disappear (absorbed/dried out) within the next ~8-12 hours after soaking or misting!
#### How to rehydrate Panaeolus aka Copelandia mushroom cake
**Don't soak in water Panaeolus (aka Copelandia) mushroom cake** if the main substrate is manure. If you soak such cake in water it loses the shape and turns into mud.
For Panaeolus rehydration just spray water on the top casing layer till small puddles appeared. Maintain proper fruiting conditions for Copelandia and wait for the new flush.
#### What if mushroom cake has strange smell during or after soaking
If you feel a smell of something **fermented, rotted, cider, vinegary, sweet and sour, stale, yeasty, smell of dirty socks, alcohol** — all these are clear signs of fermentation (bacteria/yeast contamination). It is a common issue if you had mild bacteria contamination in grain spawn before making mushroom cake/block. High temperature and water speed up fermentation process.
> Fermentation — the state of actively growing microorganisms, usually in a liquid environment. Smell is a good indicator of fermentation, it starts out with a sweet vinegary odor and then turns to a denatured alcohol smell. Fermentation in cultivation is a sign of contamination. The bacteria are breaking down the yeast and causing the fermentation of the tissue
> 🔴 Recommended: [Mycology Glossary & Abbreviations](https://shroomok.com/en/wiki/Mycology_Glossary_and_common_Mushroom_Growing_Abbreviations)
Mild smell is not a problem. To prevent such fermentation process add 10-20ml H2O2 hydrogen peroxide solution (3%) per 1 Quart (1 liter) of water. Shake it well and use for soaking mushroom cake no more than 3-4 hours. But if your cake totally healthy don't use H2O2, because it inhibits useful microorganisms and mycelium as well. If you notice visible signs of contamination i.g. **slime,** **rotted areas** and **strong smell**, then toss mushroom cake or bury it in the garden!
> 🔴 Recommended: [Wasted mushroom cake: carry on or throw away](https://shroomok.com/en/wiki/Disposing_of_magic_mushrooms_cakes)
#### **Fruiting conditions after dunking Cubensis mushroom cake**
- Temperature +20°..+25°C or 68-77°F
- Relative humidity 90-92% (possible range 85%-95%)
- Light 12 hours on/off cycle - optional
- Fresh air exchange 2-4 times a day for 2-3 minutes. Or turn on air pump 24/7. Or turn on PC fan for 1-2 minutes every 2-4 hours. Or just natural air flow through air vents in your fruiting chamber.
The next flush are going to develop faster. In 2-7 (up to 14) days you'll see new pins and mushroom bodies on the cakes. In 7-14 days it's time for harvesting.
Now looking forward for the next flush of fruiting Psilocybe Cubensis mushrooms!
Move on — [**Step 15. Day 38-41. Second flush of fruiting and harvesting Psilocybe Cubensis**](https://shroomok.com/en/wiki/Second_flush_of_magic_mushrooms_harvest "Second wave of magic mushrooms harvest")
1.
## Second flush of magic mushrooms harvest
[Second flush of magic mushrooms harvest](https://shroomok.com/en/wiki/Second_flush_of_magic_mushrooms_harvest)
### **STEP 15. Day 38-41. Second flush of magic mushroom fruiting and harvesting results**
#### Photo report of the second flush
To trigger second flush we made rehydration or soaking mushroom cakes in water for 8-12 hours.Here is new flush in 6-7 days after rehydration! Usually it takes from 5 to 14 days.
[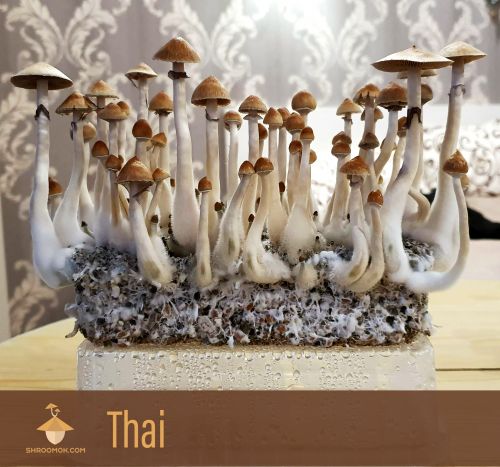](https://shroomok.com/en/wiki/File:Psilocybe-cubensis-mushrooms-growing-thai-strain-second-flush-of-harvesting.jpg) Psilocybe Cubensis Thai strain. Second flush of harvesting period. 6-7 days after rehydration[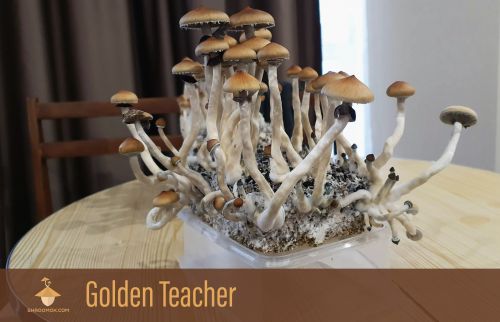](https://shroomok.com/en/wiki/File:Psilocybe-mushrooms-growing-golden-teacher-second-wave-of-fruiting.jpg) Psilocybe Cubensis Golden Teacher strain. Second flush of harvesting period. 6-7 days after rehydration[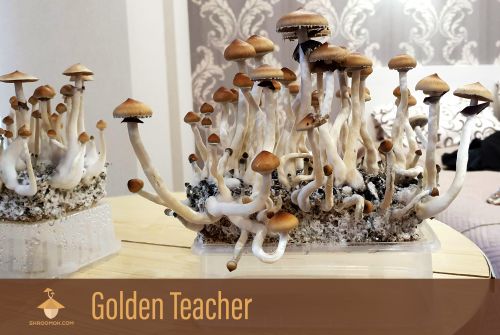](https://shroomok.com/en/wiki/File:Psilocybe-mushrooms-fruiting-golden-teacher-strain-second-flush-of-harvesting.jpg) Psilocybe Cubensis Golden Teacher strain. Second flush of fruiting. 6-7 days after rehydration[](https://shroomok.com/en/wiki/File:Psilocybe-mushrooms-growing-brazil-strain-second-flush-of-fruiting.jpg) Psilocybe Cubensis Brazil strain. Second flush of fruiting and harvesting period. 4-5 days after rehydration[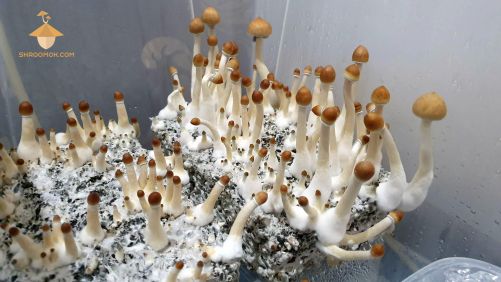](https://shroomok.com/en/wiki/File:Psilocybe-cubensis-growing-second-flush-of-fruiting.jpg) Psilocybe Cubensis Golden Teacher (on the left) and Thai (on the right). 4-5 days after rehydration#### **Harvesting results of the second flush**
From 5 small mushroom cakes: **447.05 (g) wet = 34.64 (g) dried + 23 spore prints**
> 🔴 Statistics by flushes, by strains of Psilocybe Cubensis: [Grow report in numbers](https://shroomok.com/en/wiki/Magic_mushrooms_growing_statistics_with_charts "Magic mushrooms growing statistics with charts")
#### How to initiate third flush of mushroom fruiting
After the 2nd flush all cakes were rehydrated for 8-24 hours. Just repeat all steps described in the rehydration guide for mushroom cakes and mushroom block in MonoTub
> 🔴 Recommended: [Rehydration guide](https://shroomok.com/en/wiki/Rehydration_of_psilocybe_cakes "Rehydration of psilocybe cakes")
Let us briefly remind you how to rehydrate mushroom cake after harvesting and initiate new flush
1️⃣ Pick you harvest from the cake.
2️⃣ Remove all mushrooms and their stumps. Leave small mushroom pins on the cake, they continue growth on the next flush
3️⃣ Rinse cake under running water.
4️⃣ Put cake in the plastic container. Pour water.
5️⃣ Submerge the cakes completely in water.
6️⃣ Leave cake to soak for 8-24 hours.
7️⃣ After 8-24 hours drain the water. Rinse the cake under running water again.
8️⃣ Wash fruiting chamber before new flush.
9️⃣ Pour a glass of water (200 ml) in growbox. You can add 5-10 ml of peroxide (optional)
🔟 Put cake in fruiting chamber. Maintain fruiting conditions and wait for the new flush
#### **Fruiting conditions after rehydration**
✅ Temperature +20°..+25°C for Psilocybe Cubensis
✅ Relative humidity 90-92% (85-95% is allowed)
✅ Light 12 hours on/off cycle
✅ FAE 4-6 times a day for 2-3 minutes. Or turn on air pump 24/7. Or turn on PC fan for 1-2 minutes every 2-4 hours.
Waiting for the third flush — [Step 16. Day 45-51. Third flush of fruiting Psilocybe Cubensis and harvesting results](https://shroomok.com/en/wiki/Third_flush_of_magic_mushrooms_harvest "Third wave of magic mushrooms harvest") 🔽
## Third flush of magic mushrooms harvest
[Third flush of magic mushrooms harvest](https://shroomok.com/en/wiki/Third_flush_of_magic_mushrooms_harvest)
### **STEP 16. Day 45-51. Third flush of fruiting Psilocybe Cubensis magic mushrooms and total crop weight**
#### Photo report of the third flush of fruiting magic mushrooms
Check out rich third flush of fruiting Psilocybe Cubensis!
In 5-7 days after rehydration it's time for harvesting the 3rd flush (Psilocybe Cubensis Brazil strain)
[](https://shroomok.com/en/wiki/File:Fruiting-psilocybe-cubensis-mushrooms-brazil-strain.jpg) P. Cubensis Brazil. Third flush of fruiting. 45-47 days after inoculation. 5-7 days in fruiting chamber after rehydration
Psilocybe Cubensis Golden Teacher mushrooms were harvested on the 10th day after rehydration
[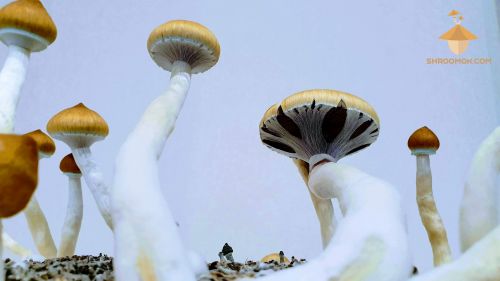](https://shroomok.com/en/wiki/File:Fruiting-psilocybe-cubensis-mushrooms-golden-teacher.jpg) Psilocybe Cubensis Golden Teacher. Third flush of fruiting[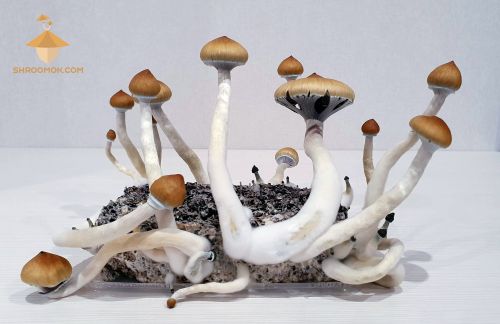](https://shroomok.com/en/wiki/File:Growing-psilocybe-cubensis-mushrooms-golden-teacher.jpg) Psilocybe Cubensis Golden Teacher. Third flush of fruiting. 50 days after inoculation. 10 days in growbox after rehydration[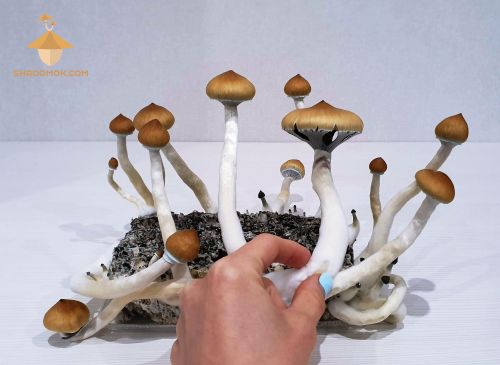](https://shroomok.com/en/wiki/File:Psilocybe-mushrooms-growing-golden-teacher.jpg) Psilocybe Cubensis Golden Teacher. Third flush of harvesting magic mushrooms. 50 days after inoculation. 10 days in fruiting chamber[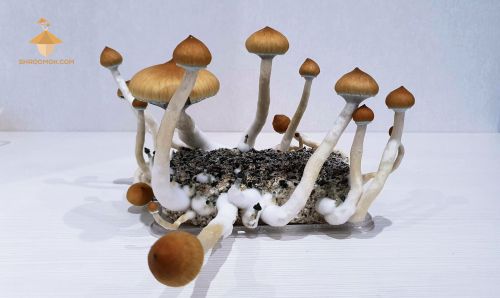](https://shroomok.com/en/wiki/File:Magic-mushrooms-psilocybe-cubensis-third-flush-of-fruiting.jpg) Golden Teacher magic mushrooms. Third flush of fruiting[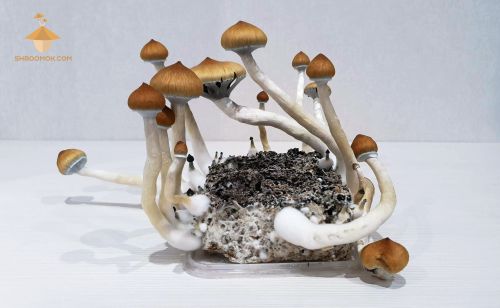](https://shroomok.com/en/wiki/File:Magic-psilocybin-mushrooms-third-flush-golden-teacher.jpg) Psilocybe Cubensis Golden Teacher. 3rd flush of fruiting magic mushrooms[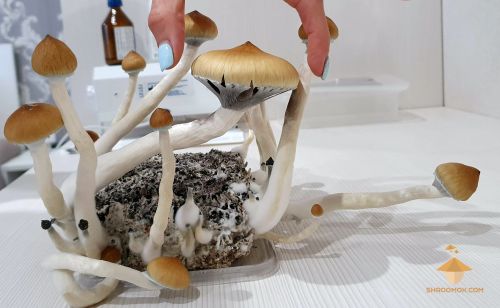](https://shroomok.com/en/wiki/File:Golden-teacher-psilocybe-cubensis-third-flush-of-harvesting.jpg) The biggest mushroom (P.Cubensis Golden Teacher). Third flush of fruiting magic mushrooms at home
This Golden Teacher mushroom cap is about 5-6 cm in diameter. One of the biggest mushroom of the whole fruiting cycle
[](https://shroomok.com/en/wiki/File:Huge-psilocybin-mushroom-for-spore-print-third-flush-of-fruiting.jpg) Huge psilocybin mushroom (Psilocybe Cubensis Golden Teacher). Third flush of fruiting and harvesting. Diameter is about 5-6 cm
Height of mushroom bodies up to 20 cm on the third flush of fruiting period
[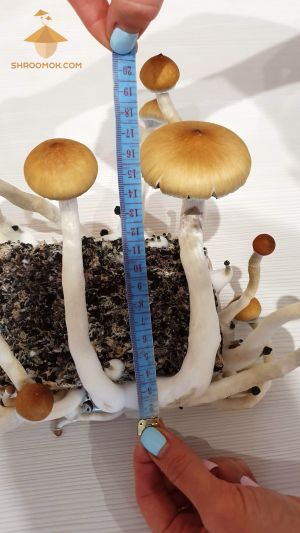](https://shroomok.com/en/wiki/File:Magic-mushroom-measures.jpg) Psilocybe Cubensis (Golden Teacher) mushroom measure. Height of mushroom bodies up to 20 cm[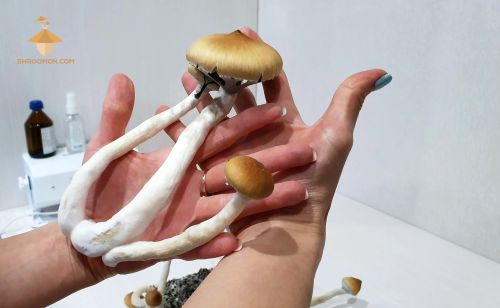](https://shroomok.com/en/wiki/File:Magic-cubensis-golden-teacher.jpg) Golden Teacher cluster
Great cap for making spore print!
[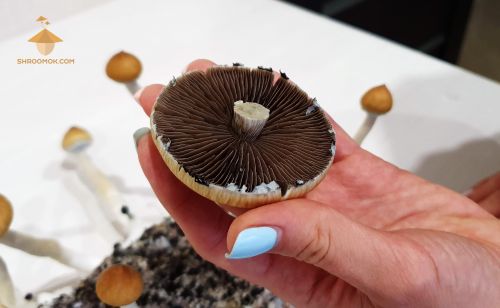](https://shroomok.com/en/wiki/File:Biggest-psilocybe-cubensis-mushroom-cap.jpg) Our biggest Psilocybe Cubensis (Golden Teacher) cap for spore print[](https://shroomok.com/en/wiki/File:Huge-psilocybe-cubensis-spore-print.jpg) Our biggest magic mushroom spore print (Psilocybe Cubensis Golden Teacher)[](https://shroomok.com/en/wiki/File:Big-magic-mushroom-spore-print-golden-teacher.jpg) Big magic mushroom spore print (Golden Teacher) from third flush of harvesting> 🔴 Recommended: [How to make mushroom spore print](https://shroomok.com/en/wiki/How_to_make_magic_mushrooms_spore_prints "How to make magic mushrooms spore prints")
Psilocybe Cubensis Thai mushrooms were harvested on the 9th and 10th day after rehydration
[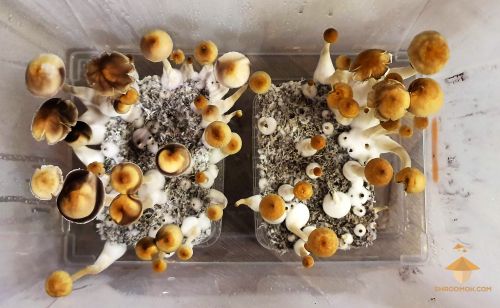](https://shroomok.com/en/wiki/File:Magic-mushrooms-psilocybe-cubensis-thai-strain-fruiting.jpg) Psilocybe Cubensis Thai. Third flush of fruiting and harvesting magic mushrooms. 49-50 days after inoculation. 9-10 days in growbox after rehydration[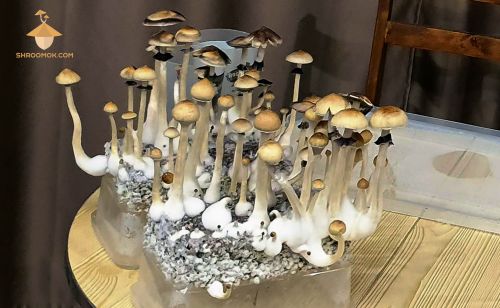](https://shroomok.com/en/wiki/File:Magic-mushrooms-fruiting-psilocybe-cubensis-thai.jpg) P. Cubensis Thai. Third flush of fruiting. 49-50 days after inoculation. 9-10 days in fruiting chamber after last rehydration#### **Total weight of the third flush of fruiting magic mushrooms**
Total crop from 5 small mushroom cakes: **476.15 (g) wet = 42.3 (g) dried + 27 spore prints**
> 🔴 Statistics, charts, life cycle by flushes and by strains: [Grow report in numbers](https://shroomok.com/en/wiki/Magic_mushrooms_growing_statistics_with_charts "Magic mushrooms growing statistics with charts")
#### How to initiate new flush of fruiting
After harvesting repeat rehydration process or soaking mushroom cakes in water for 8-24 hours.
Just repeat all steps described in the rehydration guide for mushroom cakes and mushroom block in MonoTub
> 🔴 Recommended: [Rehydration guide](https://shroomok.com/en/wiki/Rehydration_of_psilocybe_cakes "Rehydration of psilocybe cakes")
#### **Fruiting conditions for the next flush of fruiting**
✅ Temperature +20°..+25°C for Psilocybe Cubensis
✅ Relative humidity 90-92% (85-95% is allowed)
✅ Light 12 hours on/off cycle
✅ FAE 4-6 times a day for 2-3 minutes. Or turn on air pump 24/7. Or turn on PC fan for 1-2 minutes every 2-4 hours.
Waiting for the 4th flush — [**Step 17. Fourth flush of fruiting Psilocybe Cubensis mushrooms and harvesting results**](https://shroomok.com/en/wiki/Fourth_flush_of_magic_mushrooms_harvest "Fourth wave of magic mushrooms harvest") 🔽
## Fourth flush of magic mushrooms harvest
[Fourth flush of magic mushrooms harvest](https://shroomok.com/en/wiki/Fourth_flush_of_magic_mushrooms_harvest)
### **STEP 17. Day 54-64. Fourth flush of magic mushroom fruiting period and harvesting results**
#### Fourth flush of fruiting in photos
After 2-3 flushes mushroom cake usually produces less mushrooms, but fruit bodies itself can be bigger.
The 4th flush of P. Cubensis Brazil was harvested in 7-8 days after rehydration (54-55 days after grain inoculation).
The 4th flush of P.Cubensis Thai and Golden Teacher were harvested in 12-13 days after rehydration (63-64 days after grain inoculation).
Here you can see mushrooms with long stems, small caps and fuzzy feet due to lack of fresh air exchange. This flush is an example of poor fruiting conditions. Growbox was left for a week without additional FAE and any attention!
> 🔴 Check out: [Why Mushrooms too Leggy, Fuzzy Feet and White Dots on Caps](https://shroomok.com/en/wiki/Why_Mushrooms_too_Leggy,_Fuzzy_Feet_and_White_Dots_on_Caps "Why Mushrooms too Leggy, Fuzzy Feet and White Dots on Caps")
[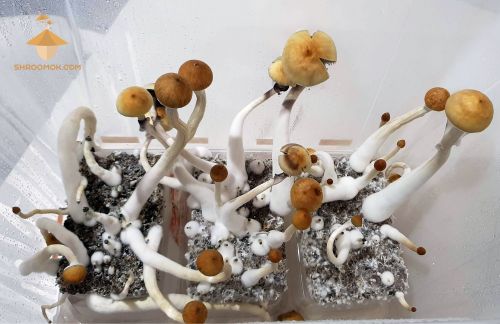](https://shroomok.com/en/wiki/File:Psilocybe-cubensis-fourth-flush-of-fruiting-and-harvesting.jpg) Golden Teacher (on the left) and Thai (in the middle and on the right). Fourth flush of fruiting Psilocybe Cubensis mushrooms. Long stems and fuzzy feet[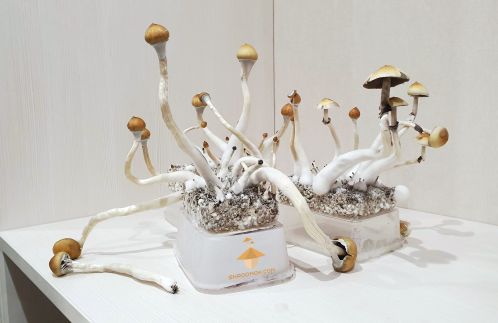](https://shroomok.com/en/wiki/File:Psilocybe-mushrooms-cultivation-fourth-flush.jpg) Golden Teacher and Thai magic mushrooms. Fourth flush of fruiting. Long stems and fuzzy feet due to lack of FAE[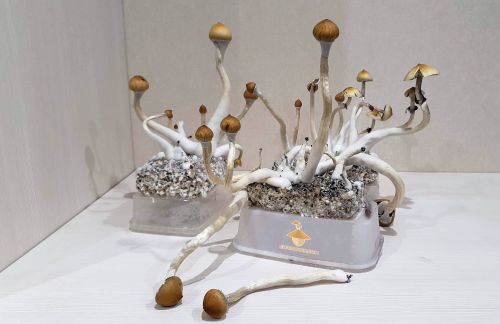](https://shroomok.com/en/wiki/File:Psilocybe-cubensis-mushrooms-growing-and-fruiting-fourth-flush.jpg) Fourth flush of fruiting Psilocybe Cubensis mushrooms GT and Thai. Mushrooms are leggy and fuzzy feet due to lack of FAE[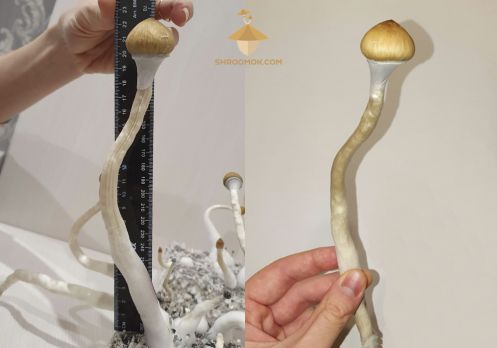](https://shroomok.com/en/wiki/File:Magic-psilocybin-mushrooms-fruiting-forth-wave.jpg) Fourth flush of fruiting and harvesting magic mushrooms. The height of mushrooms 23-25 cm. Mushrooms are leggy due to lack of oxygen[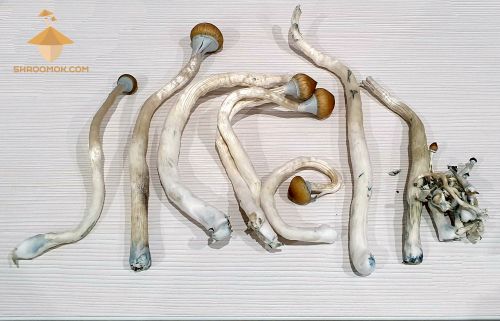](https://shroomok.com/en/wiki/File:Psilocybe-cubensis-fruiting-fourth-flush.jpg) Psilocybe Cubensis Golden Teacher harvest. Fourth flush of fruiting and harvesting. Long stems and small caps due to lack of FAE#### **Total weight of the fourth flush of mushroom fruiting**
From 5 small mushroom cakes total weight: **371.73 (g) wet = 35.7 (g) dried + 9 spore prints**
> 🔴 Statistics by flushes and by strains: [Grow report in numbers](https://shroomok.com/en/wiki/Magic_mushrooms_growing_statistics_with_charts "Magic mushrooms growing statistics with charts")
#### How to initiate 5th flush of mushroom fruiting
Repeat rehydration process for mushroom cakes after harvesting. The rehydration process the same as we made before (soaking in water for 8-24 hours).
After 2-3 rehydrations, soaking for 4-8 hours is enough. Sometimes you can skip rehydration if mushroom cake/block is wet enough
> 🔴 Recommended: [Rehydration guide](https://shroomok.com/en/wiki/Rehydration_of_psilocybe_cakes "Rehydration of psilocybe cakes")
Waiting for the 5th flush — [**Step 18. Fifth flush of magic mushroom fruiting, harvesting results**](https://shroomok.com/en/wiki/Fifth_flush_of_magic_mushrooms_harvest "Fifth wave of magic mushrooms harvest") 🔽
## Fifth flush of magic mushrooms harvest
[Fifth flush of magic mushrooms harvest](https://shroomok.com/en/wiki/Fifth_flush_of_magic_mushrooms_harvest)
### **STEP 18. Day 61-73. Fifth flush of magic mushroom fruiting period**
#### Fifth flush in photos
Usually the first 2-3 flushes are the most productive. That's why the next flushes are optional
[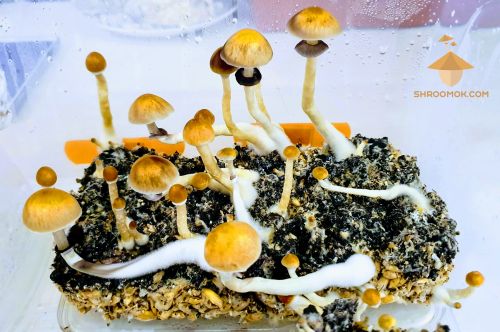](https://shroomok.com/en/wiki/File:Magic-psilocybe-mushrooms-brazil-strain-fruiting-fifth-flush.jpg) Psilocybe Cubensis Brazil. Fifth flush of fruiting. 7-9 days between flushes. 61-63 days after inoculation[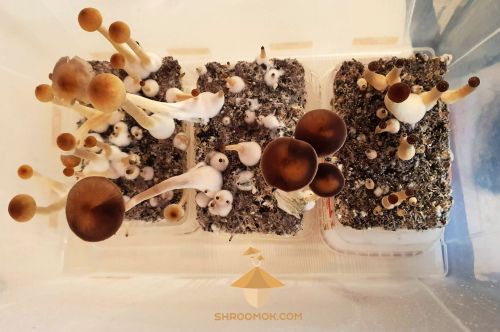](https://shroomok.com/en/wiki/File:Growing-psilocybe-mushrooms-fifth-wave-of-fruiting.jpg) Psilocybe Cubensis Thai (on the left and middle). Golden Teacher (on the right). Fifth flush of fruiting magic mushrooms
Here you can see black areas on caps. It's not contamination, just mushroom spores
> 🔴 Recommended: [Black spots on Mushrooms and Mycelium](https://shroomok.com/en/wiki/Black_spots_on_Mushrooms_and_Mycelium "Black spots on Mushrooms and Mycelium")
[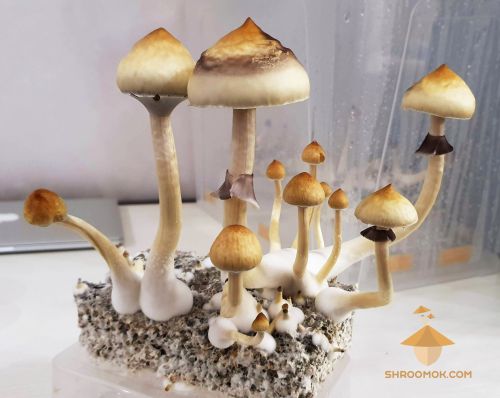](https://shroomok.com/en/wiki/File:Magic-mushrooms-growing-and-fruiting-fifth-wave.jpg) Magic mushroom fruiting (P. Cubensis Thai). Fifth flush[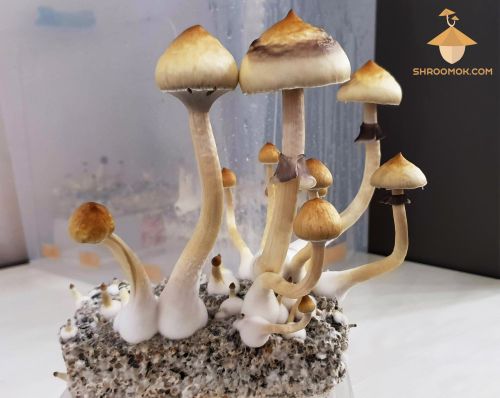](https://shroomok.com/en/wiki/File:Psilocybe-cubensis-fruiting-flush-5.jpg) Thai magic mushrooms, 5th flush of fruiting cycle[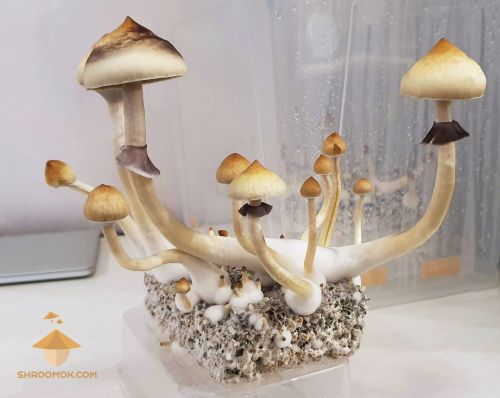](https://shroomok.com/en/wiki/File:Growing-psilocybe-mushrooms-5-flush-of-fruiting-and-harvesting.jpg) Fifth flush of magic mushroom fruiting[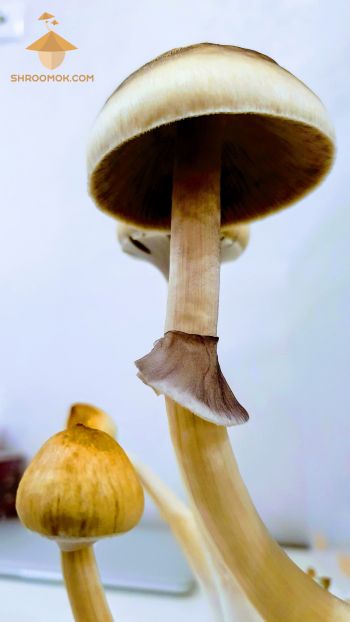](https://shroomok.com/en/wiki/File:Magic-mushrooms-growing-fifth-flush.jpg) Fifth flush of Psilocybe Cubensis growing#### **Total harvest on the fifth flush of mushroom fruiting**
Total weight (5 cakes, 5th flush): **325,69 (g) wet = 28,74 (g) dried + 1 spore print**
> 🔴 Statistics by flushes, by strains of Psilocybe Cubensis: [Grow report in numbers](https://shroomok.com/en/wiki/Magic_mushrooms_growing_statistics_with_charts "Magic mushrooms growing statistics with charts")
Here we skip rehydration, maintain fruiting conditions in GrowBox/MonoTub and wait for the 6th flush!
Move on — [STEP 19. Day 67-71. Sixth magic mushrooms harvest](https://shroomok.com/en/wiki/Sixth_flush_of_magic_mushrooms_harvest "Sixth wave of magic mushrooms harvest") 🔽
## Sixth flush of magic mushrooms harvest
[Sixth flush of magic mushrooms harvest](https://shroomok.com/en/wiki/Sixth_flush_of_magic_mushrooms_harvest)
### **STEP 19. day 67-71. Sixth flush of magic mushroom fruiting period**
At this step mushroom cakes/blocks are depleted, they spent most of nutrients for the previous flushes.
Some growers continue fruiting cycle till the 8th flush. In fact fruiting is not productive after 3-4 flushes.
Our 6th flush produced only 24 grams of Brazil magic mushrooms, which turned into 1 gram of dried shrooms.
Here is our super flush and harvest 😆
[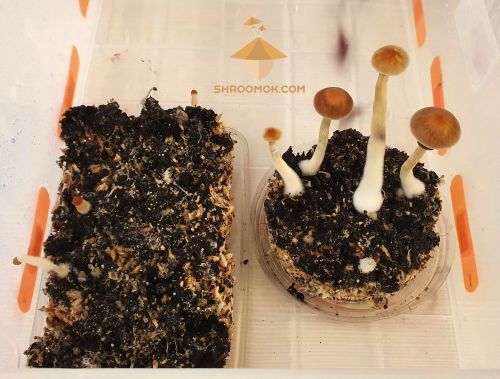](https://shroomok.com/en/wiki/File:Fungi-growing-sixth-flush-of-fruiting-and-harvesting.jpg) Sixth flush of fruiting period, Psilocybe Cubensis Brazil[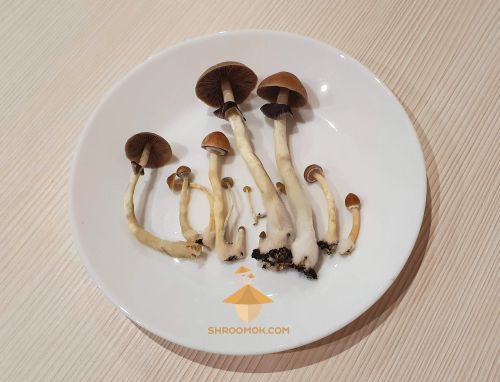](https://shroomok.com/en/wiki/File:Psilocybe-cubensis-growing-sixth-flush-harvest.jpg) Psilocybe Cubensis Brazil. Sixth flush and final harvest
All other cakes (one GT cake and two Thai cakes) were buried in the garden after 5th flush. Maybe we would have had another 70-100g, but we didn't want to bother with wasted cakes.
It is more interesting to start new growing process with using new teks of cultivation and with new mushroom species.
What can you do with wasted mushroom cakes? How can you continue mushroom fruiting?
Check out the final step — [**Step 20. What to do with wasted mushroom cake: carry on or throw away**](https://shroomok.com/en/wiki/Disposing_of_magic_mushrooms_cakes "Disposing of magic mushrooms cakes") 🔽
## Disposing of magic mushrooms cakes
[Disposing of magic mushrooms cakes](https://shroomok.com/en/wiki/Disposing_of_magic_mushrooms_cakes)
[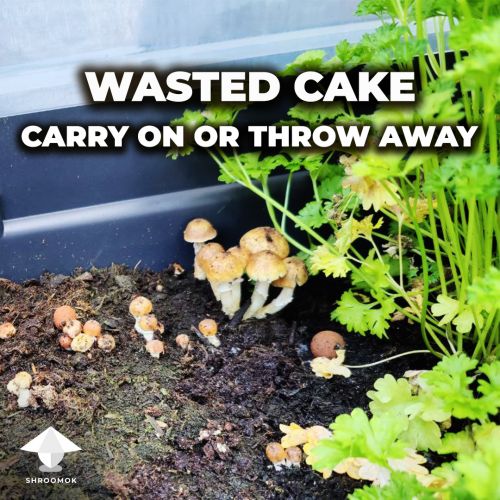](https://shroomok.com/en/wiki/File:Wasted-mushroom-cake-carry-on-or-throw-away.jpg) What to do with wasted mushroom cake or mushroom block after fruiting### **STEP 20. Day 71-73. What to do with wasted mushroom cake: carry on or throw away**
This is the final step of our mushroom growing guide. Fruiting cycle is finished, mushrooms absorbed all nutrients from the substrate, eventually your mushroom cake stopped producing mushrooms. What to do with wasted (and contaminated!) cakes?
You have 2 options to follow...
#### How to carry on mushroom fruiting
##### Wasted mushroom cake fruiting outdoor
My favorite and the best way is bury wasted mushroom cake or mushroom block in the garden, or in the forest, or in plant pot outdoor. The best place to do this is under the shades of trees or bushes to avoid direct sunlight.
Dig mushroom cake and cover with thin layer of coco coir or garden soil as a casing layer (about 1 inch). Spray the top layer with water. Mist the top layer from time time or just let nature to do the rest. You can skip all sterility rules here.
> ✅ This tip also works for contaminated mushroom cakes, spawn jars and spawn bags. Give them a chance!
Of course, current climate conditions in your country affect the possibilities of fruiting. As you know, Psilocybe Cubensis, Psilocybe Natalensis, Panaeolus are warm-loving species. The more close your climate conditions to required fruiting conditions (or natural conditions for these mushrooms) the better. Impossible to grow them outdoor in cold winter season, however they feel great in warm summer time or during warm spring and autumn time.
[](https://shroomok.com/en/wiki/File:Psilocybe-cubensis-in-the-forest-how-to-bury-wasted-mushroom-cake.jpg) Magic mushrooms grow outdoor. Fruiting from wasted cake buried in the forestIf you live in tropical/subtropical climate your shrooms feel good any season of the year with minimum support from your side during hot dry season
> Be careful with shrooms grown outdoor! Always check and id mushrooms! Poisonous fungi can grow on the place where you bury your wasted mushroom cake
##### Wasted mushroom cake fruiting in a plant pot
Example of mushroom growing by **quantum\_mama** on [Discord](https://discord.gg/ngKhQDmymD) Shroomok Growers Community
> Hello all! I had a cake that I got 6 or so good flushes from in a bag. It only had 1 mushroom the last flush so I considered it spent. Well I buried it in a pot of potting soil I had laying around and placed it outside. I got some growth! So cool! Just wanted to share
[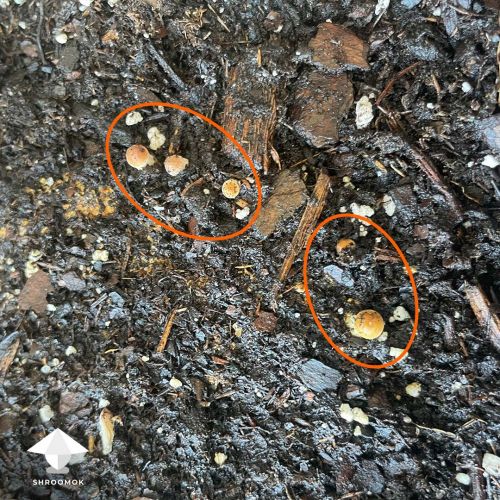](https://shroomok.com/en/wiki/File:Outdoor-mushroom-growing-from-wasted-cake.jpg) Outdoor mushroom growing in pot from wasted mushroom cake after 6 flushes. Photo by **quantum\_mama** on DiscordOne more example. Plant pot for mushroom growing indoor or outdoor. Sometimes such neighbouring is so friendly!
[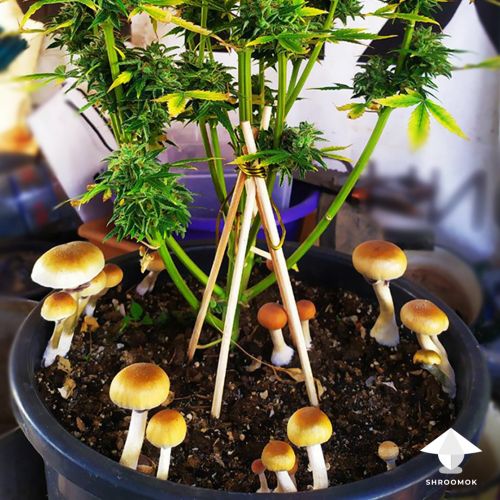](https://shroomok.com/en/wiki/File:Cubensis-mushrooms-grow-in-plant-pot.jpg) Psilocybe Cubensis magic mushrooms grow in plant pot indoor [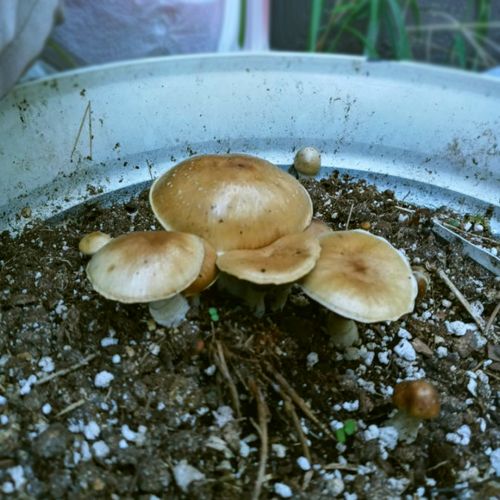](https://shroomok.com/en/wiki/File:Magic-mushrooms-growing-in-pot-outdoor.jpg) Magic mushrooms growing in plant pot outdoorExperiment with different options and have fun!
##### Mix wasted mushroom cake with fresh bulk substrate
This method can be successful for healthy mushroom cakes after 3-4 flushes. Break mushroom cake and mix it with fresh portion of bulk substrate (for example, coco coir, vermiculite, gypsum and limestone mix for P.Cubensis).
#### **Throw away wasted mushroom cakes**
If you don't have opportunities for outdoor growing or don't want to bother with it just toss wasted or contaminated mushroom cakes.
One more important point to mention here! The legal status of unauthorised actions with psilocybin mushrooms varies worldwide. That's why this step is extremely important for some growers
> 🔴 Check out the [Legal status of psilocybin mushrooms](https://en.wikipedia.org/wiki/Legal_status_of_psilocybin_mushrooms "wikipedia:Legal status of psilocybin mushrooms") in your country
Pack them in a separate trash bag and throw it away separately from all your other trash. The same way for contaminated cakes, failed spawn jars, bags and stuff for mycological manipulations.
> ❌ Don't throw anything down the toilet! You'll have unwanted plumber issues
Usually spore prints, grow kits and all related growing products are legal as they do not contain psilocybin and psilocin.
#### Afterword
Dear Grower!
Shroomok sincerely wishes you to reach this final step!
10 weeks of this growing journey passed. We made 20 steps on the way of magic mushroom growing
> 🔴 [Mushroom Cultivation Guide in 20 steps by Shroomok](https://shroomok.com/articles:grow-mushrooms-at-home-guide)
Mushroom cultivation process is always accompanied by trials and errors, fails and successes, sadness and happiness, insights at each step.
Mushrooms teach us how to find and keep balance in everything: something too much is bad, something less than required is also bad.
Mushroom growing is a great life lesson. It is a unique experience. It's a special trip, that can't be compared to any mushroom trip. Mushroom growing is more that any psychedelic trip...
Anyone who has ever grown their own magic mushrooms will always remember this moment in their life story.
This simple trip to the Fungi Kingdom is over, but there are many more expeditions to the vast world of Mycology ahead of us. This is just the beginning...
Have a happy growing and enjoy the magic of mushroom cultivation with Shroomok!
To be continued...
Let's sum up our results: [Mushroom grow report in numbers: charts, statistics, yield by flushes and by strains](https://shroomok.com/en/wiki/Magic_mushrooms_growing_statistics_with_charts "Magic mushrooms growing statistics with charts") 🔽
## Magic mushrooms growing statistics with charts
[Magic mushrooms growing statistics with charts](https://shroomok.com/en/wiki/Magic_mushrooms_growing_statistics_with_charts)
### **Grow report in numbers. Mushroom cultivation with statistics and charts**
In this section were noted all successes and failures of one Psilocybe Cubensis grow. Hope this information help you to plan your growing and have some predictions. Maybe it can be example for you to make your own growing statistics.
Let's start with the most interesting Q&A and charts with data.
#### **Psilocybe Cubensis Life Cycle statistics**
##### **How long was your growing process?**
The whole productive growing period lasts **73 days + 2 days** for preparation all needed [Stuff to buy for growing](https://shroomok.com/en/wiki/Stuff_to_buy_for_growing "Stuff to buy for growing") and [Liquid spore syringes preparation from spore prints](https://shroomok.com/en/wiki/Liquid_psilocybe_spore_syringe "Liquid psilocybe spore syringe").
##### **When the first mycelium on the substrate was detected?**
First mycelium in jars with substrate appeared on the **4-8th day after** [inoculation](https://shroomok.com/en/wiki/Inoculation_without_glove_box "Inoculation without glove box"), depending the psilocybe cubensis strain. Check examples in [Magic mushrooms incubator control](https://shroomok.com/en/wiki/Magic_mushrooms_incubator_control "Magic mushrooms incubator control") section.
##### **When the first pins and magic fungi bodies on your cakes were detected?**
First pins and first mushroom bodies appeared on the **25-28th day after** [inoculation](https://shroomok.com/en/wiki/Inoculation_without_glove_box "Inoculation without glove box")**,** depending the psilocybe cubensis strain. Check examples in [Growbox. Growing stage](https://shroomok.com/en/wiki/DIY_Grow_Box_for_Magic_mushrooms._Fruiting_conditions "Magic mushrooms growbox. The Growing stage") and [Start of Fruiting](https://shroomok.com/en/wiki/Fruiting_period._Pinhead_initiation,_mushroom_pinning_and_mushrooms_growth_parameters "Magic mushrooms fruiting") sections.
##### **When the first flush was harvested?**
[The first flush of magic mushrooms](https://shroomok.com/en/wiki/Magic_mushroom_harvesting_time,_first_flush "First wave of magic mushrooms harvest") was harvested on the **32-34th day after** [inoculation](https://shroomok.com/en/wiki/Inoculation_without_glove_box "Inoculation without glove box")**.**
Check the whole Psilocybe Cubensis life cycle by steps and strains in the table below:
[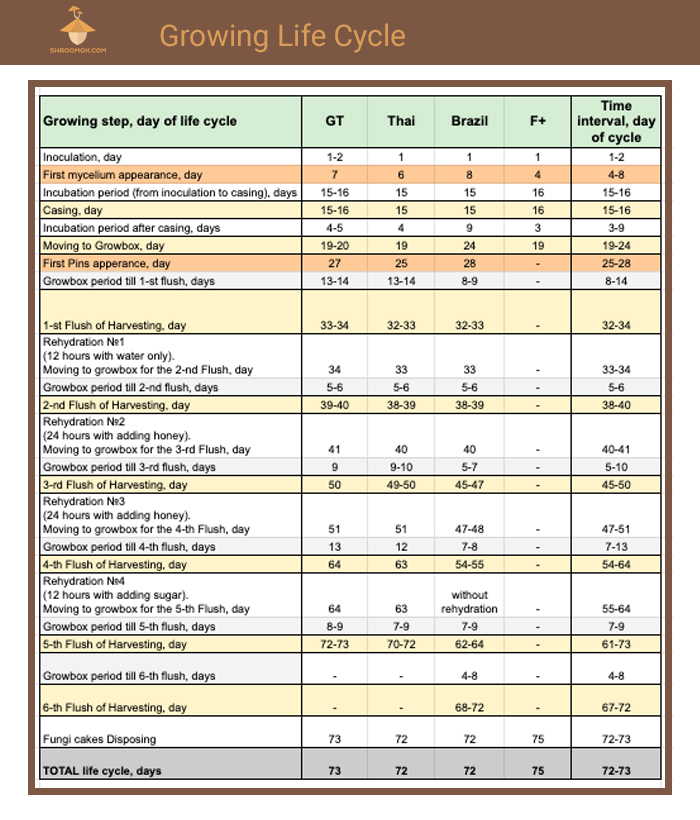](https://shroomok.com/en/wiki/File:Growing-psilocybe-mushrooms-life-cycle.jpg) Full life cycle of cultivation psilocybin mushrooms Psilocybe Cubensis from inoculation substrate to disposing mushroom cakes#### **Overall mushroom yield**
##### **What was your overall result of growing magic mushrooms at home?**
We had 5 spore prints and 5 spore syringes.
We inoculated 15 jars with substrate. 20% (3 jars) were lost during colonization period.
With other 12 jars we made 9 cakes (mix of small and big jars).
22% (4 cakes from 9) were lost during fruiting phase.
Our final result is **58% of success to 48% of lost**
[](https://shroomok.com/en/wiki/File:Overall-performance-of-growing.jpg) Overall performance of growing psilocybin mushrooms Psilocybe Cubensis#### **Psilocybe Cubensis yield by flushes and strains**
##### **How much mushrooms have you harvested in total?**
The final result of the whole psilocybin fungi growing is **1 kg 883 grams** of Psilocybe Cubensis mushrooms. If we hadn't lost no one jar and no one cake our current yield could have been two times greater!
##### **How much does a mushroom flush yield?**
It depends from the flush number, strain, spore print quality, substrate volume, growing conditions and many other factors. From our own experience we admitted that from 5 cakes (3 different strains) from flush to flush we got from **238 grams to 476 grams** of psilocybin mushrooms.
The most productive was the [3rd flush of fruiting and harvesting period](https://shroomok.com/en/wiki/Third_flush_of_magic_mushrooms_harvest "Third wave of magic mushrooms harvest"). The weakest was the very [first flush](https://shroomok.com/en/wiki/Magic_mushroom_harvesting_time,_first_flush "First wave of magic mushrooms harvest") (not including the [experimental 6th flush](https://shroomok.com/en/wiki/Sixth_flush_of_magic_mushrooms_harvest "Sixth wave of magic mushrooms harvest") which gave us **only 24 grams**).
Take a look how different it could be:
[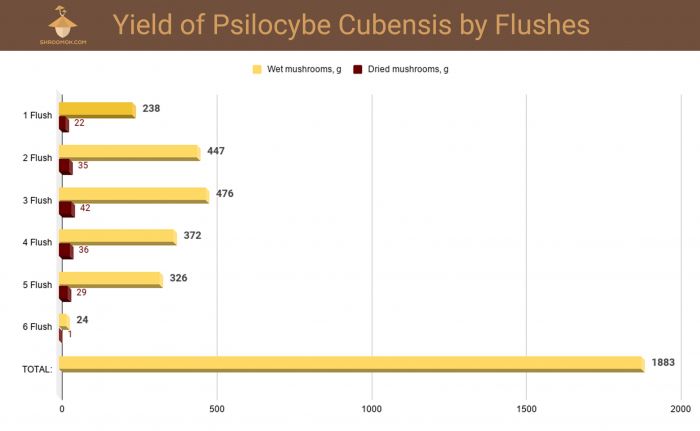](https://shroomok.com/en/wiki/File:Psilocybe-cubensis-mushrooms-fruiting-graph-en.jpg) Graph: Yield of Psilocybe Cubensis by Flushes (grams)[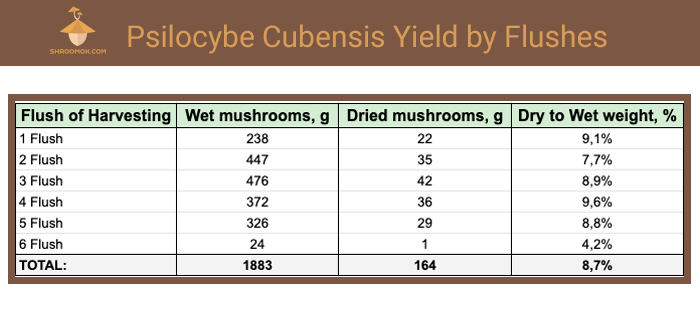](https://shroomok.com/en/wiki/File:Psilocybe-mushrooms-yield-statistics.jpg) How much mushrooms can you get from each flush of fruiting and harvesting period? Wet and dried magic mushrooms grow report
**1 kg 883 grams** of wet magic mushrooms after drying turned into **164 grams of dry weight**. Drying the mushrooms was more than 10 times (on average, mushrooms leave 8-9% of their original mass).
##### **How much psilocybin mushrooms can you get from 1 spore print (1 spore syringe)?**
In our successful experience yield from 1 spore print (1-GT, 1-Thai, 1-Brazil) was from 489 grams to 869 grams from all flushes. It also can be 0 as it was with F+ strain.
Take a look:
[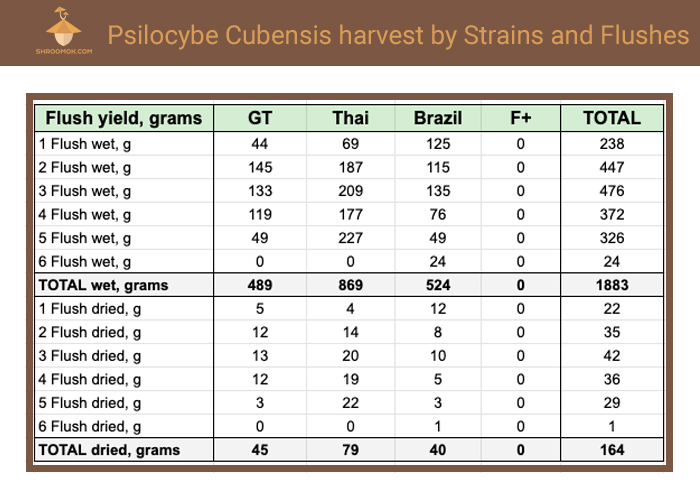](https://shroomok.com/en/wiki/File:Psilocybe-cubensis-harvest-by-strains-and-flushes-statistic-table.jpg) Growing statistics: Psilocybe Cubensis harvest by strains and flushes##### **How much psilocybin mushrooms could be harvested from 1 cake in average?**
Due to our growing statistics yield from one cake could be **from 35 grams to 135 grams** per one flush. **Up to 500 grams** for the whole fruiting and harvesting period (all flushes). It depends from the flush number, strain, spore print quality, substrate volume, mycelium, growing conditions and many other factors.
##### **Are there any difference in yield between Psilocybe Cubensis strains?**
Golden Teacher (GT) is seems a great and easy strain for beginners. In fact, most problems we got with GT (2 jars with substrate and 1 cake were lost). Anyway, it depends from many factors, not only strain choosing.
The most productive was Thai strain. We didn't loose no one jar with substrate and no one cake. As a result we've got the biggest yield from 1 spore print from Thai strain in comparison with the others.
Brazil showed good results as well. The yield could be even better than Thai if we didn't loose 1 jar with substrate.
F+ was lost totally because of [overlay](https://shroomok.com/en/wiki/Psilocybe_growing_problems_-_overlay,_abortions,_etc "Psilocybe growing problems - overlay, abortions, etc"). Check details about F+ story in [Psilocybe growing problems - overlay, abortions, etc](https://shroomok.com/en/wiki/Psilocybe_growing_problems_-_overlay,_abortions,_etc "Psilocybe growing problems - overlay, abortions, etc")
[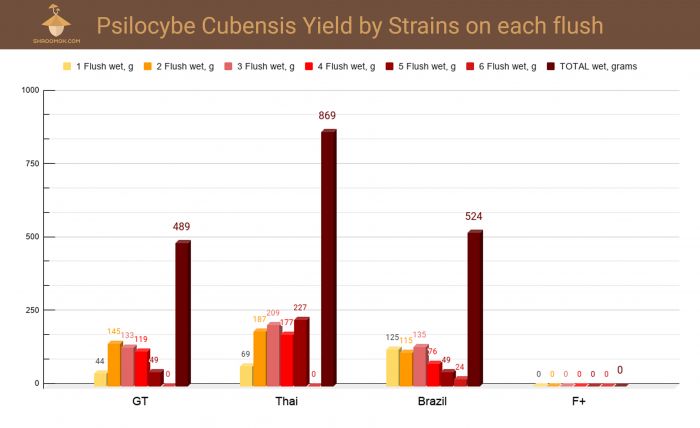](https://shroomok.com/en/wiki/File:Psilocybe-cubensis-yield-by-strains-and-flushes-graph.jpg) Graph of Psilocybe Cubensis yield by strains and flushes (g)[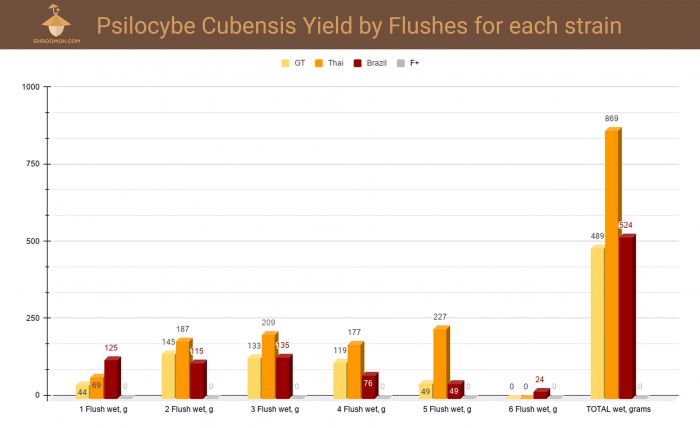](https://shroomok.com/en/wiki/File:Psilocybe-cubensis-yield-by-flushes-and-strains-graph.jpg) Magic mushrooms growing stats. Graph of Psilocybe Cubensis yield by flushes and strains (Golden Teacher, Thai, Brazil, F+)[](https://shroomok.com/en/wiki/File:Graph-accumulated-yield-by-flushes-and-strains.jpg) Growing psilocybin mushrooms statistics. Graph of accumulated yield by flushes and strains (g)##### **How many spore prints have you prepared?**
We gathered in total 72 conditionally clean spore prints from all flushes (except the last [experimental 6th flush](https://shroomok.com/en/wiki/Sixth_flush_of_magic_mushrooms_harvest "Sixth wave of magic mushrooms harvest")).
Read how to prepare properly your own spore prints in the [Spore Prints preparation](https://shroomok.com/en/wiki/How_to_make_magic_mushrooms_spore_prints "How to make magic mushrooms spore prints") section.
[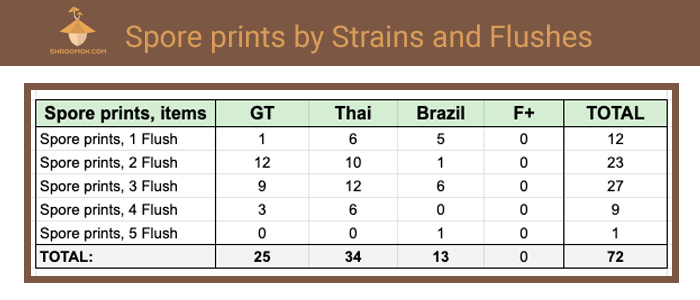](https://shroomok.com/en/wiki/File:Magic-mushrooms-spore-prints-statistics-table.jpg) Psilocybe Cubensis spore prints statistics table[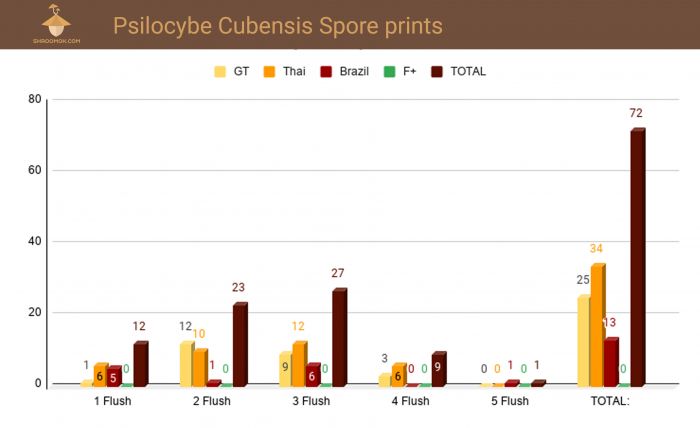](https://shroomok.com/en/wiki/File:Spore-prints-statistics-graph.jpg) Psilocybe Cubensis spore prints statistics graph
It's just one simple grow. Hope to share with you more soon.
Wish you amazing harvests! Enjoy your grow-trip!
Peace, Shroomok 🤍
🍄 [**Buy Shroomok a mushroom**](https://www.buymeacoffee.com/shroomok) as a donation and say something nice!
## Grain to Grain Transfer (G2G)
[Grain to Grain Transfer (G2G)](https://shroomok.com/en/wiki/Grain_to_Grain_Transfer_(G2G))
### Grain to Grain transfer is easy as 1-2-3
[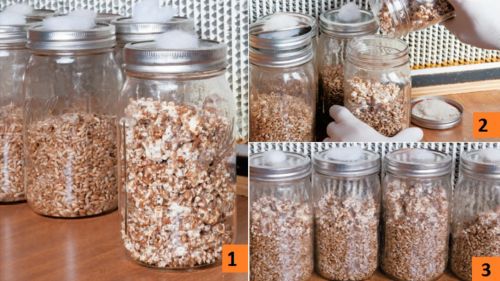](https://shroomok.com/en/wiki/File:G2G-tek.jpg) Grain to Grain transfer as 1-2-3When you have at least one spawn jar with healthy mycelium you are lucky!
Because you can easily multiply this one jar and turn it into 3-5 or even 7 similar jars of grain mycelium. Very roughly it can be compared to budding or propagation by offshoots in plants.
Let us consider one of the effective methods of inoculation and reproduction of mycelium - Grain to Grain transfer (G2G).
❇️ The method is suitable for all mushroom species that use grain as a primary substrate for spawn: either it's magic mushrooms or Hericium (aka Lion's Mane).
#### Advantages of Grain to Grain transfer
✅ **Easy** method. The grain-to-grain (G2G) transfer is so simple that any beginner in mushroom growing can handle it.
✅ **High speed of grain colonization.** After inoculation of sterile grain with this method, the mycelium grows much faster in comparison with liquid spore inoculation.
✅ **Simple.** This method is also good for those who are not yet ready to embark on the more labor-intensive procedure of preparing a liquid culture. And the G2G transfer is as fast as liquid mycelium inoculation in terms of colonization rate.
✅ **Increases the chances of successful colonization.** Very often newbie growers find that they have used up all the spore print and all liquid spore suspension for 10-20 jars at once, and end up with only one or two successful ones.
✅ This method is also popular and successfully used by advanced growers. This method save your time and minimum manipulations required from your side.
✅ In fact, this is an endless method of mycelial propagation. You can repeat such transfers on fresh sterile grain again and again.
#### How to make grain to grain transfer
1️⃣ Prepare jars with fresh sterile grain substrate: wheat, oats, barley, brown rice, rye, popcorn, corn, millet, sorghum, bird seeds etc.
[](https://shroomok.com/en/wiki/File:Substrate-ready-for-inoculation-psilocybe-cubensis-spores.jpg) Sterile grain substrate for mushroom spawn after sterilization in pressure cookerFill jars with grain no more than 50-60%, so that there is some volume for grain spawn, which will be added to the top of the jars.
How to prepare substrate for grain spawn check in: [Choose and prepare substrate](https://shroomok.com/en/wiki/Choose_and_prepare_substrate_for_magic_mushrooms "Choose and prepare substrate for magic mushrooms"), [Cooking Grain Substrate](https://shroomok.com/en/wiki/Substrate_sterilization_before_adding_psilocybe_spores "Substrate sterilization before adding psilocybe spores") and [Substrate sterilization](https://shroomok.com/en/wiki/Substrate_sterilization_before_adding_psilocybe_spores "Substrate sterilization before adding psilocybe spores")
2️⃣ Remember about sterility! Use gloves, face mask, cap, gown/PE raincoat before performing the following procedures.
[](https://shroomok.com/en/wiki/File:Growers-outfit-for-mushroom-cultivation.jpg) Grower's outfit: face mask. gloves, cap, gown
3️⃣ Choose a spawn jar with healthy snow-white mycelium. Check it for mold, sourness, and metabolites. Only healthy, perfect mycelium is suitable for this inoculation method. Wipe the spawn jar with ethyl alcohol (70%).
[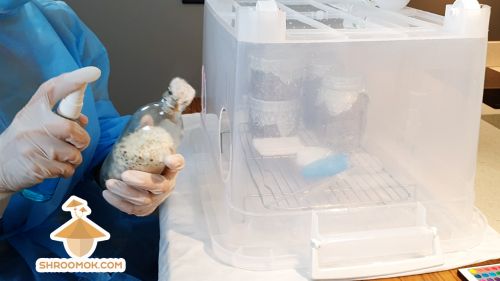](https://shroomok.com/en/wiki/File:Spawn-jar-to-shake.jpg) Wipe the Spawn Jar with ethyl alcohol before opening and making Grain to Grain transfer
4️⃣ Shake and break grain spawn in a jar without opening. Take the jar and methodically tap it on all the sides with the palm of your hand and rub it well. You need to get the clump of grain mycelium to break into independent grains or smaller clumps.
[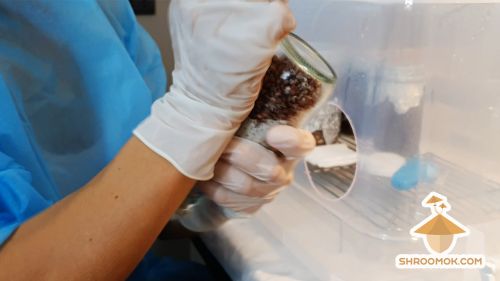](https://shroomok.com/en/wiki/File:How-to-shake-spawn-jar.jpg) Shake grain spawn in the jar or spawn bag before G2G without opening
5️⃣ Clean and wipe the table with alcohol before G2G transfer.
If you have a quartz lamp in your arsenal use it to disinfect your room 30 minutes in advance.
Great to use a [SAB (still air box)](https://shroomok.com/en/wiki/Still_Air_Box_for_Mycology "Still Air Box for Mycology"), glovebox or [laminar flow hood](https://shroomok.com/en/wiki/How_I_built_my_first_laminar_flow_hood_for_home_mycology "How I built my first laminar flow hood for home mycology").
If you don't have such devices you can make G2G transfer in as clean room as possible on an alcohol-treated table or over the open lid of heated oven under a hot air stream.
**Shroomok's experience:** manipulation in open air (without SAB etc) infects 1-2 jars out of 10 with mold contamination.
6️⃣ Thoroughly wipe down jars (with fresh sterile grain substrate) with alcohol. Pay special attention to the place where the lid connect with the jar.
[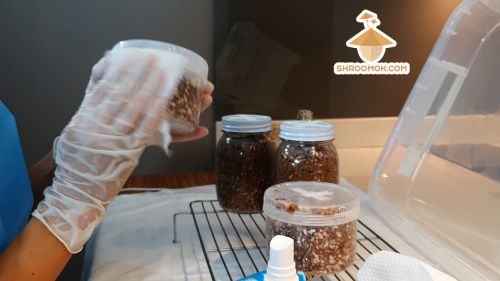](https://shroomok.com/en/wiki/File:Transfer-grain-to-grain.jpg) Preparation jars with fresh sterile grain substrate for grain to grain transfer7️⃣ Open spawn jar with mycelium and one of your uncolonized fresh jars. Inoculate some of the grain mycelium into the sterile grain substrate. Close the inoculated jar with a lid with air filter lid and set it aside. No need to make inoculation port for such jars, only breathing filter for gas exchange.
[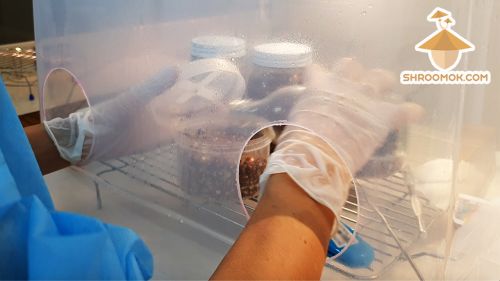](https://shroomok.com/en/wiki/File:Inoculation-grain-to-grain-transfer.jpg) Grain to grain inoculation[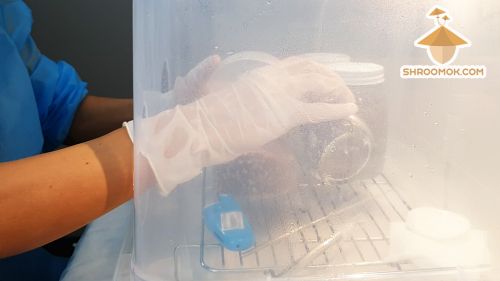](https://shroomok.com/en/wiki/File:Inoculation-grain-to-grain.jpg) Grain to grain transfer: grain spawn to fresh sterile grain substrate
Repeat all these manipulations with every single jar you've prepared for G2G. Try to do it as quickly as possible and don't hang over an open jar for too long!
[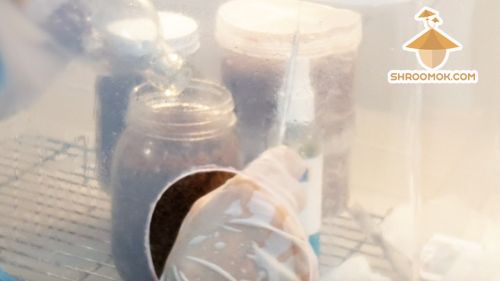](https://shroomok.com/en/wiki/File:Grain-to-grain-mycology.jpg) Spawn grain to sterile grain transfer
❗️Share spawn between 3-5-7 similar jars. Mycelium of one jar can be shared with maximum 10 jars of the same volume.
❗️ The more grain spawn were transferred into each jar the higher chances of quick and successful colonization.
🔴 If the Grain Spawn is very dense and you could not break it in the jar you can use sterile spoon or inoculation needle. Don't forget to treat your tools with alcohol to avoid contamination by non-sterile tools.
[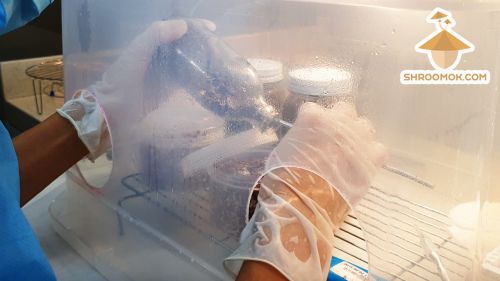](https://shroomok.com/en/wiki/File:Grain-2-grain-transfer.jpg) G2G inoculation
8️⃣ When you've finished G2G transfer shake the jars thoroughly to spread the grain with mycelium evenly. The more evenly it spreads the faster each jar will reach 100% colonization.
9️⃣ Put the jars in a dark, dry and warm place (+27°...+29° C) for colonization — to the incubator. After 1-2 weeks (depending on the species of mushrooms) all jars will be fully colonized.
[](https://shroomok.com/en/wiki/File:Spawn-jars-in-incubator.jpg) Spawn jars in incubator for colonization period#### What is the best choice of grain for G2G transfer?
❇️ Smaller grains (e.g. millet) colonise the grain substrate faster after grain-to-grain transfer because of the greater number of mycelial development points.
❇️ Spawn on small grains is preferable and effective for grain-to-grain inoculation. Thus, one jar of colonized millet can effectively inoculate 5-7 jars of grain. Whereas one jar of corn can be shared between no more than 3-4 jars.
❇️ Purified grain without husks (even if successfully colonized with mycelium) is not the best option for G2G inoculation. Only whole grain can be used for G2G transfer.
#### **How long mushroom spawn can be stored?**
Fully colonised grain spawn can be stored in the refrigerator for up to 2-4 months. Temperature shouldn't be lower than +2°C or 36°F (optimal temperature +5°..+8°C or 41-46°F).
Storing mushroom spawn gives grower more opportunities to plan cultivation process.
> 🔴 Recommended: [How to store Mushroom Spawn for a long time and postpone Spawn to Bulk](https://shroomok.com/en/wiki/How_to_store_Mushroom_Spawn_for_a_long_time_and_postpone_Spawn_to_Bulk "How to store Mushroom Spawn for a long time and postpone Spawn to Bulk")
#### Support Shroomok
If you find my work, articles, advices I've sharing helpful you can support Shroomok in the following way.
🍄 [**Buy Shroomok a mushroom**](https://www.buymeacoffee.com/shroomok) as a donation and say something nice!
Join Shroomok community, ask questions and share your best practices in [Discord](https://discord.com/invite/ngKhQDmymD) and [Reddit](https://www.reddit.com/r/Shroomok/)
Have a happy growing!
Peace, Shroomok 🤍
## How to make mushroom Liquid Culture
[How to make mushroom Liquid Culture](https://shroomok.com/en/wiki/How_to_make_mushroom_Liquid_Culture)
[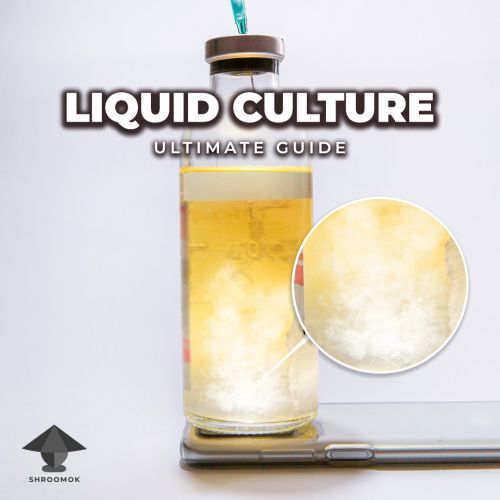](https://shroomok.com/en/wiki/File:Mushroom-liquid-culture-ultimate-guide.jpg) Mushroom Liquid Culture guideMastering this skill can save you time and money in the long run. Equip yourself with the necessary reserves for mycological experiments without the fear of making costly mistakes or losing rare, valuable mushroom strains.
This guide is versatile and applicable to both active and edible mushrooms:
✨ Psychedelic mushroom species: This includes Psilocybe Cubensis, Psilocybe Natalensis, Panaeolus, magic truffles like Psilocybe Tampanensis, Psilocybe Mexicana, and Psilocybe Galindoi; Psilocybe Hoogshagenii var. convexa; Psilocybe Azurescens, and more.
✨ Edible, gourmet, and medicinal species: This includes shiitake, Lion's Mane, oyster, maitake, enoki, cordyceps, reishi, and others.
Let's dive in!
#### What is Liquid Culture
***Liquid media, or liquid culture media,*** is a low-viscosity nutrient broth designed to support the growth of liquid mycelium, also known as liquid culture. This sterile concoction is made from water and one (or more) simple carbohydrates. Its purpose is to foster the development of mycelium after it's been inoculated with a spore syringe, liquid culture syringe, liquid inoculant, or agar.
[](https://shroomok.com/en/wiki/File:Liquid-culture-broth-preparation.jpg) Potato broth and LME liquid media preparation. Filtering through coffee filters***Liquid culture (LC), or liquid mycelium,*** is the vegetative growth of fungi that consists of thin, branched mycelial filaments within a liquid medium (LM). Within this nutrient broth, mushroom spores can germinate, form hyphae, and intertwine with these hyphae to form a mycelial network - clones of the original.
[](https://shroomok.com/en/wiki/File:LC-potato-dextrose-day-10-galindoi.jpg) Liquid Culture aka Liquid MyceliumIn essence, this is the same mycelium you typically see on substrate or agar. The only difference lies in the form of nutrient media provided for mycelium growth. This mycelium's consistency and appearance resemble that of a jellyfish.
Once the mycelium has colonized the nutrient broth, the liquid culture can be inoculated into a grain substrate, agar media, or stored in liquid form for an extended period.
**Advantages of Mushroom Liquid Culture**
✅ Colonization speed is 2-3 times faster compared to a spore syringe solution and even faster than agar inoculation. Within 7-14 days post-inoculation with Liquid Culture, you can have fully colonized grain spawn.
✅ High viability, allowing for a head start over potential contaminants in the grain substrate.
✅ It's cheap and easy to prepare, even for beginners. You can create liquid media from ingredients you likely already have at home (e.g., honey, potatoes, brown rice). Moreover, a pressure cooker isn't necessary for LC sterilization.
**Disadvantages of Mushroom Liquid Culture**
➖ It's typically impossible to identify contamination directly in the liquid culture and to be 100% certain it's free of contaminants. If you've inoculated your liquid media with a spore syringe, it's highly recommended to check your Liquid Culture on agar before inoculating a multitude of grain jars.
#### Basic Guidelines for Preparing Liquid Culture Media
Liquid media generally comprise simple carbohydrates (simple sugars) dissolved in water.
🟠 **Distilled water** is recommended for preparing liquid media. However, reverse osmosis (RO) clean, filtered, and chlorine-free drinking water can be used.
🟠 The nutritional base primarily consists of simple carbohydrates such as honey, corn syrup, malt extract, glucose (the same as dextrose), fructose, grain or potato broth, and so on.
🟠 The optimal concentration of nutrients for liquid media falls between 1-4%. A concentration of 5% isn't critical, but the idea that 'more is better' doesn't necessarily apply to mushrooms.
⛔️ Concentrations of 10% or more carbohydrates can be harmful to mushroom mycelium!
#### Liquid culture for noobs without sterilization
##### Liquid culture in syringe
If you have a spore print make a spore syringe first.
> Check out full guide: [How to make a spore syringe](https://shroomok.com/en/wiki/Liquid_psilocybe_spore_syringe "Liquid psilocybe spore syringe")
[](https://shroomok.com/en/wiki/File:Magic-truffles-spore-print.jpg) Spore print for spore syringeFor this method, I suggest to prepare a spore solution in larger volume syringes, ranging from 20-60 ml. However, if you have only a 10 ml syringe, it's not a problem; you can still use it.
[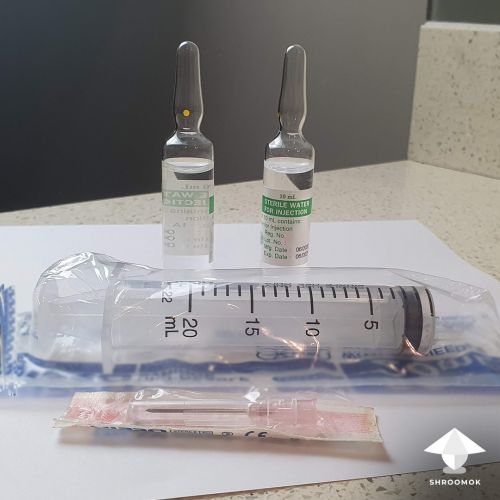](https://shroomok.com/en/wiki/File:Syringe-for-spore-syringe-liquid-culture.jpg) Syringe for spore solution and liquid cultureMake a spore solution in syringe aka spore syringe
[](https://shroomok.com/en/wiki/File:Spore-syringe-from-spore-print.jpg) Spore syringe from spore printAdd sterile pharmaceutical-grade glucose to the syringe. This could be glucose for intravenous drip or glucose from an injectable vial.
[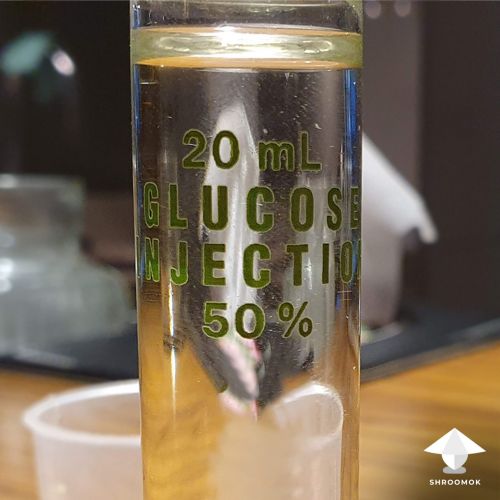](https://shroomok.com/en/wiki/File:Glucose-for-liquid-culture.jpg) Glucose injection for making LC in syringeFor the liquid culture, we need a glucose concentration of 1-4% in the syringe solution.
**Calculating how much glucose to add:**
- **50%** glucose: add **0.25-0.75 ml** **per 10 ml** of the spore solution.
- **25%** glucose: add **0.5-1.5 ml** **per 10 ml** of the spore solution.
- **10%** glucose: add **1-4 ml** **per 10 ml** of the spore solution
- **5%** glucose: add **5-10 ml** **per 10 ml** of the spore solution
Store the syringe in a dark place at room temperature and leave it undisturbed for the next 2-3 days.
After 2-3 days, check the syringe. You should see thin threads forming in the liquid.
[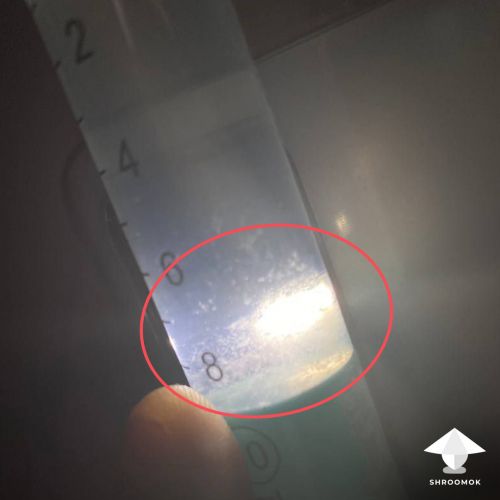](https://shroomok.com/en/wiki/File:Liquid-culture-in-syringe.jpg) Liquid mycelium growth in syringe with added glucose
From this point forward, shake it daily to prevent mycelium clumps.
[](https://shroomok.com/en/wiki/File:Liquid-mycelium-growth-in-syringe.jpg) Mycelium development in syringe solution with pharmacy glucoseTypically, within 10-14 days, the liquid culture in the syringe will be ready for inoculation.
This method is incredibly straightforward, as it eliminates the need for preparing liquid media and subsequent sterilization in a pressure cooker. The risk of contamination is minimal, as pharmaceutical-grade glucose is sterile.
Using this type of liquid culture can significantly accelerate grain colonization in comparison with spore solution.
However, it's worth noting that you can't be completely sure it's free of contaminants because spore prints, and therefore spore syringes, can't be 100% sterile.
> 💡 Tip: I highly recommend testing your spore syringe and/or liquid culture on agar before inoculation to make sure it is free of contaminants! If you are not ready for agar work skip it for now and use 1-2 grain jars for test before inoculating a bunch of jars/bags
Since the amount of liquid culture is small, it can be challenging to shake it well and break up the mycelium in the syringe. That's why it's recommended to use such a syringe within 1-3 months of preparation.
Once the liquid culture is fully colonized, store it in the refrigerator (between 35-45ºF or +2º..+8ºC) and give it a shake 2-4 times a month.
##### Using Pharmaceutical Glucose for Liquid Culture without Sterilization
You can use liquid glucose (dextrose) from the pharmacy in sealed bottles for drops (usually 250-500ml intravenous bottles).
You can utilize liquid glucose (aka dextrose) from the pharmacy, typically found in sealed bottles/bags intended for intravenous drips (usually 100-500 ml glass/plastic bottles/bags).
[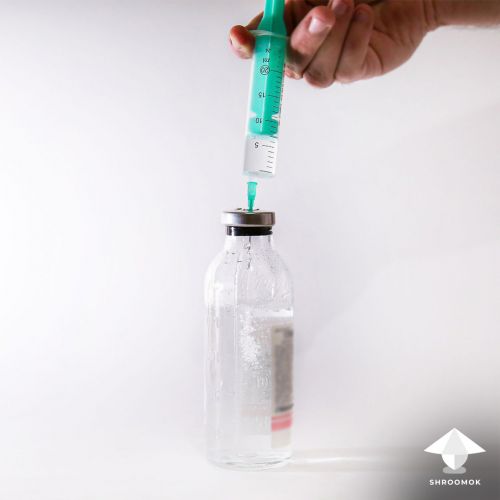](https://shroomok.com/en/wiki/File:Pharmacy-glucose-liquid-media-for-mushroom-liquid-culture.jpg) Pharmacy glucose 5% as a liquid media for mushroom liquid culture
There are available 5%-20% dextrose solution. Then you can add more sterile water and make 2-4% solution.
These come in concentrations of 5%-20% dextrose solution. If necessary, you can add more sterile water to create a 2-4% solution.
It's advisable to use a 5% concentration, as this is essentially ready-to-use sterile media for fungal development. You can directly inoculate the 5% glucose solution, or dilute it to achieve a 2-4% medium. To dilute it, remove 20-50% of the glucose solution with a syringe and add sterile water or chilled boiled water (boil the water for 20 minutes).
The main advantage of such a glucose solution is that it's **already sterile**, and you don't need to sterilize it in a pressure cooker.
Inoculate this liquid medium with a spore syringe or a liquid culture syringe, and then wait for the mycelium to grow.
[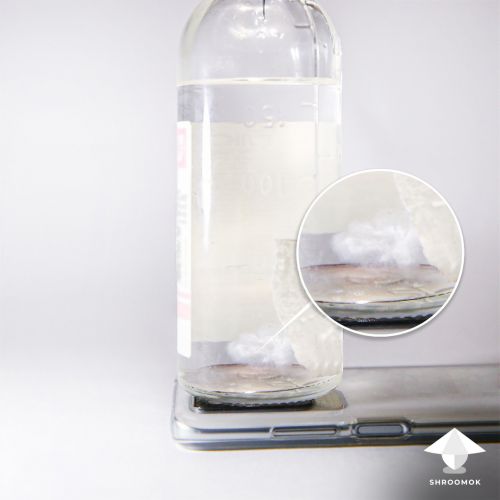](https://shroomok.com/en/wiki/File:Glucose-dextrose-liquid-culture.jpg) Liquid culture development in a 4% glucose solution. 7 days after inoculation with P. Natalensis spore syringeNow, let's explore a common approach suitable for true mushroom growers and farmers.
#### Step 1. Liquid Culture Recipes
Choose any recipe for liquid media; all of them work well. Experiment with different options to find the best one for your mushrooms. Prepare as much liquid as you need, but always maintain the correct ratio of nutrients (1-4%) to water.
> 💡 Pro Tip: I recommend adding all ingredients to warm or hot water, as this helps dissolve them better. Ensure all ingredients are fully dissolved! You can also add a pinch of gypsum to each jar
##### Recipe 1. Honey LC or Corn Syrup LC
Honey water is a basic recipe for liquid culture. It works great, with the only potential drawback being possible caramelization during sterilization if you use honey. A great substitute for honey is light corn syrup (like Karo) or fructose syrup for beverages.
- Organic honey ([Amazon](https://amzn.to/3TFVQO5)) **or** light corn syrup ([Amazon](https://amzn.to/3LNCvc2)) - 2-4g
- Water - 100 ml
##### Recipe 2. Light Malt Extract LC
This recipe is also popular for promoting fast mycelium growth. The only subjective disadvantage is the dark amber color of the liquid. It's better to use light malt.
- LME aka Light Malt Extract ([Amazon](https://amzn.to/40dRqk7)) - 2-4g
- Water - 100 ml
##### Recipe 3. Dextrose or fructose LC
I love this recipe for the clear, transparent color of the liquid media. Mycelium develops slower here, but it's perfect for long-term storage.
- Dextrose ([Amazon](https://amzn.to/3yYPujs)) **or** Fructose powder ([Amazon](https://amzn.to/408fXHn)) - 2-4g
- Water - 100 ml
##### Recipe 4. Malt extract Dextrose LC
- Light Malt Extract ([Amazon](https://amzn.to/40dRqk7)) - 1-2g
- Dextrose ([Amazon](https://amzn.to/3yYPujs)) - 1-2g
- Water - 100 ml
##### Recipe 5. Grain water LC
This old-school recipe is cheap and simple. For better results (faster growth), use the same type of grain for both the broth and grain spawn (e.g., brown rice for both). Sterilization should be slightly longer, around 40 minutes.
- Brown Rice ([Amazon](https://amzn.to/3lvEAPf)) or Wheat Berries ([Amazon](https://amzn.to/40tz0LP)) or any other grain - 1 cup
- Water - 1 Qt (1L)
Simmer grain in water for 30-40 mins.
Drain the grain, keeping only the broth.
Add water to bring the solution back to 1 quart (1 liter).
Done!
##### Recipe 6. Potato broth LC
Another old-school recipe that can be prepared at any time using only potatoes. All other ingredients are optional. The potential drawback is a slightly hazy solution, but it becomes almost transparent after sterilization. Sterilization should be a bit longer, around 40 minutes.
**Ingredients:**
- Unpeeled fresh potato - 150g
- Water - 500ml
- Optional: Dextrose **or** Honey/Corn syrup **or** LME - 7g
**Instructions:**
1. Wash the potato but don't peel it. Cut it into 4 pieces.
2. Simmer the potato in water for 20-30 mins.
3. Drain the potato and add any optional ingredients to the broth (dextrose, honey, corn syrup, LME).
4. Filter the broth to remove potato pieces (e.g., using coffee filters).
5. Add water to bring the solution back to 500 ml. Done!
Use this broth as a nutrient medium for your liquid culture.
##### Recipe 7. Potato flakes LC or potato starch LC
You can use potato flakes or potato starch as a substitute for real potatoes.
- Potato Flakes ([Amazon](https://amzn.to/405O0ji)) **or** Potato Starch ([Amazon](https://amzn.to/42x4z9u)) - 1-2g
- Light Corn Syrup - 1-2g
- Water - 100 ml
##### Recipe 8. LME, yeast, potato flakes, peptone
This recipe is excellent for promoting rapid liquid culture growth. There are different variations of this recipe. For instance, you could use Light Malt Extract (LME) or corn syrup combined with peptone.
**Ingredients:**
- Nutritional yeast ([Amazon](https://amzn.to/40tMlUI)) - 1g
- Potato flakes ([Amazon](https://amzn.to/405O0ji)) - 1g
- Light Malt Extract ([Amazon](https://amzn.to/40dRqk7)) or honey/corn syrup - 7g
- Peptone ([Amazon](https://amzn.to/3nf1Pxp)) - 1g
- Water - 500 ml
##### Recipe 9. Complete LC recipe by Radical Mycology
**Ingredients:**
- Malt (light malt extract) - 10g
- Peptone - 1g
- Yeast - 0.3g
- Vegetable oil - 5 drops
- Ground grain - 1g
- + pinch of gypsum (optional)
- Water - 500 ml
##### Recipe 10. Lysogeny LC
**Ingredients:**
- Dextrose - 10g
- Peptone - 5g
- Yeast - 2.5g
- + pinch of gypsum (optional)
- Water - 500 ml
#### Step 2. Jars and Lids for Liquid Culture
You can use or reuse any transparent glass jars, including canning jars or mason jars available on Amazon. You can even repurpose any glass jars you have at home. The optimal volume is between 10-32 oz or 300-1000 ml. The medium size of 16 oz or 500 ml is usually ideal ([Amazon](https://amzn.to/42FQeYt)).
[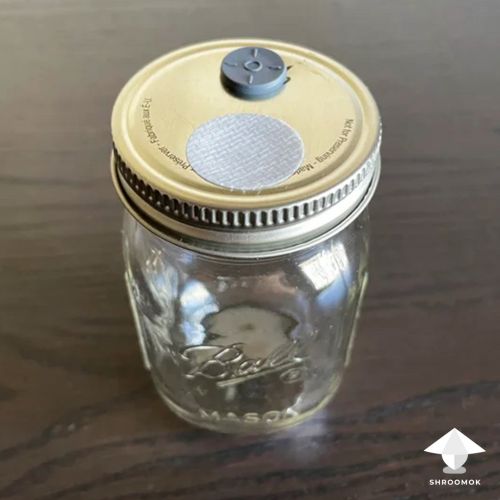](https://shroomok.com/en/wiki/File:Jars-for-liquid-culture.jpg) Glass mason jar with metal modified lid for liquid culture
In the photos for this guide, you can see some repurposed pharmacy jars. This isn't a specific recommendation, I just had them on hand and repurposed them as part of a zero-waste approach. They work well and already have a self-healing injection port.
[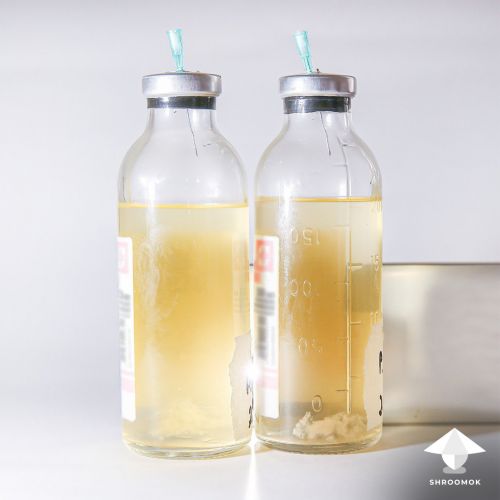](https://shroomok.com/en/wiki/File:Pharmacy-jars-for-drips-for-liquid-culture.jpg) Pharmacy jars for drips for making mushroom liquid culture
Create modified lids with a self-healing inoculation port and synthetic hydrophobic filter disks (available on [Amazon](https://amzn.to/3MrLvCt)); or use a syringe filter ([Amazon](https://amzn.to/41TICzZ)) as breathable filter for gas exchange.
[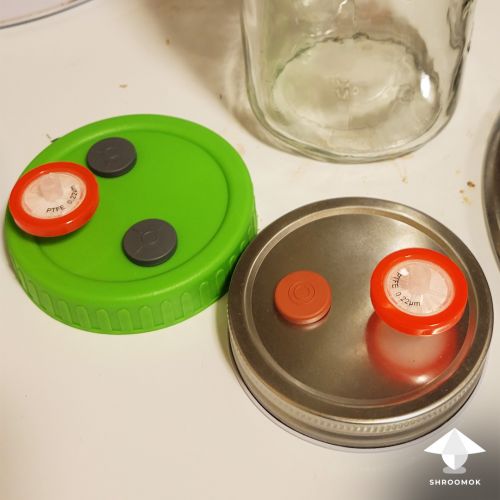](https://shroomok.com/en/wiki/File:Modified-lids-for-liquid-culture.jpg) Modified metal and 5PP lids for liquid culture with self healing inoculation port and breathable syringe filter. Photo: D!NGOUse heat resistant high temp silicone, like RTV ([Amazon](https://amzn.to/3orYlIK)), to attach and seal all components on the lid.
[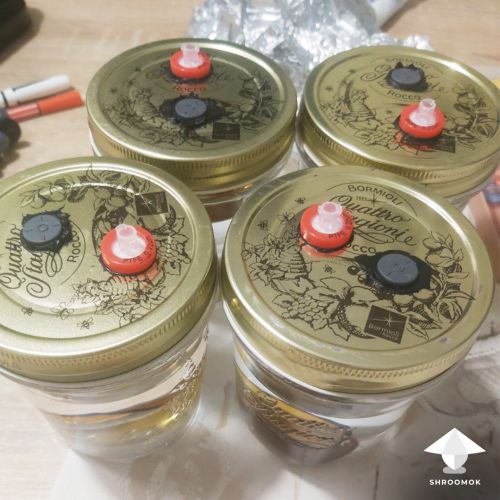](https://shroomok.com/en/wiki/File:LC-jar-with-modified-lids.jpg) Filter and inoculation port sealed with hi-temp siliconeRTV silicone can be used as an alternative to self-healing butyl rubber stoppers for DIY inoculation ports in lids.
[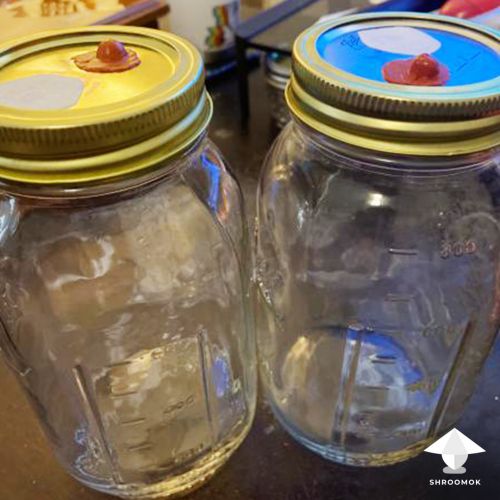](https://shroomok.com/en/wiki/File:DIY-modified-jar-for-LC.jpg) DIY modified lids for LC with rtv inoculation portAlternatively, you can buy ready-made 5PP Liquid Culture Lids ([Amazon](https://amzn.to/3nd3NOI))
> 💡 Tip: Jars and lids are reusable. It's better to use plastic 5PP lids, as metal lids can start to rust around the holes after 1-3 uses, potentially becoming a vector for contamination. To prevent this, seal the edges of holes in metal lids with high temp silicone.
Fill the jars with liquid media to about 50-80% of their total volume.
[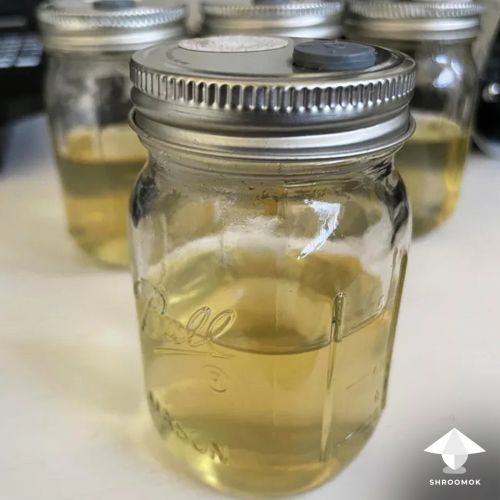](https://shroomok.com/en/wiki/File:Jar-with-liquid-culture-media.jpg) Jar with LC media ready for sterilizationIf you have a Magnetic Stirrer Bar ([Amazon](https://amzn.to/3G3nGyr)), add it directly into the liquid now.
[](https://shroomok.com/en/wiki/File:Magnet-stir-bar-for-liquid-culture.jpg) PTFE magnetic stir bars for liquid culture> 💡 Tip: Magnetic stir bar helps to break up the mycelium and adds oxygen.
If you don't have magnet bar add a stainless steel bolt, or marble mixer, or glass ball, or nickel coin, aquarium decoration stone, or any smooth stone
If you don't have a magnetic bar, you can add a stainless steel bolt, marble mixer, glass ball, nickel coin, aquarium decoration stone, or any smooth stone.
[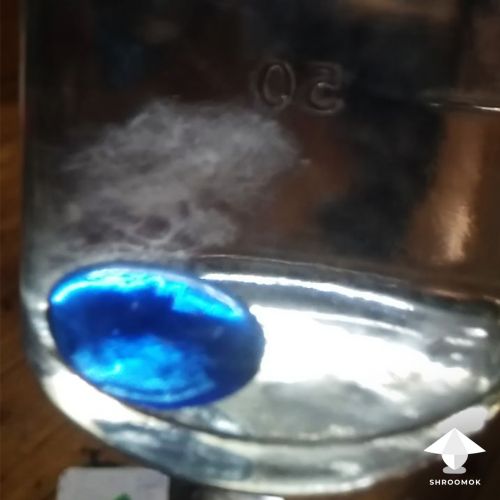](https://shroomok.com/en/wiki/File:Stirrer-bar-for-liquid-culture.jpg) Glass ball as a stir bar for LCDon't worry if you don't have any of these items or forget to add one. You'll just need to shake the liquid culture a bit longer to break up mycelium clots.
#### Step 3. Liquid culture media sterilisation
Before sterilization, wrap the lids in foil to keep the air filter dry during the sterilization process.
Sterilise the liquid media broth for 20-30 minutes at 15 PSI in a pressure cooker ([Amazon](https://amzn.to/40vFRoI)) or autoclave.
[](https://shroomok.com/en/wiki/File:Substrate-sterilization-for-mushroom-growing-in-autoclave.jpg) Sterilization in PC or autoclaveIf you're using Recipe 5 (grain broth) or Recipe 6 (potato broth), I recommend sterilizing a bit longer, for 30-40 minutes.
Some books and guides recommend sterilizing liquid media in a pressure cooker for 15 minutes, and usually this works fine. However, in my experience, this has led to bacterial contamination more often. Instead, if I build pressure in the pressure cooker more slowly and sterilize at 10-15 PSI for a slightly longer period of 20-30 minutes, the results are much better.
Sterilization should not exceed recommended duration to avoid the caramelization of carbohydrates. This typically happens with honey and Light Malt Extract if you pressure cook for more than an hour. You can easily spot this: the caramelized liquid will appear more amber when it comes out of the pressure cooker than when it went in.
[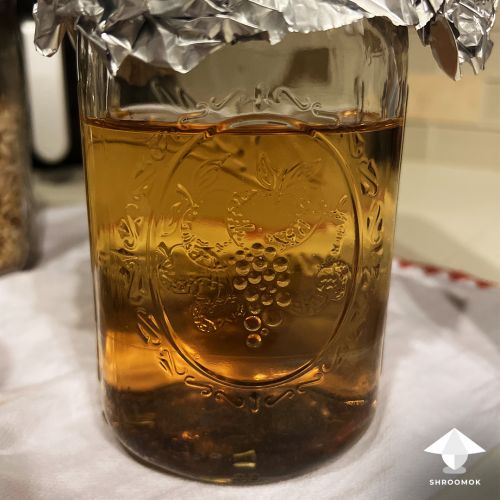](https://shroomok.com/en/wiki/File:LC-burned-in-PC.jpg) Burned LC media after PCing for 1.5 hoursAnd there might also be sediment and strange substances at the bottom.
[](https://shroomok.com/en/wiki/File:Caramelization-burned-liquid-culture-after-sterilization.jpg) After sterilization in PC nutrient media (agar here) darkens and small pieces of caramelised carbs appeared on the bottom> ❗️Ideally, the liquid should retain the same color after sterilization as it had before. It may become a little bit darker, but it should remain clear and transparent.
##### Can I sterilize liquid culture media without a pressure cooker
Yes, liquid media can be sterilized in an ordinary pot with a lid, Instant Pot, or multi-cooker for 40-60 minutes.
Eliminating potential contaminants in liquid is much easier than in a grain substrate, which is why this method can be successfully employed for liquid culture preparation.
#### Step 4. Inoculate Liquid Media
> ❗️Ensure the jars have cooled down to room temperature after sterilization before proceeding!
Before inoculation, prepare yourself and your workspace. This includes washing your hands, putting on gloves, wearing a face mask, and sanitizing your tools. Also, ensure your workspace is clean. Turn off ventilation at least 30-60 minutes in advance and clean all surfaces and inoculation ports with alcohol.
Using a Still Air Box (SAB), Fan Filter Box, or Laminar Flow Hood is optional, but recommended, especially if you're working with agar.
Prepare your genetic material for inoculation. Typically, you have:
- **spore print** for making a spore syringe
- ready to use **spore syringe**
- ready to use **liquid culture** in a syringe
- mycelium on **agar**
The syringe needle must be sterile! Clean the inoculation port with alcohol before introducing the needle.
[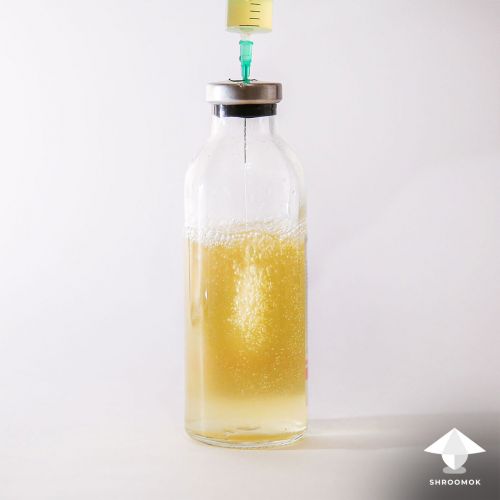](https://shroomok.com/en/wiki/File:Liquid-culture-media-inoculation.jpg) LC to LC inoculation
For further sterility, between inoculations, sterilize the needle by flaming it until it glows red and/or use alcohol wipes.
[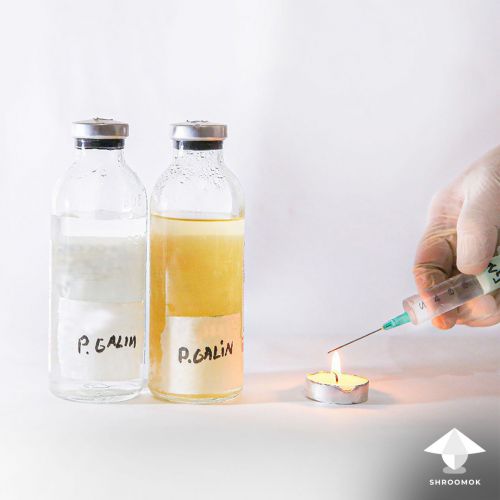](https://shroomok.com/en/wiki/File:Liquid-culture-inoculation.jpg) Flame sterilization before liquid culture inoculationAdd 1 cc/ml of genetic material through the inoculation port to each jar of sterile liquid media (even a few drops is enough).
[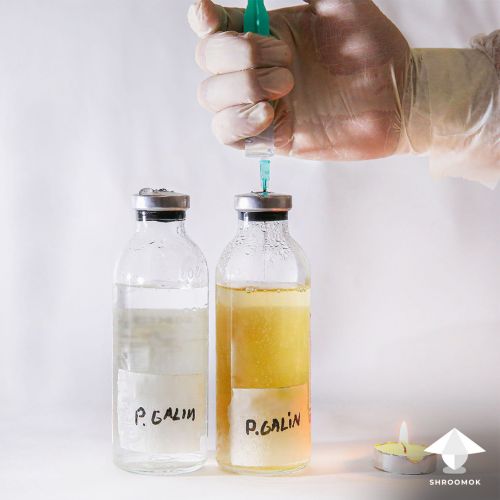](https://shroomok.com/en/wiki/File:LC-inoculation.jpg) LC inoculationShake the jar after inoculation to distribute the genetic material throughout the media. Now, simply wait for the mycelium to grow.
##### Can I make a Liquid Culture from Mycelium on Agar
Certainly! This is one of the best methods of inoculation as you're introducing contamination-free mycelium into the liquid media. Moreover, this method allows you to use perfect isolated strain for LC inoculation.
Such a process requires a Still Air Box (SAB), a Fan Filter Unit, or a Laminar Flow Hood, as it involves opening both the jar with sterile liquid media and the agar plate with mushroom mycelium.
If you're already working or plan to work with agar, at least having a SAB is essential. A Laminar Flow Hood or a Fan Filter Unit is recommended for easier operation.
> Check out guide: [DIY Fan Filter Unit for under $100](https://shroomok.com/en/wiki/How_I_built_my_first_laminar_flow_hood_for_home_mycology)
**There are two methods to inoculate liquid media with agar:**
1\) Simply cut a small piece(s) of mycelium on agar using a scalpel. Open the jar with sterile liquid media and put the agar into it for further growth. That's it!
2\) Alternatively, you can make a Liquid Inoculant (LI) from agar.
> 📖 Liquid Inoculant (LI) is a suspension of mushroom mycelium in water. This differs from a Liquid Culture (LC) as the mycelium does not grow in the medium, but is instead a method for transfer/inoculation.
The most common way to make an LI is to blend up a wedge or dish of clean mycelium on agar with sterile water and draw it into a syringe. To do this, add a few cc/ml of sterile water onto the agar plate with a syringe and gently scrape mycelium with the syringe needle or an inoculating needle/loop.
The syringe containing the LI can be used for inoculation in the same way as a spore syringe or a liquid culture syringe. Simply add 1 cc/ml of LI into the sterile liquid media through the inoculation port in the jar. Give the jar a little shake. That's it!
##### Mushroom Liquid Culture from Grain Spawn
1\) **Add a few kernels** of healthy colonized grain spawn i**nto the liquid medium** in sterile conditions. This method is typically used as a form of mycelial propagation, although it's practiced on agar as well.
Once I've used this technique successfully to save a mushroom culture with bacteria contamination at the bottom of the jar, but I used healthy grain samples on the top of the jar.
2\) Make a **Liquid Inoculant from Grain Spawn**. Add 10-20 ml of sterile water in grain spawn jar. Shake the jar a little. Now you have liquid inoculant - it means now the liquid have pieces of mycelium in it. Draw in the syringe and use it for LC media inoculation.
> ❗️ For this method mushroom grain spawn should be 100% contam-free!
##### Liquid Culture from the piece of mushroom body or cloning in liquid culture media
In fact it's mushroom cloning. This method involves using a piece of the fruiting body of the mushroom, which can continue its development in a liquid nutrient medium. Typically, a piece of the mushroom is chopped up in a blender and then added to the liquid media. This technique is particularly favored by farmers cultivating edible mushrooms.
#### Step 5. Conditions for Liquid Culture growth
After inoculation, store the jars in a dark place at room temperature (68-75°F or 20-24°C). Alternatively, you can put them in an incubation box (77-80°F or 25-27°C) to promote further colonization.
2-4 days later, check the jars. You can usually see the first signs of hyphae and mycelium within 2-7 days.
> 🧬 Mycelium is made up of thin threads that measure 1.5-10 microns in thickness. Under favorable conditions in their natural environment, the mycelium can grow miles in length. These threads are called hyphae, and where hyphae intersect, they form nodes and a network of mycelium.
> ❗️The color of mycelium should be white or slightly yellowish. The texture of mycelium is cloudy and cotton-like. The liquid media should remain clear and transparent.
Here are some photos showing the day-by-day development of the liquid culture:
[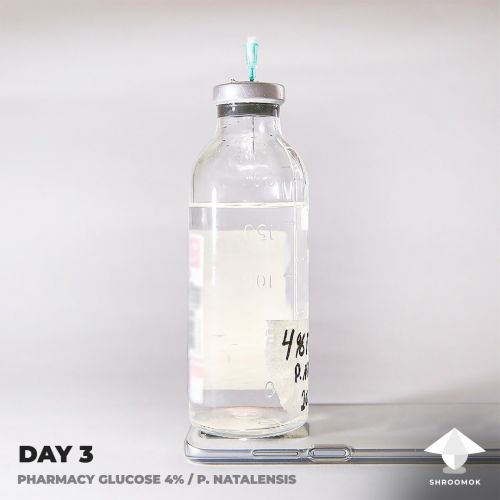](https://shroomok.com/en/wiki/File:LC-glucose-day-3.jpg) 4% pharmacy glucose. 3 days after inoculation with P. Natalensis spore syringe[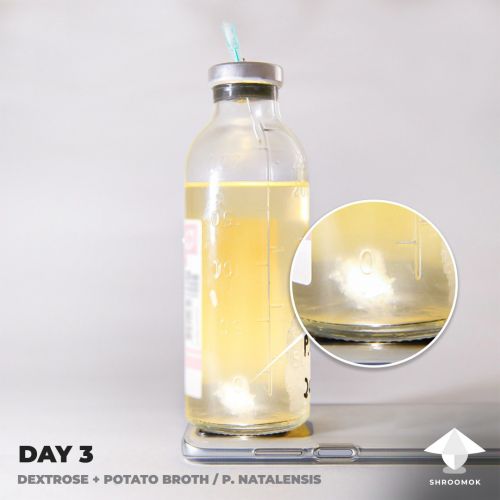](https://shroomok.com/en/wiki/File:LC-growth-day-3-potato-dextrose-natal.jpg) Potato broth with dextrose LC recipe. 3 days after inoculation with P. Natalensis spore syringe[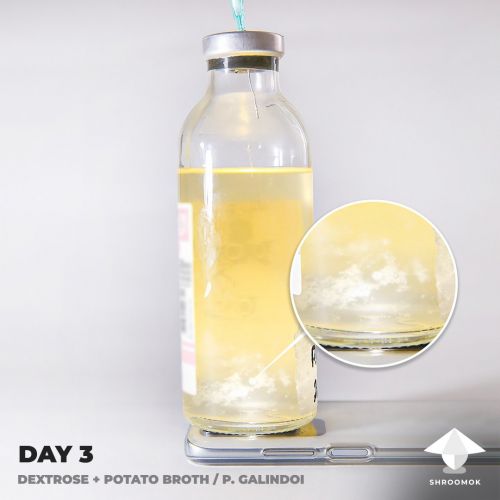](https://shroomok.com/en/wiki/File:Liquid-culture-growth-day-3-galindoi.jpg) Potato glucose LC recipe, 3 days later - P. Galindoi aka P. Mexicana[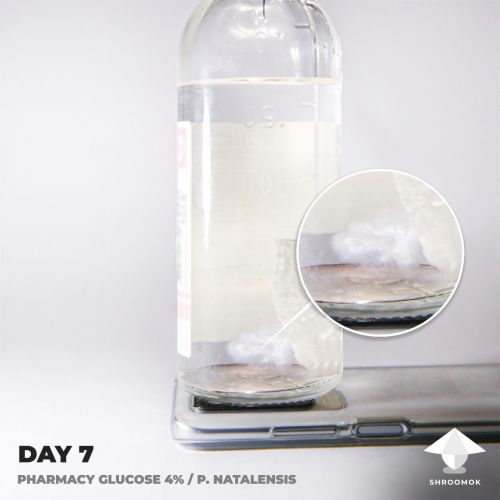](https://shroomok.com/en/wiki/File:LC-pharmacy-glucose-day-7-natalensis.jpg) Glucose 4%. P. Natalensis LC 7 days later[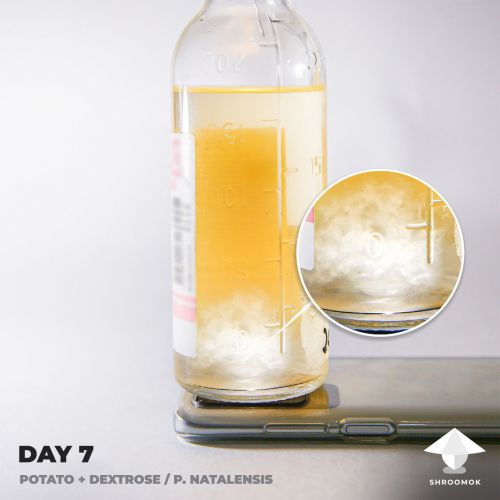](https://shroomok.com/en/wiki/File:Potato-dextrose-LC-day-7-natal.jpg) Potato broth with dextrose LC. P. Natalensis 7 days later[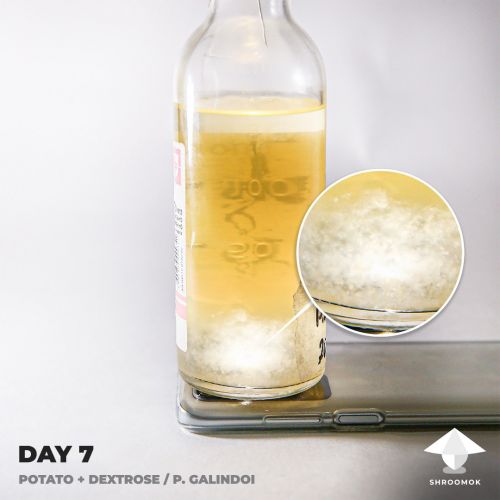](https://shroomok.com/en/wiki/File:LC-potato-dextrose-day-7-mexicana-galindoi.jpg) Potato broth with dextrose or corn syrup LC recipe. 7 days later - P. Galindoi[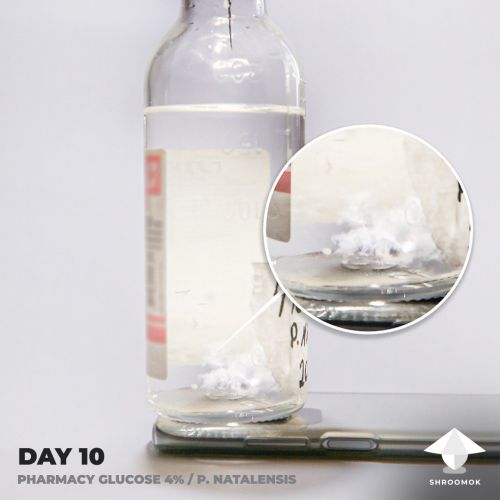](https://shroomok.com/en/wiki/File:LC-pharmacy-glucose-day-10-natalensis.jpg) Pharmacy dextrose 4%. 10 days after inoculation with P. Natalensis spore syringe[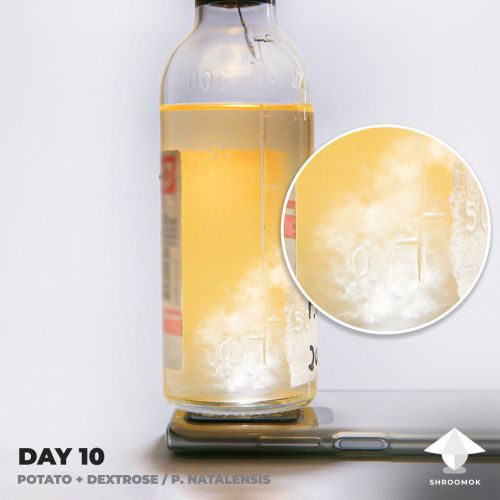](https://shroomok.com/en/wiki/File:Liquid-culture-development-day-10.jpg) Potato broth with dextrose LC. 10 days after inoculation with P. Natalensis spore syringe[](https://shroomok.com/en/wiki/File:LC-potato-dextrose-day-10-galindoi.jpg) Potato broth with glucose LC. 10 days after inoculation with P. Natalensis spore syringe[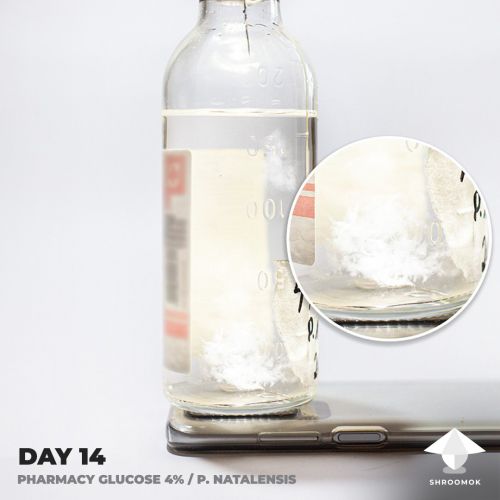](https://shroomok.com/en/wiki/File:LC-glucose-day-14-natalensis.jpg) Dextrose 4% LC. 14 days later - P. Natalensis[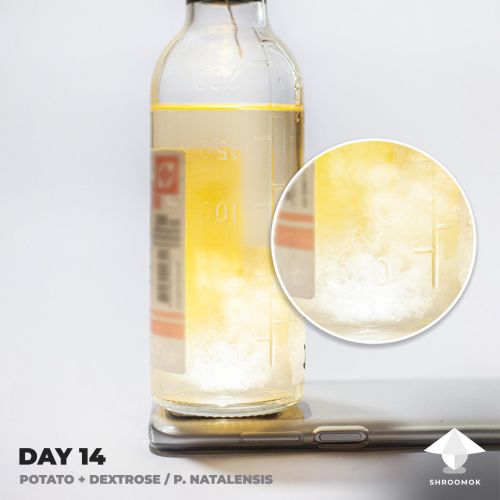](https://shroomok.com/en/wiki/File:LC-potato-dextrose-day-14-natalensis.jpg) Potato broth with glucose LC. 14 days after inoculation with P. Natalensis spore syringe[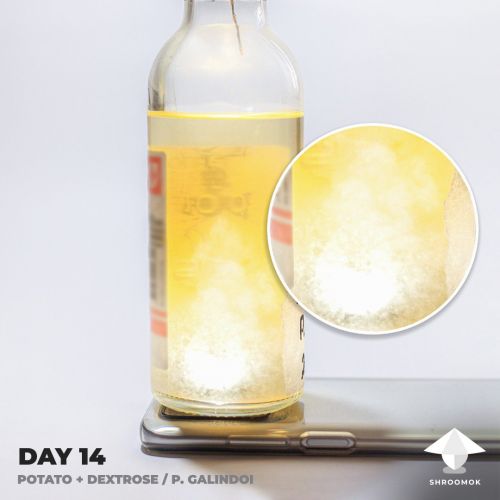](https://shroomok.com/en/wiki/File:LC-potato-dextrose-day-14-galindoi.jpg) Potato broth with glucose LC. 14 days after inoculation with P. Galindoi spore syringe#### Step 6. Shake the Liquid Culture
2-4 days after inoculation, shake the broth thoroughly to distribute the spores, hyphae, and mycelium evenly.
Once you observe mycelium growth, shake the nutrient broth every day for the following 7-14 days to encourage uniform spreading in the liquid and prevent mycelium clumps. Dense clumps may be difficult to draw into a syringe later on.
Moreover, breaking apart the mycelium accelerates its spread throughout the entirety of the nutrient broth and saturates the culture with oxygen.
##### How to shake the Liquid Culture
This can be done manually. Ideally, you would have added a magnet bar in the jar (or alternatively, a stainless steel bolt, marble, glass ball, nickel coin, or smooth stone). If you haven't, it's not a problem. You'll just need to shake for a longer duration (1-2 minutes).
If you add a magnet bar to the jar, you can stir it manually or use a laboratory Magnetic Stirrer ([Amazon](https://amzn.to/3LH4vhv))
It's relatively straightforward to create a simple magnetic mixer on your own.
[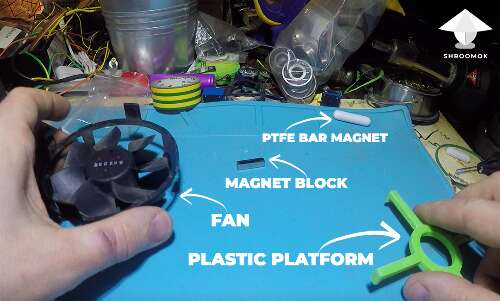](https://shroomok.com/en/wiki/File:Needed-materials-for-diy-magnetic_stirrer.png) All you need for DIY magnetic stirrer> Check out guide with video: [DIY magnetic stirrer for liquid culture](https://shroomok.com/en/wiki/How_to_make_a_magnetic_stirrer_for_liquid_culture)
#### When is Liquid Culture ready
Usually, the liquid culture is ready for the next steps within 10-14 days. Once it's ready, shake it to distribute the mycelium for usage.
[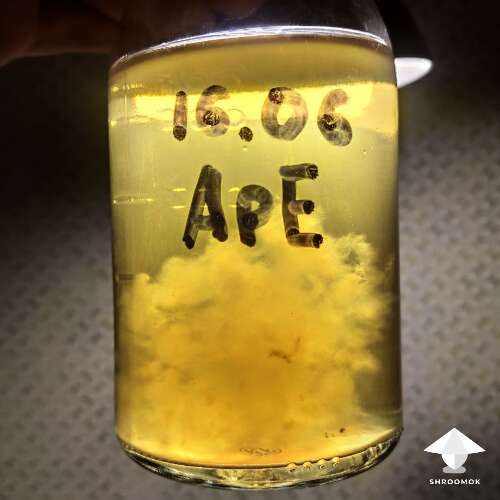](https://shroomok.com/en/wiki/File:Albino-penis-envy-liquid-culture.png) Good healthy Liquid Culture, LME recipe, 7 days after inoculation with LC**The speed of growth can vary based on several factors:**
- The quality of the mushroom genetics
- The type of genetic material used for inoculation (for instance, a spore syringe may require more time than LC, liquid inoculant, or agar)
- The temperature (lower temperatures result in slower growth)
- The presence of contaminants in the broth (such as bacteria, yeast, mold, and viruses), which are often invisible but can inhibit mycelial growth
- The content and nutrient ratio within the liquid media
Always monitor your liquid culture carefully to ensure optimal growth conditions.
#### How to Use Mushroom Liquid Culture
Prepare a sterile syringe with a needle. It's recommended to use thicker 18G or 16G needles, as they make it easier to fill the syringe with thick mycelium threads.
[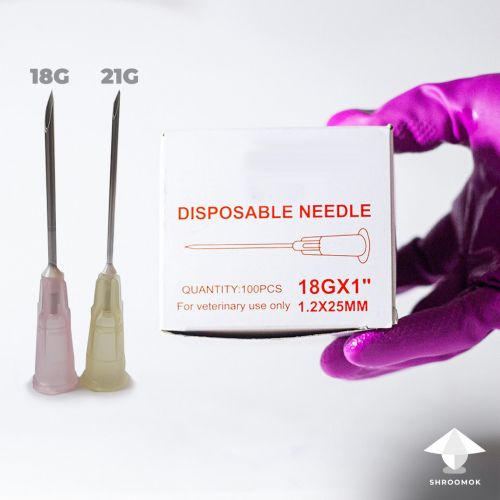](https://shroomok.com/en/wiki/File:Syringe-needle-for-liquid-culture.jpg) Syringe needle 18G for liquid culture> 💡 **Pro Tip:** Use 2-way stopcocks (available on [Amazon](https://amzn.to/434RAvI)) to avoid contamination when filling the syringes with liquid culture. This allows you to leave a needle in the LC jar and simply switch syringes. Afterward, you can close the valve to prevent contaminants from entering.
[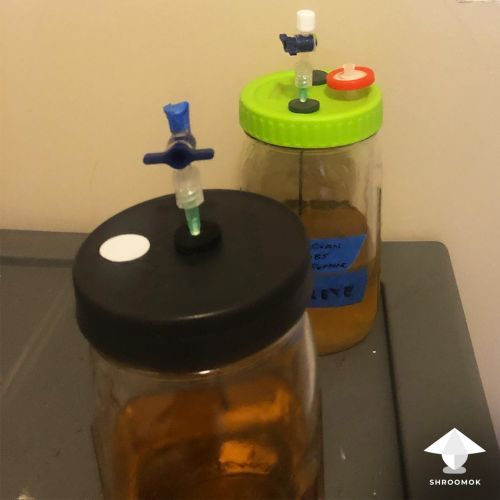](https://shroomok.com/en/wiki/File:LC-jar-with-2-way-stopcocks.jpg) Liquid culture jar with air filter, inoculation port and 2 way stopcocks
Shake the jar and fill the syringe with Liquid Culture.
[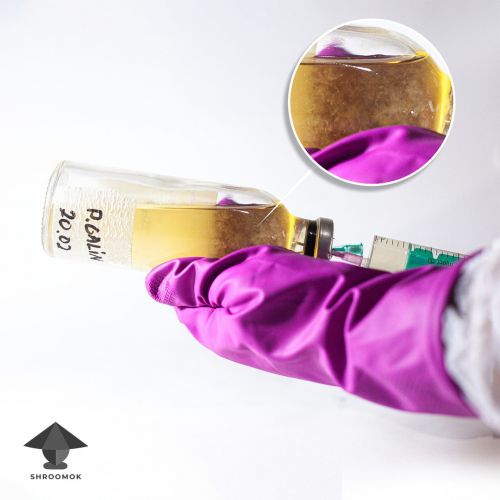](https://shroomok.com/en/wiki/File:Liquid-mycelium-sclerotia-magic-mushroom-growing-guide.jpg) Fill the syringe with LC[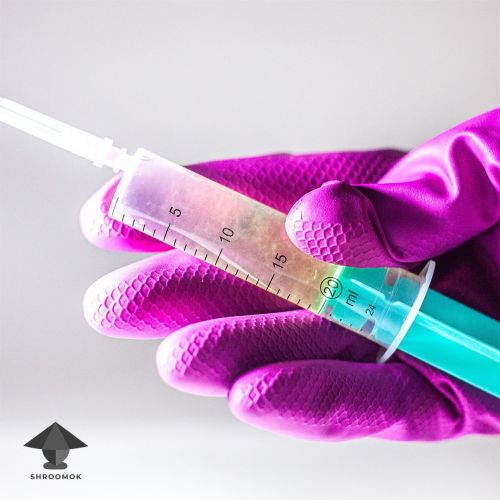](https://shroomok.com/en/wiki/File:Liquid-culture-psilocybe-sclerotia-mushrooms.jpg) Liquid culture in syringe
To inoculate a sterile grain substrate (in jars or grow bags), wipe the inoculation port with alcohol and draw 1-5 cc/ml of liquid culture into a sterile grain.
[](https://shroomok.com/en/wiki/File:Grain-substrate-inoculation.jpg) Grain substrate inoculation with liquid culture> ❗️ **Important:** Treat the syringe needle with alcohol and/or flame (until it's red) BEFORE inoculating the other jar!
To inoculate an agar plate, shake the LC and place a few drops on the agar plate.
Remember, maintaining sterility throughout these steps is crucial to avoid contamination.
#### Signs of Liquid Culture Contamination
As mentioned earlier, the main disadvantage of liquid culture is that you can't be 100% certain of its sterility. Contamination signs are usually detected when you check your LC on agar (which is highly recommended) or after inoculating the grain substrate.
However, there are several visible signs of LC contamination
##### Bacteria or Yeast contamination
Bacteria or yeast contamination usually appears in the first weeks after inoculation. The main signs are:
Smell through the filter: fermentation/sweet/sour/yeasty/cider are obvious signs of contamination.
Fermentation bubbles: These may appear when you shake the jar, similar to a foamy beer. The bubbles become more intense with each shake. This is a sure sign of bacterial or yeast contamination.
[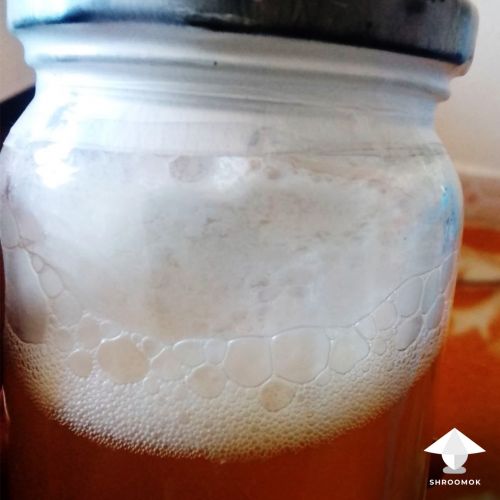](https://shroomok.com/en/wiki/File:Liquid-culture-contamination-bacteria-fermentation-bubbles.jpg) After shaking such bubbles appear in liquid culture. Photo: Moe
Cloudy liquid: If your liquid culture is not clear and transparent, it may indicate bacterial contamination.
[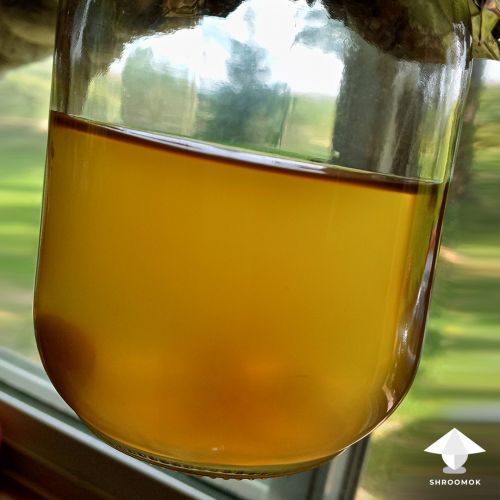](https://shroomok.com/en/wiki/File:Liquid-culture-contamination.jpg) Cloudy LC is a sign of contamination. Photo: Mycelia PThese issues may arise due to contaminated genetic material (spore print, spore syringe, LC syringe), sterility problems during the inoculation process, or improper sterilization of the liquid culture media.
#### Mold Contamination in Liquid Culture
Identifying mold in LC is challenging because it's also in the mycelial stage, making it difficult to distinguish from mushroom mycelium in liquid. However, there can sometimes be clear signs of mold contamination. For instance, mold may float on the surface of the nutrient broth.
[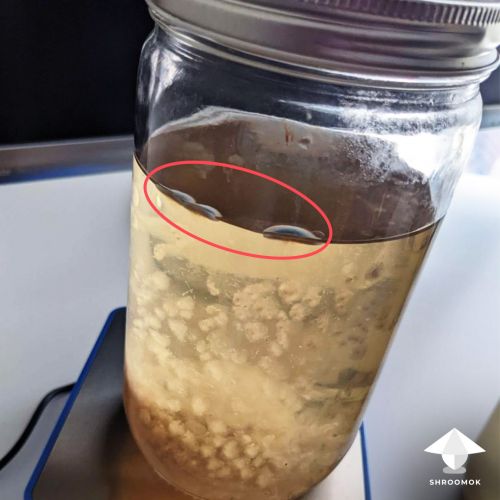](https://shroomok.com/en/wiki/File:Liquid-culture-mold-contamination.jpg) Blue-green mold Penicillium floating on top of LC. Photo: hottubfootRemember, any change in color is a sure sign of mold: green, blue-green, pink, purple, black, gray, etc. This rule applies to liquid culture when mold is floating on the top.
[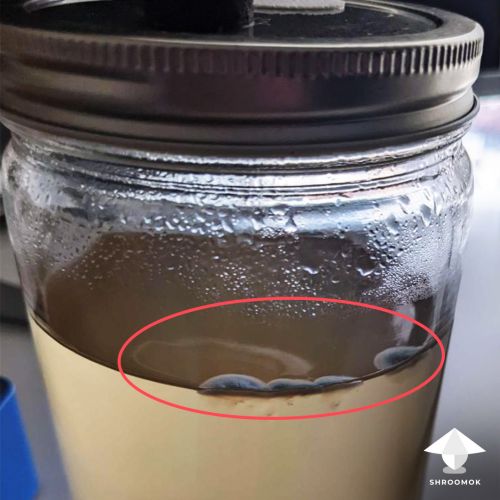](https://shroomok.com/en/wiki/File:LC-mold-contamination.jpg) Mold contamination in liquid culture. Photo: hottubfootGray-black growth on the top and cloudy liquid also indicate mold contamination.
[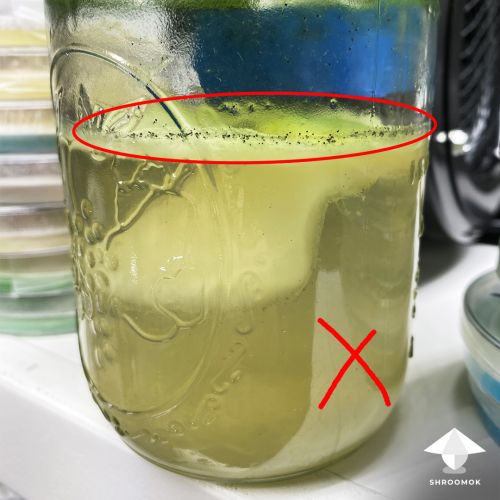](https://shroomok.com/en/wiki/File:Contaminated-liquid-culture.jpg) Cloudy liquid (bacteria contam) + signs of mold contamination on top of LC. Photo: mysterytour2000#### Healthy Liquid Culture that might be confused with contamination
Certain characteristics of healthy liquid culture might be confused with contamination. For example, mycelium clumps might appear when you don't shake the jar for several weeks or months while storing LC jars.
[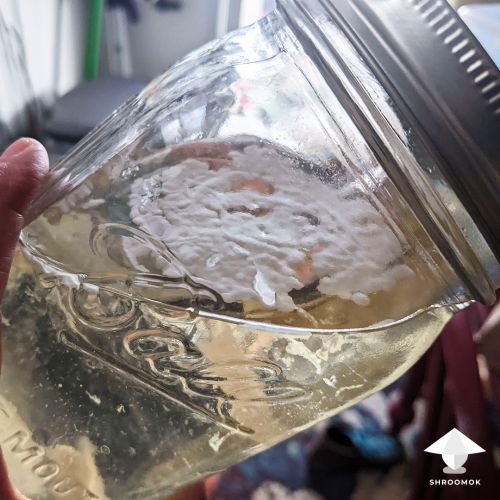](https://shroomok.com/en/wiki/File:Clots-of-mycelium-on-top-liquid-culture.jpg) Mycelium clots floating on the top of LC is not a contamination. Photo: YonavaIn such cases, shake the jar carefully and proceed with using the liquid culture.
[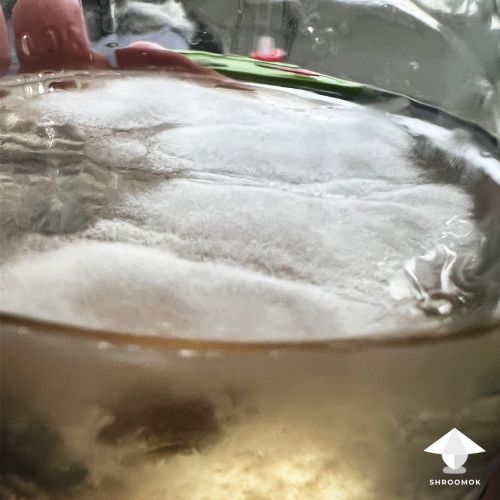](https://shroomok.com/en/wiki/File:LC-clumps-on-top-contaminated-or-healthy.jpg) Healthy mycelium growing on top of LCTo prevent such dense mycelium growth, shake the jar more often, use a magnet stirrer bar, or a marble stone in LC to break mycelium more easily.
#### How to Test if Liquid Culture is contaminated
The most reliable method to test liquid mycelium for contaminants is to use agar media.
> 💡 **Pro Tip:** If you are not ready for agar work don't worry and skip it for now. Just use 1-2 grain jars for test before inoculating a bunch of jars
Highly recommended to test your LC, especially if you used a spore syringe and didn't test it before LC inoculation!
Agar serves as a solid medium that can reveal any contamination within 2-7 days after placing a few drops of liquid culture onto it.
[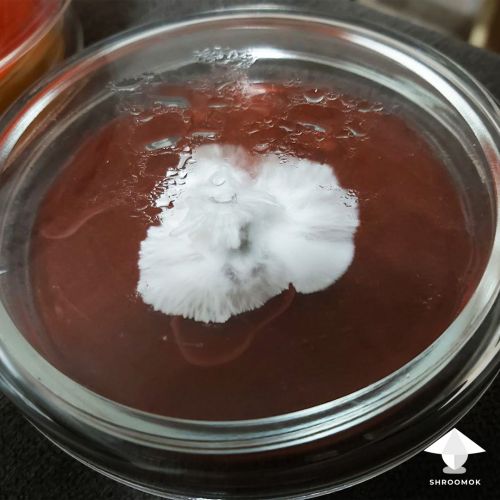](https://shroomok.com/en/wiki/File:LC_test_on_agar.jpg) LC test on agar. Healthy snow-white myceliumSigns of contamination include white or colored slime (a sign of bacteria or yeast contamination), or any powdery colored growth other than snow-white. If any of these signs are present, your culture is likely contaminated.
[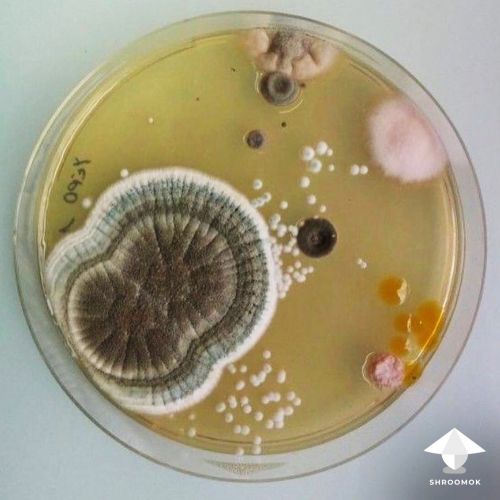](https://shroomok.com/en/wiki/File:Mold-bacteria-yest-contamination-on-agar.jpg) Molds, bacteria, yeast contaminants on agar#### Liquid Culture vs. Agar for Grain Inoculation
The choice between liquid culture and agar for grain inoculation is a topic of debate among mushroom growers. The decision ultimately depends on personal preferences, previous experiences, and specific needs.
Personally, I prefer using liquid culture for grain inoculation because the mycelium growth on grain is much faster, and it allows me to skip some steps in the sterility routine.
Agar is indeed a great option for grain inoculation, however mycelium tends to spread more slowly and a higher level of sterility is required when working with agar.
#### How long to store Liquid Culture
Liquid culture can be stored in the refrigerator for **6-12 months** or even longer. It remains active until the liquid mycelium has consumed all the nutrients in the solution, making it suitable for long-term use in your mycological experiments.
If you haven't used your liquid culture for 1 year and want to preserve the culture, simply prepare a new jar with nutrient broth and transfer 1-2 cc/ml of the "mother liquid culture" to the fresh liquid media. Allow it to grow and then store the new liquid culture in the refrigerator for the next 6-12 months.
#### How to store Liquid Culture
During the initial development and active growth of liquid mycelium (first 2-4 weeks), the jar should be stored at room temperature (68-77ºF or 20º-25ºC) in a dark place. However, what should you do afterwards?
##### **Can Liquid Culture be stored at room temperature for longer**
Yes, liquid culture can be stored at room temperature for longer, but it is recommended not to exceed **1-3 months.**
##### How to store Liquid Culture for longer
For long term storage keep your jars with liquid mycelium **in the refrigerator or cool dark room at 35-46ºF or +2º...+8ºC.** This will slow down the growth of the mycelium and nutrient absorption, allowing you to preserve the liquid culture for at least 6-12 months, and potentially even longer, extending its shelf life for years to come.
[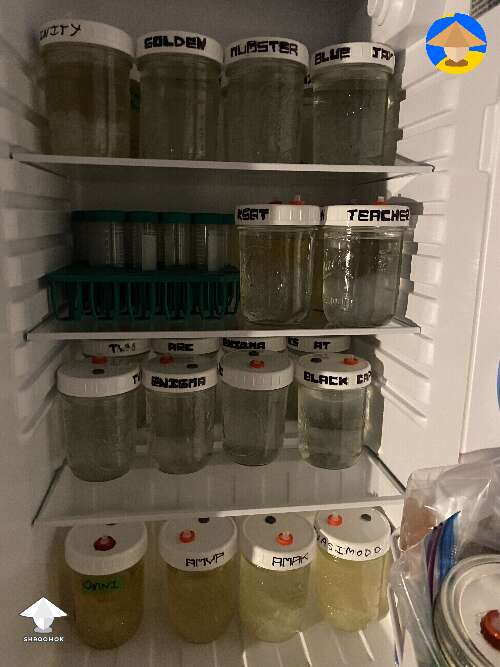](https://shroomok.com/img_orig/1550cc/4032_this-is-my-2nd-lcagar-fridge-by-grim-mfkr.jpg) [LC jars in fridge for long term storage](https://shroomok.com/en/wiki/File:this-is-my-2nd-lcagar-fridge-by-grim-mfkr-b1380a)##### What if I freeze Liquid Culture
Liquid mycelium is capable of surviving after being frozen and can continue its development.
There have been instances where mycelium survived after being frozen at temperatures as low as -4°F or -20°C for 1 month and colonized grain substrate after inoculation successfully. However, freezing the mycelium has no significant benefit. Freezing can potentially stress the mycelium, so it's generally not recommended unless there is a specific reason or experiment requirement to do so.
#### Afterwords
Once you have mastered the basic liquid culture technique, you can explore and expand your mushroom cultivation skills. Experimenting with agar work, making an aerated Liquid Culture, using pro tools like Erlenmeyer flasks, blenders, magnetic stirrers, can indeed enhance your LC production and make the cultivation process easier.
Continuously improving your process and exploring new techniques will contribute to a fulfilling and rewarding mycological journey. Enjoy the exciting world of mushroom cultivation!
If you find this guide helpful, please support me with a cup of coffee on ☕️ [buymeacoffee](https://www.buymeacoffee.com/shroomok)
Have a happy growing!
Peace, Shroomok ❤️
Check out more examples in 📸 [Liquid Culture photo gallery](https://shroomok.com/gallery/liquid-culture)
Join Shroomok on **Discord** and **Reddit** for questions and sharing your experience.
You can also leave your comments on this page below ⬇️
## How to grow magic truffles Psilocybe Mexicana and Tampanensis
[How to grow magic truffles Psilocybe Mexicana and Tampanensis](https://shroomok.com/en/wiki/How_to_grow_magic_truffles_Psilocybe_Mexicana_and_Tampanensis)
[](https://shroomok.com/en/wiki/File:Sclerotia-magic-truffles-growing-guide.jpg) Sclerotia aka magic truffles cultivation guideShroomok story began long time ago with ‘Philosopher’s stones’ from a tiny smartshop in Amsterdam...
Finally the Magic Truffles growing guide in 8 steps has been published. Enjoy!
### Complete guide on how to grow Magic Truffles aka sclerotia from scratch
#### What are Magic Truffles
Psilocybe Mexicana *and* Psilocybe Tampanensis *are* probably the most popular psilocybin mushrooms that develop magic truffles is also called 'Philosopher's Stones'
[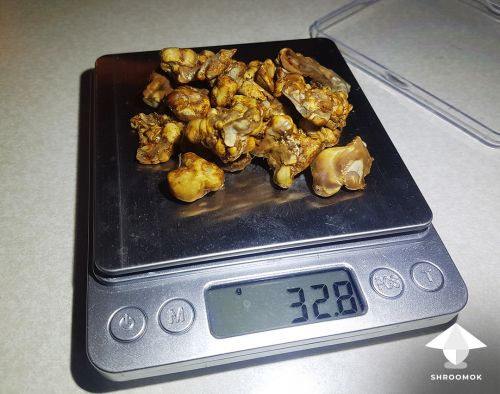](https://shroomok.com/en/wiki/File:Philosophers-stones-magic-truffles-cultivation.jpg) Philosophers stones aka magic truffles aka sclerotia
"Magic truffles" and true truffles are not the same. They are totally from unrelated species!
True truffles are fungi that produce spores underground. "Magic truffles", in contrast, are something like the fungal equivalent of a potato, a structure formed by the organism not for reproduction, but for surviving a difficult period, when it's too hot or too dry, or too cold in natural environment and growth is not possible.
The correct term for them are ***sclerotia*** of Psilocybin mushrooms.
Sclerotia are not technically the same as mushrooms. They are masses of dense mycelium like chestnuts, which contains the hallucinogenic alkaloids psilocybin, psilocin, baeocystin.
At the same time these unique species can produce fruit bodies — mushrooms we are used to seeing. But usually only sclerotia of magic mushrooms are legal in some countries, in Netherlands particularly.
> *Mexicanae section* including Psilocybe Galindoi or Psilocybe Galindii, Psilocybe Atlantis, Psilocybe Samuiensis, Psilocybe Acutipilea, Psilocybe ATL#7 and other synonym species. For the first time Psilocybe Tampanensis was included to Mexicanae section, but then considered as an independent species
There are some mess in taxonomy for all these species. We'll cover all information about magic truffles in a separate article, but they are worth a brief clarifying note here, since all these mushrooms are often grown specifically for its "truffles".Magic truffles also popular with their soft psychedelic effects, less side effects while tripping and pretty good taste.
> 🔴 Coming soon: All about Magic Truffles: history, species, main features, potency and more
However, this article is about step-by-step cultivation process.
Let’s get started!
#### Features, pros and cons of sclerotia growing
✅ **Noob friendly growing.** Sclerotia cultivation is the easiest growing process. Easier to grow than Cubensis.
✅ **Invitro growing.** You don't need fruiting chamber like [GrowBox](https://shroomok.com/en/wiki/DIY_Grow_Box_for_Magic_mushrooms._Fruiting_conditions "DIY Grow Box for Magic mushrooms. Fruiting conditions"), [MonoTub](https://shroomok.com/en/wiki/Forget_Monotub_Kit._DIY._How_to_make_Monotub_for_Mushrooms_by_your_own "Forget Monotub Kit. DIY. How to make Monotub for Mushrooms by your own") or Martha Tent. Just prepare substrate, inoculate the jar or bag, sit back and watch them grow.
Sclerotia grow right in the jar/bag. You can skip all steps we usually make for Cubensis, Natalensis, Panaeolus - forget about complicated steps: spawn to bulk, casing, growbox, monotub, grow tent, fruiting conditions, misting, fresh air exchange etc.
✅ **No extra requirements to growing conditions.** It is possible to grow magic truffles at room temperature (70-80F or 21-27C) in a dark place. Incubator is not necessary, but recommended for cold winter season and if you want to speed up growing process (at least for the first month).
✅ **Less contamination risks.** As you grow magic truffle in closed jar contamination risks decreases greatly. However sterility for inoculation and grain substrate sterilization to kill bacteria are extremely important steps, because your truffles are going to stay there for a long time.
✅ **Stealth growing.** It's easy to hide your jars from prying eyes. Any hidden place is great: shelf in a wardrobe, box in the corner, cabinet, dresser etc. Don't worry about someone noticing growing process.
✅ **Possible to grow mushroom fruit body.** All species that produce sclerotia also can produce mushrooms. But getting these species to fruit is difficult for a new mycologist, required casing and fruiting chamber (growbox, monotub) to provide necessary fruiting conditions (humidity, FAE, light). If you need sclerotia only skip it.
✅ **Tripping.** The trip with sclerotia is cleaner and smoother. You don't get nauseous when you eat them, less side effects, light entry. To the taste sclerotia like chestnuts and nuts. You can prepare a shroom-shake or magic tea with sclerotia as well, the same recipes as for Cubensis.
✅ **Microdosing.** Can be used for microdosing (fresh or dried). Sclerotia have more even content of alkaloids in each magic stone.
🔴 **Time of growing.** Usually you need to wait at least 3 month till good magic truffles formed, but you can have a nice batch of stones in 2 month. You can also let them grow longer, even for 6-12 month. The longer they grow, the bigger truffles you get. Some growers stated that potency also higher with time, but it is still debated topic.
🔴 **Sclerotia storage.** Fresh magic truffles should be stored in airtight bags in refrigerator only (+2..+5C or 35-41F). Sclerotia save their potency for 6-12 month. Dried sclerotia can be stored at room temperature (+20..+25°C or 68-77°F) or in the in refrigerator in airtight bags for 6-12 month.
#### Magic Truffles cultivation guide
##### Step 1. Spore syringe or Liquid mycelium for grain inoculation
There are several options here!
1️⃣ If you have **spore print of species that produce sclerotia** (i.g. the sign is Psilocybe Mexicana, Psilocybe Galindoi or Psilocybe Tampanensis, Psilocybe Atl#7, Psilocybe Atlantis) it's easy to **make a spore syringe** by you own. It takes only 10 minutes for preparation and 1-2 days for spores rehydration in syringe before grain inoculation.
Spore print of sclerotia species usually more expensive and much smaller than regular P. Cubensis, P. Natalensis and even Panaeolus
[](https://shroomok.com/en/wiki/File:Magic-truffles-spore-print.jpg) Psilocybe Galindoi spore print in comparison with P. Natalensis spore print> 🔴 Check out: [How to make liquid Spore Syringe from spore print](https://shroomok.com/en/wiki/Liquid_psilocybe_spore_syringe "Liquid psilocybe spore syringe")
2️⃣ You can also **make a Liquid Culture** from **Spore Syringe** by your own.
[](https://shroomok.com/en/wiki/File:Liquid-mycelium-sclerotia-magic-mushroom-growing-guide.jpg) Liquid culture of sclerotia species (Psilocybe Galindoi)> 🔴 Coming soon: [How to make mushroom Liquid Culture](https://shroomok.com/en/wiki/How_to_make_mushroom_Liquid_Culture "How to make mushroom Liquid Culture")
Liquid Mycelium or Liquid Culture (LC) colonize substrate faster. Moreover you can create more material for inoculation, i.g. turn 5-10 ml syringe you bought into 300-400 ml instead. However LC required patience, some additional knowledge and it takes more time for preparation (about 1-2 hours). Further liquid mycelium development takes about 2 weeks until it is ready for grain inoculation
> 🔴 Check out: [Liquid Spore Syringe vs Liquid culture](https://shroomok.com/en/wiki/Liquid_spore_vs_Liquid_culture "Liquid spore vs Liquid culture")
3️⃣ If you **bought ready to use** Spore Syringe or Liquid Culture syringe you can use it for substrate inoculation **right now.** Or create more liquid mycelium (highly recommended!)
[](https://shroomok.com/en/wiki/File:Liquid-culture-psilocybe-sclerotia-mushrooms.jpg) Genetic material of magic truffles species for inoculation: spore syringe or liquid culture##### Step 2. What substrate to choose for magic truffles growing
[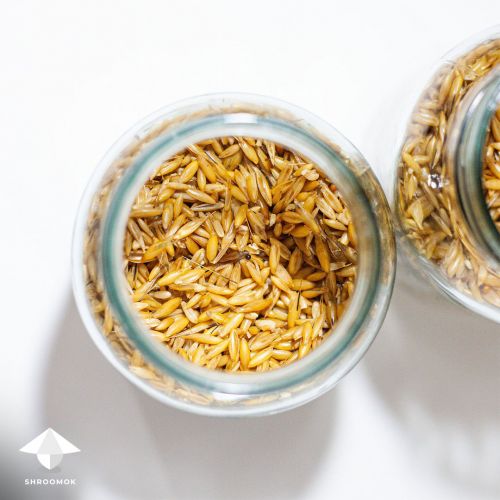](https://shroomok.com/en/wiki/File:Substrate-for-mushrooms-and-sclerotia-growing.jpg) Rye grass seeds substrate for sclerotia growingSubstrate is essential part for sclerotia cultivation and has some special requirements
I suggest to use whole grain oats (oats that are intact, meaning they have not been ground down or refined).
On the second place are ryegrass seeds (RGS), rye berry (aka rye grain), barley, brown rise flour (BRF) substrate, whole white/red millet, wild bird seeds (WBS).
I don't recommend to use whole brown rice grain at all! And don't recommend to use wheat berry for beginners due to clumping. Such grain absorb too much moisture. As a result, high risk of bacteria contamination. However with right moisture level wheat berry can be great substrate for sclerotia as any other grain and I'll show you successful examples.
Let's figure out some recipes one by one.
###### How to prepare grain substrate for sclerotia
Rinse the grain thoroughly 3-5 times in cold tap water to get rid of dust, husks etc. until the water is pouring off reasonably clear.
[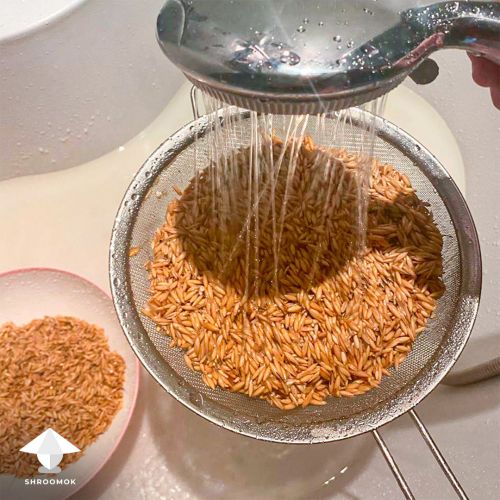](https://shroomok.com/en/wiki/File:Rinse-grain-whole-oat-for-magic-truffles-growing.jpg) Rinse whole grain for sclerotia cultivation (whole oats on the photo)
Pour water in clean grain (tap water or clean drinking water). Leave it to soak for 24-48 hours at room temperature (70-80°F or +20°..+25°C).
[](https://shroomok.com/en/wiki/File:Whole-oat-substrate-for-mushroom-growing.jpg) Whole grain oats as a substrate for magic truffles growing> 💡 Optional! Add one table spoon of gypsum in water while soaking grain. This helps to avoid grain clumping. Adding coffee to this mix also optional. Usually growers prepare a strong pot of coffee and add it to water for soaking or add few table spoons of grounded coffee while simmer
In a few hours you can see bubbles and fermentation smell. On this step it's great, it means bacteria cells and their endospores woke up. It will be easier to kill bacteria on the next preparation steps
[](https://shroomok.com/en/wiki/File:How-to-prepare-grain-for-magic-truffles-growing.jpg) Grain soaking, 24 hours later
After soaking rinse grains in clean water and bring to a boil in a large pot. Let them simmer (low heat)
[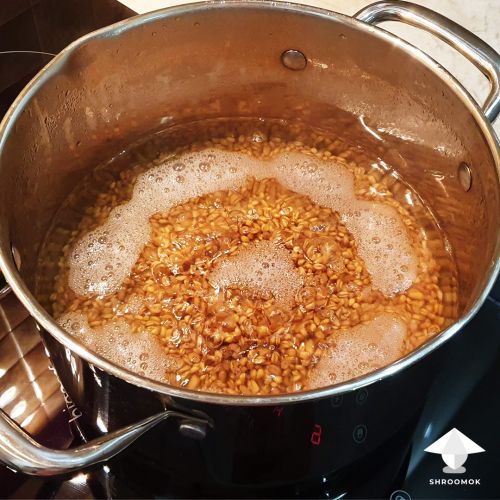](https://shroomok.com/en/wiki/File:How-to-prepare-grain-substrate-for-mushroom-cultivation.jpg) Grain cooking process. Bring it to boil⏰ oats, rye, millet, wild bird seeds — about 10-15 minutes
⏰ wheat berry, barley — about 25-35 min
Drain the grain in a sieve (or colander). Leave grain in a sieve for 20-30 minutes to remove excess water.
Ready!
**Shroomok's choice on Amazon:**
[Organic Whole **Oat** Grain Seeds (With Husk Intact), 2/5/10 Lb](https://www.amazon.com/dp/B07FN4T97F?th=1&linkCode=ll1&tag=shroomok-20&linkId=b8e82568ed1f1f791e30231e54c1d207&language=en_US&ref_=as_li_ss_tl) $15.99
[Organic **Rye** Berries, 5 lbs](https://www.amazon.com/AA-Plus-Organic-Berries-Certified/dp/B08TZWWL8Z?&linkCode=ll1&tag=shroomok-20&linkId=bbe1537e08df4ee1a7881e5f5ef1b439&language=en_US&ref_=as_li_ss_tl) $21.95
[Unhulled **Barley** (Hull Intact), 12 lbs](https://www.amazon.com/Josephs-Grainery-Unhulled-Non-GMO-Certified/dp/B003A162H6?&linkCode=ll1&tag=shroomok-20&linkId=abf7128e9acb1d986086d13d16de5843&language=en_US&ref_=as_li_ss_tl) $31.99
[**Red Proso Millet**, 20 lbs](https://www.amazon.com/SLEEK-SASSY-NUTRITIONAL-DIET-Natural/dp/B07SHWV64D?&linkCode=ll1&tag=shroomok-20&linkId=223d1771bfdfe8ffc9e9f01e0cfc3452&language=en_US&ref_=as_li_ss_tl) $49.79
[Hard Red Winter **Wheat** Berries, 3 lbs](https://www.amazon.com/gp/product/B016VJ8XQQ?&linkCode=ll1&tag=shroomok-20&linkId=f17a199a696ff6354fd15981308782d4&language=en_US&ref_=as_li_ss_tl) $13.95
[Organic **Gypsum**, 5 lbs](https://www.amazon.com/Down-Earth-Organic-Calcium-Sulfate/dp/B07N2Y5NHM?&linkCode=ll1&tag=shroomok-20&linkId=693eb37b029846877c6e3264e632dae3&language=en_US&ref_=as_li_ss_tl) $21.36
###### How to prepare rye grass seeds for sclerotia growing
[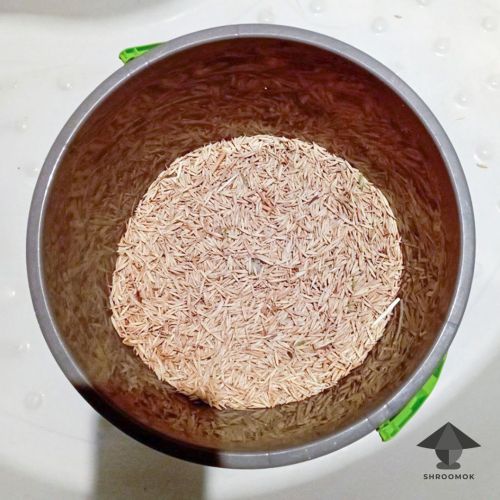](https://shroomok.com/en/wiki/File:Rye-grass-seeds-for-magic-truffles.jpg) Rye grass seeds for sclerotia growingRye grass isn't a rye grain. It's very similar to whole oats, but thinner and usually almost empty inside. The main advantage of rye grass seeds that you can prepare substrate without long soaking and boiling.
Pour 400 ml of DRY rye grass seeds (RGS) in 1Qt jar.
Add 1/3 tea spoon (or pinch on eye) of gypsum.
Add 200 ml water.
Close the lid of jar (unmodified lid, without holes in it).
Shake the jar and let it soak for 3-4 hours.
Prepare as many jars as you need.
Ready!
**Shroomok's choice on Amazon:**
[RyeGrass Seed, 3/5/10/25 lb](https://www.amazon.com/Annual-RyeGrass-Seed-Eretz-Willamette/dp/B088NGR8PR?th=1&linkCode=ll1&tag=shroomok-20&linkId=934cf3d861ff2001599abe08799a796d&language=en_US&ref_=as_li_ss_tl) $17.99
[Organic Gypsum, 5 lb](https://www.amazon.com/Down-Earth-Organic-Calcium-Sulfate/dp/B07N2Y5NHM?&linkCode=ll1&tag=shroomok-20&linkId=693eb37b029846877c6e3264e632dae3&language=en_US&ref_=as_li_ss_tl) $21.36
###### How to prepare BRF substrate for sclerotia?
Mix 2 cups of vermiculite and 1 cup of brown rice flour. Then pour 1 cup of water.
Mix it thoroughly to have even mass. When you squeeze the mix a water drop should appear.
[](https://shroomok.com/en/wiki/File:How-to-prepare-brown-rice-flour-brf-substrate-for-mushroom-growing.jpg) BRF substrate for sclerotia growingReady!
> 💡 You can grind brown rice in coffee grinder to get brown rice flour or buy ready flour, up to you
**Shroomok's choice on Amazon:**
[Brown Rice Flour 5 lbs](https://amzn.to/41ykiEG) $20.99 - ready flour for BRF substrate
[Brown Rice, 2 lb](https://amzn.to/3miGKBx) $1.89 - grind in coffee grinder to make a flour
[Coffee Grinder w/Cleaning Brush, Stainless Steel](https://amzn.to/3vK7mgn) $24.95 - great for grain and dry shrooms
[Organic Vermiculite 8 qt.](https://amzn.to/38KoBmj) $18.39
##### Step 3. Jars or Bags for magic truffles cultivation
You can use both options either jars or bags. My choice for sclerotia is jar. Why?
Any sudden shaking can disturb sclerotia forming on early stages. Easier to ruin mycelium in bags, than in jars. Cubensis forgive you this, but sclerotia not. Magic truffles extremely sensitive for the first month.
The optimal volume of jars is from 16oz to 1Qt (500 ml to 1 liter). 1Qt jar for magic truffles is the best option!
[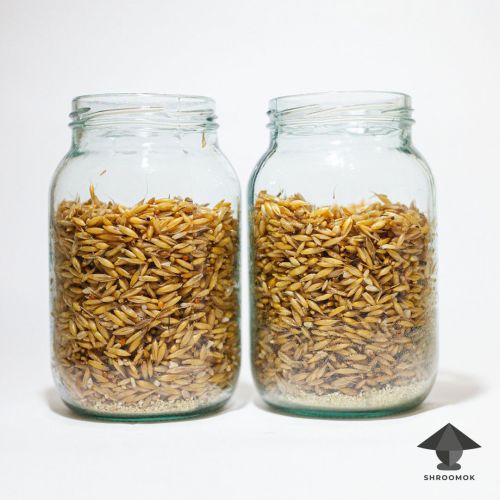](https://shroomok.com/en/wiki/File:Jars-with-grain-substrate.jpg) 1 Quart jar with substrate for magic truffles growingUp to 1,5Qt (1,5 L) jars are allowed. Sclerotia create great stones in bigger volume of nutrient substrate. At the same time bigger volume takes more time for colonization, need more time for good sterilization and can catch contamination easier. At last you need big pressure cooker (PC) for such jars.
So if you prefer big volume, then better to use spawn bags to fit your PC.
Fill your jars with ready substrate, up to 70-80% of the whole volume.
> ❗️ I suggest to add 1 table spoon of dry vermiculite at the bottom of each jar. If any excess of condensation and water appear vermiculite absorb it. Sometimes unwanted moisture and condensation appear on the 4-6th weeks of sclerotia growing
One more option for sclerotia is making layers of grain substrate and coco coir.
[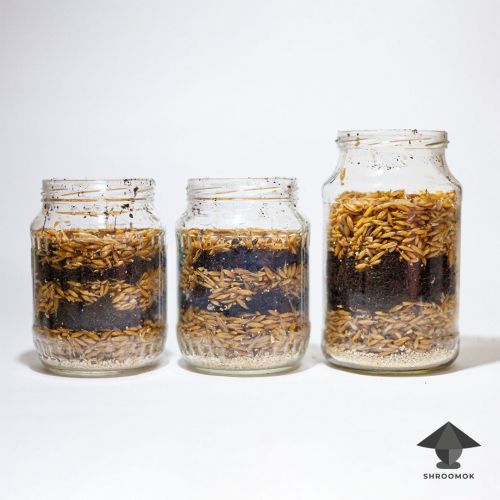](https://shroomok.com/en/wiki/File:Grain-substrate-with-coco-coir-in-jars-for-magic-truffles-growing.jpg) Layers of grain substrate with coco coir in jars for sclerotia growing. Volume of jars - 24oz and 1Qt> 💡 This method helps to maintain good moisture balance and get bigger truffles. Just soak part of coco brick in water. Squeeze it till you have a water drop in substrate. Use as a layer about 1/2 to 1 inch
Close the jars tightly with modified lids (or seal grow bags if you use bags).
[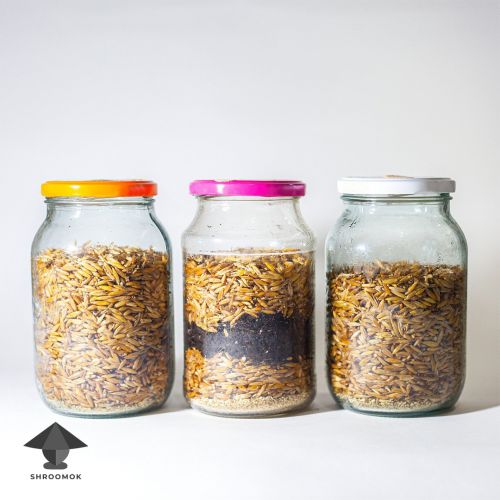](https://shroomok.com/en/wiki/File:Jars-with-grain-substrate-ready-for-inoculation.jpg) Substrate in jars covered with modified lidSuch lids/bags have inoculation port and air filter (synthetic air filter, Luer lock filter, synthetic bactericidal patch etc.) for gas exchange. It's easy and cheap by your own!
[](https://shroomok.com/en/wiki/File:Syringe-filter-with-luer-lock-and-self-healing-butyl-rubber-injection-port.jpg) Modified lid: air filter and injection port[](https://shroomok.com/en/wiki/File:Spawn-bag-for-mushroom-cultivation.jpg) Mushroom bag with air filter and injection port> 🔴 Check out details: [DIY Jars and Bags for grain substrate](https://shroomok.com/en/wiki/How_to_make_jars_with_substrate_for_mushroom_spawn "How to make jars with substrate for mushroom spawn")
**Stuff to buy on Amazon:**
[2-in-1 for lids: Synthetic Air Filter 64 pcs & Injection Ports 100 pcs](https://amzn.to/3WSXzAD) - $13.99
[Wide Mouth Mason Jars 32oz, 6 Pack](https://amzn.to/3C4E7s9) $16.99
[Wide Mouth Mason Jars 24oz, 4 Pack](https://amzn.to/3jAlkhS) $22.85
[3-in-1: Autoclavable Grow Bag + Injection Port + CO2 Filter, 10 pcs](https://amzn.to/3QkLwJT) $26.49
[Premium Coco Coir Brick, 2/4/6/8/10/12 Pack](https://amzn.to/3vl8as2) $12.99
[Organic Coconut Coir Brick, 5/10/15/20 Bricks](https://amzn.to/3YPyvff) $21.95
##### Step 4. Substrate sterilization for magic truffles
Cover each jar with aluminium foil. This helps to prevent water excess through air filter.
[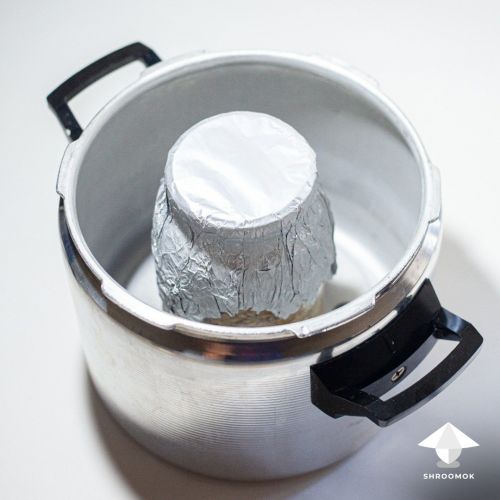](https://shroomok.com/en/wiki/File:Mushroom-substrate-in-jar-ready-for-sterilization.jpg) Substrate sterilization for sclerotia growingAdd a stand at the bottom of PC.
Fill PC/autoclave with water. Water level should be up to 1/2-2/3 of the jars height.
Put jars/bags into PC/autoclave.
[](https://shroomok.com/en/wiki/File:Grain-sterilization-for-mushroom-growing.jpg) Substrate sterilization in pressure cooker for magic truffles growing[](https://shroomok.com/en/wiki/File:Grow-bag-sterilization.jpg) Mushroom grow bag with substrate in pressure cookerClose PC/autoclave. Turn on the stove. Wait for required pressure, then count down the time.
⏰ Sterilize jars for 90 minutes at 15 psi. I suggest to sterilize 1-1,5Qt jars/bags for 2 hours.
[](https://shroomok.com/en/wiki/File:Substrate-sterilization-for-mushroom-growing-in-autoclave.jpg) Sterilization in autoclave or pressure cooker> 💡 If you don't have pressure cooker make sterilization in instant pot for 2 hours. Then leave jars for 24-48 hours at room temperature. Repeat sterilization for 2 hours again
Don't open the PC right after sterilization is completed. Wait till pressure cooker and jars/bags in it cool down the room temperature. Ready!
**Recommended stuff on Amazon:**
[Barton Pressure Pressure Cooker, 22 Qt](https://www.amazon.com/dp/B08DKY9JMT?&linkCode=ll1&tag=shroomok-20&linkId=8729db9ecc7ec8931e0c0c6641370230&language=en_US&ref_=as_li_ss_tl) $99.95
[T-fal Pressure Cooker, 3 PSI Settings, 22 Qt](https://www.amazon.com/dp/B01KWZEERC?th=1&linkCode=ll1&tag=shroomok-20&linkId=ce16bb30a9f47aa696fee91ccb095332&language=en_US&ref_=as_li_ss_tl) $109.99
[All American Pressure Cooker 21.5/30 Qt](https://www.amazon.com/dp/B00004S88Z?th=1&linkCode=ll1&tag=shroomok-20&linkId=a8e9ea19f3a4f7c0780433347876ddce&language=en_US&ref_=as_li_ss_tl) $419.95
##### Step 5. Inoculation
Once the jars are room temperature it's time for inoculation.
[](https://shroomok.com/en/wiki/File:Grain-substrate-inoculation.jpg) Substrate inoculation with spore syringe or liquid culturePrepare necessary stuff for inoculation. Turn off ventilation and/or air conditioning, close the windows to avoid air flows and drafts.
> ❗️If you have still air box (SAB), glovebox or laminar flow hood use it for inoculation process to eliminate contamination risks
1️⃣ Wash your hands and face.
2️⃣ Wear face mask, gloves, cap, medical gown (or PE raincoat).
3️⃣ Wipe your hands in gloves with isopropyl alcohol.
4️⃣ Wipe the table with alcohol (spray it on the table and wipe with a cotton pad).
5️⃣ Treat everything on your table with alcohol: jars with substrate, syringe and everything on the table.
6️⃣ Remove foil from the jars with substrate.
7️⃣ Wipe the inoculation port with iso alcohol.
8️⃣ Prepare syringe (spore syringe or LC). Here we used liquid culture. For LC use thick syringe needle 18G. Shake the syringe well before each inoculation!
9️⃣ Insert the syringe needle through inoculation port. Inject the liquid spore or LC (1-3 ml per each jar). Make sure the tip of the needle does NOT touch the grain!
🔟 Heat the syringe needle over a spirit lamp or lighter/candle until red and wipe the needle with a cotton pad soaked in alcohol. Repeat this step after each inoculated jar to have sterile needle between jars.
> 🔴 Check out detailed guide: [Inoculation guide](https://shroomok.com/en/wiki/Inoculation_without_glove_box "Inoculation without glove box")
**Recommended stuff on Amazon:**
[Isopropyl Alcohol 70% Spray Bottle](https://www.amazon.com/gp/product/B08LW5P844?th=1&linkCode=ll1&tag=shroomok-20&linkId=2fb0ba4a1e99ea586df7df13ce094577&language=en_US&ref_=as_li_ss_tl) $27.50
[Gloves 10 pcs. + 1 face mask pack](https://www.amazon.com/gp/product/B0865SSK9T?&linkCode=ll1&tag=shroomok-20&linkId=a1b7c0bbfe34b000bc7dbbdc7b6e8674&language=en_US&ref_=as_li_ss_tl) - $7.99
##### Step 6. Colonization period for magic truffles
After inoculation put the jars in **dark place** and forget about them for 1-2 weeks
[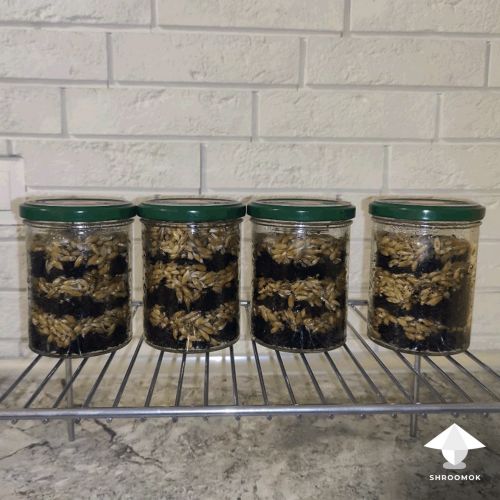](https://shroomok.com/en/wiki/File:Sterile-substrate-after-inoculation-for-galindoi-magic-truffles.jpg) Jars with sterile substrate right after inoculation with Psilocybe Galindoi spore syringe
Room temperature 70-77°F or +21°...+25°C is okay for colonization period, but...
If you want to speed up colonization process or if room temperature is lower (especially during cold winter season in some countries) then use simple incubator or incubation chamber with constant temperature control about **77-80°F** or **+25..+27°C** **at least for the first month after inoculation.**
> 🔴 Check out: [Simple Incubator for psilocybin mushrooms](https://shroomok.com/en/wiki/Magic_mushrooms_incubator_control "Magic mushrooms incubator control")
> 🔴 Check out: [Incubation chamber with automated temperature control](https://shroomok.com/en/wiki/How_to_build_automatic_incubation_chamber_for_mushrooms)
[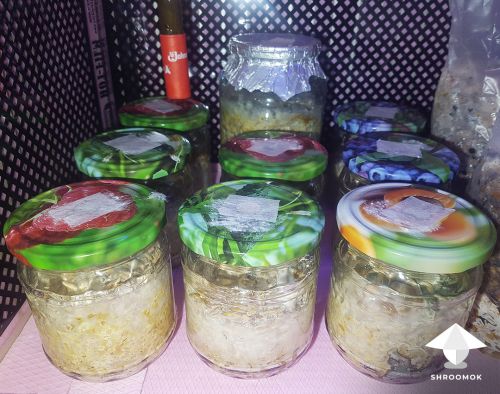](https://shroomok.com/en/wiki/File:Sclerotia-incubation-period.jpg) Jars with magic truffles in incubator box (heating from the sides). Photo by **mrzimm** - shroomok growers community on [Discord](https://discord.gg/ngKhQDmymD)
Actually high temperature up to 90°F or +32°C is considered normal for warm-loving sclerotia species. That's why it's easy to work with these species in hot season. They don't need cooling and feel good!
Low temperature is not a problem as well. It just slows down the growth, so it is still possible to grow sclerotia even in cold winter season.
Magic truffles don't need fresh air exchange. Jars require only gas exchange through air filter in modified lid or through air filter in a grow bag. Open the incubator/box from time to time at least to check the growth and detect possible contamination. That's enough!
Keep your jars/bags in dark place! Sclerotia develop underground and don't need light!
First signs of mycelium growing you can admit in 5-14 days after inoculation. Full colonization takes about 1-1,5 month.
[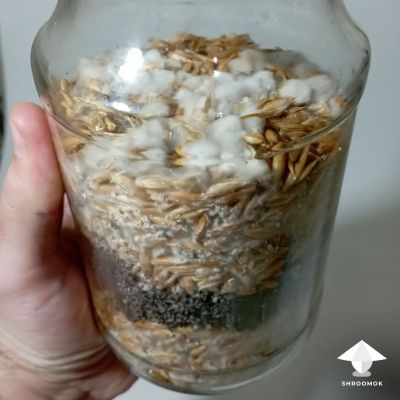](https://shroomok.com/en/wiki/File:Galindii-sclerotia-colonization.jpg) Psilocybe mexicana colonization, 2 weeks after inoculation[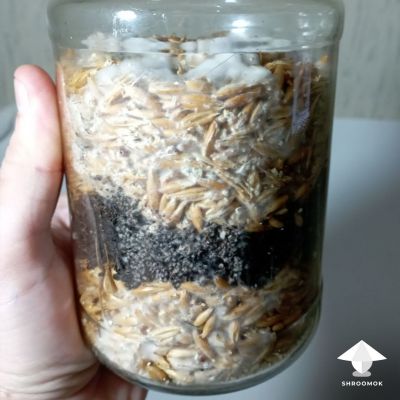](https://shroomok.com/en/wiki/File:Galindoi-magic-truffles-colonization.jpg) Sclerotia colonization, 14 days after inoculation> ❗️Mycelium of "magic truffles" is thinner and has slightly grayish color in comparison with thick snow-white threads of P. Cubensis mycelium
[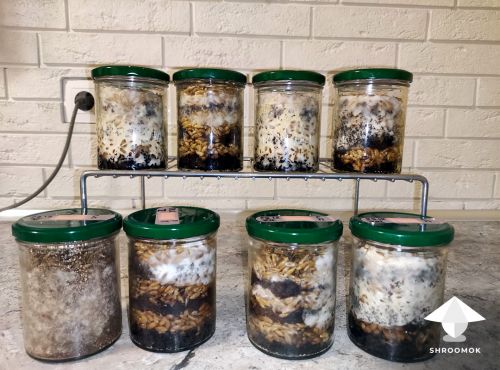](https://shroomok.com/en/wiki/File:Galindoi-atlantis-magic-truffles-growing-42-days.jpg) Psilocybe galindoi cultivation, 42 days (6 weeks) after inoculation> ❌ Don't break and shake the substrate! This advice applies for P. Cubensis only! Shaking the substrate can ruin sclerotia development!
**Useful stuff for incubator on Amazon:**
[Heating Mat with Temperature Adjustment](https://amzn.to/45AiWuw) $19.98
[Inkbird ITC-308 Digital Thermostat](https://amzn.to/3VVHkBk) $28.00 - temperature control
[Quiet Fan 120mm with plug](https://amzn.to/3Xigdln) $19.99 - to spread warm air in the incubator evenly
##### Step 7. Sclerotia forming and development
During colonization process and/or after full colonization (about 4-10 weeks after inoculation) you can find first signs of sclerotia magic stones
[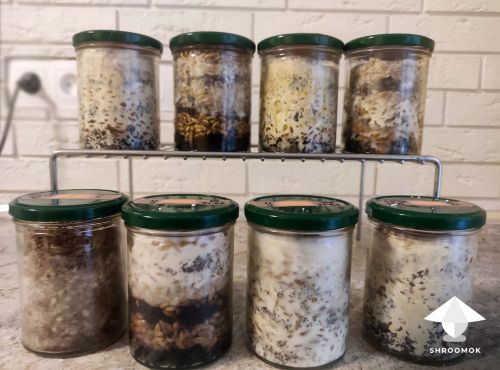](https://shroomok.com/en/wiki/File:Galindoi-atlantis-sclerotia-growing-62-days-after-inoculation.jpg) Psilocybe galindoi magic truffles growing, 62 days (2 month) after inoculation[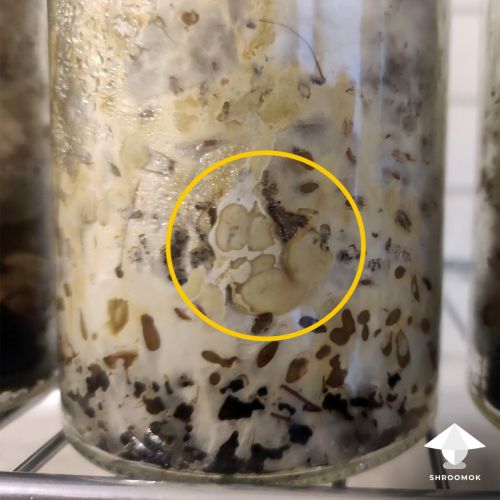](https://shroomok.com/en/wiki/File:Galindoi-atlantis-sclerotia-development.jpg) Psilocybe galindoi magic truffles, first sclerotia, 62 days (9 weeks) after inoculation
After 4-6 weeks maintain temperature in incubator about 77°F or +25°C.
Room temperature 68-75°F or +20°...+24°C is also okay, but growing process will be slower.
Keep your jars or bags in a dark place!
All you need now is patience! Sclerotia stones continue growth for next 3-6 months, increasing in size the longer you leave them. How long you leave them will depend on how patient you are.
[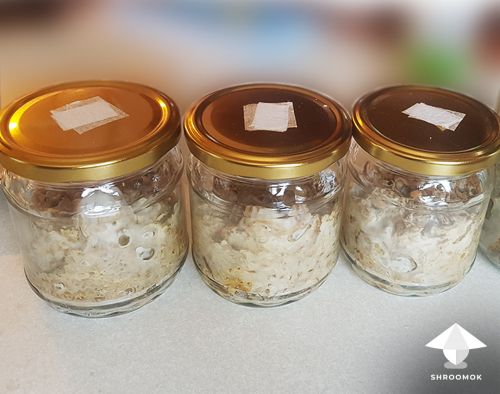](https://shroomok.com/en/wiki/File:Magic-truffles-colonization-period.jpg) Magic truffles colonization period and start of sclerotia development, 3 month after inoculation. Photo by **mrzimm**Don't afraid strange look of sclerotia stones further :)
[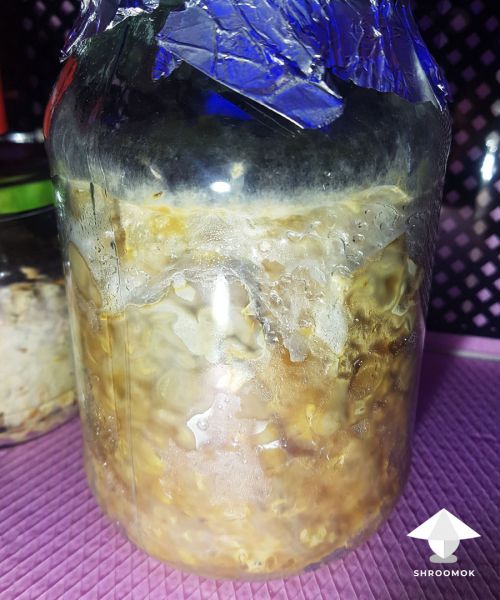](https://shroomok.com/en/wiki/File:Sclerotia-growing-in-jar.jpg) Magic truffles active growth, 4-5 month after inoculation. Photo by **mrzimm**You can harvest one jar in 3 month, another jar in 6 month or even in 1 year.
About 5-8 month is considered the best time for magic truffles harvesting.
##### Step 8. Harvesting magic truffles
Take a spoon, any plate or box. Clean them with alcohol.
Open the jar/bag. Scrape out the substrate on the plate/box.
[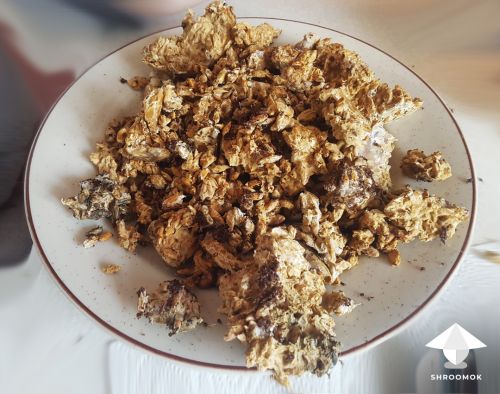](https://shroomok.com/en/wiki/File:Harvesting-magic-truffles.jpg) Harvesting magic truffles. Remove substrate from jar/bag. Photo by **mrzimm** - shroomok growers community on [Discord](https://discord.gg/ngKhQDmymD)
Pick sclerotia magic stones one by one
[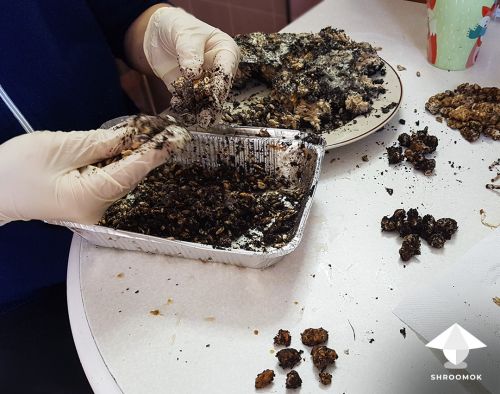](https://shroomok.com/en/wiki/File:How-to-harvest-magic-truffles.jpg) Sclerotia harvesting. Photo by **mrzimm** - shroomok growers community on [Discord](https://discord.gg/ngKhQDmymD)
Clean up magic truffles with paint brush and/or wash them in cold water. After shower let them dry on a fabric towel or paper towel
[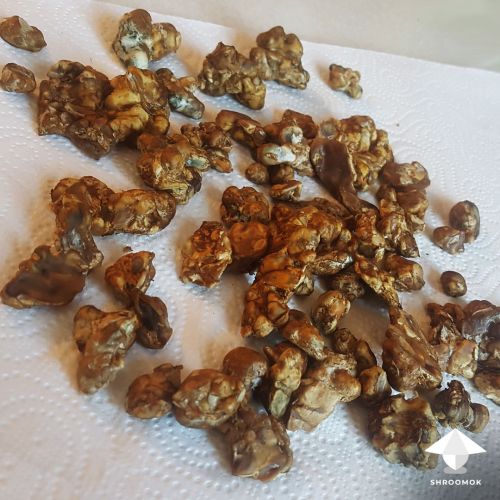](https://shroomok.com/en/wiki/File:Magic-truffles-harvest.jpg) Pros and cons of magic truffles growing for newbies. Photo by **mrzimm** - shroomok growers community on [Discord](https://discord.gg/ngKhQDmymD)> If you use grow bag just crumble the substrate inside the bag, open it and pick the truffles
Check the weight of your harvest
[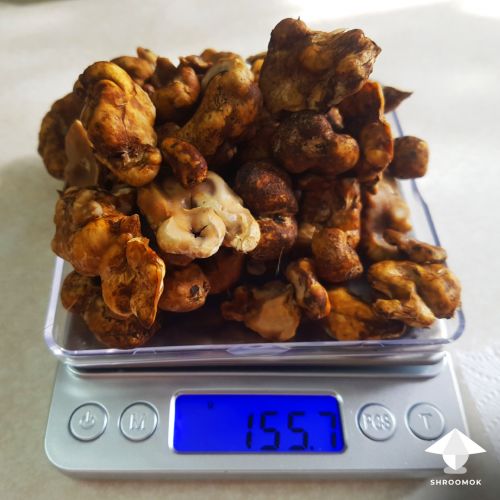](https://shroomok.com/en/wiki/File:Magic-truffles-yield-harvesting.jpg) Magic truffles aka sclerotia stones. Photo by **mrzimm** - shroomok growers community on [Discord](https://discord.gg/ngKhQDmymD)
Another butch of smaller magic truffles
[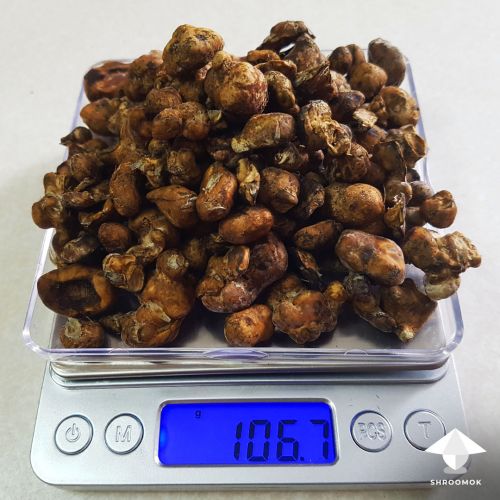](https://shroomok.com/en/wiki/File:Sclerotia-harvest.jpg) Magic truffles harvest, smaller stones. Photo by **mrzimm** - shroomok growers community on [Discord](https://discord.gg/ngKhQDmymD)
Pick tiny magic truffles as well!
[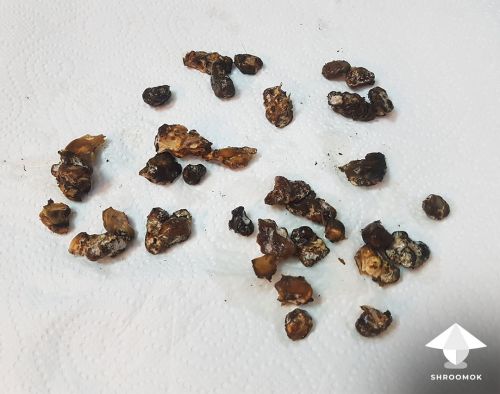](https://shroomok.com/en/wiki/File:Sclerotia-harvesting-small-magic-truffles.jpg) Tiny sclerotia stones of Psilocybe Tampanensis. Photo by **mrzimm** - shroomok growers community on [Discord](https://discord.gg/ngKhQDmymD)[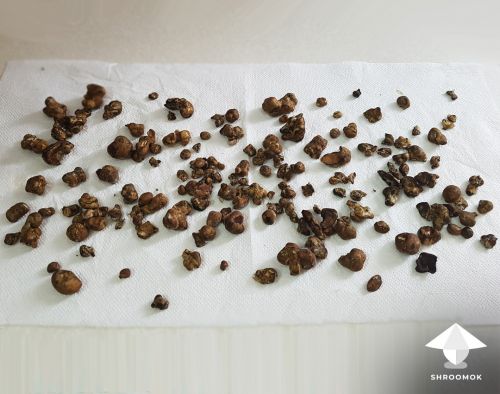](https://shroomok.com/en/wiki/File:Magic-truffles-harvesting-small-sclerotia.jpg) Small magic truffles, P. tampanensis. Photo by **mrzimm** - shroomok growers community on [Discord](https://discord.gg/ngKhQDmymD)#### How to store fresh magic truffles
[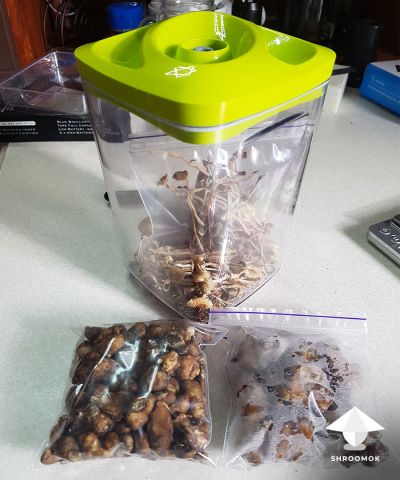](https://shroomok.com/en/wiki/File:How-to-store-magic-truffles.jpg) Store magic truffles in airtight bags or jars in refrigerator. Photo by **mrzimm** - shroomok growers community on [Discord](https://discord.gg/ngKhQDmymD)Pack sclerotia in airtight bags and store in refrigerator at 35-41°F or +2°..+5°C for 6-12 month.
Room temperature storage can destroy all alkaloids in **FRESH** magic truffles in a few days (according to my experience)
> 💡 Use vacuum sealer and make small portions 10-15-20g. Open the pack, when you need to take magic truffles
Actually long time growing is the best way to store magic truffles. Just open the jar and you have fresh truffles to take.
**Shroomok's choice on Amazon:**
[Slider Storage Bags - Quart Size - 78 Count](https://amzn.to/3k1bl5u) - $7.82
[Wide Mouth Jars with Airtight Lids and Labels, 16 oz, 6 Pack](https://amzn.to/3IsNIgB) $23.99
[Vacuum Sealer Machine w/Starter Kit](https://amzn.to/3Zd1J85) - $49.97
#### How to dry and store dried magic truffles
Magic truffles consist of about 50% water and dry faster than mushroom fruit bodies, that usually consist of about 90% water.
Better to use dehydrator for fast drying. Recommended temperature up to 121°F or +50°C.
Dry magic truffles store in refrigerator (preferable!) or room temperature for 6-12 month.
Keep them in airtight bags or jars!
**Shroomok's Choice on Amazon from Simple to Premium:**
[Food Dehydrator, Temp Control, 5 Trays, Gray/Black](https://www.amazon.com/Elite-Gourmet-Dehydrator-BPA-Free-Stackable/dp/B0B64F8V7P?&linkCode=ll1&tag=shroomok-20&linkId=83cdb49f98f89c94afb7882d9c294d0e&language=en_US&ref_=as_li_ss_tl) $39.99
[Presto Standard Food Dehydrator, White](https://www.amazon.com/gp/product/B008H2OELY?&linkCode=ll1&tag=shroomok-20&linkId=3a241206c24c09d1f73ada2ea3f6c2a8&language=en_US&ref_=as_li_ss_tl) $45.80
[Food Dryer Machine, 5 BPA-Free Trays, Dishwasher Safe](https://www.amazon.com/gp/product/B0828613J4?th=1&linkCode=ll1&tag=shroomok-20&linkId=ad2955059d1e69291b0cffe1ad74af99&language=en_US&ref_=as_li_ss_tl) $59.99
[Elite Gourmet Food Dehydrator, 4/5 Stainless Steel Trays](https://www.amazon.com/gp/product/B08BSY4DVH?&linkCode=ll1&tag=shroomok-20&linkId=91a33ad439bc4a91f78c71385d88fb4c&language=en_US&ref_=as_li_ss_tl) $69.99
[Professional Dehydrator Machine - 6 Stainless Steel Trays, 50 Free Recipes, Silver/Black](https://www.amazon.com/gp/product/B07PY5M579?&linkCode=ll1&tag=shroomok-20&linkId=453305daf07c818b3524f9e4db1ec8a1&language=en_US&ref_=as_li_ss_tl) $159.99
#### How to save Psilocybe Mexicana and Psilocybe Tampanensis genetic
Here you have a few options to save mushroom culture for your mycological experiments.
✅ **Grain to Grain transfer.** Actually sclerotia don't like break and shake and it slow down magic truffles grow, but right after mycelium colonization (before sclerotia forming) you can use a spawn jar as inoculant for other jars with sterile substrate
[](https://shroomok.com/en/wiki/File:G2G-tek.jpg) Grain to grain transfer> 🔴 Check out: [Grain to Grain transfer guide](https://shroomok.com/en/wiki/Grain_to_Grain_Transfer_(G2G) "Grain to Grain Transfer (G2G)")
✅ **Grain spawn to agar.** One of the methods to save mycelium samples. Just put a grain(s) with mycelium on agar to multiply mycelium.✅ **Sclerotia cloning.** Clone piece of sclerotia on agar and save the culture for the next transfers or grain inoculation. In fact sclerotia is tough mycelium that great for further reproduction
> ❗️Use clean sterile tissue inside the sclerotia stone!
Few days after sclerotia sample cloning on agar
[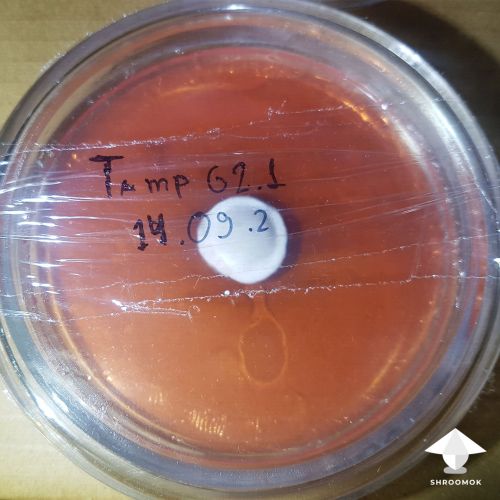](https://shroomok.com/en/wiki/File:Magic-truffles-on-agar.jpg) Sclerotia cloning on agar, few days after cloning. Photo by **mrzimm** - shroomok growers community on [Discord](https://discord.gg/ngKhQDmymD)
The same petri dish, 2 weeks after sclerotia sample cloning on agar
[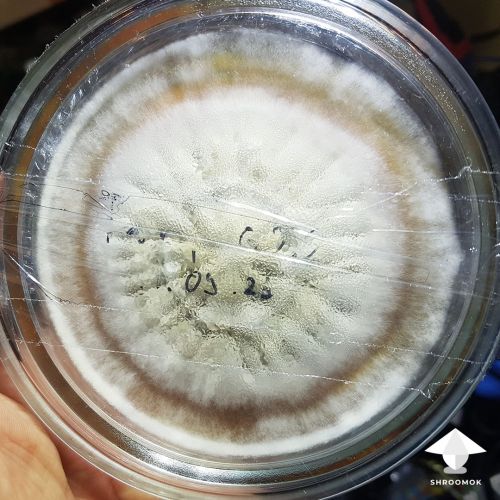](https://shroomok.com/en/wiki/File:Cloning-sclerotia-on-agar.jpg) P. tampanensis magic truffle clone on agar, 2 weeks after cloning. Photo by **mrzimm** - shroomok growers community on [Discord](https://discord.gg/ngKhQDmymD)
The same plate, view from another side. Psilocybe tampanensis started to form sclerotia on agar
[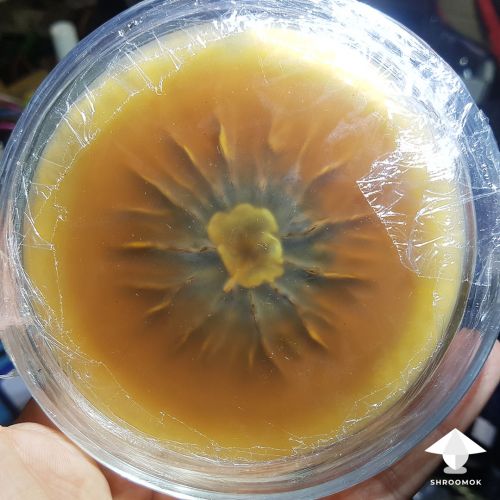](https://shroomok.com/en/wiki/File:Sclerotia-clone-on-agar.jpg) Psilocybe tampanensis on agar, same plate another side. Photo by **mrzimm** - shroomok growers community on [Discord](https://discord.gg/ngKhQDmymD)
✅ **Make a spore print.** As you remember it is possible to grow mushroom fruit bodies, but getting these species to fruit and make print is a challenge for cultivators.
Be ready that single mushrooms produce spores on the 1st flush. Usually mushroom caps are too small, don't open at all or don't have spores. However you can get normal caps with mature spores for reproduction on the 2nd and 3rd flush of fruiting
[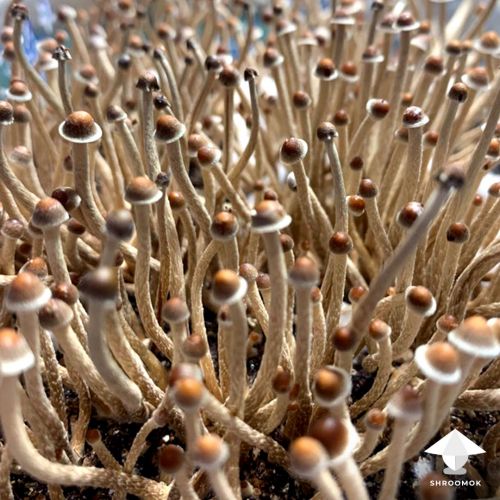](https://shroomok.com/en/wiki/File:How-to-grow-tampanensis-mushrooms.jpg) P. tampanensis fruiting
If you make your own spore prints you are lucky, because such spore prints are expensive. You can use spores any time for making spore syringe, liquid culture or working with agar
[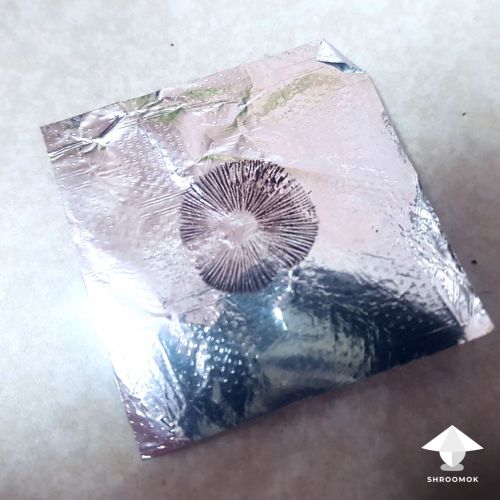](https://shroomok.com/en/wiki/File:Tampanensis-spore-print.jpg) P. tampanensis spore print. Print by **mrzimm** - shroomok growers community on [Discord](https://discord.gg/ngKhQDmymD)> 🔴 Check out full guide: [How to make a spore print](https://shroomok.com/en/wiki/How_to_make_magic_mushrooms_spore_prints "How to make magic mushrooms spore prints")
#### How to get Psilocybe Mexicana and Tampanensis to fruit
[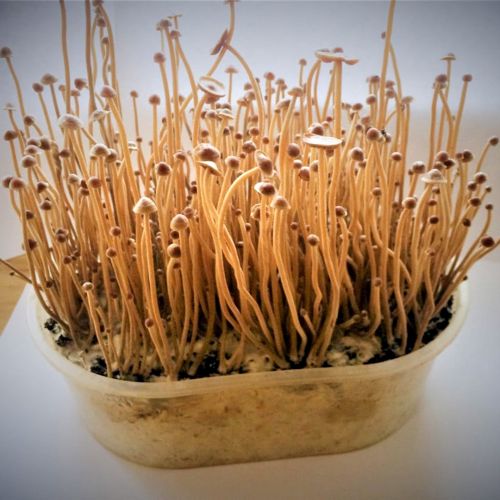](https://shroomok.com/en/wiki/File:Tampanensis-mushroom-fruiting-flush.jpg) Psilocybe tampanensis flush of fruitingYou can use grain spawn after sclerotia harvesting for making mushroom cakes and further fruiting.
To do this you need to cover spawn with casing layer and provide fruiting conditions in fruiting chamber ([growbox](https://shroomok.com/en/wiki/DIY_Grow_Box_for_Magic_mushrooms._Fruiting_conditions "DIY Grow Box for Magic mushrooms. Fruiting conditions"), [monotub](https://shroomok.com/en/wiki/Forget_Monotub_Kit._DIY._How_to_make_Monotub_for_Mushrooms_by_your_own "Forget Monotub Kit. DIY. How to make Monotub for Mushrooms by your own"), grow tent, [bottle-tek](https://shroomok.com/en/wiki/Bottle-tek_or_how_to_grow_mushrooms_in_plastic_bottles "Bottle-tek or how to grow mushrooms in plastic bottles")).
Usually possible to get 2-3 flushes of mushrooms + harvest sclerotia from mushroom cakes before you throw them away.
##### How to make mushroom cake for fruiting P. Mexicana and P. Tampanensis
Break spawn, put it in a flat container or plastic box.
[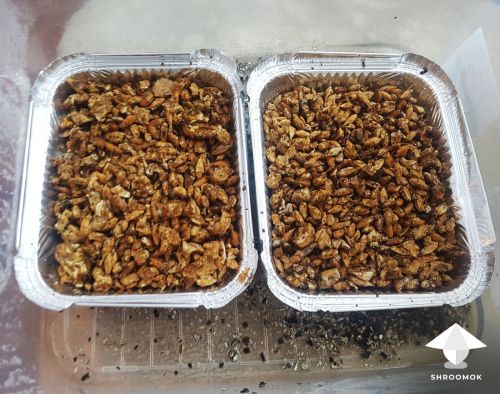](https://shroomok.com/en/wiki/File:Mushroom-cake-for-tampanensis-fruiting.jpg) Put grain spawn in a flat container (P. Tampanensis)> 💡 You can use spawn right after colonization or pieces of grain spawn after harvesting sclerotia. This is a great feature of this species, because you can harvest both, sclerotia and mushrooms
Bottle-tek works for these mushroom species great enough!
> Check out: [Bottle-tek or how to grow mushrooms in plastic bottles](https://shroomok.com/en/wiki/Bottle-tek_or_how_to_grow_mushrooms_in_plastic_bottles "Bottle-tek or how to grow mushrooms in plastic bottles")
Then cover spawn with casing layer
[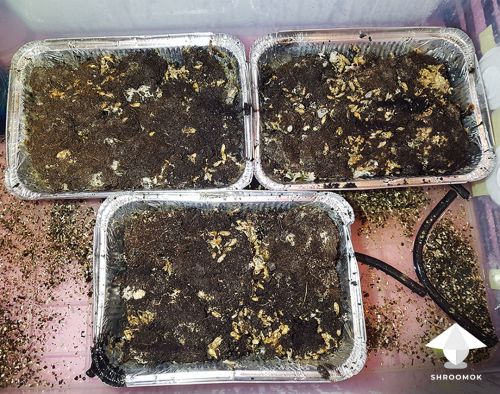](https://shroomok.com/en/wiki/File:Mushroom-cake-casing-tampanensis-fruiting.jpg) Cover mushroom spawn with casing layer. Mushroom cake and casing to for P. tampanensis fruiting> ❗️Try to hide spawn totally under casing substrate. Make even casing layer!
[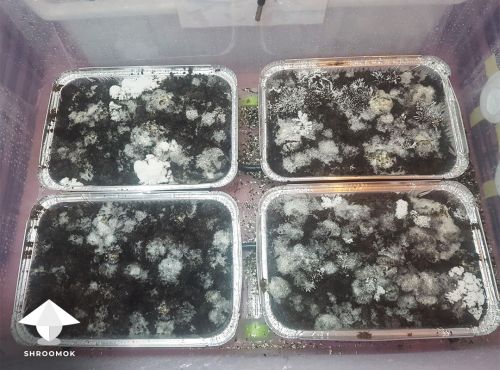](https://shroomok.com/en/wiki/File:Tampanensis-with-cubensis-mix.jpg) P. tampanensis top layer colonization**The content of casing substrate is:** soil for plants (tomato soil) 70%, sphagnum 20%, vermiculite 10%, water (on eye).
**How much water to add?** We usually use simple test for bulk/casing substrates. When you squeeze ready-made substrate water drop should appear. It means substrate is moist enough, but not too wet and not too dry for mushrooms development.
**Sterilization in PC:** for 45-60 mins. Wait till it cool down to room temperature.
Cover spawn with this mix. The layer should be about 1/2-1 inch (1,5-2,5 cm).
Close the tub with lid, foil or film and wait for top layer colonization.
##### Fruiting period
When 80-100% of top layer is colonized provide fruiting conditions:
temperature 68-75°F or +20°..+24°C, relative humidity 90%, FAE every few hours or at least 4-6 times/day.
> Don't expect fast fruiting. All species that produce sclerotia are slow growing. Usually pinning and fruiting start only in 3-4 weeks after providing fruiting conditions. Fruiting cycle (2-3 flushes) lasts about 2-3 month
Mexicana and Tampanensis mushrooms are smaller than Cubensis. They have thin wavy stems and small caps.
[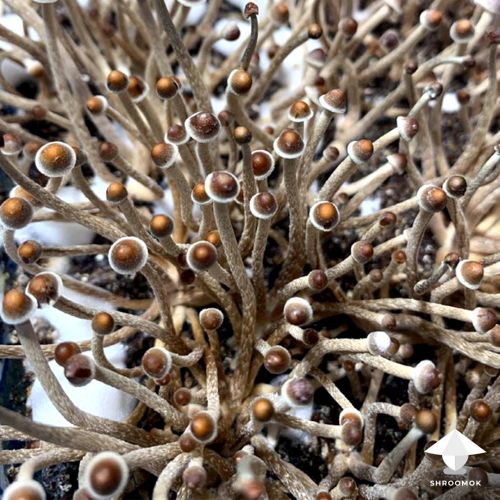](https://shroomok.com/en/wiki/File:How-to-get-sclerotia-species-to-fruit.jpg) P. tampanensis fruitingSometimes sclerotia species don't fruit and impossible to get them fruiting. Usually after harvesting truffles they continue producing truffles in cakes with casing and don't form mushrooms. If you want to get mushroom bodies for sure it is recommended to make casing right after mycelium colonization, before sclerotia forming.
#### How to store Mexicana and Tampanensis mushroom bodies for a long time
Dry magic mushrooms in the same way as any other magic mushrooms. Keep them in airtight bags/jars in refrigerator or at room temperature.
[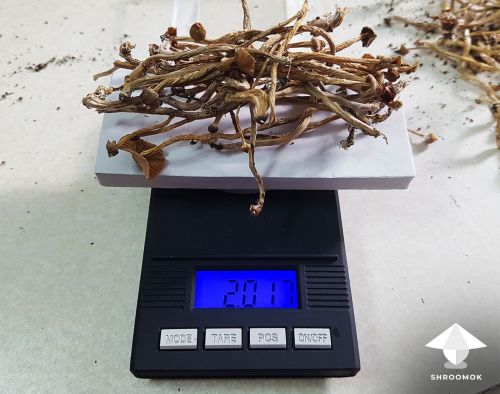](https://shroomok.com/en/wiki/File:How-to-dry-tampanensis-mushrooms.jpg) Dry P. tampanensis mushrooms ready for storage. Photo by **mrzimm** - shroomok growers community on [Discord](https://discord.gg/ngKhQDmymD)> 🔴 Check out: [How to dry and store magic mushrooms](https://shroomok.com/en/wiki/How_to_dry_and_store_psilocybe_mushrooms "How to dry and store psilocybe mushrooms")
#### Wrap it Up
Sclerotia growing is the easiest cultivation process for newbies. It's really neglect tek, just try.
You can skip fruiting period and grow magic truffles only.
If you find this guide helpful [🍄 Buy Shroomok a mushroom](https://www.buymeacoffee.com/shroomok) as a donation and say something nice.
Have a happy growing and magic trips with Philosopher's Stones!
To be continued...
## Making mushroom cake, spawn to bulk, and casing
[Making mushroom cake, spawn to bulk, and casing](https://shroomok.com/en/wiki/Making_mushroom_cake,_spawn_to_bulk,_and_casing)
[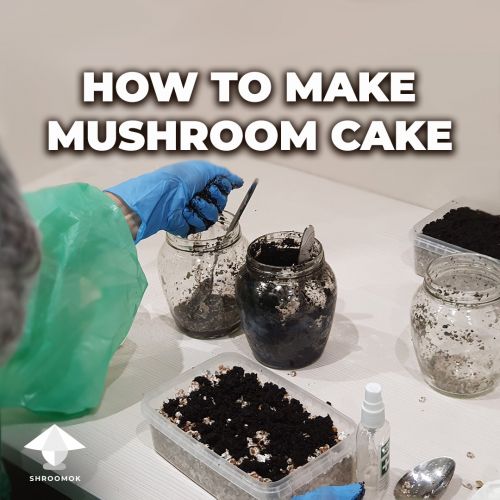](https://shroomok.com/en/wiki/File:Mushroom-cake-spawn-to-bulk-casing.jpg) How to make small mushroom cake or monotub cake. Spawn to bulk and Casing### **Step 8. Day 15-18. How to make mushroom cake, Spawn to Bulk and Casing**
On this step [spawn colonization](https://shroomok.com/en/wiki/Magic_mushrooms_incubator_control "Magic mushrooms incubator control") is completed. Now you've already have grain spawn for making mushroom cake/block.
> Cake — aka mushroom cake or mushroom block, refers to a fully colonized bulk substrate in the fruiting phase of cultivation
What is bulk? What is casing? Why some growers use bulk & casing and some don't? Why some growers even skip spawn to bulk?
Eventually, how to prepare mushroom cake?
How to make mushroom cake for Monotub or Shoebox or Bottle-tek?
Let's figure out!
#### Can I grow mushrooms without spawn to bulk and casing
Yes. In fact you can grow P. Cubensis mushrooms without Spawn to Bulk and Casing by using PF-tek. Pf tek is a great start and much easier for beginners. The main disadvantage of PF tek is lower yield.
[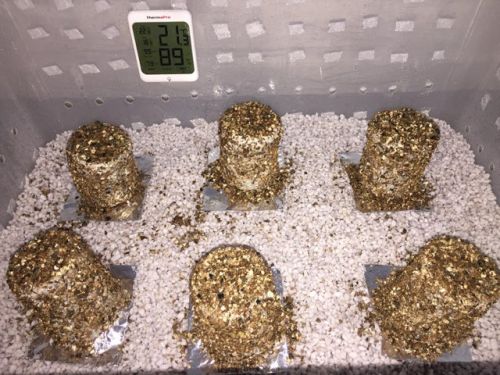](https://shroomok.com/en/wiki/File:Pf-tek-example.jpg) PF-tek mushroom cakes
If you decide to choose PF-tek, then you just need to get the jars out of the incubator. Open the jars. Remove PF-cakes. Roll them in wet vermiculite. Put mushroom cakes in [Growbox](https://shroomok.com/en/wiki/DIY_Grow_Box_for_Magic_mushrooms._Fruiting_conditions "DIY Grow Box for Magic mushrooms. Fruiting conditions") with a layer of wet perlite at the bottom.
So you can skip the guide below and move on [**STEP 9. DIY Growbox. Fruiting conditions**](https://shroomok.com/en/wiki/DIY_Grow_Box_for_Magic_mushrooms._Fruiting_conditions "DIY Grow Box for Magic mushrooms. Fruiting conditions")
However by mastering Spawn to Bulk & Casing techniques you'll be able to increase your yield significantly and improve your skills for cultivation wide variety of mushroom species including gourmet mushrooms and other species of magic mushrooms.
#### Why growers skip Spawn to Bulk and Casing
Sometimes beginners are afraid of spawn to bulk and casing process for several reasons:
🔺 Spawn to bulk and Casing involves extra steps are not necessary to get fruit bodies (for P. Cubensis).
🔺 Spawn to bulk gives opportunities for contaminants. However pH adjusted bulk substrate and casing layer is a great protection against some molds.
🔺 Spawn to bulk and Casing involves "putting all the eggs in one basket" because the covered mushroom cakes/blocks contain the amount of spawn equivalent to 2-6 PF-cakes. If one container contaminated, all the amount of mushrooms that could have been given from each mushroom cake separately will be lost.
🔺 Spawn to bulk and Casing process requires extra steps and time.
🔺 Casing substrate preparation requires pH adjusting.
🔺 Newbies think spawn to bulk and casing are difficult techniques. In fact, it's easy!
If you want to skip all preparation steps for bulk substrate you can buy ready to use sterilized bulk substrate and Casing substrate with proper field capacity and just use them for making mushroom cakes.
**Shroomok's Choice on Amazon:**
[**Sterile Coco Coir/Vermiculite** Substrate - 5 Pounds - 1 Bag](https://www.amazon.com/gp/product/B083RJG4FF/ref=as_li_tl?ie=UTF8&tag=shroomok-20&camp=1789&creative=9325&linkCode=as2&creativeASIN=B083RJG4FF&linkId=283a900c2dadd61b858349822a9e7b8f) - $29.95
Although it's easy to prepare bulk substrate by your own and save money!
#### How to make small mushroom cake
For newbies I recommend to start with small mushroom cakes (1-2 quarts) or bottle-tek. Why?
It's something between 2 teks: old school PF-tek - that produce too little harvest; and MonoTub - 'putting all the eggs in one basket', which means if your shoebox/monotub contaminated you should toss the entire monotub cake at once. Then all the amount of mushrooms that could have been harvested from each small mushroom cake separately will be lost.
If any **small cake** contaminated you'll lost just a small cake instead of the whole monotub block.
Small mushroom cakes can significantly increase your chances for harvest.
This method for those who are not ready for monotub, but want to get more efficient yield than with PF-tek.
Fruiting and final result may be awesome, not worse than other teks.
Let me show you a few examples of small mushroom cakes fruiting
[](https://shroomok.com/en/wiki/File:Fruiting-psilocybe-cubensis-mushrooms-brazil-strain.jpg) Small mushroom cake 1 Qt, P. Cubensis Brazil fruiting [](https://shroomok.com/en/wiki/File:Psilocybe-cubensis-mushrooms-growing-thai-strain-second-flush-of-harvesting.jpg) Small mushroom cake 1 Qt, P. Cubensis Thai fruiting [](https://shroomok.com/en/wiki/File:Pink-buffalo-magic-mushrooms.png) Small mushroom cake 1 Qt, Pink Buffalo fruiting[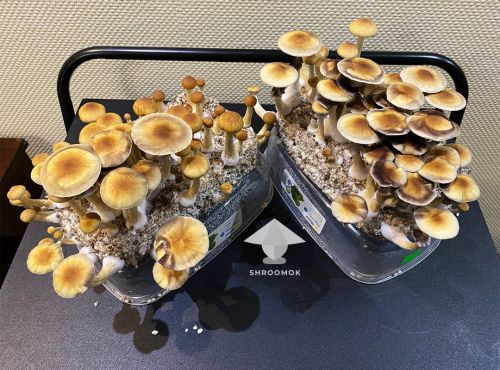](https://shroomok.com/en/wiki/File:Mushroom-cake-fruiting-golden-teacher.jpg) Small mushroom cakes (1,5 qt each), Golden Teacher mushrooms fruiting##### **List of required stuff for making small mushroom cakes**
1️⃣ Grower outfit: medical gloves, mask, cap, raincoat or gown.
[](https://shroomok.com/en/wiki/File:Growers-outfit-for-mushroom-cultivation.jpg) Face mask, gloves, cap, gown[10 Gloves and 1 Mask Bundle](https://www.amazon.com/gp/product/B0865SSK9T/ref=as_li_tl?ie=UTF8&tag=shroomok-20&camp=1789&creative=9325&linkCode=as2&creativeASIN=B0865SSK9T&linkId=1d82b94e370c712ed711ce9dc08c35ba) - $6.99
2️⃣ Colonized Spawn jars or Spawn bags
[](https://shroomok.com/en/wiki/File:Spawn-jars.jpg) Spawn jars ready for casing3️⃣ Coconut peat soil or coconut fiber brick
[](https://shroomok.com/en/wiki/File:Coco-brick-for-casing-layer-in-growing-psilocybe-cubensis.jpg) Coco brick for casing substrate. Magic mushrooms cultivation**Shroomok's Choice on Amazon:**
[Nature's Premium Coco Coir 1-Pound Brick](https://www.amazon.com/gp/product/B01KIX8FY6/ref=as_li_tl?ie=UTF8&tag=shroomok-20&camp=1789&creative=9325&linkCode=as2&creativeASIN=B01KIX8FY6&linkId=6ce728f40aa3e282cb288b0f80eec2ce) - $8.99
[Coco Bliss - Premium Coconut Coir, 5/10/20 Bricks](https://amzn.to/3ZIioAD) $21.99
4️⃣ **Optional!** **Calcium carbonate (CaCO3)** for pH adjusting: limestone flour, limestone grit, chalk, marl, limestone dolomite flour, oyster shell
[](https://shroomok.com/en/wiki/File:Limestone-Flour_copy.jpg) Limestone flour for casing substrate**Shroomok's Choice on Amazon Calcium carbonate (CaCO3):**
[Calcium Carbonate from Ground Limestone 1/5/10 lb (97+%)](https://www.amazon.com/gp/product/B00959XKGI/ref=as_li_tl?ie=UTF8&tag=shroomok-20&camp=1789&creative=9325&linkCode=as2&creativeASIN=B00959XKGI&linkId=a17d92e802b89c1f9de9fe745e822693) - $14.04
[Organics Garden Lime Soil Amendment, 6 lb](https://www.amazon.com/gp/product/B01N94B724/ref=as_li_tl?ie=UTF8&tag=shroomok-20&camp=1789&creative=9325&linkCode=as2&creativeASIN=B01N94B724&linkId=de46ae03e7750d0e16cf2efd3258f92c) - $15.64
[Organic Garden Lime Calcium Carbonate, 5lb](https://www.amazon.com/gp/product/B07N2YT9QN/ref=as_li_tl?ie=UTF8&tag=shroomok-20&camp=1789&creative=9325&linkCode=as2&creativeASIN=B07N2YT9QN&linkId=6afbc9c97e4fb87c6636477217369729) - $16.90
5️⃣ **Optional!** **Gypsum (CaSO4)** for substrate aeration
[Food Grade Calcium Sulfate (Gypsum) 1.5/3/4 Pounds](https://www.amazon.com/gp/product/B084D4JMDB/ref=as_li_tl?ie=UTF8&tag=shroomok-20&camp=1789&creative=9325&linkCode=as2&creativeASIN=B084D4JMDB&linkId=9880057335d1bf7e3ecd28a10f623300) - $9.68
[Organic Garden Gypsum Calcium Sulfate, 5 lb](https://www.amazon.com/gp/product/B07N2Y5NHM/ref=as_li_tl?ie=UTF8&tag=shroomok-20&camp=1789&creative=9325&linkCode=as2&creativeASIN=B07N2Y5NHM&linkId=3d844f424154e3e0f0723d1ccb2ed762) - $17.59
6️⃣ **Optional!** **Vermiculite** or **Vermiculite/Perlite 1:1.**
[](https://shroomok.com/en/wiki/File:Vermiculite-perlite-for-growing-magic-mushrooms.jpg) Vermiculite**Shroomok's Choice on Amazon:**
[Organic Vermiculite 4 qt.](https://www.amazon.com/gp/product/B07N7PSQM1/ref=as_li_tl?ie=UTF8&tag=shroomok-20&camp=1789&creative=9325&linkCode=as2&creativeASIN=B07N7PSQM1&linkId=c3023b00d5abf25c441891496365d300) - $13.99
[Vermiculite 8 qt.](https://www.amazon.com/gp/product/B001693Y3Y/ref=as_li_tl?ie=UTF8&tag=shroomok-20&camp=1789&creative=9325&linkCode=as2&creativeASIN=B001693Y3Y&linkId=aab8022c311d9913eb323603bea05da5) - $14.59
[Premium Perlite 8 qt.](https://www.amazon.com/gp/product/B01LZDOLRI/ref=as_li_tl?ie=UTF8&tag=shroomok-20&camp=1789&creative=9325&linkCode=as2&creativeASIN=B01LZDOLRI&linkId=d7d247f8698cb95cbffd7d7609b8db47) - $13.95
[Organic Perlite 8 qt.](https://www.amazon.com/gp/product/B07CND4WV9/ref=as_li_tl?ie=UTF8&tag=shroomok-20&camp=1789&creative=9325&linkCode=as2&creativeASIN=B07CND4WV9&linkId=6f7d2c2c5137ebca153ef3f89bf3c9eb) - $15.89
6️⃣ [Jars with modified lids](https://shroomok.com/en/wiki/How_to_make_jars_with_substrate_for_mushroom_spawn "Jars for substrate") or heat resistant **bags** for substrate sterilization. Jars are exactly the same as for grain sterilization
[](https://shroomok.com/en/wiki/File:Jars-for_substrate.jpg) Jars for casing substrate sterilization
7️⃣ **Flat Plastic** **Food Containers** (volume about 1-2 Qt or 1-2 L) for making mushroom cakes in it
[](https://shroomok.com/en/wiki/File:Containers-for-psilocybe-mushrooms-cultivation.jpg) Flat food boxes for making mushroom cakes or mushroom shoeboxes**Shroomok's Choice on Amazon:**
[Black Container with Lid, 34 oz, 30 Pack](https://amzn.to/3kuiwn4) $21.99
[Square Clear Containers with Lids, 32 oz, 20 Pack](https://amzn.to/3kxmsUh) $30.59
8️⃣ Alcohol 70% in a spray bottle
[](https://shroomok.com/en/wiki/File:Isopropyl-alcohol-spray.jpg) Alcohol (70%) in spray bottle[Isopropyl Alcohol 70%](https://www.amazon.com/gp/product/B08LW5P844/ref=as_li_tl?ie=UTF8&tag=shroomok-20&camp=1789&creative=9325&linkCode=as2&creativeASIN=B08LW5P844&linkId=de58e8e2a98ad37b75f875c879a5e62e) - $22.99
9️⃣ Tablespoons - 2 pcs.
🔟 Boiled chilled water (about 1 liter).
1️⃣1️⃣ Cotton disks.
1️⃣2️⃣ Aluminium foil.
1️⃣3️⃣ Pressure cooker /autoclave /multicooker /instant pot /oven /microwave for substrate sterilization
[](https://shroomok.com/en/wiki/File:Substrate-sterilization-for-mushroom-growing-in-autoclave.jpg) Autoclave for substrate sterilization[](https://shroomok.com/en/wiki/File:Pressure-cooker-for-substrate-sterilization.jpg) Pressure cooker for substrate sterilization in mushroom cultivation**Shroomok's Choice on Amazon:**
[Pressure Cooker & Canner, 3 PSI Settings - 22 Qt](https://www.amazon.com/gp/product/B01KWZEERC/ref=as_li_tl?ie=UTF8&tag=shroomok-20&camp=1789&creative=9325&linkCode=as2&creativeASIN=B01KWZEERC&linkId=1330c550fca531439c6a4630281d43b4) - $109.99
[Pressure Canner and Cooker - 23 Qt](https://amzn.to/3kwi73F) - $147.99
[Professional All-American Non-Electric Sterilizer - 25 Qt](https://www.amazon.com/gp/product/B000X2H846/ref=as_li_tl?ie=UTF8&tag=shroomok-20&camp=1789&creative=9325&linkCode=as2&creativeASIN=B000X2H846&linkId=8b6398c55e5989c0050c2537f02bcdcf) - $449.95
##### **How to prepare substrate for mushroom cake**
1️⃣ Mix ingredients
🔸 130g of coco coir (1/5 coco brick)
🔸 1.6 cups vermiculite - optional
🔸 1 table spoon of gypsum - optional
🔸 1 table spoon of limestone flour - optional
🔸 3-3.6 cups of water (0.9 qts)
This amount of substrate enough for 2-3 Qts of grain spawn and for making 2-4 mushroom cakes 1-2 Qt each
2️⃣ Fill the jars/bags with prepared substrate.
3️⃣ Close the jars with modified lid or seal the bag. Wrap the lid with foil. Jars and lids are the same as for grain substrate sterilization. Heat-resistant autoclavable bags also great to use.
> 🔴 To remind the process: [DIY Spawn Jars and Spawn Bags](https://shroomok.com/en/wiki/How_to_make_jars_with_substrate_for_mushroom_spawn "How to make jars with substrate for mushroom spawn")
4️⃣ Place all jars/bags to pressure cooker/multi cooker or just in pot with lid at 100-120°C (212-250°F). Sterilize for 45-60 mins. The process is the same as for grain substrate sterilization step, but not so long and high pressure is not critical for coco substrate. You can proceed sterilization in the oven at 180°C (~350°F) for 1 hour. Or place the substrate in heat-resistant bag and heat in the microwave at maximum power for 5 minutes, then shake/flip the substrate and heat for another 5 minutes.
> 🔴 To remind the process: [Substrate sterilization](https://shroomok.com/en/wiki/Substrate_sterilization_before_adding_psilocybe_spores "Substrate sterilization before adding psilocybe spores")
5️⃣ Let the substrate cool down to room temperature inside the PC/pot/multicooker/oven.
You can also buy ready to use sterilized substrate and skip all steps are listed above.
**Shroomok's Choice on Amazon:**
[Ready Sterile Coco Coir/Vermiculite Substrate - 5 Pounds - 1 Bag](https://www.amazon.com/gp/product/B083RJG4FF/ref=as_li_tl?ie=UTF8&tag=shroomok-20&camp=1789&creative=9325&linkCode=as2&creativeASIN=B083RJG4FF&linkId=283a900c2dadd61b858349822a9e7b8f) - $34.95
##### Preparation step before making mushroom cake
1️⃣ Wipe the table, plastic boxes, tablespoons, jars with casing substrate and vermiculite with alcohol.
2️⃣ Take the spawn jars or spawn bags out of the incubator.
[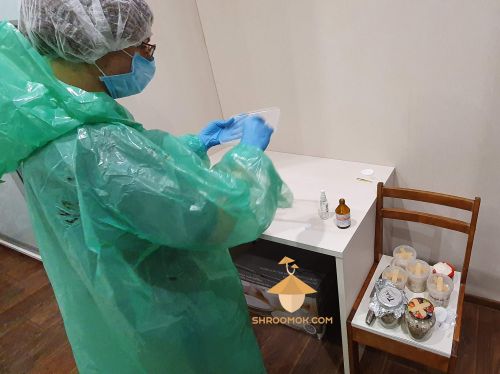](https://shroomok.com/en/wiki/File:Casing-technique-psilocybin-mushrooms-growing.jpg) Preparation for casing process. Psilocybe Cubensis casing technique3️⃣ Without opening the jars check each one for the presence of contaminants.
Make sure there are no contamination in them. If you notice blue-green, green, olive, gray, red, pink, purple or black spots, the whole jar should be tossed without opening!
Even if there is healthy white mycelium of Psilocybe Cubensis in that jar with the contamination, don't spare and throw the entire jar away, because it is already contaminated. Contamination can affect neighboring healthy mushroom cakes in the future. **Taking away the healthy mycelium and throwing away contaminated parts won't work!** Mold spores spread easily and imperceptibly over the substrate.
If you see any signs of mold, bacterial contamination or doubtful areas - throw such jar away!
##### Make small mushroom cake step by step
Video demo: [How to make small mushroom cake](https://www.dailymotion.com/video/x85217k)
1️⃣ **Optional step!** Cover the bottom of plastic container with moist vermiculite
[](https://shroomok.com/en/wiki/File:Mushroom-cake-and-casing-layer.jpg) Making mushroom cake or mushroom shoebox2️⃣ Open the spawn jar
[](https://shroomok.com/en/wiki/File:Casing-procedure-for-psilocybe-pf-tek.jpg) Casing procedure for psilocybin mushrooms3️⃣ Check each jar for the signs of contamination. Choose good healthy spawn only
[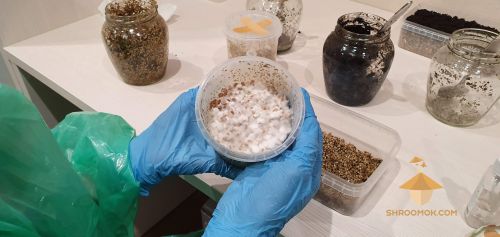](https://shroomok.com/en/wiki/File:Casing-procedure-2.jpg) White healthy Psilocybe Cubensis mycelium on substrate before casing
4️⃣ Move the grain spawn into a flat plastic container. You can do it with sterile spoon. Don't afraid to crush the substrate. It's okay to mix 2-3 jars of the **same strain** in one container. **Don't mix different strains!**
[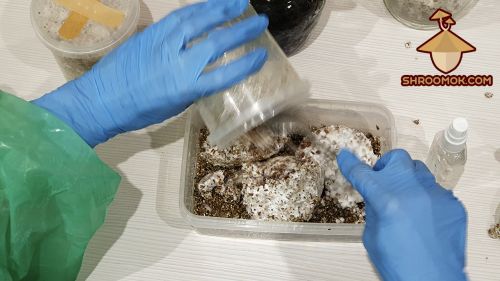](https://shroomok.com/en/wiki/File:Mushroom-cake-and-casing-process.jpg) Move spawn grain into a flat plastic box. Step by step casing process for psilocybe mushrooms[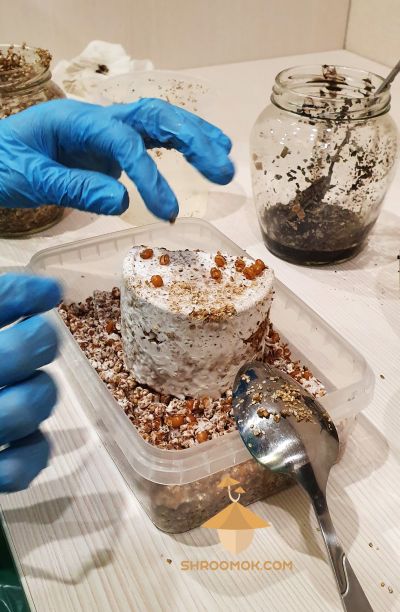](https://shroomok.com/en/wiki/File:Casing-technique-for-psilocybe-cubensis-growing.jpg) Put substate with mycelium to flat plastic box. Casing technique. Cultivation psilocybin mushrooms Psilocybe Cubensis
5️⃣ Remove substrate parts that are not covered with mushroom mycelium or too wet, or have slime, or fermentation smell (sweet, sour, cider, alcohol etc.). Use only healthy spawn!
If you find signs of mold (any bright color with powdered texture - green, blue, pink, yellow, red) toss this jar/bag immediately.
> ❗️Don't use uncolonized grain. It's high risk of bacteria and mold contamination
> ❗️**Small mushrooms that have already formed in spawn jar/bag should be removed.** If we leave them, they can start to rot and provoke contamination
6️⃣ Spread the spawn evenly, but don't press it! Fill the container with substrate and leave 2-3 cm to the top of the container, because we need to add 1-1.5 cm of sterile coco substrate on to
[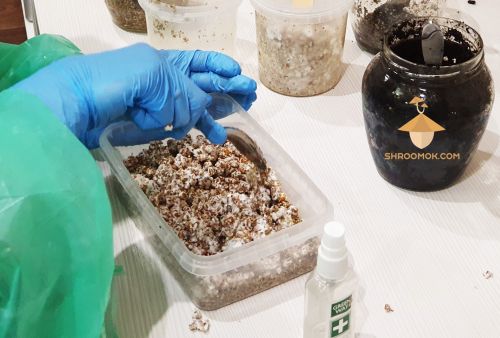](https://shroomok.com/en/wiki/File:Casing-procedure-for-psilocybin-mushrooms-pf-tek.jpg) Spread substrate evenly over box. Casing technique> 🟠 The optimal height for small mushroom cake about 2-3 inch (5-8 cm), up to 4 inch (10 cm). There is no reason to make a tower
7️⃣ Put the layer of soil on the top. About 1-1.5 cm, no more! The soil should be wet. Pressing it down should release a water drop. If there is too much of water and it flows from the soil, you need to squeeze the soil. If there is not enough liquid, add cooled boiled water.
[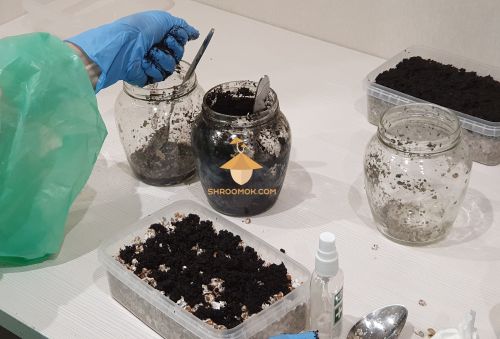](https://shroomok.com/en/wiki/File:Casing-layer-for-psilocybin-mushrooms-growing.jpg) Casing layer. Psilocybin mushrooms growing[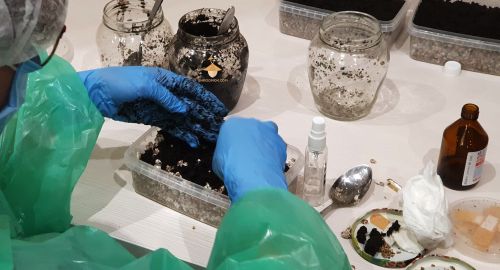](https://shroomok.com/en/wiki/File:Casing-psilocybe-cubensis-growing.jpg) Coconut peat soil or coconut fiber as casing layer for cakes> ❗️You can also mix your grain spawn and coco coir substrate 1:1
8️⃣ Wrap the containers with foil (all sides). This is to give the mushrooms an upward direction of growth. Non-transparent containers also suitable, the only disadvantage you won't be able to see possible contamination that might show up inside
[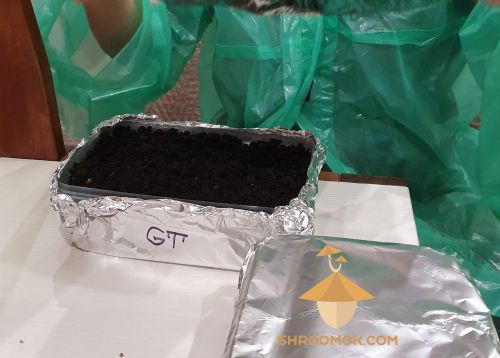](https://shroomok.com/en/wiki/File:Casing-technique-for-psilocybin-mushrooms-growing.jpg) Wrap cakes with foil. Casing
9️⃣ Spray the mushroom cake several times with boiled chilled water. Ultra fine mist spray bottle is the best to use
[Ultra Fine Spray Bottle, 10 oz, 300ml, Different Colors](https://amzn.to/3wkx37u) $7.99
🔟 Cover gently each cake with foil to keep out the light. You can cover them with a plastic lid from a container. But don't close tightly, you need to leave minimal air access. **Foil or plastic lid should NOT contact or press top substrate!**
[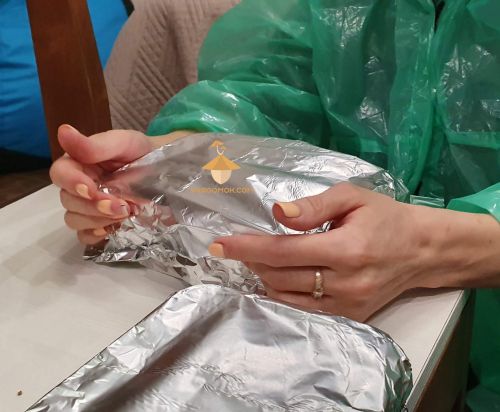](https://shroomok.com/en/wiki/File:Casing-procedure-for-psilocybin-fungi-growing-pf-tek.jpg) Cover cakes with foil (or lid). Casing
1️⃣1️⃣ **Optional!** On the top of foil (or on the lid) make a few small holes with a needle. Usually I just cover the cake with plastic lid, but don't close tightly
[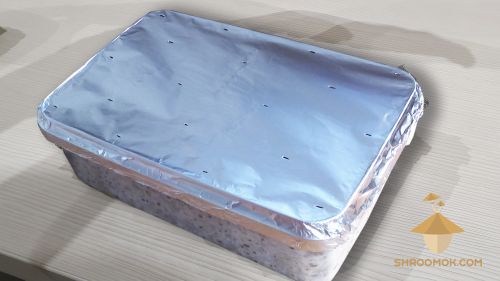](https://shroomok.com/en/wiki/File:Mushroom-cake-casing.jpg) Mushroom cake after casing ready for casing colonizationMove your mushroom cakes to incubator or any clean box. Wait for colonization new substrate.
##### **Colonization period for mushroom cake**
It takes about 3-5-7-10 days for colonization coco substrate.
**Incubation conditions are the same as for grain colonization:** temperature range is **70-81°F** or **+21°..+27°C,** no light at all, no fresh air exchange and no misting for this step!How to identify when we need to move cakes to the grow box?
At this stage colonization process is faster and you can observe changes every day.
✳️ 2 days after:
[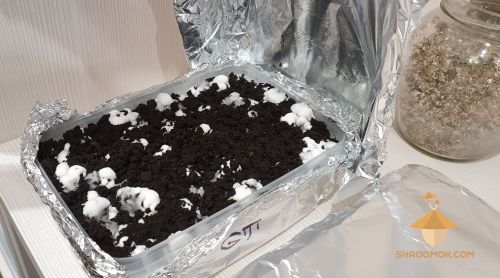](https://shroomok.com/en/wiki/File:Casing-2-days-GT.jpg) Psilocybin cake. Golden Teacher strain. 2 days after casing✳️ 2 days after:
[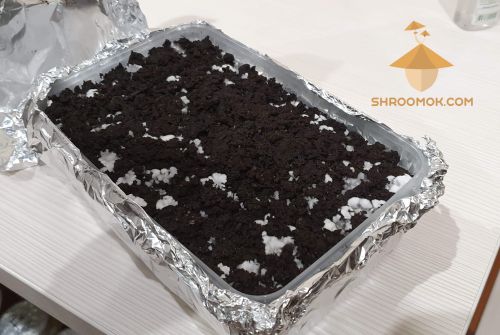](https://shroomok.com/en/wiki/File:Casing-2-days-Thai.jpg) Psilocybin cake. Thai strain. Two days after casing.
✳️ 4 days after:
[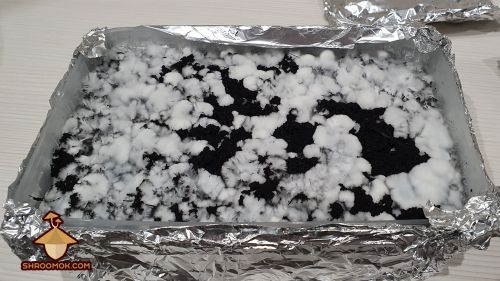](https://shroomok.com/en/wiki/File:Mushroom-cake-ready-for-fruiting-period.jpg) Casing colonization. Psilocybe Cubensis Thai (cake 2). 4 days after casing
✳️ 4 days after:
[](https://shroomok.com/en/wiki/File:Mushroom-cake-for-fruiting-period.jpg) Casing colonization. Psilocybe Cubensis Thai. 4 days after casing##### **When mushroom cakes are ready for fruiting conditions**
When 70-100% of the top substrate is colonized by mycelium it's time to prepare the fruiting chamber and provide fruiting conditions.
On the photo below you can see mushroom cakes 4 days after casing. They are ready to move in the growbox
[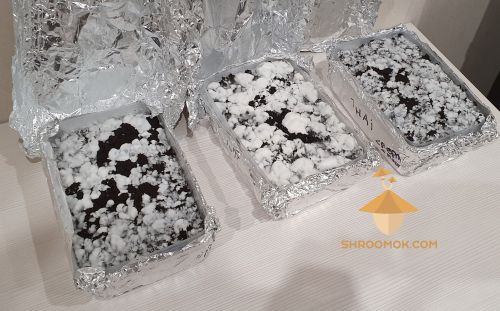](https://shroomok.com/en/wiki/File:Psilocybin-cakes-ready-for-growbox.jpg) Magic cakes ready for growing stage in growbox> 🔴 **Don't keep mushroom cakes for colonization too long!** Overgrown mycelium can be a cause of [overlay](https://shroomok.com/en/wiki/Psilocybe_growing_problems_-_overlay,_abortions,_etc "Psilocybe growing problems - overlay, abortions, etc"). Then fruit bodies can't form and you won't get mushrooms at all!
Before moving mushroom cakes to Fruiting Conditions I'd like to mention one of the most debated topic. Check it out: [Cold Shock in mushroom cultivation: pros and cons](https://shroomok.com/en/wiki/All_you_need_to_know_about_cold_shock_for_magic_mushrooms "All you need to know about cold shock for magic mushrooms")
**Now it's time for: [Step 9. DIY Grow Box. Fruiting conditions](https://shroomok.com/en/wiki/DIY_Grow_Box_for_Magic_mushrooms._Fruiting_conditions "DIY Grow Box for Magic mushrooms. Fruiting conditions")**
[](https://shroomok.com/en/wiki/File:Growbox-for-mushroom-growing.jpg) Growbox as a fruiting chamber for mushroom growing#### Spawn to Bulk
This method and recipes are recommended for all modifications of MonoTub, Shoebox, Bottle-tek, Grow Tent growing.
##### What is Spawn to Bulk
> **Spawn to Bulk (S2B)** — transfer **grain spawn** to secondary **fruiting substrate** (bulk) for further bulk colonisation and mushroom fruiting in fruiting chamber (growbox, shoebox, monotub, grow tent etc.)
Tek for Shoebox, Monotub: [**DIY Monotub for mushrooms. Monotub configurations**](https://shroomok.com/en/wiki/Forget_Monotub_Kit._DIY._How_to_make_Monotub_for_Mushrooms_by_your_own)
[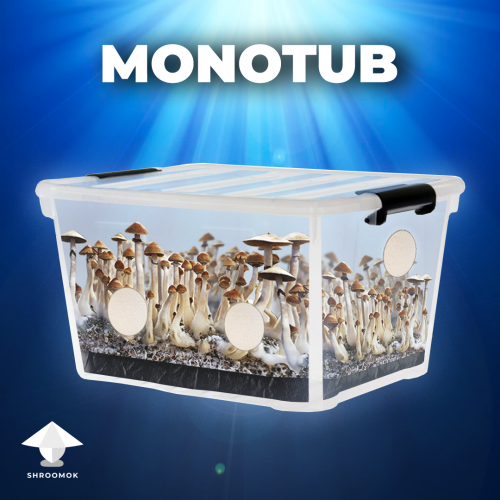](https://shroomok.com/en/wiki/File:Monotub-guide-DIY-How-to-make-Monotub-for_mushrooms.png) MonoTub Tek: modified monotub, unmodified monotub, shoebox, twin tub or double tub, automated monotub
Tek for growing shrooms in bottle: [**Bottle-tek or how to grow mushrooms in plastic bottles**](https://shroomok.com/en/wiki/Bottle-tek_or_how_to_grow_mushrooms_in_plastic_bottles "Bottle-tek or how to grow mushrooms in plastic bottles")
[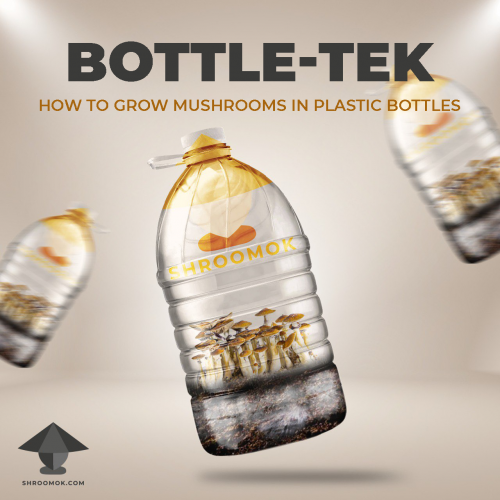](https://shroomok.com/en/wiki/File:Bottle-tek-guide-mushroom-cultivation.png) Bottle Tek or mushroom growing in plastic bottles> Remember, there is no right or wrong way to fruit mushrooms. Any tek works, has pros and cons. Start with the easiest and cheap tek. Skip any automatization for the first attempts
##### Why coco coir for bulk substrate
Fruiting substrate content depends on the mushroom species we grow. Some edible mushrooms prefer wood products (sawdust, wood chips, paper etc), straw or manure.
Cubes enjoy coco coir and hay substrates. Manure substrate is also good for Cubes, but not necessary.
Manure substrate for Panaeolus aka Copelandia is recommended!
The most popular ingredient of bulk substrate for Cubensis mushrooms is coco coir. It's cheap, easy to buy, easy to prepare. It is lightweight, supports aeration. When soaked in water increases in volume by 8-10 times, it makes coco coir excellent moisture retainer for longer. At the same time coco coir relatively resistant to molds, bacteria, pests.
The best option of coco coir are pressed coco bricks.
On the packages with ready-made coconut-peat soil and coco bricks manufacturers always indicate the pH level, that can vary from 5.5 to 7.5.
> ❗️Don't use coconut peat soil mix for plants! Usually brands add Trichoderma to coco coir for plants, it’s a part of their mycorrhiza. Trichoderma is useful for plants, but not for shrooms!
##### Salted coco coir
One important point about coco coir! As we know it's made from coconuts. Palm trees usually grow near the sea, that's why coco coir sometimes salted (usually from no-name sellers).
> ❗️Salt inhibits mushroom metabolism, as a result inhibits mushroom pinning and fruit bodies development!
Sometimes salt level in coco coir +/- normal, sometimes extremely high. Moreover can vary from brick to brick!
'Washing' the coco coir in water helps to remove salt and check the salinity level. Sometimes we need repeat such washing few times to have normal salt level.
How to check salt level? If you have pool at home or aquarium you know about it for sure. Use salinity tester or test strips, they show the salt level in water after washing the coco coir.
[Saltwater Test Strips](https://amzn.to/3C0I69G) $9.99
[Digital salinity tester](https://amzn.to/3UAri0g) $39.99
> Drinking water < 0.5 ppt
>
> Normal saline = up to 9 ppt
>
> Sea water = 30-35 ppt
##### Simple coco coir recipe for bulk substrate
**Simple recipe without any additives:** 650g coco coir (1 coco brick), 14 cups of water (3.5 qts)
[Coco Bliss - Premium Coconut Coir, 5/10/20 Bricks](https://amzn.to/3ZIioAD) $21.99
##### CVG recipe for bulk substrate
> CVG substrate = Coco coir + Vermiculite + Gypsum
**For 5qt spawn jars (for Monotub Tek):** 650g coco coir (1 coco brick 1,4lbs = 650g), 8 cups of vermiculite (2 qts), 1 cup of gypsum, 18 cups of water (4.5 qts)
**For 2.5qt spawn jars (for Monotub Tek):** 325g coco coir (1/2 coco brick), 4 cups vermiculite, 1/2 cup gypsum, 2.25 qts of water (9 cups)
**For 2 qts spawn jars (shoebox tek, small mushroom cakes, bottle-tek):** 260g coco coir, 3.2 cups vermiculite, 2/5 cups gypsum, 7.2 cups of water (1.8 qts)
For 1 qt spawn jar (shoebox tek, small mushroom cakes, bottle-tek): 130g coco coir (1/5 coco brick), 1.6 cups vermiculite, 1/5 cups gypsum, 3.6 cups of water (0.9 qts)
> 🔴 Gypsum provides looseness (particle separation) to reduce soil compaction and increase drainage, aeration in soils. Provides mineral salts, especially sulfur and calcium, essential elements for mushroom metabolism.
> 🔴 **Gypsum is not a buffering agent! It has a neutral pH 7.0.** It can be added as an additional ingredient to the basic buffering agent and change pH level up to 7.0. You can use gypsum with any other buffer agent 50/50 (i.g. if I need 1 cup of gypsum I add 1/2 cup of gypsum and 1/2 cup of Limestone flour)
**Shroomok's Choice on Amazon:**
[Coco Bliss - Premium Coconut Coir, 5/10/20 Bricks](https://amzn.to/3ZIioAD) $22.99
[Professional Grade Vermiculite 8Qt, 1/2/5 Pack](https://amzn.to/3QLs7lD) $14.50
[Gypsum (Calcium Sulfate), 2lb](https://amzn.to/3iQPeyz) $12.99
[Organic Lime Soil Amendment, 6 lb](https://www.amazon.com/gp/product/B01N94B724/ref=as_li_tl?ie=UTF8&tag=shroomok-20&camp=1789&creative=9325&linkCode=as2&creativeASIN=B01N94B724&linkId=91127d216856b6dc26d065cea40786b0) - $15.61
##### Bulk substrate Pausterization or Sterilization
We need this step to kill possible mold spores in bulk substrate and prevent mold contamination. In fact it is enough to keep bulk substrate at 140F and higher (60C) for at least 30+ minutes.
At this step we don't work with bacteria as we do this with grain substrate. Coco coir doesn't have so much carbs as in grain, that's why it is not so attractive for bacteria pathogens.
For pausterization put all dry ingredients (coco coir + vermiculite + gypsum) in a PC/pot/bucket.
[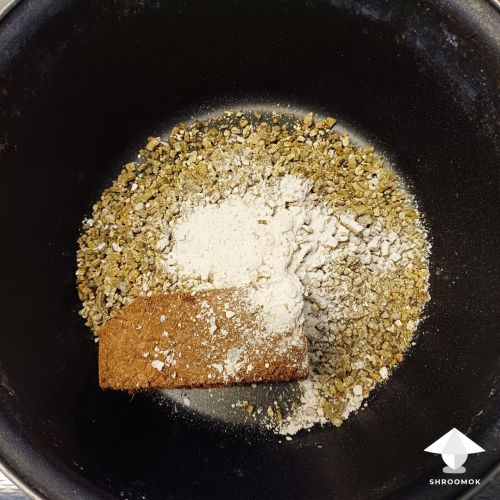](https://shroomok.com/en/wiki/File:CVG-bulk-substrate-preparation.jpg) Add dry ingredients in pot for making CVG substrate (Coco brick + Vermiculite + Gypsum). Follow the ratioPour steep boiled water right on dry ingredients.
Close the PC/pot/bucket with lid. Cover it with towel or blanket to retain heat for longer.
Let it sit and cool down to room temperature (about 4-8 hours depending the volume of substrate).
For sterilization prepare bulk substrate (here you can use cold water) and fill the spawn jars/bags. Sterilize/pausterize in pressure cooker or pot for 45-60 mins at 10-15 psi. Let it cool down to room temperature.
Usually mushroom farmers and home growers use pasteurization to save time and beneficial bacteria in substrate, that support mushroom growth. However Sterilization and Pasteurization have advantages and disadvantages that were discussed on [Shroomok Growers Community on Discord](https://discord.gg/ngKhQDmymD)
> 🟠 Check out discussion: [Sterilization vs Pasteurization for bulk substrate](https://shroomok.com/en/wiki/Sterilization_vs_Pasteurization_for_bulk_substrate)
You can also use 'sterilization' in microwave. Put jar/bag in microwave for 8-10 mins (use the highest power). Mix it around 4-5 min then finish the rest 4-5 mins of cooking. Let it cool down to room temperature.
Sterilization in oven. Turn on your oven and set 250F (120C). Wait for this temperature. Put jars/bags in oven. Wait for 1 hour. Turn off the oven and let it cool down to room temperature in the oven.
##### Bulk substrate field capacity
Before mixing mushroom spawn with bulk substrate you should check field capacity, literally it is right water content in substrate. It's extremely important for mushrooms!
> Field capacity — perfect substrate moisture conditions
A good way to test for this is to grab a handful of the substrate mixture and squeeze it in your hand.
⛔️ If you are unable to squeeze out any water, it is too dry.
⛔️ If a light squeeze causes a stream of water to come out, it’s too wet.
✅ You want to be able to squeeze the mixture as hard as you can, and only have a few steady drops come out to have a field capacity moisture level. This is perfect!
##### Recommended ratio of grain spawn to bulk substrate
The recommended ratio of Grain Spawn to ready for use Bulk substrate is from 1:1 to 1:4.
Typically growers do 1:2 or 1:3
> 1:2 = means 1 part of Grain Spawn to 2 parts of Bulk
For the very first attempt try to work with 1:1 or 1:2 ratio.
> Check out discussion about S2B ratio from Shroomok Discord: [What is the best ratio of spawn to bulk for mushroom growing](https://shroomok.com/en/wiki/What_is_the_best_ratio_of_spawn_to_bulk_for_mushroom_growing "What is the best ratio of spawn to bulk for mushroom growing")
##### Spawn to Bulk process
Wash your boxes/tubs/bottles with any disinfectant before making mushroom cakes/blocks in them.
Wipe boxes/tubs/bottles with iso alcohol.
Check the spawn jar for signs of contamination on all sides and at the bottom. Grain should be covered completely with white mycelium.
[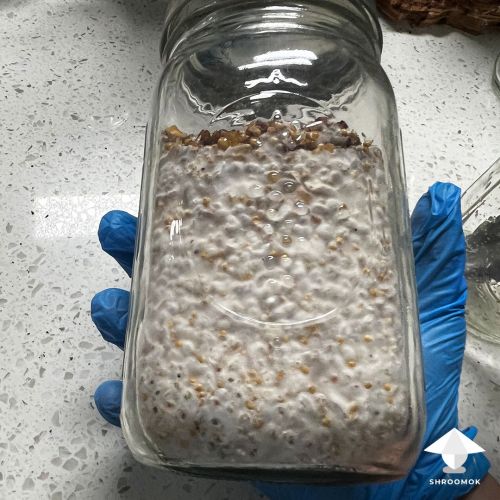](https://shroomok.com/en/wiki/File:Spawn-jar-ready-for-spawn-to-bulk.jpg) Healthy fully colonised spawn jar ready for spawn to bulk
Open the jar and check the mycelium on top. It should be perfectly white.
[](https://shroomok.com/en/wiki/File:Colonized-grain-spawn.jpg) Good example of fully colonised healthy mushroom grain spawn> Don't use bald areas (uncolonised grains without mycelium) as they are prone to further contamination. Throw away uncolonized grain and pick good grain from the jar for the next step. Check the smell as well. It should have a nice mushroomy smell. Sweet-sour, cider, rotted smell is a sign of contamination.
Remove grain spawn from the jar and transfer it to a plastic box (shoebox, monotub, bottle). To make it easier, use a tablespoon. Don't be afraid to break grain spawn apart.
[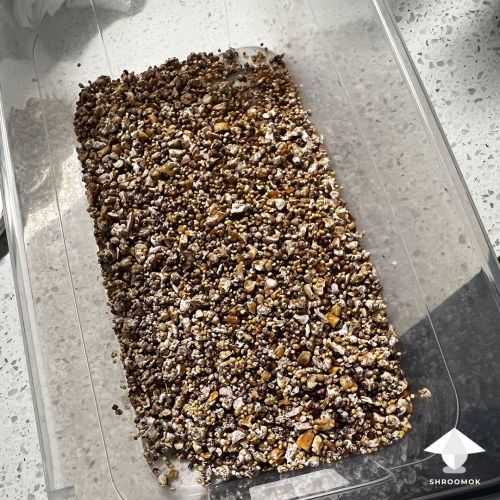](https://shroomok.com/en/wiki/File:Grain-spawn-in-shoebox.jpg) Mushroom grain spawn is transferred from the jar to a plastic box (shoebox, monotub)Add pausterized or sterilized bulk substrate in the box. Spawn to Bulk ratio from 1:1 to 1:4.
[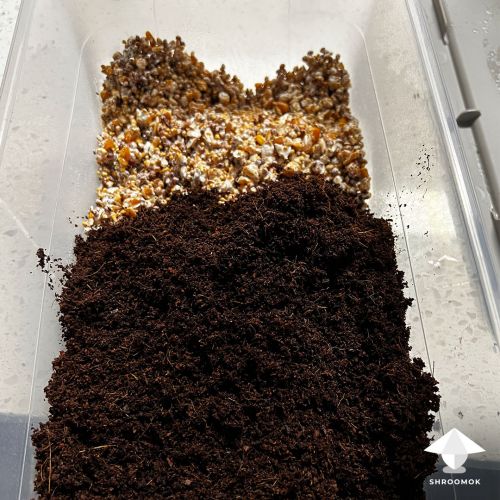](https://shroomok.com/en/wiki/File:Mix-spawn-with-bulk-substrate.jpg) Add pausterized or sterilized bulk substrateYou can create layers of spawn and bulk one by one.
[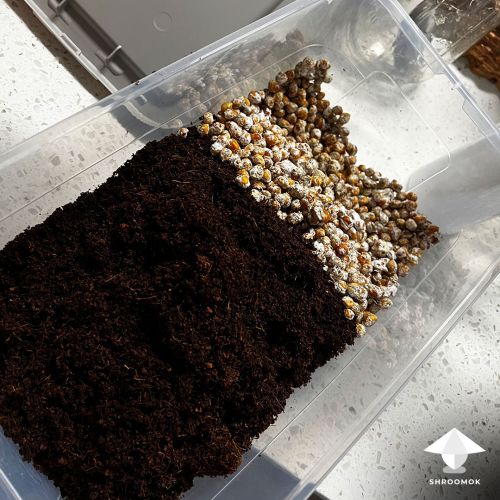](https://shroomok.com/en/wiki/File:Spawn-to-bulk-shoebox.jpg) Mix spawn and bulk or use substrate layeringOr simply mix spawn with bulk. I prefer to break up grain and MIX with bulk substrate without layering. In this way we create more points of growth. Therefore, the speed of bulk substrate colonization is faster.
[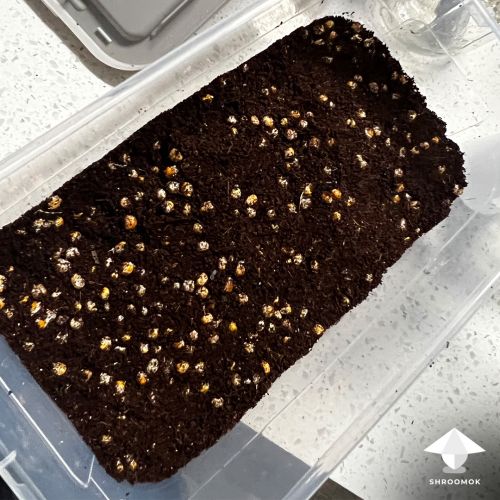](https://shroomok.com/en/wiki/File:Shoebox-spawn-to-bulk-ready-for-mycelium-run.jpg) Mixed grain spawn with bulk substrate. Shoebox ready for bulk colonization aka mycelium runCover the cake with 1/2-1/3 inch (~1cm) of bulk substrate on top of your cake after mixing to cover all grains.
Tamp the whole cake a little.
Close the lid of your box and all air vents (if you have them). Wait for bulk substrate colonization. Usually it takes 3-10 days, up to 14 days. For this period, mycelium don't need any air exchange or light!
> **Question:** Shroomok, what is the ideal height for mushroom cake?
**Answer:** Your cake should take up no more than 1/3 of the total volume of the fruiting chamber (shoebox, bottle, monotub). For instance, if your plastic box = 24 cm in height, then your mushroom cake should be up to 8 cm (24/3=8). The height of mushroom cake (grain spawn + bulk + thin top layer) should be around 5-10 cm (2-4 inches). +/- 1 cm is not critical. You don't need a tower, at the same time cake should be thick enough.
##### Bulk substrate colonization
Wait till 80-100% of bulk substrate colonization.
Then you have 2 options for your choice:
1\) making casing layer and providing fruiting conditions right after casing
2\) skip casing layer and providing fruiting conditions
> Check out: [Pinhead initiation. Fruiting parameters](https://shroomok.com/en/wiki/Fruiting_period._Pinhead_initiation,_mushroom_pinning_and_mushrooms_growth_parameters)
I do recommend to use casing layer! Let's figure out why and how to make it.
#### Casing
##### What is casing
Extremely beneficial, but optional step for some mushroom species (for Cubensis particularly). This step applied after Spawn to Bulk and bulk substrate colonization.
> Casing — a layer of water-retentive materials applied to a substrate to encourage and enhance fruitbody production. It is not supposed to provide nutrients for fungi development
Usually casing content including peat moss, vermiculite and water. Additives include hydrated lime or limestone flour. Casing should not have any nutrients, **it's non-nutrient substrate!** If the casing layer is nutritious, mycelium won't form mushrooms and continue vegetative growth until it had taken over the entire nutrient medium.
##### Casing layer benefits
> This practice was developed by Agaricus mushroom cultivators. They discovered experimentally that mushroom pinhead formation is stimulated by covering the compost with such a layer. The cover layer promotes fruiting and increases the yield potential for many (but not for all) cultivated mushrooms.
**Casing layer has the following reasons:**
✅ To protect the colonized substrate from drying out. Casing layers hold moisture in substrate, promote and hold humidity level x2 better than coco coir and vermiculite
✅ Additional contamination protection. When pH adjusted between 8.0 - 9.0 casing creates a hostile environment for certain contaminations like Trichoderma mold to live
✅ To provide a moist microclimate for pinhead initiation and further growth.
✅ To provide an additional water supply for fungi growing on active stage.
✅ To support the growth of beneficial microorganisms that improve fruiting.
✅ Mushroom cake produce more flushes, increase yield in terms of size and weight for each flush and in terms of overall harvested weight. Have even fruiting all over the cake, not only near the borders of your tub
✅ Beneficial for growing such strains like [APE (Albino P Envy)](https://shroomok.com/en/wiki/Mutant_strain_Albino_Penis_Envy_aint_just_APE_but_King_Kong_of_Magic_Mushrooms "Mutant strain Albino Penis Envy aint just APE but King Kong of Magic Mushrooms"). Casing layer helps to prevent or decrease 'Dino Eggs' mutation during pinning period
✅ Casing layer helps to prevent overlay and works great for overlay treatment.
✅ Highly recommended for Psilocybe Natalensis, casing initiate pins formation and reduce aggressive mycelium groth.
**In a substrate with high acidity:**
🔴 nutrients are poorly assimilated
🔴 mushroom growth is inhibited
🔴 increases the activity of competitive microorganisms. It leads to decomposition of organic matter and substrate contamination.
🔴 In addition, the substrate is gradually acidified by mushroom waste products, which makes it even more vulnerable for molds like green mold Trichoderma. For example, if we applied a casing layer with a pH 7.5, it gradually drops to a pH 5.0-6.5 after the 1st flush. **That's why green mold contamination often appear on the 2nd, 3rd or 4th flush of fruiting when mushroom cake is depleted and acidified.**
> Check out: [Green mold contamination aka Trichoderma](https://shroomok.com/en/wiki/Green_mold_contamination_aka_Trichoderma)
##### **Casing by species**
For most mushroom species it is optional step or not necessary at all. However, there are some mushroom species for which casing is a mandatory part of their life cycle. The table below shows some examples:
[](https://shroomok.com/en/wiki/File:Mushroom-species-casing-required-optional-not-required.jpg) Casing by mushroom species: optional, required or not required
As you can see, casing is optional for Psilocybe Cubensis and Panaeolus subbalteatus strains. You can skip it and continue growing using the PF-tek or Monotub tek without casing at all. For Psilocybe Cubensis casing is not required for getting mushrooms.
##### pH level for casing layer
The acidity level of the casing substrate for different fungi species range from 6.5 to 8.0.
The optimum pH for Psilocybe Cubensis growing is 7.0-7.5 - neutral or slightly alkaline soil (bulk substrate).
For casing substrate which we apply on top only (just 1-1,5 cm or no more than 1/2 inch) we adjust pH about 8.0-8.5 (up to 9.0)
[](https://shroomok.com/en/wiki/File:PH-scale.jpg) pH scale> ❗️ pH 9.0 and higher provoke mushroom metabolites. Check out: [Mycelium metabolites or mushroom pee](https://shroomok.com/en/wiki/Mycelium_metabolites_or_mushroom_pee "Mycelium metabolites or mushroom pee")
##### How to prepare casing substrate
**The base for Casing layer is** peat moss aka sphagnum, vermiculite and water. Additives include hydrated lime or limestone flour. Sphagnum pH vary from 3.5 to 4.5, that's why you need more or less lime
Here is the list of formulas for the casing substrate. They can be used for **Psilocybe Cubensis, Psilocybe Natalensis, Panaeolus** and other species for which casing is a required cultivation step.
The recipe below always works perfect!
###### The best casing substrate recipe for shrooms
- peat moss (aka sphagnum) - 2 cups ([Amazon](https://amzn.to/46VIpjj))
- vermiculite - 1 cup ([Amazon](https://amzn.to/44xqlKO))
- hydrated lime (aka calcium hydroxide) - 1 tablespoon ([Amazon](https://amzn.to/3pNDIrp))
- water - 1 cup
Prepare as much as you need, just follow the ratio. Peat based casing don't require sterilization and rarely require pasteurization. However I recommend pausterization for casing. Fill the canning jar with casing mix, close the lid. Put it in an instant pot, saucepan with lid or pressure cooker. Add water in a pot and bring it to a boil. For casing layer we don't need high pressure and you can use just pot with lid.
Pausterize the casing substrate for ~60 mins. Let it cool down to room temperature.
I also found casing formulas in the book ***'The Mushroom Cultivator: A Practical Guide to Growing Mushrooms at Home' by by Jeff S. Chilton and Paul Stamets.*** Although they use CaCO3 - limestone flour, limestone grit, chalk or marl as a buffering agents and recommend these formulas for *Agaricus culture* and most species require a casing. However limestone (aka garden lime) is less effective for pH adjusting than hydrated lime (aka slaked lime). Hydrated lime works faster.
###### Formula 1
- Coarse peat (sphagnum) - 4 parts
- Limestone flour - 1 part
- Limestone grit - 1/2 part
- Vermiculite - 1/2 to 1 part
- Water - about 2-2¼ parts
> Limestone saturates the substrate with oxygen, promotes mushroom metabolism and reproduction of beneficial microorganisms, reduces the growth of pathogenic microorganisms and thereby increases the yield of mushrooms and the duration of the fruiting period (the number of fruiting flushes).
###### Formula 2
- Coarse peat (sphagnum) - 2 parts
- Chalk or marl - 1 part
- Vermiculite - 1/2 to 1 part
- Water - about 1-1¼ parts
###### Casing recipe **with pH adjusted water**
Take 1 gallon of water (distilled, clean drinking or tap) and add 1/8 teaspoon of hydrated lime in water. Shake it and leave for 1 hour.
In 1 hour check the pH level of water with pH test strips for water or pH meter. If pH less than 8.5-9.0 add a pinch of hydrated lime, shake it well. Check the pH again after 1 hour. Leave it for 12-24 hours before using.
Mix 5 cups of dry sphagnum and 5 cups of vermiculite.
Add pH adjusted water 4 cups. Mix it.
Use the same field capacity test as for bulk substrate. Add more water if needed. If too much water add more sphagnum and/or vermiculite.
###### **Why vermiculite is bad casing layer**
Some growers and growkit producers use moist vermiculite only as a casing layer for mushroom cakes. I don't recommend such casing layer, because in 99% you have issues with moisture balance during the fruiting period. Works bad and doesn't guarantee mold protection!
[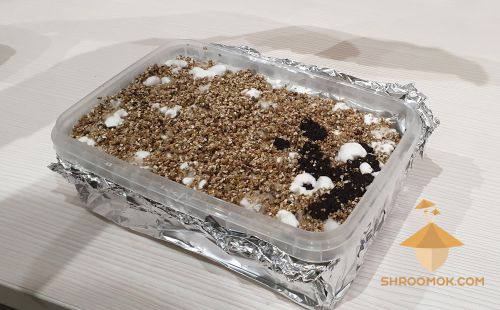](https://shroomok.com/en/wiki/File:Casing-2-days-GT-vermiculit.jpg) Psilocybe Cubensis cake. Golden Teacher strain. 2 days after casing (vermiculite casing layer with small coco-peat spot)[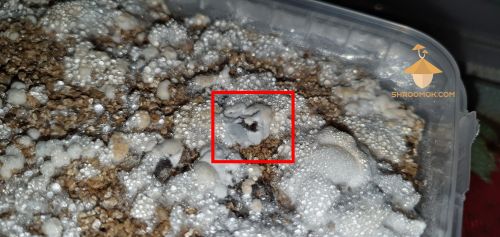](https://shroomok.com/en/wiki/File:Mold-on-vermiculite-casing-layer.jpg) Blue-green mold contamination, vermiculite top layer##### How to check soil pH level
1️⃣ Easy cheap way to check soil pH level (for casing and bulk) is pH Test Strip
[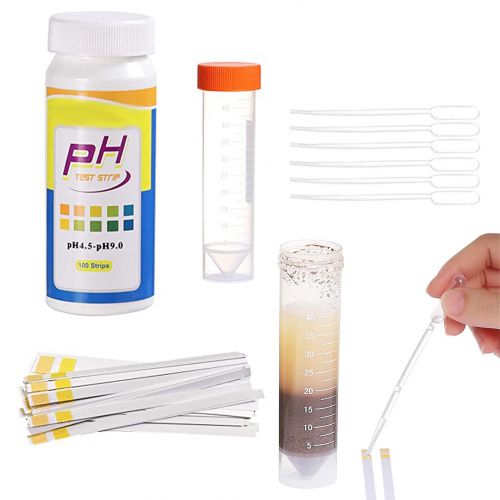](https://shroomok.com/en/wiki/File:How-to-check-soil-ph-for-mushroom-substrate-with-test-strips.jpg) How to check soil pH for mushroomsUse **distilled water** and mix water with soil in a 1:1 ratio. Use litmus paper to determine the pH level of the soil based on the color.
**Shroomok's Choice on Amazon:**
[Soil pH Test Strips Kit (3.5-9 Range) 100 Tests](https://www.amazon.com/gp/product/B07YZT5ZPJ/ref=as_li_tl?ie=UTF8&tag=shroomok-20&camp=1789&creative=9325&linkCode=as2&creativeASIN=B07YZT5ZPJ&linkId=64a76f9f1778c4e5b55cbd8839e5704c) - $12.98
**2️⃣ Another option is Digital Soil pH Meter**
[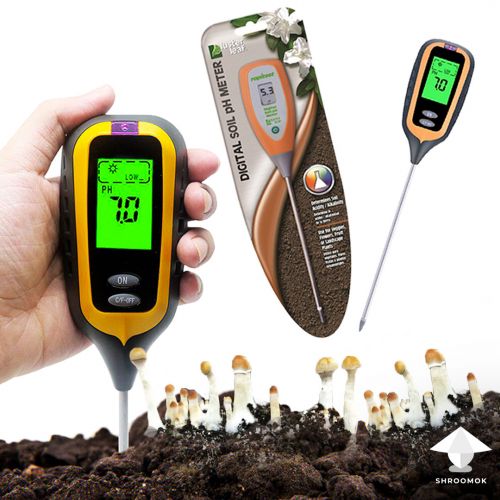](https://shroomok.com/en/wiki/File:Soil-pH-meter-for-mushroom-bulk-substrate-and-casing.jpg) Soil pH meter for mushroom bulk substrate and casingYou just insert the tip of the tester into the soil and in a few minutes you can see the result.
**Shroomok's Choice on Amazon:**
[Digital Soil Ph Meter](https://www.amazon.com/gp/product/B0786YZMC8/ref=as_li_tl?ie=UTF8&tag=shroomok-20&camp=1789&creative=9325&linkCode=as2&creativeASIN=B0786YZMC8&linkId=de7e67fef9c7f4fc0110caee82018318) - $17.95
#### What to do next
After successful Bulk Substrate colonization add casing layer. It should be about 1/3-1/2 inch (or ~1 cm).
Provide fruiting conditions right after casing.
If you don't use casing layer, then provide fruiting conditions when top layer (bulk substrate) is colonized for 80-100%.
**Now it's time to move on — [Step 10. Fruiting period. Pinhead initiation, mushroom pinning and mushrooms growth parameters](https://shroomok.com/en/wiki/Fruiting_period._Pinhead_initiation,_mushroom_pinning_and_mushrooms_growth_parameters "Fruiting period. Pinhead initiation, mushroom pinning and mushrooms growth parameters")**
Join Shroomok Community on [Discord](https://discord.gg/ngKhQDmymD) and [Reddit](https://www.reddit.com/r/Shroomok) for questions and sharing experience.
If you find this guide helpful, please support me with subscription or cup of coffee on ☕️ [buymeacoffee](https://www.buymeacoffee.com/shroomok)
Peace, Shroomok ❤️
## Ground coffee substrate experiment with APE mushrooms
[Ground coffee substrate experiment with APE mushrooms](https://shroomok.com/en/wiki/Ground_coffee_substrate_experiment_with_APE_mushrooms)
[](https://shroomok.com/en/wiki/File:Coffee-grounds-for-magic-mushroom-growing.jpg) Coffee substrate for mushroom growing### The story about growing Albino Penis Envy mushroom on coffee substrate
Hey Shroomok Community!
**@D!ngo** here — Magic Warrior of [Shroomok Discord](https://discord.gg/ngKhQDmymD)
I've been growing mushrooms for about a year now and have done some very interesting experiments along the way. The most recent my experiment was a coffee only inoculation, and I am very excited to share the results so far and the steps I took to make them happen.
#### How I came up with idea to make coffee substrate experiment
The reason I came up with the idea in the first place was because of the simple fact that I ran out of grain and while I was waiting for my order to arrive, I wanted to know if there was anything else in my house I could use for the time being.
I started researching normal household items that mushrooms love, and I came across [this reddit post/photo](https://www.reddit.com/r/shrooms/comments/bvspyw/experiment_inoculated_some_coffee_grounds_and/)
[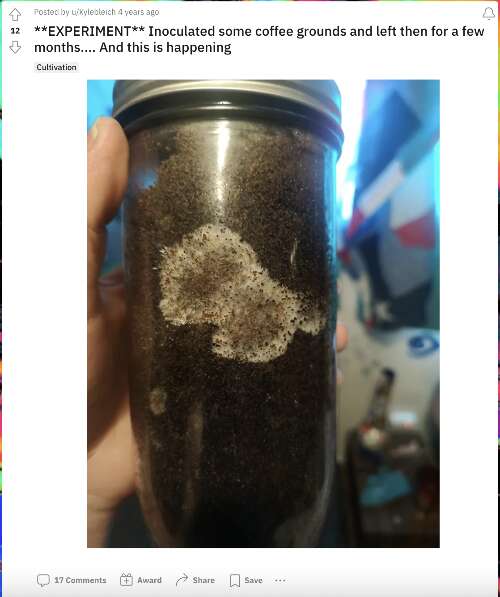](https://shroomok.com/en/wiki/File:Coffee-experiment-on-reddit.png) Coffee substrate experiment on r/shroomsAlso I've found one article on medium "Using Coffee Grounds to Grow Magic Mushrooms" about possibilities of using coffee grounds as a substrate for growing magic mushrooms.
My interest in this peaked and I began looking for more information on it, but all I could find was articles on mixing coffee grounds with worm casings, cardboard, popcorn kernels and straw. With this I was convinced that I may not need any filler because I remembered the time I've seen mold patches grow on coffee itself, and if mushrooms loved the properties of coffee, then what harm could be done?
#### List of stuff I used
🔸 The main ingredient I used for this experiment is 1 cup of coffee grounds (I used Folgers Colombian medium blend)
🔸 Coffee maker and clean drinking water (for pasteurization and acid lowering process)
[](https://shroomok.com/en/wiki/File:Coffee-maker.jpg) Coffee maker
🔸 Wide mouth mason jars and modified lids with air filter and injection port mentioned on Shroomok website in the section [DIY Spawn Jars and Bags](https://shroomok.com/en/wiki/How_to_make_jars_with_substrate_for_mushroom_spawn "How to make jars with substrate for mushroom spawn")
[](https://shroomok.com/en/wiki/File:Mason-jar-with-modified-lid-for-mushroom-substrate.jpg) Mason jars and modified lids with air filter and inoculation port🔸 Pressure cooker for coffee substrate sterilization
[](https://shroomok.com/en/wiki/File:Pressure-cooker-for-coffee-substrate-sterilization.jpg) Pressure cooker or instant pot for coffee substrate sterilization🔸 [Still Air Box (SAB)](https://shroomok.com/en/wiki/Still_Air_Box_for_Mycology "Still Air Box for Mycology") for more sterile inoculation process and colonized agar plate with [Albino Penis Envy](https://shroomok.com/en/wiki/Mutant_strain_Albino_Penis_Envy_aint_just_APE_but_King_Kong_of_Magic_Mushrooms "Mutant strain Albino Penis Envy aint just APE but King Kong of Magic Mushrooms") strain. You can use a liquid culture or spore syringe, but it takes longer to show signs of growth with how dark coffee is
[](https://shroomok.com/en/wiki/File:SAB-agar-coffee-substrate-inoculation.jpg) Still air box with agar plate and coffee substrate ready for inoculationReady! Let's go 🚀
#### How I prepared coffee substrate for mushroom growing step by step
**Step 1.** The first step I did was get all my materials together, then brewed some coffee for substrate and for coffee break ☕️
[](https://shroomok.com/en/wiki/File:Brew-coffee-making-coffee-substrate.jpg) Brew coffee in coffee maker to get spent coffee grounds for substrateThe reasons for brewing first is because coffee grounds are initially too acidic for mushrooms to grow on, and the brewing process cuts down on the acid as well as hydrates the grounds and pasteurizes them.
I used a big pot and filled the water up to make 12 cups ☕️
**Step 2.** Fill mason jars with spent coffee grounds and close with modified lids
[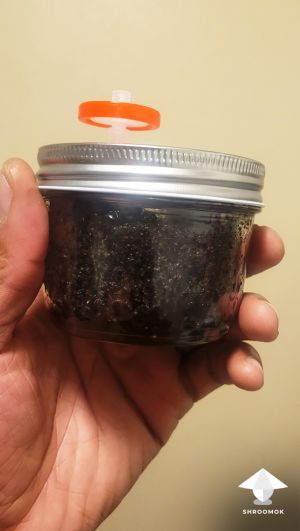](https://shroomok.com/en/wiki/File:Jar-with-coffee-substrate.jpg) Jar with coffee substrate ready for sterilization in PC**Step 3.** Cover the lid with foil, fill PC with water for further pressure cooking spent coffee grounds
[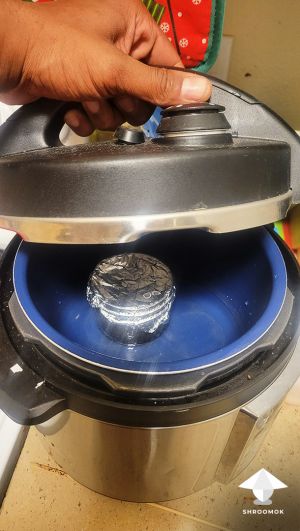](https://shroomok.com/en/wiki/File:Jar-with-coffee-substrate-in-pressure-cooker.jpg) Jar with coffee substrate in PCI prefer to do this part right after brewing to cut down on chances of contamination. I've seen you can just use the grounds directly after brewing because its already pasteurized, but since coffee is known to be more prone to contamination, I wouldn't take any chances and be sure to pressure cook for at least **45 minutes**. I made sure to loosely pack the jar
[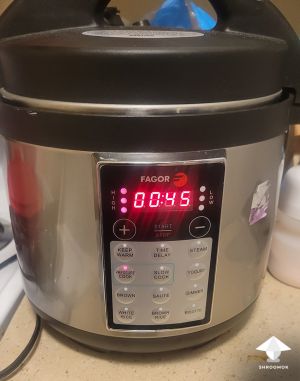](https://shroomok.com/en/wiki/File:Coffee-substrate-sterilization-in-PC.jpg) Coffee substrate sterilization in pressure cooker or instant pot**Step 4.** The fourth step I took was to let the jar cool and put it in the SAB along with agar plate and scalpel. Let the air sit for a few minutes after closing the lid
[](https://shroomok.com/en/wiki/File:SAB-agar-coffee-substrate-inoculation.jpg) Still air box with agar plate and coffee substrate ready for inoculation**Step 5.** When everything is ready, cut wedge from plate, drop into coffee grounds and close the lid. I normally give the jar a little shake to move the agar closer to the middle of the jar.
Check out the process in my video: [Coffee substrate inoculation with Mycelium on Agar in Still Air Box](https://www.youtube.com/watch?v=zEMeNEoyzX0)
#### Colonization period and progress on the way
I've noticed that at first it looked like the mycelium was dead or just not there at all because of how dark the coffee is. After about 4 days I noticed the mycelium came back and was really white and fluffy.
> As always, patience is key here!
Let's check the progress!
Here is 4 days after inoculation with agar
[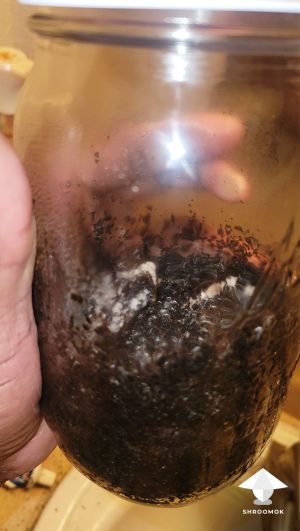](https://shroomok.com/en/wiki/File:APE-on-coffee-4-days.jpg) Signs of APE mycelium on coffee substrate, 4 days since inoculation
Another side, same jar, 4 days after inoculation
[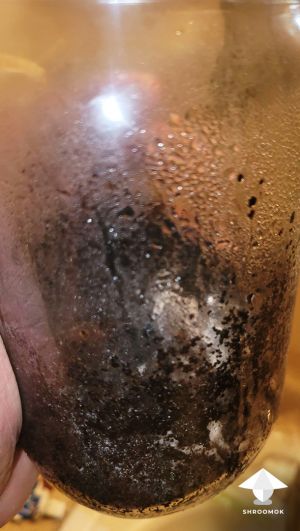](https://shroomok.com/en/wiki/File:APE-on-coffee-substrate-4-days-after-inoculation.jpg) APE mycelium, 4 days after inoculationDay 6 after inoculation
[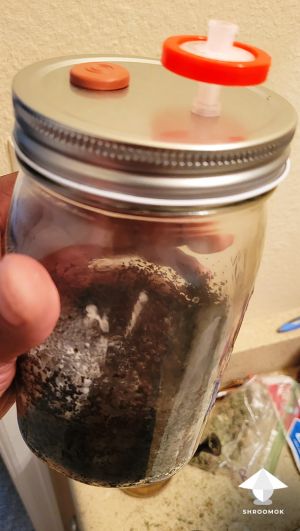](https://shroomok.com/en/wiki/File:Coffee-substrate-colonization-6-days.jpg) APE on coffee, 6 days after inoculationActive coffee substrate colonisation. Jar from the all sides and points of view
Day 19th after inoculation
[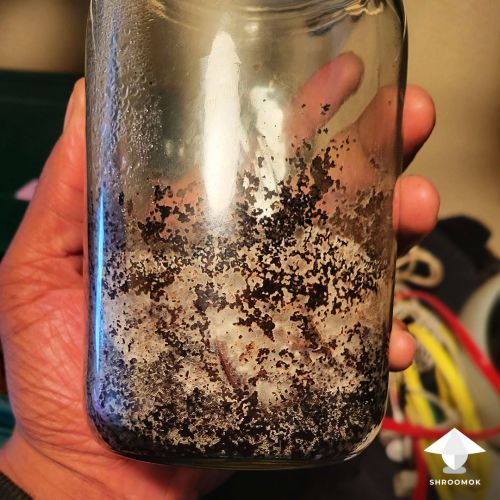](https://shroomok.com/en/wiki/File:Coffee-substrate-colonization-APE-mushroom-growing.jpg) Active coffee substrate colonization, 19 days after inoculationAlmost colonised at the bottom, 19 days after inoculation with agar
[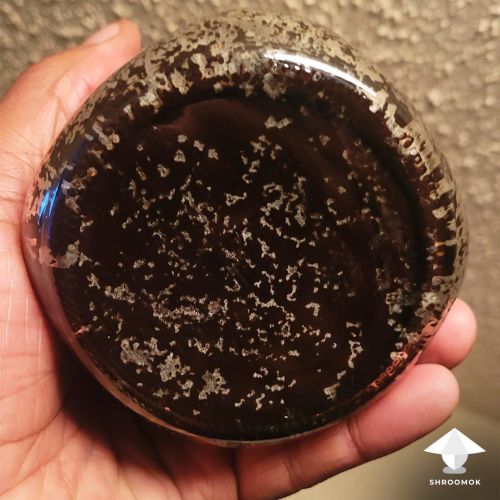](https://shroomok.com/en/wiki/File:Coffee-substrate-colonization-jar-bottom.jpg) Signs of APE mycelium at the bottomLet's check jar from the sides (19 days after inoculation)
[](https://shroomok.com/en/wiki/File:Coffee-colonization-APE-mycelium.jpg) Mycelium colonisation from the sidesAnd one more from another angle
[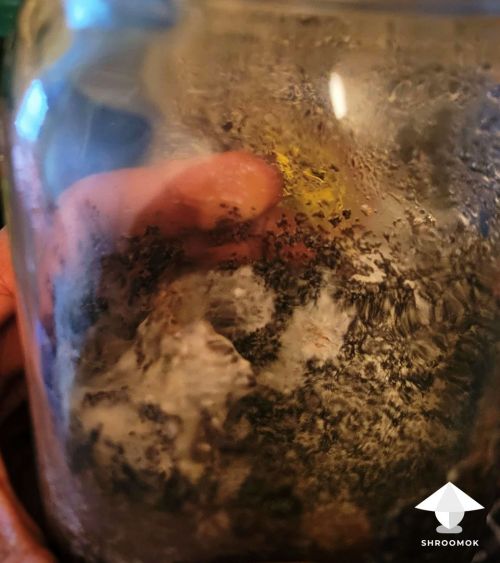](https://shroomok.com/en/wiki/File:Coffee-mushroom-spawn.jpg) Coffee spawnLet's wait for a few days more, to be sure that it is fully 100% colonised.
So far colonization step is totally successful, but experiment hasn't finished yet, because we need to get mushrooms.
I'm going to mix it with coco coir and vermiculite or CVG substrate, maybe I'll add casing to see what happens.
I'll keep you updated here. Stay tuned!
To be continued...
## Grow your first Shiitake mushrooms at home
[Grow your first Shiitake mushrooms at home](https://shroomok.com/en/wiki/Grow_your_first_Shiitake_mushrooms_at_home)
[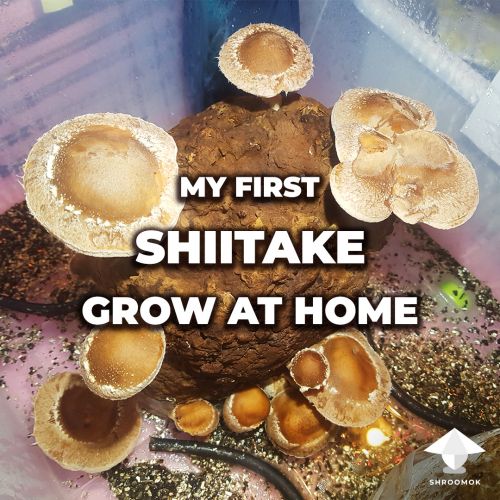](https://shroomok.com/en/wiki/File:Shiitake-growing-guide-shroomok.jpg) Shiitake mushroom growing guide### Shiitake mushroom growing guide for beginners
Hey Shroomok Community, **@mrzimm** here!
I'd like to share my first experience with shiitake cultivation. Just repeat my way, improve some steps and grow magnificent mushrooms at home
> **Shroomok' note:** @mrzimm is a Tech Guru, moderator of shroomok growers community and extremely humble mushroom growing veteran. You can find a a few tech guides by @mrzimm in the section: [DIY equipment & Teks](https://shroomok.com/articles:diy-mushroom-growing-equipment-and-cultivation-teks)
#### Why I decided to grow shiitake mushrooms
I'm into mushroom growing both: actives and gourmet. My cultivation journey started 4 years ago with [Psilocybe Cubensis Golden Teacher](https://shroomok.com/en/wiki/The_magic_of_Golden_Teacher_mushroom).
Then I played with different strains and different techniques. For example, here you can find my [magic truffles Psilocybe Tampanensis](https://shroomok.com/en/wiki/How_to_grow_magic_truffles_Psilocybe_Mexicana_and_Tampanensis "How to grow magic truffles Psilocybe Mexicana and Tampanensis") grow report
At some point, I wanted to go further and try something new:
> How about growing edible mushrooms?
I chose between 2 species, **oysters** *(Pleurotus ostreatus)* and **shiitake** *(Lentinula edodes) - the easiest mushrooms to cultivate (according to majority of growers)*. So I started with both. How I was surprised when first oysters attempt failed (I'll share this story somehow)
Fortunately, Shiitakes were kind enough :-)
I'm going to share my very first experience of Shiitake cultivation from scratch
[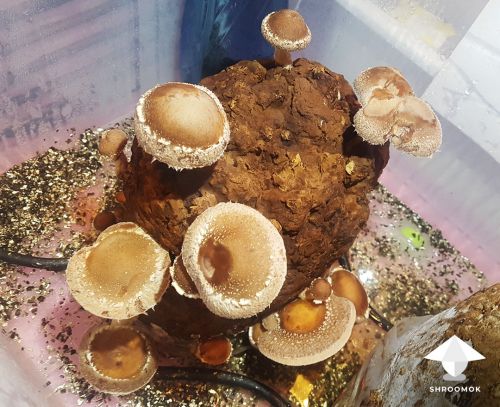](https://shroomok.com/en/wiki/File:Shiitake-mushroom-block-fruiting-period.jpg) First experience with shiitake mushroom cultivationAlso I'll show you my latest shiitake mushrooms that were grown in the basement
[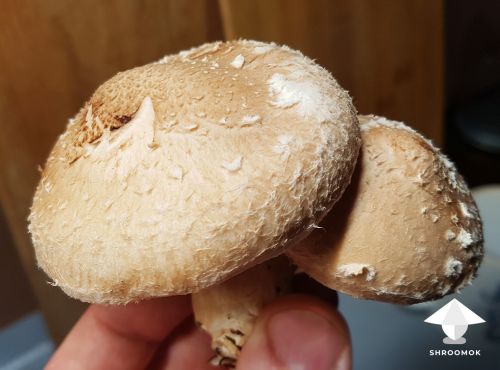](https://shroomok.com/en/wiki/File:Shiitake-yield-small-block.jpg) Shiitake mushrooms harvest from the basementLet's get started
>
#### Facts about shiitake mushrooms useful to know
🔸 The **shiitake** or **shitake,** scientific name is ***Lentinula edodes*** is one of the most popular gourmet mushroom native to East Asia (Japan, Korea, China). It is considered a **medicinal mushroom** in some forms of traditional medicine.
[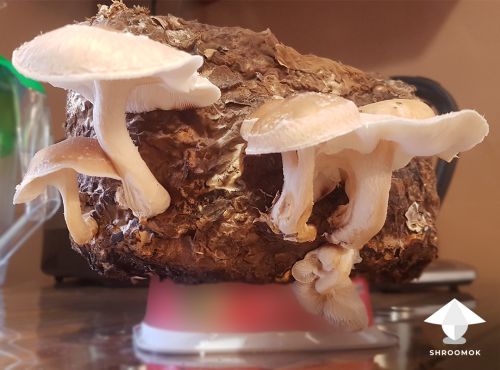](https://shroomok.com/en/wiki/File:Shiitake-grow-report.jpg) Shiitake mushroom block fruiting🔸 It is woodland mushroom that decompose hardwood in nature. That's why commonly called 'sawtooth oak mushroom', 'black forest mushroom', 'black mushroom', 'golden oak mushroom', or 'oakwood mushroom'.
🔸 **Scientific classification**
- Kingdom: Fungi
- Division: Basidiomycota
- Class: Agaricomycetes
- Order: Agaricales
- Family: Omphalotaceae
- Genus: Lentinula
- Species: L. edodes (in latin *'edodes'* means *'edible'*)
🔸 The **first written record of shiitake cultivation** can be traced to *Wu Sang Kwuang* who was born in China (A.D. 960–1127).
🔸 Many cultivation techniques and experiments were made with shiitake mushrooms. Some of them were brought to magic mushrooms cultivation, e.g. stress factors for mushroom fruiting like cold shocking for fruiting stimulation. Details: [All you need to know about cold shock](https://shroomok.com/en/wiki/All_you_need_to_know_about_cold_shock_for_magic_mushrooms)
🔸 Growing **shiitake on logs** was developed in Japan and China over a thousand years ago. However growing indoor (sawdust mushroom blocks tek is commonly used today) developed in the past century.
🔸 **Rich aroma** makes this mushroom unforgettable. When Shiitake are stir-fried, the rich aroma causes the olfactory senses to dance. You'll definitely remember this smell and taste! That's why one more name for shiitake in China Shiang Ku or 'Fragrant Mushroom.
🔸 Grain spawn (mycelium) has a smell similar to crushed fresh shiitake mushrooms.
🔸 For the first time shiitake mycelium is totally white. In age, or as a response to damage, turns totally **dark brown**. This is a distinctive feature of shiitake cultivation that easy to confuse with contamination
🔸 Overall shiitake growing cycle lasts about 8-12 weeks:
- grain colonization - 3-4 weeks
- bulk colonization - 3-4 weeks
- pinning - 1-2 weeks
- first flush of fruiting - 1 week
- 2nd and 3rd flushes after rehydration - 2-3 weeks
#### Step by step shiitake cultivation guide
##### Step 1. How to prepare grain substrate for shiitake spawn
I use whole oats (unhulled grain!) as a grain substrate for shiitake spawn
[](https://shroomok.com/en/wiki/File:Whole-oat-substrate-for-mushroom-growing.jpg) Whole oats for grain substrateRinse it well few times. Soak for 24 hours. Simmer for 10-15 mins. Drain and let it dry for 20-30 mins in a strainer. Ready!
> I don't dry grain on the towel!
You can also use **rye, barley, wheat berries, millet, sorghum** etc for shiitake and for a wide variety of other mushroom species.
> 🟠 Check out full guide: [How to prepare grain substrate](https://shroomok.com/en/wiki/Cooking_the_substrate_for_psilocybes "Cooking the substrate for psilocybes")
**Grain options on Amazon for DIY substrate:**
[Whole Oat Grain Seeds (With Husk Intact), 2/5/10 Lb](https://amzn.to/3Yq9UMO) $12.99
[Whole Grain Sorghum, 24 Ounce](https://amzn.to/3X4N24o) $10.89
[Hard Red Winter Wheat Berries, 3 lbs](https://amzn.to/3JC6MJO) - $13.95
[Organic Rye Berries, 5 lbs](https://amzn.to/3XVb8Qx) $21.95
[Unhulled Barley (Hull Intact), 12 Lbs](https://amzn.to/3RwcBKE) $31.99
If you want to skip first 3 preparation steps use sterile grain substrate. This way helps to save your time and money for purchasing all components and pressure cooker. It's really good approach for the first attempts in mushroom cultivation:
[Sterilized Rye Berry **Grain Substrate** in Bag, 1/6/12 bags](https://amzn.to/3Ygh9r9) $16.50
[Sterilized Rye Berry **Grain Substrate** in Jar](https://amzn.to/3x2Hqxm) $17.99
[Sterilized Millet **Grain Substrate** in Bag, 3 lb](https://amzn.to/3X7qikp) $24.99
##### Step 2. Jars and lids for grain substrate
Fill your jars (glass jars or 5PP jars) with ready grain substrate, no more than 2/3 or 3/4 of the volume.
[](https://shroomok.com/en/wiki/File:Jars-with-grain-substrate.jpg) Fill the jars with substrate, 2/3 or 3/4 of the volume
Close the jars with modified lids. Modified lids have inoculation port and air filter for gar exchange.
[](https://shroomok.com/en/wiki/File:Mason-jar-lid-with-filter-and-injection-port.jpg) One of the examples of modified lid with injection port and air filters
Autoclavable polypropylene (5PP) grow bags with air filter and inoculation port for grain substrate great to use as well!
[](https://shroomok.com/en/wiki/File:Spawn-bag-example.jpg) Spawn bag for grain substrate, with injection port and air filter> 🟠 Different options in full guide: [DIY Jars and Bags for mushroom spawn](https://shroomok.com/en/wiki/How_to_make_jars_with_substrate_for_mushroom_spawn "How to make jars with substrate for mushroom spawn")
**Stuff to buy on Amazon:**
[Wide Mouth Mason Jars With Lids, **16 oz**, 12 Jars](https://amzn.to/3K09mcT) $24.98
[Ball Mason Wide Mouth Jars with Lids and Bands, **32 oz,** 12 Jars](https://amzn.to/40EmxG3) $28.00
[2-in-1: Synthetic Air Filters 64 pcs + Injection Ports 100 pcs](https://amzn.to/3x2OdXK) $13.99
[High Temperature RTV Silicone](https://amzn.to/3E06xof) $6.88 - to seal/make injection port
[Mushroom Grow Bags with Injection Port and Air Filter for Grain substrate, 10 pcs.](https://amzn.to/3JP7Z0q) $28.74
> 💡 All these components are reusable!
##### Step 3. Grain substrate sterilization for shiitake growing
Cover the lid with foil before sterilization in pressure cooker or autoclave. Fill the PC with water (1/2 of jars level). Sterilize jars in pressure cooker/ autoclave/ instant pot for 90-120 mins at 15 psi (120°C or 250°F)
[](https://shroomok.com/en/wiki/File:Grain-sterilization-for-mushroom-growing.jpg) Jars with grain substrate are ready for sterilization in pressure cooker> 💡Usually I make sterilization twice with 24-48 hours break. It's not a rule, just my recommendation, especially if you are not sure about exact pressure in your PC or if you use instant pot
> 🟠 Full guide, sterilization time & temperature, how to sterilize w/o PC: [Substrate sterilization](https://shroomok.com/en/wiki/Substrate_sterilization_before_adding_psilocybe_spores "Substrate sterilization before adding psilocybe spores")
**Stuff to buy on Amazon:**
[T-fal Pressure Cooker, 3 PSI Settings, 22 Qt](https://amzn.to/3HCSTbH) $93.95
[Presto Pressure Cooker, 23 Qt](https://amzn.to/48Q0LCK) $124.99
[Instant Pot 9-in-1 with Pressure Cooker mode, 8 Qt](https://amzn.to/3X9iRcE) 149.99
[All-American Pressure Cooker 21/25/30/40 Qt](https://amzn.to/3HfB96z) $449.95
##### Step 4. Inoculation
Usually I inoculate grain substrate with LC (liquid culture) in syringe through inoculation port in jar (1-2 ml per jar).
[](https://shroomok.com/en/wiki/File:Grain-substrate-inoculation.jpg) Grain substrate inoculation with Liquid CultureThis time I used **Grain to Grain transfer as an inoculation method,** because I bought a small sample of ready grain spawn. I could skip all previous steps, however I needed to multiply my mycelium at least in 3-5 times for making good blocks and to save shiitake mycelium for my long term hobby.
> 🟠 Recommended guide: [Grain to Grain transfer](https://shroomok.com/en/wiki/Grain_to_Grain_Transfer_(G2G) "Grain to Grain Transfer (G2G)")
I just break and shake ready spawn and share it among my new jars with sterile oats substrate. To do this I have to open each jar. That's why sterility is highly recommended here! Use gloves, wipe all tools, jars, table with iso alcohol. [SAB (still air box)](https://shroomok.com/en/wiki/Still_Air_Box_for_Mycology "Still Air Box for Mycology") or [Laminar Flow Hood](https://shroomok.com/en/wiki/How_I_built_my_first_laminar_flow_hood_for_home_mycology "How I built my first laminar flow hood for home mycology") for inoculation is optional, but would be great to use
> 🟠 Recommended guide: [How I built my first Laminar Flow Hood for home mycology for $99.86](https://shroomok.com/en/wiki/How_I_built_my_first_laminar_flow_hood_for_home_mycology)
> 🟠 Recommended guide: [DIY Still Air Box](https://shroomok.com/en/wiki/Still_Air_Box_for_Mycology "Still Air Box for Mycology")
Shake each jar to spread spawn in the grain substrate.
Here you can see mycelium in jars right after G2G transfer and shaking jars
[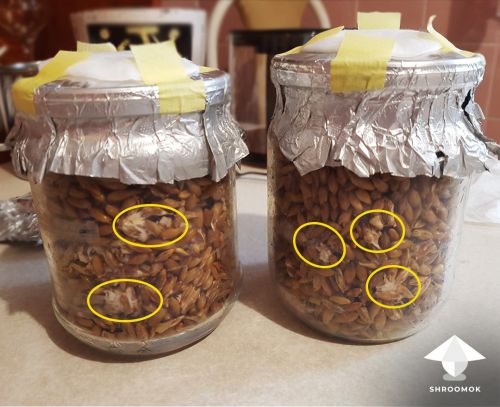](https://shroomok.com/en/wiki/File:Grain-to-grain-inoculation-shiitake-growing.jpg) Jars after Grain to Grain transferAs a result small sample of grain spawn was shared among 4 jars with sterile oats.
> 💡 You can also put some samples of spawn on agar, so that multiply mycelium on agar. Play with different options!
**Stuff to buy on Amazon:**
[Isopropyl Alcohol 70% Wipes](https://amzn.to/3ll3sbZ) $9.69
[Isopropyl Alcohol 70% in spray bottle](https://amzn.to/3YwUaYK) $22.99
##### Step 5. Grain colonization period
After inoculation (Grain to Grain transfer in my case) I placed jars in incubation chamber.
Dry dark place with constant temperature 78-82°F or +26..28°C
> 🟠 Check out my setup: [Automated incubation chamber for mushrooms with temperature control](https://shroomok.com/en/wiki/How_to_build_automatic_incubation_chamber_for_mushrooms)
Wait at least 3-4 weeks for full colonization, usually up to 30 days.
Here is a spawn jar after 26-28 days after inoculation
[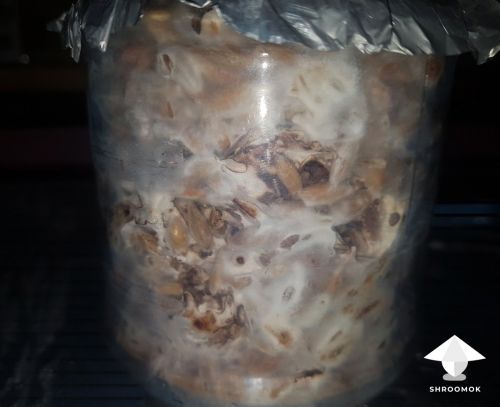](https://shroomok.com/en/wiki/File:Grain-colonization-shiitake-cultivation.jpg) Shiitake mycelium run in grain substrate, 26-28 days after inoculation> ❗️ Beige, yellowish or brown mycelium is totally normal for shiitake. Don't get it confused with contamination!
Such jar is fully colonized and ready for the next step
[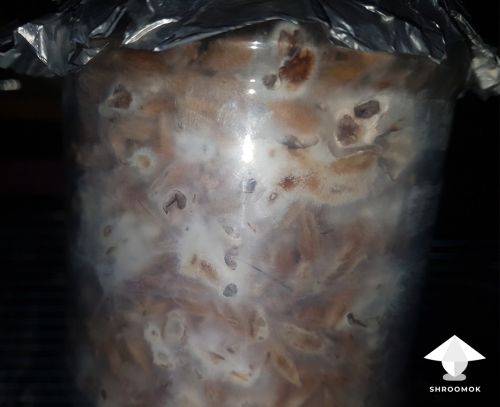](https://shroomok.com/en/wiki/File:Grain-colonization-shiitake-growing-guide.jpg) Shiitake grain substrate colonization, 26-28 days after Grain to Grain transfer##### Step 6. Sawdust substrate recipe for shiitake fruiting
Now we need to prepare fruiting (aka bulk) substrate and then mix it with grain spawn (aka spawn to bulk process)
[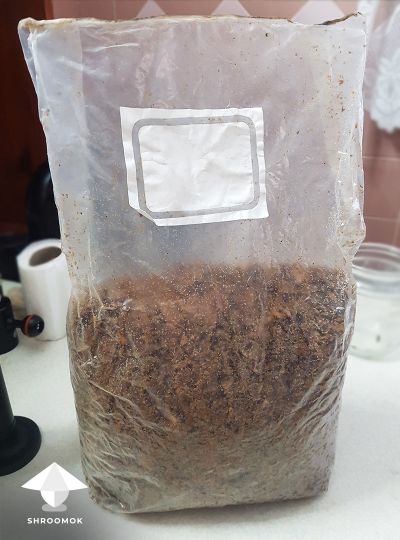](https://shroomok.com/en/wiki/File:How-to-make-shiitake-mushroom-block.jpg) Shake grow bag after spawn to bulkAs you know, shiitake mushroom is a wood lover species, that's why the base for fruiting substrate is harwood sawdust.
> Hardwood sawdust, especially oak, alder, cottonwood, poplar, ash, elm, sweetgum, beech, birch, and similar woods are the best. Fresh sawdust is obviously better than aged. Sawdust with dark zones (often a sign of mold contamination) should be avoided. Don't use furniture sawdust, pine trees, eucalyptus and similar sawdust!
My recipe for shiitake bulk substrate is following. Mix all dry ingredients together:
🔸 Hardwood Sawdust - 4 parts (20 cups)
🔸 Hardwood chips or shavings - 2 parts (10 cups) or just use sawdust instead
🔸 Sawdust pellets - 2 parts (10 cups) or just use sawdust instead
**Optional ingredients:**
🔸 Sunflower hulls or cottonseed hulls - 1 part (5 cups). I also added buckwheat husks and sunflower hulls 50/50.
🔸 Bran (rye, wheat, corn, oat, and soybean) is commonly used as a nitrogen-rich supplement - 20% of the total dry mass = about 1 part (4-5 cups).
🔸 Gypsum (calcium sulfate) is beneficial for any bulk substrate - 1/8-1/4 cup
**Water balance or field capacity:**
Water is added to dry mix until 65–75% moisture is achieved, a few percentage points below saturation. Here we use the popular moisture test.
Grab a handful of the substrate mixture and squeeze it in your hand.
⛔️ If you are unable to squeeze out any water, it is too dry (add more water).
⛔️ If a light squeeze causes a stream of water to come out, it’s too wet (add more sawdust).
✅ You want to be able to squeeze the mixture as hard as you can, and only have a few steady drops come out to have a field capacity moisture level. This is perfect!
Fill grow bags with ready substrate from 3 to 6 lbs or 1,5-2,5 kg.
Use autoclavable polypropylene grow bags (medium or large size). You don't need injection port here right now.
Seal your bags and they are ready for sterilization in pressure cooker, instant pot or autoclave for **2 hours at 15 psi (120°C or 250°F)**
[](https://shroomok.com/en/wiki/File:Grow-bag-sterilization.jpg) Sterilization in pressure cooker> Pasteurization at 190–194°F (88–90°C) for at least 14-16 hours at atmospheric pressure (1 psi) also reduce mold contaminations in the substrate. I prefer sterilization
Sterile grow bags are ready for the next step!
[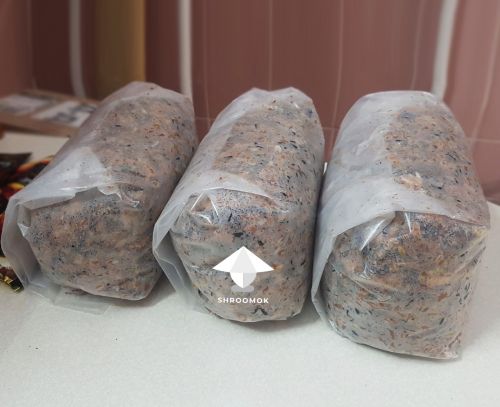](https://shroomok.com/en/wiki/File:Shiitake-fruiting-substrate.jpg) Fruiting substrate in grow bags for shiitake**Ingredients for DIY sawdust substrate on Amazon:**
[Premium Mixed Hardwood **SAWDUST**, 1 lb](https://amzn.to/3DN4HqR) $14.79
[Mixed Hardwood **SAWDUST**, 6 lb](https://amzn.to/3HZAyXD) $34.89
[**Hardwood oak chips**, Sawdust Shavings](https://amzn.to/3Xfv0fY) $28.88
[Hardwood **Pellets**, 20 lb](https://amzn.to/3Y9zbLP) $8.99
[Hardwood Blend **Pellets**, 20 lb](https://amzn.to/3HD884w) $12.99
[Oak Blend Hardwood **Pellets**, 40 lb](https://amzn.to/3XemHRA) $29.99
[**Gypsum** Calcium Sulfate, 2 lb](https://amzn.to/3JN5vQg) $15.99
[**Gypsum** Calcium Sulfate, 5 lb](https://amzn.to/3Yc1jOd) $21.38
[Oat **Bran**, 2 lb](https://amzn.to/3YscWAd) $12.90
[Wheat **Bran**, 2 lb](https://amzn.to/40rQVn0) $12.99
[Mushroom **Growing Bags**, 10 Pack](https://amzn.to/3HJyfqa) $9.99
[Mushroom **Growing Bags**, 10/25/100 Pack](https://amzn.to/3HG8NC3) $12.99
[Automatic Electric **Sealing Machine** for Mushroom Bags, 12 Inch](https://amzn.to/3JRf28R) $26.81
[Sterilized Hardwood **Sawdust** (Oak) Substrate with Bran in Grow Bag](https://amzn.to/3lg1sSg) $25.95 - if you want to skip this step use ready-made sterile substrate
##### Step 7. Make shiitake mushroom block
Now you have **grain spawn in jar** and **sterile sawdust substrate in grow bag**.
[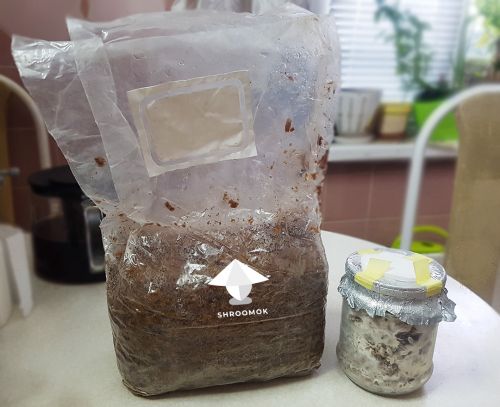](https://shroomok.com/en/wiki/File:Spawn-to-bulk-shiitake.jpg) Spawn to bulk substrate for shiitake growing> ❗️Be sure your grow bags cool down to 86F or 30C before spawn to bulk. 100F or 38C can destroy mycelium
Wear gloves, wipe all tools, table, jars, bags, hands with iso alcohol.
Open the bag. Open the spawn jar. Add spawn to sawdust substrate in bag. My ration of spawn to bulk was 1:10.
Seal the bag!
Here is a bag with sawdust substrate and oats spawn on top. The bag was sealed right after the transfer. I used sealer machine for this purpose (find it in the list to buy below)
[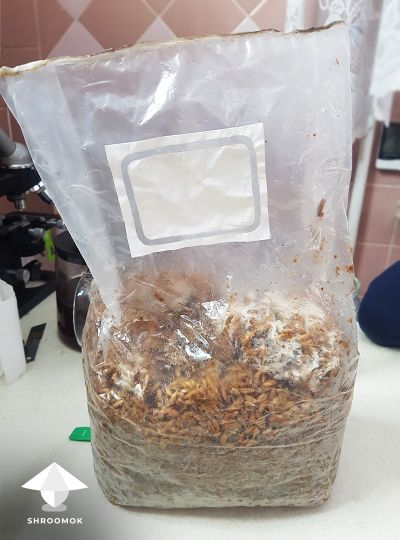](https://shroomok.com/en/wiki/File:Shiitake-growing-guide-spawn-to-fruiting-substrate.jpg) Add shiitake spawn from the jar to fruiting substrate in the bagShake the bag to spread mycelium throughout the substrate to have even mycelium colonization
[](https://shroomok.com/en/wiki/File:How-to-make-shiitake-mushroom-block.jpg) Shake grow bag after spawn to bulkReady! Wait for full colonization!
**Useful stuff to this section on Amazon:**
[Mushroom **Grow Bag**, Large Size, 10/20/50 Pack](https://amzn.to/3XfEkAp) $9.99
[Mushroom **Growing Bags**, 10/25/100 Pack](https://amzn.to/3HG8NC3) $12.99
[Automatic Electric **Sealing Machine** for Mushroom Bags, 12 Inch](https://amzn.to/3JRf28R) $26.81 - exactly what I use
[Automatic Food Sealer with Multi-function](https://amzn.to/40Hlzc4) $32.19 - Moist Mode here great for sealing wet bags
[Impulse Aluminum Heat **Sealing Machine,** 12 inch](https://amzn.to/3JS3uSW) $78.04 - good quality for long-term hobby
[Digital **Laser Thermometer**, Adjustable Emissivity, Temp Alarm](https://amzn.to/3XhySgB) $19.58 - to check the temp of the bag
[Infrared Digital Laser **Temperature Gun**](https://amzn.to/3YtVUSg) $25.99 - to check the temp of the bag
##### Step 8. Shiitake block colonization period
For bulk colonization I moved mushroom blocks in incubation chamber again.
Dry dark place with constant temperature 77°F or +25°C. Room temperature 68-75°F or 20-24°С is also good for colonization period.
It takes about **3-4 weeks** for full colonization
[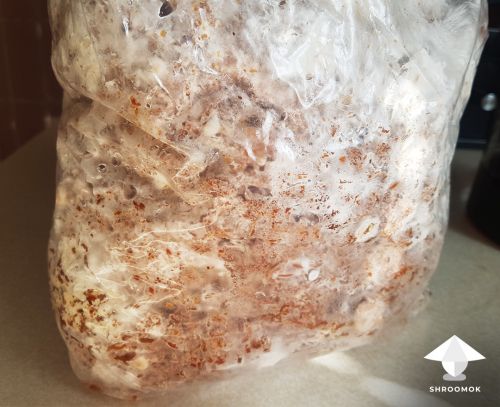](https://shroomok.com/en/wiki/File:Shiitake-mushroom-block-mycelium-run.jpg) Shiitake mycelium run, 3 weeks after spawn to bulk[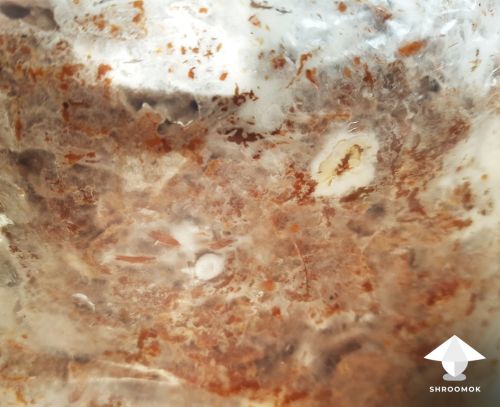](https://shroomok.com/en/wiki/File:Shiitake-sawdust-substrate-colonization.jpg) Shiitake fruiting substrate colonisation, 3 weeks after spawn to bulk
While mycelium run older mycelium turn dark brown color. Don't worry, this is normal for shiitake
[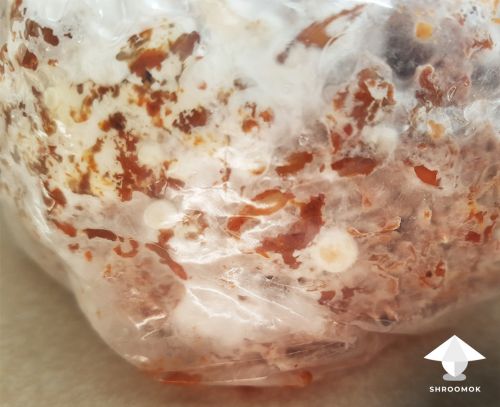](https://shroomok.com/en/wiki/File:Shiitake-mycelium-growing.jpg) Shiitake mycelium run, 4 weeks after spawn to bulkMushroom block fully colonized!
[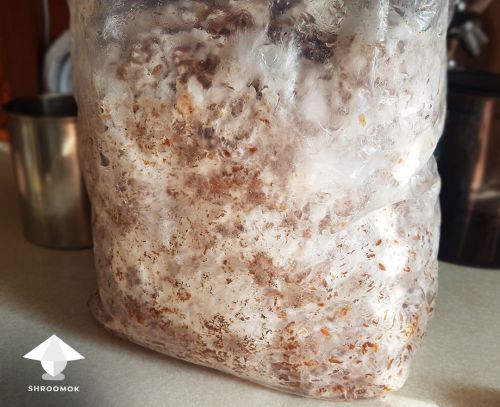](https://shroomok.com/en/wiki/File:Shiitake-block-colonization.jpg) Shiitake mycelium bulk colonization in grow bag, 4 weeks after spawn to bulk[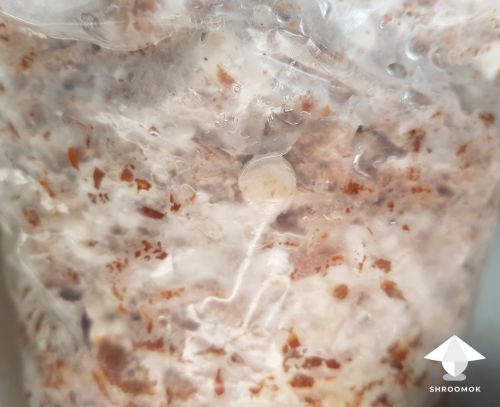](https://shroomok.com/en/wiki/File:Shiitake-bulk-substrate-colonization.jpg) Fruiting substrate colonization, 4 weeks after spawn to bulkRemove block from the bag. Just cut the bag around the block with scissors. Leave the piece of bag at the bottom
[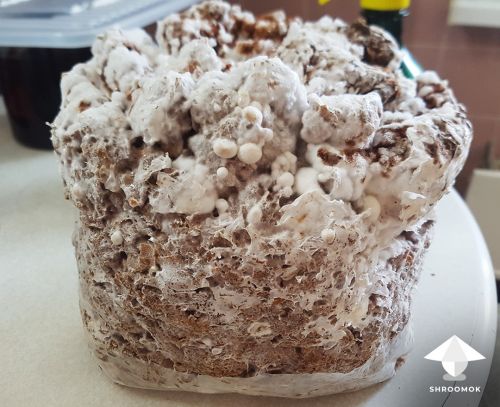](https://shroomok.com/en/wiki/File:Shiitake-block-1.jpg) Shiitake mushroom block ready for fruiting conditions, 4 weeks after spawn to bulk
Mushroom block ready for fruiting conditions in fruiting chamber (GrowBox or Growing Tent)
[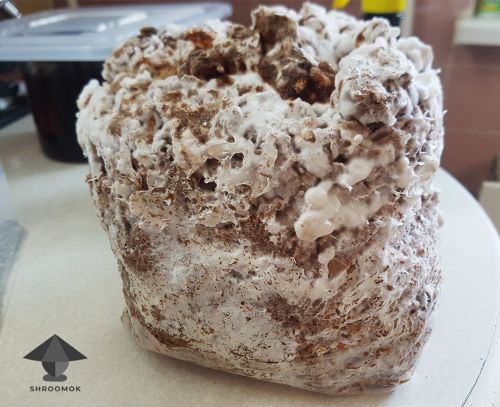](https://shroomok.com/en/wiki/File:Shiitake-mushroom-cake-ready-for-fruiting-conditions.jpg) Shiitake block ready for fruiting conditions, 4 weeks after spawn to bulk> ❗️If you notice pins or small shrooms that were formed in bag during colonization period, they usually stop further development. If so it's [mushroom aborts](https://shroomok.com/en/wiki/Mushroom_aborts)
##### Step 9. Shiitake fruiting conditions and fruiting period
Move mushroom block in fruiting chamber. I used the same GrowBox as for my magic mushrooms growing.
> 🟠 Check out full guide: [DIY Grow Box for mushroom growing](https://shroomok.com/en/wiki/DIY_Grow_Box_for_Magic_mushrooms._Fruiting_conditions "DIY Grow Box for Magic mushrooms. Fruiting conditions")
If you have MonoTub, also works!
> 🟠 Check out full guide: [DIY MonoTub for mushroom growing](https://shroomok.com/en/wiki/Forget_Monotub_Kit._DIY._How_to_make_Monotub_for_Mushrooms_by_your_own "Forget Monotub Kit. DIY. How to make Monotub for Mushrooms by your own")
It takes about **2 weeks for pinning** after providing fruiting conditions + **1 week** for mushrooms growth (first flush of fruiting).
At this point your mushroom blocks stop mycelium development and seems like no changes at all for the next 7-14 days. Be patient, just wait!
[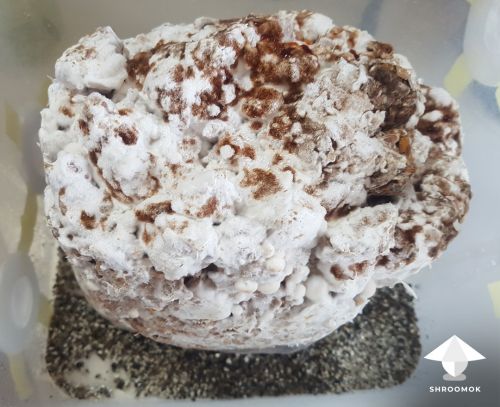](https://shroomok.com/en/wiki/File:Shiitake-block-fruiting-conditins.jpg) Shiitake mushroom block in fruiting chamber (growbox), first day of fruiting period
**My fruiting conditions are following:**
🌡 temperature - 68-72°F or +20..22°C (lower temperature is also good, but not higher!)
💧 relative humidity - 90-99%. Use fogger or spray bottle for manual misting
💨 fresh air exchange (FAE) - CO2 should be <1000 ppm. I have air vents in growbox and from time to time use simple air pump for additional FAE
💡 light - 12 hours on/off cycle. I use the same lamps as for other mushrooms Mushroom block turns from white to dark brown with time (one week after):
[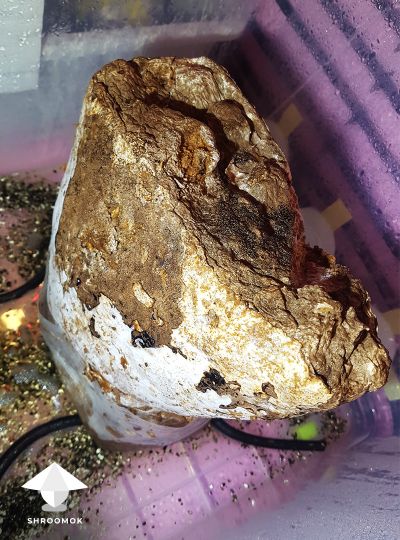](https://shroomok.com/en/wiki/File:Shiitake-block-in-fruting-chamber.jpg) Shiitake block transformations in fruiting chamber, 1 week of fruiting period
Let it become totally dark brown. It takes up to 2 weeks. After that pinning started. You can see small white pins on this block:
[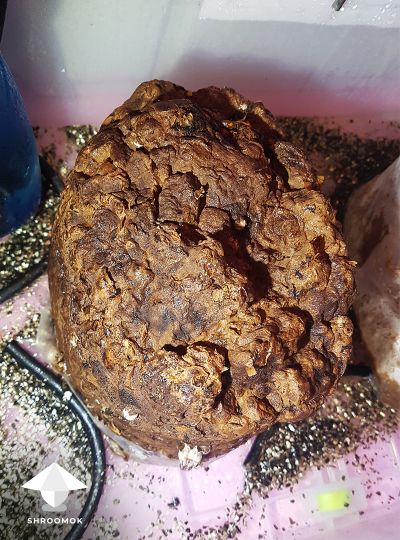](https://shroomok.com/en/wiki/File:Shiitake-block-ready-for-fruiting.jpg) Shiitake block, start of pinning, 2 weeks of fruting period
Brown shiitake block (another one) and snow-white cubensis block in one GrowBox. Here you can see the jar with water in the corner, the hose of air pump placed in this jar, so that fresh air filtered through the water. Humidity/temperature sensor (on the wall of the tub). Air vents at the bottom covered with synthetic filters outside.
[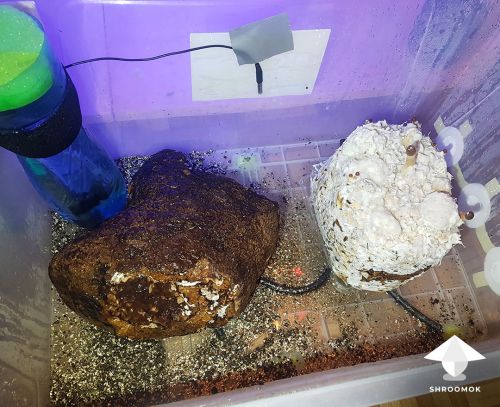](https://shroomok.com/en/wiki/File:Shiitake-block-in-fruiting-chamber.jpg) Shiitake mushroom block in growbox
Let's check shiitake fruiting in dynamic day by day. Start of primordia development, 42 days after providing fruiting conditions:
[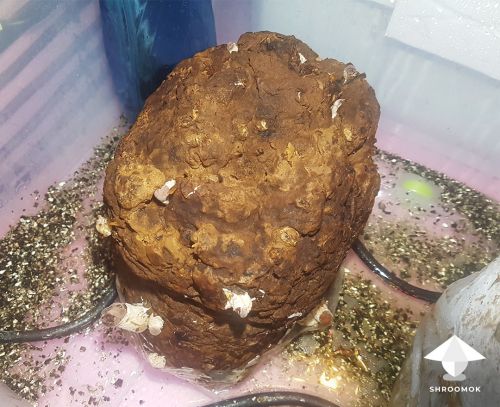](https://shroomok.com/en/wiki/File:Shiitake-start-of-pinning-and-fruiting.jpg) Start of pinning and fruiting shiitake, 15 days of FC
Mushroom fruit bodies development
[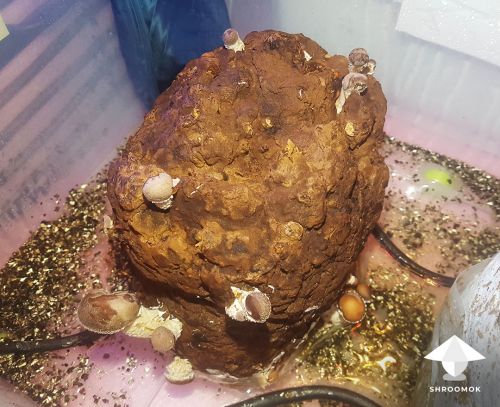](https://shroomok.com/en/wiki/File:Shiitake-block-active-fruiting.jpg) Shiitake active phase of fruiting period, 16 days of FCActive mushroom growth
[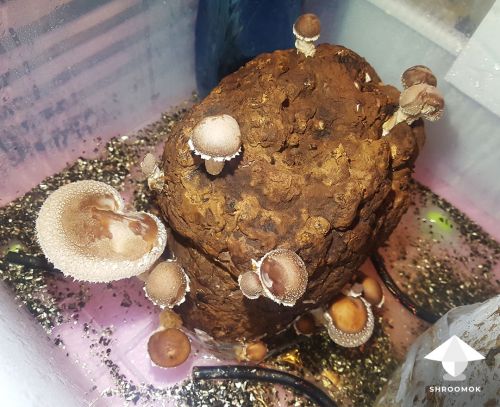](https://shroomok.com/en/wiki/File:Shiitake-mushrooms-fruiting.jpg) Shiitake fruiting, 17 days of FCHooray! My first shiitake mushrooms
[](https://shroomok.com/en/wiki/File:Shiitake-mushroom-block-fruiting-period.jpg) Shiitake fruiting period, 18 days of FC
Time for harvesting this beauty
[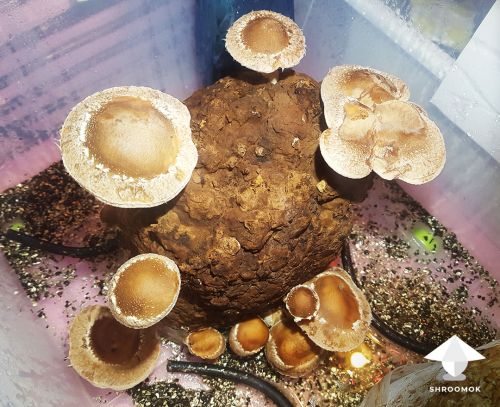](https://shroomok.com/en/wiki/File:Shiitake-fruiting-harvesting.jpg) Shiitake first flush of fruiting ready for harvesting, 19 days of FC**Stuff to buy on Amazon:**
[HOMZ Heavy Duty Containers, 66 Qt, 2 Pack](https://amzn.to/3jzAMLW) $64.99 - 2 plastic boxes for fruiting chamber
[Large Storage Bin, 132 Qt, 1 Pack](https://amzn.to/3HC5R9C) $69.99 - 1 large box for fruiting chamber (growbox, monotub)
[Adjustable Quiet Oxygen Air Pump](https://amzn.to/3jEptC7) $14.99 - for additional FAE in GrowBox or MonoTub
[Govee Digital Hygrometer and Thermometer, Remote App](https://amzn.to/3JNy7c9) $11.04 - to track temp and humidity in fruiting chamber
[Cold White LED light bar, Under Cabinet with Memory Function](https://amzn.to/3lmuOhE) $16.99 - light option for any fruiting chamber
[LED White Light Strip, 6500K, 16.4ft](https://amzn.to/3RQkBX5) $15.99 - light option for growbox, monotub, small growtent
[LED Rope Lights Waterproof, 6500K, 150ft](https://amzn.to/3HJJwHd) $83.99 - enough for few boxes or GrowTent
[Mist spray bottle, 10 oz., White/Black/Clear](https://amzn.to/3x6PvAU) $8.99 - for manual misting
[Humidifier Fog Machine Mister - 3L](https://amzn.to/3DQHXpG) $49.77 - to maintain high relative humidity
[Fogger with Humidity Controller 4L](https://amzn.to/40wMZkW) $57.99 - humidifier with humidity controller
[Humidity Sensor with LCD Display for Greenhouse Mushroom Grow](https://amzn.to/40HyH0U) $25.99 - humidity sensor if you use humidifier for automated misting
[Inkbird Humidity Controller IHC200 Humidistat Mushroom Greenhouse](https://amzn.to/3Xg5V4z) $42.99 - humidity sensor if you use humidifier for growbox or growtent
##### Step 10. Shiitake fruiting and harvesting
I had 2 mushroom blocks.
Each block was about 5 lbs (~2 kg) and produce 3 handsome flushes.
[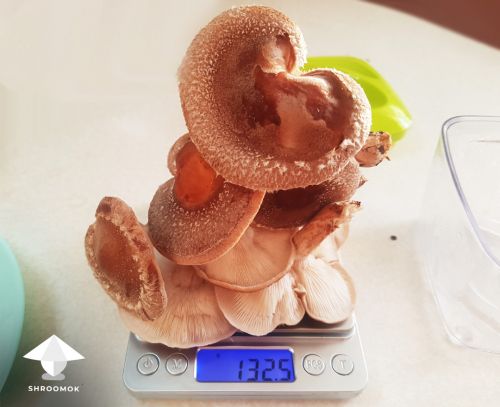](https://shroomok.com/en/wiki/File:Shiitake-harvest-yield.jpg) Shiitake final harvest, first flush of fruitingSecond flush after rehydration was the most productive.
Overall yield from each block (3 flushes) was about 300-400g of fresh shiitake mushrooms.
**Stuff to buy on Amazon:**
[Amazon Stainless Steel Digital Kitchen Scale with LCD Display and Batteries](https://amzn.to/3jHNHeI) $11.35
[Digital Kitchen Scale Multifunction with Large Panel, 22 lb 10 kg](https://amzn.to/3jKGo5V) $16.99
##### Step 11. Rehydration for shiitake mushroom block
To initiate new flush of fruiting (cycling mushroom block) you need to make rehydration (soaking mushroom block in water).
Rehydration also helps to initiate the very first flush. If you don't have pins in 2 weeks from starting fruiting conditions, then rehydration highly recommended to shock mycelium and promote pinhead initiation.
> [Rehydration](https://shroomok.com/en/wiki/Rehydration_of_psilocybe_cakes "Rehydration of psilocybe cakes") — aka Flushing or cycling of the mushroom cake/block that includes submersion the entire block substrate in cold water and allowing waste products to flush out and the bulk substrate to rehydrate with water in preparation of the next cycle. This creates a shock to the block that stimulates new mycelial growth to flush again. Often aborts and secondary metabolites will appear after a block cycle rehydration.
I rehydrate mushroom block after **each flush of fruiting and harvesting**.Just soak mushroom cake in cold clean drinking water for 8-12 hours and bring back to growbox again.
> ❗️ Be sure mushroom block completely submerged in water
Wait for the new flush in 1-2 weeks.
Usually first and second flushes are the most powerful.
Here is my 3 flush after rehydration, just one mushroom on the block
[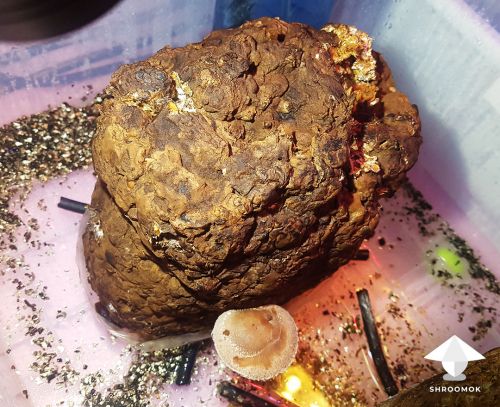](https://shroomok.com/en/wiki/File:Shiitake-fruiting-after-soaking-second-flush.jpg) Shiitake fruiting after rehydration, third flush, block 1[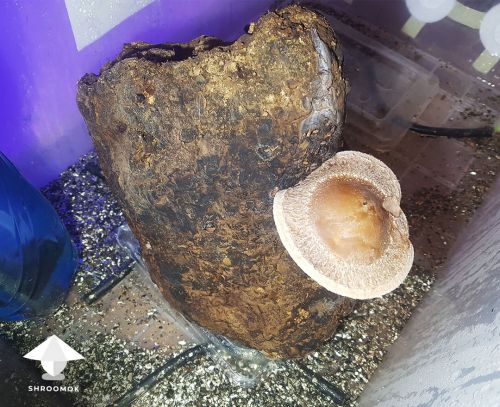](https://shroomok.com/en/wiki/File:Shiitake-fruiting-block-2.jpg) Shiitake fruiting, 3 flush, block 1
Another block after rehydration is more productive on the 3rd flush
[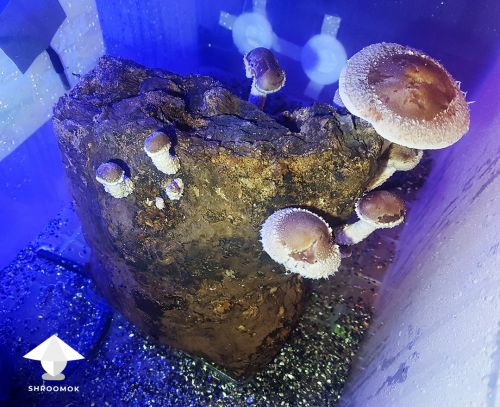](https://shroomok.com/en/wiki/File:Shiitake-fruiting-mushroom-block-2.jpg) Shiitake mushroom cake, 3 flush of fruiting, block 2##### **Start growing right away with ready grow kit**
If you want to skip all steps are listed above just use shiitake grow kit. Mist ready-made block from time to time, maintain fruiting conditions, enjoy mushroom fruiting and harvesting!
**Shiitake grow kit on Amazon:**
[Small Shiitake Indoor Growing Kit](https://amzn.to/3RGouxz) $19.99
[Shiitake Mushroom Grow Kit](https://amzn.to/3XbVRtl) $34.99
[Ready Shiitake Mushroom Grow Kit](https://amzn.to/3I0r3r8) $39.41
> **Shroomok' comment:** I prefer and suggest to make everything by your own! It's cost effective for long-term mushroom growing hobby!
#### Flush of fruiting from wasted blocks
Usually after 3 flushes mushroom block don't have enough nutrients and won't fruit any more.
I thought so, till I saw this
[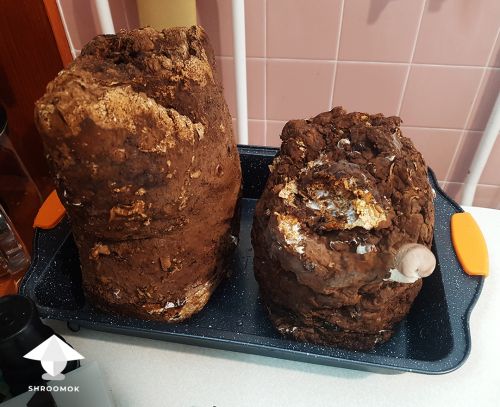](https://shroomok.com/en/wiki/File:Shiitake-mushroom-block-after-rehydration.jpg) Wasted shiitake mushroom block still fruiting
New mushrooms appeared and blocks fruited again
[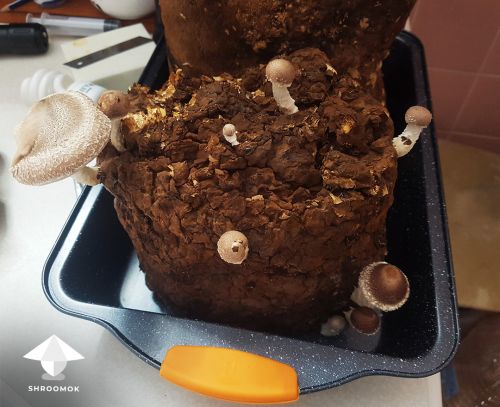](https://shroomok.com/en/wiki/File:Shiitake-fruiting-flush-from-wasted-cake.jpg) Shiitake flush of fruiting from wasted block
My additional unexpected harvest
[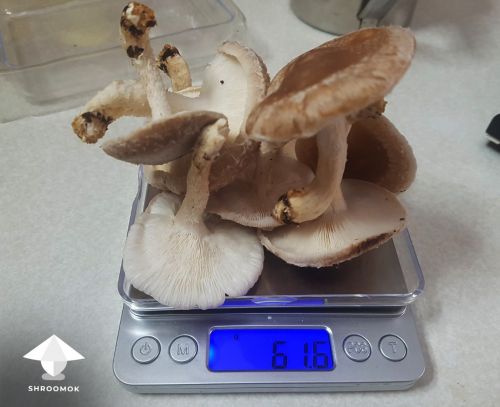](https://shroomok.com/en/wiki/File:Shiitake-harvest-new-flush.jpg) Shiitake harvest from 'wasted' blocks#### Shiitake fruiting in the basement
For my next shiitake cultivation I repeat all steps are listed above: spawn preparation, sawdust substrate preparation, bulk colonization period.
The only thing was different. I used the basement as fruiting chamber, actually it was fruiting ROOM for my shiitake. I didn't do anything extra. Just put mushroom block in the basement.
There were 59-61F or +15..16C, sometimes maybe lower temperature.
It was cold and extremely humid. There were water drops on the walls and ceiling.
And you know what?! My shiitake loved it!
[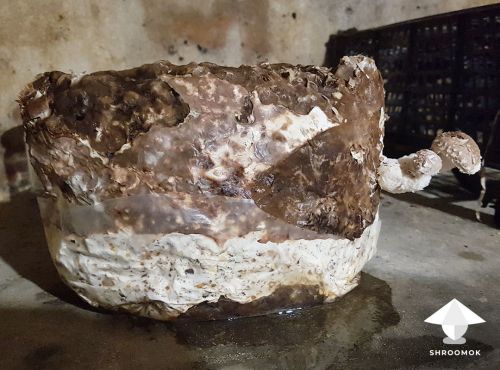](https://shroomok.com/en/wiki/File:Shiitake-fruiting-in-the-basement-1.jpg) Start of shiitake fruiting in the basement
First flush of fruiting is coming...
[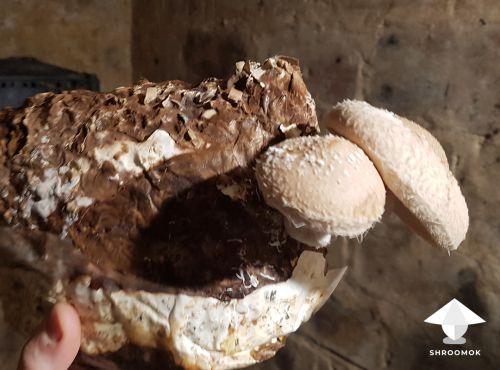](https://shroomok.com/en/wiki/File:Shiitake-fruiting-in-the-basement-2.jpg) Shiitake active fruiting in the basement[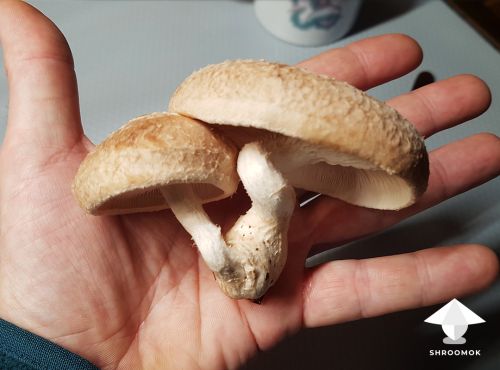](https://shroomok.com/en/wiki/File:Shiitake-harvest-2.jpg) Cute shiitake mushrooms, first flush[](https://shroomok.com/en/wiki/File:Shiitake-yield-small-block.jpg) Shiitake mushrooms harvest from the basement[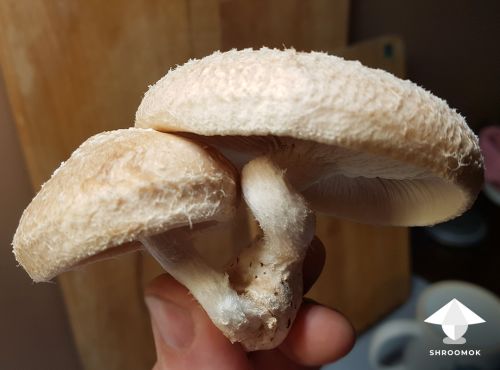](https://shroomok.com/en/wiki/File:Shiitake-harvesting-small-block.jpg) Shiitake couple[](https://shroomok.com/en/wiki/File:Shiitake-yield-small-block-2.jpg) Shiitake shroomsTo initiate new flush I rehydrated mushroom block in cold water for 8-12 hours. Placed it in the basement conditions again. Voila, in 1-2 weeks I had second flush of fruiting
[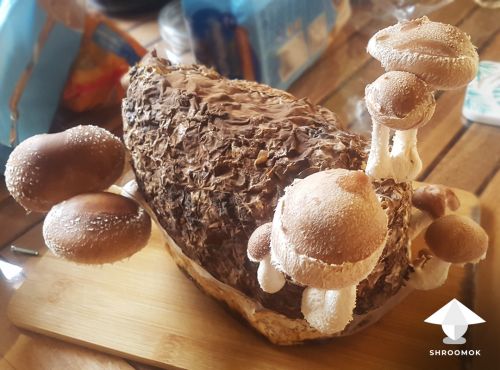](https://shroomok.com/en/wiki/File:Shiitake-cultivation-guide-fruiting-period.jpg) Shiitake growing in the basement, second flush[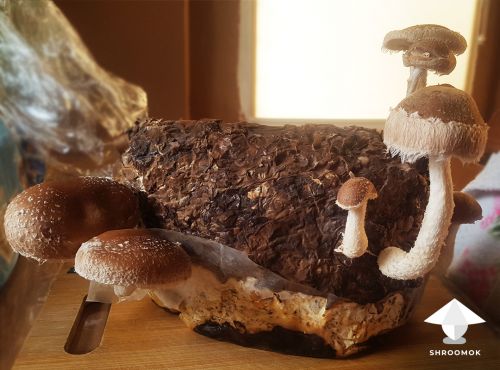](https://shroomok.com/en/wiki/File:Shiitake-growing-guide-fruiting-period-grow-report-2.jpg) Shiitake mushroom block fruiting, second flush[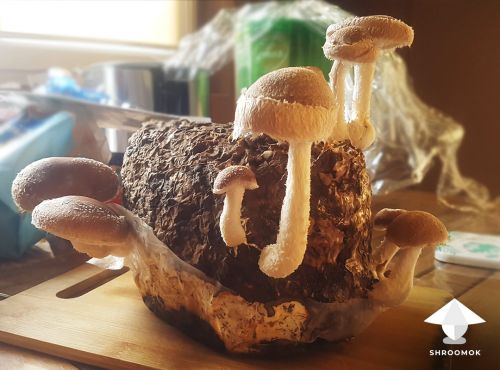](https://shroomok.com/en/wiki/File:Shiitake-fruiting-new-growing.jpg) Fruiting period, shiitake mushroom cake, 2nd flush[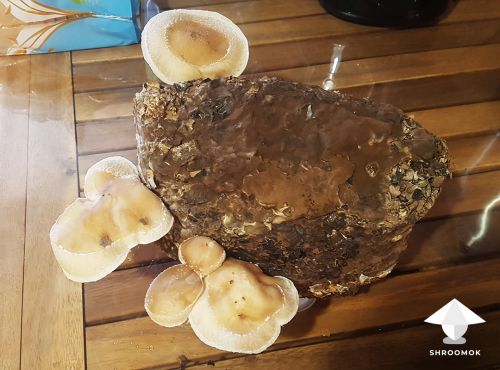](https://shroomok.com/en/wiki/File:Shiitake-fruiting-in-the-basement-3.jpg) Shiitake mushroom cultivation, second flush
Final third flush of fruiting (after rehydration)
[](https://shroomok.com/en/wiki/File:Shiitake-grow-report.jpg) Shiitake mushrooms fruiting[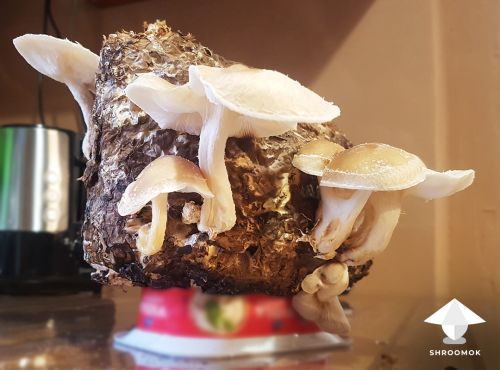](https://shroomok.com/en/wiki/File:Shiitake-fruiting-grow-report.jpg) Shiitake mushrooms flush[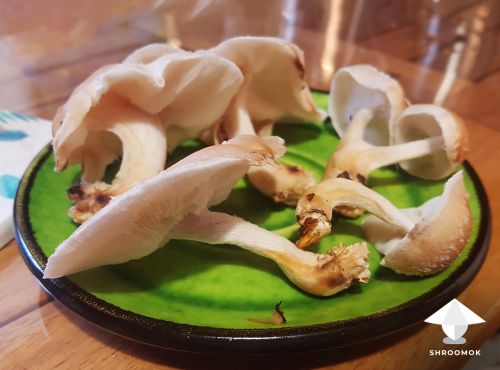](https://shroomok.com/en/wiki/File:Shiitake-final-harvest.jpg) Shiitake harvest
I had mushroom block about 4-5 lbs (~2 kg) and 3 productive flushes of fruiting.
Total yield from this block for 3 flushes - 400g of fresh shiitake 😋
#### How to store shiitake mushrooms
Fresh shiitake mushrooms can be stored in refrigerator in paper bag or plastic bag up to 1 week.
For long term storage dry them right after harvesting to save their aroma and nutrients.
The best way to dry shiitake mushrooms is in food dehydrator. If you don't have dehydrator you can use fan, heat fan or just put mushrooms on the flat surface in ventilated room for a few days.
**Dehydrators for any mushrooms on Amazon:**
[Food Dehydrator, Temp Control, 5 Trays, Gray/Black](https://amzn.to/3leUI77) $39.99
[Presto Standard Food Dehydrator, White](https://amzn.to/3YrPC60) $54.00
[Food Dryer Machine, 5 BPA-Free Trays, Dishwasher Safe](https://amzn.to/3x7nIQY) $59.99
[Dehydrator Machine, Digital Timer, LED Temperature Control, Silver/Red](https://amzn.to/3I9MaqY) $69.98
[Elite Gourmet Food Dehydrator, 4/5 Stainless Steel Trays](https://amzn.to/3YviY3e) $69.99
[Professional Dehydrator Machine, 6 Stainless Steel Trays, Silver/Black](https://amzn.to/3RK8KKa) $159.99
#### My notes, tips and tricks for shiitake growing
🔸 Brown mycelium is totally normal for shiitake!
🔸 I had experience of reusing grow bag with sawdust substrate that was contaminated with green monster Trichoderma (after spawn to bulk).
I re-sterilized my grow bag and wait for 1-2 days. When the growth of Trich mold started again (it looks pretty distinctive), then sterilized one more time. At this point the substrate is ready for reusing.
> To be sure make sterilization 2 times after Trichoderma contamination
I assume that the final yield from such block may be a little less, because trich had time to absorb some nutrients from the substrate. But I think it won't noticeable if you sterilize your block right after the start of green mold spreading. There is much more benefits to reuse the substrate than just throw it away with the high risk of spreading spores in the air!
🔸 Rehydrate mushroom block BEFORE first flush if you are waiting for pins/primordia more than 2 weeks after providing fruiting conditions. Rehydration is a great way to initiate pinning and further mushroom fruiting.
#### Write it up!
Hope my experience with shiitake mushrooms inspire you to add them to your cultivation portfolio.
I love shiitake cultivation! Love their beautiful look, amazing taste and awesome mushroom aroma. They taste 1000 times better than oysters for sure! They have special mushroom behavior while growing. It's so interesting to explore them on each step of cultivation process.
I have some ideas for improvements that can increase my yield. I'll keep you posted! Stay tuned!
Feel free to ask any questions regarding my shiitake guide on [🤌gourmet-medicinal](https://discord.com/channels/868489864310566913/1069427371951788102) channel on [Shroomok Discord](https://discord.gg/ngKhQDmymD) or **in comments to this post** below ⬇️
Have a happy growing!
Made with love by @mrzimm
Promoted by ©Shroomok
Support our work with donation on [buymeacoffee](https://www.buymeacoffee.com/shroomok)
## Manure agar recipes for Panaeolus mushrooms
[Manure agar recipes for Panaeolus mushrooms](https://shroomok.com/en/wiki/Manure_agar_recipes_for_Panaeolus_mushrooms)
[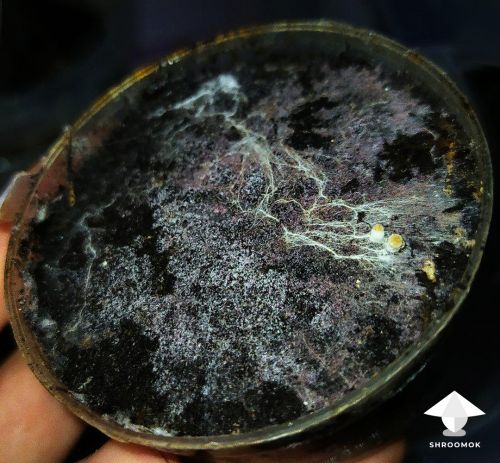](https://shroomok.com/en/wiki/File:Panaeolus-mycelium-manure-black-agar-media-recipe.jpg) Panaeolus mycelium and small pins on black charcoal manure agar mediaIf you are ready for the Panaeolus cultivation challenge, then the following two agar recipes can be a game changer. They are based on manure 💩 as one of the ingredients loved by Panaeolus mushrooms.
#### Recipe 1 - Charcoal Manure Agar Recipe
##### Ingredients
- Dry manure (horse, cow, elephant, turtle, camel, zebra) - 50 g
- Water - 500 ml
- Agar - 10-12 g ([Amazon](https://amzn.to/48B4pRJ))
- Activated charcoal - 2g ([Amazon](https://amzn.to/3ENF358))
##### Equipment
- High-Precision digital scale - [Amazon](https://amzn.to/46jyV0d)
- Measuring cup
- Saucepan and tablespoon
- Canning jar with lid or Lab Bottle (Erlenmeyer Flask)
- Funnel
- Pressure Cooker or Autoclave, or Instant Pot, or Pot with Lid - [Amazon](https://amzn.to/46iJfWj)
- Infrared thermometer gun (optional) - [Amazon](https://amzn.to/48qKfK6)
- Petri dishes - [Amazon](https://amzn.to/3ZmZ2kN)
- Parafilm or PE food film or Clear Packing Tape
- [Still Air Box](https://shroomok.com/en/wiki/Still_Air_Box_for_Mycology), or [Fan Filter Unit](https://shroomok.com/en/wiki/How_I_built_my_first_laminar_flow_hood_for_home_mycology), or Laminar Flow Hood for sterile work
##### Preparation
1. Prepare dry manure. You don't need composted manure, you can dry fresh poo in direct sunlight. > It’s important to dry it, because wet manure has too much **ammonia nitrogen** which can be harmful for mycelium
2. Turn dry dung into powder. You can grind it, or use a pounder, or wear gloves and crush with your fingers. > Dry poo doesn't have a bad smell and looks like peat soil for plants
3. Boil dry manure in water for 10 minutes.
4. Let it sit for 16-20 hours.
5. Filter out solids (you can use cheese-cloth or coffee filters).
6. Bring back to 500 ml.
7. Heat it again, add agar 10-12g and bring to boil.
8. Add activated charcoal - 2g (or food color)> Activated charcoal is optional, however black color is perfect for working with Panaeolus mycelium, which has grayish tint and is much thinner than Cubensis mycelium ropes. Color contrast between black agar and thin Panaeolus mycelium is extremely helpful for your further mycology work (transfers, culture isolation, contamination id etc.)
#### Recipe 2 - Dung Agar media recipe with additional ingredients
##### Main ingredients
- Dry manure (horse, cow, elephant, turtle, camel poo) - 50 g
- Water - 1 Liter
##### Additional ingredients
- Malt Extract - 5 g/L ([Amazon](https://amzn.to/3rp2MFR))
- Yeast Extract - 2 g/L ([Amazon](https://amzn.to/3PuirLY))
- Calcium Sulfate (aka gypsum) - 0.7 g/L ([Amazon](https://amzn.to/45ZbYzA))
- Peptone - 0.10 g/L ([Amazon](https://amzn.to/3nf1Pxp))
- Agar - 20 g/L ([Amazon](https://amzn.to/48B4pRJ))
- Activated charcoal powder - 4g or black/blue food color ([Amazon](https://amzn.to/3t1Rsjk))
##### Preparation steps
1. Turn dry manure into powder - 50 g.
2. Boil manure in water (1L) for 10 mins.
3. Let it sit for 16-20 hours.
4. Filter out solids (you can use cheesecloth or paper coffee filters).
5. Bring the mix to 1 Liter.
6. Heat it again and add additional dry ingredients.
7. Bring the agar media to a boil, hence all ingredients and agar will be dissolved.
#### Sterilization and preparation for agar inoculation
1. Sterilize prepared agar media in a pressure cooker for 30 minutes at 15 psi (250ºF or 121ºC). In instant pot or saucepan with lid for 45-60 minutes.
2. Let the PC to depressurize completely, open the lid and remove bottle with hot agar.
3. Let the agar cool down to 130-140°F or 45-50ºC before pouring. At the lower temperatures agar clumps appear. Agar solidifies completely at 86°F or 30°C. Use an infrared thermometer gun to monitor the temperature.
4. Pour agar in a sterile Petri dishes or ketchup cups.
5. Let it harden and cool down to room temperature.
6. Inoculate agar with Panaeolus genetic material (spore swab, spore syringe, liquid culture, agar to agar transfer).
7. Cover agar plates with food film, or use parafilm or tape.
8. Keep agar plates in a dark place within temperature range 73-86°F or 23°..30°C.
9. Sit back and wait for mycelium growth.
> ❗️Use Still Air Box, Fan Filter Unit or Laminar flow hood while pouring agar into Petri dishes and during inoculation process
What is your perfect agar recipe for Panaeolus species? Please, share in the comments below ;)
Enjoy your home mycology and have a happy growing!
Join Shroomok Community on [Discord](https://discord.gg/ngKhQDmymD) and [Reddit](https://www.reddit.com/r/Shroomok) for questions and sharing experience.
If you find this guide helpful, please support me with subscription or cup of coffee on [☕️ buymeacoffee](https://www.buymeacoffee.com/shroomok)
Peace, Shroomok ❤️
## List of agar recipes for mushroom cultivation
[List of agar recipes for mushroom cultivation](https://shroomok.com/en/wiki/List_of_agar_recipes_for_mushroom_cultivation)
[](https://shroomok.com/en/wiki/File:Agar-media-recipes-for-mushroom-cultivation.jpg) Types of agar media for mushroom growing and their uses### How to Choose the Right Agar Media for Your Mushroom Cultivation Needs
Every mushroom cultivator should be able to prepare agar media. It is an essential skill for anyone who wants to explore mushroom growing process, and it is easy to learn.
Before you start working with agar media, it is important to understand its components and the necessary parameters for successful preparation.
#### Types of Agar Media
Depending on the type of microorganism being cultured there are bacterial media, yeast media, moss media, fungal media, universal general-purpose media for different microorganisms.
Some media recipes are specifically designed for bacteriological purposes. For instance, MacConkey selective agar medium has ingredients for isolation gram-negative bacteria. Blood agar and Chocolate Agar provide the unique nutrients needed for the growth and identification of pathogenic bacteria.
If we are talking about mycological purposes let me remind you, that Mycology is a huge world. It's not only about mushrooms we cultivate.
I assume you've heard about medical mycology! Thus Sabouraud Dextrose Agar, which is named after French dermatologist Raymond Sabouraud, was developed for the identification of skin diseases in animals and humans.
Czapek-Dox medium is used in mycology to grow fungi, but saprophytic fungi (e.g., Aspergillus, Candida, Penicillium, and Paecilomyces) and also soil bacteria. It was originally formulated to grow Penicillium camemberti (which is used in the production of Camembert, Brie, Langres, Coulommiers, and Cambozola cheeses) and black Aspergillus.
What about mushroom cultivation?
##### Agar Media for Mushroom Cultivation
- **Basal Agar Media.** Basal agar media are general-purpose media that provide the basic nutrient requirements for mycelium growth. They are typically used for spore germination and primary strain isolation. Basal media do not contain additional components, supplements, vitamins, or reagents. Almost all types of fungi can be grown on basal agar media.
- **Complete Agar Media.** Complete agar media are basal agar media that have been enriched with additional components or supplements. These additives may include sources of nitrogen, salts of various metals, vitamins, and amino acids. Complete agar media are often used to promote rapid growth and fruiting of mushrooms.
- **Selective Agar Media.** Selective agar media are modified agar media that contain selective agents, such as antibiotics or dyes, or have a non-standard pH (Sabouraud's agar with low pH). Selective agar media are used to inhibit the growth of certain contaminants (bacteria, yeast, mold) while allowing mushroom mycelium to grow.
- **Storage Agar Media.** Storage agar media are low-nutrient media that are used for long-term storage of mushroom cultures. Grain broth, potato broth, or any basal medium with a low nutrient content (about 1%, up to 2%) can be used as storage agar media.
##### Agar types by ingredients
- **Defined (synthetic) media.** Completely synthetic ingredients has a composition that is repeatable every time. There is no yeast, plant or animal tissue present, and all the chemicals employed are known. These are made from ingredients the exact molecular composition is known. Usually used for scientific researches.
- **Undefined (natural) media.** Nutrient agar medium prepared from natural ingredients: whole grain, flour, honey, potatoes, yeast extract etc. The only drawback of such agar recipes is that the medium is obtained “by eye”. Each time the medium prepared from natural ingredients contain a different set of chemical components and the precise composition is unknown.
#### What is the best agar recipe for mushroom cultivation
There is no one agar recipe that is ideally suited for the cultivation of all mushroom species and for all purposes. Different mushroom species have different nutrient requirements, and some media are better suited for certain purposes.
Don't use complicated agar recipes for your first attempts. Start simple with natural ingredients.
Use any general purpose agar media for spores germination, primary strain isolation and mycelium reproduction.
> Potato/Starch Agar, Malt Agar, Grain Agar are simple and always work great!
**Why we don't use one universal agar media for all mushrooms all the time**
- **Nutrients** in agar media and their concentration determines the quality and quantity of growth; and whether vegetative growth or sporulation will dominate. For instance, a weak medium with a low C and/or N source suppresses vegetative growth and stimulates sporulation.
- For spores germination and primary strain isolation we use **more nutrient** agar media. For mycelium long term storage on [Agar Slants](https://shroomok.com/en/wiki/Long_term_mycelium_storage_on_agar_slants "Long term mycelium storage on agar slants") we need to slow down mycelium growth and use **low nutrient** agar media.
- When you get perfect isolated mushroom strain it is recommended to change the agar recipe/ingredient(s) for the next transfers (for mycelium reproduction) **to prevent the aging of mushroom culture.** Hence you can't use the same recipe all the time for particular strain. Stress is necessary for maintaining the viability of mushroom culture. You have to play with ingredients, add something new.
- You can get great yield results if you add some ingredients for agar media similar to substrates you are going to use. For instance, brown rice for agar media and brown rice for grain spawn; ground milo for agar and milo for grain spawn; corn syrup in agar media and 'drippy corn' grain for spawn etc. For dung loving mushrooms, such as Panaeolus, we can play with [Manure Agar Recipes](https://shroomok.com/en/wiki/Manure_agar_recipes_for_Panaeolus_mushrooms "Manure agar recipes for Panaeolus mushrooms"). For wood-loving species sawdust can be added (up to 2%) or 3-5g of fruiting substrate you are going to use.
> 🧬 The introduction of substrates at an early stage stimulates the production of digestive enzymes by mycelium, which will later be needed for the effective cleavage of substrates, which will accelerate the growth of mycelium and fruiting
- **Antibiotics** are not necessary and not widely used for agar media. Mushroom growers mostly work on sterility routine and clean up mushroom culture by Agar to Agar transfer. However while cloning the mushroom tissue or using spores **collected in the wild** an antibiotic is extremely helpful for isolation healthy mushroom culture. Antibiotics inhibit the growth of **bacterial** and fast growing **mold** contaminants. Peroxided Agar (3% hydrogen peroxide (H2O2)) is a cheap substitution for Antibiotic Agar, that inhibits bacteria, yeast and mold spores. > ❗️You don't really need antibiotics or peroxided agar unless you are having serious problems with contamination. Details and recipes in the Antibiotic Agar and Peroxide Agar on this page
- Some mushroom cultivators are fans of adding ***activated carbon aka activated charcoal** to agar - **10 g per 1 liter for totally black color.*** It is considered as a bacteria inhibitor and good for stimulation spore germination. I like to work with ***charcoal*** **agar** mostly because it's easier to observe mycelium spreading and black color is helpful during working on strain isolation.
- You can use one recipe for one species, but colonize agar cultures at different temperature and find out that some parts of mycelium on agar (strain) growing better at higher temperature, or vice versa at lower temperature. In this case temperature (not the recipe itself) is a game changer. This is a great chance to isolate **heat-resistant** or **cold-resistant** strains and use them according to your environmental conditions and season of the year.
- At last you can find out that some of your mushroom species/strains grow better or worse on a specific agar medium.
#### Main nutrients used for Agar Media
Agar powder doesn't have nutritional value on its own. We use agar for making solid form of media.
Water agar medium is a base, where you can add additional required nutrients.
**Water Agar (WA)** - non-nutrient agar. Actually this is the very first agar recipe.
- Water – 500 ml
- Agar – 10 g
It must be supplemented with other nutrients for the germination of spores and further mycelium development.
> Carbon (C) and nitrogen (N) are the two main macronutrients required by fungi for structural and energy requirements; P, K and Mg are also considered macronutrients for mushrooms, in addition, trace elements such as Fe, Se, Zn, Mn, Cu and Mo appear to be needed for diverse functions (Chang and Miles, 2004).
>
> The simplest sources of carbon, such as monosaccharides, will be the first to be broken down thanks to the low energy cost of doing so.
>
> The only source of nitrogen (N) that all fungi can use is amino acids (Deacon, 2006). Proteins are long chains of amino acids.
The most common nutrients used for agar media are carbohydrates, proteins, vitamins and minerals to ensure healthy growth of mycelium. Usually added:
- **CARBON:** dextrose (corn sugar), light malt extract, grain flour, oat water or boiled potato broth. Some cultivators prefer to mix carbohydrate sources to make more reliable recipes.
- **PROTEINS:** grain flour, soy peptone and potato water contain different proteins and amino acids.
- **VITAMINS B:** deactivated nutritional yeast or brewers yeast.
- **MINERALS:** add a pinch of gypsum (CaSO4) to a 1 Liter of agar for additional calcium (Ca) and sulfur (S) which beneficial for mycelium development. An additional experimental additive is a few drops of liquid concentrate of trace elements. Just make sure that the concentrate doesn't contain silver, which has an antifungal effect.
To modify and improve your agar media you should know exactly what carbon and nitrogen sources prefer the mushroom species you are going to cultivate. If you understand it, then you are able to create your own perfect medium.
> ❗️If you introduce sources of **carbon (sugars)** into **water agar** their percentage in the nutrient medium should not exceed **4%** of the total volume. If you introduce **nitrogen sources** (organic or inorganic), it should not exceed **0.5%** of the total volume
**Never use the following inhibitors or antifungal ingredients in your recipes:** coconut water/milk, onion, garlic, pomegranate, cinnamon, cilantro, curry, cloves, raw coffee, dark coffee beans.
#### pH of Agar Media
Most mushrooms usually grow best on media high in carbohydrates, with a pH range between 5 to 6.
The pH of all media is usually measured and adjusted to approximately 6.5-7.2 before autoclaving.
#### What water to use for agar media
Use fresh water prepared by distillation, deionization, or reverse osmosis.
Do not use tap water as it affects selectivity and pH. The presence of copper ions, high conductivity, and high pH may significantly alter the quality of prepared media.
#### List of Agar Media Recipes for mushrooms
General purpose natural agar recipes. Usually used for spores germination and primary strain isolation. There are used simple ingredients you have at home. These recipes easy to prepare anytime you need.
> 500 ml of agar = 20-30 petri dishes or 50-60 ketchup cups
##### Stuff to buy on Amazon
- [Agar Powder](https://amzn.to/469eL9N) $12.99 - this gives the mixture solidity
- [Potato Flakes](https://amzn.to/3rDFfRu) $14.99 - provides carbohydrates, organic nitrogen
- [Dextrose](https://amzn.to/3tknYNE) $8.99 - provides carbohydrates
- [Light Malt Extract](https://amzn.to/3PG9sY6) $12.09 - provides carbohydrates
- [Light Corn Syrup](https://amzn.to/3PGLRXu) $18.99 - provides carbohydrates
- [Yeast Extract](https://amzn.to/3rpU76d) $14.99 - contribute vitamins (B), carbohydrates, nitrogen, and salts
- [Peptone](https://amzn.to/3rAvaoy) $22.99 - water-soluble protein hydrolysates, containing peptides, amino acids, and inorganic salts as well as other compounds, such as lipids, vitamins, and sugars
- [Activated Carbon (Activated Charcoal)](https://amzn.to/46u6qgz) $4.99 - provide exceptional contrast with mycelium, allowing for easier examination without the use of artificial dyes or coloring.
- [Food Coloring Set](https://amzn.to/3t1Rsjk) $11.98 - you can add a few drops of food color instead of charcoal (blue, black, purple).
- [High-precision Digital Scales](https://amzn.to/46jyV0d) $9.99 - for measuring ingredients
##### SPORES GERMINATION AGAR RECIPES
Recommended agar recipes for spores germination based on cornmeal and dextrose or malt.
###### Spore Germination Agar #1 (SGA1)
- H2O - 500 ml
- Agar - 10 g
- Cornmeal - 10 g
- Glucose (Dextrose) - 1 g
- Yeast - 0.5 g
###### Spore Germination Agar 2 - SGA2
- H2O - 500 ml
- Agar - 10 g
- Cornmeal - 10 g
- Glucose (Dextrose) - 3.5 g
- Sucrose - 5 g
- Yeast - 0.5 g
- KH2PO4 - 0.5 g
###### Spore Germination Agar 3 - SGA3
- H2O - 500 ml
- Agar - 10 g
- Cornmeal - 10 g
- Malt - 0.8 g
###### Spore Germination Agar 4 - SGA4
- H2O - 500 ml
- Agar - 10 g
- Cornmeal - 10 g
- Glucose (Dextrose) - 1 g
- Sucrose (sugar) - 1.5 g
- Yeast - 0.5 g
##### POTATO and STARCH AGAR RECIPES
General purpose basic recipes for spores germination, primary strain isolation, mycelium reproduction.
Recipes based on fresh potato or potato starch, potato flakes as a substitution for fresh potatoes. Dextrose, fructose, honey, light Karo corn syrup - use any one ingredient for your choice.
###### Potato Dextrose Agar PDA
- H2O - 500 ml
- Agar - 10 g
- Dextrose **or** Honey/Corn Syrup - 7 g **or** 10 ml
- Diced potatoes - 150 g
- or Potato Flakes (instant potatoes) as a substitute of fresh potato - 5 g
Boil 150 g of fresh potatoes in the 500 mL of water, and use this broth (not the potatoes). Filter it to have clear broth without potato pieces. Bring solution back to 500 mL with water then add remaining ingredients. Potato flakes can be used as a substitute (5 g in the 500 mL of water).
###### Potato (starch) Dextrose Agar PDA
- H2O - 500 ml
- Agar - 10 g
- Potato starch - 10 g
- Dextrose - 7 g
###### Potato Dextrose Yeast Agar PDYA
- H2O - 500 ml
- Agar - 10 g
- Dextrose **or** Honey/Corn Syrup - 7 g **or** 10 ml
- Diced potatoes **or** Potato Flakes - 150 g **or** 5 g
- Yeast - 1 g
###### Potato Skin Dextrose Agar PSDA
- H2O - 500 ml
- Agar - 10 g
- Dextrose - 7 g
- Dried Potato skins - 10 g
###### ATCC Medium 336
- H2O - 500 ml
- Agar - 10 g
- Diced Potatoes **or** Potato Starch - 150 g **or** 10 g
- Dextrose - 10 g
###### Potato Carrot Agar PCA
- H2O - 1000 ml
- Agar - 20 g
- Diced Potatoes - 200 g
- Diced Carrot - 250 g
Wash 200 g of carrots (sweet) and 250 grams of potatoes in clean water. Cut into small cubes. Poured with a 1liter of water and simmer for 30 minutes. Filter the broth and use it to prepare a nutrient medium. Heat it again to dissolve agar.
This is a **poor low nutrient agar medium**. The more sugars carrot contains, the “richer” it is. This nutrient medium can be used as a medium for long-term storage of mushroom culture. This medium contains the necessary amount of components only to maintain the life of the culture, but not for intensive vegetative growth. The mycelium grow slowly on it, but when transferred to a “richer” agar nutrient medium, the mycelium shows rapid growth.
###### Potato, Ammonium citrate, Thiamin Agar PAT
Cordyceps militaris is known to fruit from this medium and brown rice in jars.
- H2O - 400 ml
- Agar - 10 g
- Potato broth - 100 ml
- Dextrose - 15 g
- Monopotassium phosphate (KH2PO4) - 1 g
- Magnesium sulfate (MgSO4)- 0.5 g
- Peptone - 1.5 g
- Ammonium Citrate - 0.5 g
- Thiamine (B1 vitamin) - 0.025 g
###### Avocado Peel Dextrose Agar APDA
- H2O - 500 ml
- Agar - 10 g
- Avocado Peels - 10 g
- Dextrose - 7 g
##### MALT AGAR RECIPES
General purpose basic recipes for spores germination, primary strain isolation, mycelium reproduction.
Agar recipes based on Light Malt Extract. Optional additional ingredients: honey, yeast extract, peptone, activated carbon, vitamins, microelements etc.
###### Malt Extract Agar ME
- H2O - 500 mL
- Malt Extract or Light Malt Extract (LME) - 10 g
- Agar - 10 g
###### Malt Extract with Honey MEH
- H2O - 500 ml
- Malt Extract - 10 g
- Honey - 16 g
- Agar - 10 g
###### Malt Yeast Extract MYA
- H2O - 500 ml
- Malt Extract - 10 g
- Yeast (Nutritional Yeast) - 1 g
- Agar - 10 g
###### Malt Extract with Peptone MEP
- H2O - 500 ml
- Malt Extract - 10 g
- Peptone - 1 g
- Agar - 10 g
###### Malt Extract with Yeast and Peptone MYAP
- H2O - 500 ml
- Malt Extract - 10 g
- Yeast - 1 g
- Peptone - 1 g
- Agar - 10 g
###### Malt Extract with Activated Carbon MEAC
- H2O - 500 ml
- Malt Extract - 10 g
- Activated Carbon (activated charcoal) - 1 g
- Agar - 10 g
###### Malt Extract with Yeast, Peptone, and Activated Carbon MEPYAC
- H2O - 500 ml
- Malt Extract - 10 g
- Peptone - 1 g
- Yeast - 1 g
- Activated Carbon - 1 g
- Agar - 10 g
###### Wheat Malt Yeast Extract WMYA
- H2O - 500 ml
- Wheat Malt - 10 g
- Yeast - 1 g
- Agar - 10 g
###### Wheat Malt Extract with Peptone WMEP
- H2O - 500 ml
- Wheat Malt - 10 g
- Peptone - 1 g
- Agar - 10 g
###### Wheat Malt Extract with Yeast and Peptone WMYAP
- H2O - 500 ml
- Wheat Malt - 10 g
- Yeast - 1 g
- Peptone - 1 g
- Agar - 10 g
###### Malt Extract with Milo MEM
- H2O - 500 ml
- Malt Extract - 10 g
- Ground Milo (Sorghum) grain - 10 g
- Agar - 10 g
###### Malt Extract with Corn MEC
- H2O - 500 ml
- Malt Extract - 10 g
- Ground Corn grain- 10 g
- Agar - 10 g
###### ATCC medium 597 Clavicorona medium
- H2O - 500 ml
- Malt extract - 3.75 g
- Yeast extract - 0.25 g
- Peptone - 0.5 g
- Agar - 10 g
###### MYAP with Multi-vitamin MYMP
- H2O - 500 ml
- Fresh ground crickets - 8 g (freeze before grinding)
- Malt extract - 10 g
- Yeast extract - 1 g
- Peptone - 1 g
- Agar - 10 g
- Multi Vitamin - 0.01 g
Multi-Vitamin should be added AFTER sterilization!
###### MYAP with elements MYPMCZ
- H2O - 500 ml
- Malt extract - 10 g
- Yeast extract - 1 g
- Peptone - 1 g
- Calcium - 0.01 g
- Magnesium - 0.01 g
- Zinc - 0.01 g
- Agar - 10 g
You can use just 1 or 2 elements, so label MYPZ or MYPCZ, etc.
###### Yeast Malt Extract YME
- H2O - 500 ml
- Pre-mixed Malt Agar - 25 g
- Yeast extract - 1 g
###### Peptone Malt Extract PME
- H2O - 500 ml
- Pre-mixed Malt Agar - 25 g
- Peptone - 1 g
##### GRAIN AGAR MEDIA RECIPES
General purpose basic recipes for spores germination, primary strain isolation, mycelium reproduction.
Agar recipes based on grain broth or grain flour. You can grind whole grain in coffee grinder and use it according to the recipe.
###### Brown Rice Agar BRA
Low nutrient media for mycelium long term storage, suppresses vegetative growth and stimulates sporulation.
- H2O - 500 ml
- Brown rice - 10 g
- Agar - 10 g
Take whole brown rice and boil it in 500 ml of water for about 60 minutes. Filter the broth through a thin cloth (cheesecloth). Add water to bring the solution back to 500 ml. Heat the broth again and add agar, bring it to boil to dissolve agar completely.
###### Brown Rice Peptone Agar BRPA
- H2O - 500 ml
- Brown rice - 10 g
- Peptone - 4 g
- Agar - 10 g
Take whole brown rice and boil it in 500 ml of water for about 60 minutes. Filter the broth through a thin cloth (cheesecloth). Add water to bring the solution back to 500 ml. Heat the broth again. Add peptone and agar. Bring it to boil, so that agar completely dissolved.
###### Brown Rice flour-Malt Extract BRMA
- H2O - 500 ml
- Brown rice flour - 40 g
- Malt - 2 g
- Yeast (optional) - 1 g
- Agar - 10 g
###### Rice Bran Malt Extract Agar RBMA
- H2O - 500 ml
- Rice bran - 40 g
- Malt Extract - 2 g
- Yeast (optional) - 1 g
- Agar - 10 g
###### Dark Rice Flour Malt Extract DRMA
- H2O - 500 ml
- Brown rice flour - 40 g
- Malt Extract - 2 g
- Yeast (optional) - 1 g
- Agar - 10 g
###### Bird Seed Malt Agar BSM
- H2O - 500 ml
- Agar - 10 g
- Brown rice flour - 2.5 g
- Ground Bird Seeds - 5 g
- Malt Extract - 2.5 g
- Peptone - 0.5 g
###### Corn Agar CA
Low nutrient media for mycelium long term storage, suppresses vegetative growth and stimulates sporulation.
- H2O - 500 ml
- Dry sweet corn - 25 g
- Agar - 10 g
Soak dry corn in water for a few hours. Then boil it for 1-1.5 hours. Filter the broth. Bring to 500ml. Heat it again to dissolve agar.
###### Cornmeal Dextrose Agar CDA
- H2O - 500 ml
- Cornmeal - 25 g
- Dextrose - 3 g
- Agar - 10 g
###### Cornmeal Malt Agar MEC
- H2O - 500 ml
- Agar - 10 g
- Malt - 10 g
- Cornmeal - 10 g
###### Milo Sorghum Agar MA
Sorghum (Milo) is a nutritious grain rich in protein, fiber, B vitamins, and minerals.
- H2O - 500 ml
- Ground milo - 10 g
- Agar - 10 g
###### Milo Sorghum Agar 2
Sorghum (Milo) is a nutritious grain rich in protein, fiber, B vitamins, and minerals.
- H2O - 500 ml
- Ground milo - 20 g
- Yeast - 1 g
- Agar - 10 g
###### Barley Malt Extract Agar BMA
- H2O - 500 ml
- Barley flour - 40 g
- Malt - 2 g
- Yeast (optional) - 1 g
- Agar - 10 g
###### Wheat Agar WA
Low nutrient media for mycelium long term storage suppresses vegetative growth and stimulates sporulation.
- H2O - 500 ml
- Whole wheat grain (wheat berry) - 15 g
- Agar - 10 g
Take whole wheat grain (wheat berry) and boil it in 500 ml of water for about 60 minutes. Filter the broth through a thin cloth (cheesecloth). Add water to bring the solution back to 500 ml. Heat the broth again and add agar, bring it to boil to dissolve agar completely.
###### Wheat Peptone Agar WPA
- H2O - 500 ml
- Whole wheat grain (wheat berry) - 15 g
- Peptone - 10 g
- Yeast - 5 g
- Glycerin - 5 g
- Agar - 10 g
Take whole wheat grain (wheat berry) and boil it in 500 ml of water for about 60 minutes. Filter the broth through a thin cloth (cheesecloth). Add water to bring the solution back to 500 ml. Heat the broth again. Add additional ingredients and agar. Bring it to boil to dissolve agar completely.
###### Wheat Flour Malt Extract Agar WFMA
- H2O - 500 ml
- Wheat flour - 40 g
- Malt Extract - 2 g
- Yeast (optional) - 1 g
- Agar - 10 g
###### Oat Flour Malt Extract Agar OFMA
- H2O - 500 ml
- Oat flour - 40 g
- Malt Extract - 2 g
- Yeast (optional) - 1 g
- Agar - 10 g
###### Teff Flour Malt Extract Agar TFMA
- H2O - 500 ml
- Teff flour - 40 g
- Malt - 2 g
- Yeast (optional) - 1 g
- Agar - 10 g
###### Green Bean Powder Agar GBPA
- H2O - 500 ml
- Green bean powder - 10 g
- Agar - 10 g
###### Garbanzo Bean Malt Extract GBMA
- H2O - 500 ml
- Garbanzo (chickpeas) bean flour - 40 g
- Malt - 2 g
- Yeast (optional) - 1 g
- Agar - 10 g
##### ANIMAL RELATED AGAR MEDIA
General purpose recipes for spores germination, primary strain isolation, mycelium reproduction.
###### Dog Food Agar DFA
- H2O - 500 ml
- Agar - 10 g
- Ground dry dog food - 10 g
###### Cat Food Agar CFA
- H2O - 500 ml
- Agar - 10 g
- Ground dry cat food - 10 g
###### Dr. Pollock’s Modified Agar POLL
- H2O - 500 ml
- Agar - 10 g
- Ground dry dog food - 10 g
- Dextrose or malt extract - 2 g
###### Rabbit Food Agar RFA
- H2O - 500 ml
- Agar - 10 g
- Rabbit food - 12.5 g
Boil the rabbit food mix. Steep for 30 minutes. Filter and add agar to filtrate.
###### Brown Rice Rabbit Food BRRF
- H2O - 500 ml
- Agar - 10 g
- Brown Rice Flour - 10 g
- Peptone - 1 g
- Crushed Rabbit food - 5 g
- Dextrose - 1 g
###### Bird Seed Malt Agar BSM
- H2O - 500 ml
- Agar - 10 g
- Brown Rice flour - 2.5 g
- Ground Bird seeds - 5 g
- Malt - 2.5 g
- Peptone - 0.5 g
###### Fish Flake Dextrose Agar FDA
- H2O - 500 ml
- Agar - 10 g
- Fish Flakes - 3 g
- Dextrose - 10 g
###### Gold Fish Food Agar GFF
- H2O - 500 ml
- Agar - 10 g
- Gold Fish Food - 10 g
###### Krill Agar KA
- H2O - 500 ml
- Agar - 10 g
- Krill - 10 g
###### Blood Worm Agar BW
- H2O - 500 ml
- Agar - 10 g
- Blood Worms - 5 g
###### Meal Worm Agar MW
- H2O - 500 ml
- Agar - 10 g
- Meal Worms (ground) - 10 g
- Dextrose - 3 g
- Yeast - 1 g
###### Fishy Wax Agar FWA
- H2O - 500 ml
- Agar - 10 g
- Krill - 3.3 g
- Tubifex Worms - 3.3 g
- Fish Flakes - 3.3 g
- Bee's Wax - 1 g
##### COMPLETE MEDIA CM
Complete agar media are often used to promote rapid growth and fruiting of mushrooms.
- H2O - 500 ml
- Agar - 10 g
- Sucrose - 15 g
- Ammonium Tartrate (NH4-) - 2.5 g
- Ammonium Nitrate (NH4NO3) - 0.5 g
- Magnesium sulfate heptahydrate (MgSO4x7H2O) - 0.25 g
- Sodium Chloride (NaCl) - 0.5 g
- Calcium Chloride (CaCl2) - 0.065 g
- Yeast Extract - 0.5 g
- Monopotassium phosphate (KH2PO4) - 0.5 g
##### ANTIBIOTIC AGAR AB
Selective agar media are used to inhibit the growth of certain contaminants (bacteria, yeast, mold) while allowing mushroom mycelium to grow.
- H2O - 500 ml
- Agar - 10 g
- Additional nutrients can be added (malt extract and potato based recipes recommended) or proceed without nutrients at all to inhibit competitive microorganisms completely in non-nutrient agar medium.
Antibiotics are added to inhibit the growth of specific **bacterial** contaminants.
> Veterinary antibiotics can be used!
The broad-spectrum autoclavable antibiotics that can be added to agar at the preparation stage **BEFORE** sterilization (per 500 ml):
- Gentamycin - 10 mg
- Streptomycin - 10 mg
The antibiotic of your choice needs to be added to agar **AFTER** sterilization (per 500 ml):
- Levaquin or Levofloxacin - 250 mg
- Doxycycline - 250 mg
- Amoxicillin - 250 mg
- Cefdinir - 250 mg
- Ciprofloxacin - 250 mg
- Azithromycin - 250 mg
- Cephalexin - 250 mg
- Ampicillin sodium sulfate (50 mg/mL; Sigma-Aldrich) - 0.5 ml
- Kanamycin monosulfate (30 mg/mL; Fisher Scientific) - 0.5 ml
###### How to add antibiotics after PCing
1. If you use antibiotic in pills grind antibiotic into powder in sterile conditions (use Still Air Box (SAB) or Laminar Flow Hood). You can crumble the pill between 2 sterile tablespoons. Add about 10-15 ml of pre-sterilized H2O (sterile water for injections) and mix it well.
2. If you use antibiotic for injections, fill the syringe with necessary amount of antibiotic.
3. When agar has cooled to about 50-60C, add the antibiotic solution and mix agar medium well.
##### Hydrogen Peroxide Agar
3% hydrogen peroxide (H2O2) is a cheap substitution for antibiotics. H2O2 kill **bacteria** and **fungal spores**, inhibit the growth of **yeasts**.
Peroxidated agar is not recommended as a medium for spores germination. Mushroom spores fall under the category of fungal spores, so they won't germinate on peroxidated agar. Agar with H2O2 works good if you need to clean up mycelium with contamination (agar transfer to peroxidated agar plate).
H2O2 can't withstand high temperatures in a pressure cooker and should be added to agar as soon as it cools down to a temperature below 140°F (60°C), at the rate of 6-10 ml per 1 Liter of agar.
###### **Agar Media with fungicide antibiotic**
Selective agar media with *Cycloheximide* is a naturally occurring fungicide, antibiotic that used to inhibit the growth of **rapidly growing mold** contaminants.
Fill the syringe with 1 ml of cycloheximide solution 1% and add into any 1L of prepared agar media (malt extract and potato based recommended). To make 1% of cycloheximide solution weight out 0.1 g of cycloheximide and bring solution to 10 ml with sterile water.
#### Afterwords
Start with simple recipes, use natural ingredients.
Potato/Starch Agar, Malt Agar, Grain Agar are universal general purpose recipes and always work great for almost all mushroom species!
Experiment with different agar recipes and ingredients to find what works best for you and the mushroom species you are cultivating. There is no one-size-fits-all approach to agar media.
Nutrients content, percentage, formulations and additives in agar media depends on your needs.
What is your favourite agar recipes? Please, share in the comments below ;)
Enjoy your home mycology and have a happy growing!
Join Shroomok Community on [Discord](https://discord.gg/ngKhQDmymD) and [Reddit](https://www.reddit.com/r/Shroomok) for questions and sharing experience.
If you find this guide helpful, please support me with cup of coffee on [☕️ buymeacoffee](https://www.buymeacoffee.com/shroomok)
Peace, Shroomok ❤️
## Long term mycelium storage on agar slants
[Long term mycelium storage on agar slants](https://shroomok.com/en/wiki/Long_term_mycelium_storage_on_agar_slants)
[](https://shroomok.com/en/wiki/File:Agar-slants-how-to-store-mycelium-long-term.jpg) Agar slants and tips on mycelium long term storage### Agar Slants and tips on how to store mushroom mycelium for longer
#### What are agar slants
Most cultivators store their mushroom culture collection long term in test tubes known as ***Agar Slants**.*
Agar slants are formed by using sterile agar media in a test tube and setting it at an angle. This allows for more surface area for mycelial growth than if the agar were allowed to solidify vertically.
#### What agar media to choose for agar slants
One more important note: use low-nutrient media for agar slants (storage agar media), e.g. 1% of nutrients for your choice. It can be any general purpose agar media with 1% of nutrients (no more than 2% of nutrients). For instance ***Potato Dextrose Agar (PDA)**, **Malt Extract Agar (MEA)*** or low nutrient ***Oatmeal agar (OA)**, **Cornmeal Agar (CMA)*** etc.
> 🟠 Check out: [List of Agar Recipes for mushroom cultivation](https://shroomok.com/en/wiki/List_of_agar_recipes_for_mushroom_cultivation)
What are the benefits of using low-nutrient agar media for mycelium storage:
1. It slows down mycelium growth, which helps to extend the storage life of the culture.
2. It preserves the viability of the mycelium for longer periods of time.
3. When the mycelium is transferred to fresh, more nutrient-rich agar media, it experiences a boost in growth.
Overall, using low-nutrient agar media for long-term storage of mycelium is a good practice that can help to ensure the viability of your cultures.
To inoculate the test tube, cut a small piece of agar culture from your petri dish and place it on top of the agar in the tube. Seal agar slants with parafilm or close the test tube. Let mycelium completely colonize the agar on top for several days.
> ❗️For inoculation process (agar to agar transfer in this case) use [Still Air Box](https://shroomok.com/en/wiki/Still_Air_Box_for_Mycology) or Laminar Flow Hood! Remember to sterilize the tool you use for agar inoculation (scalpel blade or inoculation needle) before inoculating each test tube!
#### How and how long to store agar slants
> ❓Question: I need a way to store mushroom cultures on agar slants long term. Do you think they'd survive long term in a basement, 3ft (~1m) underground? Temperature should remain about 48-50F (9–10°C)
Recommended temperature range for agar slants for long-term storage is **36–41°F (2–5°C) in the refrigerator or cold dark room.** I assume 48–50°F (9–10°C) would also work, but the higher the temperature, the more active the mycelium growth and the shorter the storage time will be.
> ❗️It is essential to reduce the metabolic activity in order to prevent rapid exhaustion of the medium.
Recommended storage time for agar slants is **1 year.** Actually they can be stored for several years. The exact storage time will depend on the mushroom species, the nutrient content of the agar media, and the temperature at which the slants are stored. Magic mushroom species such as P. Cubensis, P. Natalensis, sclerotia species P. Tampanensis, P. Mexicana or P. Galindoii can be stored on agar slants successfully for about 2 years. Panaeolus species - for 1-2 years. Some mushroom species, such as Oysters and Shiitake - for up to 3 years. Other mushroom species, such as morels, may only be storable for a few months.
> Once I **accidentally** stored Lion's Mane **petri dish** in a fridge for 2 years, while recommended storage time is 6-12 month. Agar was wet enough and mycelium survived
It is important to check your agar slants regularly for contamination. If you notice any signs of contamination (discoloration, slime, mold growth), discard the slants immediately.
For newbie cultivators I suggest to prepare at least 5 test tubes of each mushroom culture you'd like to store!
#### Agar Slants with wooden sticks
Check your test tubes regularly, because the agar and mycelium might dry out, even if the test tubes are sealed/closed tightly.
> ❗️Drying it out is one more important factor in determining shelf life of agar slants. Check agar slants for condensation from time to time. Condensation means there is a heat source driving out water from the agar, which will dry it out quickly
For additional source of moisture, **wooden coffee stirrer sticks** soaked in water can be added to the test tubes with agar.
**Why is it beneficial?** If the agar dries out, these wooden sticks maintain water and save the mycelium further. To revive mycelium you can put the stick on agar and wait for its growth. This method especially beneficial for wood-loving mushroom species and any other species.
##### How to make agar slants with wooden sticks
[](https://shroomok.com/en/wiki/File:Agar-slants-with-wooden-sticks.jpg) Agar slants with wooden sticks1. Soak wooden sticks in water for 24 hours or simmer them in water for 30 minutes before adding to test tubs and pouring agar media. Cut them to fit the size of test tubes
2. Use heat resistant autoclavable 5PP centrifuge test tubes with screw caps, the volume between 15-50 ml.
3. Add wooden sticks in each test tube.
4. Pour prepared agar media in each test tube (about 1/2-2/3 of the volume).
5. Close the lids of test tubes, but not completely tight!
6. Place test tubes on a wire rack or just cover them all together in aluminium foil.
7. Sterilize in PC for 30 mins.
8. Open the PC in 30 minutes after depressurization.
9. Let the agar to cool down horizontally or setting it at an angle 20-30°.
10. When agar slants cool down to room temperature they are ready for inoculation.
11. Inoculate agar slants (agar to agar transfer). Cut the agar piece the size of a grain.
12. Close the test tubes with plastic lids.
13. Let them colonize for a few days.
14. Seal test tubes additionally with lab film (parafilm) to ensure sterility during storage.> 💡 No pour agar and sterilization right in test tubes reduce the risk of contamination
##### Useful stuff on Amazon
- [5PP Test Tubes 15/50ml, 50/25 pcs.](https://amzn.to/3RCAORx) $16.99
- [Wooden Stirrers Sticks](https://amzn.to/46xFo7S) $7.99
- [Laboratory Film Parafilm](https://amzn.to/48xSVOI) $38.99
- [Agar Powder](https://amzn.to/3RFkMGw) $10.99
- [Light Malt Extract](https://amzn.to/3tfENcR) $12.09
- [High-Precision digital scale](https://amzn.to/46jyV0d) $9.99
- [Ready sterile agar slants, 5 Pack](https://amzn.to/3LKvOGW) $22.50
#### Agar Slants with mineral oil or liquid paraffin
Never tried this method, but I know mycologists and experienced mushroom cultivators cover the agar slants (after agar colonization) with sterile mineral oil or medical liquid paraffin. Mineral oil or pharmaceutical grade liquid paraffin is cheap and available in any pharmacy.
The entire slope should be covered. Then the culture is stored at low temperature. This creates a protection layer that keeps moisture and protect mycelium in test tubes for up to 3 years.
To use this culture further, just pour out the mineral oil (liquid paraffin). Cut a sample of the culture and inoculate a new fresh agar plate.
#### Afteword
Agar slants are a good way to store mushroom mycelium, because they provide a sterile environment and prevent the cultures from drying out for years. This is your backup for any unexpected cases.
Enjoy your home mycology!
Join Shroomok Community on [Discord](https://discord.gg/ngKhQDmymD) and [Reddit](https://www.reddit.com/r/Shroomok) for questions and sharing experience or leave your comments below.
If you find this guide helpful, please support me with a cup of coffee on [☕️ buymeacoffee](https://www.buymeacoffee.com/shroomok)
Peace, Shroomok ❤️
# Contams & Troubleshooting
## How to recognize whether mushrooms contaminated or not
[How to recognize whether mushrooms contaminated or not](https://shroomok.com/en/wiki/How_to_recognize_whether_mushrooms_contaminated_or_not)
### Contamination or not: non contamination issues and the most common contaminants in mushroom cultivation
The short overview of the most common contamination and cultivation problems for fast identification. Each problem and contamination has a detailed guide with recommendations on how deal with contamination and how to prevent contam for the future.
This page is under continuous update. Stay tuned!
> 🔴 Growing issues guides: [Growing Troubleshooting](https://shroomok.com/articles:mushroom-growing-troubleshooting)
>
> 🔴 Contamination photos: [Contamination photo collection](https://shroomok.com/gallery/mushroom-contamination)
>
> 🔴 Non contam photos: [Growing problems photo collection](https://shroomok.com/gallery/growing-problems)
#### TOP non Contamination problems in mushroom cultivation
Common mushroom cultivation problems, when mycelium and mushrooms are not contaminated by fungi molds, bacteria, viruses
[](https://shroomok.com/en/wiki/File:Not-contamination-problems-in-mushroom-cultivation.jpg) TOP-5 common not contam cases in mushroom cultivation##### 1. Overlay and Stroma
[](https://shroomok.com/en/wiki/File:Mushroom-overlay-monotube.jpg) Overlay on mushroom cake in monotub: 1 - start of overlay, 2 - overlay[](https://shroomok.com/en/wiki/File:Steps-of-mushroom-overlay.jpg) Overlay on small mushroom cake: 1 - start of overlay, 2- overlayIf mycelium became cottony, fluffy, crust-like or matted. No pins at all!
❓Is it contamination or not?
❓What are Stroma and Overlay?
❓How to identify?
❓What are the main causes of overlay?
❓How to fix it and initiate pin setting?
**Overlay (aka stroma)** is a dense mycelial growth that covers casing layer, and shows little or no inclination to form pinheads and eventually mushrooms.
🔴 Bad News: problems with growing conditions and pinhead initiation. You can lose all possible harvest.
❇️ Good News: overlay is not contamination. There is chance to fix the problem
> 🔴 **Check out details: [Overlay and Stroma in Mushroom Cultivation](https://shroomok.com/en/wiki/Psilocybe_growing_problems_-_overlay,_abortions,_etc "Psilocybe growing problems - overlay, abortions, etc")**
##### 2. Mycelium Bruising and Mushroom Bruises
[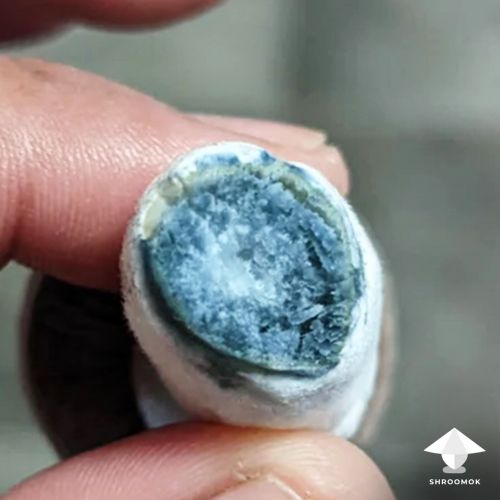](https://shroomok.com/en/wiki/File:Bruises-on-mushroom-stem-harvesting.jpg) Bruising on mushroom stem right after harvesting[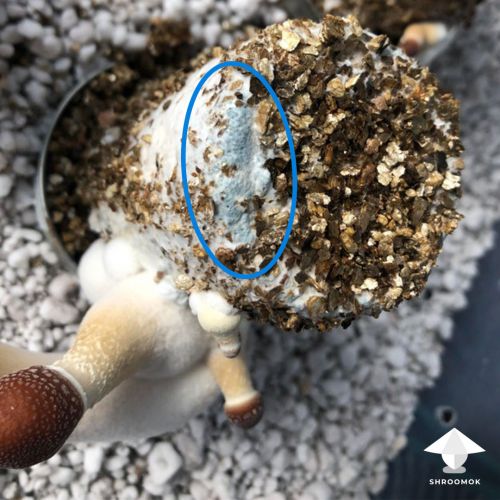](https://shroomok.com/en/wiki/File:Mycelium-bruising.jpg) Mycelium bruising❓Why magic mushrooms turned blue and bruised?
❓Is it contamination?
❓Is bruised mycelium and fruit bodies bad during growth?
❓How to avoid and what to do with bruising?
❓Bruises or Mold? How to find the difference?
Bruising is the reaction between psilocyn and oxygen. It’s not contamination! Such mushroom reactions could appear on mycelium and on fruit bodies. Blue color, blue-green or even black bruises is one of the signs of psilocybin mushrooms.
Bruising is a result of mechanical impact, when cell walls of mycelium or mushroom tissue are damaged. It can influence mushroom development.
Bruised mushrooms right harvesting is absolutely normal!
Mycelium bruises usually confused with green mold Trichoderma and blue-green mold Penicillium
> 🔴 **Check out details:** [Mycelium Bruises or Mold Contamination](https://shroomok.com/en/wiki/Mycelium_Bruises_or_Mold_Contamination "Mycelium Bruises or Mold Contamination")
##### 3. Mushroom Aborts
[](https://shroomok.com/en/wiki/File:Mushroom-abort-example.jpg) Mushroom abortsIf mushroom caps turned black and shrooms stop growing
🆘 Why mushroom caps turned black?
🆘 Why mushrooms stop growing?
🆘 Is it contamination?
🆘 Are they safe to consume?
☝️Mushroom aborts are primordia or small mushrooms that stop their development. These shrooms never become full-grown and never produce spores.
A distinctive feature of mushroom aborts are totally **black caps or dark-blue caps.**
Abortions are NOT contamination!
Moreover, such aborted shrooms are usually more potent than mature mushrooms. Take it into account!
> 🔴 **All about aborted shrooms:** [**Mushroom aborts**](https://shroomok.com/en/wiki/Mushroom_aborts "Mushroom aborts")
##### 4. Fuzzy feet, white dots on mushroom caps and long stems
[](https://shroomok.com/en/wiki/File:Fuzzy-feet-caps-in-mushroom-cultivation.jpg) Fuzzy feet, fluffy caps, long stems in mushroom cultivationIf you find fluffy base of stems, white dots on mushroom caps or your mushrooms have long stems and small cap
> 🔴 Check out for more details and examples: **[Why Mushrooms too Leggy, Fuzzy Feet and White Dots on Caps](https://shroomok.com/en/wiki/Why_Mushrooms_too_Leggy,_Fuzzy_Feet_and_White_Dots_on_Caps "Why Mushrooms too Leggy, Fuzzy Feet and White Dots on Caps")**
##### 5. Strange dark spots on mushrooms and mycelium
[](https://shroomok.com/en/wiki/File:Dark-spots-on-mushroom-caps-contam-or-not.jpg) Mushroom caps and mycelium turned blackStrange black spots suddenly appeared on mushroom caps and mycelium. Why is this happening? Is it contamination or not? Is it safe to take such mushrooms?
> 🔴 **Check out details and examples:** [Black spots on Mushrooms and Mycelium](https://shroomok.com/en/wiki/Black_spots_on_Mushrooms_and_Mycelium "Black spots on Mushrooms and Mycelium")
##### 6. Mycelium Metabolites or Mushroom Pee
[](https://shroomok.com/en/wiki/File:Mushroom-secondary-metabolites-exudate.jpg) Mushroom metabolites on mycelium🆘 Help! A strange yellow liquid appear on the mushroom mycelium
🆘 Why mycelium turned yellow?
🆘 Is it contamination? What to do?
Mycelium pigmentation, transparent yellow liquid without odors is secondary metabolites (aka mushroom exudate, mushroom urea, mushroom piss). It is a waste product of fungal metabolism
🔬 Biochemical analyses of the exudates showed that acid phosphatase, β-glucosidase, acid and alkaline protease, RNase polygalacturonase and cellulase enzymes as well as oxalic acid and ammonia were present.
It is not contamination! Metabolites are natural immune response of the mycelium to stress or pathogens (especially bacteria)
Newbie cultivators often confuse secondary Metabolites with Mycogon (aka Wet Bubble) contamination or with Aspergillus yellow spp. (Aspergillus flavus).
> 🔴 Let’s figure out in the section: [**Mycelium metabolites or mushroom pee**](https://shroomok.com/en/wiki/Mycelium_metabolites_or_mushroom_pee "Mycelium metabolites or mushroom pee")
##### 7. Cracked & split caps and stems
[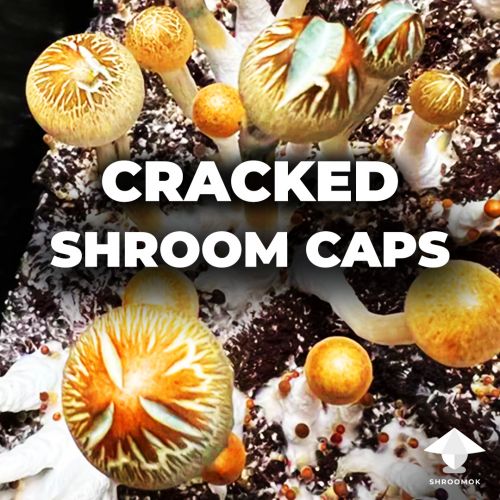](https://shroomok.com/en/wiki/File:Mushroom-caps-splitting-cracking-issue.jpg) Mushroom cap and stems splitting issueA split or cracked mushroom caps and stems are neither contamination nor a disease in this case. These symptoms indicate dehydration or imbalanced parameters in the fruiting chamber, which can be fixed. It can also be a genetic mutation that cannot be fixed
> 🔴 D**etails and examples: [Mushroom caps splitting and cracking issue](https://shroomok.com/en/wiki/Mushroom_caps_splitting_and_cracking_issue "Mushroom caps splitting and cracking issue")**
#### TOP Contamination in mushroom growing
##### 1. Green mold aka Trichoderma contamination
[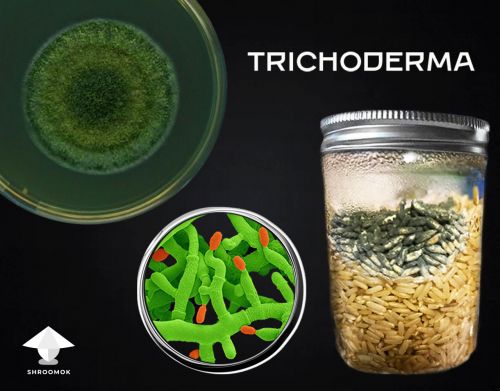](https://shroomok.com/en/wiki/File:Trichoderma-mold-contamination.jpg) Green mold contamination or TrichodermaI have a lot to say about Green Mold contamination: about identification, preventive measures, about additives for prevention, about Lime and Gypsum, what to do with contaminated mushroom cake and many many more...
I wanted to share a brief overview, however I have long read for you with details and many photo examples. Hope you’ll find useful insights here
> 🔴 **All about Trich contam: [Green mold contamination aka Trichoderma](https://shroomok.com/en/wiki/Green_mold_contamination_aka_Trichoderma "Green mold contamination aka Trichoderma")**
##### 2. Cobweb Mold contamination
[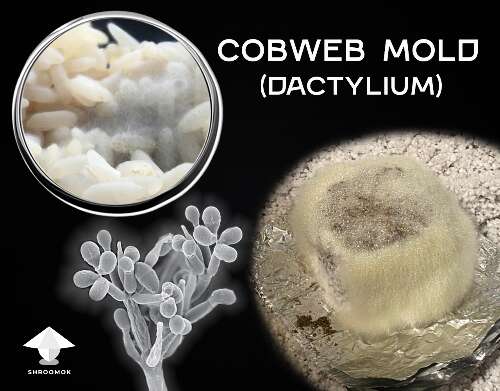](https://shroomok.com/en/wiki/File:Cobweb-mold-dactylium.png) Cobweb mold disease**Cobweb** is a common fungal disease of commercially and home cultivated mushrooms. It is caused by mold pathogens: *Dactylium* *spp., Cladobotryum* *spp., Hypomyces spp.* etc.
It is fast growing thin greyish mold that can appear on mushroom cake or spawn.
We remember the best and most common advice for treatment any kind of mold is *«Throw it away immediately!»*
But good news give us hope!
❇️ Actually, cobweb is considered a treatable disease. It is one of the few molds which can be slowed down or even destroyed with **3% hydrogen peroxide solution** or **salt application**
❓How to identify cobweb contamination?
❓Cobweb or mushroom mycelium?
❓Preventative measures of cobweb disease
❓Cobweb mold treatment guide
> 🔴 **Check out details: [How to identify and get rid of Cobweb Mold](https://shroomok.com/en/wiki/How_to_identify_and_get_rid_of_Cobweb_Mold "How to identify and get rid of Cobweb Mold")**
##### 3. Wet bubble disease aka Mycogone contamination
[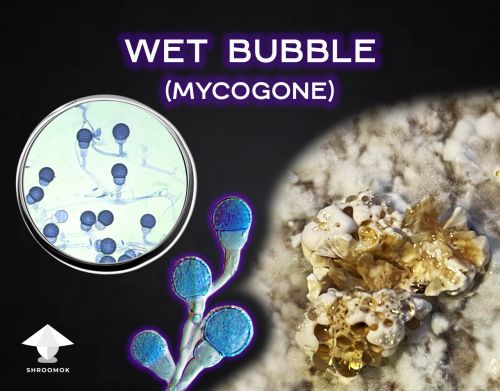](https://shroomok.com/en/wiki/File:Wet-bubble-mycogone-contamination-shroomok.jpg) Mycogone contamination aka Wet Bubble diseaseWet Bubble is a fungal disease caused by parasitic pathogen *Mycogone perniciosa,* that usually affected pinheads and mushrooms. It has a few often used names: mycogone, wet bubble, white mushroom mold, vesicular disease, La Mole.
The main features of mycogone contam are shapeless masses, fluffy blobs of mycelium ooze with amber yellow orange brown liquid. For newbie growers such symptoms easy to confuse with secondary metabolites.
❓How to identify Mycogone?
❓How to recognize whether it's mycogone or mycelium piss?
❓ Main causes of mycogone contam and how to prevent wet bubble?
❓ Is it possible to treat wet bubble disease?
> 🔴 **Check out details:** [Mycogone contamination aka wet bubble disease](https://shroomok.com/en/wiki/Mycogone_contamination_aka_wet_bubble_disease "Mycogone contamination aka wet bubble disease")
If you find my work helpful [🍄 Buy Shroomok a mushroom](https://www.buymeacoffee.com/shroomok) as a donation and say something nice!
Have a happy growing and healthy shrooms!
To be continued...
## Psilocybe growing problems - overlay, abortions, etc
[Psilocybe growing problems - overlay, abortions, etc](https://shroomok.com/en/wiki/Psilocybe_growing_problems_-_overlay,_abortions,_etc)
### Overlay and Stroma in Mushroom Cultivation
The process of cultivation psilocybin mushrooms is not only joy and pleasure. There are also difficulties and failures. Sooner or later every mushroom cultivator comes across them. Here I want to show you one of the most common problem in the growing process — ***overlay, stroma*** and related issues.
#### **What is overlay and stroma**
I have good news and I have bad news.
The good one — overlay and stroma are not contaminants. There is a chance to fix the problem.
The bad one — growing conditions for [pinhead initiation](https://shroomok.com/en/wiki/Fruiting_period._Pinhead_initiation,_mushroom_pinning_and_mushrooms_growth_parameters "Fruiting period. Pinhead initiation, mushroom pinning and mushrooms growth parameters") have not been met. So, you might not get harvest at all!
Mushroom growers don't distinguish the difference between overlay and stroma. Visually it's the same issue, because they look alike.
> ❗️Paul Stamets shares two definitions. He admitted overlay caused by wrong fruiting conditions and stroma caused by genetic changes
***Overlay*** — is a dense mycelial growth that covers the casing surface and shows little or no inclination to form pinheads. Mainly it caused by prolonged mycelial growth (colonization period) into the casing layer. 100% colonized bulk substrate are at such a risk. However, there are chances to fix the problem
***Stroma*** — is a dense, mat-like growth of mycelia or cushion-like aggregation of mycelium forming on the surface of composts or casings and indicative of somatic (vegetative), not generative growth. Such mycelium can absorb nutrients, but can't produce mushroom fruit bodies. At the fruiting stage the cultivator won't be able to influence such genetic changes in any way. Although inappropriate fruiting conditions can be a trigger for such genetic changes as well.
#### **How to identify overlay**
Visually it is a dense snow-white layer of mycelium resembling fluffy cottony clouds.
[](https://shroomok.com/en/wiki/File:Steps-of-mushroom-overlay.jpg) Step 1 - Start of stroma overlay. Step 2 - mushroom cake covered by stroma overlay[](https://shroomok.com/en/wiki/File:Micelium-overlay-fix.jpg) Overlay. Psilocybin mushroom cake after rehydration[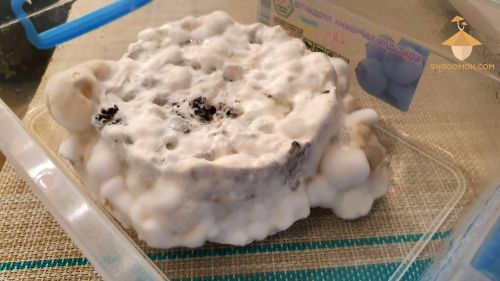](https://shroomok.com/en/wiki/File:Overlay-magic-mushroom-growing.jpg) Overlay and mycelium products[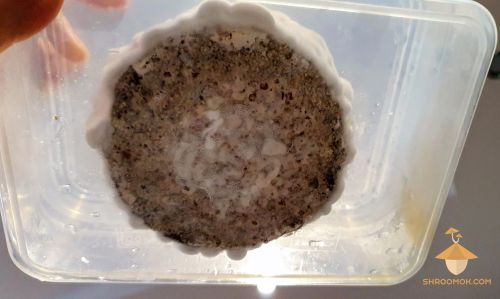](https://shroomok.com/en/wiki/File:Mycelium-overlay-growing-psilocybe-mushrooms.jpg) Mycelium overlay. Growing psilocybe cubensis
The difference between normal and overlayed mushroom cakes.
[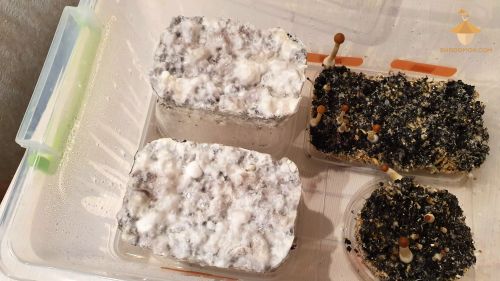](https://shroomok.com/en/wiki/File:Difference-between-fruiting-cakes-and-overlay.jpg) Difference between cakes with fluffy/down-like (tomentose mycelium) and fruiting cakes with a wiry-type structure (rhizomorph mycelium)To the touch neglected form of overlay like cotton pads or polyurethane foam.
[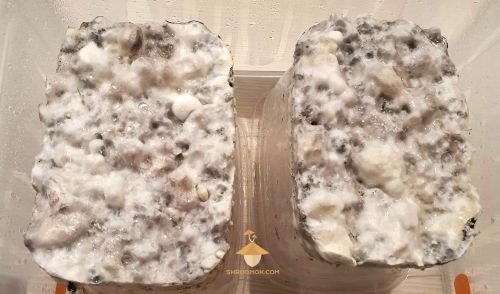](https://shroomok.com/en/wiki/File:Overlay-psilocybe-cubensis-growing-mushrooms.jpg) Overlay on both mushroom cakes
It can turn into a dense dry crust that block mushroom cake and doesn't allow air and moisture to pass through. Overlay often accompanied by [Mycelium secondary metabolites or mushroom pee](https://shroomok.com/en/wiki/Mycelium_metabolites_or_mushroom_pee "Mycelium metabolites or mushroom pee") (phase 2 on the photo).
[](https://shroomok.com/en/wiki/File:Mushroom-overlay-monotube.jpg) 1 - start of overlay. 2 - mycelium turned into crust of overlay[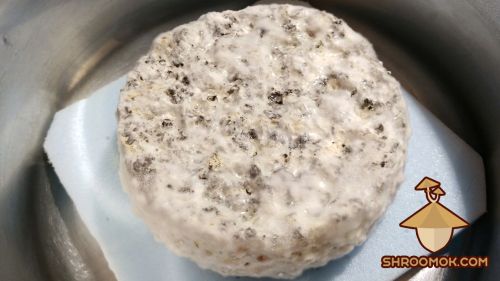](https://shroomok.com/en/wiki/File:Overlay-psilocybe-growing-problems.jpg) Strange cottony mycelium or mycelium crust[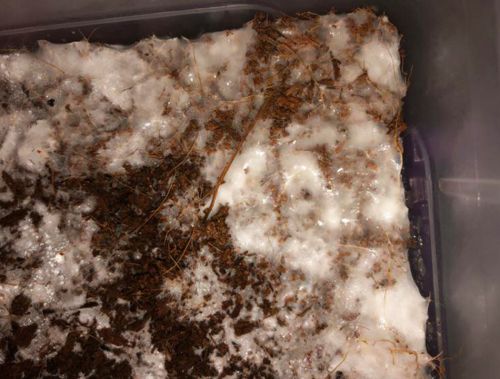](https://shroomok.com/en/wiki/File:Overlay-on-mushroom-cake.jpg) Mycelium crust of overlay stroma.#### Main causes of overlay
⛔️ Overlay can form **in a spawn jar due to prolonged colonization period in incubator**. However, it's not a problem. Remove mycelium overgrowth and use grain spawn for the next step ([Spawn to Bulk](https://shroomok.com/en/wiki/Making_mushroom_cake,_spawn_to_bulk,_and_casing "Making mushroom cake, spawn to bulk, and casing")).
[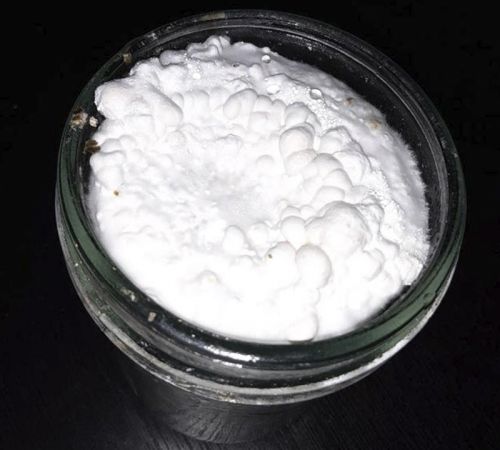](https://shroomok.com/en/wiki/File:Overlay-in-spawn-jar.jpg) Overlay in spawn jar
⛔️ **Prolonged bulk colonization period.** You should provide fruiting conditions when 70-90% of the top layer is covered with mycelium.
Here is an example when fruiting conditions for mushroom cakes were provided too late. Top layer is fully covered with mycelium and fluffy clouds started to form.
[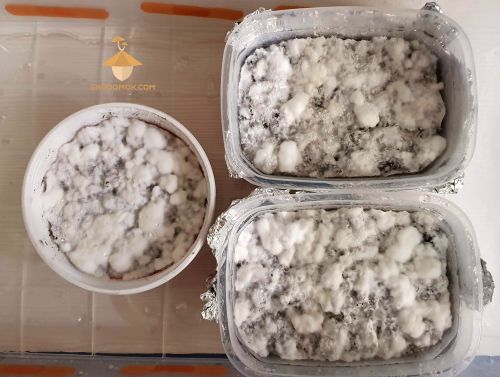](https://shroomok.com/en/wiki/File:Fungi-cakes-before-overlay-F%2B-strain.jpg) Fluffy overlayed cakes. Psilocybe Cubensis F+
⛔️ **Too dry or too wet top layer and bulk substrate.** Control [bulk substrate field capacity](https://shroomok.com/en/wiki/Making_mushroom_cake,_spawn_to_bulk,_and_casing#Bulk_substrate_field_capacity) to have perfect moisture balance.
⛔️ **Imbalanced fruiting conditions:** CO2, temperature, relative humidity.
Use air monitor to track basic fruiting parameters during mushroom fruiting period: temperature, relative humidity, CO2 level
[](https://shroomok.com/en/wiki/File:Digital-CO2-sensor-air-quality-detector.jpg) Air Quality monitor: Digital СO2 detector + Thermometer + Hygrometer**Shroomok's Choice on Amazon:**
[Mini Air Analyzer 3-in-1: CO2, Temperature, Humidity](https://amzn.to/3oH3WuQ) $45.99
[8-in-1: CO2, Air Pollution, Temperature, Humidity](https://www.amazon.com/gp/product/B08Q7YMX9X/ref=as_li_tl?ie=UTF8&tag=shroomok-20&camp=1789&creative=9325&linkCode=as2&creativeASIN=B08Q7YMX9X&linkId=bfe4b8046f03e17c3256ec0004a763e6) $59.98
⛔️ **High carbon dioxide (CO2) concentration** (above 1000-1500 ppm) for a long period.
> Recommended CO2 concentration for Psilocybe Cubensis is 600-1000 ppm
⛔️ **Low relative humidity** in the fruiting chamber (less than 85%) **+ high CO2** concentration.
⛔️ **High temperature** for a long period. 77F (+25°C) and higher for Psilocybe Cubensis.
⛔️ **High evaporation rate + high RH + high CO2.** The humidity level in the fruiting chamber is high, but it is provided by extreme evaporation from the top layer, thus mushroom cake dries out quickly. In combination with high CO2 dry crust appears on top layer.
⛔️ **Acid grain spawn and bulk substrate (pH 6.5 and lower).** To prevent substrate acidification:
\- Adjust the **grain pH to 7.0-7.5.** Use a combination of hydrated lime and gypsum. Approximately 5-10 grams of lime and gypsum are added per one kilogram of cooked grain.
\- Adjust the **bulk substrate pH 7.5-7.8.** Use hydrated lime to raise the pH at the very beginning, at the mixing stage and then use gypsum in the amount of 2-10% of the amount of dry substrate to prevent pH fluctuations later.
> Gypsum (calcium sulphate) is not used to raise the pH. Gypsum contains both calcium carbonate and sulphur. Therefore, it tends to maintain the pH near neutral, **preventing pH fluctuations**
\- Adjust the **casing substrate pH 7.5-8.0** by using buffering agents like hydrated lime.
> Details are in [Spawn to Bulk and Casing](https://shroomok.com/en/wiki/Making_mushroom_cake,_spawn_to_bulk,_and_casing "Casing of magic mushrooms cakes")
⛔️ **Strain degeneration, aged genetics.** As mushrooms strains get older, they begin to develop anomalies as random mutations accumulate. Such genetics are capable of vegetative (mycelium) growth only, where mycelium absorb nutrients, but can't form pins and develop fruit bodies.
⛔️ **Aged mycelium.** If the grain spawn jars were stored for too long (over 3 month) this can cause genetic changes and stroma growing.
⛔️ Overlay and stroma is often a **complex of several factors:**
- dry mycelium due to high evaporation rate + high CO2 = overlay
- high CO2 + high RH and water drops on mycelium = overlay
- high t° + low RH + high CO2 = overlay
- low RH + high CO2 = overlay
- dry top layer + high CO2 = overlay
- dry top layer + low RH + high CO2 = overlay
- any of parameters (triggers) + genetic issues = stroma
If you have constantly high temperature in the fruiting chamber, too high or too low relative humidity (RH) with extreme CO2 level, mycelium continue vegetative (mycelial) growth and won't form pinheads.
> 🔴 Recommended: **[Fruiting period. Pinhead initiation and mushrooms growth parameters for Psilocybe Cubensis](https://shroomok.com/en/wiki/Fruiting_period._Pinhead_initiation,_mushroom_pinning_and_mushrooms_growth_parameters "Magic mushrooms fruiting")**
#### How to fix overlay and initiate pin setting
It is impossible for mushroom pins to break through the thick layer of mycelium and start fruiting. Because the top layer of mycelium is literally dead.
Stage 1 on the photos below are mushroom cakes at the start of overlay formation. Stage 2 - is already overlayed cake.
[](https://shroomok.com/en/wiki/File:Steps-of-mushroom-overlay.jpg) Step 1 - Start of stroma overlay. Step 2 - mushroom cake covered by stroma overlay[](https://shroomok.com/en/wiki/File:Mushroom-overlay-monotube.jpg) 1 - start of overlay. 2 - mycelium turned into crust of overlaySuch problem can be handled by adjusting fruiting conditions, fork-tek, using **casing or pseudo-casing layer**
##### 1. Fix fruiting conditions
First stage of overlay (phase 1 on the photos) is easy to fix by balanced fruiting conditions.
Reduce excessive CO2 level by increasing fresh air exchange. Gently introduce fresh air every 4-6 hours manually. Just open the lid of the tub for 1-2 minutes.
Maintain relative humidity around 90%. The walls of fruiting chamber should be covered with small water drops.
Air temperature in the fruiting chamber should be around 70-74°F or +21°..+23°C.
> In 5-10 days first pins should appear
Great thing to use is aquarium air pump for constant FAE in the growbox. For sufficient FAE use air pump for 60 Gallons per hour and higher. This would be enough for the fruiting chamber of 30-80 Qt
[](https://shroomok.com/en/wiki/File:Aquarium-air-pump-for-growbox.jpg) Aquarium air pump for introducing FAE (180 L/hour)The aquarium air pump should be switched on 12-24 hours/day during this hard period. In this way fresh air move in the growbox all the time. There is a rock at the end of the hose, it should be dropped into a jar of water. This will filter the incoming air against contams.
[](https://shroomok.com/en/wiki/File:Growbox-with-air-pump-for-air-exchange-and-humidification.jpg) Growbox with aquarium air pump for FAE[](https://shroomok.com/en/wiki/File:Fruiting-chamber-for-mushrooms-with-air-pump-for-FAE.jpg) Fruiting chamber with air pump in the corner**Shroomok's Choice on Amazon:**
[Quiet Oxygen Pump for 20-100 Gallon - 2 Outlets](https://www.amazon.com/gp/product/B07RJ3XLM8/ref=as_li_tl?ie=UTF8&tag=shroomok-20&camp=1789&creative=9325&linkCode=as2&creativeASIN=B07RJ3XLM8&linkId=a95f2e7fd5ddd905a223db6e6ef7b9e3) - $15.99
[Powerful Air Pump - for 20-200 Gallon - 2 Outlets](https://www.amazon.com/gp/product/B08HMZSH9J/ref=as_li_tl?ie=UTF8&tag=shroomok-20&camp=1789&creative=9325&linkCode=as2&creativeASIN=B08HMZSH9J&linkId=129cc0f3bc777d413baed339a79e2a6c) - $22.89
##### 2. Fork tek and Casing
You may think this method is too cruel, but it works great for significant overlay (stage 2).
This method also works for Psilocybe Natalensis overlay, which is the main issue for this species.
> Check out real case: [Natalensis grow bag fruiting and overlay problems](https://shroomok.com/en/wiki/Natalensis_grow_bag_fruiting_and_overlay_problems "Natalensis grow bag fruiting and overlay problems")
Step 1. Scratch the mycelium with sterile fork aka Fork Tek.
> The fork should be sterile! Wipe it with iso alcohol. Otherwise, you increase the risk of contamination
[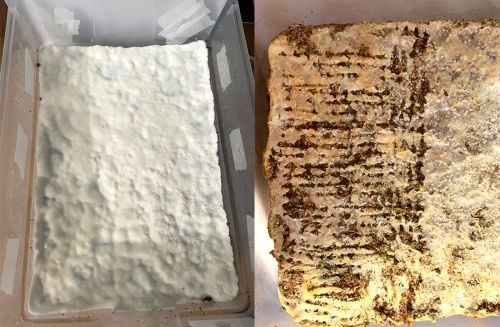](https://shroomok.com/en/wiki/File:Stroma-overlay-mushroom.jpg) Overlayed mushroom cake and fork-tek
In this way we remove the crust and give an air access for mushroom cake. But don't scratch it off completely!
[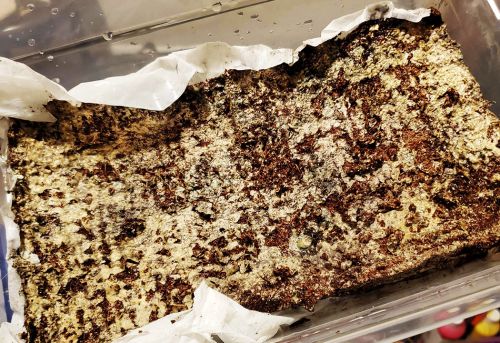](https://shroomok.com/en/wiki/File:Fork-tek-stroma-overlay.jpg) How to deal with overlay? Mushroom cake after fork scratching
**Step 2. Make a casing or pseudo-casing layer**
**Casing layer recipe and advantages**
Grain for spawn is a highly nutrient substrate for producing mycelium, till too much nutrients mycelium continues colonisation phase and don't want to produce mushroom fruits.
Bulk substrate (coco coir mix) is a source of water and less nutrient.
True casing layer is a **non-nutrient** substrate that promotes pinning. The mycelium thinks it’s getting choked off and fights to fruit so it can deliver its spores and live on. Casing layer is a sign for mycelium "No more nutrients! Hurry up! Go go go, save your genes!" And boom! Fruits are coming for sporulating!
The recipe for casing layer:
- sphagnum aka peat moss - 2-3 cups
- vermiculite - 1 cup
- hydrated lime aka calcium hydroxide - 0,5-1 tbsp
- water - 1-1,5 cup
Sterilization in a pressure cooker or instant pot at 10-15 psi for 1 hour.
Let the jar cool down to room temperature.
**Pseudo-casing layer recipe**
Less effective method, because coco coir is relatively nutrient. However if you don't have a peat moss it works as well.
The recipe for casing layer:
- coco coir - 130g or 1/5 coco brick
- vermiculite - 1.6 cups
- hydrated lime aka calcium hydroxide - 1 tbsp
- water - 3.6 cups or 0.9 qts
Check field capacity (balanced moisture level). A good way to test it is to grab a handful of the substrate mixture and squeeze it in your hand.
⛔️ If you are unable to squeeze out any water, it is too dry. Add more chilled boiled water.
⛔️ If a light squeeze causes a stream of water to come out, it’s too wet. Squeeze the substrate before use.
✅ You want to be able to squeeze the mixture as hard as you can, and only have a few steady drops come out to have a field capacity moisture level. This is perfect!
Make sterilization or pausterization as for bulk substrate in bucket or pot. Or you can fill the jar with ready substrate and put it in pressure cooker at 10 psi or instant pot for 1 hour or pausterize in a microwave. Let the jar to cool down to room temperature.
**Step 3. Cover the cake with casing layer**
Mushroom cake right after the fork tek.
[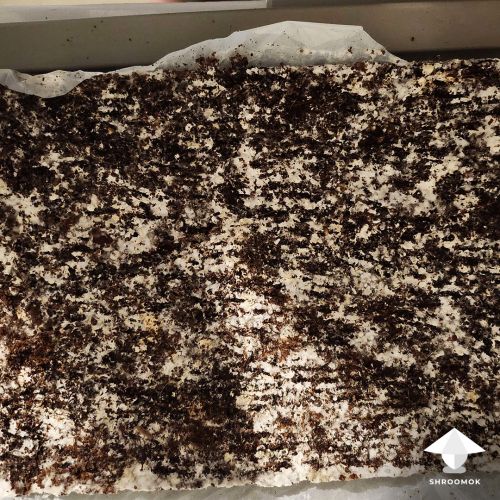](https://shroomok.com/en/wiki/File:Mushroom-cake-right-after-fork-tek.jpg) Mushroom cake right after fork tekAdd 1/4-1/2 inch or 0,5-1,5 cm of casing layer on top of the cake. Casing doesn't require colonization conditions, provide fruiting conditions right after casing
[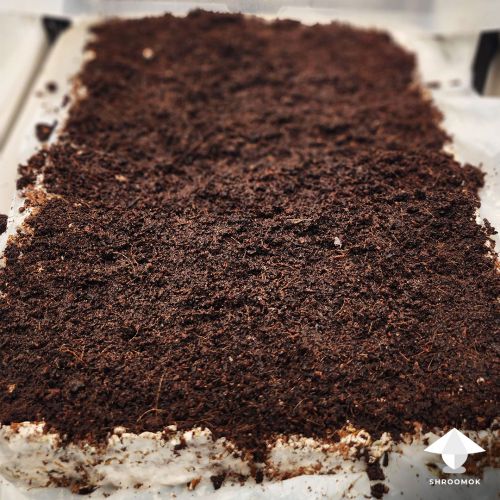](https://shroomok.com/en/wiki/File:Mushroom-cake-with-pseudo-casing-layer.jpg) Mushroom cake covered with pseudo casing layer. Photo: Prof. Frags
Usually in 3-7 days first pins appear
[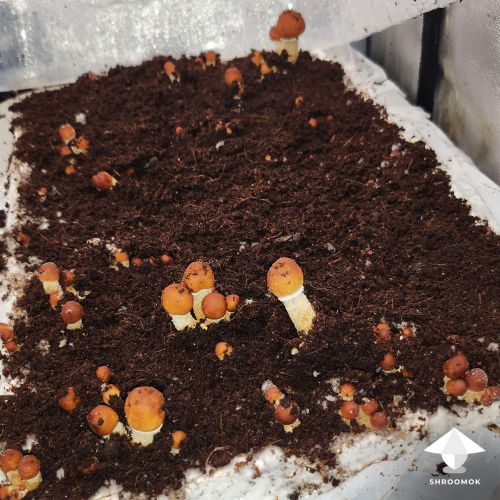](https://shroomok.com/en/wiki/File:Mushroom-fruiting-after-fork-tek-and-casing.jpg) Mushroom fruiting, 2-3 days after after fork tek and casing. Photo: Prof. Frags
Mushroom blooming!
[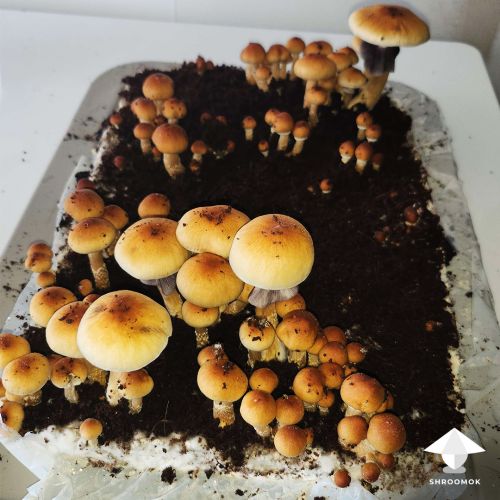](https://shroomok.com/en/wiki/File:Fixed-overlay-and-mushroom-fruiting.jpg) Active fruiting after overlay. Photo: Prof. Frags##### 3. Fork tek and rehydration with cold shock
This method will be useful for dry cake with overlay.
Scratch the overlay
[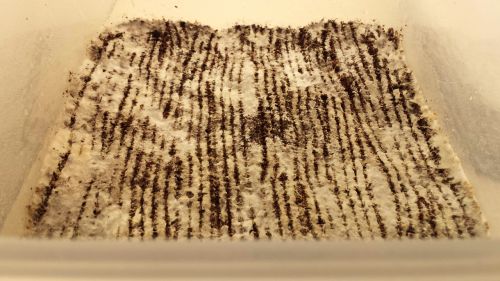](https://shroomok.com/en/wiki/File:Fork-tek-overlay.jpg) Overlay and fork-tekIf overlay wasn't removed, then rehydration is absolutely useless. Mycelium will work like a film and won't absorb water. The demonstration in the photo below
[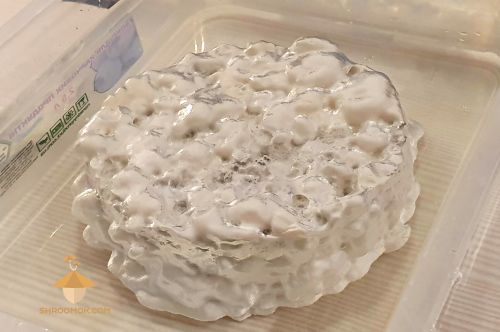](https://shroomok.com/en/wiki/File:Mushroom-overlay-fungi-growing.jpg) Magic fungi cake with overlay in the water. Mycelium is watertightSoak mushroom cake/block in cold water with added ice for 2-4 hours. Cold shock works as a trigger for pinning, can inhibit the aggressive mycelium growth and stimulate pin setting.
> Recommended: [How to rehydrate mushroom cake](https://shroomok.com/en/wiki/Rehydration_of_psilocybe_cakes "Rehydration of psilocybe cakes")
Casing layer after soaking in water and cold shocking is optional, but highly recommended!
#### Case with Salty Coco Coir or How Sodium in bulk substrate causes mycelium overlay
Here is an exceptional mushroom growing story worth telling you about. Details in the dialog!
> QN: Hi Shroomok! Thank you so much for your help and interest in my issue. Finally, I found the parameter that was blocking fruiting and causing the constant overlay. I've described the problem and would like to share my case with shroomok community. Maybe you'll add it to your blog post. I hope it will be useful to someone. Regards, QN
Hello, I once came here with a problem, and I received tremendous support from you. You are an amazing community! After **8 months of failures**, I solved my issue, and I want to share my insights with you.
**Who might be affected by this problem** – growers living in tropical countries.
**The issue** – constant OVERLAY and zero pins due to high salinity of coconut coir. A few examples:
[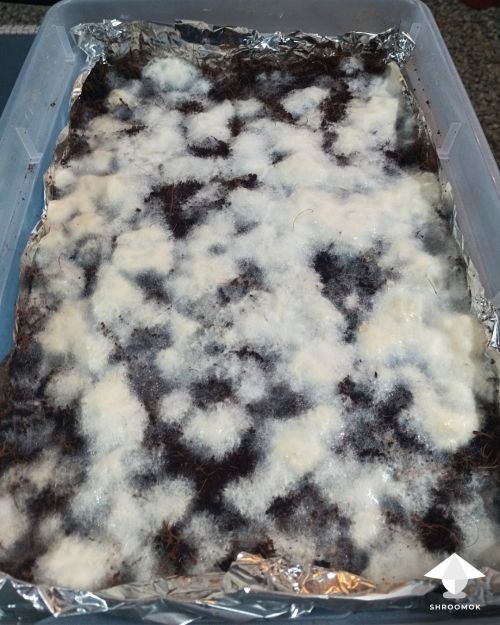](https://shroomok.com/en/wiki/File:Overlay-zero-pins-salty-coco-coir.jpg) Fluffy growth turning the crust, zero pinning[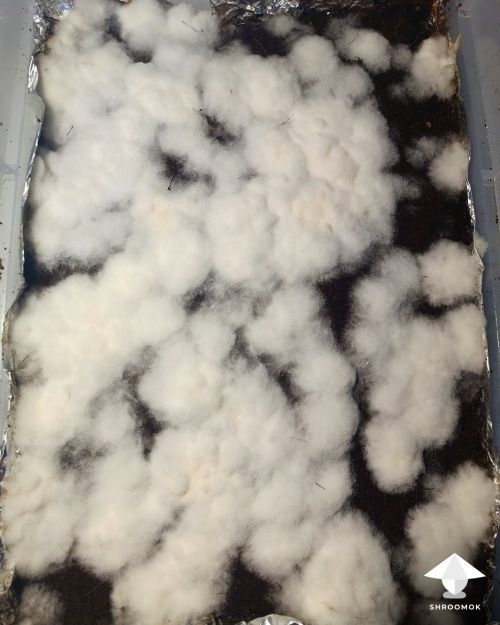](https://shroomok.com/en/wiki/File:Overlay-salty-coco-coir.jpg) Overlayed mycelium[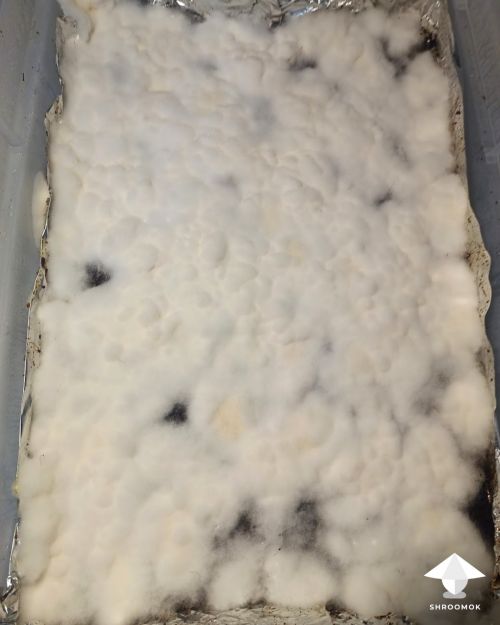](https://shroomok.com/en/wiki/File:Overlay-salted-bulk-substrate.jpg) Thick overlay cover**Introduction** – I am from Poland, and 20 years ago, I successfully ran a mushroom farm, learning the basics of cultivation and growing on agar. Now I live in Costa Rica and decided to start growing again, beginning with the simplest strain, Golden Teacher.
**Observations** – the mycelium colonized the grain (corn, rye) at a very fast pace. After inoculating the substrate, colonization occurred literally within a few days. Upon providing FC, a thick mycelium layer always formed within a few days, up to 2 cm thick. Forking (fork-tek), using succulent soil as a casing, and cold shocking didn’t yield any results; the mycelium always grew excessively, forming a thick layer but never produced fruit bodies. There were also large amounts of metabolites, and the mycelium was clearly very stressed.
**Reflections** – I had ideal colonization conditions, perfect fruiting conditions; there had to be some damn parameter in the substrate. Around the world, people buy COMPRESSED coconut coir in supermarkets or garden stores, and this coir likely comes from coconut plantations that probably don’t grow on the beach. These are plantations.
In Costa Rica, coconut coir is sold in bags from local producers, but there are no plantations here; coconut palms only grow on beaches by the ocean, so they may be salty.
> After purchasing a salinity tester, I found that the coconut coir had **1300 ppm of salt!** **And that was the damn parameter!**
**Solution to the problem** – salty coconut coir (mine was 1300 ppm, Ph 6.0) should be rinsed 4 or 5 times. For the first 4 rinses, leave the coir in water for 30 minutes and change the water, and ideally, leave the final rinse for 12 hours. After this process, you will get 40 ppm of salt and Ph 7.0.
First results – I used the salty, colonized substrate I already had as a spawn and mixed it with desalted coconut coir. After 5 days of colonization, I moved it to FC, and after another 10 days, the first fruit bodies appeared!
8 months of failures, but what knowledge and satisfaction I’ve gained! I hope my experience and observation help at least someone from tropical countries.
**Shroomok:** QN, huge thank you for sharing your experience! It's a great pleasure to share your story.
Your case confirms that Sodium (Na) is what is really poisonous to mycelium!
> Sodium (Na) is an antifungal agent and inhibits the growth of fungal mycelium, affect mushroom metabolism. As a result inhibits mushroom pinning and fruit bodies development.
That's why baking soda (NaHCO3) that contains (Na) never used for substrates' pH adjusting. Salt (NaCl) never been known as a beneficial additive. Although salt and soda are used for making [salt/soda application](https://shroomok.com/en/wiki/How_to_identify_and_get_rid_of_Cobweb_Mold#Salt_application_for_cobweb_mold_treatment) for treating small contaminated areas on mushroom cake. Such patch helps to seal the contaminated area and inhibit fungal pathogen, because Sodium (Na) affects any type of fungi, including molds.
Coming back to your case, I once had the same problem with salty coco coir. In my case it was also no name coco coir, but in BRICKS (compressed). I don't remember exactly what was the ppm level on the tester, around 1200 ppm or so. I had to soak and wash coir 3 times to reduce it. I briefly mentioned this factor in [Spawn to bulk and Casing](https://shroomok.com/en/wiki/Making_mushroom_cake,_spawn_to_bulk,_and_casing#Salted_coco_coir) article. But I thought it's very rare case to talk about, just my own one-time accident. Now I see, I'm not alone. Moreover, this is a problem that anyone can face, not just growers living in tropical countries.
**QN:** I’m glad I was able to figure out the cause of the problem, and now I’m harvesting huge yields! It’s great that even the mushrooms outdoors, in the garden and in pots, are growing beautifully. I see that I’m not the only one who has encountered the issue with salty coco coir – it seems to be more common than I thought.
#### **Useful notes for overlay treatment and prevention**
🔴 Usually overlay indicates faults in the growing process. Check your growing conditions first. Early overlay is possible to fix by changing some fruiting parameters.
🔴 For fork tek scratching use sterile fork (treat it with alcohol). Don't touch casing layer with your hands. This can be a vector of contamination. Use sterile gloves (treated with alcohol) when work with mushroom cake.
🔴 After fork-tek you may notice that mushroom cake is completely dry (more than 3 weeks after providing fruiting conditions). In this case [rehydration](https://shroomok.com/en/wiki/Rehydration_of_psilocybe_cakes "Rehydration of psilocybe cakes") is recommended.
🔴 Casing layer is optional, but highly recommended. Use casing layer 1/4-1/2 inch or 0,5-1,5 cm after bulk colonization to prevent overlay and stimulate pinning. Casing also works as a treatment for overlay and pinhead initiation.
🔴 Fork-tek is stressful for mycelium. It takes about 1-2 weeks for recovering and start of pinning. Be patient.
🔴 Overlay is a frequent companion of Tomentose mycelium (fluffy, cottony, cloudy). Rhizomorphic mycelium is less prone to overlay.
🔴 If you notice aggressive cottony mycelium growth in spawn jar/bag then mix spawn to bulk in 1:3 or 1:4 ratio. Less nutrients is better.
🔴 Even if you haven't made mistakes during the colonization and fruiting phase the cause of stroma overlay may be due to strain genetics. In this case the mycelium is only capable for vegetative growth. It will actively consume nutritions, but will not be able to form fruiting bodies. Alas, you won't get mushrooms from such cake even in ideal fruiting conditions.
🔴 **High Sodium (Na)** and **low pH level** of bulk substrate. Check the pH and salinity of your bulk substrate before using it.
#### **More failures with overlay**
One more example with overlay in my growing experience was Psilocybe Cubensis F+. It was aggressive colonization of grain substrate. The first signs of mycelium in the jars were already 4 days after inoculation. When casing was 60% colonized with mycelium the fruiting conditions were provided.
Overlay happened at the fruiting stage in the growbox at +21°...23°C, humidity 95% and FAE 4-6 times a day - fruiting conditions that were perfect for other strains.
Eventually, I haven't got mushrooms from these cakes at all.
I played with different options to promote pinning. Each mushroom cake with stroma overlay was subjected to a number of experiments: fork-tek, fork-tek with [rehydration](https://shroomok.com/en/wiki/Rehydration_of_psilocybe_cakes "Rehydration of psilocybe cakes"), [cold-shocking](https://shroomok.com/en/wiki/All_you_need_to_know_about_cold_shock_for_magic_mushrooms "All you need to know about cold shock for magic mushrooms"). Casing layer promote some hyphal knots that stalled later.
None of the cakes were successful. They covered with a new white fluffy mycelium. No pins. No shrooms.
After 75 days after inoculation and all experiments I said goodbye to three Psilocybe Cubensis F+ cakes.
[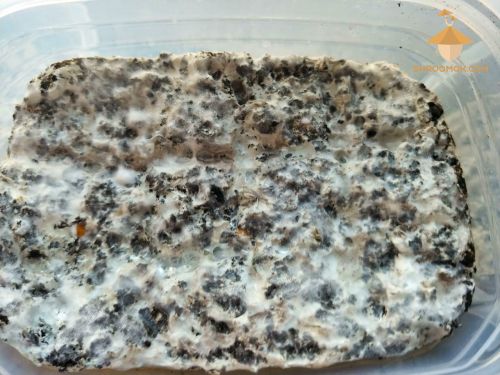](https://shroomok.com/en/wiki/File:Mycelium-overlay-cake-growing-magic-fungi.jpg) Psilocybe Cubensis cake 1, F+ strain. 75 days after inoculation[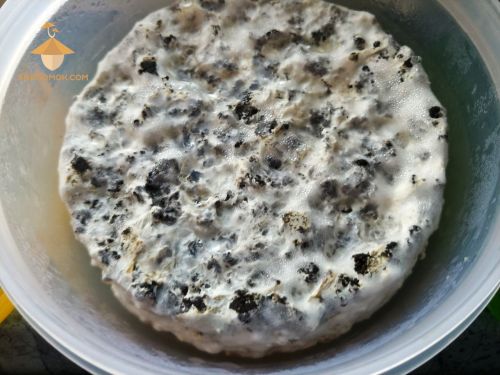](https://shroomok.com/en/wiki/File:Psilocybe-cubensis-micelium-overlay.jpg) Psilocybe Cubensis cake 2, F+ strain. 75-th day after inoculation. Cake with overlay before disposing[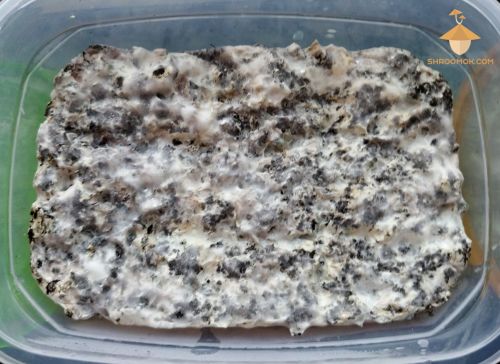](https://shroomok.com/en/wiki/File:Psilocybe-mushroom-micelium-overlay.jpg) Psilocybe Cubensis cake 3, F+ strain. 75-th day after inoculation. Cake before disposing.#### Accompanying problems with overlay
🔴 Check out: [**Mushroom aborts**](https://shroomok.com/en/wiki/Mushroom_aborts "Mushroom aborts")
🔴 Check out: [**Mycelium metabolites or mushroom piss**](https://shroomok.com/en/wiki/Mycelium_metabolites_or_mushroom_pee "Mycelium metabolites or mushroom pee")
#### Afterwords
Check out the section [Contams & Troubleshooting](https://shroomok.com/articles:mushroom-growing-troubleshooting) to explore more cultivation problems and contaminations.
More photo examples in [📸 Growing Problems photo gallery](https://shroomok.com/gallery/growing-problems)
More overlay examples in [Overlay photo gallery](https://shroomok.com/gallery/overlay)
Join Shroomok Community on **[Discord](https://discord.gg/ngKhQDmymD)** and **[Reddit](https://www.reddit.com/r/Shroomok)** for questions and sharing experience.
If you find this guide helpful, please support me with a cup of coffee on [☕️ buymeacoffee](https://www.buymeacoffee.com/shroomok)
You can also leave your **questions and** **comments on this page below** ⬇️
Have a happy growing and healthy shrooms!
Peace, Shroomok ❤️
## Mycelium Bruises or Mold Contamination
[Mycelium Bruises or Mold Contamination](https://shroomok.com/en/wiki/Mycelium_Bruises_or_Mold_Contamination)
[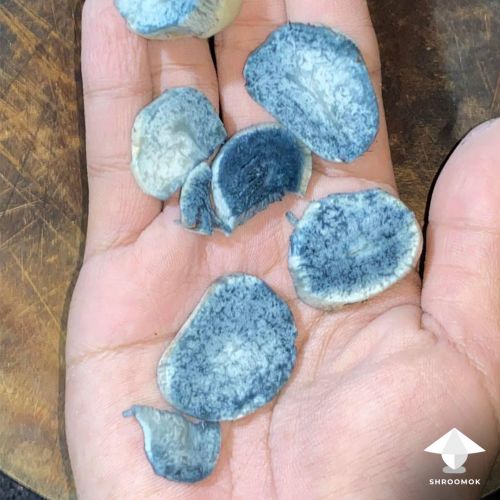](https://shroomok.com/en/wiki/File:Stem-bruises.jpg) If you cut the mushroom bruises appear in a few seconds### Why magic mushrooms and mycelium turned blue and bruised
#### What is mushroom bruising
Fist of all, it is not contamination! This reaction is of great interest to chemists. Because exact cause of mycelium bruising is still not well studied yet.
It is believed the main cause of mycelium and mushrooms bruises is oxidize. As you know, magic mushrooms contain psilocybin and psilocin. These are the main alkaloids.
In the presence of oxygen psilocybin is more stable. But psilocin readily forms bluish and dark-blue decomposition products. The bluish reaction or bluish-green is obvious in the most potent species. The less psilocin there is in a species, the more subtle the bluish reaction.
> Bruising is the reaction between psilocin and oxygen. It’s not contamination!
Such mushroom reactions could be on the mycelium and on the fruit bodies. Blue color, blue-green or even black bruises is one of the signs of psilocybin mushrooms.
[](https://shroomok.com/en/wiki/File:Albino-penis-envy-spore-swab-preparation.jpg) APE mushroom bruises> It is also found out that not only exposure to oxygen cause mycelium or mushrooms bruises. Another cause for the mycelium bruising is believed to be the presence of a metal ion like copper in the mycelium. This may be the reason why some non-psychoactive mushrooms get bruised as well
#### Why bruises appear during fruiting period
> Bruising is a result of mechanical impact, when cell walls of mycelium or mushroom tissue are damaged
🔵 If you touch the mushroom body or mycelium
[](https://shroomok.com/en/wiki/File:Mycelium-bruising.jpg) Mycelium bruises🔵 After shaking the jar/bag with mushroom spawn
🔵 Hard misting. Water drops rolled down the mushroom body and influence the mushroom tissue or mycelium
[](https://shroomok.com/en/wiki/File:Mycelium-bruising-after-hard-misting.jpg) Mycelium bruising after hard misting (directly on mycelium). Photo by u/bluesplatema - Shroomok Community on [Reddit](https://www.reddit.com/r/Shroomok/)🔵 Hard fanning, when air currents can irritate mushrooms or mycelium
> Real case: My fungi and mycelium turned a blue color about 2 hours after I misted them and lightly fanned. What’s going on here?
[](https://shroomok.com/en/wiki/File:Bruises-on-magic-mushroom-body.jpg) Bruises on psilocybin mushrooms after hard misting and fanningThis case is a good example of hard fanning and misting. You can see bruises from the one side of mushroom stem, where air flow or water spraying irritated mushroom "skin"
🔵 Extreme bruising is normally found on harvested mushrooms, their stems and stumps
[](https://shroomok.com/en/wiki/File:Bruises-on-mushroom-stem-after-harvesting.jpg) Bruises on mushroom stem after harvesting🔵 Bruising because cake and mycelium dehydrated or after water puddles on top layer. In this case mycelium dry out, loses its flexibility and becomes "brittle". Dehydration bruising is often widespread on the mycelium or around the base of pins and around the base of mushrooms
[](https://shroomok.com/en/wiki/File:Mycelium-bruising-example.jpg) Mycelium bruising, top layer dry out and provoke bruising🔵 Mycelium bruises on agar, when you cut a piece of mycelium for agar transfer
[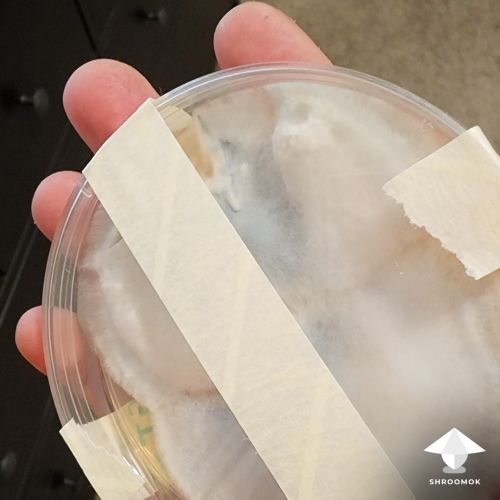](https://shroomok.com/en/wiki/File:Bruises-on-mycelium-after-agar-transfer.jpg) Blue mild bruises on mycelium after agar transfer[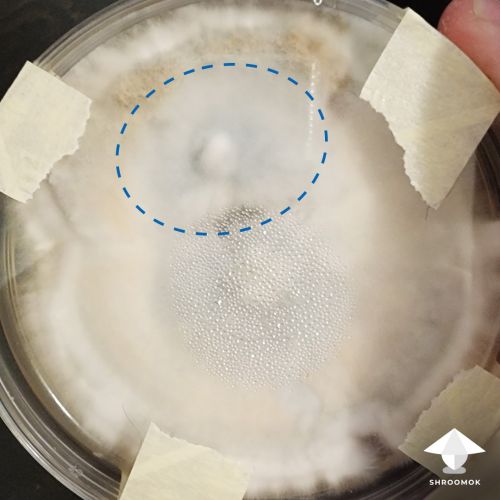](https://shroomok.com/en/wiki/File:Mycelium-bruising-on-agar.jpg) Mycelium bruising on agar
🔵 Bruises on dry mushrooms
[](https://shroomok.com/en/wiki/File:Mushroom-bruising-on-dry-mushrooms.jpg) Mushroom bruising on dry magic mushrooms#### Is bruised mycelium and mushrooms bad
Bruising is not contamination. But it is often bruised damaged parts of the mycelium won't produce mushrooms. Sometimes mycelium can recover damaged parts. The parts of the mycelium which aren't damaged can still be producing healthy mushrooms.
Extreme bruising on mushroom bodies **during fruiting period** influences their development and potency.
Bruising during picking/harvesting mushrooms is impossible to avoid and this is absolutely normal!
[](https://shroomok.com/en/wiki/File:Bruises-on-mushroom-stem-harvesting.jpg) Bruises on mushroom stem during harvesting#### How to avoid and what to do with mycelium bruising
🔷 Be gentle with your mycelium and mushrooms. They are super sensitive!
🔷 Don’t touch mushrooms and mycelium during fruiting period
🔷 Don’t spray on the mycelium and mushrooms directly! If you maintain high humidity of the fruiting chamber by spraying it with water, spray on the walls of the tub only. Use ultra fine mister
🔷 Don’t turn on the fan very hard. It will be enough to open your tub for 5 minutes or use PC fan on slow mode and gently introduce fresh air
🔷 In case of mycelium bruising because of dry mycelium your mushroom cakes need rehydration and proper relative humidity in fruiting chamber (not less than 90%)
#### Difference between Mycelium Bruising and Mold Contamination
##### Bruises and Green mold *Trichoderma*
It's always confused newbie growers, because green mold *Trichoderma spp. (T. harzianum, T. viride, T. koningi)* have white then green color
[](https://shroomok.com/en/wiki/File:Trichoderma-mold-contamination.jpg) Trichoderma mold contamination[](https://shroomok.com/en/wiki/File:Mushroom-bruises-vs-trich-mold.jpg) Mushroom bruises and Trichoderma mold
All in one: mycelium bruising (blue) and trich mold (green) on mushroom cake
[](https://shroomok.com/en/wiki/File:Trich-and-bruises.jpg) Trich (green) and mycelium bruises (blue) on mushroom cake> 🔴 All about Green Mold: **[Green mold contamination aka Trichoderma](https://shroomok.com/en/wiki/Green_mold_contamination_aka_Trichoderma "Green mold contamination aka Trichoderma")**
##### Bruises and blue-green mold *Penicillium*
Blue-green mold *Penicillium spp.* also have blue-green color
[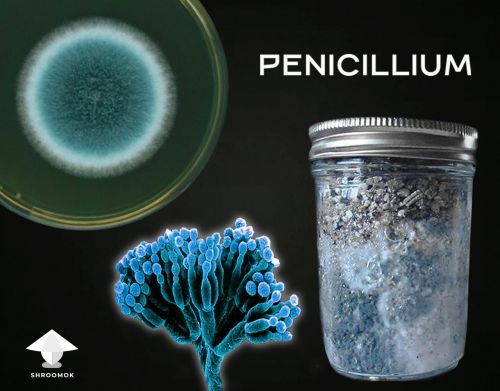](https://shroomok.com/en/wiki/File:Pennicilium-mold.jpg) Blue mold contamination (Penicillium)[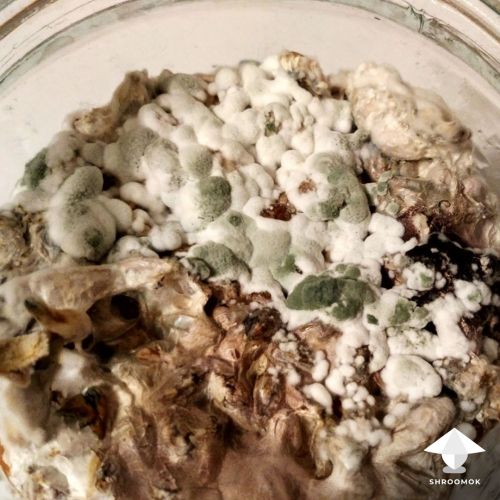](https://shroomok.com/en/wiki/File:Trichoderma-mold-identification.jpg) Green mold with powdery (green) and marshmallow (white) texture, could be Penicillium blue-green mold> ❗️Remember, the main hallmark of molds (Trich, Penicillium) is a powdery and/or marshmallow texture
##### Bruising on mycelium that hard to identify
Bruised not contaminated mycelium can also have greenish tinge. Here was the most difficult case for identification bruises, take a look!
[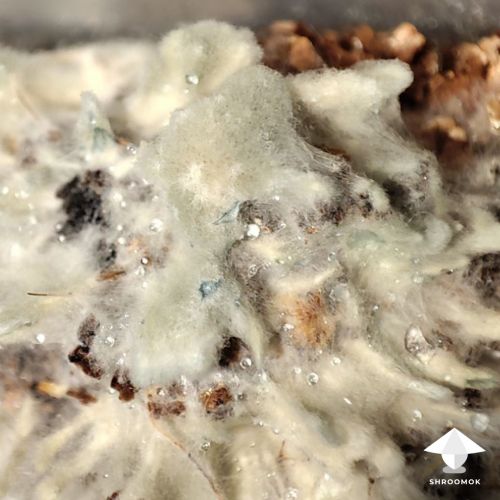](https://shroomok.com/en/wiki/File:Mycelium-bruising-or-contamination.jpg) Mycelium bruising or mold contamination? It's bruising!
From this photo (another side, same area) much easier to identify mycelium bruises. Here you can see mushroom mycelium threads turned blue, without powdery or marshmallow texture
[](https://shroomok.com/en/wiki/File:Bluish-reaction-magic-mushroom-mycelium.png) Mild bruises of magic mushroom mycelium. Such bruising easy to confuse with mold#### Q-Tip Test or Swab Test for mold identification
Q-tip test isn't scientific test, but popular lifehack among newbie mushroom growers.
Swab test can be used to determine whether your mycelium is just bruised or contaminated with mold *(green mold Trichoderma spp. or blue mold Penicillium spp)*. This test is possible to use during fruiting period only. The test is based on the fact that mold spores are sticky and would be stuck on any surface that comes into contact.
To do this you have to take a clean white cotton swab or a fresh Q-tip and swipe it across the contaminated area. If your cotton swab rubs the blue or green powder on to it, it is highly likely that you are looking at a Trich or Penicillium contamination. If your cotton swab comes out clean without any color on it, your mycelium may be simply bruised.
Check out more photo examples of different contaminations and cultivation issues in [📸 Growing Problems photo gallery](https://shroomok.com/gallery/growing-problems)
Join Shroomok Community on **Discord** and **Reddit** for questions and sharing experience.
You can also leave your **comments on this page below** ⬇️
If you find this guide helpful, please support me with a cup of coffee on [☕️ buymeacoffee](https://www.buymeacoffee.com/shroomok)
Have a happy growing and healthy shrooms!
Peace, Shroomok ❤️
## Mushroom aborts
[Mushroom aborts](https://shroomok.com/en/wiki/Mushroom_aborts)
#### What are mushroom aborts?
[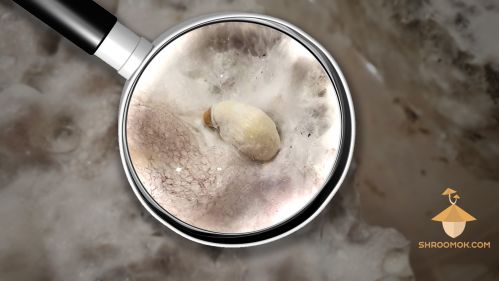](https://shroomok.com/en/wiki/File:Psilocybe-cubensis-aborted-mushroom.jpg) Mushroom abort example> ***Abort*** - a small pinning mushroom that ceases to grow and never reaches full maturity, don't produce spores. The cap of aborted shroom turn black color
#### How to identify mushroom aborts?
🔴 The distinctive feature of mushroom aborts are totally **black caps or dark-blue caps**
[](https://shroomok.com/en/wiki/File:Mushroom-abort-example.jpg) Why mushrooms become black and stop development? Mushroom aborts
🔴 The growth of such mushrooms stops completely. In 2-4 days you can notice that the size of mushrooms doesn't change at all
[](https://shroomok.com/en/wiki/File:Mushroom-aborts.jpg) Mushroom aborts. How they look like🔴 Stalled pins can be found on cakes with mycelium overlay
[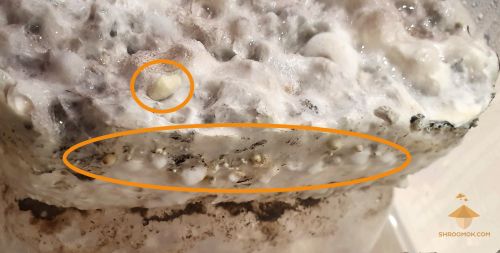](https://shroomok.com/en/wiki/File:Psilocybe-mushroom-aborts.jpg) Psilocybin mushrooms aborts examples. Problems during growing process> 🔴 Recommended article: [Overlay and Stroma in mushroom cultivation](https://shroomok.com/en/wiki/Psilocybe_growing_problems_-_overlay,_abortions,_etc "Psilocybe growing problems - overlay, abortions, etc")
#### Main causes of mushroom aborts
Single abort or small amount of aborts throughout the mushroom cake is absolutely normal case.
[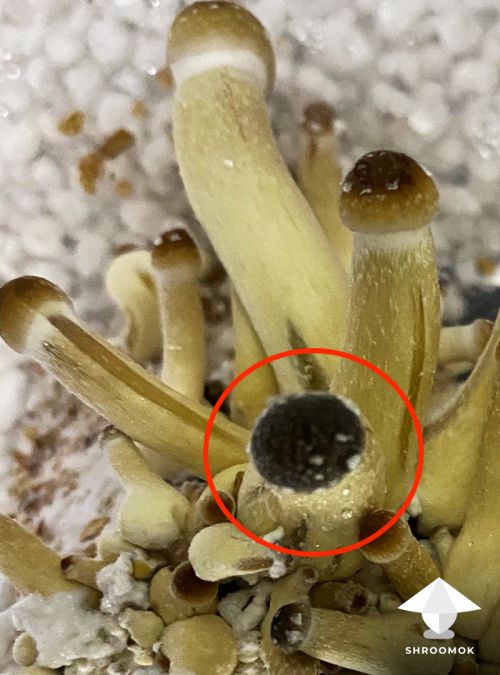](https://shroomok.com/en/wiki/File:Aborted-mushroom.jpg) Single abort in mushroom clusterMore than 20% of aborted shrooms is a symptom of sudden changes in [fruiting conditions](https://shroomok.com/en/wiki/Fruiting_period._Pinhead_initiation,_mushroom_pinning_and_mushrooms_growth_parameters "Fruiting period. Pinhead initiation, mushroom pinning and mushrooms growth parameters"), poor environmental conditions overall or genetic issues.
[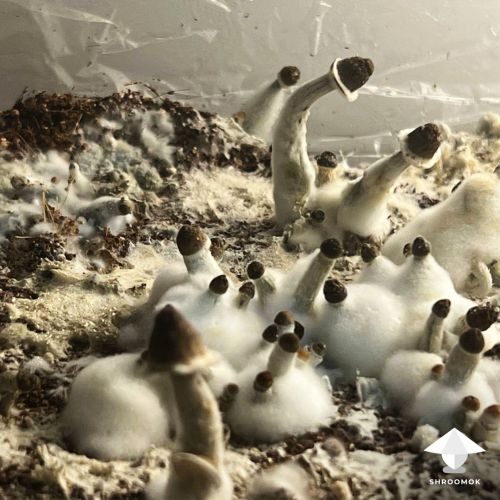](https://shroomok.com/en/wiki/File:Aborted-mushrooms-stalled-growth.jpg) All mushrooms turned to aborts**Let's figure out main causes of mushroom aborts**
[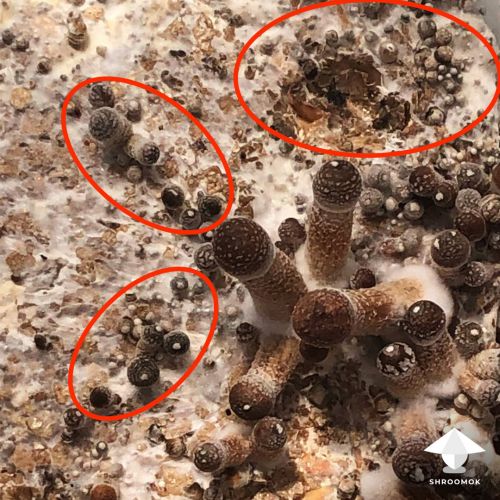](https://shroomok.com/en/wiki/File:Aborted-and-normal-mushrooms.jpg) Aborted pins and normal mushrooms on the cake⛔️ sharp and/or frequent temperature changes during fruiting period (more than 10°)
⛔️ drafts, hard fanning, extreme air flows
⛔️ lack of fresh air exchange, high **CO2** concentration in fruiting chamber and low relative humidity (RH)
⛔️ imbalanced fruiting chamber environment; CO2 and RH too high.
> Use air quality monitor to track and maintain proper fruiting conditions ([Amazon](https://amzn.to/3WFpdl8))
⛔️ overlay
⛔️ strain mutation
⛔️ old genetic, bad strain. Acquire new strain
⛔️ competition for nutrients between fungi colonies (multiculture)
⛔️ rich pinning and competition for nutrients between mushrooms in the same cluster
⛔️ lack of nutritions (usually on the last flushes and it considered normal)
⛔️ contamination competitors: molds ([Mycogone](https://shroomok.com/en/wiki/Mycogone_contamination_aka_wet_bubble_disease "Mycogone contamination aka wet bubble disease"), Verticillium, [Trichoderma](https://shroomok.com/en/wiki/Green_mold_contamination_aka_Trichoderma "Green mold contamination aka Trichoderma")) and bacteria
⛔️ small amount of abortions often appear after soaking in water for flushing aka **[rehydration](https://shroomok.com/en/wiki/Rehydration_of_psilocybe_cakes "Rehydration of psilocybe cakes")** due to a sharp changes of temperature; or after rehydration with cold shocking
> 🔴 Recommended: [All you need to know about cold shock for magic mushrooms](https://shroomok.com/en/wiki/All_you_need_to_know_about_cold_shock_for_magic_mushrooms "All you need to know about cold shock for magic mushrooms")
#### **Are mushroom aborts safe or not**
✅ **Mushroom abort is NOT a contamination!** Aborts don't spread contamination on the substrate, safe for neighboring healthy mushrooms.
⛔️ It is considered mushroom aborts is a common point of origin for [cobweb mold](https://shroomok.com/en/wiki/How_to_identify_and_get_rid_of_Cobweb_Mold "How to identify and get rid of Cobweb Mold"). There is a clear correlation between the development of cobweb mold and the presence of aborts. However, it is hard to say that the aborts are the direct cause of cobweb disease or even if the cobweb mold was the underlying cause of the aborts.
✅ Pick mushroom aborts when you are harvest all other mature healthy mushrooms.
✅ Aborted shrooms can be dried and stored with the other harvested mushrooms.
✅ Mushroom aborts are safe for both [microdosing](https://shroomok.com/en/wiki/Magic_mushrooms_microdosing "Magic mushrooms microdosing") and [trips](https://shroomok.com/en/wiki/How_to_prepare_for_psychedelic_mushroom_trip "How to prepare for psychedelic mushroom trip"). Moreover, such aborted shrooms are more potent than full-grown mushrooms. In fact, every single mushroom has different alkaloids concentration, thus different psychoactivity. However, take into account, that **aborted shrooms are extremely powerful!**
> ❗️ Aborts are much stronger and especially psychoactive
If you find this guide helpful support my work and [🍄 Buy Shroomok a mushroom](https://www.buymeacoffee.com/shroomok) as a donation.
Have a happy growing and healthy shrooms!
📸 More examples: [Mushroom Aborts photo gallery](https://shroomok.com/gallery/abort)
## Mycelium metabolites or mushroom pee
[Mycelium metabolites or mushroom pee](https://shroomok.com/en/wiki/Mycelium_metabolites_or_mushroom_pee)
### Yellow mycelium or Yellow liquid on mushroom mycelium: contamination or mycelium piss
Sometimes you can observe healthy mycelium with small amount of clear yellow, yellowish, orange or brown liquid forming on the surface of the mycelium.
It can be noticed in spawn jars during colonisation period.
[](https://shroomok.com/en/wiki/File:Metabolites-psilocybe.jpg) Yellow liquid (metabolites) in spawn jar
It can be noticed on mushroom cake during top layer colonisation or fruiting period
[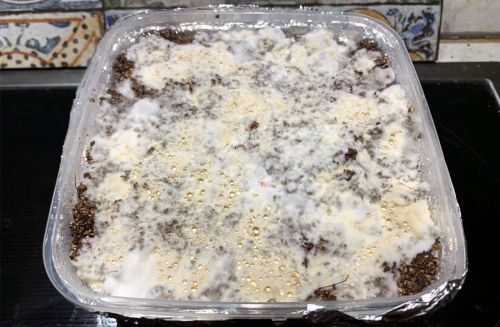](https://shroomok.com/en/wiki/File:Secondary-metabolites.jpg) Secondary metabolites on mushroom cakeWhat is it? Is there something to worry about?
#### **What are mushroom metabolites**
***Secondary mycelium metabolites (aka mycelium exudate, mushroom urea, mycelium piss, mycelium pee)*** — it is a waste products of fungal metabolism or mushroom exudate.
> 🔬 *Biochemical analyses of the exudates showed that acid phosphatase, β-glucosidase, acid and alkaline protease, RNase polygalacturonase and cellulase enzymes as well as oxalic acid and ammonia were present*
In short and simple metabolites consist of acids, exopolysacharides, waste products and antibiotics, which are naturally secreted by mycelium cells. They can be found on different species of mushrooms: wild mushrooms, magic mushrooms, gourmet and edible mushrooms.
> Metabolites are the natural immune response of mycelium to stress or pathogens.
#### **Symptoms of mushroom piss**
✅ Color of liquid: yellow, orange or brown.
✅ Liquid is transparent, not cloudy.
✅ NO slime.
✅ NO smell (rotted, sweet, sour, cider). Smell of soil and mushrooms is totally normal!
[](https://shroomok.com/en/wiki/File:Mushroom-secondary-metabolites-exudate.jpg) Orange and yellow metabolites on mycelium[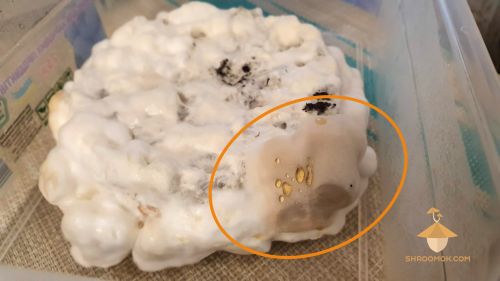](https://shroomok.com/en/wiki/File:Overlay-and-mycelium-waste-products.jpg) Mycelium metabolites and [overlay](https://shroomok.com/en/wiki/Psilocybe_growing_problems_-_overlay,_abortions,_etc "Psilocybe growing problems - overlay, abortions, etc")[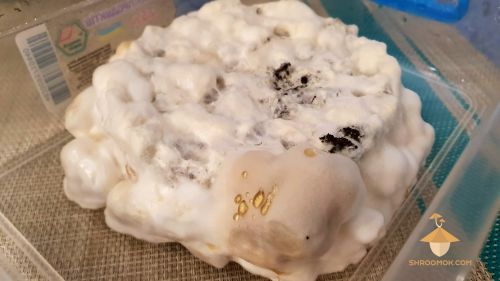](https://shroomok.com/en/wiki/File:Psilocybe-mushrooms-micelium-products.jpg) Brown mycelium and yellow liquid as mushroom metabolites example#### Main causes of mycelium metabolites
**Metabolites is a reaction to environmental stress or immunity response to contaminants:**
🆘 over misting, water pools on mycelium
🆘 direct sunlight
🆘 high temperature
🆘 extremely dry mushroom cake
🆘 aged mycelium (aged spawn jars)
🆘 lack or excess of nutrients in the substrate
🆘 a symptom that mycelium is fighting with pathogenic microorganisms (bacteria, mold)
🆘 this also happens if you mix several strains of mushrooms. Their colonies struggle with each other and create yellow/brown borders between
🆘 [stroma and overlay](https://shroomok.com/en/wiki/Psilocybe_growing_problems_-_overlay,_abortions,_etc "Psilocybe growing problems - overlay, abortions, etc") are accompanied by mushroom pee
🆘 mycelium tissue damage
> 🔴 **Recommended: [Fruiting period. Pinhead initiation. Growing parameters for Psilocybe Cubensis](https://shroomok.com/en/wiki/Fruiting_period._Pinhead_initiation,_mushroom_pinning_and_mushrooms_growth_parameters "Fruiting period. Pinhead initiation, mushroom pinning and mushrooms growth parameters")**
#### What is the strange yellow-brown line on the mycelium
Let's figure out one case from [Shroomok Discord Community](https://discord.com/invite/ngKhQDmymD). This is a great example to show you metabolites sectoring.
> **Question:** Strange yellow-brown line on the mycelium. Anyone know what this could be?
[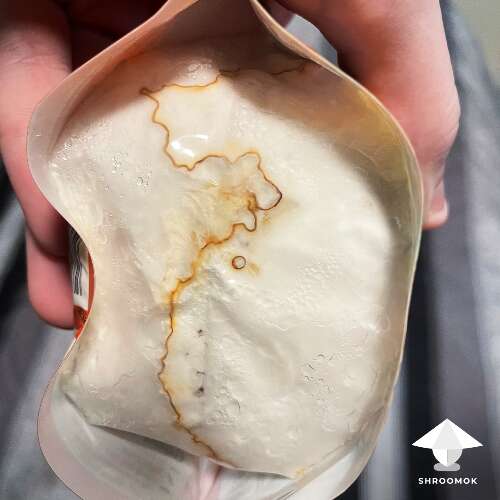](https://shroomok.com/en/wiki/File:Metabolites-or-contamination.png) Contamination or metabolites?**Answer from Shroomok:**
> Here are mushroom metabolites and sectoring process. Why did this happen?
>
> In this way **different colonies of mushroom mycelium** or **bacteria/mold** can temporarily share territory and useful nutrients in the substrate. Since we are dealing with two different microorganisms or different mushroom colonies that **compete with each other**, usually clear boundaries form between them where they cross aka sectors.
>
> I don't see bacterial or mold contamination so far. Just a struggle between mushroom relatives. As a result we see such immunity reaction of mycelium — metabolites.
On the photo below more intense metabolites. It is a sign of struggling with pathogens (i.e. mild bacterial contamination). Spawn can be used for the next steps of cultivation, but you should check it thoroughly (smell, color) and remove weird areas.
[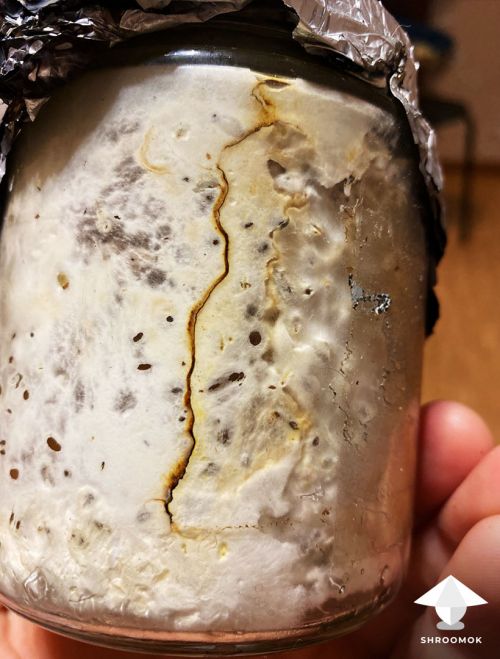](https://shroomok.com/en/wiki/File:Mushroom-metabolites-sectoring.jpg) Mushroom metabolites and sectoring as a sign of struggling with contamination#### Yellow mycelium as a type of metabolites
Occasionally, snow-white mycelium can turn beige, yellow or even brown during colonisation period in the jar or during fruiting period in the fruiting chamber. It is also a kind of fungal exudate — waste products of mycelium.
[](https://shroomok.com/en/wiki/File:Yellow-micelium-psilocybe-cubensis-waste-products-excreated-by-psilocybe-cubensis-mushrooms.jpg) Mycelium pigmentation
This case can be as a reaction of fungal immunity to a minor contamination. It means mycelium struggles successfully! Observe and be attentive.
[](https://shroomok.com/en/wiki/File:Yellow-mycelium.jpg) Yellowish mycelium is not contaminationMinor fungal pigmentation is very common in mushroom growing and nothing to worry about! When mycelium contact and digest other materials from bulk substrate (coco coir, hay, straw, sawdust etc.) it can pick up some amount of matter that change its color. In most cases, yellowish or beige mycelium is not harmful and won't affect its ability to produce healthy mushroom fruit bodies.
[](https://shroomok.com/en/wiki/File:Yellow-mycelium-contamination-or-not.png) Yellow mycelium is NOT a contamination here#### Mycelium metabolites or contamination
If mycelium ingests excess of anything that may become toxic enough to eventually harm, disable or kill it, mycelium produces waste exopolysaccharides as antimicrobial agents, acids, excrete enzymes and tries rid itself off that excess.
Metabolites exude is a reaction to stress or response to mild contamination. Mushroom metabolites is a natural mushroom antibiotic and immunity reaction. This means your mycelium is fighting off pathogens or stress. **It’s not a contamination itself!**
[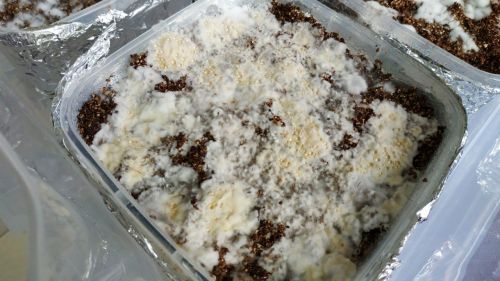](https://shroomok.com/en/wiki/File:Mushroom-piss-exudate.jpg) Metabolites exudeIf mushroom mycelium struggles with contaminants, such mushroom cake requires close attention. Very often mycelium copes with mild contamination successfully.
However there are several examples of contaminations are easy to confuse with metabolites. What are they?
##### Bacterial contamination
It is easy to identify bacterial contamination in mushroom cake by **slimy liquid** and the **specific smell**.
> Fermented, rotted, cider, sweet and sour, stale, yeasty, smell of dirty socks — those are clear signs of bacterial (also yeast) contamination. Healthy mycelium has an 'earthy' or mushroom smell.
[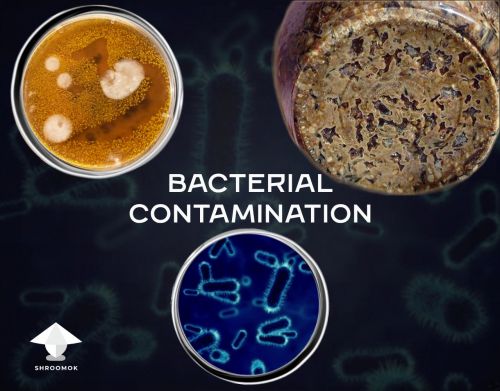](https://shroomok.com/en/wiki/File:Bacterial-contamination-in-mushroom-cultivation-guide.jpg) Bacterial contamination guide> 🟠 Check out full guide: [Bacterial Contamination Guide](https://shroomok.com/gallery/bacterial-mushroom-contamination)
However, it may be hard to feel the smell in a spawn jar/bag. Here is an example with a sign of bacterial contamination in spawn jar:
[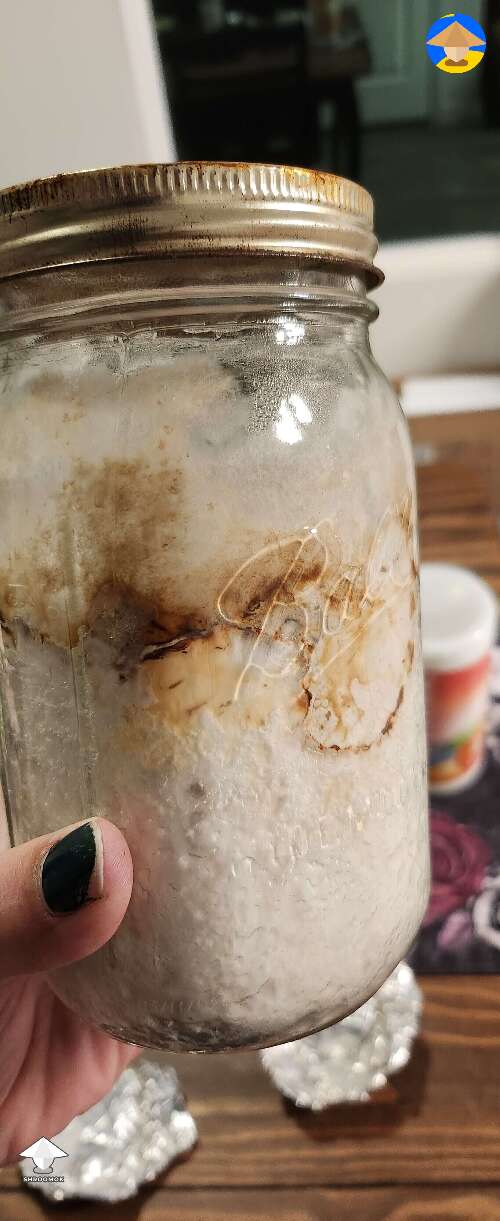](https://shroomok.com/img_orig/45db61/4032_what-am-i-seeing-contaminated-by-prof-frags.jpg) [What am I seeing? Contaminated? LooseCannon answered: aerobic bacteria 🔥 it](https://shroomok.com/en/wiki/File:what-am-i-seeing-contaminated-by-prof-frags-4fca6e)##### Wet Bubble disease
Newbie cultivators often confuse secondary metabolites with Wet Bubble disease aka Mycogone.
[](https://shroomok.com/en/wiki/File:Wet-bubble-mycogone-contamination-shroomok.jpg) Mycogone contamination aka Wet Bubble diseaseIt seems similar to metabolites, but *Mycogone* has specific features. An **amber liquid** with a **rotten smell** oozes from pins, primordia and clots of mycelium.
> Check out full guide: [Mycogone contamination aka Wet Bubble disease](https://shroomok.com/en/wiki/Mycogone_contamination_aka_wet_bubble_disease "Mycogone contamination aka wet bubble disease")
##### Aspergillus yellow mold
Newbie cultivators confuse pigmentation with ***Aspergillus spp. (Aspergillus flavus).*** This mold has **yellow powdery texture without any liquid** on mycelium.
[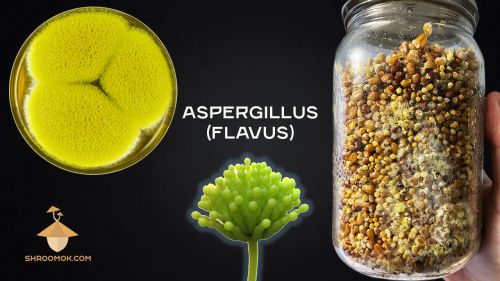](https://shroomok.com/en/wiki/File:Aspergillus-flavus.jpg) Aspergillus flavus on mushroom mycelium#### Afterwords
For more examples check out 📸 [Metabolites photo gallery](https://shroomok.com/gallery/mushroom-metabolites)
If you find this guide helpful, please support me with a cup of coffee on **☕️ [buymeacoffee](https://www.buymeacoffee.com/shroomok)**
Join Shroomok Community on **Discord** or **Reddit** for questions and sharing your experience.
You can also leave your c**omments on this page below** ⬇️
Have a happy growing and healthy shrooms!
Peace, Shroomok ❤️
## How to identify and get rid of Cobweb Mold
[How to identify and get rid of Cobweb Mold](https://shroomok.com/en/wiki/How_to_identify_and_get_rid_of_Cobweb_Mold)
[](https://shroomok.com/en/wiki/File:Cobweb-mold-dactylium.png) Cobweb disease: how to identify and get rid of### Cobweb mold in mushroom growing: symptoms, prevention and treatment guide
#### What is cobweb mold
***Cobweb*** is a fungal disease of commercially and home cultivated mushrooms. It isn’t just one species of mold. It is more like a closely related group of mold species.
**Cobweb contamination can be caused by several related pathogens:** Dactylium, Dactylium dendroides, Cladobotryum dendroides, Cladobotryum mycophilum, Hypomyces or Hypomyces Rosellus etc.
Each species of cobweb mold is so similar to its brethren that only genetic testing can tell them apart.
This mold affect magic mushrooms, edible, gourmet and wild mushrooms.
[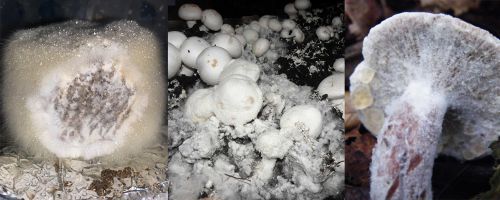](https://shroomok.com/en/wiki/File:Cobweb-mold-psilocybin-edibles-wild-mushrooms.jpg) Cobweb mold on psilocybin, edibles and wild mushroomsSymptoms of disease can appear on the very first steps of mushroom cultivation. For example, in spawn jars during colonization period.
[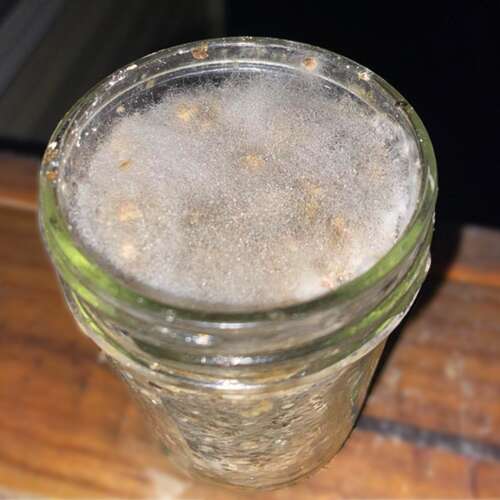](https://shroomok.com/en/wiki/File:Cobweb-disease.png) Cobweb mold in spawn jar
During pinhead initiation and fruiting period, when pins and primordia start their active development.
[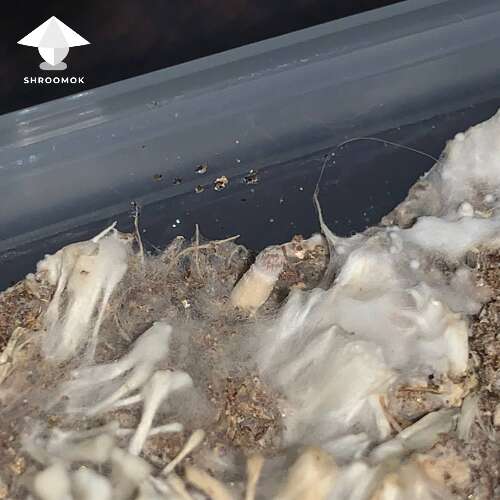](https://shroomok.com/en/wiki/File:Dactylium-mold-pinhead-initiation.png) Dactylium mold during pinhead initiation and fruiting period> ❗️Cobweb spores can "sleep" in casing layer for a long time and wait for the favorable conditions to activate them. That's why cobweb most often develops in later flushes.
#### How to identify cobweb mold
It appears on the casing layer as small white spots. Like cottony areas. Soon cobweb envelopes mushroom mycelium, pinheads and even small fruit bodies with a soft fluffy mold mycelium that causes a soft rot.
**Let's figure out main indicators of cobweb contamination.**
🔴 The main symptom — **cobweb mold is darker than mushroom mycelium**. It has **grey** mycelium compared to snow-white mushroom mycelium
[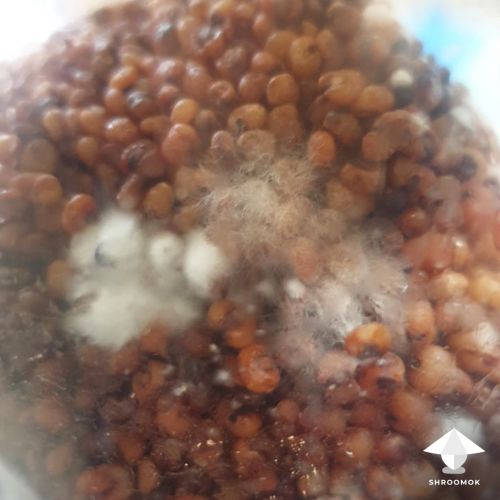](https://shroomok.com/en/wiki/File:Cobweb-mold-vs-mushroom-mycelium-by-So_Oh.jpg) Grayish cobweb mold contamination and white mycelium on grain substrate for spawn. Photo by **So Oh** - Shroomok Growers Community[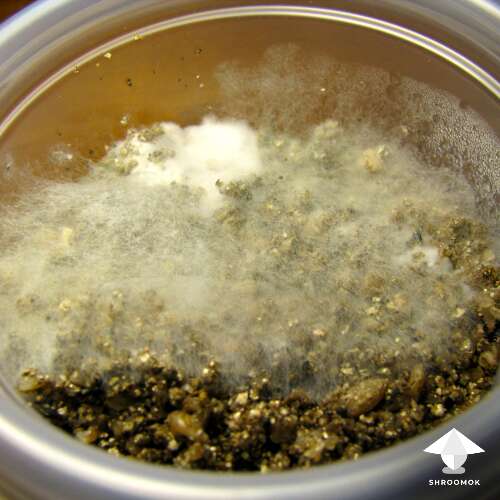](https://shroomok.com/en/wiki/File:Cobweb-vs-mushroom-mycelium.png) Cobweb have **grey color** compared to snow-white mushroom mycelium🔴 The one that sticks out is **the speed of growth**. Because **cobweb grows extremely fast**, colonizing mycelium and mushrooms on its way. A small patch, the size of a coin, grows over the entire top layer just in 1-2 day and turns into fluffy layer.
[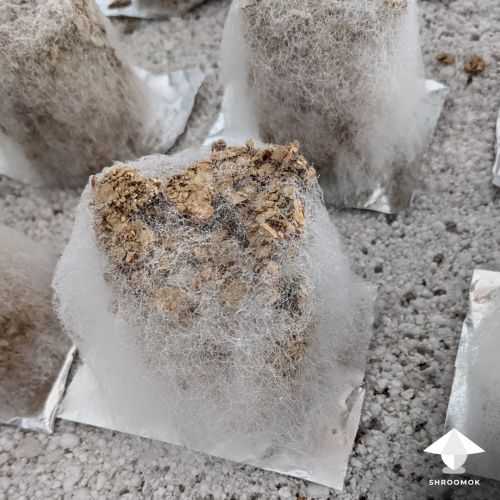](https://shroomok.com/en/wiki/File:Cobweb-mold-contamination.jpg) Cobweb mold on BRF cake. Photo by **adagar** - Shroomok Growers Community on [Discord](https://discord.gg/ngKhQDmymD)[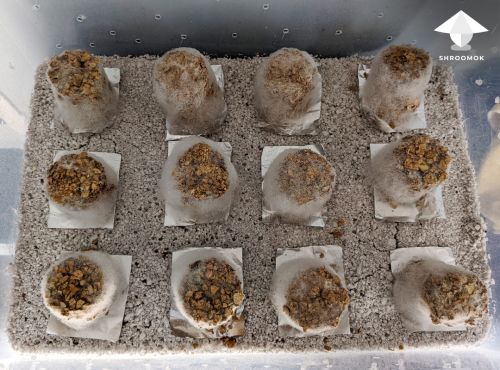](https://shroomok.com/en/wiki/File:Cobweb-mold-disease-2.jpg) Cobweb mold disease. Photo by **adagar** - Shroomok Growers Community on [Discord](https://discord.gg/ngKhQDmymD)[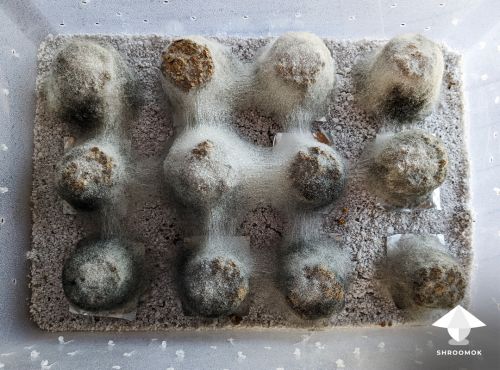](https://shroomok.com/en/wiki/File:Cobweb-mold-disease.jpg) Cobweb mold contamination fast spreading. Photo by **adagar** - Shroomok Growers Community on [Discord](https://discord.gg/ngKhQDmymD)[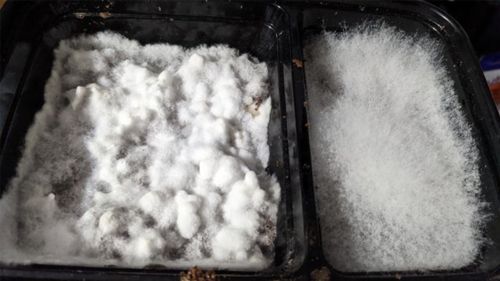](https://shroomok.com/en/wiki/File:Dactylium-cobweb-mold-on-the_cake.jpg) Cobweb mold spreading on top layer
🔴 Cobweb mold has **very thin hyphae**, while mycelium tends to be thicker ropes. Cobweb is almost transparent.
[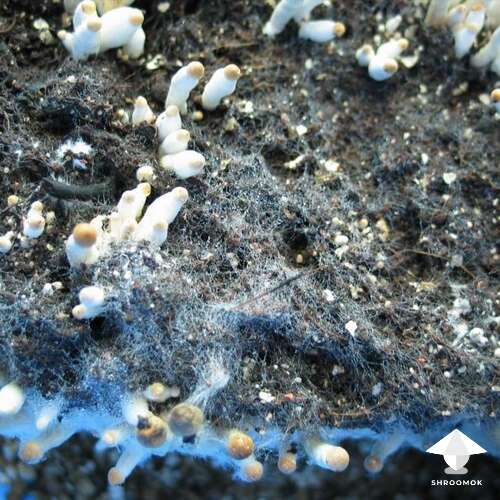](https://shroomok.com/en/wiki/File:Cobweb-mold-and-mushrooms.png) Cobweb mold has thin hyphae, while mycelium tends to be thicker ropes🔴 Cobweb often appears on free **uncolonized areas** without mushroom mycelium.
[](https://shroomok.com/en/wiki/File:Cobweb-on-casing-layer.jpg) Cobweb contam spreading (thin grey areas). Photo by **varda** - Shroomok Growers Community[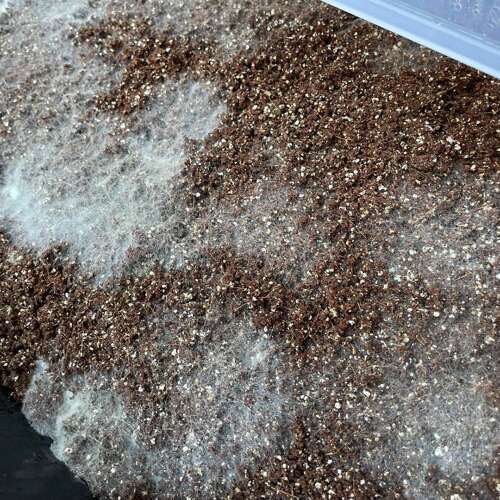](https://shroomok.com/en/wiki/File:Cobweb-mold-on-mushroom-cake.png) Cobweb disease on uncolonized bulk substrate[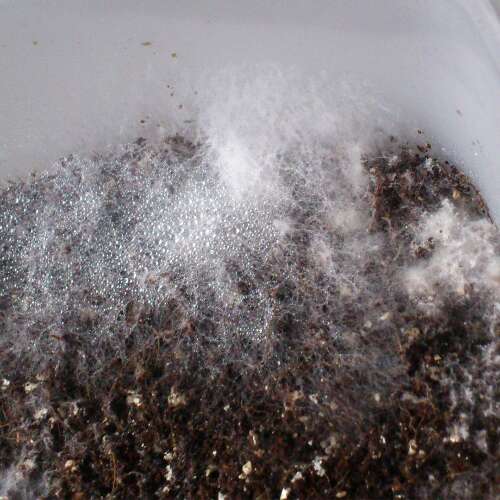](https://shroomok.com/en/wiki/File:Cobweb-example.png) Cobweb mycelium
🔴 In the later stages of disease, when molds release spores it **turns red-purple** and change **to yellow or orange.**
[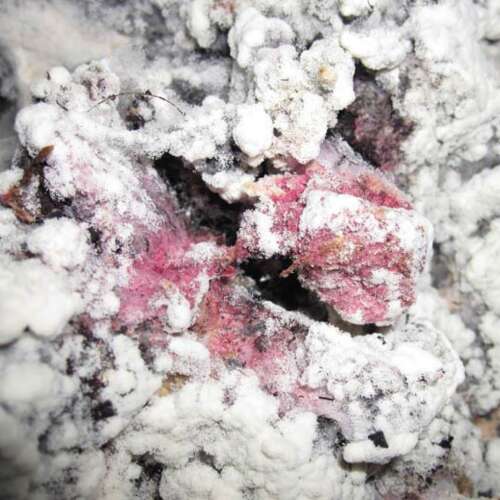](https://shroomok.com/en/wiki/File:Cobweb-spores.png) Cobweb mold on the late stage turns red-purple and change to yellow or orange
❗️ Such bright rich colors distinguish cobweb from another very similar mold is called ***mucor***. Mucor has black beads at the tips when releases spores. This mold we'll figure out soon in the next article.
[](https://shroomok.com/en/wiki/File:Mucor.png) Mucor#### Cobweb Mold or Mushroom Mycelium
Color and hyphae differences of mold and mushroom mycelium are hard to identify for newbie growers haven't seen them side by side before. Your job is to know which is which. Let's figure out a few illustrative cases.
✅ Mycelium and mushroom cake looks grey, because the top layer is dry out. That's why mycelium have blue-grey color. There is no cobweb disease! Such mushroom cakes need [rehydration](https://shroomok.com/en/wiki/Rehydration_of_psilocybe_cakes "Rehydration of psilocybe cakes").
[](https://shroomok.com/en/wiki/File:Dehydrated-mushroom-cake-2.png) Dehydrated mushroom cake. Mycelium have grey color, but it's not contamination[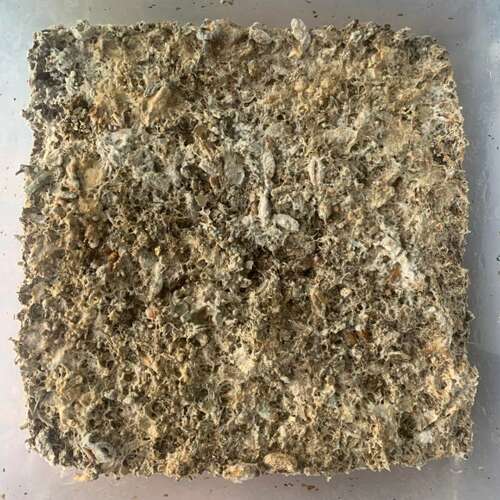](https://shroomok.com/en/wiki/File:Dehydrated-mushroom-cake-1.png) Dehydrated mushroom cake. Mycelium have yellow-grey color, but it's not contamination
✅ Confusing bluish reaction of magic mushroom mycelium with mold. It’s not contamination!
[](https://shroomok.com/en/wiki/File:Bluish-reaction-magic-mushroom-mycelium.png) Mycelium bruises (grey-blue color)For more examples of mushroom and mycelium bruising check out:
> 🔴 Recommended: [Mycelium Bruises or Mold Contamination](https://shroomok.com/en/wiki/Mycelium_Bruises_or_Mold_Contamination "Mycelium Bruises or Mold Contamination")
✅ A common mistake to misidentify a weak strain of mycelium as being cobweb mold. In fact everything is good in the example below! Photo shows a healthy mycelium of different types (tomentose and rhizomorphic mix).
[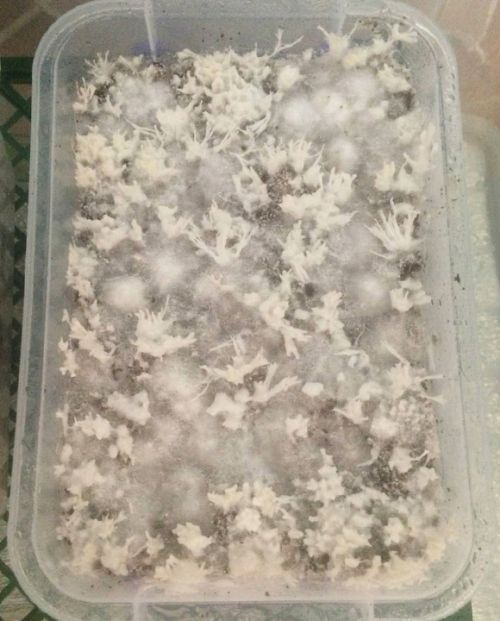](https://shroomok.com/en/wiki/File:Weak-mycelium-not-cobweb.jpg) Different colonies of healthy mycelium (fluffy thin tomentose and thick rhizomorphic mix) can be confused with cobweb mold
✅ Fuzzy feet is a symptom of lack of fresh air exchange, but it’s not a cobweb contamination.
[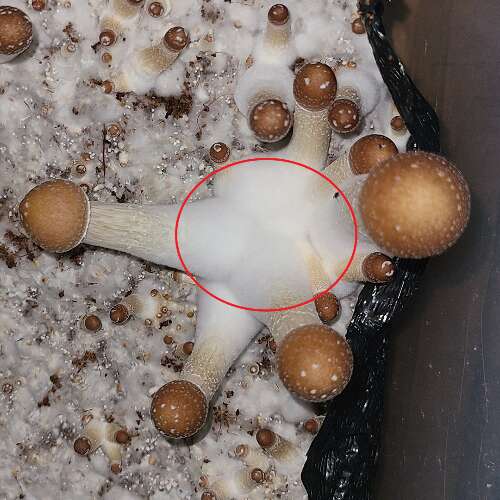](https://shroomok.com/en/wiki/File:Fluffy-feet.png) Fuzzy feet = lack of oxygen. It's not a cobweb mold[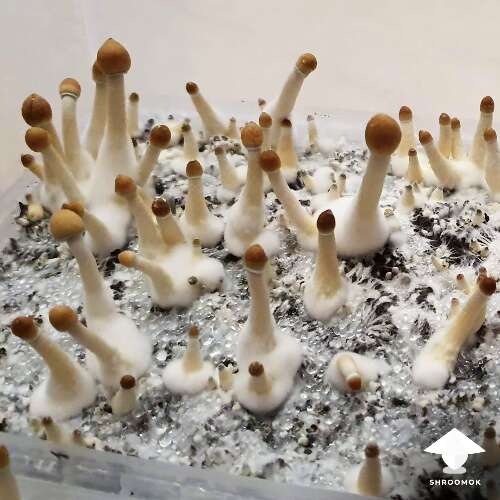](https://shroomok.com/en/wiki/File:Fuzzy-feet.png) Fuzzy feet is NOT contamination> 🔴 Recommended: [Why Mushrooms too Leggy, Fuzzy Feet and White Dots on Caps](https://shroomok.com/en/wiki/Why_Mushrooms_too_Leggy,_Fuzzy_Feet_and_White_Dots_on_Caps "Why Mushrooms too Leggy, Fuzzy Feet and White Dots on Caps")
#### Main causes of Cobweb Mold
⛔️ **Lack of FAE (fresh air exchange)**. Cobweb molds enjoy stagnant air. Mushroom mycelium need fresh air. Here is one more reason why we need to ventilate our fruiting chamber. It’s not only because of the high CO2 level, it’s also because all molds like stale air.
⛔️ «**Dead zones» in the monotube.** As a result, insufficient fresh air exchange. Make monotube properly with correct air vents.
⛔️ Cobweb molds are favored by **high relative humidity in stagnant air.**
⛔️ Cobweb like combination of **high relative humidity** (90% and above) **+ high temperature** (+23°C or 74°F and above) **+ lack of fanning** (less than 3 times/day for growbox or monotube with dead areas).
⛔️ During spore-forming, cobweb is easily **spread in the air and during growbox misting**. Moreover, cobweb is easily spread by spores and pieces of mycelium, which stick to your clothes or tools.
⛔️ **Poor sterility.** Including environment, workspace, tools, bulk substrate, presence of animal hair, insects, parasites and even cultivator (hand, clothes etc) can carry mold spores.
⛔️ During **sporulating** phase mold easily spreads in the air when you introducing fresh air and misting growbox or monotube.
⛔️ **[Mushroom aborts](https://shroomok.com/en/wiki/Mushroom_aborts "Mushroom aborts")** is another common point of origin for cobweb mold. There is a clear a correlation between the development of cobweb mold and the presence aborts. However, it is hard to say that the aborts are the direct cause of cobweb disease or even if the cobweb mold was the underlying cause of the aborts.
#### Preventive measures of cobweb disease
> Preventive measures are always the best treatment!
✅ **Sterilize or pasteurize bulk substrate,** because it may contain spores of cobweb mold. In fact it's very easy to kill this mold. At a temperature of **+50°C or 122°F for 30 minutes cobweb spores die.** This means that cobweb can easily be prevented by proper sterilization or pasteurization.
✅ Keep all mycological manipulations **as sterile as possible.**
✅ Maintain favorable **fruiting conditions**: fresh air exchange, temperature, humidity, light. Remember, spores of cobweb mold can sleep for a long time in casing layer, but as soon as you have stagnant air in fruiting chamber mold is there.
✅ **Remove all mushroom aborts** any time you are harvesting mushrooms.
#### Cobweb mold treatment
What to do if mold has ALREADY appeared on your mushroom cake?
The best and most common advice for treating any kind of mold is «Throw it away immediately! Avoid spreading spores in the air and on healthy mushroom cakes!»
But we have good news that give us hope!
> ❇️ Actually, cobweb is considered a treatable disease. It is one of the few molds which can be slowed down or even destroyed with 3% hydrogen peroxide solution (Н2О2)
🔴 Bright color is a late-stage for any kind of mold. The color indicates a sporulation process that is no longer treatable and is a huge risk of spreading contamination. **It's too late for treating!**
[](https://shroomok.com/en/wiki/File:Cobweb-spores.png) Bright color are cobweb spores. Too late for treatment!
Treatment is possible in the presence of mild contamination and only in the **early mycelial stage**!
[](https://shroomok.com/en/wiki/File:Dactylium-mold-pinhead-initiation.png) Mycelial period of cobweb growth, NO bright color
If you want to fight with mycelial stage of cobweb you can try the following method.
1. Spray contaminated areas of mushroom cake **3 times, 12-hour interval between treatments** with hydrogen peroxide (Н2О2) solution 3%. It's ready to use solution from the pharmacy, don't dilute it!
2. Mist not only affected area, but also healthy mycelium around contaminated spots.> ❗️The most common reaction you see when hydrogen peroxide is introduced to casing layer is this sort of aggressive fizzing. This is directly caused by the fast conversion of the Н2О2 into its constituent parts, water and oxygen
[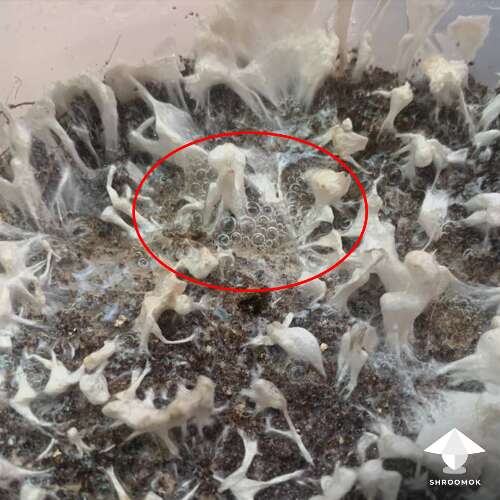](https://shroomok.com/en/wiki/File:Cobweb-mold-treatment.png) Bubbles after misting cobweb with hydrogen peroxide 3% (Н2О2)
3. After a series of treatments cobweb mycelium should melt and disappear. If this doesn't happen dispose of contaminated cake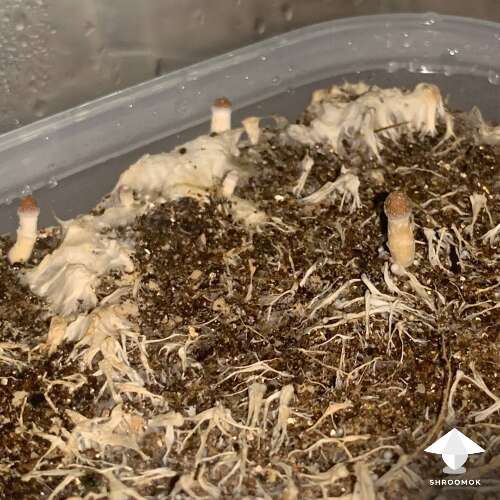](https://shroomok.com/en/wiki/File:Dactylium-cobweb-mold-treatment.png) Melted cobweb mycelium
4. After treatment you should take care of the fresh air exchange in growbox/monotub. This can be: extra manual ventilation, fan/cooler or 24/7 aquarium air pump. Check if natural airflow works for your fruiting chamber.
5. After the very first treatment reduce air temperature in growbox/monotub up to +18°..+20°C (64-68°F) for the next 2-3 days. It helps to inhibit cobweb growth.
#### Is hydrogen peroxide safe or harmful for mushroom mycelium
It's a common misconception that hydrogen peroxide only affects cobweb mold. In fact H2O2 kills any fungal spores (including mushroom spores) and kills mold mycelium. However H2O2 doesn't kill, but slightly inhibit mushroom mycelium growth. Don't be surprised if you get your harvest 1-2 weeks later
In case of mild contamination many pins and mushrooms may indeed live and thrive afterward!
[](https://shroomok.com/en/wiki/File:Dactylium-mold-pinhead-initiation.png) Before cobweb treatment (cake 1)[](https://shroomok.com/en/wiki/File:Mushroom-cake-after-cobweb-treatment.png) Mushroom fruiting after cobweb mold treatment. 3-4 days after (cake 1)
One more example and results of Cobweb Mold treatment
[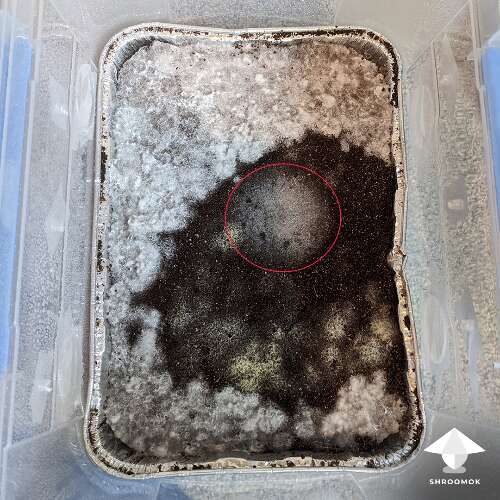](https://shroomok.com/en/wiki/File:Cobweb-mold-before-treatment.png) Cobweb mold before treatment. Main area in red circle (cake 2)[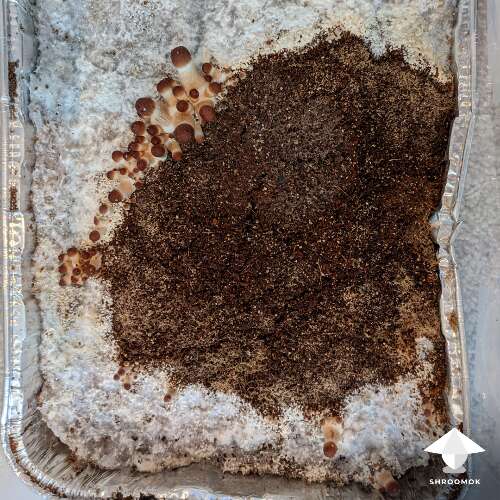](https://shroomok.com/en/wiki/File:Cobweb-after-treatment.png) 5 days after cobweb treatment with hydrogen peroxide. Cobweb melted, mushroom cake started to fruit (cake 2)> ❗️Hydrogen peroxide inhibit and kill cobweb mold, however it doesn't mean it won't come back again. Unfortunately it can be a battle till the end
As a result the most effective method of dealing with all species of mold are preventive measures and disposal contaminated cake. But don't give up if you faced with cobweb contamination!
Take advantage of a tried-and-true tip with H2O2 or salt treatment.
#### Salt application for cobweb mold treatment
One more effective method against ***Cladobotryum spp. cobweb is salt application***. Most often used in commercial cultivation.
Place a damp paper tissue/towel over the growth to contain any spores that have not yet released. Then you can pour salt (refined, small fraction) over the paper towel. It helps to eliminate the cobweb mold presence in the top layer of substrate
[](https://shroomok.com/en/wiki/File:Salt-application-for-cobweb.png) Salt application to control Cladobotryum spp cobweb. Credit: "Identification and control of Cobweb disease on mushrooms" by Helen Grogan, Teagasc and Richard Gaze, WHRI & ADAS1. The patches of disease must first be gently covered with damp tissue to prevent the spores becoming airborne.
2. Then the tissue should be covered with fine grained salt. The salt application should first seal the edges of the tissue to prevent the escape of spores.
3. Seal the edges completely.
4. Once the edges are sealed, more salt should be applied to completely cover the tissue and underlying patch of cobweb.
#### Specific control measures to prevent the spread of cobweb mold
To prevent the spread of cobweb contamination during treatment:
⛔️ **Never mist growbox/monotub with untreated mushroom cake inside!** Misting over untreated areas of contamination will result in a massive spore load being spread throughout the crop.
⛔️ **Turn off the air conditioning or ventilation** during treatment manipulations likely to disturb mold spores or pieces of mold mycelium (e.g. misting with H2O2 and salt application)
#### **Useful stuff on Amazon to prevent or deal with cobweb disease**
##### **Basic stuff for cobweb treatment**
- [Hydrogen Peroxide 3% - 32 oz](https://amzn.to/46K98i9) $9.99
- [Ultra Fine Mist Spray Bottle - 10 oz](https://www.amazon.com/gp/product/B0948WBX9L?&linkCode=ll1&tag=shroomok-20&linkId=b2568ccef0151facd2ee37e2e2c156c1&language=en_US&ref_=as_li_ss_tl) $8.99
##### **Sterilised bulk substrate**
- [Ready Bulk Substrate - 5 Pounds - 1 Bag](https://www.amazon.com/gp/product/B083RJG4FF/ref=as_li_tl?ie=UTF8&tag=shroomok-20&camp=1789&creative=9325&linkCode=as2&creativeASIN=B083RJG4FF&linkId=283a900c2dadd61b858349822a9e7b8f) $32.95
##### **Fresh air exchange and additional fanning for [MonoTub](https://shroomok.com/en/wiki/Forget_Monotub_Kit._DIY._How_to_make_Monotub_for_Mushrooms_by_your_own "Forget Monotub Kit. DIY. How to make Monotub for Mushrooms by your own")**
- [Quiet PC Fan with power plug cord](https://www.amazon.com/AC-Infinity-Cooling-Ventilation-Projects/dp/B009OWVUJ0?crid=1HAKBLTXUE6X0&keywords=computer+fan&qid=1650528287&sprefix=computer+fa%2Caps%2C338&sr=8-8&linkCode=ll1&tag=shroomok-20&linkId=3ee6f83453e06151ac757c99ec3f5c11&language=en_US&ref_=as_li_ss_tl) $19.99
##### **Fresh air exchange, additional ventilation, air filtering for [GrowBox](https://shroomok.com/en/wiki/DIY_Grow_Box_for_Magic_mushrooms._Fruiting_conditions "DIY Grow Box for Magic mushrooms. Fruiting conditions")**
- [Quiet **Oxygen Pump** for 20-100 Gallon - 2 Outlets](https://www.amazon.com/gp/product/B07RJ3XLM8/ref=as_li_tl?ie=UTF8&tag=shroomok-20&camp=1789&creative=9325&linkCode=as2&creativeASIN=B07RJ3XLM8&linkId=a95f2e7fd5ddd905a223db6e6ef7b9e3) $15.99
##### **For sterilisation (tools, environment etc)**
- [Isopropyl Alcohol 70% Spray 32 oz or bigger volume](https://amzn.to/3Q7kib9) $13.95
- [Clorox Bleach Germicidal Spray 32 oz.](https://amzn.to/3Q5WULg) $13.98
- [UVC Light Lamp - Ozone Free](https://www.amazon.com/dp/B0B5CV9PB5?&linkCode=ll1&tag=shroomok-20&linkId=cb3c7a7c1a4e7a10418aaf6e2fe75ff0&language=en_US&ref_=as_li_ss_tl) $17.99
- [UV Light Bulb with Base - Ozone, with Timer](https://www.amazon.com/dp/B09ZY5DSWJ?&linkCode=ll1&tag=shroomok-20&linkId=b3c2dbb79de824c27b5f3fd81b8286df&language=en_US&ref_=as_li_ss_tl) $36.99
- [Air HEPA Purifier for Home](https://amzn.to/3PPRq60) $99.99
#### Afterwords
Check out more examples of cobweb contamination in 📸 [Cobweb Mold photo gallery](https://shroomok.com/gallery/cobweb-mold)
Join Shroomok Community on **Discord** and **Reddit** for questions and sharing experience.
You can also leave your comments on this page below ⬇️
If you find this guide helpful, please support me with cup of coffee on [☕️ buymeacoffee](https://www.buymeacoffee.com/shroomok)
Have a happy growing and healthy shrooms!
Peace, Shroomok ❤️
## Green mold contamination aka Trichoderma
[Green mold contamination aka Trichoderma](https://shroomok.com/en/wiki/Green_mold_contamination_aka_Trichoderma)
[](https://shroomok.com/en/wiki/File:Trichoderma-mold-contamination.jpg) Trichoderma contamination in mushroom cultivation*Trichoderma spp.* provide a valuable service in the nature. Many species have found wide practical application in agriculture, food, paper and textile industries.
This mold colonises plant roots and form symbiotic associations that protect plants against fungi diseases. Gardeners around the world like Trichoderma a lot, but things change in the world of mushroom cultivation... *Trichoderma spp* is the cause of the green mold disease.
### Green mold in mushroom growing: identification guide, how to prevent and what to do with contaminated mycelium
#### What is Trichoderma?
**Trichoderma** *(aka green mold or forest mold)* is a common form of mold. It is present in all types of soil and spread all over the world.
[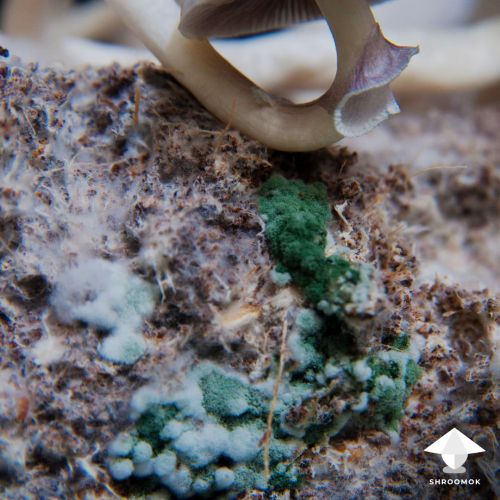](https://shroomok.com/en/wiki/File:Trichoderma-green-mold-contamination-in-mushroom-growing.jpg) Green mold on mushroom cake, fruiting period. Photo by **Triptolamus** - Shroomok Growers Community**Scientific classification:**
- Kingdom: Fungi
- Division: Ascomycota
- Class: Sordariomycetes
- Order: Hypocreales
- Family: Hypocreaceae
- **Genus: *Trichoderma***
- Type species: *Trichoderma fuliginoides*
- Species: [List of *Trichoderma* species](https://en.wikipedia.org/wiki/List_of_Trichoderma_species "wikipedia:List of Trichoderma species")
[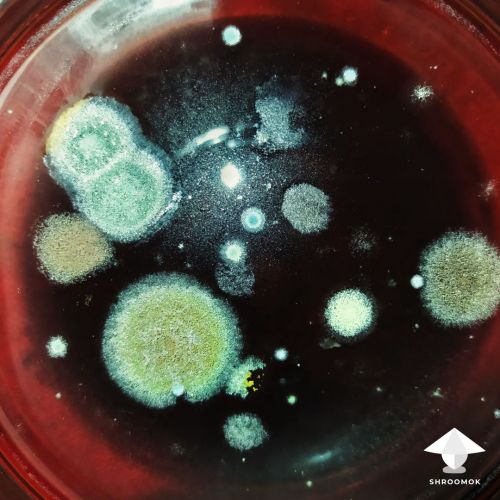](https://shroomok.com/en/wiki/File:Trichoderma-mold-on-agar.jpg) Trichoderma mold on agar> The genus was discovered by a German scientist named Christiaan Persoon in 1794, but the taxonomy has remained difficult to resolve. For a long time it was considered to consist of only one species, *Trichoderma viride*, named for producing green mold
According to various estimations, this genus includes from 200 to 400 species. Some of them may turn out to be synonyms of other species, and some of them may belong to other genus. The position of the genus Trichoderma is still debatable. The [List of *Trichoderma* species](https://en.wikipedia.org/wiki/List_of_Trichoderma_species "wikipedia:List of Trichoderma species") contains 382 species.
#### How to identify trich on mushroom mycelium?
Usually it is hard to identify early stage of Trichoderma for newbie growers. Seems like it is mushroom mycelium or bruises, but Trich has typical features for identification.✅ **Color.** It begins to grow with a white or off-white color at the very beginning, maturing into green as it releases spores
[](https://shroomok.com/en/wiki/File:White-to-green-trichoderma-mold-on-mushroom-cake.jpg) Early stage (white) and sporulating stage (green) of Trichoderma development. White area turns green in 12-24 hours✅ **Texture.** Trich is powdery and/or marshmallow at the beginning
[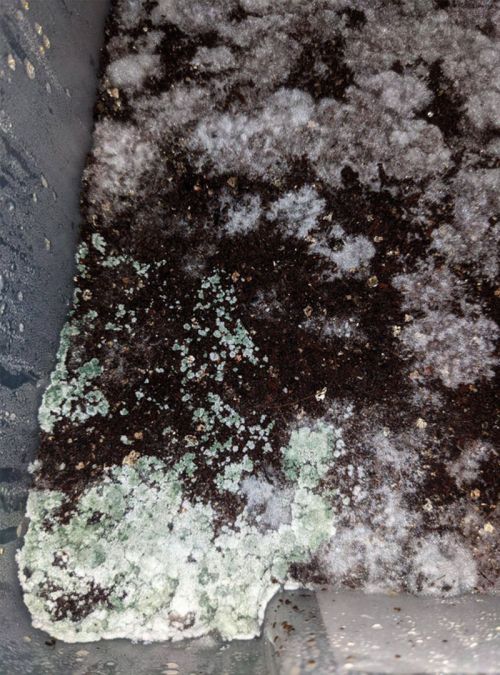](https://shroomok.com/en/wiki/File:Green-mold-contaminated-mushroom-casing-layer.jpg) Green mold contamination in monotubTrichoderma mold always powdery in active phase of sporulating on spawn, bulk substrate and casing layer
[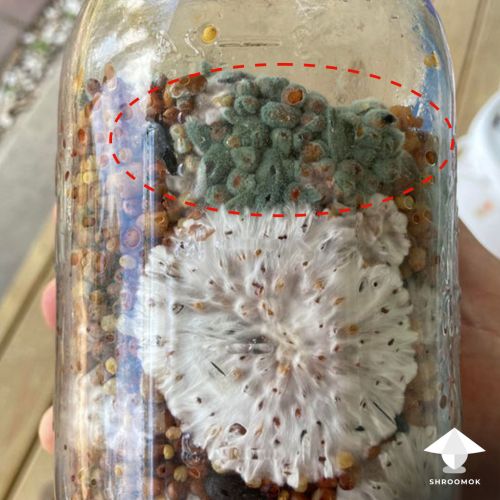](https://shroomok.com/en/wiki/File:Mushroom-spawn-contamination-green-mold-trichoderma.jpg) Mushroom spawn jar contaminated by green mold[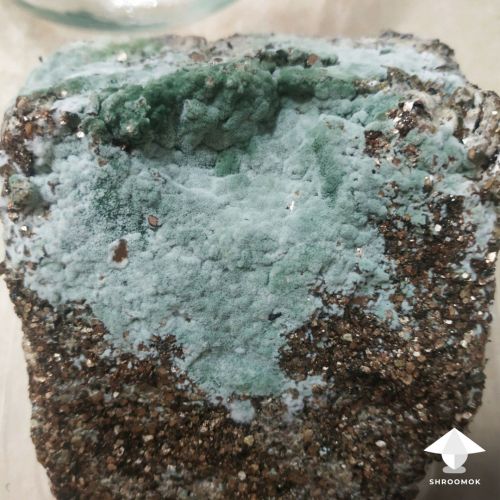](https://shroomok.com/en/wiki/File:Contaminated-mushroom-block-green-mold-trichoderma.jpg) Powdery texture of Trichoderma mold contamination on mushroom block
✅ Let's figure out one great example of color and texture differences. Such case can be useful for newbies.
Here Trichoderma contamination is white, but the texture is different to mushroom mycelium. Trich is more dense and powdery like. Mushroom mycelium has thin threads.
[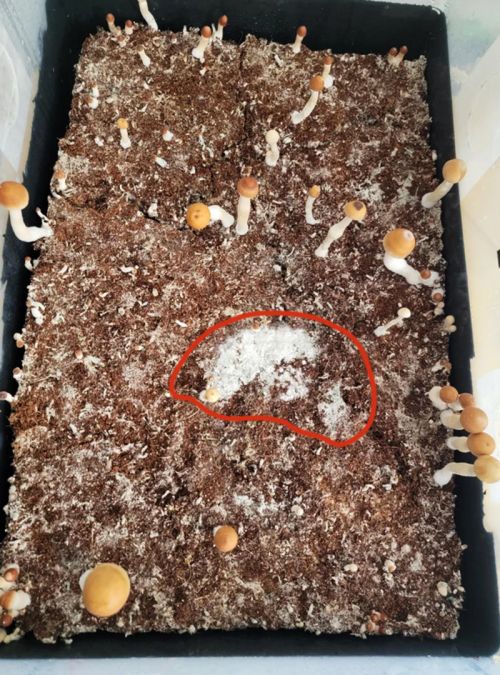](https://shroomok.com/en/wiki/File:Trichoderma-green-mold-contam-in-monotub.jpg) Trichoderma mold is white, but the texture is different to mushroom myceliumThe same mushroom cake, closer photo of the same contaminated area. Here you can see greenish tinge
[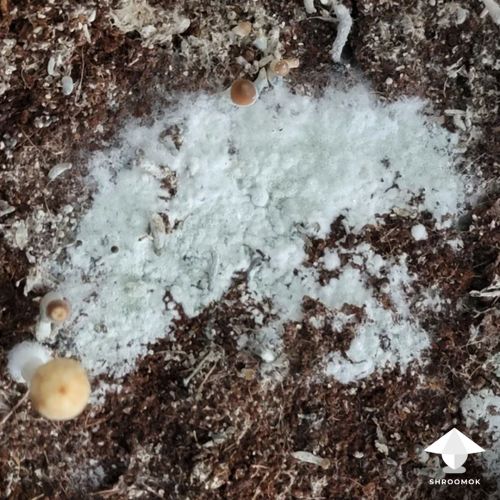](https://shroomok.com/en/wiki/File:Green-mold-contamination-in-mushroom-cultivation.jpg) Trichoderma contamination on the early stage, white Trich with greenish tingeOne more example for identification Trich contam on mushroom cake in MonoTub
[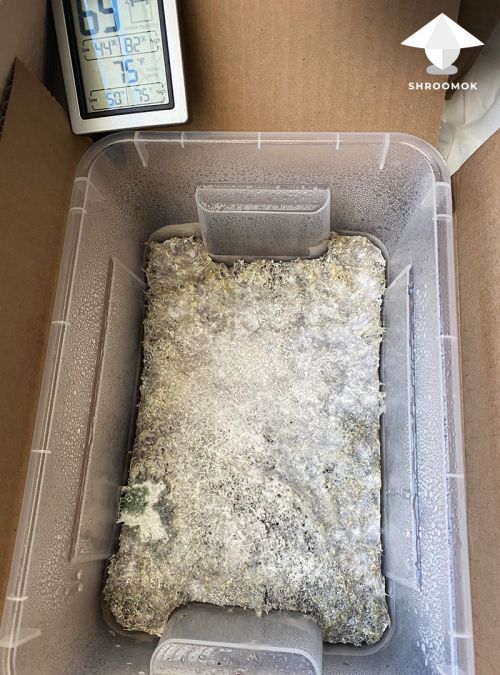](https://shroomok.com/en/wiki/File:Trich-contam-mushroom-cake.jpg) Green mold contam in monotub. Photo by **pvestal** - Shroomok Growers Community on [Discord](https://discord.gg/ngKhQDmymD)```
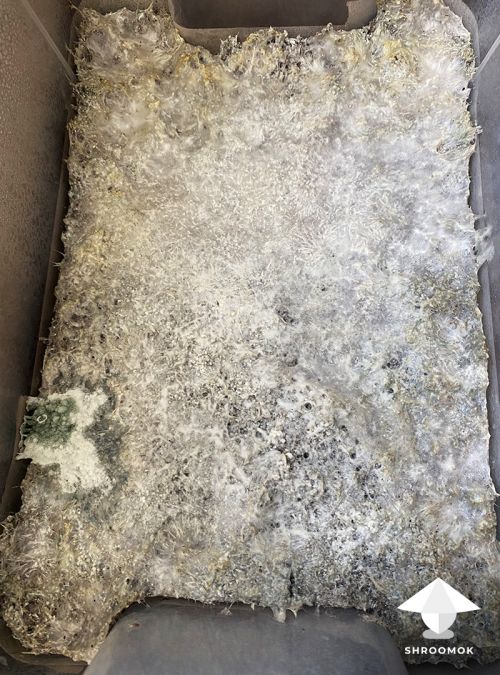 Closer photo of Trich contam on mushroom cake in monotub. Photo by pvestal - Shroomok Growers Community on Discord
```
[](https://shroomok.com/en/wiki/File:Green-mold-trichoderma-contamination.jpg) Same photo, Trichoderma contam. White area - early stage, green - sporulating phase. Photo by **pvestal** - Shroomok Growers Community on [Discord](https://discord.gg/ngKhQDmymD)✅ **Smell.** Usually hard to feel in home cultivation due to small amount of contamination. On mushroom farm you can feel **coconut smell** as sign of Trichoderma contamination.
> Clear liquid with a typical coconut smell produced by Trichoderma species is called *[6-Amyl-α-pyrone](https://en.wikipedia.org/wiki/6-Amyl-%CE%B1-pyrone "wikipedia:6-Amyl-α-pyrone")*
Of course you can use microscope for identification, but it is possible to id on eye. All questionable cases are easier to determine with macro photo (as close as possible) and good light or use simple Magnifying Glass with light on Amazon
[Magnifying Glass with 12 LED Lights, 30X](https://www.amazon.com/Magnifying-Illuminated-Magnifier-Inspection-Degeneration/dp/B08PP4RJ5J?&linkCode=ll1&tag=shroomok-20&linkId=b9f024ed48b7a483b0bb72c7855e3742&language=en_US&ref_=as_li_ss_tl) $8.99
#### Mushroom bruises or Trichoderma contamination?
It's always confused newbie growers, because *Trichoderma spp. (T. harzianum, T. viride, T. koningi)* have white color at the very beginning and sometimes have even blue tinge.
Green color you can admit only on the latest stage (sporulating phase).
Mycelium bruising and Trichoderma contamination on mushroom spawn
[](https://shroomok.com/en/wiki/File:Mushroom-bruises-vs-trich-mold.jpg) Mushroom bruising and Green Mold contamination in spawn jar
Mycelium bruises and green mold contamination on mushroom cake
[](https://shroomok.com/en/wiki/File:Trich-and-bruises.jpg) Mycelium bruising (blue) and Trichoderma mold (green) on the same cake. Photo by Claudius - Shroomok Growers Community> 🔴 Check out more examples for id: [Mycelium Bruises or Mold Contamination](https://shroomok.com/en/wiki/Mycelium_Bruises_or_Mold_Contamination "Mycelium Bruises or Mold Contamination")
#### Q-Tip Test or Swab Test for green mold identification
Q-tip test isn't scientific test, but popular life hack among newbie mushroom growers.
Swab test can be used to determine whether your mycelium is just bruised or contaminated with mold *(green mold Trichoderma spp. or blue mold Penicillium spp)*. This test is possible to use during fruiting period only. The test is based on the fact that mold spores are sticky and would be stuck on any surface that comes into contact.
To do this you have to take a clean white cotton swab or a fresh Q-tip and swipe it across the contaminated area.
If your cotton swab rubs the green powder on to it, it is highly likely that you are looking at a Trich contamination.
If your cotton swab comes out clean without any color on it, your mycelium may be simply bruised.
#### Main causes of Trich mold contamination
⛔️ Contaminated spore syringe or liquid culture.
⛔️ Poor sterility of mycological manipulations, especially during inoculation process (also transfer, spawn to bulk, casing etc.)
⛔️ Poor bulk substrate pasteurisation. At a temperature over **140°F (+60°C) for at least 30+ minutes** Trichoderma spores die. Pasteurization helps to kill Trich and save useful microflora, that's why pasteurisation method is preferable for bulk substrate. Check out why in Shroomok Community discussion: [Sterilization vs Pasteurization for bulk substrate](https://shroomok.com/en/wiki/Sterilization_vs_Pasteurization_for_bulk_substrate "Sterilization vs Pasteurization for bulk substrate")
> It is supposed that sterilisation treatment due to high temperature and the cooking effect, released nutrients that benefited the green mold. It is also considered that the reduction of the natural microbial flora of the substrate by the sterilization action increases Trichoderma sp. opportunities to colonize the substrate because of a lower presence of competitive micro flora which reduces the possibility of mycelial growth. Bacterial strains can inhibit the growth of *Trichoderma sp* by production of volatile organic compounds (Mackie and Whetley, 1999) or by releasing antibiotics (Nielsen *et al.*, 2000)
> [Efficiency of treatments for controlling *Trichoderma* spp during spawning in cultivation of lignicolous mushrooms](https://www.ncbi.nlm.nih.gov/pmc/articles/PMC4323299/)
⛔️ Trichoderma spp. spread by airflows (spores in the air, in air conditioning and ventilation system), water (misting), tools and insects
⛔️ High concentration of Trichoderma spores in the growing room. Especially if you had Trich contamination before. During sporulating phase mold easily spreads in the air when you introducing fresh air and misting growbox or monotube.
⛔️ Plant pots near fruiting chamber. Plants and Trich can form symbiotic associations and support each other, but such neighbouring may be harmful for your mushrooms
⛔️ High temperature. Trichoderma molds enjoy 80–86 °F (27–30 °C)
⛔️ Low pH level (acid soil). Trich molds enjoy pH 4-6.
#### How to prevent Trichoderma Mold contamination?
##### Basic rules for Trich prevention
✅ Make up your room regularly. Use non-toxic odor-free fungicide, especially on porous surfaces and if you have molds in your accommodation
[Disinfectant Spray Cleaner Fungicide](https://www.amazon.com/dp/B07FDL9RK1?&linkCode=ll1&tag=shroomok-20&linkId=28af31a917b82906468f9aae58e55ca8&language=en_US&ref_=as_li_ss_tl) $16.99
✅ Treat all your stuff (tub, tools, jars) with bleach if you had Trichoderma contamination before
[Bleach Germicidal Cleaner Spray, 1 Qt](https://www.amazon.com/Clorox-Healthcare-Bleach-Germicidal-Cleaner/dp/B000GULS3W?&linkCode=ll1&tag=shroomok-20&linkId=dbc0b3685180ffa1c6ec7e06d2326ea8&language=en_US&ref_=as_li_ss_tl) $13.83
[Bleach Germicidal Wipes for surfaces, 150 Count](https://www.amazon.com/Clorox-Healthcare-Bleach-Germicidal-Canister/dp/B078MVPF95?&linkCode=ll1&tag=shroomok-20&linkId=3a7976335239d91f208ee349d3d9e6be&language=en_US&ref_=as_li_ss_tl) - $12.49
✅ Keep all mycological manipulations as sterile as possible. Always wear gloves. Use isopropyl alcohol to treat all tools and wipe all surfaces (especially for inoculation process)
[Isopropyl Alcohol 70% USP Grade - One Quart Spray](https://www.amazon.com/gp/product/B08LW5P844/ref=as_li_tl?ie=UTF8&tag=shroomok-20&camp=1789&creative=9325&linkCode=as2&creativeASIN=B08LW5P844&linkId=de58e8e2a98ad37b75f875c879a5e62e) $21.99
[Disposable Gloves, Black, 50/100 Pack](https://www.amazon.com/dp/B0B71BGZBQ?&linkCode=ll1&tag=shroomok-20&linkId=aff7970bd3e1271f88d400e7cedb55ad&language=en_US&ref_=as_li_ss_tl) - $9.99
✅ Turn off ventilation and air conditioning 1 hour before any mycological manipulations.
✅ Use SAB (still air box), or glovebox, or air flow hood for inoculation process ([grain inoculation](https://shroomok.com/en/wiki/Inoculation_without_glove_box "Inoculation without glove box"), agar inoculation) and transfer (agar transfer, [Grain2Grain](https://shroomok.com/en/wiki/Grain_to_Grain_Transfer_(G2G) "Grain to Grain Transfer (G2G)") transfer).
✅ Control **pH level** of bulk substrate and casing soil to prevent Trichoderma mold. Use buffering agents for pH level adjusting. We'll figure out this important step in the next paragraph.
✅ Sterilise or pasteurise bulk substrate, because it can contain Trichoderma spores. At a temperature 140 °F (+60°C) for 30 minutes Trichoderma spores die. Bulk pasteurisation is easy and cheaper to make by your own. Just pour hot boiled water in coco coir mix in bucket and leave it to chill overnight.
> Trichoderma prefer wood-based, hay, straw fruiting substrate more than manure.
✅ Protect air vents in [MonoTub](https://shroomok.com/en/wiki/Forget_Monotub_Kit._DIY._How_to_make_Monotub_for_Mushrooms_by_your_own "Forget Monotub Kit. DIY. How to make Monotub for Mushrooms by your own") with **Synthetic Filters** or **Polyfill** or **breathable tape**
[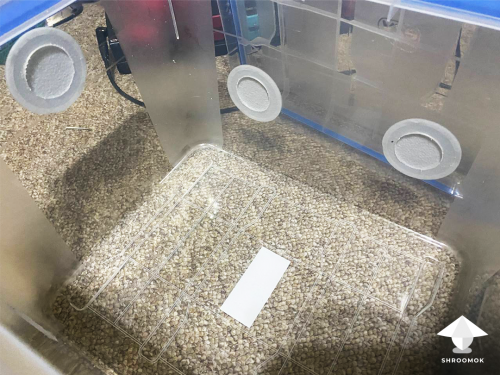](https://shroomok.com/en/wiki/File:4-diy-monotube-for-mushroom-growing.png) *Use Adhesive Synthetic Filters or Polyfill for air vents***Shroomok's Choice on Amazon:**
[Synthetic Filter Discs - 16/30 Pieces](https://www.amazon.com/dp/B08RYNCZM7?&linkCode=ll1&tag=shroomok-20&linkId=b9e856c23dae70a417635f16d9400cf7&language=en_US&ref_=as_li_ss_tl) $14.99
[Poly-Fill Premium Fiber - 250g/8.8oz](https://www.amazon.com/dp/B08LYJ66HN?&linkCode=ll1&tag=shroomok-20&linkId=e4acbbbadf32c0375f30be505f6932ea&language=en_US&ref_=as_li_ss_tl) $12.99
[Micropore Paper Tape - 3m](https://www.amazon.com/3M-Micropore-Paper-Tape-White/dp/B003TXPZ64?&linkCode=ll1&tag=shroomok-20&linkId=c4d61a7d462de08fbf5a945f42fdf4a7&language=en_US&ref_=as_li_ss_tl) $9.43
✅ Wait for 80-100% of top/casing layer colonisation before introducing fresh air and overall fruiting conditions. Trichoderma mold (any mold, for that matter) love and enjoy uncolonised spots
✅ Keeping your fruiting chamber cooler than 80–86 °F (27–30 °C) can discourage Trichoderma growth. Most of mushroom species prefer lower temperature than Trichoderma, there is no conflict with fruiting conditions here
✅ Keep your fruiting chamber on the table or shelf, pick up from the floor. Usually molds flow on the floor with drafts
✅ Good fresh air exchange (FAE)
> Trich and all other molds prefer stagnant air in fruiting chamber
✅ Use clean water for humidifier or spray/mister bottle
✅ Keep your gardening projects and plant pots separately from mushroom cultivation projects
##### Additional recommendations for Trich prevention
✅ Use UV germicidal lamp as additional method for sterilisation tools and air in the room
[UVC Light Lamp (110V 6W with Ozone)](https://www.amazon.com/dp/B0B5CV9PB5?&linkCode=ll1&tag=shroomok-20&linkId=cb3c7a7c1a4e7a10418aaf6e2fe75ff0&language=en_US&ref_=as_li_ss_tl) $20.99
[UV Germicidal Lamp with Timer](https://amzn.to/3OQVrXK) $36.99
✅ Use air purifiers for home
[Air Purifiers for Home Bedroom with H13 HEPA Air Filter](https://amzn.to/3ZL7f46) $37.99
[Ionic Air Purifier Ionizer with UV-C Sanitizer](https://www.amazon.com/OION-Technologies-B-1000-Permanent-Sanitizer/dp/B00FBMJK9Y?&linkCode=ll1&tag=shroomok-20&linkId=5aa16cba96715fbe6b06afb01c5c554d&language=en_US&ref_=as_li_ss_tl) $99.95
✅ Use aquarium air pump for [GrowBox](https://shroomok.com/en/wiki/DIY_Grow_Box_for_Magic_mushrooms._Fruiting_conditions "DIY Grow Box for Magic mushrooms. Fruiting conditions") to introduce fresh air. There is a stone at the end of the aquarium air pump hose; it should be dipped in water. This will filter the incoming air from spores of contaminants through water.
[](https://shroomok.com/en/wiki/File:Growbox-with-air-pump-for-air-exchange-and-humidification.jpg) Growbox with air pump for filtering incoming air[](https://shroomok.com/en/wiki/File:Fruiting-chamber-for-mushrooms-with-air-pump-for-FAE.jpg) Growbox/monotub for mushrooms with air pump (right corner) for introducing fresh air. Incoming air is filtering trough water. Photo by **H워얼V** - Shroomok Growers Community**Shroomok's Choice on Amazon:**
[Quiet Oxygen Pump for 20-100 Gallon - 2 Outlets](https://www.amazon.com/gp/product/B07RJ3XLM8/ref=as_li_tl?ie=UTF8&tag=shroomok-20&camp=1789&creative=9325&linkCode=as2&creativeASIN=B07RJ3XLM8&linkId=a95f2e7fd5ddd905a223db6e6ef7b9e3) - $14.97
[Adjustable Oxygen Pump for 20-100 Gallon - 2 Outlets](https://www.amazon.com/gp/product/B01EBXI7PG/ref=as_li_tl?ie=UTF8&tag=shroomok-20&camp=1789&creative=9325&linkCode=as2&creativeASIN=B01EBXI7PG&linkId=a0a86a19ba80cf22326ca33748ae2c6c) - $14.99
[Powerful Air Pump - for 20-200 Gallon - 2 Outlets](https://www.amazon.com/gp/product/B08HMZSH9J/ref=as_li_tl?ie=UTF8&tag=shroomok-20&camp=1789&creative=9325&linkCode=as2&creativeASIN=B08HMZSH9J&linkId=129cc0f3bc777d413baed339a79e2a6c) - $21.97
✅ Regular cleaning of the air conditioning and ventilation system at least once a year. It's also important for your health. A/C spread spores extremely effective and mold can grow in your A/C system
#### How soil pH affect Trichoderma
Trichoderma mold prefer acidic soils (pH 4-6). This is actually a good news, because most mushrooms required neutral or slightly alkaline soil. The optimum pH for actives and edibles is about 6.5-8.5 (except acid-loving edible species, pH 5.5-6.5). This means you can control Trichoderma growing by pH level adjusting.
[](https://shroomok.com/en/wiki/File:PH-scale.jpg) pH scaleWhy is it important?
As the mushroom mycelium colonises the bulk substrate its pH gradually falls. Moreover, flush by flush the substrate is gradually acidified by mushroom waste products, which makes it even more vulnerable for Trichoderma mold.
For example, if we applied a bulk substrate and casing layer with pH 7.5, it gradually drops to pH 6.0-6.5 after the 1st-2nd flush of fruiting. If we used a bulk substrate with pH 5.5-6.5, then after the 1st-2nd flush we'll get acid soil and high risk of Trich contamination.
> ❗️**That's why Trich contamination often appear on the 2nd, 3rd or even 4th flush of fruiting when mushroom cake is acidified**
##### Additives for bulk and casing substrates
For pH adjusting we need to add buffering agent.
The casing ingredients as a buffering agents described in the book "*The Mushroom Cultivator: A Practical Guide to Growing Mushrooms at Home" by Jeff S. Chilton and Paul Stamets are based on **Calcium carbonate*** **CaCO3** - limestone flour, limestone grit, dolomitic limestone flour, chalk, marl, oyster shells. There are a few recommend formulas with using some of these ingredients for growing *Agaricus culture*. BUT! Dolomitic limestone flour is high in magnesium, thus depressed mycelial growth. Limestone flour and limestone grit (aka garden lime) is possible to use for **bulk** substrate, but it is less effective for pH adjusting than **Calcium Hydroxide Ca(OH)2** (aka hydrated lime, slaked lime). Eventually, such ingredient as limestone almost useless for **casing** substrate that required rapid pH raise.
Limestone is intended for long-term decomposing, for example in the garden, in the soil. Substrates that bear fruit for a month or so do not require long-term pH adjustment. They need a short, fast pH changes.
> Hydrated lime (**Calcium Hydroxide Ca(OH)2** ) works within 24 hours. That's why hydrated (slaked) lime is what you need to consider for rapid pH adjustment, especially for casing
**What about gypsum?**
**Gypsum** or Calcium Sulfate (CaSO4) is often added into bulk substrate (2-5% to dry mass of substrate), but it is NOT a buffering agent itself. It is chemically neutral or near-neutral (pH ~6–7) and does not significantly raise or lower the pH, but it has another influence on pH.
Gypsum contains both calcium carbonate and sulphur. While it doesn’t directly shift the pH, it helps stabilize pH fluctuations in the substrate over time by neutralizing certain acids and bases. Therefore, it tends to maintain pH around neutral, as metabolites are released to lower the pH. This action promotes proper pH balance in the substrate. These effects improve the physical structure of the substrate by aggregating colloidal particles giving a looser, more porous structure, which leads to increased aeration within the substrate.
> ❗️ Gypsum provides looseness (particle separation) to reduce soil compaction and increase drainage, aeration in soils.
>
> 🔴 Gypsum may affect pH by half of a point initially. Its pH-altering ability is minor until the sulfur evolves into sulfuric acid. Calcium and sulfur are essential elements in mushroom metabolic processes. If the substrate is lacking in these essential elements, yields are adversely affected.
##### Bulk substrate and Trichoderma prevention
You need to know the pH of your initial substrate before and after mixing all ingredients. Check the pH every time you work with new pack/brick.
For bulk substrate the main ingredient is coco coir (loose in pack or pressed in bricks). The pH on label is 6.5. In fact the pH of each pack/brick is varied - pH 5.5 - 6.5.
The best basic recipe for bulk substrate is CVG (Coco coir + Vermiculite + Gypsum) or CVG with added lime (hydrated aka slaked lime):
- Coco coir - 1 brick (650g = 1,4 Lbs)
- Vermiculite - 8 cups (2 qts)
- Gypsum - 1 cup **OR** Gypsum 1/2 cup + Lime 1/2 cup
- Water - 18 cups of water (4.5 qts)
All you need on Amazon here -> [Ingredients for Coco Coir mix or CVG substrate](https://shroomok.com/amazon-kits/bulk-coco-coir-CVG-substrate-ingredients)
Prepare more or less, just follow the ratio.
##### How to prepare pH adjusted casing substrate
Actually, pH adjusted casing is a main protection against Trichoderma mold. The base for Casing layer is peat moss aka sphagnum, vermiculite and water. The additive for pH adjusting is hydrated (slaked) lime.
Sphagnum is acid, its pH vary from 2.5-3.5 to 4.5. We need pH 7.8-8.5.
The recipe below always works perfect! It can be used for Psilocybe Cubensis, Psilocybe Natalensis, Panaeolus and other species for which casing is a required cultivation step.
**The optimal casing substrate recipe:**
- peat moss (aka sphagnum) - 2 cups (Amazon)
- vermiculite - 1 cup (Amazon)
- hydrated lime (aka calcium hydroxide) - 1 tablespoon (Amazon)
- water - 1 cup
All you need on Amazon here -> [Ingredients for pH adjusted Casing substrate](https://shroomok.com/amazon-kits/casing-layer-ingredients)
Prepare as much as you need, just follow the ratio.
Peat based casing doesn't require sterilization (high pressure and high temperature) and rarely require pasteurization as it is non-nutrient type of substrate. However, I recommend pausterization for casing.
- Mix your substrate ingredients thoroughly.
- Place the prepared mix into a heat-safe bag, 5PP container or Mason canning jar.
- Heat water in pot with lid to around **65-75°C (149-167°F)** and immerse the jar with substrate. Or you can use a bain-marie (water bath) for pasteurization.
- Keep the substrate at this temperature for **1-2 hours**. Avoid letting the temperature exceed 80°C (176°F), as this can move toward sterilization and kill beneficial bacteria.
- Allow the substrate to cool completely in a clean area. Better to leave it for 24 hours before using it for pH stabilization.
- Before applying the casing, test the pH to ensure it is within the ideal range (7.8-8.2, up to 8.5). Adjust with more lime or water if needed.
- Casing layer should be applied with clean tools and in a sanitized area on **colonized bulk substrate.** The casing layer should be even, around 1/5-1/3 inch or 0.5-1 cm.
- Fruiting conditions should be provided right after casing.
> 💡 If you find products like "Trich preventer additive" it's mostly marketing. In fact the main content of such products are calcium carbonate or gypsum + hydrated lime, which are 10 times cheaper. Save your money ;)
##### How to check soil pH level?
✅ The best and the most accurate method is **Soil pH meter** or **Digital soil tester**
[](https://shroomok.com/en/wiki/File:Soil-pH-meter-for-mushroom-bulk-substrate-and-casing.jpg) Soil pH meter to check pH level of mushroom bulk substrate and casingInsert the tester tip into substrate and in a few minutes check the result. Such simple device may be useful in gardening.
**Shroomok's Choice on Amazon:**
[Luster Leaf Digital Soil pH Meter](https://www.amazon.com/BioLogic-MK1845-Digital-Meter-Plots/dp/B091FXGCTB?th=1&linkCode=ll1&tag=shroomok-20&linkId=2f941eb1ac782982a3634dec927bb241&language=en_US&ref_=as_li_ss_tl) $14.41
[Digital, Luster Leaf, Soil pH Meter](https://www.amazon.com/gp/product/B0786YZMC8?ie=UTF8&linkCode=ll1&tag=shroomok-20&linkId=bf7983b2bcb3a955a98997a7832518ce&language=en_US&ref_=as_li_ss_tl) - $23.25
[Digital, Luster Leaf, 3 Way Analyzer for Soil pH](https://www.amazon.com/Luster-Leaf-Fertility-Temperature-1836/dp/B08X6PM984?&linkCode=ll1&tag=shroomok-20&linkId=b6c5c23b4313010ffbdf54225b50f0a0&language=en_US&ref_=as_li_ss_tl) - $26.90
✅ Cheap and easy way is **pH Paper Test Strips**. Such tests may be useful in gardening as well
[](https://shroomok.com/en/wiki/File:How-to-check-soil-ph-for-mushroom-substrate-with-test-strips.jpg) pH test strips to check pH level of bulk substrate and casingUse **distilled water** and mix it with the soil in 1:1 ratio. Use paper test strips to determine the pH level based on the color chart.
**Shroomok's Choice on Amazon:**
[Soil pH Test Strips Kit, 3.5-9 Range, 100 Tests](https://www.amazon.com/gp/product/B07YZT5ZPJ/ref=as_li_tl?ie=UTF8&tag=shroomok-20&camp=1789&creative=9325&linkCode=as2&creativeASIN=B07YZT5ZPJ&linkId=64a76f9f1778c4e5b55cbd8839e5704c) - $12.98
✅ Improvised amateur method to determine pH level is **acetic acid** or **vinegar**.
Take a sample of wet soil and add a few drops of vinegar. If bubbles and foam appear, then soil is alkaline. If the amount of bubbles is small, then neutral, if no bubbles at all - soil is acidic.
Of course, this method will be rough and approximate. You won't be able to adjust accurately the pH level in this way.
##### Rehydration in pH adjusted water to prevent Trichoderma contamination
One of the methods to reboot pH level for mushrooms after harvesting is rehydration in alkaline water pH 8.0 - 9.0. The main ingredient we use here is hydrated lime (soluble in water):
> 💡 Check out details: [Soaking mushroom cake in alkaline water](https://shroomok.com/en/wiki/Rehydration_of_psilocybe_cakes#Soaking_mushroom_cake_in_alkaline_water)
Reapply casing layer to prevent green mold contamination (optional step, but may be beneficial if you catch contam often). Adding new layer of **pH adjusted casing** (about 0,5 cm) after rehydration helps to manage pH and protect mycelium.
> ⛔ Don't scrap mushroom cake and previous casing layer! Just add new thin layer to reboot pH, thus protecting mycelium
Casing layer is non-nutrient substrate. It is based on peat moss, vermiculite and pH adjusted. That's why casing content is unattractive for molds, but beneficial for mushrooms. Moreover casing top layer retains moisture extremely great and acts as a security guard for shrooms.
> 💡 Check out details: [Casing layer for growing magic mushrooms](https://shroomok.com/en/wiki/Making_mushroom_cake,_spawn_to_bulk,_and_casing)
#### What do I do if I see green mold growing?
Trichoderma spp. grow quickly and spread spores like wildfire. That's why isolation is a key.
🔴 Get contaminated mushroom cake/block/spawn/agar out of your house immediately! Keep healthy spawn bags/jars, tools, substrates, fruiting chambers, mushrooms far away from contaminated.
🔴 Don't open the spawn jar/bag with contaminated spawn indoor, because you can spread mold spores in your room. It's a high contamination risk for your future cultivations.
🔴 Treat affected tools/tubs and surfaces with a bleach solution and wipe with alcohol to kill the mold spores. You need to bleach and alcohol everything you think you touched, change the clothes and take a shower.
[Bleach Germicidal Cleaner Spray, 1 Qt](https://www.amazon.com/Clorox-Healthcare-Bleach-Germicidal-Cleaner/dp/B000GULS3W?&linkCode=ll1&tag=shroomok-20&linkId=dbc0b3685180ffa1c6ec7e06d2326ea8&language=en_US&ref_=as_li_ss_tl) $13.83
[Bleach Germicidal Wipes for surfaces, 150 Count](https://www.amazon.com/Clorox-Healthcare-Bleach-Germicidal-Canister/dp/B078MVPF95?&linkCode=ll1&tag=shroomok-20&linkId=3a7976335239d91f208ee349d3d9e6be&language=en_US&ref_=as_li_ss_tl) - $12.49
This will at least prevent the Trichoderma from infecting more of your current and future crops. You can bury contaminated mushroom cake and spawn in the garden.
> 💡 Contaminated cakes/blocks/spawn buried in the garden can produce healthy mushroom fruiting outdoor
#### Is it possible to treat Green Mold contamination on mushroom cake or spawn?
*Trichoderma* species are resistant to most agricultural chemicals, including fungicides. It is extremely aggressive and fast growing mold.
Trich spores easy spread in the air. Once you had green mold contamination you have high risk of contamination for the future cultivations and be ready to fight for a long time...
⛔️ No sense to treat contaminated spawn jars/bags. Throw them away without opening in the room. Open contaminated jars outdoor only!
[](https://shroomok.com/en/wiki/File:Spawn-jar-contamination-green-mold-trich.jpg) Mushroom spawn contaminated by green mold Trichoderma. Throw it away](https://shroomok.com/en/wiki/File:Green-mold-in-spawn-bag.jpg) Spawn bag contaminated by green mold Trichoderma. Toss it!
Even such tiny contamination should be tossed!
[](https://shroomok.com/en/wiki/File:Trich-mold-contam-in-spawn-jar.jpg) Green mold contam on mushroom spawn⛔️ No sense to treat contaminated mushroom cakes/blocks when green color detected on top layer.
Even if you see small green area. Throw it away immediately or bury in the garden
[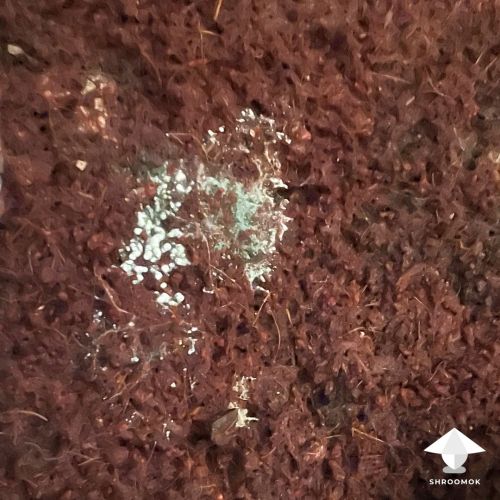](https://shroomok.com/en/wiki/File:Trich-mold-contamination-on-bulk-substrate.jpg) Trich mold contamination, start of sporulating. RIP[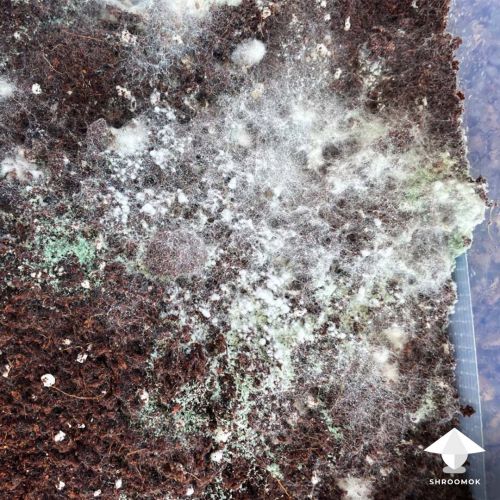](https://shroomok.com/en/wiki/File:Start-of-trichoderma-sporulating-on-mushroom-cake.jpg) Trich contam, color changes from white to green[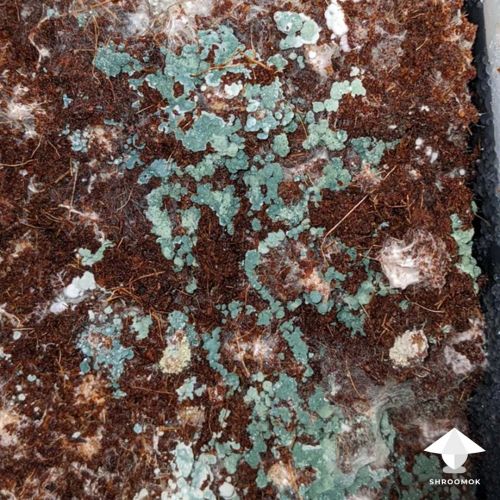](https://shroomok.com/en/wiki/File:Green-mold-on-casing-layer-and-mushroom-mycelium.jpg) Contaminated cake in shoebox. Green mold contaminationGreen mold powder (spores of Trich) and such huge area of contamination is a dangerous sporulating phase. Don't let it get to such critical state!
[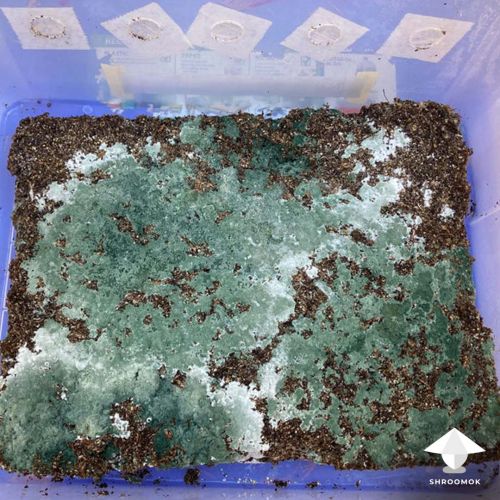](https://shroomok.com/en/wiki/File:Monotub-mushroom-block-contaminated-by-trichoderma-mold.jpg) DANGER! TOSS IT IMMEDIATELY!⛔️ Don't use mushroom caps for making spore prints from contaminated mushroom cake. Trichoderma spores may be on mushroom stems and caps as well and you'll get contaminated spore print from the very beginning.
⛔️ Any treatment for Trichoderma mold is impossible and risks of future contamination increases greatly. I still recommend to throw away contaminated cakes/blocks to avoid INEVITABLE spreading of spores and work on prevention
> Preventive measures are always the best treatment!
⛔️ If you decide to cut contaminated green area it won't work, after 2-3 days Trichoderma will say hello again, even more than before, because you pushed spores during cutting process on the entire mushroom cake ⛔️ If you decide to spray contaminated area with alcohol or hydrogen peroxide (H2O2) you'll spread the spores of Trichoderma with aerosol flow and Trich will appear again soon
> 🔥 Keep in mind wildfire example as an analogue of spreading Trichoderma spores
##### Can I save mushroom culture on agar contaminated with Trichoderma mold?
Yes, you can save mushroom culture on agar by transferring healthy part of mycelium to new agar plate. Sometimes it takes 5-10 transfers to get clean culture. It makes sense for rare expensive mushroom cultures or if you have a patience and great desire to play with it.
##### How to treat Trichoderma mold on the early stage?
Any recommendations on treatment green mold isn't professional advice.
> If you are newbie grower toss contaminated cake immediately and forget about this paragraph
You can save the flush if you have pins or small shrooms on the cake and suddenly **early stage** of Trich contam happen.
> It is possible to stop **mild** green mold contamination **on the early stage** of Trichoderma development only. **If you see green color, it's too late to bother about treatment.** Throw it away immediately or you'll have to burn down your house, because it's too hard to fight with green mold after sporulating and spreading in the air
Again, this applies to small areas on the early stage (totally white!) of Trich contamination and it doesn't mean you can stop it for sure!
[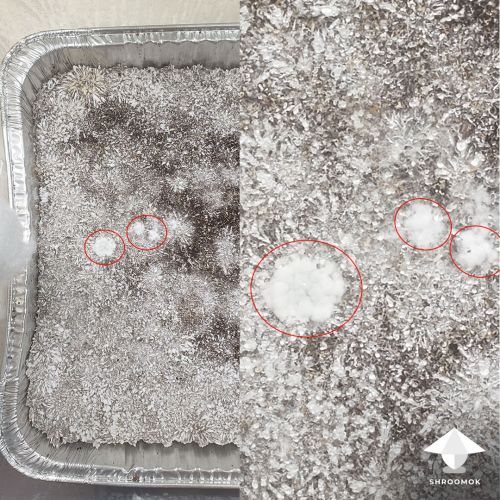](https://shroomok.com/en/wiki/File:Early-stage-of-trich-green-mold-contam.jpg) Early stage of Trich mold (totally white) possible to treat. Chances always 50/50. Photo by Almrey - Shroomok Growers Community on [Discord](https://discord.com/invite/ngKhQDmymD)For such cases mushroom farmers use salt application (or baking soda application, or garden lime application). It is more popular method for [Cobweb disease](https://shroomok.com/en/wiki/How_to_identify_and_get_rid_of_Cobweb_Mold "How to identify and get rid of Cobweb Mold") treatment, parasitic pathogen [Mycogone or Wet Bubble disease](https://shroomok.com/en/wiki/Mycogone_contamination_aka_wet_bubble_disease "Mycogone contamination aka wet bubble disease") and possible to use for Trichoderma as well
[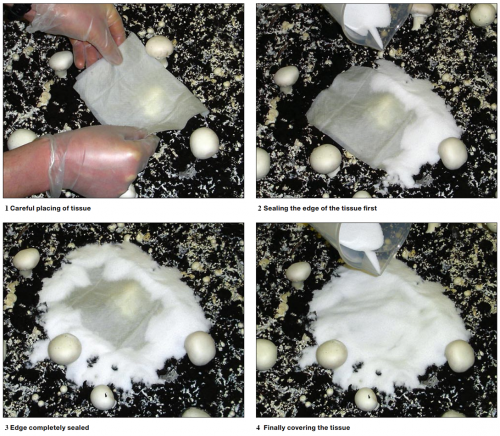](https://shroomok.com/en/wiki/File:Salt-application-for-cobweb.png) Salt application for mold. Credit: "Identification and control of Cobweb disease on mushrooms" by Helen Grogan, Teagasc and Richard Gaze, WHRI & ADAS> ❗️Edge of tissue should be totally sealed with salt!
This way you can seal and stop contamination development and possible spores spreading. But it doesn't mean it won't show up elsewhere on the cake. Trich can grow deep inside mushroom cake. ❇️ One more method is acid 30% hydrogen peroxide solution. Spray directly on contaminated area as soon as you noticed bright white area. Don't wait till it turns green!
> ❗️30% H2O2 is very acidic, protect your skin (wear gloves) and eyes!
Usually both methods works for one flush you are waiting for. It is not recommended to soak such mushroom cake in water after harvesting to avoid possible mold spreading all over the cake.
Such manipulations (salt/soda/lime application) helped me to save the Panaeolus cake that produced 3 more flushes after treatment (size of early Trich was like a coin). Also helped to save Oysters block. So, it works for cultivators! However mycologists don't do this and don't recommend any treatment, because they prefer to work on prevention. Although mushroom farmers and home growers don't hesitate to use treatment for saving harvest. Just keep balance between two points of view!
##### Can I reuse jars and tubs after contamination?
Yes, it is possible to reuse jars and fruiting chambers **after washing them in bleach solution** to kill mold spores. Wipe fruiting chamber (shoebox/growbox/monotub) with isopropyl alcohol for additional treatment before spawn to bulk.
#### Mushroom Mycelium vs Trichoderma battle
Mushroom mycelia not so defenseless. Mycelia have immunity and always struggle with any kind of contamination. Sometimes can literally eat bacteria or mold contamination.
This battle between mycelium and green mold contamination was shared by **Mycelia P** in Shroomok Growers Community on [Discord](https://discord.gg/ngKhQDmymD).
Who will win this time!? Take a look day by day fighting
[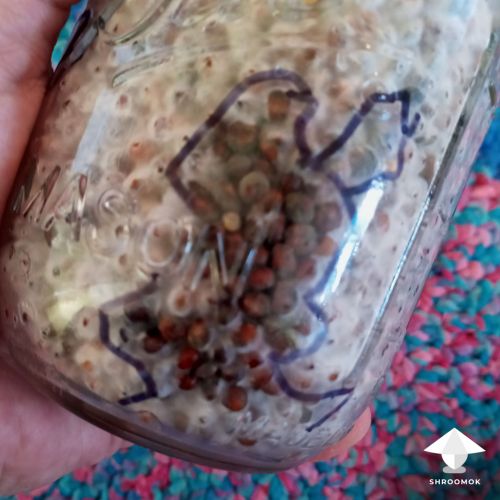](https://shroomok.com/en/wiki/File:Mycelia-vs-trich-contam-day-1.jpg) Mycelia vs Trich contam. Day 1[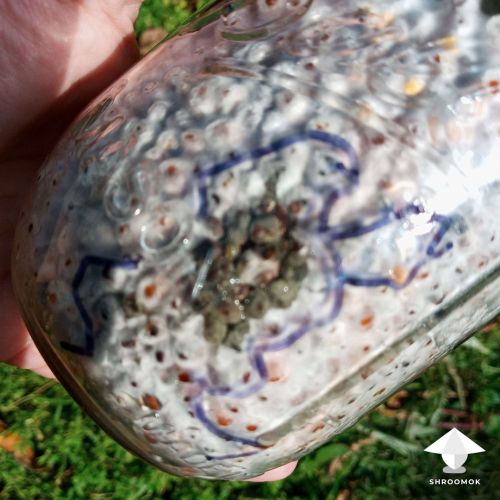](https://shroomok.com/en/wiki/File:Mycelium-vs-trichoderma-contamination-battle-day-4.jpg) Battle between mycelium and trich. Day 4[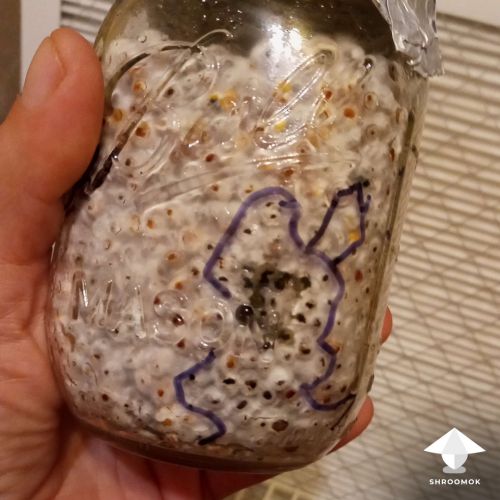](https://shroomok.com/en/wiki/File:Mycelia-vs-green-mold-contam-battle-day-6.jpg) Mycelia vs Trich. Day 6[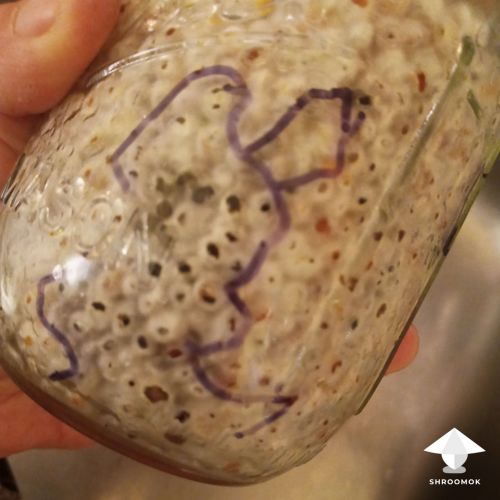](https://shroomok.com/en/wiki/File:Mushroom-mycelium-vs-trichoderma-mold-contamination-battle-day-8.jpg) Battle between mushroom mycelia and green mold. Day 8[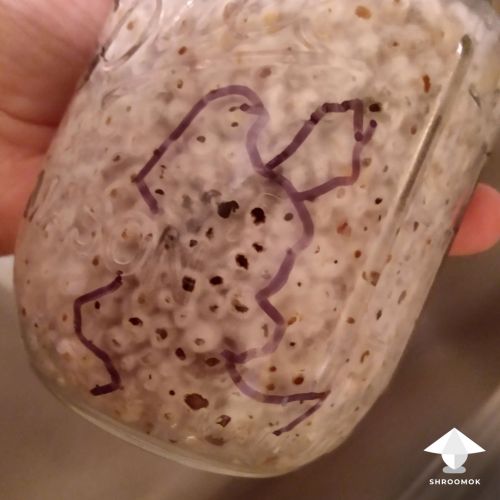](https://shroomok.com/en/wiki/File:Mushroom-mycelia-vs-green-mold-contamination-day-11.jpg) Mycelium vs Green Mold. Day 11#### Is Trichoderma useful for anything?
Many species have found wide practical application: for food production, pulp and paper production, textile industries, for disposing of waste and especially in agriculture as biocontrol.
Being a mycoparasite, the *Trichoderma* *viride* are very popular natural anti-fungal treatment for plants and bio-fertilizer for seed preparation. Trich creates a protection for plant roots against other fungi. It is natural antifungal treatment for plants. It is also antibiotic producers, especially of wood-rotting fungi. Trich promotes the growth of the plants and plant defense responses.
*Trichoderma harzianum is also* well-known species and is widely used as a biocontrol agent and for enzyme production.
*Trichoderma reesei is a* highly efficient producers of many extracellular enzymes*.* They are frequently used in the food and textile industries for these purposes. For example, cellulases from these fungi are used for denim fabrics (soft, stone-washed effect denim).
So funny, isn't it? Trichoderma is useful... if you’re not trying to grow mushrooms!
#### Is *Trichoderma* toxic for people?
Human infection by species of *Trichoderma* (T. atroviride, T. harzianum, T. koningii, T. longibrachiatum, T. viride, T. citrinoviride, T. pseudokoningii, T. reeseiis) limited to individuals with severely weakened immune systems, provoke allergic reaction, coughing, sneezing, sore throats, and asthma.
However, some species are producers of potent mycotoxins.
*Trichoderma longibrachiatum* (produces small toxic peptides trilonginsis) often found in air conditioner filters, window filters, natural carpets, cabinets, on water-saturated wood items, wallpapers, gypsum walls, mattress dust, bathroom corners, and kitchen.
It can cause adverse health effects in **immunocompromised individuals:** mycosis, invasive sinusitis (inflamed sinuses), brain abscess, liver infection, necrotizing stomatitis (inflamed mouth), hypersensitivity pneumonitis, skin infections.
*Trichoderma viride* can produce gliotoxin, that inhibit immunity system and can also be neurotoxic.
> Normally, we are capable of fighting off any inhaled or ingested *Trichoderma spp.* spores. We don't live in a sterile environment, we contact with thousands of molds every day and our immunity system manage it every day. Don't be paranoid! Illness related to Trichoderma is rare in healthy people but common in those with compromised immune systems.
Regular overall cleaning, regular ventilation of the property, cleaning air conditioning and ventilation filters, using air purifiers, regular monitoring of your property/furniture for signs of moisture and stagnant air are preventing measures to combat mold and protect both your health and your shrooms
> Mold spores concentration (any mold, for that matter) differ from house to house. It also depends on the climate conditions and season of the year greatly. This can influence your growing cycles planning and preventive measures
#### Afterword
I know how contamination cases hurts, especially on the first try. In fact contamination happen to all cultivators, even experienced ones.
Don't regret throwing away the contaminated mushroom cake/jar/bag. Don't afraid to start again. Don't give up, my dear grower. Keep learning and keep growing!
If you find this guide helpful you can [🍄 Buy Shroomok a mushroom](https://www.buymeacoffee.com/shroomok) as a donation, ask a question in comments to donation or just say something nice!
You can also request a [Personal Consultation](https://www.buymeacoffee.com/shroomok/extras) with Shroomok
Have a happy growing and healthy shrooms!
## Why Mushrooms too Leggy, Fuzzy Feet and White Dots on Caps
[Why Mushrooms too Leggy, Fuzzy Feet and White Dots on Caps](https://shroomok.com/en/wiki/Why_Mushrooms_too_Leggy,_Fuzzy_Feet_and_White_Dots_on_Caps)
[](https://shroomok.com/en/wiki/File:Fuzzy-feet-caps-in-mushroom-cultivation.jpg) Fuzzy feet and caps in mushroom growing### What the long stems, fuzzy feet and fuzzy caps indicate
Okay, grower! You’re enjoying your own cultivation process, and suddenly notice your mushrooms are starting to grow a fuzzy stem, become leggy and strange fluffy white dots appear on the mushroom caps. Why this happen?
What is this fuzzy stuff? Is it contamination? What's wrong with such mushrooms? Is it possible to fix?
Lots of questions, so let’s get started!
First of all, it's not contamination! All these cases have the same main reason - lack of oxygen, lack of fresh air exchange (FAE) in fruiting chamber during fruiting period
#### Mushrooms too leggy
Mushrooms and mycelium breath like humans. They inhale oxygen (O2) and exhale carbon dioxide (CO2).
When oxygen level is too low, fruit bodies grow long stems to search for fresh air. As a result mushrooms have small caps and spindly stems.
[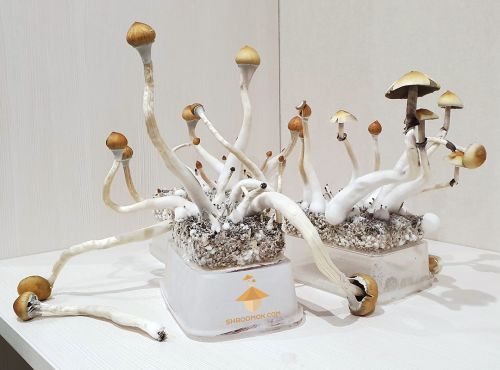](https://shroomok.com/en/wiki/File:Leggy-mushrooms.jpg) Long stems and small caps due to lack of FAE#### Fuzzy feet
In fact fuzzy feet is mushroom mycelium. It isn't huge problem. Moreover not contamination case!
[](https://shroomok.com/en/wiki/File:Fluffy-feet.png) Fluffy base of mushroom stems[](https://shroomok.com/en/wiki/File:Fuzzy-feet.png) Fuzzy feet[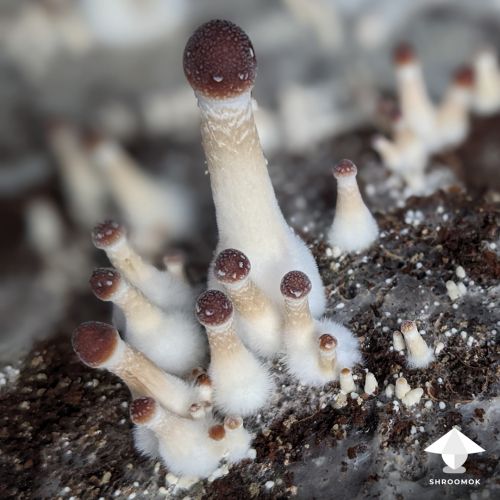](https://shroomok.com/en/wiki/File:Fuzzy-feet-in-mushroom-cultivation.jpg) The base of mushroom stems are fuzzy. Photo by **ChanandlerBong** - Shroomok Growers Community on [Discord](https://discord.gg/ngKhQDmymD)Such fuzziness is typically caused by two growing factors.
1️⃣ Lack of fresh air exchange (FAE) in fruiting chamber
As we know, CO2 is heavier than oxygen and concentration is higher at the bottom of the tube and lower as we go up. So that, the base of our shrooms will be the first area struggling to breathe.
2️⃣ High relative humidity level in combination with lack of FAE
So strange, isn't it? We know that mushrooms enjoy high humidity! It's true, however in this case high relative humidity influences gases ratio in fruiting chamber. When we increase humidity and add moisture, we are removing free space for oxygen in the air – thus, our mushrooms suffocate, and the fuzzy feet result.
[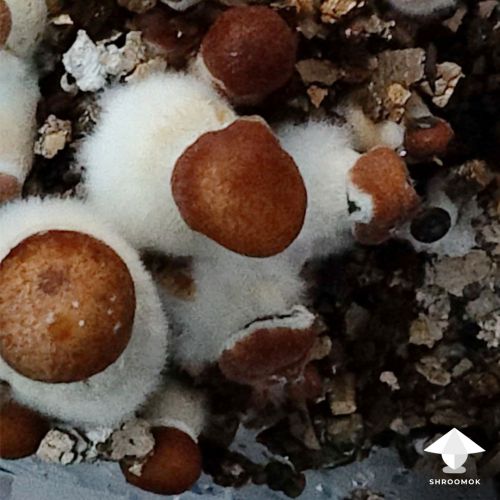](https://shroomok.com/en/wiki/File:Fuzzy-stems-in-mushroom-growing.jpg) Fuzzy base of stems. Photo by Leo - Shroomok Growers Community on [Discord](https://discord.gg/ngKhQDmymD)#### Fuzziness or contamination?
Usually newbie growers confuse fuzziness symptom on stems and white dots on caps with Cobweb Mold contamination.
It's easy to identify fuzzy feet and cobweb disease. Just remember, cobweb has thiner threads and greyish color in comparison with snow-white mycelium
[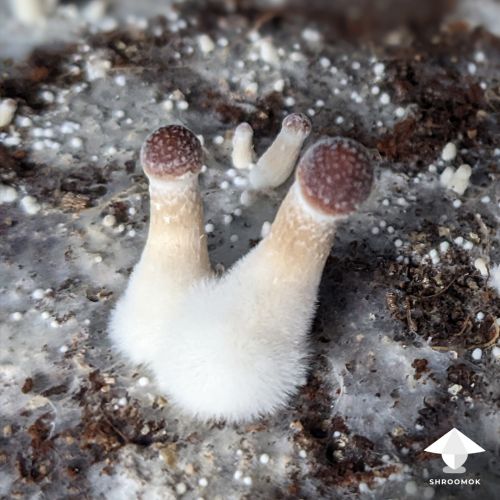](https://shroomok.com/en/wiki/File:Fluffy-mushroom-stems-or-contamination.jpg) Snow-white Fuzzy Feet and white dots on caps is mycelium, not contam! Photo by **ChanandlerBong** - Shroomok Growers Community on [Discord](https://discord.gg/ngKhQDmymD)[](https://shroomok.com/en/wiki/File:Cobweb-mold-and-mushrooms.png) Thin grey Cobweb Mold contamination on mushroom cake> 🔴 More examples: [How to identify and get rid of Cobweb Mold](https://shroomok.com/en/wiki/How_to_identify_and_get_rid_of_Cobweb_Mold "How to identify and get rid of Cobweb Mold")
#### White dots or fluffy mushroom caps
One more example usually confused with mold contamination or mutation. But the reason is poor FAE again.
[](https://shroomok.com/en/wiki/File:Fuzzy-mushroom-cap-shroomok-community.jpg) Fuzzy cap. Photo by **ʂƙı℘ɬཞı℘℘ıŋ** - Shroomok Growers Community on [Discord](https://discord.gg/ngKhQDmymD)Let me show you real case in Shroomok Growers Community on Reddit
[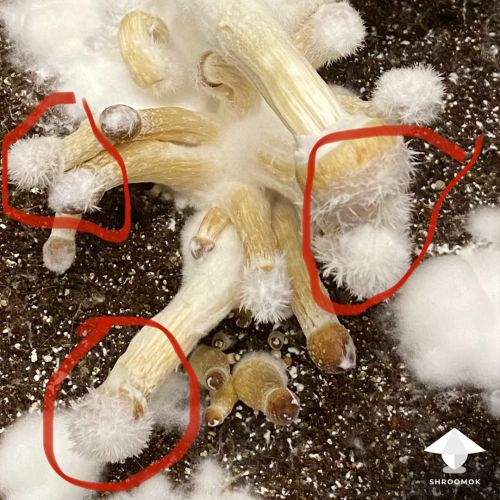](https://shroomok.com/en/wiki/File:Fuzzy-mushroom-caps.jpg) Fuzzy mushroom caps. Case and photo by **u/angelinejovan** - Shroomok Growers Community on [Reddit](https://www.reddit.com/r/Shroomok/comments/v9exua/contamination/)> **angelinejovan:** Contamination? Fuzzy caps! What the hell is this!?
> **shroomok:** Looks ok so far, don't worry. It's just mycelium, not contam! Your shrooms need more fresh air, that's why fuzzy. Try to FAE 4-6 times/day
> **angelinejovan:** Thank you for all your help! What a difference a day makes. Yesterday they were fuzzy, then after fanning every four hours religiously overnight the fuzzies have stopped growing. And I’ve been able to harvest over 7 ounces today. I am so ecstatic!! (BTW the fuzzies peel off the caps & stems)
#### How to fix fuzzy feet, fluffy caps and long stems?
Try to introduce more fresh air for your mushrooms. Usually in 2-3 days you can fix it easy.
✅ **Manual FAE.** Open your fruiting chamber for 3-5 minutes at least 4-6 times/day.
✅ **Natural airflow in MonoTub.** Properly made air vents in MonoTub create natural airflow. If air vents made wrong you have "dead zones" in the corners of your tub and poor overall FAE
> 🔴 Recommended: [Monotub Guide](https://shroomok.com/en/wiki/Forget_Monotub_Kit._DIY._How_to_make_Monotub_for_Mushrooms_by_your_own "Forget Monotub Kit. DIY. How to make Monotub for Mushrooms by your own")
✅ **Use additional gadgets for FAE in fruiting chamber:** aquarium air pump, PC fan or combination PC fan + humidifier
**Shroomok's choice on Amazon:**
[Quiet PC Fan with power plug cord](https://www.amazon.com/gp/product/B009OWVUJ0?&linkCode=ll1&tag=shroomok-20&linkId=b06971d01b5cc8b91e373b531ed5d290&language=en_US&ref_=as_li_ss_tl) $19.99
[Powerful Air Pump - for 20-200 Gallon - 2 Outlets](https://www.amazon.com/gp/product/B08HMZSH9J/ref=as_li_tl?ie=UTF8&tag=shroomok-20&camp=1789&creative=9325&linkCode=as2&creativeASIN=B08HMZSH9J&linkId=129cc0f3bc777d413baed339a79e2a6c) - $19.99
[Humidifier Fog Machine Mister 3L](https://www.amazon.com/Coospider-Terrariums-Humidifier-Paludarium-Amphibians/dp/B07VVNP7F3?&linkCode=ll1&tag=shroomok-20&linkId=34c372047e4963ecfbf583c1bf7bce03&language=en_US&ref_=as_li_ss_tl) $49.77
✅ **Use CO2 detector to monitor air quality.** CO2 level in fruiting chamber should be 600-800 ppm (up to 1000 ppm)
**Shroomok's choice on Amazon:**
[Coreel Portable CO2 Monitor + Temperature & Humidity, LCD Display](https://www.amazon.com/gp/product/B08NP3L8JK?&linkCode=ll1&tag=shroomok-20&linkId=8d141ab041cf69b289f6ddeca342c3b6&language=en_US&ref_=as_li_ss_tl) $46.99
[INKBIRDPLUS Air Quality Monitor: CO2, Temperature, Relative Humidity for Grow Tents](https://www.amazon.com/dp/B09MRX4F12?&linkCode=ll1&tag=shroomok-20&linkId=98b6d38b888809159cdd64094523ed0b&language=en_US&ref_=as_li_ss_tl) $69.99
[7-in-1 Air Quality Monitor, Real Time Data Recording](https://www.amazon.com/dp/B09FRYZCD9?&linkCode=ll1&tag=shroomok-20&linkId=2429fbd773f4596320f4fed83f1ae856&language=en_US&ref_=as_li_ss_tl) $129.99
#### Wrap it Up!
Mushrooms interact with us, always give us an exact sign what they need. Long stems, fuzzy feet and fluffy caps mean mushrooms are begging for a breath of fresh air.
Learn mushroom language, grower!
If you find this guide helpful you can [🍄 Buy Shroomok a mushroom](https://www.buymeacoffee.com/shroomok) as a donation and say something nice!
You can also request a Personal consultation on [Growing Mushroom Troubleshooting](https://www.buymeacoffee.com/shroomok/extras)
Be attentive to your shroom pets and have a happy growing!
## Black spots on Mushrooms and Mycelium
[Black spots on Mushrooms and Mycelium](https://shroomok.com/en/wiki/Black_spots_on_Mushrooms_and_Mycelium)
[](https://shroomok.com/en/wiki/File:Dark-spots-on-mushroom-caps-contam-or-not.jpg) Mushroom caps and mycelium turned black### Strange black color on mushroom caps and mycelium
You can observe such dark spots on mushroom caps and mycelium right after torn veil. Since this moment sporulating phase is started. It is vital importance for mushrooms to spread all mature spores and continue fungi life
#### Black spots on mushrooms and mycelium: contamination or not?
The color of fungi spores are black-violet or brown-violet. At first spores appear on the torn veil and mushroom stem.
[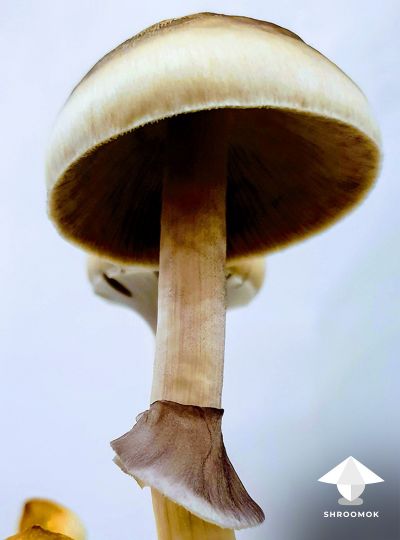](https://shroomok.com/en/wiki/File:Spores-on-mushroom-stem-and-veil.jpg) Mushroom spores (brown-violet color) on stem and torn veil. It's normal!If you leave mushrooms on the cake to sporulate for 1-2 days they drop huge amount of spores on the substrate, other cakes, mushrooms and even walls of fruiting chamber. Total mess at first glance looks like contamination. Extreme sporulating aesthetically looks unattractive.
[](https://shroomok.com/en/wiki/File:Spores-on-mushroom-cake.jpg) Spores everywhere in fruiting chamber: on mushroom cakes, on mushroom caps and walls of the growbox. Photo by mrzimm - Shroomok Growers Community on [Discord](https://discord.gg/ngKhQDmymD)Newbie growers often confuse such case with black mold contamination, inky cap disease or bacteria contam.
Usually noobs so surprised and scared to see "horrible" changes that can appear just a few hours after or one day after
> "Holy black crap - is this the nasty stuff I think it is? Wwwaaahhhh"
[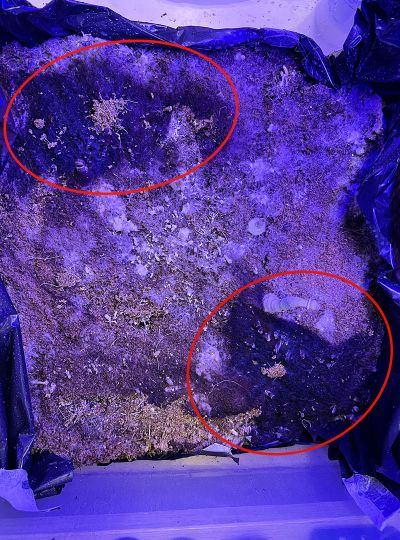](https://shroomok.com/en/wiki/File:Spores-on-mushroom-cake-after-harvesting.jpg) Black spots of spores on mushroom cake after harvesting. Photo: **angeline** on Shroomok [Discord](https://discord.gg/ngKhQDmymD)When realised it's just spores:
> "OMG what a f\*vking noob I am! Not black mold but SPORES! Took three (shrooms) this size out of tub… they all looked like this - spores ejected! Hahahaha learning - all the time learning"
[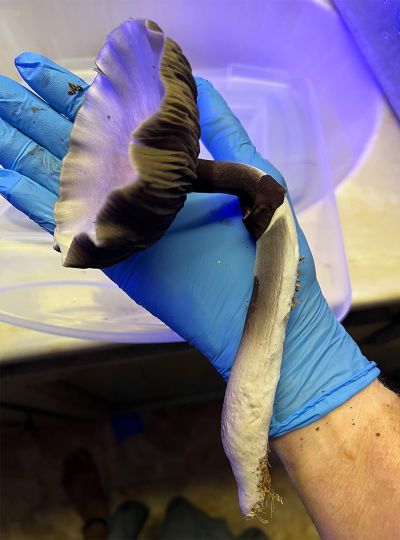](https://shroomok.com/en/wiki/File:Shroom-sporulating.jpg) Harvested mushroom that started sporulatingNothing to worry about, grower! It’s not a contamination, just mushroom spores create such layer.
#### Mushrooms spores on mycelium and shrooms. Is it safe or not?
Since torn veil mushrooms stop their growth. Spores spreading in the air. After sporulating fruit body become useless, life cycle closed.
[](https://shroomok.com/en/wiki/File:Spores-on-mushrooms-before-harvesting.jpg) Spores released on shroom caps and mycelium. Hurry up! After spore releasing, the process of decomposition of the fungus cells begins. Mushroom body literally dying and slowly loses its quality and potency. That's why no sense to wait too long. Moreover, it influences pin development of the next flush and can provoke contamination.
[](https://shroomok.com/en/wiki/File:Spores-on-mushroom-caps.jpg) Mushroom caps turned black with spores. Hurry up!In fact we wait for torn veil if we are going to make spore prints.
> 🔴 Recommended: [How to make magic mushroom spore print](https://shroomok.com/en/wiki/How_to_make_magic_mushrooms_spore_prints "How to make magic mushrooms spore prints")
It's too late to make spore prints after releasing spores, because they are mostly on caps and mycelium.
[](https://shroomok.com/en/wiki/File:Dark-mushroom-caps-sporulating.jpg) Spores on caps and mycelium. Photo by **mrzimm** - Shroomok Growers Community on [Discord](https://discord.gg/ngKhQDmymD)If you don't need prints you can crop your mushrooms anytime: before torn veil, or right after torn veil.
> For consuming I crop shrooms earlier, before torn veil. Such mushrooms are denser and taste better to me IMHO
There is one more reason to avoid such rich sporulating. Spores create a layer on mycelium and inhibit pins development.
[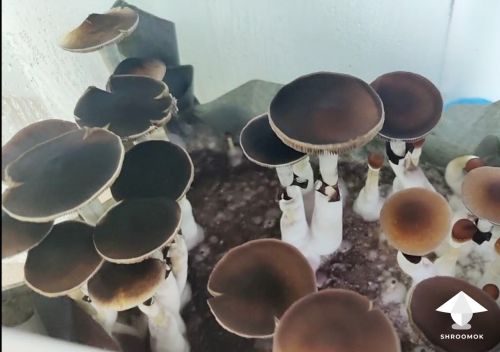](https://shroomok.com/en/wiki/File:Mushroom-sporulating-phase.jpg) Spores on mushroom caps and cake. Photo by Leo - Shroomok Growers Community
The last point. If the fruiting bodies begin to rot, it can lead to contamination of the entire mushroom cake/block.
[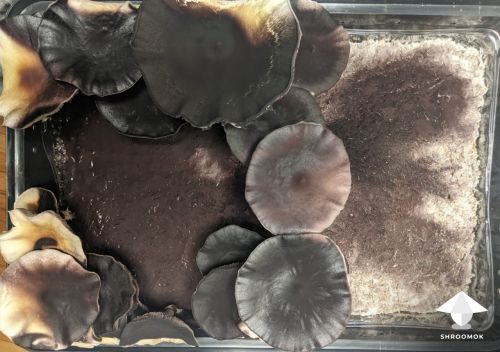](https://shroomok.com/en/wiki/File:Spores-on-mushrooms-and-mycelium.jpg) Spores on mushrooms and mycelium#### Beautiful cases of mushroom sporulating
Right after torn veil air currents carry spores and deposit them on the tops of the caps and sometimes creating beautiful arts.
[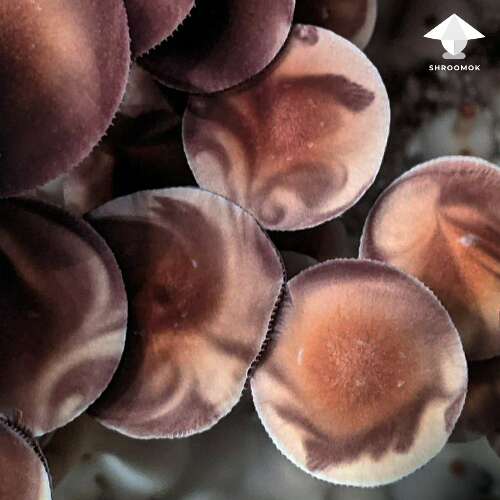](https://shroomok.com/en/wiki/File:Spores-art.png) Spores art on mushroom caps
Such mild signs of sporulating on mushroom caps is totally normal and cute
[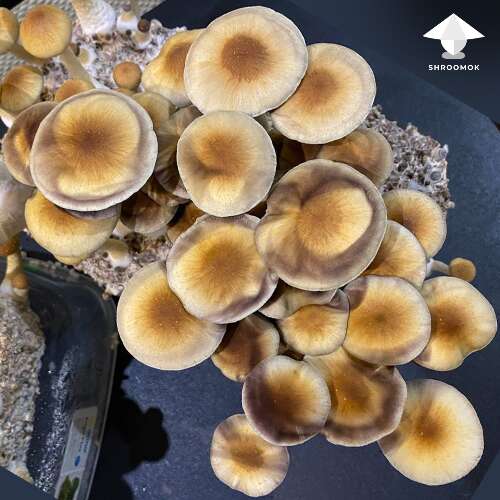](https://shroomok.com/en/wiki/File:Gt-harvest-and-spores-on-mushroom-caps.png) Mild spores signs on mushroom caps
Check out spores on gills under the microscope. Here are the billions of spores produced by mushroom fruit body
[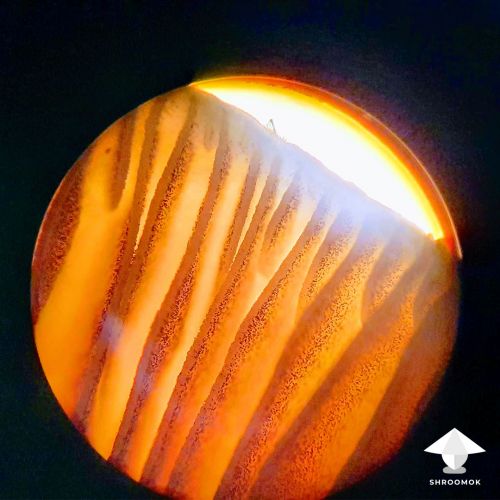](https://shroomok.com/en/wiki/File:Mushroom-spores-on-gills.jpg) Spores on gills, microscopySpores of Golden Teacher for microscopy use
[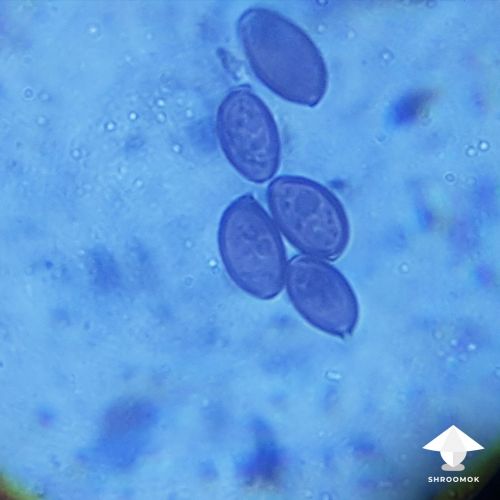](https://shroomok.com/en/wiki/File:Mushroom-spores-golden-teacher-microscopy.jpg) Spores of Psilocybe Cubensis Golden Teacher, microscopy. Photo by **mrzimm** - Shroomok Growers Community on [Discord](https://discord.gg/ngKhQDmymD)
Harvest your shrooms in time and ave a happy growing!
If you find this guide helpful, please support me with a cup of coffee on [☕️ buymeacoffee](https://www.buymeacoffee.com/shroomok)
Join Shroomok on **Discord** and **Reddit** for questions and sharing your experience.
You can also leave your **comments on this page below** ⬇️
Peace, Shroomok ❤️
## Mycogone contamination aka wet bubble disease
[Mycogone contamination aka wet bubble disease](https://shroomok.com/en/wiki/Mycogone_contamination_aka_wet_bubble_disease)
[](https://shroomok.com/en/wiki/File:Wet-bubble-mycogone-contamination-shroomok.jpg) Wet bubble aka Mycogone contamination guide by Shroomok### Wet bubble or Mycogone contamination: how to identify, prevent and treat it
#### What is wet bubble disease?
This is a fungal disease caused by parasitic pathogen ***Mycogone perniciosa,*** that usually affected pinheads and mushroom fruitbody. It has a few often used names: mycogone, wet bubble, white mushroom mold, vesicular disease, La Mole.
It is one the most common problems of commercially cultivated edible mushrooms.
> *Mycogone perniciosa n*ot known to be pathogenic to people or animals!
Usually we can find many examples of mycogone contamination from Agaricus bisporus mushroom farmers. Although wet bubble affected magic mushrooms, i.g. Psilocybe Cubensis quite often.
Let's figure out mycogone contamination in magic mushrooms cultivation, mostly for Cubensis.
#### Symptoms of wet bubble contamination
🔴 The early stage of *Mycogone perniciosa* is characterized by the development of **dense** **white fluffy mycelial growth or wart-like growths**, that usually appear on pinheads and mushroom fruiting bodies.
[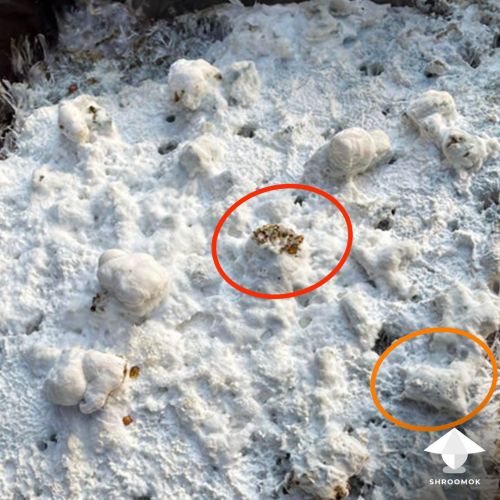](https://shroomok.com/en/wiki/File:Wet-bubble-contamination-mycogone.jpg) White fluffy mycelial growth of Mycogone on all mushroom pinheads. Orange cycle - early mycogone contamination, red circle - late wet bubble disease
🔴 On the later stage of Mycogone contamination you can admit pins and mushrooms **deformation** or development of **distorted masses** of mushroom tissues, or **fluffy blobs** instead of normal pinheads and mushrooms. As a result pinheads and mushrooms can't develop at all
[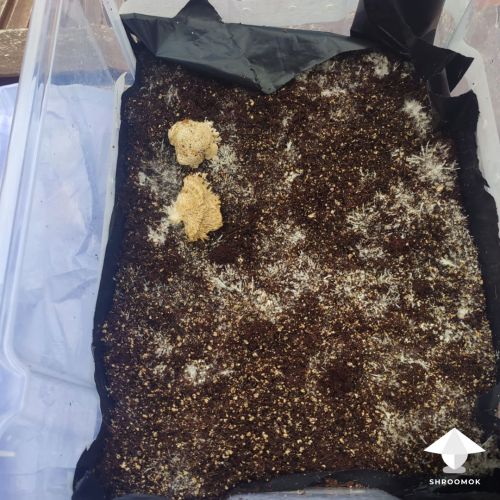](https://shroomok.com/en/wiki/File:Mycogone-perniciosa-aka-wet-bubble-disease.jpg) Pinheads and mushroom deformation as a symptom of mycogone perniciosa contamination in mushroom growing. Photo by Gorka on Shroomok Discord
🔴 The shapeless mass initially is white and fluffy, but become brown with age and then decay.
[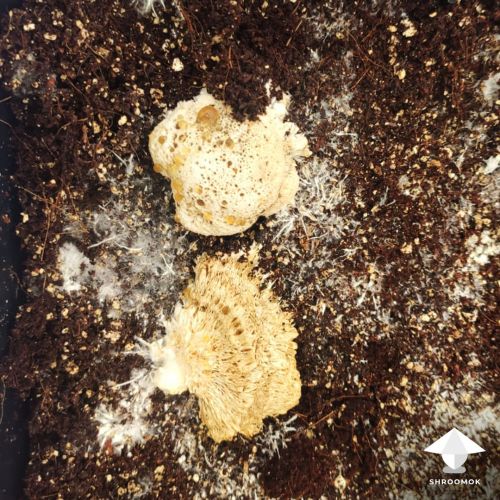](https://shroomok.com/en/wiki/File:Mycogone-contamination-aka-wet-bubble-in-mushroom-growing.jpg) Mycogone blobs become brown with age and start to rot. Photo by Gorka on Shroomok Discord🔴 On the late stage of wet bubble an **amber liquid** (yellowish, orange, brown) oozes from pins, blobs and mycelium clots
[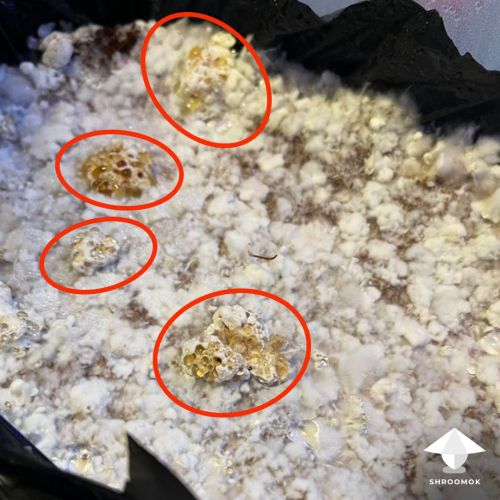](https://shroomok.com/en/wiki/File:Mycogone-wet-bubble-contamination-in-mushroom-growing.jpg) Yellow, brown, orange, amber liquid oozes from mushrooms, pinheads or mycelium clots is a sign of wet bubble disease
🔴 This fluid contains spores and bacteria that spread all over the mushroom cake and accompanied by objectionable odor, distinctive **rotten smell.** Although, the smell is imperceptible with a small area of contamination
[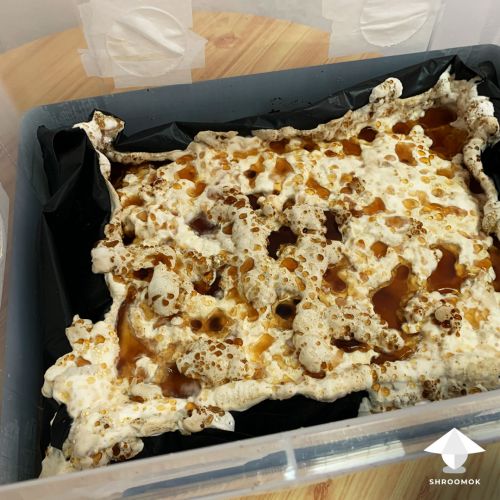](https://shroomok.com/en/wiki/File:Wet-bubble-contamination-mycogone-on-mushroom-cake.jpg) Wet bubble disease spread over the Cubensis mushroom cake in monotub. Late stage of mycogone contamination. Photo by kp shrooms on Shroomok Discord> 🔴 In dry conditions, the shapeless masses remain dry in appearance and similar to ***Verticillium*** contamination or ***Dry Bubble disease***
#### How to recognize whether it's mycogone contamination or mycelium piss
Wet bubble contamination seems similar to mycelium metabolites, but Mycogon has some differences.
Mycogone usually appears on pinheads and mushrooms. Wet bubble creates a blob with porous surface, like a sponge. Look, each yellow-brown drop has its place. Usually this liquid is slimy and smelly.
[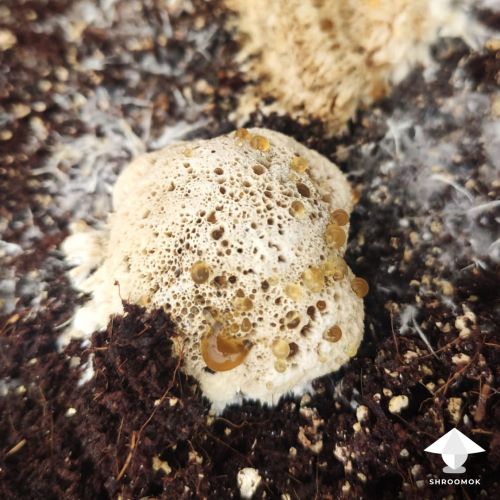](https://shroomok.com/en/wiki/File:Wet-bubble-or-metabolites.jpg) Mycogone contamination or mycelium metabolites? Porous blob like a sponge with oozes yellow-brown liquid is wet bubble disease. Photo by Gorka on Shroomok Discord
Mycelium piss, also known as mycelium metabolites, usually appear due to stress on mushroom mycelium. Metabolites are transparent. Without any odor at all. Without slime, like water, but with yellow-brown color.
[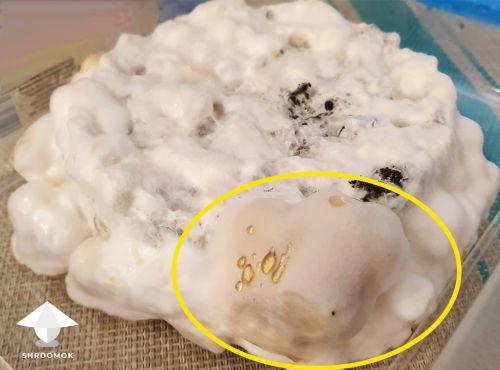](https://shroomok.com/en/wiki/File:Mycelium-metabolites-piss-and-overlay.jpg) Mycelium piss due to stress and overlayMycelium piss is not a contamination itself and totally save.
> 🟠 Recommended guide: [Mycelium metabolites or mushroom piss](https://shroomok.com/en/wiki/Mycelium_metabolites_or_mushroom_pee "Mycelium metabolites or mushroom pee")
#### Main causes of mycogone contamination
[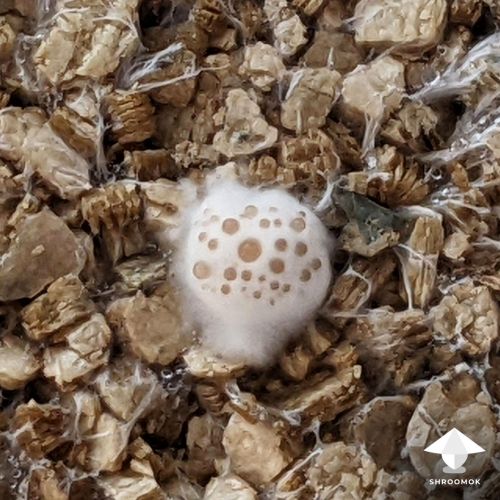](https://shroomok.com/en/wiki/File:Yellow-liquid-on-mycelium-wet-bubble-contamination.jpg) Wet bubble on mushroom cake, Psilocybe Cubensis growingMycogone perniciosa forms two kinds of spores:
🧬 **conidiospores** — unicellular, thin-walled spores, with a relatively short life, very light, therefore, they can be carried by air currents
🧬 **chlamydospores** — consist of two cells, thick-walled, brown spores, they stay viable for several years
The main Mycogone habitat is soil, that's why the main source of contamination is mostly the bulk substrate and casing substrate.
The disease can spread by spores and pieces of mycogone mycelium, adhering to any objects that touch the fungus (air flow, dust, tools, flies and mites, grower's hands and clothes).
Incubation period for Mycogone is two weeks. What does it mean?
If Mycogone appears during the first flush, then it spores were probably introduced via the bulk or casing substrate at the time of its application or during spawn run.
Later contamination (more than 2 weeks after spawn to bulk and casing, 2-3 flush) are more probably spread by air, grower's hand and clothes, insects etc.
#### Preventive measures of wet bubble disease
Substrate pausterization (sterilization) and sterility is a key!
[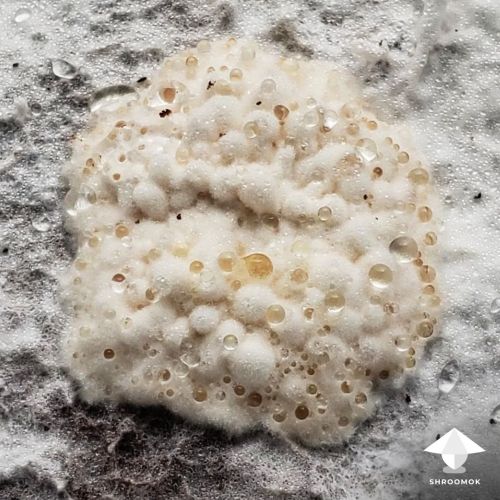](https://shroomok.com/en/wiki/File:Mushroom-contaminants-wet-bubble-disease.jpg) Mycogone contamination on P. Cubensis mycelium✔️ Bulk and casing substrate pausterization in bucket. Spores of *Mycogone perniciosa* are killed at 120F or +49C and higher when exposed to moist heat (pasteurization) for 24 hours.
✔️ Bulk and casing substrate pausterization in the oven also works great (at least 160F or +70C for 1-2 hours).
✔️ Sterilized bulk and casing substrate (pressure cooker or autoclave at 15 psi for 1 hour). Although pausterization is preferable for bulk and casing.
✔️ Good fresh air exchange (FAE) in fruiting chamber. Stagnant air causes a wide range of contaminants.
✔️ Lowering temperature. Mycogone doesn't grow at temperatures lower than 60F or 15C. For many edible mushroom species it's a good point, however not for warm-loving magic mushroom species.
✔️ Strict hygienic conditions before and during any mycological manipulations (use sterile tools, wipe surfaces and tools with iso alcohol, wash your hands, wear gloves and face mask)
#### Wet bubble treatment
Mycogone is a vigorous and resilient contaminant. More effective to prevent this contamination than treat it.
[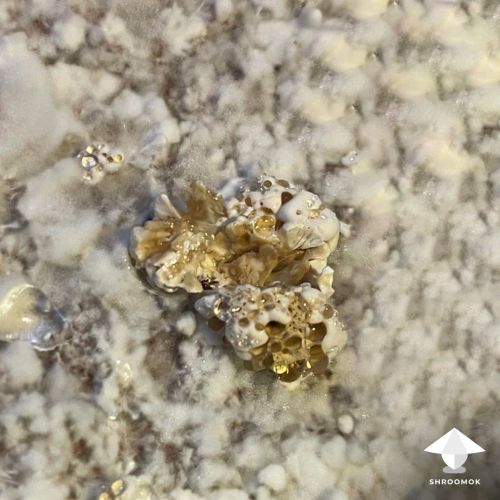](https://shroomok.com/en/wiki/File:Wet-bubble-disease-cubensis-cultivation.jpg) Shapeless mass with rotted smell is a sign of late mycogone contaminationSmall mushroom cakes or mushroom blocks in monotub usually have not so big surface as mushroom bed on the farms. If you have Mycogone on top layer probably the entire bulk substrate and/or casing layer is contaminated with Mycogone spores, if it is you can’t just scoop it out. It means Mycogone can appear again and again...That's why the most effective and popular advises here are: toss it immediately, bury in the backyard or burn it!
Let's look at the experience of mushroom farmers! Do they really burn mushroom blocks/beds with infected area **size of a coin**?
**1) Non toxic, the most common method is used by mushroom farmers for Mycogone treatment (the size of a coin!)**
Remove localised pieces of Wet Bubble disease carefully, using a disposable glove or plastic bag. Once in the bag or glove, carefully invert the bag or glove over it, close securely and dispose of safely.
Then the localized area is:
a) sprinkled with salt, baking soda or ground lime
[](https://shroomok.com/en/wiki/File:Salt-application-for-cobweb.png) Salt application. Credit: "Identification and control of Cobweb disease on mushrooms" by Helen Grogan, Teagasc and Richard Gaze, WHRI & ADASb) or watered with a formalin (formaldehyde) solution and then strewed with ground lime. These areas can be completely removed the next day, grasping the casing layer of a larger diameter.
> ❗️Don't mist/spray/water/rehydrate mushroom cake until the contaminated area is treated to avoid infection spreading all over the mushroom cake
**In literature, the following recommendations for Mycogone prevention and treatment are given:**
2\) According to *Kneebone (1961)* he recommends the use of chlorinated water (150-250 ppm) for misting/watering to prevent Mycogone spores germination.
**How to prepare 150-250 ppm Chlorinated Water?**
Dissolve the bleach (Sodium Hypochlorite - NaOCl) in 1 liter of water according to these ratios:
- NaOCl **5.25%** ([Amazon](https://amzn.to/3RPvnic)) - add **3.0-5.0 ml** per 1L of water
- NaOCl **6.0%** ([Amazon](https://amzn.to/45qU9IG)) - add **2.6-4.4 ml** per 1L of water
- NaOCl **7.5%** ([Amazon](https://amzn.to/3rGVs8y)) - add **2.1-3.5 ml** per 1L of water
- NaOCl **12.5%** ([Amazon](https://amzn.to/3ZTQSAz)) - add **1.3-2.1 ml** per 1L of water
- Fill a spray bottle with the solution and spray it on casing surface.
3\) Spray of Benomyl 0,1% (also marketed as Benlate) fungicide immediately after casing has been found one of the most effective *(Gupta et al., 2018).*
4\) Application of fungicides: Carbendazim, Chlorothalonil, Prochloraz Manganese complex (Sportak 50 WP) 0,1% into casing material *(Gupta et al., 2018).*
5\) A spray of 0,8% Formalin (formaldehyde) on casing surface, immediately after its application is also effective *(Gupta et al., 2018).*
If you find this guide helpful support my work and [buymeacoffee](https://www.buymeacoffee.com/shroomok)
Feel free to ask your questions on [Shroomok Discord](https://discord.gg/ngKhQDmymD) or [Reddit](https://www.reddit.com/r/Shroomok) or **in comments** to this post ⬇️
Have a happy growing and healthy shrooms!
## My incubator with spawn jars was overheated
[My incubator with spawn jars was overheated](https://shroomok.com/en/wiki/My_incubator_with_spawn_jars_was_overheated)
[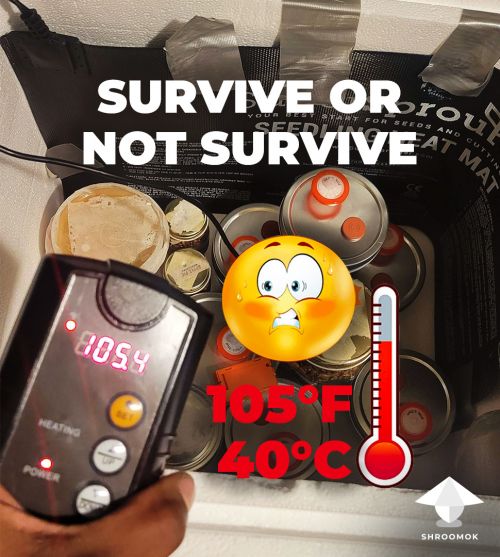](https://shroomok.com/en/wiki/File:Incubator-high-heat-for-mycelium.jpg) High heat in incubation box, 105F for a few hours. Original photo by D!NGO on Shroomok Discord### Will mycelium survive if my incubator accidentally overheated
A real case that can happen to every mushroom grower
> D!NGO: So my thermometer fell out of the box while I was away at work… I'm screwed on this, aren't I? Is it possible they survived at 105°F (40°C)? That would be such a life saver! It's B+ strain btw, if that means anything
**Answer from Shroomok:** Temperature is one of the most critical factors in mushroom cultivation for any kind of fungi as it affects survival overall, growth rate, time of fruiting, yields, **molecular changes in protein structure** and even mushroom morphology.
The survival of fungi is determined **by temperature**, but also **exposure time**.
Mycelium perishes at high temperatures **around 113°F (45°C)**. However, prolonged exposure at temperatures above 95°F (35°C) more than 3-4 hours can also destroy mycelium cells and eventually kill mycelium.
> It was shown in researches and experiments with shiitake and warm-weather species by *Tokimoto and Komatsu (1978, 1982)*
**D!NGO:** This is very helpful! Thank you. I haven't thrown anything away yet so fingers crossed
**Shroomok:** Let's hope for the best 🤞 Keep us updated please!
**D!NGO:** Dito! I be sure to document everything and go from there!
**Notes to consider for other growers:**
1. If you are using a thermostat aka temperature controller, make sure to place the temperature sensor inside the box.
2. Temperature controller is optional, but very helpful device. It turns on/off the heating element (i.g. heat mat) within required temperature range (typically we need around 75-80F).
3. If you don't have thermostat, test the box (temperature inside for a few hours) before using it as an incubation box for jars/bags. Use at least simple thermometer inside the box.
**Useful stuff on Amazon:**
- [Digital Thermometer, Hygrometer with Remote App](https://amzn.to/3vcCHLH) $12.99 - you'll receive an alert once the temp. is out of its preset range
- [Reptile Heat Mat 9" x 16"](https://amzn.to/41AtSHP) $10.99 - budget option, with manual temperature regulator, but w/o thermostat.
- [Inkbird Digital Temperature Controller](https://amzn.to/48dT7Cc) $35.00 - good quality thermostat w/o heating mat
- [VIVOSUN Heat Mat 10"x 20.75" with Digital Thermostat](https://amzn.to/48wc8zq) $30.99 - 2-in-1 Combo Set
Some time later…
**Shroomok:** Hey D!NGO! Do you remember when you accidentally left spawn jars at 105°F? Did the jars survive? Any updates?
**D!NGO:** They did not unfortunately. They ended up dying off after a few days. Apparently it was left at that temperature for a few hours
**Shroomok: A**ll the jars dead? And mycelium was already there, right?
**D!NGO:** Yeah they all turned black and just stayed that way. I kept them 3 weeks to see if anything would change and it didn't. And yeah... They were about 1/8th colonized
**Shroomok:** You're not alone with this case. Thank you for update!
One more case later:
> Hey guys, quick one, stupidly left my heater on for about an hour and a half and the room got to 120°Fahrenheit (49°C). Will the jars be ok? It’s cooled down now. Quite a lot of condensation in the jars but they seemed to have cooled off
What do you think happened next? :(
## Mushroom caps splitting and cracking issue
[Mushroom caps splitting and cracking issue](https://shroomok.com/en/wiki/Mushroom_caps_splitting_and_cracking_issue)
[](https://shroomok.com/en/wiki/File:Mushroom-caps-splitting-cracking-issue.jpg) Mushroom caps and stems split in mushroom growing### Split or cracked mushroom caps: main reasons and how to fix them
Split or cracked mushroom caps (stems as well) can occur in any active or edible mushroom species. Let's explore the main causes and how to address this issue.
[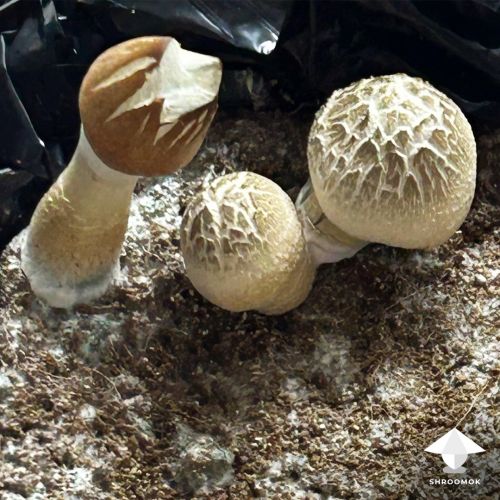](https://shroomok.com/en/wiki/File:Cracked-shroom-caps.jpg) Cracked shrooms caps#### Main causes of cracked or split mushroom caps
As you probably know, mushrooms consist of about 90% water and require high relative humidity (RH) of around 90% for pinhead initiation and fruit body growth.
The mushroom cake/block may be moist enough, but the air outside the cake/block is too dry. Usually, room RH varies from 30% to 70%. This means that for mushrooms, you need to maintain higher humidity than in your room. That's why we use fruiting chambers as closed environments with specific climate conditions for mushrooms (such as monotubs, shoeboxes, growboxes, dub tubs, plastic bottles, grow tents, and grow rooms).
🔴 **Fluctuations in relative humidity (RH).** The sharp difference between the required humidity (90%) and the low humidity for mushrooms (lower than 85%) causes a fast evaporation rate, moisture loss, and mushroom dehydration.
[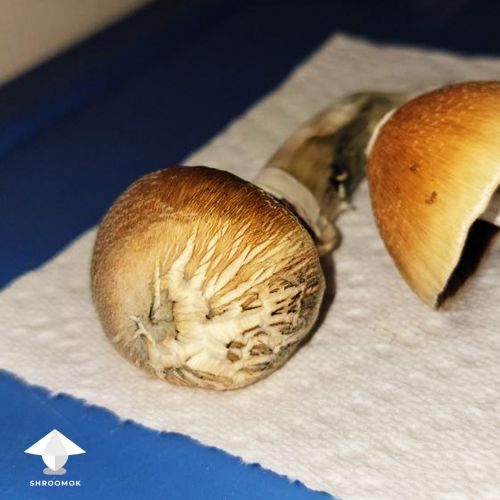](https://shroomok.com/en/wiki/File:Mushroom-cap-split-deformation.jpg) Mushroom cap split[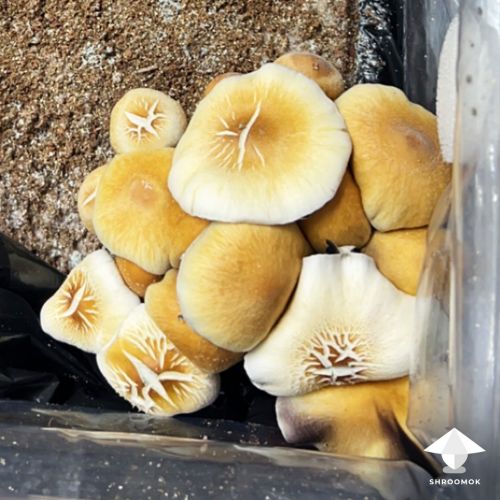](https://shroomok.com/en/wiki/File:Cracks-on-mushroom-caps.jpg) Caps cracks due to dehydration - low RH and dry mushroom cake
🔴 Moisture loss also occurs due to **active fresh air exchange (FAE) and frequent aggressive fanning**. As a result, we experience rapid moisture loss, leading to cracks on caps and stems as well.
[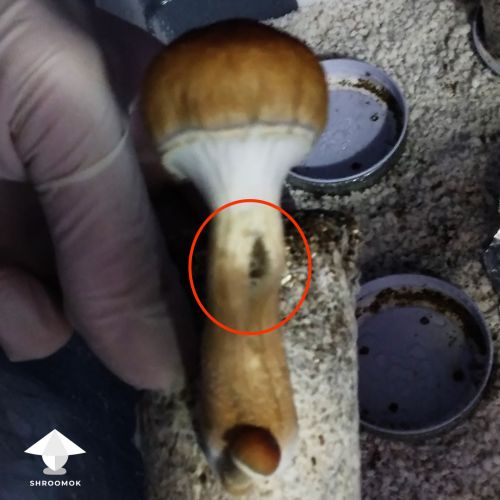](https://shroomok.com/en/wiki/File:Mushroom-stem-split.jpg) Mushroom stem split🔴 Another reason for split caps is a **high temperature in the fruiting chamber.** In this case, yellowish pigmentations and secondary metabolites usually appear on mushrooms and mycelium.
> Imbalanced or incorrect fruiting parameters can impact the development of mushroom fruit body
🔴 Lastly, cracked mushroom caps and abnormal growth can be a result of **genetic factors, mutations.**
[](https://shroomok.com/en/wiki/File:Cracked-split-mushroom-caps-APE.jpg) APE shroom caps are cracked. Photo: Mycelia PSome mutations are triggered by sharp changes or improper fruiting conditions. Certain genetic mutations are already present in cells (for instance, mushroom spores with genetic mutations) from the very beginning of mycelium development. Sometimes mutations look funny.
[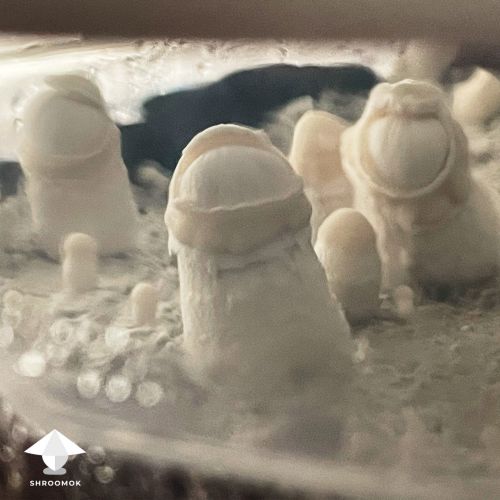](https://shroomok.com/en/wiki/File:Cracked-mushroom-cap-genetic-mutation.jpg) Mushroom cap cracked due to genetic mutation> ❗️ Pay attention! If cracked caps and/or split stems have color changes (yellow, brown, gray, black), have spotting or necrotic symptoms, abnormal deformations, then it can be a sign of contamination!
#### How to fix mushroom cracking
You cannot fix it if it has already happened; however, it is possible to prevent it in future flushes.
##### Maintain a balance between fruiting parameters
Track your fruiting parameters using a simple device (available on [Amazon](https://amzn.to/3O2vbKK)): relative humidity, temperature, and CO2 level (optional).
##### Maintain relative humidity
To maintain high RH, use ultra-fine water mist. The Flairosol spray bottle (available on [Amazon](https://amzn.to/44IMZAq)) is a cheap and effective solution for manual misting. Mist the walls of your tub! Don't spray on mycelium and mushrooms directly!
A fogger/humidifier (available on [Amazon](https://amzn.to/3nM5jrY)) can also be used, although it is more suitable for large tubs or grow tents. Avoid water pools on mushroom cake.
##### Provide gentle fresh air exchange to reduce CO2 level
Passive natural FAE through air vents in your tub or gaps between the tub and lid is sufficient. Avoid vigorous fanning as it can dry out your cake and mushrooms.
> Active FAE involves using a fan or waving a lid, while passive FAE relies on allowing air to naturally flow and diffuse
An aquarium air pump ([Amazon](https://amzn.to/3LTrC76)) or any small PC fan ([Amazon](https://amzn.to/3pYbdag)) are good solutions for additional FAE in a growbox.
If you use a fan, turn it on a few times a day for 1-2 minutes. Mist immediately after fanning.
##### Proper temperature for the mushroom fruiting period
Each mushroom species requires a specific temperature range for normal fruiting, and the temperature difference can vary significantly between species. For edible mushrooms, the temperature ranges from 50°F to 82°F (10°C to 27°C), while for active mushrooms, it can range from 50°F up to 100°F (10°C to 40°C).
> Fresh air exchange, relative humidity, and temperature should be balanced during the fruiting period
##### Genetic isolation
Starting your growing journey with a spore syringe is always like a lottery. You never know what you'll end up with. Many mushroom colonies coexist, resulting in a wide genetic variety within the same mushroom cake/block.
You cannot fix genetic mutations during the cultivation process. However, you can work on genetic isolation (strain isolation, selection, cloning) to achieve perfect mushroom fruits in the future.
#### To sum it up
Mushroom splitting and cracking are neither contamination nor a disease. Such mushrooms are safe to consume.
However, you should check your fruiting parameters: relative humidity (should be 85-95%), temperature (check this parameter for each species), and fresh air exchange (natural FAE or active FAE with a timer and schedule).
All these factors should coincide and be balanced.
If you find this guide helpful support my work with subscription or one-time donation on ☕️ [buymeacoffee](https://www.buymeacoffee.com/shroomok)
Join Shroomok Community on [Discord](https://discord.gg/ngKhQDmymD) or [Reddit](https://www.reddit.com/r/Shroomok) for questions and sharing your experience.
Have a happy growing and healthy shrooms!
Peace, Shroomok ❤️
## Natalensis grow bag fruiting and overlay problems
[Natalensis grow bag fruiting and overlay problems](https://shroomok.com/en/wiki/Natalensis_grow_bag_fruiting_and_overlay_problems)
[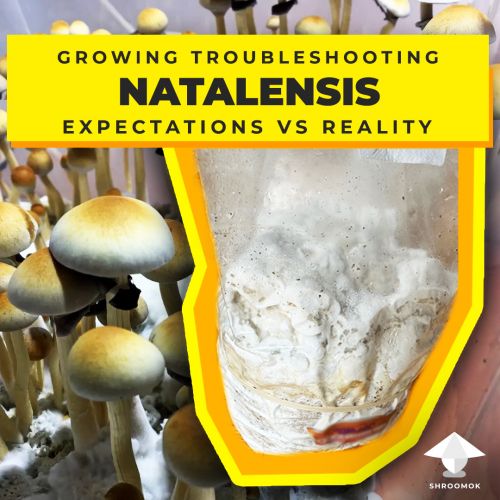](https://shroomok.com/en/wiki/File:Natalensis-growing-troubleshooting.jpg) Psilocybe Natalensis mushroom growing troubleshooting### My all in one bags with Natalensis don’t fruit and produce weird mycelium
Let's figure out real case with Psilocybe Natalensis growing.
#### Natalensis cultivation problems and growing details
> Hello Shroomok,
>
> I did a search on google and found your page. It was very helpful. I was hoping to get help with my **Psilocybe Natalensis** that I started growing almost one month ago. I am attaching some photos. Would you be so kind and give me your opinion on how to proceed?
>
> This is my first grow and the overlay seems to be too much? I used **two all in one manure grow bags** and think maybe the cake was left for too long before introducing FAE? I poked holes around the bag but things started to get weird then since there still wasn't enough air. I cut the top of the bag open but there has been no progress since I did that. I read on your blog that burying the cake in potting soil might save it?
>
> I'm at a loss. Any advice would be appreciated. Thank you in advance!
All in one bag 1, view on top and from the sides
[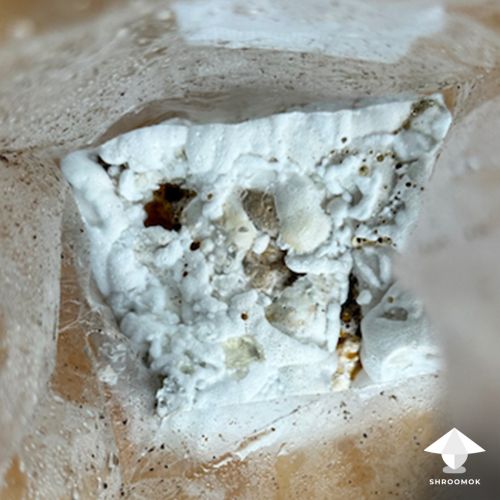](https://shroomok.com/en/wiki/File:Natalensis-grow-bag-1-top-view.jpg) Natalensis - all in one bag 1 - top view[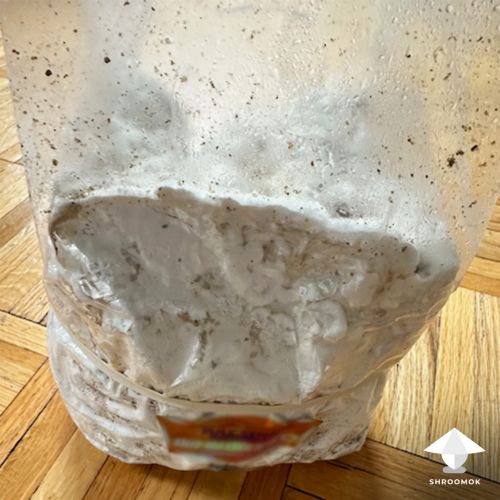](https://shroomok.com/en/wiki/File:Natalensis-grow-bag-1.jpg) Natalensis - all in one bag 1 - view from the side[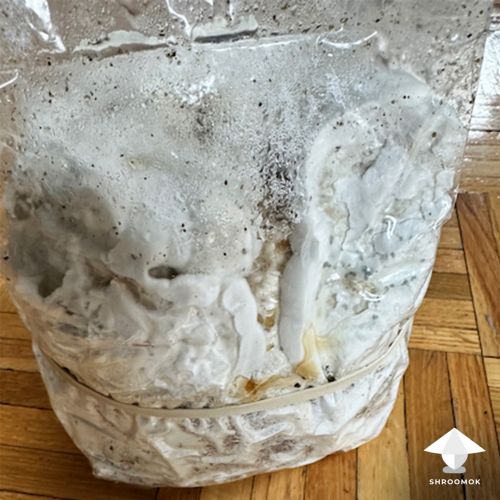](https://shroomok.com/en/wiki/File:Natalensis-grow-bag-1-another-side.jpg) Natalensis - all in one bag 1 - another sideAll in one bag 2, view on top and from the sides
[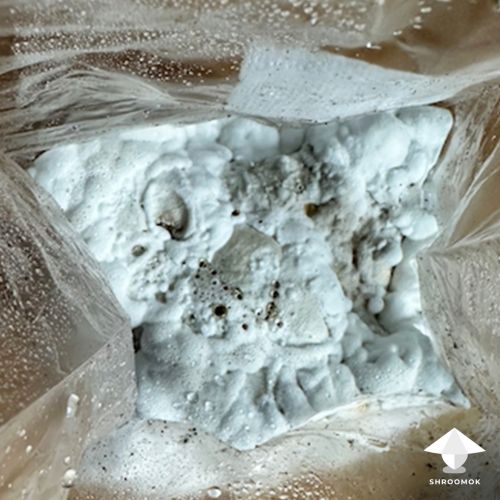](https://shroomok.com/en/wiki/File:Natalensis-all-in-one-bag-2-top-view.jpg) Natalensis - all in one bag 2 - top view[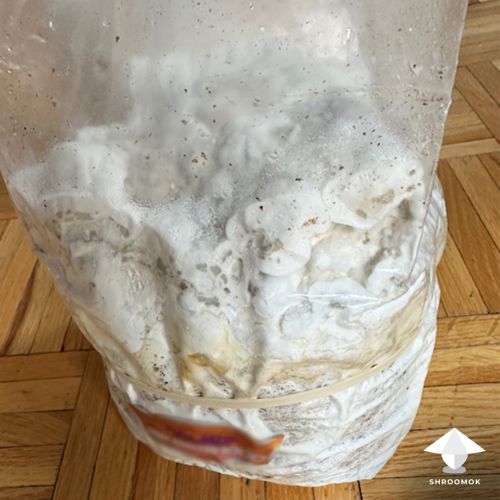](https://shroomok.com/en/wiki/File:Natalensis-overlay-fruiting-issue-bag-2.jpg) Natalensis - bag 2 - view from the side[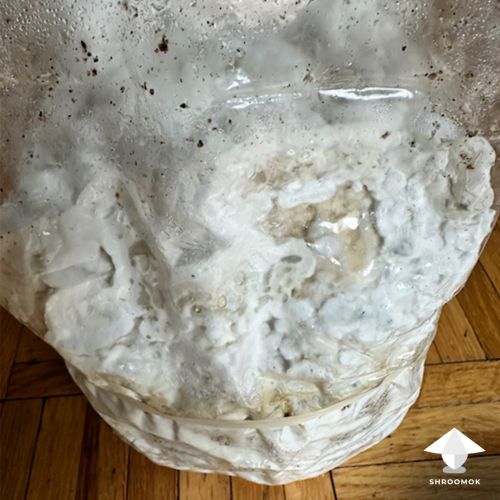](https://shroomok.com/en/wiki/File:Natalensis-growing-overlay-fruiting-problem.jpg) Nastalensis - bag 2 - another side#### Shroomok answers about Psilocybe Natalensis cultivation and how to make Natal fruit
Hello,
Regarding your questions about Natalensis grow bags. I’ve checked all the pics you’ve shared (thank you! it's very helpful). You have some yellow-brown liquid on top, which are [mycelium metabolites](https://shroomok.com/en/wiki/Mycelium_metabolites_or_mushroom_pee "Mycelium metabolites or mushroom pee"). It's not contamination, so don't worry.
##### **A few comments from my side for the future attempts with Natalensis**
1\) **Manure substrate is not necessary** for Natalensis, it's more nutritious and mycelium growth is more aggressive. Substrates based on coco coir would be better. However it’s not a problem if you use this type of substrate.
2\) For Natal better to **start with grain substrate for Spawn** first -> then make **Spawn to Bulk** (bulk substrate based on coco coir mix, 1:3 ratio) -> then after bulk colonization cover the cake with non-nutrient **Casing layer** (based on peat moss mix) to initiate pinning and create good microclimate for fruiting.
3\) Typically **Natalensis mycelium is very aggressive** from the very beginning. Mycelium overgrowth aka overlay is a common issue for this species. Also Natal forms weird marshmallow blobs of mycelium and it can happen on any flush, even if before you had good normal fruit bodies. BTW you can harvest these blobs and take them (fresh or dried).
4\) Yes, Natalensis needs to **start fruiting conditions earlier** and **requires more FAE** (fresh air exchange).
It is **hard to make them fruit right in the bag** as Cubensis. Better to make flat mushroom cake and use plastic tub as a fruiting chamber, so that you have **more volume of air** and easier to maintain fruiting conditions. You can make air vents (like in a [MonoTub](https://shroomok.com/en/wiki/Forget_Monotub_Kit._DIY._How_to_make_Monotub_for_Mushrooms_by_your_own "Forget Monotub Kit. DIY. How to make Monotub for Mushrooms by your own")) or just **flip the lid upside down,** so that we have gaps between lid and tub for natural air flow.
5\) Flat mushroom cake covered with a **casing layer** is highly recommended for Natalensis.
> Casing is a non-nutrient substrate, that promote mycelium for pinning and helps to reduce mycelium overgrowth. Usually we think the more nutrients the better. But it doesn't work for shrooms. Till mycelium has too much nutrient it will develop mycelium only and won't produce shrooms. When mycelium has a sign 'no more nutrients' it starts to form pins and fruits. Casing is exactly this sign and also a source of additional moisture and protection against contaminants. Read more: [Casing](https://shroomok.com/en/wiki/Making_mushroom_cake,_spawn_to_bulk,_and_casing#Casing)
##### **What to do in your case?**
1. Prepare a plastic box with a lid (20-40Qt or 20-40 liters or 2 plastic tubs 6-10 Qt each for DubTub), wipe it with 70% iso/ethyl alcohol.
2. Wear gloves on your hands, wipe them with alcohol.
3. Wipe fork with alcohol.
4. Remove blobs and overlayed mycelium with a sterile fork and your hands.
5. Crumble the block in a plastic box, don't be afraid to do this! You can find an example of this process here: [How to make mushroom cake](https://shroomok.com/en/wiki/Making_mushroom_cake,_spawn_to_bulk,_and_casing#Make_small_mushroom_cake_step_by_step). The process for **small or big** mushroom cake **is the same**.
6. So that you have a flat cake (the height should be about 2-4 inches or 5-10 cm).
7. Cover the cake with **casing layer** (1/3 inch or ~1 cm).[](https://shroomok.com/en/wiki/File:Mushroom-cake-with-pseudo-casing-layer.jpg) Mushroom cake with applied casing layer on top
##### How to prepare substrate for the casing layer
###### **Ingredients**
- peat moss (aka sphagnum) - 2 cups ([Amazon](https://amzn.to/46VIpjj))
- vermiculite - 1 cup ([Amazon](https://amzn.to/44xqlKO))
- hydrated lime (aka calcium hydroxide) - 1 tablespoon ([Amazon](https://amzn.to/3pNDIrp))
- water - 1 cup
Prepare as much as you need, just follow the ratio.
In your case prepare x2 for each bag (4 cups of peat moss per each bag and add other ingredients accordingly).
###### **Step by step process**
1. Fill the jar with this mix, close the lid. Put it in an instant pot, saucepan with lid or pressure cooker. Add water in a pot and bring it to a boil. For casing layer we don't need high pressure and you can use just pot with lid.
2. Sterilize/pausterize the casing substrate for ~60 mins. Let it cool down to room temperature.
3. Cover the cake with a thin casing layer on top (1/3 inch or ~1 cm).
4. Mist the walls of the plastic tub with water (clean drinking water).
5. Close the lid or flip it upside down.
6. Open the tub every day to check the progress and for additional FAE.
7. Mist the walls of the tub, if you find out they are dry out.
> Usually in the nearest 3-7-10 days you'll see first pins
If not, then we can try to make them fruit outdoors (mushroom bed) or in a plant pot outdoors. But let's try indoor growing first.
Or you can use **one bag indoors** and **another one for outdoor** growing.
##### **A few words about growing Natalensis outdoors**
Natalensis mycelium when it's strong enough is highly resistant to contaminants and high temperatures. It makes this species great for outdoor hot season cultivation.
[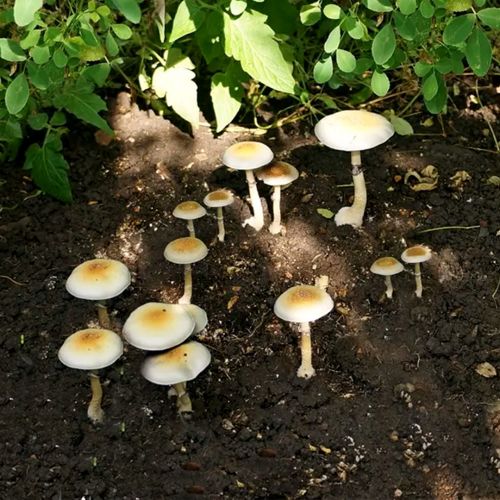](https://shroomok.com/en/wiki/File:Natalensis-mushrooms-outdoors.jpg) Psilocybe Natalensis mushrooms growing outdoors> Natalensis withstands air temperature up to 104**°**F or 40**°**C. The optimal temperature range for fruiting is 77-86**°**F or 25-30**°**C.
1. Remove mycelium blobs/overlay from the block.
2. Find the right place for 'mushroom bed'. The best place -> no sunlight and wet -> in the shadows of plants/fence or greenhouse/tent for plants. Or use a plant pot, you can move it anytime and anywhere you want.
3. **Easiest method.** Dig out the soil about 4-5 inches. Break the mushroom block and bury it in soil. Cover with soil on top - 1-2 cm or 1 inch. Don't be afraid to crumble the block.
4. **Another method.** Prepare simple coco coir substrate (just [coco coir](https://amzn.to/3NXgzL8) and water; other ingredients like vermiculite, gypsum and hydrated lime are optional). Mix mushroom block with wet coco coir. Or crumble the block and mix it with wet coco coir in a plant pot. The ratio of mycelium to coco coir substrate is up to you, 1:1 or 1:2 or 1:3 or even more.
5. Mist the top layer.
6. Cover the bed with plastic fruit/farm box. This helps to reduce sunlight, retain moisture, create good microclimate.
7. Mist the bed/pot from time to time and you'll get a few flushes in the summer and autumn season ;)
Feel free to ask any questions on e-mail, [Discord](https://discord.gg/ngKhQDmymD) or [Reddit](https://www.reddit.com/r/Shroomok)
I can check the progress with you, just share pics ;)
Growing Psilocybe Natalensis is challenging, for newbie growers especially, but it worth it!
I believe we make your bags fruit.
Best regards, Shroomok
> Thank you so much Shroomok, for taking the time to help me with such a detailed explanation! I am beyond grateful.
>
> I will get the supplies for the casing layer within the next couple of days and I'll let you know how it goes. This is literally my very first grow and I still don't understand what mushrooms need when it comes to the different substrates. I was told that dung loving mushrooms should grow in manure based substrate, so this is new information for me.
>
> The other thing that I think may have gone wrong is, the instructions for the bag tek said to use 4-5 cc of liquid culture but maybe I should have used less which would have resulted in less or no overlay... Many thanks!
#### Natalensis pinhead initiation after casing day by day
##### Day 2-3 of Natalensis fruiting period
> Hi Shroomok, I just wanted to send you this obit to see what you think. I know you said pinning would start 3-10 days from initiating the casing layer which I started 3 days ago. Does this look like mycelium or co Ramos took growing on the substrate? Please see photos below. Thank you in advance!
2 days after casing
[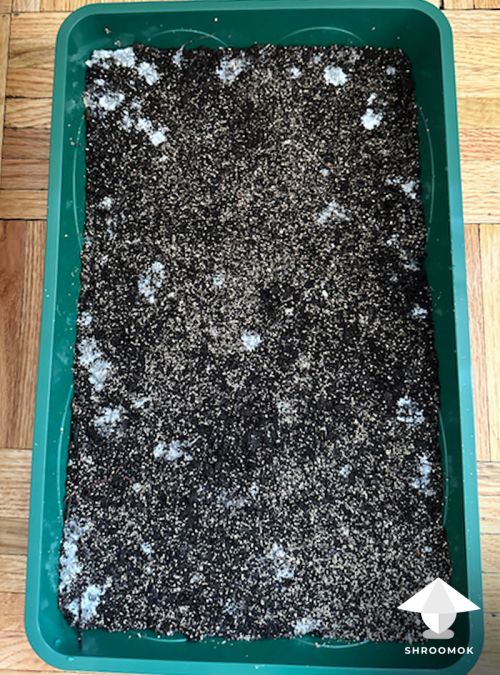](https://shroomok.com/en/wiki/File:Psilocybe-Natalensis-progress-2-days-after-casing.jpg) Natalensis cake #1 - 2 days after casing and providing fruiting conditions3 days after casing
[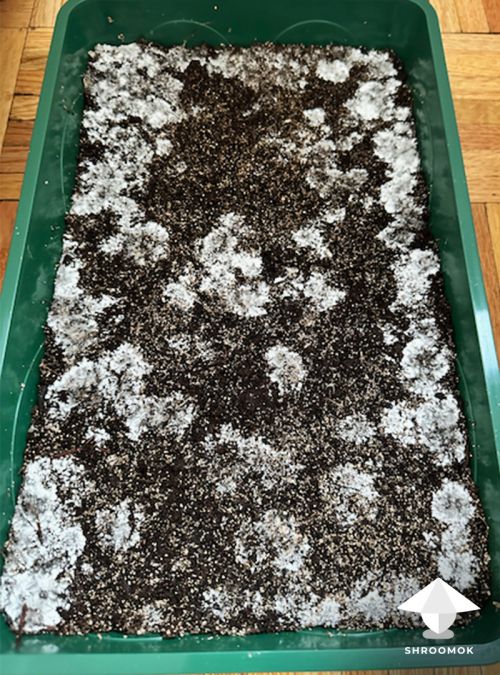](https://shroomok.com/en/wiki/File:Psilocybe-Natalensis-progress-3-days-after-casing.jpg) Natalensis cake #1 - 3 days after casing and providing fruiting conditions##### Shroomok comments on Natalensis progress after casing
Hey, thanks for updates!
It's definitely Natalensis mycelium growth. Good job! So far so good ;)
Mist **the walls of the tub** from time to time (maybe once a day or once in 2 days, or if you see the walls are dry).
**Don't mist on mycelium directly!**
If possible open the tub for **FAE at least 1-2 times/day.**
**Air vents** in your tub or **gaps between the top lid and the bottom box** are also helpful for natural airflow and FAE.
**Don’t keep your tub on the floor!** 90% of all contaminants in the air are closer to the floor and spread by drafts.
Keep me updated as often as you can.
Good luck! Hope to see pins soon, fingers crossed 🤞
> Thank you for the quick response. I feel so relieved!
>
> There is one bag in the grow box which has four ventilation ports. I open the lid 3-4 times a day just for a moment and spray once a day since the moisture seems to evaporate. I will find an alternative to the floor.
>
> Thank you again for your help and the encouragement!
##### Day 5-7 of Natalensis progress for both mushroom cakes
> Hi again Shroomok. Just wanted to show you the progress of both tubs after casing. I made 2 separate tubs from 2 all in one bags I had.
**Tub #1** - mushroom cake made from all in one **bag #1** - casing layer added **7 days ago**
[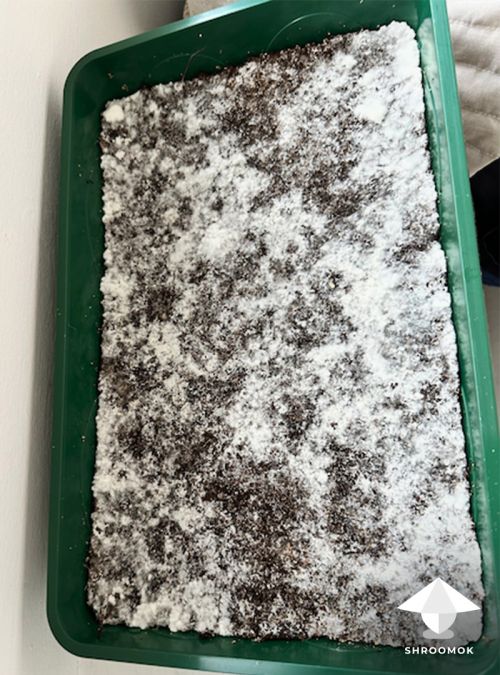](https://shroomok.com/en/wiki/File:Natalensis-7-days-after-casing-fruiting-period.jpg) Natalensis mushroom cake #1- 7 days after casing and fruiting conditions
**Tub #2** - mushroom cake made from all in one **bag #2** - casing layer added **5 days ago**
[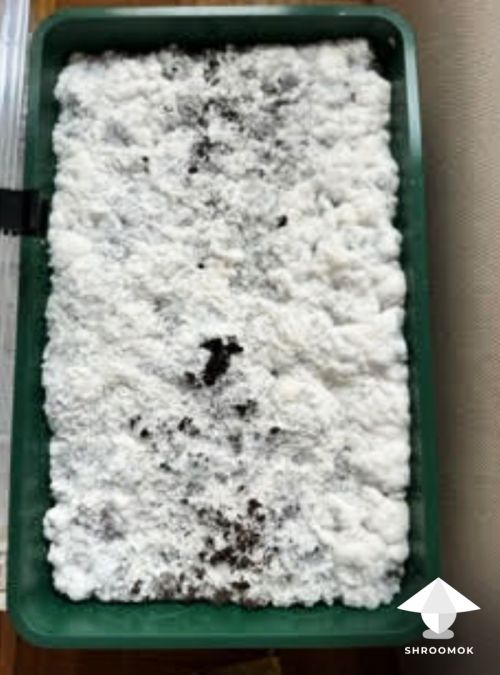](https://shroomok.com/en/wiki/File:Natalensis-progress-second-cake-5-days-after-casing.jpg) Natalensis mushroom cake #2 - 5 days after casing and providing fruiting conditions##### Shroomok comments on Natalensis progress 5-7 days after casing
Hey buddy!
Thank you for updates! So far so good. Both tubs are good and healthy.
**Tub #1 casing layer added 7 days ago** - I like the result!
**Tub #2 casing layer added 5 days ago** - mycelium is more aggressive and fluffy, but don't worry.
Let me show you the example when Natalensis mushrooms grow through the fluffy mycelium that look like overlay
[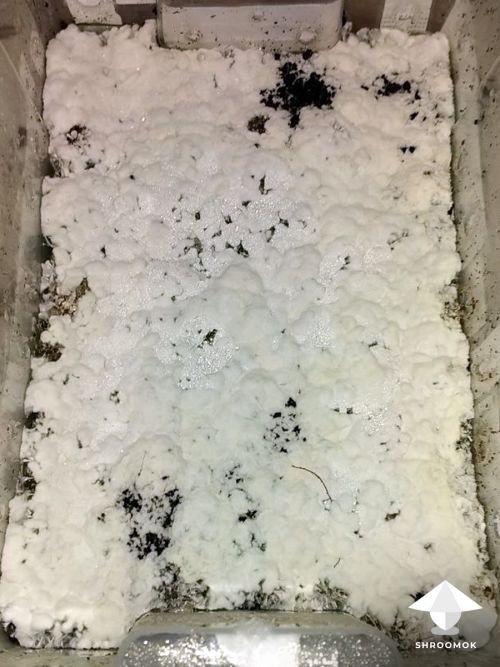](https://shroomok.com/en/wiki/File:Natalensis-mycelium-overlay.jpg) Aggressive fluffy Natalensis mycelium look like overlay
Here you can see pins!
[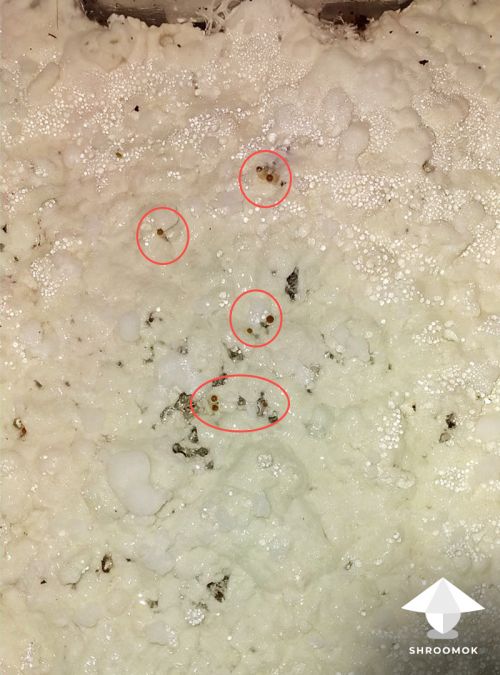](https://shroomok.com/en/wiki/File:Psilocybe-natalensis-mycelium-colonization-and-pinning.jpg) Psilocybe Natalensis first mushroom pins
Natal shrooms are coming!
[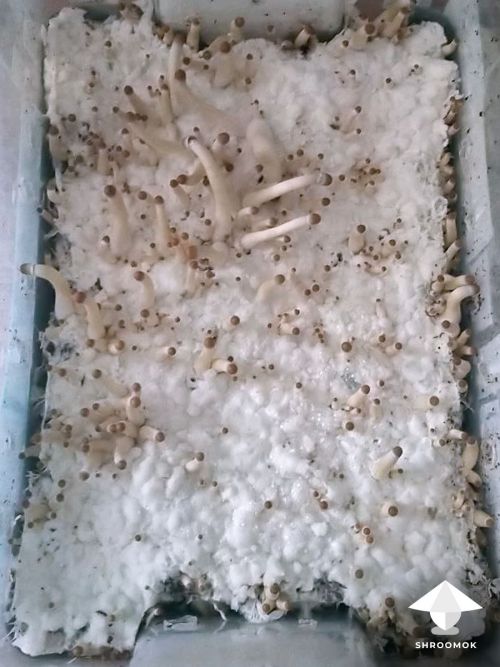](https://shroomok.com/en/wiki/File:Natalensis-fruiting.jpg) Natalensis mushrooms fruiting
**What to do next?**
FAE, misting as before and... patience.
After casing usually it takes 3-10 days for pinning, up to 15 days.
Hope for shroom babies soon. Share updates in the nearest 2-3 days pls.
Have a great weekend!
> Awesome, thanks for the feedback! I really appreciate it. I was concerned about the 2nd tub since the mycelium is so aggressive. I wonder why? I'll send you updates in a few days. I think I saw something pop up in tub #1 so let's see. Also, the examples of the aggressive mycelium were very helpful. Enjoy your weekend!
##### Day 9-11 of Natalensis fruiting period
> Hi Shroomok! Here are the updated photos. The #1 tray is doing very well and coming along. Not sure about #2 tray. See photos below. Thank you again!
Natalensis mushroom cake #1 - 11 days after casing and providing fruiting conditions. First shroom and pins appeared!
[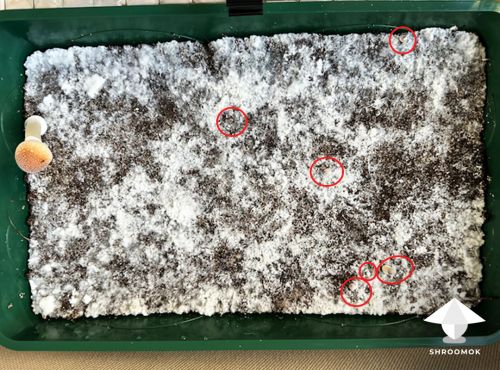](https://shroomok.com/en/wiki/File:Natalensis-pins-11-days-fruiting-period.jpg) Natalensis cake #1 - 11 days of fruiting period - first pins and shroom
Natalensis mushroom cake #2 - 9 days after casing and providing fruiting conditions. Aggressive mycelium growth.
[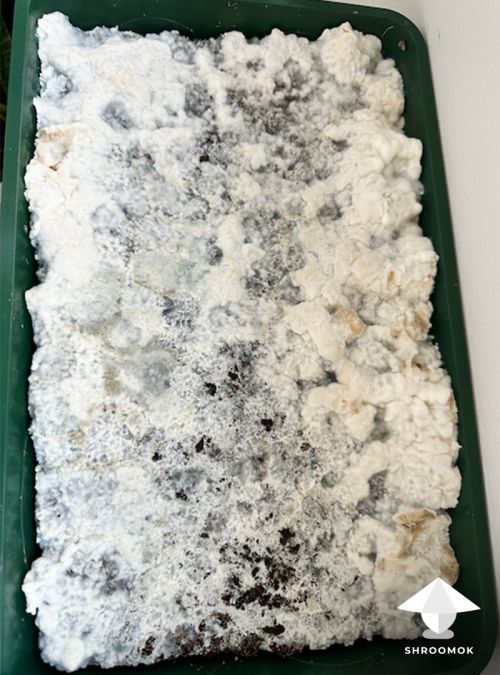](https://shroomok.com/en/wiki/File:Natalensis-9-days-fruiting-period-cake-2.jpg) Natalensis cake #2 - 9 days of fruiting period##### Shroomok comments on Natal updates: 9-11 days after casing
Hey! Hooray, finally we have first Natalensis shroom on the cake #1. I'm so happy!
**The #1 tray** is able to fruit and I see some small hyphal knots and pins ;)
Introduce FAE and misting as before.
**The #2 tray** - usually fluffy mycelium needs more time and more FAE. So if possible try to introduce FAE for this tray more frequently.
I'd suggest you make a spore print(s) from the **\#1 tray.** So that you'll have your own spores for new growing attempts and save money for genetic material for the future.
🔴 **Check out detailed guide here:** [How to make mushroom spore prints](https://shroomok.com/en/wiki/How_to_make_magic_mushrooms_spore_prints "How to make magic mushrooms spore prints")
Thank you for good news! Keep going, keep growing!
> Thank you for helping get here and all of your support! I will attempt making a spore print, good idea! Thank you for all your encouragement.
##### Day 11-13 of Natalensis fruiting period
> Hi again, just updating the pictures (see below). Thanks again!
Natalensis cake #1 - 13 days of fruiting period
[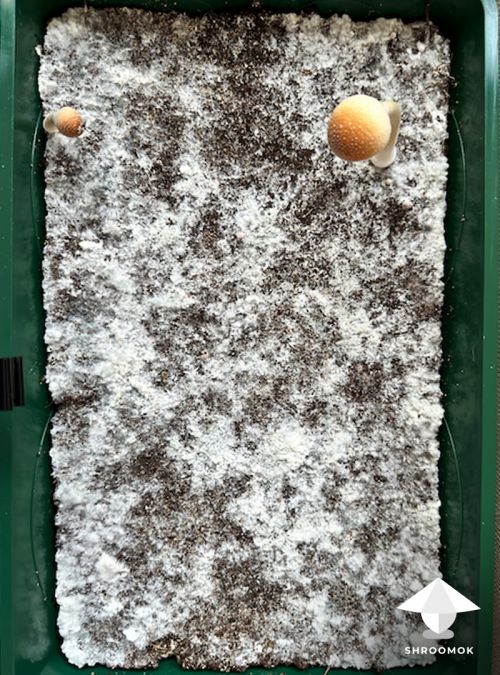](https://shroomok.com/en/wiki/File:Natalensis-progress-cake-1-fruiting-period-13-days.jpg) Natalensis cake #1 - 13 days
Natalensis cake #2 - 11 days of fruiting period
[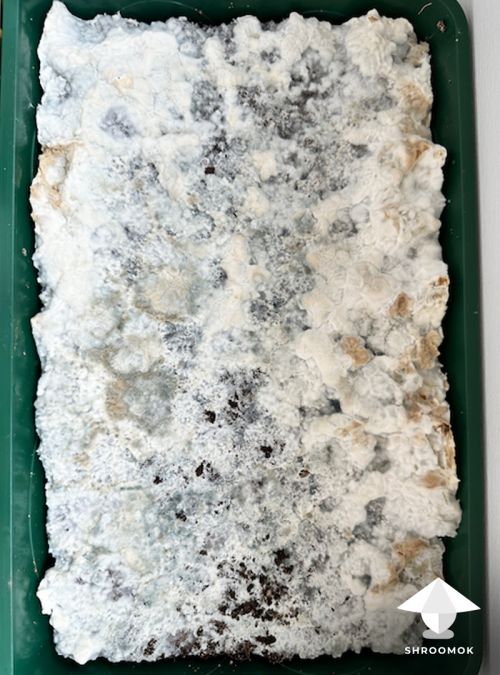](https://shroomok.com/en/wiki/File:Natalensis-growing-cake-2-fruiting-period-day-11.jpg) Natal cake #2 - 11 days##### Shroomok answers on Natal updates 11-13 days
Hello! The cake with a few mushrooms looks good.
I just can't see the pins that I saw from the photo of the previous day. Are they still there? I mean these pins (see on the photo).
[](https://shroomok.com/en/wiki/File:Natalensis-pins-11-days-fruiting-period.jpg) Natal pins
When you'll see a **torn veil** it's time for making spore prints and harvesting. Here is a torn veil example:
[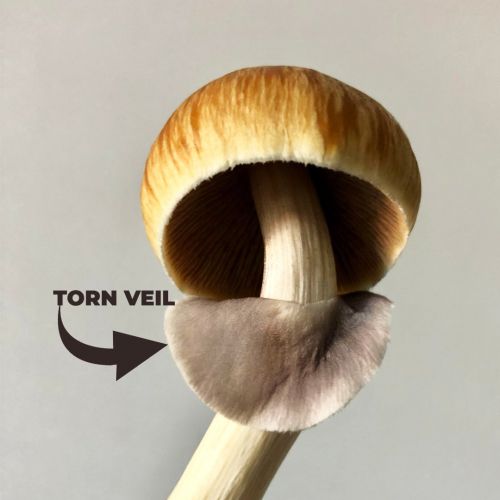](https://shroomok.com/en/wiki/File:Mushroom-ready-for-harvesting-example.jpg) Mushroom ready for making spore print and harvesting. Torn veil exampleRight after harvesting it's time to rehydrate (soaking/dunking) mushroom cake in cold water.
Soak the cake **for 4 hours in cold clean water without any additives, you can add some ice in water to make it colder.**
Usually after rehydration we get more shrooms and rich flush.
🔴 **Detailed guide with examples here**: [Mushroom cake rehydration](https://shroomok.com/en/wiki/Rehydration_of_psilocybe_cakes "Rehydration of psilocybe cakes")
**Regarding the 2nd tub** we have some marshmallow growth. Can be a kind of mutation. It's not a contamination, don't worry. Just some genetic issue.
Anyway, let's wait the next **3-5 days** for shrooms in the central area here:
[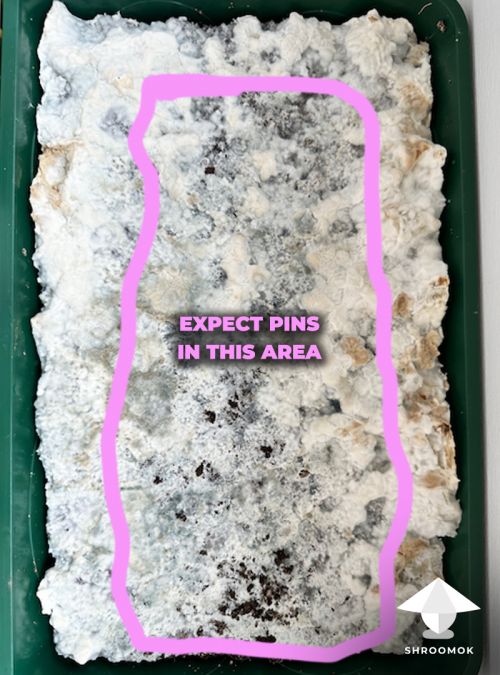](https://shroomok.com/en/wiki/File:Natalensis-mushroom-cake-and-area-for-pins.jpg) Waiting for Natalensis pins here
You can harvest these blobs further, dry them and take them as shrooms. Let me show you an example of such growth, so that you can compare it with your growth further.
[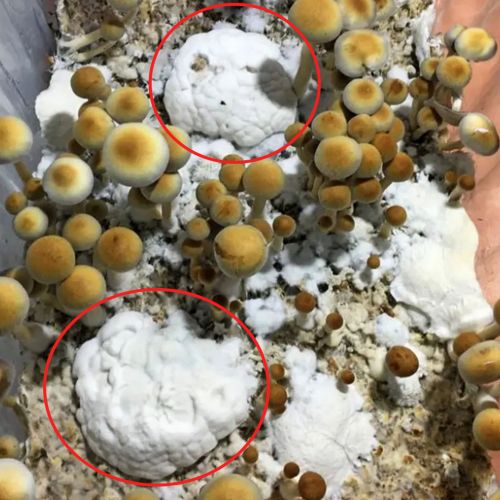](https://shroomok.com/en/wiki/File:Natalensis-mushrooms-fruiting-and-blobs-mutation-growing.jpg) P. Natalensis mushroom fruiting 1st flush and strange marshmallow mycelium blobs growth on the cake (red circles)[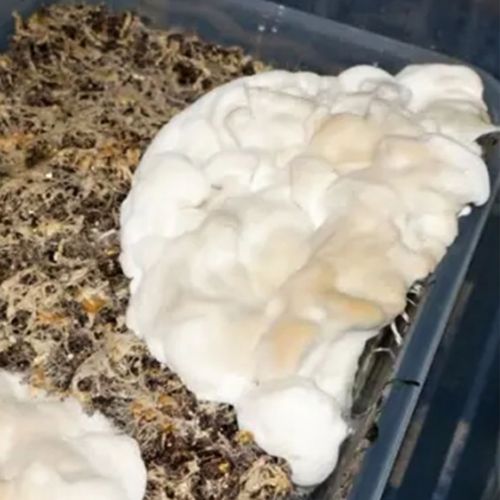](https://shroomok.com/en/wiki/File:Natalensis-mutation-growing.jpg) Marshmallow Natalensis mycelium blob mutation growing after the 1st flush and rehydrationDon't hesitate to share photos day by day and I'll check them.
Feel free to ask any questions about our next steps.
Cheers, Shroomok :)
> Hello Shroomok,
>
> 1\) The picture of **tub #1** with the pinning is from a couple days ago. The area where you circled the three pins, one was harvested today. The other two pins are still there and one near the edge of the tub will be ready by tomorrow. Should I wait for the little pins to come up first before the cold water bath?
>
> 2\) **Tub #2**, asking for clarification about the marshmallow blobs. How do I harvest the blobs? Very interesting, how does genetic mutation happen? Both tubs are from the same liquid culture... What is the best way to harvest the blob?
>
> Thank you again!
**Shroomok answers:**
1\) **Tub #1.**
If pins are stalled and you don't see visible growth for the next 1-2 days you can pick these small shrooms/pins and soak the whole mushroom cake. The earlier you make 'water bath' the earlier you get next flush of better shrooms
2\) **Tub #2.**
Let's wait for shrooms in the centre first. Maybe smth will appear in the next few days.
If not, then pick the blobs just with your hands (in sterile gloves, wipe with iso/ethyl alcohol 70%) or use sterile knife (wipe with iso/ethyl alcohol 70%).
Then also make 'water bath' for this cake.
Such blobs growth can appear even near good mushrooms. Can vary cake by cake and flush by flush. Why?
One liquid culture (in our case multiculture) can create many mushroom couples and 'families'. You never know which family(-ies) will grow on the grain/block/cake.
We have the same growth on each cake if we work with **isolated culture**, when we choose the only one 'family' genetic. This is possible with agar work and by agar to agar transferring 5-10 times and even more.
It's roughly explanation. I'll try to do this in a better way in a long-read post with pics/photos/schemes and share with you ;)
> That would be great! Thank you again for the detailed explanation. I'll keep you posted.
##### Day 12-14 of Natalensis fruiting period
> Hello again, Here are some updated photos from today.
>
> Tub #1 I just want to clarify, you said to do a cold water bath, correct?
>
> Tub #2 I see pins!
>
> Thanks again
Cake #1 after harvesting 1st flush, ready for rehydration:
[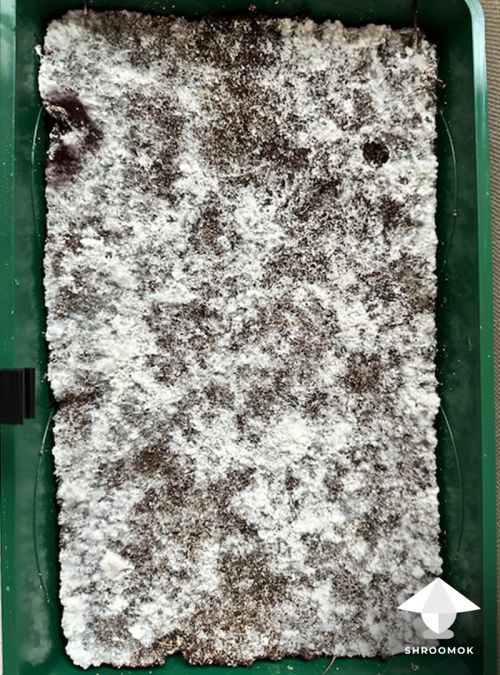](https://shroomok.com/en/wiki/File:Natalensis-mushroom-cake-1-ready-for-soaking-in-water-14-days-fruiting-period.jpg) Natalensis cake #1 ready for soaking in water. 14 days of fruiting period
Natal first pins appeared in marshmallow mycelium:
[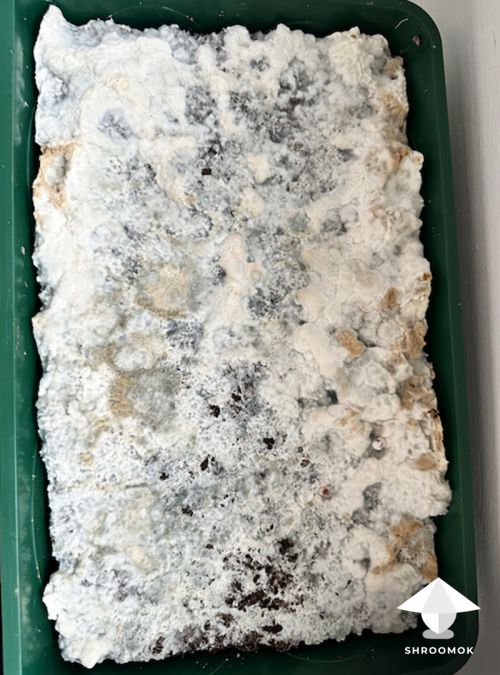](https://shroomok.com/en/wiki/File:Natalensis-mushroom-cake-2-fruiting-period-day-12.jpg) Natalensis first pins - day 12 of fruiting period##### Shroomok answers on Natalensis updates 12-14 days
Hello!
**Tub #1** - YES, cold water bath. Just use cold tap water.
If the water is not cold for your arms add some ice. Let's say 10 ice cubes per 1-2 Qt (liters) of water.
Submerge the cake in water and leave it to soak for **±4 hours.**
You can do this right in the tub!
Black spots on the cake are just mushroom spores, it's okay (see the photo below).
[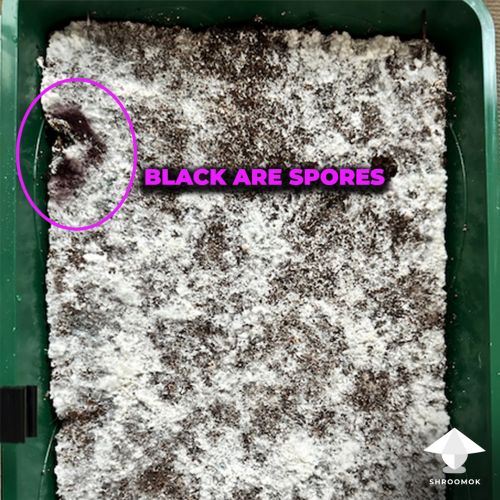](https://shroomok.com/en/wiki/File:Natalensis-cake-1-spores-on-mycelium.jpg) Natalensis spores on mycelium after harvestingBy the way, have you made a spore print(s)? How many shrooms have you harvested? Do you have a photo of your first harvest?
**Tub #2** - the first pins I've noticed in the photo below :)
[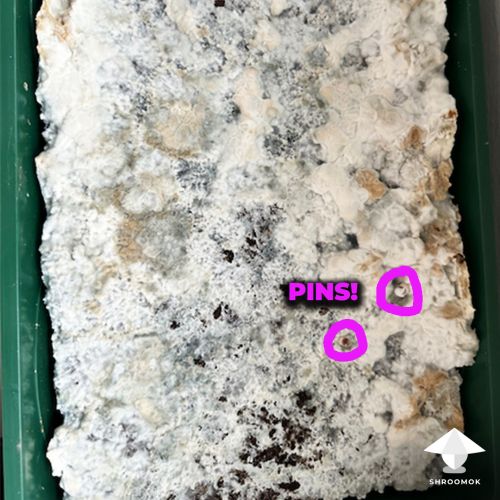](https://shroomok.com/en/wiki/File:Natalensis-first-pins-12-days-fruiting-period.jpg) First Natal pins on mushroom cake #2 - day 12 of fruiting periodBest regards, Shroomok
> \- Great, I'll work on the bath today.
>
> \- I don't have any photos of my first harvest, other than what I sent you because it was so sad, lol. The pictures that I sent you where one mushroom came at a time is all I have...a total of three mushrooms, lol. They do look good though. I will take photos of the second flush for sure.
>
> \- I will take a spore sprint after I get the supplies, i.e a surgical knife and baggies to store them in afterwards. I don't think I can get a still air box yet but will see.
>
> \- I'm so happy about the pins in bin #2. They're even coming up through the marshmallow. There's one more above the two you circled. I don't have high hopes for this bin so thank you for the encouragement.
>
> Thanks again.
##### Day 13-15 of Natalensis fruiting period
> Good morning, here are some updated photos.
Tub #1: while trying to wash the cake, it cracked. It was too light for me to hold under the faucet.
[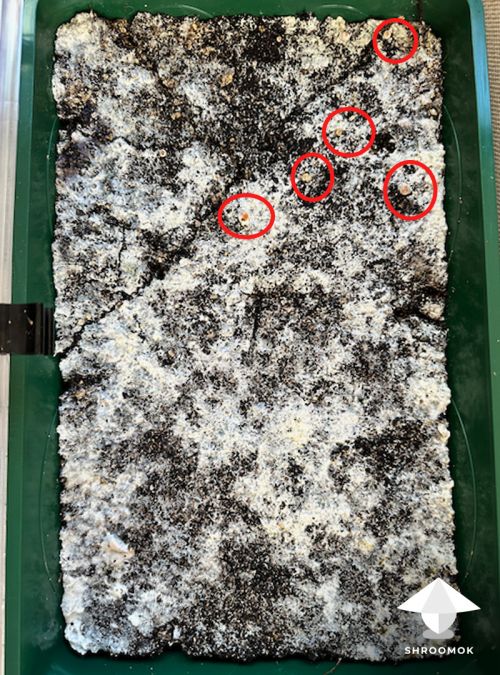](https://shroomok.com/en/wiki/File:Natalensis-cake-1-after-soaking-in-water-fruiting-period-day-15.jpg) Natalensis mushroom cake 1 day after soaking in water, day 15 of fruiting period. A few new pins appeared (red circles)
Tub #2: some good pinning going on!
[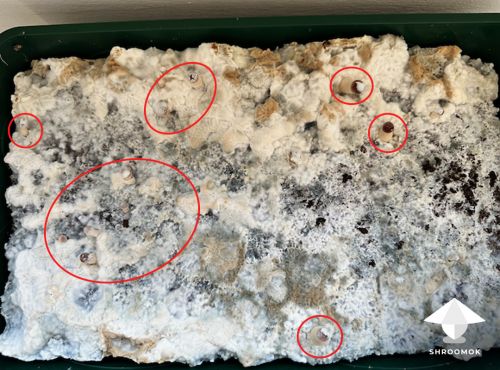](https://shroomok.com/en/wiki/File:Natalensis-cake-2-pinning-fruiting-period-day-13.jpg) Natalensis cake #2 - first pins appeared on the day 13th of fruiting period
Same Natalensis mushroom cake #2, another angle
[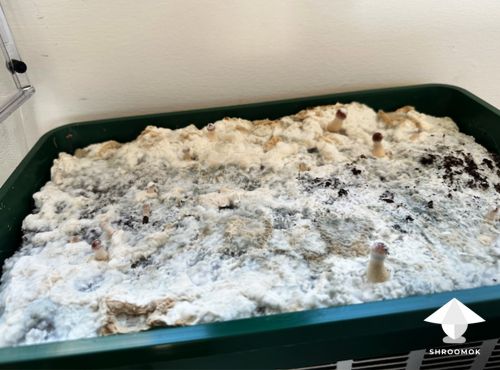](https://shroomok.com/en/wiki/File:Natalensis-cake-2-pinning-day-13.jpg) Natalensis mushroom pinning, day 13th of fruiting period##### Day 14-16 of Natalensis fruiting period
> Good morning, another update. Thanks again!
Natalensis mushroom cake #1 - 2 days after water bath - 2nd flush - day 16 of fruiting period. Some pins on the cake
[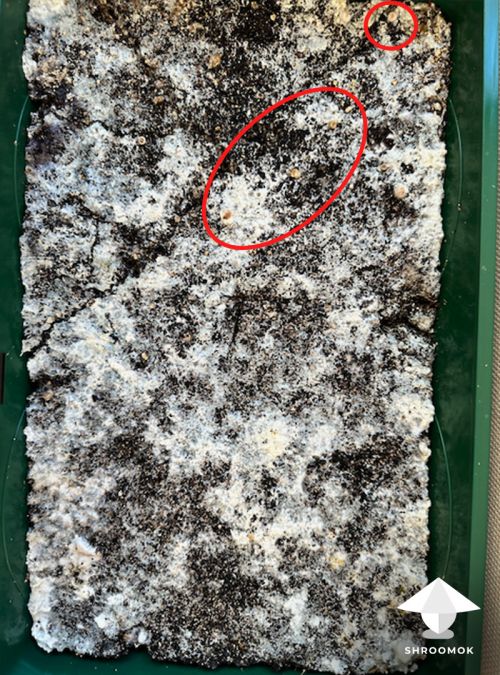](https://shroomok.com/en/wiki/File:Natalensis-mushroom-cake-1-after-rehydration-day-16.jpg) Natalensis cake #1 - 2 days after soaking in water, day 16 of fruiting period
Natalensis mushroom cake #2 - first flush - day 14 of fruiting period
[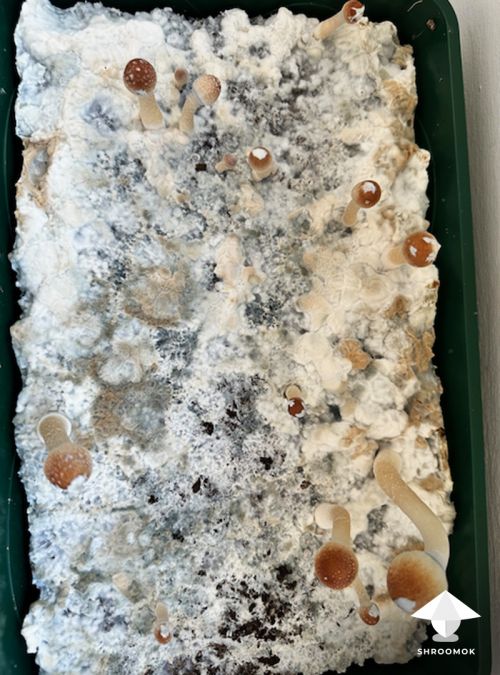](https://shroomok.com/en/wiki/File:Natalensis-mushroom-cake-2-fruiting-period-day-14.jpg) Natal cake #2, first flush, day 14 of fruiting period
Natalensis mushroom cake #2 - first flush - day 14 of fruiting period
[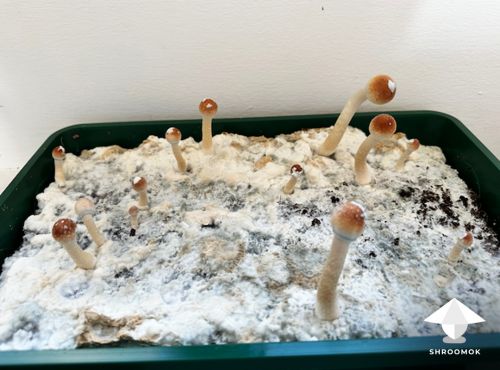](https://shroomok.com/en/wiki/File:Natalensis-mushroom-cake-fruiting-day-14.jpg) Natalensis growing - day 14 of fruiting period##### Shroomok answers on Natalensis progress 14-16 days
Hey hey, that's an amazing result!
Thank you for your efforts and time! Good job!
I've checked all the photos and comments you shared...
**Tub #1 (after soaking in water):** looks good and new pins are coming. Cracked cake is not a problem for further fruiting.
**Tub #2:** as I said before it takes **7-15 days** for pinning and some shrooms **can appear in fluffy marshmallow mycelium**.
As a result, we had pins on the day **13 or 14.**
###### **Making a spore print(s)**
A few comments here.
You don't need special tools and supplies.
So here are what you need:
1\) **aluminum foil** is the best to use for prints - cut rectangular pieces and wipe them with 70% iso/ethyl alcohol 70%.
2\) To **cut the mushroom cap** you can use sharp kitchen knife, or a stationery knife, or a razor or cutter like [this](https://amzn.to/44TvQD5).
Scalpel (aka surgical knife) is optional ([Amazon](https://amzn.to/3Pn4WO4))
Just wipe the knife/razor with 70% iso/ethyl alcohol and cut the cap.
3\) Put the mushroom cap on foil.
4\) [Still Air Box](https://shroomok.com/en/wiki/Still_Air_Box_for_Mycology "Still Air Box for Mycology") **is not** necessary, UVC lamp **is not** necessary as well.
5\) Cover shroom caps with a glass or any plastic box for food, leave them **for ~24 hours** for sporulating.
5\) Use any tweezers ([Amazon](https://amzn.to/3RncMKa)) and put ready prints in **airtight zip bags for storage** - yes, you need some **zip bags** ([Amazon](https://amzn.to/45ZZJDe))
Ready!
Let me know if you have any questions.
Regards, Shroomok
> One more question about bin #2. After I harvest the mushrooms, should I remove the marshmallow before soaking in cold water for the second flush?
>
> I have several syringes of different strains of liquid culture in my fridge. Blue Meanies, Albinos, Lions Mane, Shiitake and Blue Oyster.
>
> I have one more all in one manure grow bag left and trying to decide which one to use in it. This is very exciting! Thank you for your interest in such a newbie like myself! I will definitely try the different growing projects on your website.
###### **Shroomok answers:**
**Yes, remove marshmallow growth before soaking** (with sterile fork or sterile hands in gloves).
If you leave it, then after soaking it will be like a slimy sponge.
Zero benefits from the marshmallow growth after soaking, but the risk of contamination increases.
Just a reminder! Don't remove the casing layer! Don't remove normal mycelium on the cake!
**What to do with all in one manure bag?**
The **manure bag** you can inoculate with **Cubensis** Blue Meanie (check the label, maybe you have **Panaeolus** Blue Meanie).
Or use it for your **Cubensis albino strain** (also check the exact name of strain).
You need only 1-3 ml of LC per bag for inoculation. Don't use the whole LC syringe for one bag only.
**Plans for the next mushroom growing**
The next mushroom growing (I mean species/strains) is up to you :)
🔷 **Basic** step-by-step guide is here: [Mushroom Growing in 20 steps](https://shroomok.com/articles:grow-mushrooms-at-home-guide)
**First 7 steps** are applicable almost for all mushroom species (Cubensis, Natalensis, Panaeolus, Lions Mane, Shiitake, Oysters).
The next steps are applicable for Cubensis, Natalensis, Panaeolus.
🔷 For edibles like **Lions Mane, Shiitake** we need to create mushroom **blocks** with bulk substrate based on **sawdust**. This is the main difference!
🔷 **Shiitake** growing guide is here: [My first Shiitake Mushroom growing](https://shroomok.com/en/wiki/Grow_your_first_Shiitake_mushrooms_at_home)
Also applicable for Lions Mane and Oysters. However for LM we can try simpler tek ;)
🔷 How to make 100-200-1000 **Liquid Culture** syringes from 1 LC syringe you already have in your fridge, save money for expensive genetic and use it even for experiments and fails: [Liquid Culture Guide](https://shroomok.com/en/wiki/How_to_make_mushroom_Liquid_Culture)
If you don't have a Pressure Cooker it's not a problem. You can use an instant pot, or oven, or pot with a lid. It takes more time, but it works.
Actually you can use/reuse most of the stuff you already have at home (for instance, canning jars), and grow mushrooms successfully.
Wish you good luck with the current Natalensis cultivation and waiting for updates.
Enjoy the magic of mushroom growing!
Best regards, Shroomok
> Thank you for the links. I have one bag inoculated about a month ago, that I just did a break and shake a couple days ago. Will see how that goes...
>
> I will definitely give making my own LC a try to save money.
>
> I have a very tall stainless steel stock pot with a lid that should work.
>
> Will keep you updated!
##### Day 17-19 of Natalensis fruiting period
> Hello,
>
> Bin #1 looks like it might have stalled? I'm not sure...
>
> [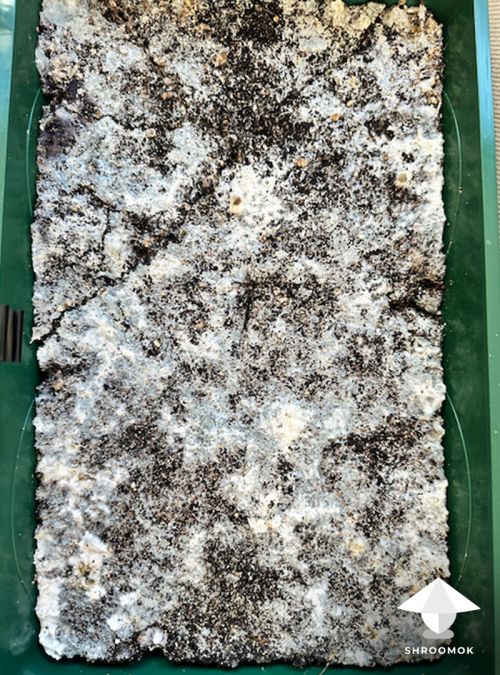](https://shroomok.com/en/wiki/File:Natalensis-cake-1-fruiting-period-day-19.jpg) Natal cake #1 - second flush - 5 days after soaking in water - day 19 of fruiting periodI'm attaching photos of the removal of the marshmallow. There were quite a few pins that just never made it through...
>
> [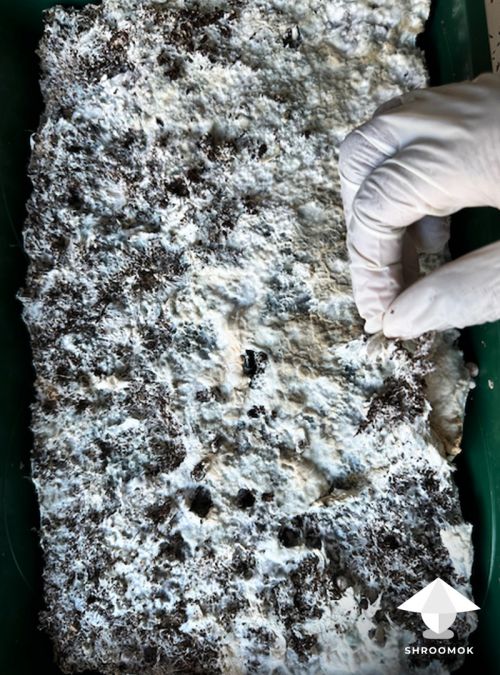](https://shroomok.com/en/wiki/File:Natalensis-cake-2-ready-for-rehydration-fruiting-period-day-17.jpg) Natalensis cake #2 after harvesting. Removing marshmallow mycelium overgrowth before soaking in water. Day 17 of fruiting period
##### Shroomok comments on Natalensis progress 17-19 days
Hello! How are you doing?
Bin #1. It might have stalled, but let's wait till **Day 10-12 after soaking** in water. I assume new mycelium and pins will appear.
**Usually it takes 3-14 days for the new flush of fruiting after 'water bath'.**
**If there are zero signs of growth, then we can:**
1\) add a new casing layer again (just 0.5 cm or 1/5 inch)
2\) or we can try outdoor growing. I'll provide you with the details if you're going to try growing outdoors.
**Bin #2.** Looks okay. The removal of marshmallow areas is also ok.
How's it going after soaking in water? Any signs of new pins?
Have you tried to make spore prints from the harvested mushrooms?
Cheers, Shroomok
##### Day 22-24 of Natalensis fruiting period - updates after soaking cake in water
> Hi Shroomok, Please find some updated pictures. All is going very well. I plan on taking a spore print the next flush.
Natalensis mushroom cake #1 - 2nd flush - 11 days after rehydration - 24 days of fruiting period
[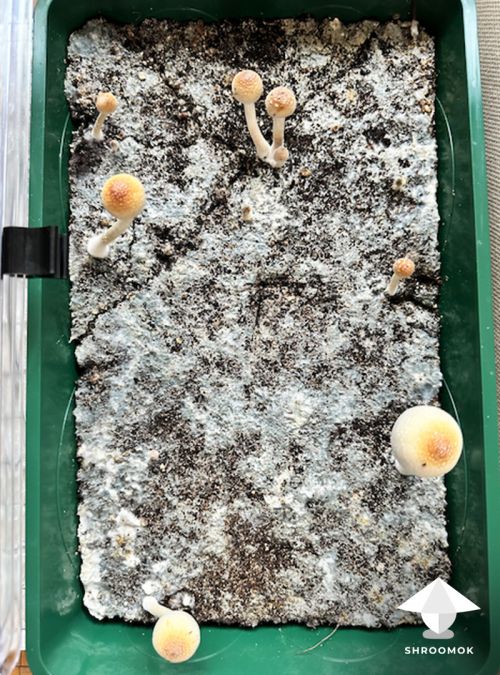](https://shroomok.com/en/wiki/File:Natalensis-mushroom-cake-1-fruiting-period-day-24.jpg) Natalensis cake #2 - 2nd flush of fruiting - 11 days after soaking in water - 24 days of fruiting periodNatalensis mushroom cake #2 - 2nd flush - 5 days after rehydration - 22 days of fruiting period. No pins yet!
[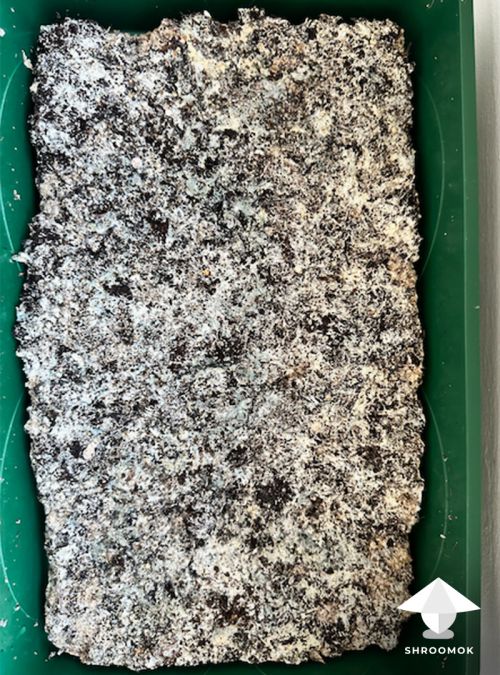](https://shroomok.com/en/wiki/File:Natalensis-mushroom-cake-2-fruiting-period-day-22.jpg) Natalensis mushroom cake #2 - 5 days after soaking in cold water. Day 22 of fruiting period##### Shroomok comments on Natal progress 22-24 days
Hello! I'm glad that the tub didn't stall and produce some shrooms.
What about bin #2?
After harvesting you can make a water bath again.
You can also apply a new casing layer (1/5 inch or 0.5 cm), although it's an optional step.
Or skip the water bath and just mist hard the top layer and create water pools. Cake will absorb the water and it will be enough!
Cheers, Shroomok
> Thank you Shroomok! I think I will try the misting this time.Bin #2 - there are some pins showing already.
##### Day 30-32 of Natalensis fruiting period
> Hi Shroomok,
>
> Just wanted to send you an update. Probably the last? I think the flushes are done. Tub #2 produced four more fruits but not more than that. The biggest flush was the first flush but unfortunately many of the pins were trapped under the marshmallow and never made it to maturity.
>
> Tub #1, I did soak one more time for a third flush and will see if anything happens. It's interesting because this tub didn't produce much at all. Not sure why.
>
> Please find two pictures attached. I did try to make a spore print. Will see how it came out tonight...
[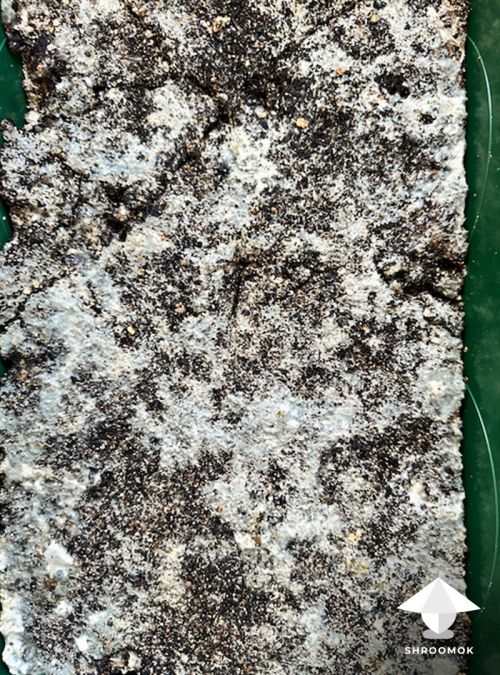](https://shroomok.com/en/wiki/File:Natalensis-cake-1-fruiting-period-day-32.jpg) Natalensis mushroom cake #1 - 32 days of fruiting period[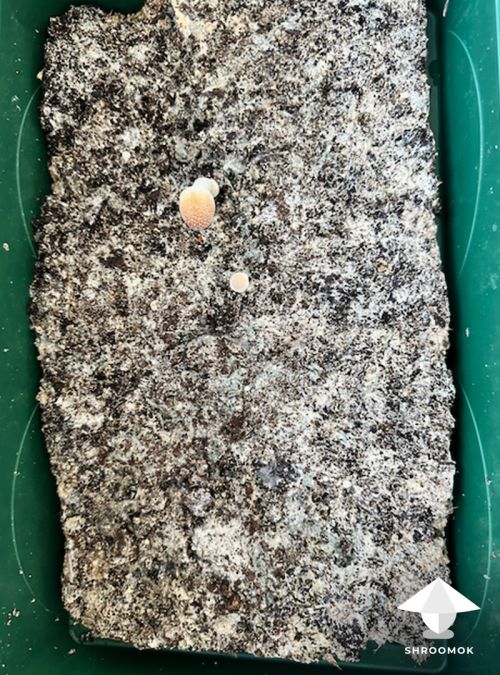](https://shroomok.com/en/wiki/File:Natalensis-cake-2-fruiting-period-day-30.jpg) Natalensis mushroom cake #2 - day 30 of fruiting period> Bonus: Just want to share some beautiful pics of Cubensis Casper's Ghost. It's first flush in a all in one bag. I think I will harvest these tonight. All the best!
>
> [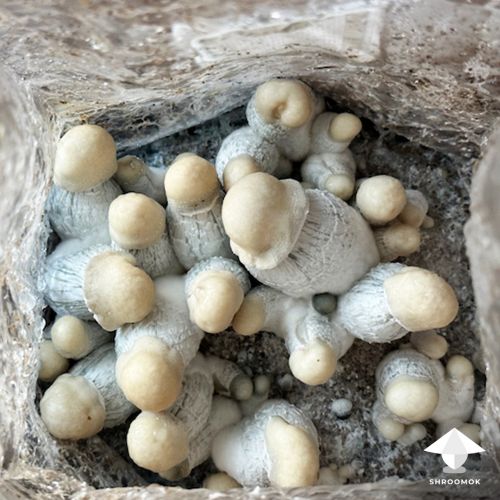](https://shroomok.com/en/wiki/File:Cubensis-Caspers-Ghost-magic-mushrooms-fruiting.jpg) Caspers Ghost mushrooms fruiting in the all in one bag, manure substrate, 1st flush[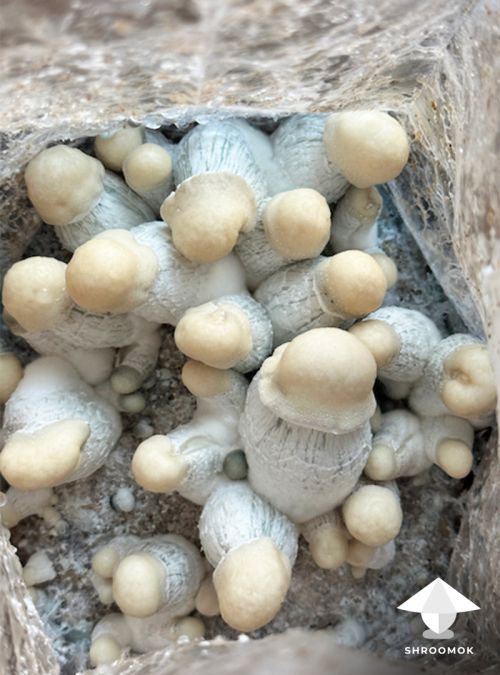](https://shroomok.com/en/wiki/File:Caspers-Ghost-mushroom-fruiting-all-in-one-bag.jpg) Caspers Ghost magic mushroom fruiting
##### Shroomok comments on Natal growing 30-32 days
Hello!
If no more pins/shrooms appear (for the next 10-14 days after soaking in water), then try to bury the cake in the plant pot or garden/backyard/forest/under the fence (anywhere in the shadow of fence or trees/bushes).
Mist it well and let nature do the rest. Maybe you'll get some outdoor shrooms ;)
Your albino Ghosts 👻 are gorgeous, thanks for sharing the beauty 😍
> Casper's Ghost = MakShak x APE cross = (Melmak x Shakti) x APE cross
Try to make a spore swabs/prints to save genetics for the new attempts ;)
From the moment I see in the photo you can wait for 1-2 days more and shrooms continue growing.
If you already harvested them, it's okay!
Mist the bag hard and wait for the new flush.
Regards, Shroomok
> Thanks Shroomok! I decided to let them grow a little more and picked them last night since I'm leaving for a few days. I did mist the bag and hope to see another flush when I get back. There were a few aborts in the end, I think it happened after opening the bag so I'm not sure if that did it? But I still harvested them and dried them after reading your blog. Thank you again!
**Shroomok comments:**
It's totally normal to have some aborts on the cake/block.
In your case they appeared in some clusters, because shrooms compete with each other and the smallest are stalled.
They are potent and safe. So don't worry.
Have a lovely day!
> Awesome, thank you so much! Will send you updates when ready. I think next time I'll try growing this Cubensis strain in a monotub to give them more room or a wider bag.
P.S. Do you mind if I share your case/questions and my answers on shroomok.com?
> I don't mind the use of my case study at all. You're very welcome. I'm happy because I hope it helps someone else who may find themselves in a similar situation. You helped me and now you and I can help others. It's been my pleasure to contribute! It's been so rewarding.
Thank you! Peace ❤️
## Air sampling in mycology check the room for mold contamination with diy agar test
[Air sampling in mycology check the room for mold contamination with diy agar test](https://shroomok.com/en/wiki/Air_sampling_in_mycology_check_the_room_for_mold_contamination_with_diy_agar_test)
[](https://shroomok.com/en/wiki/File:DIY_mold_test_on_agar_to_check_air_quility_in_your_home_for_contaminants.jpg) DIY air quality test on agar### DIY air testing to check your home for mold contaminants
#### Air as a vector of contamination
Many factors influence the mushroom cultivation process and harvest outcome. Contamination is one of them.
Let’s talk about how air quality (i.e. mold concentration) in your workspace affects mushroom growing processes and mycological procedures. Because **the AIR** is one of the main vectors of contamination in mycology.
> 📖 **5 main vectors** of contamination in mycology are: 1) the cultivator itself; 2) the AIR; 3) the substrate to be inoculated; 4) the mycelium that was being transferred; 5) the inoculating tools, equipment, containers, facilities etc.
Probably, you’ve seen many times such cases when growers accurately follow sterility rules but fail, while others totally neglect this routine and still succeed.
Of course, cultivation skills matter. However even experienced growers face contamination. They observe some patterns and periods, when contaminations appear more or less frequently.
Hopefully, it won’t surprise you, but concentration and quality of contaminants may vary from corner to corner, among the rooms, certainly between the apartments, from country to country with different climates. That’s why you will never have the same environmental conditions even with your neighbour. And, of course, cultivators from Australia, Canada or Costa Rica struggle with such contamination issues which are specific to the region they live in.
Vectors of contamination and basic principles of contamination management are fundamental for everybody. But ‘neglect practices’ from one grower won’t work for another.
Imagine 2 people who grow mushrooms in monotubs. Usually, most mold spores concentrated closer to the floor and spread with drafts. It’s better to place tubs on some podium (rack, table, shelf, etc), but don’t put them on a floor, to reduce risks of possible contamination from the air. One grower places tubs even on the floor and bragging about zero contamination. Another guy follows all recommendations and cries because of green/blue mold contamination.
> ❗️90% of all contaminants in the air are closer to the floor and spread by drafts. Don’t keep your fruiting chambers on the floor!
#### Factors that influence on the air quality
The main factors of such differences:
- **Climate zone.** Bacterial and mold variety, concentration, aggressiveness in moderate and (sub)tropical climates may change your “best practices” and cultivation plans.
- **Season of the year.** Hot/cold and dry/rainy seasons affect temperature and humidity in nature, hence the concentration of mold.
- **Cleaning routine.** Ventilation and air conditioning; how often you change air filters, wash your carpets and curtains, wipe the dust, clean your bathroom and kitchen; waste management (throw away food waste every day!) – everything counts.
- **Pets, indoor plants, or insects** play a role in the pollution level of your space becoming another vector of contamination. Pet hair spreads mold spores. Insects like fungal gnats can appear in plant pots, move to your tubs with mushrooms and destroy your harvest. Green mold that is beneficial for plants becomes a green monster for your shrooms.
- It’s funny, but depending on the climate/season, there could be a case when outdoor mushroom cultivation is more favorable than indoor.
> ❗️Leaking, poor ventilation, irregular cleaning provoke mold growth that affects not only mushroom growing, but human health as well!
#### Agar recipes and necessary equipment for DIY mold test
Let’s make a simple agar test to check the “sterility” level of your environment and the palette of contaminants in your room.
Prepare agar media. There are more than 100 different agar recipes and their variations. Use any simple recipe with ingredients you have at home. Here are a few for your choice.
##### Recipe 1. Malt Extract Agar recipe
- Water - 500 mL
- Agar - 10 g
- Malt/light malt extract - 10 g
- Optional - Food coloring - few drops
###### **Ingredients on Amazon for recipe 1**
- [Agar](https://amzn.to/3rFFLhE) $6.95
- [Light malt extract, 1lb](https://amzn.to/45imiCn) $14.00
##### Recipe 2. Potato Dextrose Agar recipe
- Water - 500 mL
- Agar - 10 g
- Potato starch - 10 g
- Dextrose (Glucose) powder - 7 g
- Optional - Food coloring - few drops
###### **Ingredients on Amazon for recipe 2**
- [All in one - Potato Dextrose Agar Powder](https://amzn.to/3qgLXfw) $33.99
##### **Equipment**
- Weight Gram scales
- Saucepan
- Tablespoon
- Stove
- Canning jar with lid or Lab Bottle
- Pressure cooker or Autoclave or Instant Pot Pot with Lid
- [Reusable autoclavable **Plastic** Petri dishes, 6/12 Pack](https://amzn.to/3Oe2R6L) $11.19
- [Temperature Gun](https://amzn.to/470sYGF) $18.74
- [Parafilm](https://amzn.to/3O805zM) $39.99 or **PE food film** or **Clear Packing Tape**
##### Ready to use Mold Test Kit
You can also buy ready to use mold tests on Amazon and send them to the lab for accurate identification (it costs 25-40$ additionally):
- [Mold Test Kit for Home - 10 Tests](https://amzn.to/3Qagsyp) $45.99
#### Agar preparation for air sampling test
1. Measure required water volume. Distilled water is typically recommended for preparing nutrient mediums. However, reverse osmosis (RO) cleaned, filtered, and chlorine-free drinking water can also be effectively used.[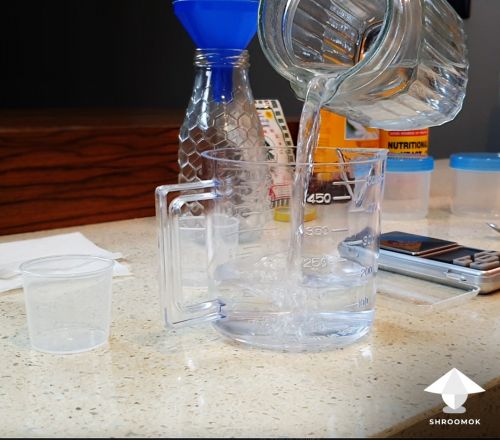](https://shroomok.com/en/wiki/File:Agar-cooking-process-for-mycology.jpg) Measure the required volume of water (500 ml)> You can prepare more or less, just follow the ratio of water and other ingredients
2. Heat required water volume in a saucepan on the stove. [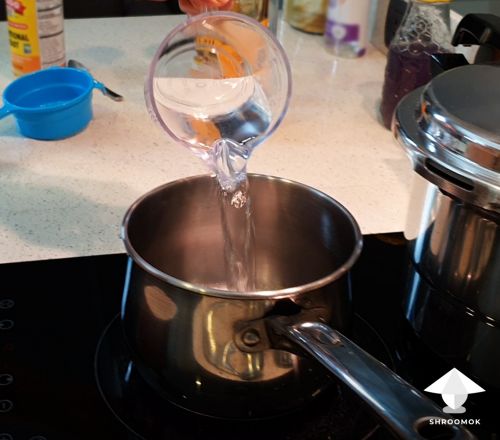](https://shroomok.com/en/wiki/File:Agar-preparation-for-mycology.jpg) Heat required water volume in a saucepan
3. Weight dry ingredients according to the recipe (agar powder and nutrients like LME/Dextrose/Potato starch etc.) [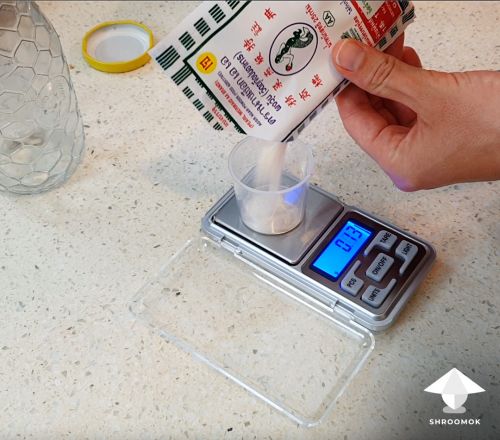](https://shroomok.com/en/wiki/File:Agar-recipe-for-mycology.jpg) Weight dry ingredients
4. Dissolve all ingredients in **hot water.** Stir well. [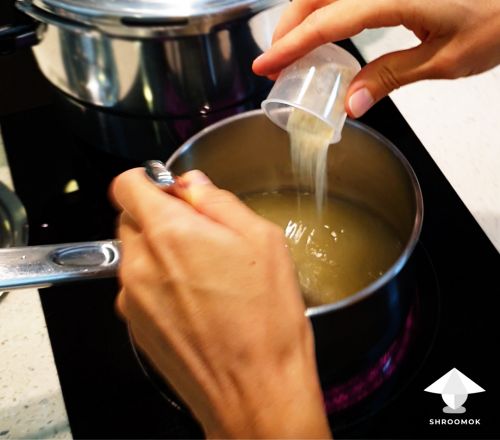](https://shroomok.com/en/wiki/File:Agar-cooking-for-ycology.jpg) Agar cooking. Dissolve dry ingredients in hot water
5. Bring agar and added ingredients to boil. Turn off the stove. Ready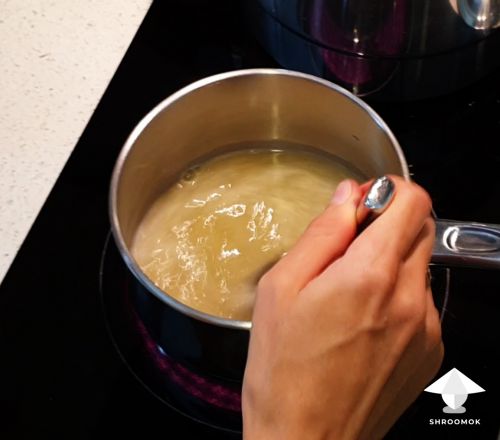](https://shroomok.com/en/wiki/File:How-to-prepare-agar-for-mushroom-growing-mycology.jpg) Bring agar with added ingredients to boil
6. Fill any heat resistant jar with lid, or canning jar, or Lab Bottle with liquid agar mix. [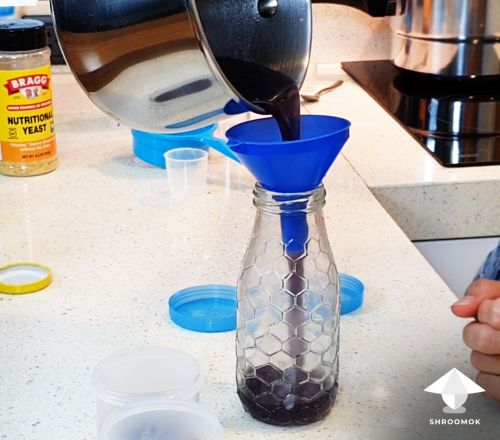](https://shroomok.com/en/wiki/File:Agar-in-bottle-for-sterilization.jpg) Fill the bottle with liquid agar
7. Sterilize agar in pressure cooker at 15 psi for 30 minutes; in instant pot or saucepan with lid for 45-60 minutes. [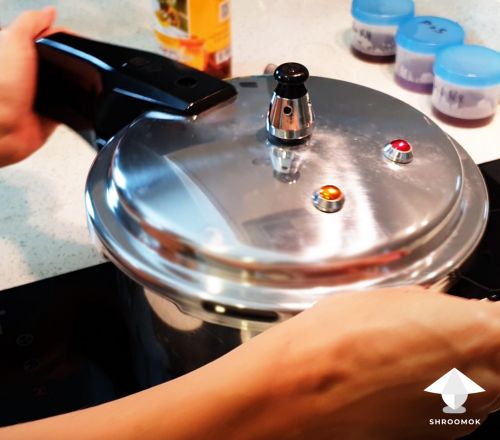](https://shroomok.com/en/wiki/File:Agar-sterilization-for-mycology.jpg) Agar sterilization
8. After sterilization let it cool down to 140°F or +60°C.
9. Pour agar in Petri dishes. Close the lids. Let agar harden and cool down to room temperature.
> 💡 At 105°F or 40°C some clumps appear in agar. At 86°F or 30°C the agar solidifies. If this happen you can put the jar with agar in hot water or microwave to make it liquid again
#### Run air sampling test for airborne contaminants
1. For testing your environment take a ready to use agar plate. [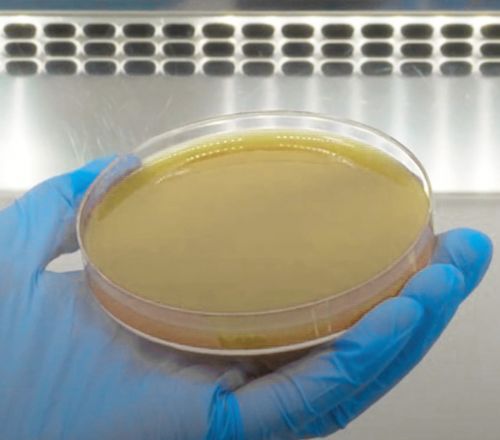](https://shroomok.com/en/wiki/File:Agar-for-air-sample-test.jpg) Agar plate for air sampling
2. Put agar plate on your work space (for example, your work table or near the tub with mushroom cake/block). Open Petri dish and leave it for **10-60 mins.** The longer agar exposed to open air the more mold spores settle. You can play with different time and compare results. Start with 10 mins if you want to check your working area for mycology, 20 mins - to check grow room/tent for mushroom cultivation. [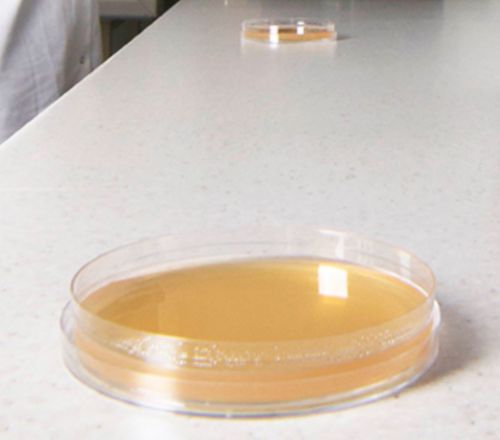](https://shroomok.com/en/wiki/File:Check_the_room_for_mold_contamination_with_diy_agar_test.jpg) Agar plate on the working table for mycology work
3. Close the agar plate (use parafilm, food film, tape for fixation the lid) and leave it for incubation/colonization period **at room temperature (around 72°F or 22°C) in a dark place for 48-96 hours.**
4. Check the agar sample. Usually, the first signs of fast growing molds appear in 48 hours.
5. Check again in 3-4-5 days, you can see bright colonies development and maybe new species of molds are present in your work space.[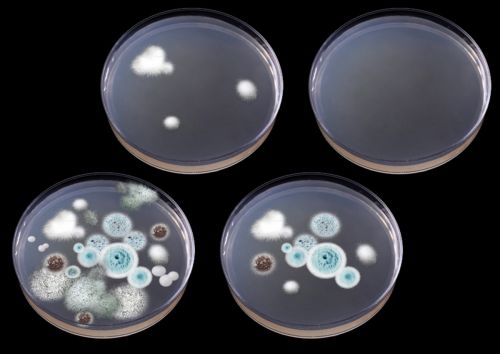](https://shroomok.com/en/wiki/File:DIY-mold-test-air-sampling.jpg) Mold development and changes day by day
You won't confuse whether it is a mycelium or contamination, because any growth on your agar is 100% contamination.
> 🔬To confirm the identity of any contaminant, compare it sporulating structures with the acсompanying microscopic illustrations and/or micrographs.
Some species you can identify easily (such as blue-green mold *Penicillium*) or ask Shroomok Community on Discord and Reddit for approximate identification. Of course, it’s impossible to identify accurately each sample by photo. However, such capture will give insights to determine the main monsters you will fight with. Know your enemies!
#### Ideas and experiments on how to use DIY Mold Test
[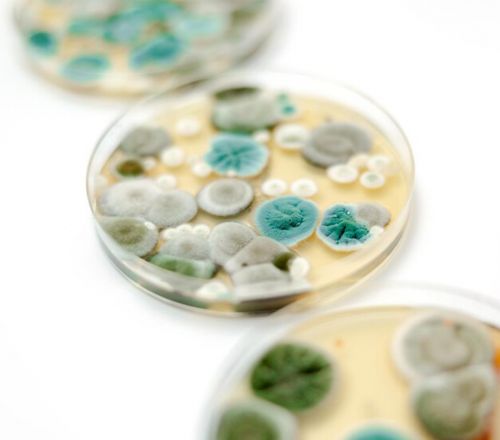](https://shroomok.com/en/wiki/File:Mold-test-on-agar-air-sampling.jpg) Mold art- Take **air samples anywhere you want** to check and compare your rooms or specific areas: grow tent, grow room, working space for mycology work, kitchen, bathroom, bedroom, basement, HVAC system.
- You can compare the difference between **air samples taken at different heights:** on the floor, on the table and closer to the ceiling.
- If you use a UVC light lamp for sterilization you can compare the CFUs on agar **with** **UVC lamp vs without UVC lamp**, so that you’ll see the difference and efficiency of using UVC light for mycology.> 📖 **CFU (Colony Forming Units)** is the number of alive and active microorganisms in one serving of supplement (in our case per agar plate). These are typically measured in CFUs per gram or per milliliter. A colony refers to the individual colonies of mold, bacteria, yeast growing together. The more colonies the higher contamination concentration.
- Count the CFUs **before and after cleaning** the grow room/tent to know how effective the cleaning routine.
- This approach is suitable for testing **SAB (Still Air Box), Fan Filter Box** and **Laminar Flow Hood efficiency.**
- You can open the agar plate and **imitate any mycological procedure.** Then close the plate and check it after 2-5 days. In this way you’ll see **how sterile your routine is.**
- **Compare indoor and outdoor samples** to get a read on whether there's excess mold in your home and if it's different than what's outside.
- Compare your agar test with contaminations during cultivation process. This can help you to improve cleaning process, to know the vector of contamination. For instance, if you have totally different mold sample on mushroom block/cake, then more likely the vector of contamination is a substrate, not from airborne spores.
- Create beautiful arts with molds, bacteria, yeast. They look beautiful :)
#### Conclusions
Each workplace for mycology and growing room for mushrooms is unique. It differs in mold varieties and concentration level. Thus directly affects your success in mushroom cultivation.
[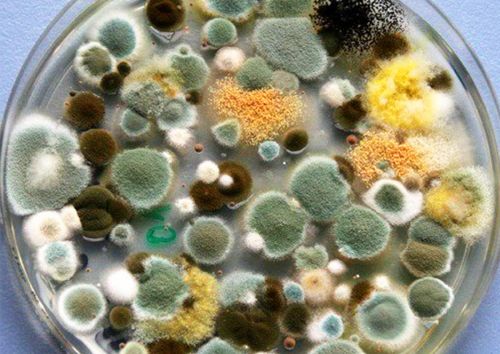](https://shroomok.com/en/wiki/File:Mold-test-on-agar.jpg) Different mold species on agarAir is one of the vectors of contamination. Remember that you can bring contamination with tools; substrate; your breath, hands and clothes; genetic materials; insects etc.
We don't live in a sterile environment, billions of spores are in the air. Simple mold test can show you the most popular varieties of mold contaminants. It’s an indicator that particular species are present in the air of your room.
There are over **100 000 different types of mold.** Not all molds are a threat, however. Some species are safe for people and animals. Some molds only become toxic when they reach certain concentration. Toxic species can be harmful to individuals with severely weakened immune systems, but it needs some level to cause such problems as allergic reactions, coughing, sneezing, sore throats, asthma etc.
Don't be paranoid! We are exposed to mold spores every day and everywhere. Normally, we are capable of fighting off any inhaled or ingested mold spores. When you walk in a forest/park you breathe with billions of different mold spores. You eat some spores with food every day and gastric juice does its job.
A small patch of green mold the size of a coin on your cake or agar plate is certainly not a significant problem.
Our main concern with molds (for mushroom cultivation) is their fast growth and ability to consume nutrients faster, they are competitors with our mushrooms. They reduce the chances of a successful mushroom harvest and increase the likelihood of contamination in future attempts.
**It is important to control mold contamination in our living spaces by:**
- regularly cleaning, maintaining ventilation, cleaning air conditioning and ventilation filters;
- monitoring for signs of moisture and leaks in the bathroom and kitchen;
- monitoring for signs of molds on the furniture and fridge;
- throwing away trash and spoiled food every day;
- washing fruits and vegetables thoroughly.
> ❗️All these simple actions are preventing measures to combat molds and protect both your health and your shrooms.
Enjoy your home mycology!
Join Shroomok Community on [Discord](https://discord.gg/ngKhQDmymD) and [Reddit](https://www.reddit.com/r/Shroomok) for questions and sharing experience.
If you find this guide helpful, please support me with subscription or cup of coffee on ☕️ [buymeacoffee](https://www.buymeacoffee.com/shroomok)
Peace, Shroomok ❤️
## Bacterial brown blotch disease on mushrooms
[Bacterial brown blotch disease on mushrooms](https://shroomok.com/en/wiki/Bacterial_brown_blotch_disease_on_mushrooms)
[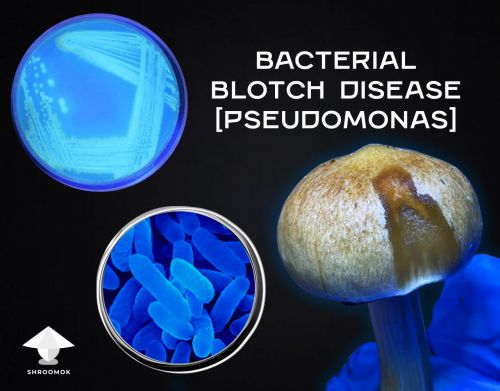](https://shroomok.com/en/wiki/File:Bacterial-blotch-disease-mushroom-cultivation.jpg) Bacterial blotch disease caused by *Pseudomonas* pathogen. Symptoms, prevention, and treatment guide### Brown Spot on Mushroom Caps: Symptoms, Prevention, and Treatment Guide
#### What is Bacterial Blotch disease
Bacterial Blotch, also known as Brown Spot or Brown Blotch, stands as the most prevalent bacterial disease affecting both commercially cultivated and home-grown mushrooms. This disease has far-reaching economic implications for mushroom farms worldwide, primarily due to its impact on quality of edible mushrooms, though it poses no health risks to humans.
This type of contamination has less dramatic impact to cultivators who grow magic mushrooms in bags, fruiting chambers or grow tents, but this annoying disease has happened to all growers from time to time.
Bacterial Blotch can be caused by various pathogens within the Pseudomonas genus, characterized as aerobic, Gram-negative soil bacteria. These motile, non-spore forming pathogens include:
- **Brown Spot, Bacterial Blotch,** and **Brown Blotch:** Caused by *Pseudomonas tolaasii, which is the most common cause of this type of contamination.*
- **Ginger Blotch:** Attributed to the *P. fluorescens* species group, collectively referred to as Pseudomonas 'gingeri'.
- **Brown Speckling** or **Pitting on Mushroom Caps:** Resulting from *Pseudomonas costantinii.*
- **Mild Yellow Blotch Disease** on **Oyster Mushroom Species:** Linked to *Pseudomonas reactans* and *Pseudomonas agarici.*
##### Scientific classification
- Domain: Bacteria
- Phylum: Pseudomonadota
- Class: Pseudomonadota (synonym Proteobacteria)
- Order: Pseudomonadales
- Family: Pseudomonadaceae
- Genus: Pseudomonas
- Species: *P. tolaasii, P. agarici, P. costantinii etc.*
> 🔮 Pseudomonas bacterium, and *Pseudomonas tolaasii* particularly, is a fluorescent bacterium (*P. fluorescens* group), which is known for its ability to produce a fluorescent pigment. The production of this pigment is one of the identifying characteristics of many Pseudomonas species (but not for all!) used in the laboratory for differentiating it from other bacteria. This fluorescence can be observed under UV light at 365 nm, which causes the bacterial colonies to emit a bluish-green or greenish-yellow glow
#### Symptoms of Bacterial Blotch contamination on mushrooms
Under optimal conditions, the population of *P. tolaasii* experiences rapid growth, accompanied by increased production of the toxin known as tolaasin.
Tolaasin disrupts the plasma membranes of mushroom cells, leading to their eventual collapse. This impact isn't confined to the mushroom's surface; when secreted, tolaasin can infiltrate deeper into the hypha tissues within the mushroom. Furthermore, tolaasin acts as an effective biosurfactant, reducing the surface tension of water. Lower surface tension allows water to spread over a larger area, facilitating the colonization of fresh areas on the mushroom cap by *P. tolaasii*.
**The contamination process unfolds as follows:**
*P. tolaasii* is deposited on the mushroom's surface -> senses the mushroom's presence -> moves towards it -> then releases tolaasin to compromise the plasma membrane of mushroom cells -> and access the nutrients within.
Initially, the affected areas exhibit a pale yellow hue, which later deepens to golden yellow or even a deep brown, eventually forming sunken lesions.
[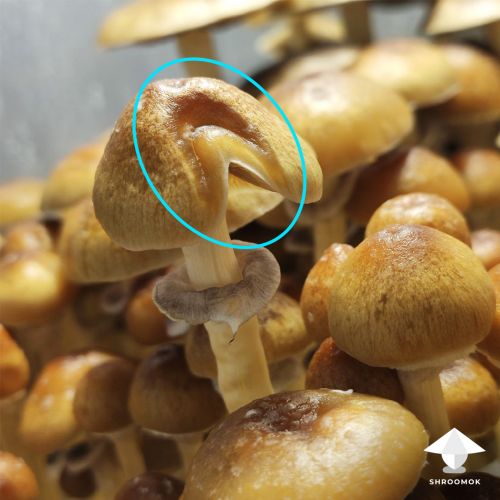](https://shroomok.com/en/wiki/File:Bacterial-brown-spot-sunken-lesions.jpg) Mushroom cap with bacterial blotch (*P. tolaasii)* contamination has golden yellow color and sunken lesions
Typically these brown spots are wet and slightly slimy or can have brown dry speckles and pits on mushroom caps
[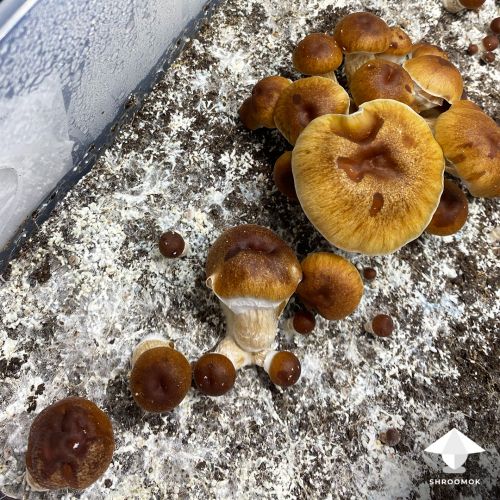](https://shroomok.com/en/wiki/File:Bacterial-brown-spot-on-mushrooms.jpg) Wet slimy brown spots on mushroom cap as a symptom of Bacterial Blotch contamination
As the blotch disease progresses, these spots transform into dark brown lesions.
[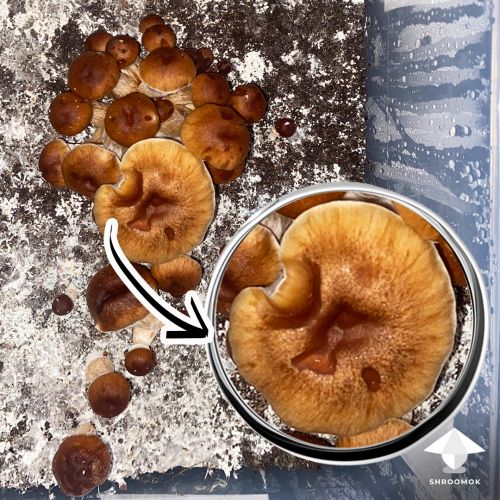](https://shroomok.com/en/wiki/File:Wet-brown-spot-on-mushroom-cap-bacterial-blotch-contamination.jpg) Brown spot on mushroom caps
Yellow-brown or black blotches become evident at or near the edges of mushroom caps, at the points where two mushroom caps make contact, or within a cluster where mushrooms touch each other.
[](https://shroomok.com/en/wiki/File:Bacterial-black-brown-blotch-on-mushroom-cluster.jpg) Late stage of bacterial blotch disease. Black blotches on mushroom caps within one cluster
In the advanced stages of blotch development, the affected areas turn black, indicating the bacterial decomposition of mushroom tissue. In this case (see photo below) most of pins were affected and they stalled. There are mild brown and black blotch on mature shrooms.
[](https://shroomok.com/img_orig/084d14/4032_mushroom-aborts-with-black-caps.jpg) [Aborts or Bacterial Blotch contamination](https://shroomok.com/en/wiki/File:mushroom-aborts-with-black-caps-26e208)#### Main Causes of Bacterial Brown Spot in Mushroom Cultivation
The primary sources of the blotch pathogen responsible for Bacterial Brown Spot in mushroom cultivation include bulk substrate, casing substrate, airborne dust, clothing, tools, equipment, insects.
These bacteria is likely present in most bulk and casing substrates, even after pasteurization. Healthy mushrooms may carry a small population of this bacteria on their caps, but this alone does not necessarily lead to bacterial blotch disease. The key factor seems to be the size of the bacterial population on the cap, rather than within the casing.
All bacteria need water to thrive, reproduce, and colonize. Water is a crucial factor for the growth and spreading of most bacteria, including *Pseudomonas tolaasii species* in mushroom cultivation. Bacterial blotch disease typically occurs when **water droplets remain on mushroom caps and stems for an extended period, usually between 4 to 8 hours or longer** after the application of water. Excessive misting and water splashes can cause the bacterial population to increase and spread.
[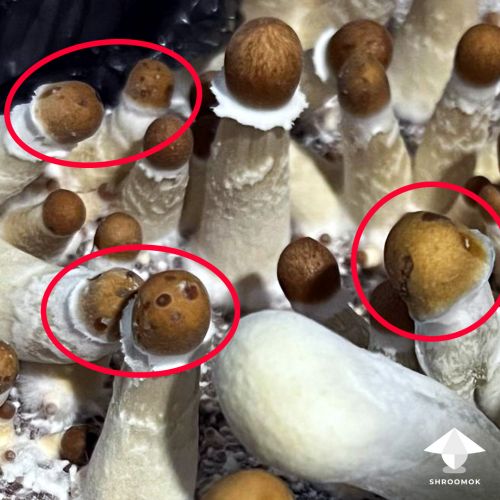](https://shroomok.com/en/wiki/File:Bacterial-blotch-pseudomonas-tolaasii-contamination-on-mushroom-cap.jpg) Mild brown blotch contamination on mushroomsThis situation often arises due to the following reasons:
1. **Direct and Excessive Misting:** Misting on mushroom fruit bodies directly and too much. Using a spray bottle with large water droplets. Using fogger for too long and lack of fresh air exchange.
2. **Water Pools:** The top layer of the substrate retains moisture for an extended period after misting or rehydration (soaking mushroom cake in water). By the way, dry top layer absorbs water poorly and more often such cake has water pools on top layer.
3. **Fluctuations in Temperature and Humidity:** Changes in temperature or relative humidity can alter evaporation rates and condensation, creating favorable conditions for bacterial pathogens.
4. **Condensation on fruits:** Condensation can form on mushroom caps and stems, either due to spraying or temperature fluctuations.
5. Additionally, **condensation water drops falling from the lid** of the fruiting chamber directly onto the mushrooms can contribute to the development of bacterial blotch disease.
#### How to Prevent Bacterial Blotch Contamination
Preventing Bacterial Blotch contamination is essential for successful mushroom cultivation. Here are some effective measures to consider:
1. **Misting Technique:** Instead of spraying water directly onto the mushrooms, mist the walls of your tub or fruiting chamber. This approach helps maintain optimal humidity without saturating the mushroom caps.
2. **Use of Ultra Fine Mist** or **Humidifier with Humidity Controller:** Use an [Ultra Fine Mist Spray Bottle](https://www.amazon.com/gp/product/B0948WBX9L?&linkCode=ll1&tag=shroomok-20&linkId=b2568ccef0151facd2ee37e2e2c156c1&language=en_US&ref_=as_li_ss_tl) ($8.99) for manual misting. Or invest in simple equipment like a [Fogger/Humidifier](https://amzn.to/3ZMEceT) ($59.99) to ensure that water droplets are finely dispersed and accurate [Humidity Controller](https://amzn.to/48Elzh4) ($30.09) to maintain stable humidity level automatically. These help to reduce the risk of excess moisture on mushroom surfaces.
3. **Manage Water Pools:** After misting or [rehydrating the mushroom cake](https://shroomok.com/en/wiki/Rehydration_of_psilocybe_cakes "Rehydration of psilocybe cakes") to initiate the next flush, ensure that any pooled water disappears within 12-16 hours. If it persists, don't mist the fruiting chamber and lower the relative humidity to 80-85% until the top layer of the substrate is dry.
4. **Casing Layer:** Soft, airy casing layer on the mushroom cake is beneficial. This layer enhances water absorption and creates an ideal microclimate for mushroom growth.
5. **Address Condensation Issues:** If you have temperature fluctuations in your growing environment (typically during the cold season) condensation on the lid of the fruiting chamber can lead to water droplets falling onto the mushrooms. To tackle this problem, I'd like to share a useful technique from my gardening (greenhouse) experience, that also effective for mushroom fruiting chamber and mushroom grow tent. Let's call it the **"WD-40 Tek":**
- Take [WD-40](https://amzn.to/48DJ6Pr) ($14.99) and spray it 5 times into 1 quart (1 liter) of water.
- Shake well and fill a spray bottle with this solution.
- Wipe the lid of your fruiting chamber (e.g., GrowBox, MonoTub, shoebox) to ensure it's completely dry.
- Spray the WD-40 solution on the lid of your fruiting chamber.
- Wipe the lid with a cloth or paper towel, moving from side to side.
This method helps prevent condensation water drops from forming on the lid and falling onto your mushrooms. Excess water will flow down the chamber walls, reducing the risk of bacterial blotch contamination on the caps.
> WD-40 doesn't come into contact with the mushrooms and is not harmful to them
Compare results BEFORE/AFTER on the photos below.
Before using WD-40 method. The condensation droplets appear large and are prone to falling off the surface easily. This can lead to unwanted moisture on mushroom caps, potentially increasing the risk of bacterial blotch contamination.
[](https://shroomok.com/en/wiki/File:Condensation-on-the-lid-before-WD-40.jpg) BEFORE using WD-40 tek. Excessive condensation on the lid of the mushroom fruiting chamber
After using the WD-40 solution. Remarkable change in condensation patterns. Water droplets are now notably smaller and remain adhered to the lid's surface. Excess water is less likely to fall onto the mushrooms below, decreasing the risk of bacterial blotch disease on their caps.
[](https://shroomok.com/en/wiki/File:Condensation-on-the-lid-after-WD-40.jpg) Condensation on the lid AFTER using WD-40 method. Small water drops are sticked to the lid and don't fall off even if you shake it#### Bacterial Blotch Treatment
In 1972, Nairand Fahy put forward a biological control approach for managing the *Pseudomonas tolaasii* species. He illustrated that the introduction of *Pseudomonas fluorescens*, a natural antagonist to P*. tolaasii,* effectively diminished the incidence of blotch without impacting the yield of Agaricus brunescens. Nonetheless, some experts suggesting that *P. fluorescens* might be considered a variant of *P. tolaasii.* As a result, are cautious in approving its use.
Brown mushrooms exhibit a natural resistance to brown blotch disease in contrast to their white counterparts. However, the specific gene responsible for this resistance remains unidentified at this time.
> Melanins represent a defence system in all organisms as well as a resistance mechanism to stress. In fungi, melanins also appear to be important in conferring resistance to microbial attacks. They can also have an antibiotic effect against antagonist organisms. The main role of fungal melanins is probably to provide protection against hydrolytic enzymes, such as glucanases and chitinases, thus preventing cell wall lysis. [Biochemical and physiological aspects of brown blotch disease of *Agaricus bisporus*](https://academic.oup.com/femsre/article/23/5/591/533240)
Today, the most common treatments for Bacterial Blotch include:
1. **Isolation (Pick and Toss):** Remove the most affected mushroom bodies to prevent the spread of bacteria to nearby mushrooms.
2. **Chlorinated Water (150-250 ppm concentrate):** This weak solution is not harmful to mushrooms but is effective against Bacterial Blotch pathogens and also [Mycogone Wet Bubble disease](https://shroomok.com/en/wiki/Mycogone_contamination_aka_wet_bubble_disease "Mycogone contamination aka wet bubble disease")
##### **How to prepare 150-250 ppm Chlorinated Water?**
Dissolve the bleach (Sodium Hypochlorite - NaOCl) in 1 liter of water according to these ratios:
- NaOCl **5.25%** ([Amazon](https://amzn.to/3RPvnic)) - add **3.0-5.0 ml** per 1L of water
- NaOCl **6.0%** ([Amazon](https://amzn.to/45qU9IG)) - add **2.6-4.4 ml** per 1L of water
- NaOCl **7.5%** ([Amazon](https://amzn.to/3rGVs8y)) - add **2.1-3.5 ml** per 1L of water
- NaOCl **12.5%** ([Amazon](https://amzn.to/3ZTQSAz)) - add **1.3-2.1 ml** per 1L of water
- Fill a spray bottle with the solution.
- Open the lid of the fruiting chamber and try to dry the water drops on the mushrooms, at least the biggest and the most visible. You can gently use a fan or leave the tub open for 30-40 minutes to allow the water droplets to evaporate.
> 💡 **Pro Tip:** Chlorinated water is an effective disinfectant, but it works best when the mushrooms are dry. If the mushrooms are wet, the Pseudomonas bacteria can reproduce faster than the disinfectant can kill them. Therefore, sodium hypochlorite (NaOCl) solution is sometimes ineffective on wet mushrooms.
- Lightly mist the mushrooms once a day for 3 days; or make 3 treatments with a 12-hour break between each misting.
> ❗️Important: Use the bleach solution when you see signs of Bacterial Blotch contamination. Don't use bleach solution as a prevention measure. It is for treatment purposes only!
- Keep relative humidity 80-85% during treatment session and for the few days.
- Monitor the progress. In some cases, a single treatment may yield positive results.
If the blotches are treated at an early stage, right after the first signs of brown spots appear, they may disappear before the mushrooms mature. After treatment or in very dry conditions following the appearance of blotch, the caps of the mushrooms may crack radially as they expand. Such shrooms with cracks are totally normal for harvesting!
[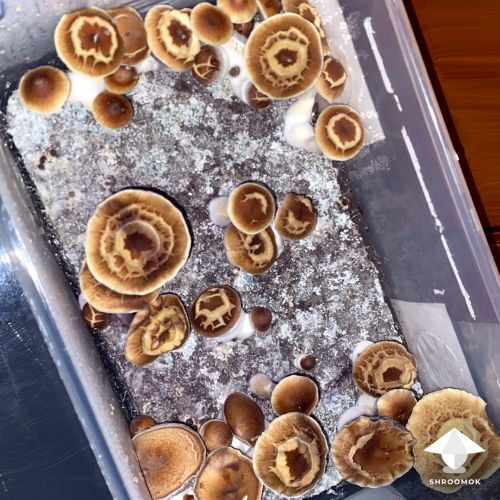](https://shroomok.com/en/wiki/File:Mushroom-caps-crack-radially-after-bacterial-blotch.jpg) Mushroom caps crack radially after treatment or in dry conditions following the appearance of blotch#### Is it safe to consume mushrooms with Bacterial Brown Spot
There are over 150-200 validly described species within the Pseudomonas genus. The one known to cause infections in humans is called *Pseudomonas aeruginosa*. However, only a few of Pseudomonas species affect mushrooms.
The Pseudomonas species that cause bacterial blotch on mushrooms, including *P. tolaasii, P. costantinii, P. reactans, P. agarici, and P. 'gingeri',* are not toxic and do not pose any threat to human health.
Once you dry mushrooms well, they'll be fine for sure. Bacterial cells can't survive without water. Hence, mushrooms affected by bacterial blotch are safe to take after being dehydrated at a 120°F (50°C).
You can also trim away the affected parts before drying your shrooms.
If your mushrooms are not looking their best or excessively slimy, don't dry and take them. They might have an unpleasant odor and turn into a mushy mess in dehydrator. It's perfectly fine to bid farewell and send them off to the trash bin.
#### Afterwords
Check out more photo examples of different contaminations and cultivation issues in [📸 Growing Problems photo gallery](https://shroomok.com/gallery/growing-problems)
Join Shroomok Community on [Discord](https://discord.gg/ngKhQDmymD) and [Reddit](https://www.reddit.com/r/Shroomok) for questions and sharing experience.
You can also leave your **comments on this page below ⬇️**
If you find this guide helpful, please support me with cup of coffee on [**☕️ buymeacoffee**](https://www.buymeacoffee.com/shroomok)
Have a happy growing and healthy shrooms!
Peace, Shroomok ❤️
## Mushrooms side and bottom pinning
[Mushrooms side and bottom pinning](https://shroomok.com/en/wiki/Mushrooms-side-and-bottom-pinning)
[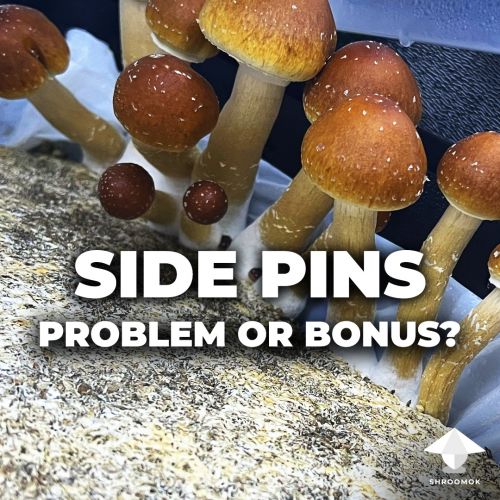](https://shroomok.com/en/wiki/File:Bottom-and-side-pins-problem-or-bonus.jpg) Bottom pins and side pinning#### Mushroom growth only on the sides and bottom of the cake
> Question: Are my side pins caused by light?
[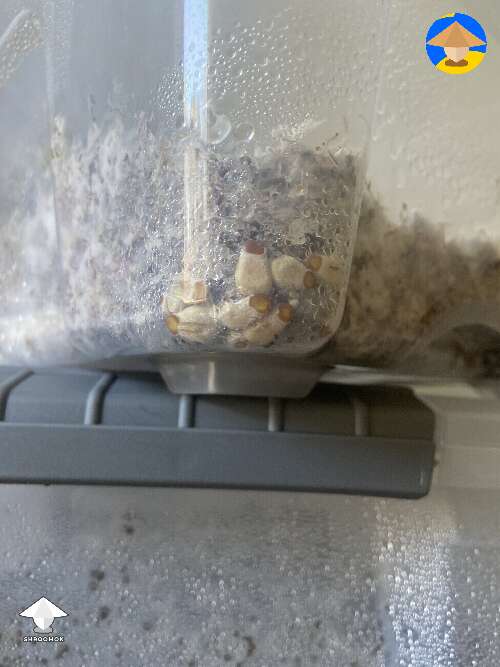](https://shroomok.com/img_orig/0ca766/4032_what-are-these-guys-doing-side-pinning-by-johnson617.jpg) [What are these guys doing here? Side pins](https://shroomok.com/en/wiki/File:what-are-these-guys-doing-side-pinning-by-johnson617-454e5b)For a long time, mushroom cultivators believed that side pinning occurred by light. Light influence on the pinning process of Basidiomycetes Fungi, but it is a secondary trigger, that mostly influence on active phase of fruit body development. Actually side pins are mostly from microclimate, not light. Basically when your substrate colonizes and pulling away as it dehydrates, the tiny gap between the cake and tub creates the perfect microclimate for side pins and even for bottom pins, where enough moisture.
> Question: Why my mushrooms are only growing around the edges of the cake or underneath and not growing evenly across the entire cake?
[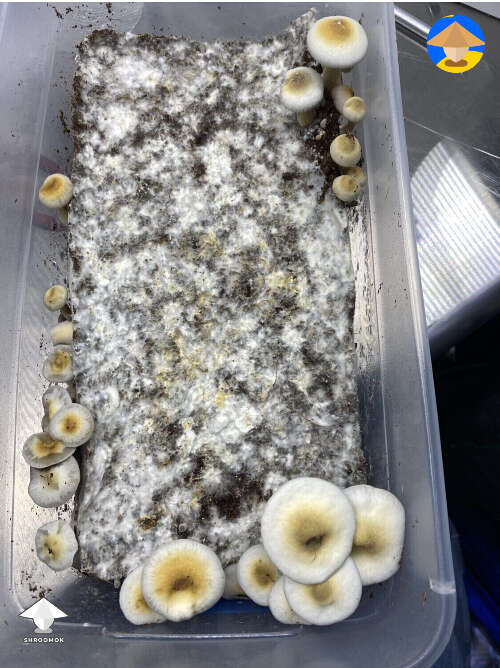](https://shroomok.com/img_orig/faf204/4032_why-are-my-mushrooms-fruiting-on-the-sides-and-underneath-can-you-eat-this-does-it-have-any-potency-by-mysterytour2000.jpg) [Why are my mushrooms fruiting only on the sides and underneath and not growing on the top?](https://shroomok.com/en/wiki/File:why-are-my-mushrooms-fruiting-on-the-sides-and-underneath-can-you-eat-this-does-it-have-any-potency-by-mysterytour2000-23fea3)[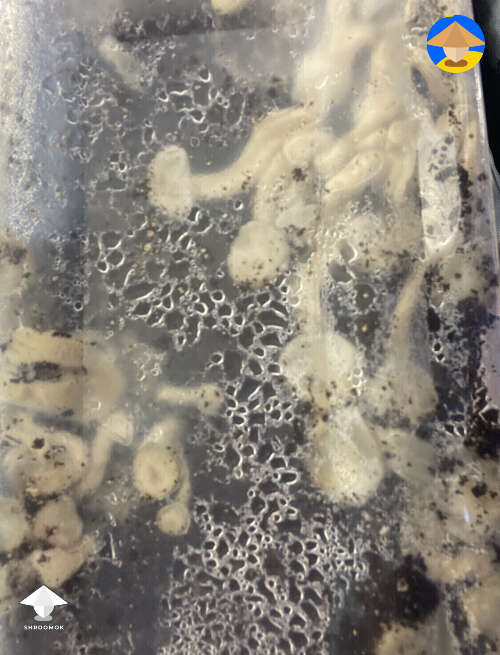](https://shroomok.com/img_orig/1215b2/4032_why-are-my-mushrooms-fruiting-on-the-sides-and-underneath-can-you-eat-this-does-it-have-any-potency-by-mysterytour2000-3.jpg) [Bottom pins fruiting](https://shroomok.com/en/wiki/File:why-are-my-mushrooms-fruiting-on-the-sides-and-underneath-can-you-eat-this-does-it-have-any-potency-by-mysterytour2000-3-85420a)It is not a problem when mushroom cake has rich fruiting 360 degrees or just a single side pin. The real issue, when mushrooms don't fruit on the top at all, but on the sides or at the bottom only. Z**ero pins on the top layer and side pins can be an indication that your surface level field conditions aren’t right!**
Each environment is unique. Season of the year, climate zone, thus temperature and humidity fluctuations are different. Hence each mushroom cultivator should adjust growing conditions according to shrooms needs. Although there are some basic mistakes to avoid.
#### Common newbie mistakes causing side pinning and zero pins on top layer
##### **Improper field capacity of bulk substrate**
[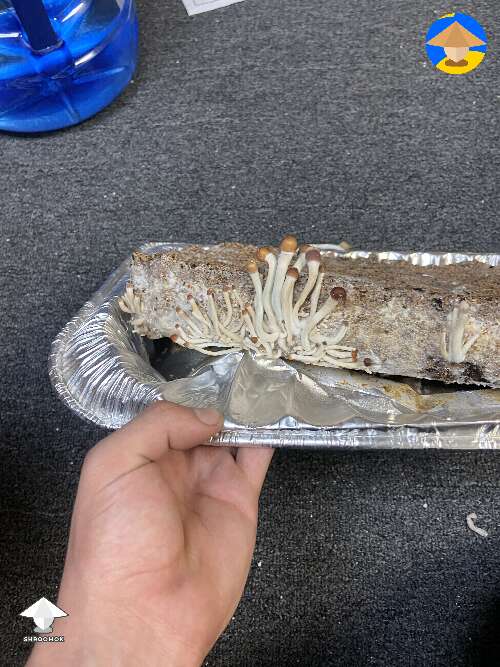](https://shroomok.com/img_orig/853125/4032_whats-my-problem-here-first-flush-no-yield-so-i-rehydrated-mushroom-cake-and-now-shrooms-just-came-out-from-the-sides-only-by-renbo.jpg) [Only side growing shrooms](https://shroomok.com/en/wiki/File:whats-my-problem-here-first-flush-no-yield-so-i-rehydrated-mushroom-cake-and-now-shrooms-just-came-out-from-the-sides-only-by-renbo-10b738)Mistake from the start. Perhaps you used too dry bulk substrate on spawn to bulk step. This moisture was enough for bulk colonization, but not enough for further mushroom fruiting.
It's a huge mistake and you should learn this basic lesson to avoid it for the future!
**What to do?**
1. Check the field capacity of bulk substrate BEFORE using it. Field capacity means a perfect substrate moisture conditions. A good way to test for this is to grab a handful of the substrate mixture and squeeze it in your hand. If you are unable to squeeze out any water, it is too dry. If a light squeeze causes a stream of water to come out, it’s too wet. You want to be able to squeeze the mixture as hard as you can, and only have a few steady drops come out to have a field capacity moisture level.
2. Harvest the side growing mushrooms and rehydrate (soak) mushroom cake in water for a few hours. Rehydration helps to saturate the mushroom cake with missed water.
> Recommended guide: [Rehydration aka soaking mushroom cake](https://shroomok.com/en/wiki/Rehydration_of_psilocybe_cakes "Rehydration of psilocybe cakes")
##### Low relative humidity in fruiting chamber
When relative humidity (RH) in the fruiting chamber lower than 90% substrate looses moisture faster. Moisture evaporation from the top layer is higher than from the sides. Mushroom cake shrinks, hence the gap between the walls of the tub and mushroom cake appears.
If you use liner (plastic bag inside) mushrooms appear near the walls, where cake more moisturised. Cracked caps are also the sign of low humidity environment.
[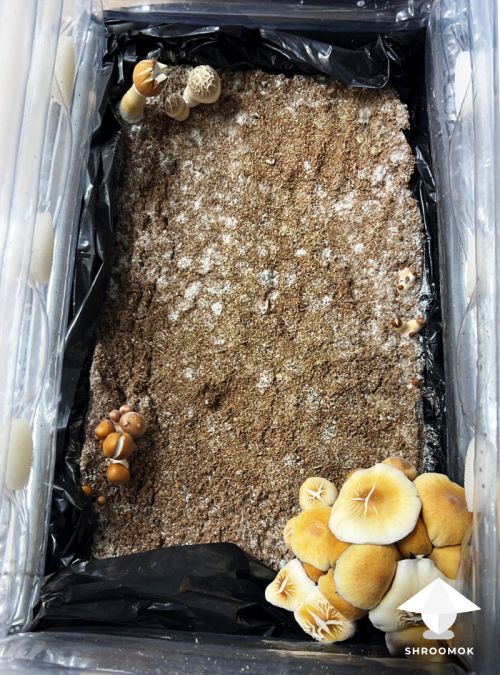](https://shroomok.com/en/wiki/File:Dry-environment-mushrooms-fruiting-on-the-sides.jpg) Dry environment - cracked caps and mushroom fruiting near the walls of the tubThis is a common problem for grow tent setup (especially for the first run) or while you testing new tek, new equipment.
[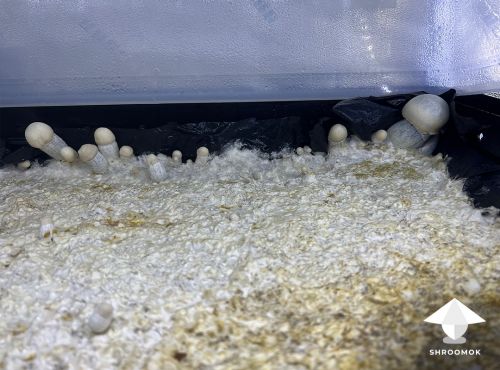](https://shroomok.com/en/wiki/File:Side-pins-fruiting-near-the-walls-of-fruiting-chamber.jpg) Side pins fruiting near the walls of fruiting chamber and zero mushrooms on the top surfaceBut it is more common case for the impatient growers, who open the fruiting chamber every hour to check the progress and they literally drying out their cake.
**What to do?**
1. Monitor RH level with any simple hygrometer. Place the sensor inside the tub and the screen outside the tub.
2. As in natural environment humidity fluctuations is totally normal and even beneficial for promoting pinning. You don't need to maintain stable humidity all the time. However if you see on hygrometer 85-89% it means you need additional misting (mist the walls of your tub) or use humidifier/fogger, especially after each opening the tub.
##### **Excessive evaporation rate, air flow and fanning**
Very often newbie growers show me a common case, when relative humidity in tub is 90-99%, there are condensation water drops, but top layer of the cake looks dry. Mostly this humidity level maintained by extreme evaporation from the substrate. The more moisture evaporates in the air the less moisture inside the substrate. It's conrintuitive sometimes.
[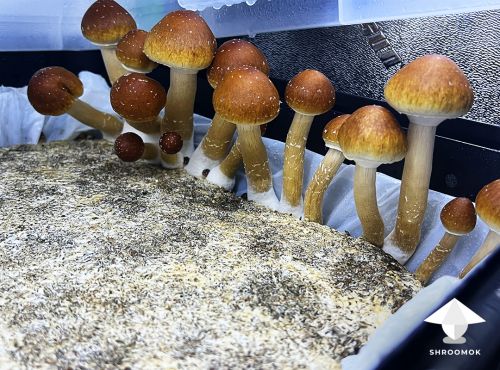](https://shroomok.com/en/wiki/File:Side-pins-bonus-mushrooms.jpg) Side pinning and side growing mushroomsUsing fan, ventilation, air conditioning in your room where you have a fruiting chamber can create additional air currents that drying out the substrate through air vents in tub.
> Excessive water loss, thus extreme shrinkage, creates the gap between cake and tub. Hence, there are perfect microclimate for fruiting in this gap, along the edges of the tub, while the top layer becomes a desert for mycelium
As mushrooms are 90% water, the better places for growing are more hydrated areas where water loss are less. Mycelium think: "We need more moisture to form fruit bodies. Too dry here. Let's search for a better place. The sides and at the bottom are pretty good conditions. Here are more chances for development fruit body and producing mature spores for our next generation. Let's do it!"
That's why we have pins and then shrooms on the sides, sometimes at the bottom, where climate conditions are more favorable.
**What to do?**
1. **Adjust FAE with fan.** If you use fan for Fresh Air Exchange (FAE) avoid extreme air flow and avoid fanning for too long. In this way you remove moisture and dry the cake. Adjust your FAE if you noticed that top layer drying out. Change the time and frequency, i.g. 2-3 times a day for 20-30 seconds. Or don't use fan at all.
2. **Misting or Humidifier.** Don't forget to mist the walls of your tub or use fogger after each opening/fanning to maintain proper humidity level without extreme evaporation from the substrate. Avoid misting/spraying water on mycelium directly.
3. **Adjust ventilation air holes in tub.** If you have air holes in your fruiting chamber you can adjust the natural airflow, that remove moisture out of your tub. Use tape to adjust for more or less FAE as needed. Sometimes closing air holes by half saves situation. Sometimes closing air holes completely and flipping the lid of the tub is a great FAE adjustment as well. Sometimes you need to close the air vents completely and get your hands out of your tub. Don't open it every hour to check how's it going. Often LITFA tek creates perfect microclimate balance!
> LITFA - Leave It The F\*ck Alone - common acronym among mushroom cultivators for impatient newbie growers
##### Vermiculite top layer
Only vermiculite as a top layer for mushroom cakes often works bad. Vermiculite retain water worse, tends to dry out faster than true [casing layer](https://shroomok.com/en/wiki/Making_mushroom_cake,_spawn_to_bulk,_and_casing#Casing) or thin coco coir mix layer. It is a common problem for growkits.
[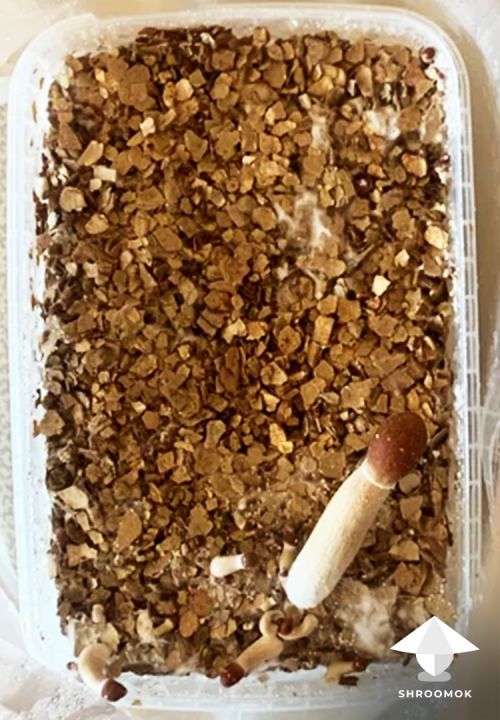](https://shroomok.com/en/wiki/File:Pinning-issue-side-pins-growkit.jpg) A few side growing mushrooms and zero shrooms on the top layer of growkit**What to do?**
1. Use coco coir mix or peat moss (sphagnum + lime) as a main ingredients for top layer (1/3 inch or up to 1cm). They keep moisture much better. You can use it for your growkit as well.
#### How to prevent side pinning
##### Inside liner for preventing side pinning
For most of growers inside liner is just a personal preference to use it or not.
It can be any plastic trash bag. The only downside of it that you can't see signs of contamination if the color of this bag is black (or any other color).
Much better option for inside liner is transparent painters plastic. It sticks to the substrate very well, it's super cheap and easy to work with it. You can still see if you get side and bottom pins or signs of contamination.
As long as those inside liner sticks to the cake really well it will prevent from side and bottom pinning.
> When you line the tub inside, the lining shrinks with the mushroom cake and shrooms won't have such conditions between tub and cake. As far as side pinning is because the microclimate between the cake and bin is ideal for fruiting conditions. The purpose of the liner is to adhere to the cake and move with the shrinking cake thus preventing or reducing the microclimate between the two surfaces/sides.
Trim the liner after Spawn to Bulk to match the substrate level. If the liner over the substrate it creates excess of moisture on mycelium and issues with Fresh Air Exchange (FAE).Liner is a pretty simple way to prevent side pins. Not really any cons to using them either.
> **Tip:** Inside liner is also helpful for harvesting process and further soaking mushroom cake in water (mostly for big cakes). It helps against cracking the cake
Anyway, if something wrong with your environment mushrooms will grow close to the wall of your tub even if you use inside liner
[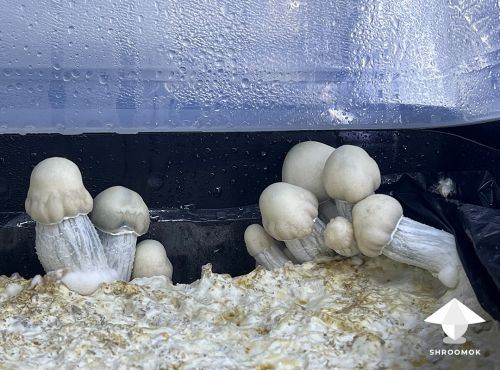](https://shroomok.com/en/wiki/File:Side-pins-growing-mushrooms.jpg) Side growing shrooms##### **Press down the bulk substrate on around the outside perimeter**
It doesn't matter if you use or don't use an inside liner, **pack the substrate down during Spawn to Bulk a little tighter, especially near the tub walls.** It will prevent some of the side pinning on the initial flush. This tamping down the substrate enough keeps the cake against the wall longer.
> I never line my shoebox tubs, because side pins are really easy to harvest in them. Just make sure you pack the substrate down pretty tight to avoid massive side pins for the first 1-2 flushes
Here is an example when bulk substrate wasn't compacted along the tub walls. Mushrooms grow on the top and from the sides.
[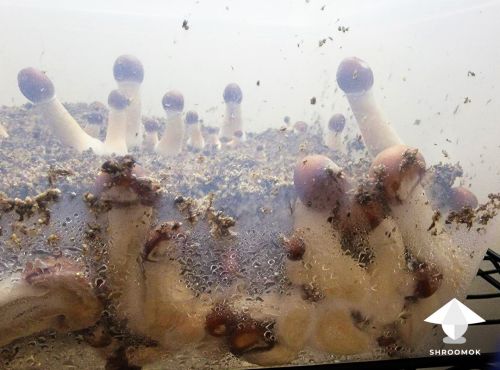](https://shroomok.com/en/wiki/File:Side-growing-mushrooms-monotub.jpg) Side growing mushrooms in monotub#### Promote pinning on the top of the cake with Bubble Wrap
You can lay bubble wrap or food film (aka [bubble wrap tek or blanket-tek](https://shroomok.com/en/wiki/Fruiting_period._Pinhead_initiation,_mushroom_pinning_and_mushrooms_growth_parameters#Blanket_tek_or_bubble_wrap_for_pinhead_initiation)) to promote pinning on the top of your mushroom cake. This method works if the top layer still have some moisture, not dried.
In this way, we save moisture inside the cake and replicate a climate conditions between the mushroom cake and the film, close to the conditions between the cake and the tub, that favorable for side pinning.
Spray some water on the piece of bubble wrap or food film and put it on top of the cake. Remove the film once a day to introduce fresh air and check the progress.
[](https://shroomok.com/en/wiki/File:Blanket-tek-for-pinhead-initiation.jpg) Bubble wrap tek or Blanket tek with food filmTypically in 3-5 days you can see first pins on the top. From this moment remove the film completely and provide normal fruiting conditions for pins transformation into mature mushrooms.
#### Are side pins bad
> Question: Are side pins bad? Can you eat this? Does it have any potency?
[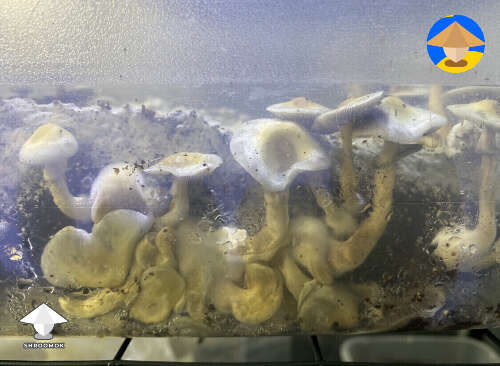](https://shroomok.com/img_orig/a4ac17/4032_why-are-my-mushrooms-fruiting-on-the-sides-and-underneath-can-you-eat-this-does-it-have-any-potency-by-mysterytour2000-2.jpg) [Are side pins bad? Can you eat this? Does it have any potency?](https://shroomok.com/en/wiki/File:why-are-my-mushrooms-fruiting-on-the-sides-and-underneath-can-you-eat-this-does-it-have-any-potency-by-mysterytour2000-2-3c26cd)Side and bottom growing pins that are able to develop into mature mushrooms are totally healthy shrooms. They may look ugly, curved, may be too wet. But they are totally normal for harvesting, potent and save to consume.
[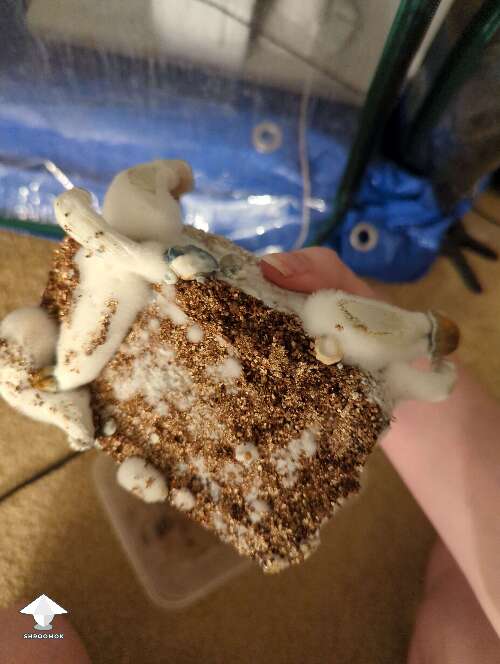](https://shroomok.com/img_orig/7fafd1/4032_side-pins-fruiting.jpg) [Side and bottom growing mushrooms](https://shroomok.com/en/wiki/File:side-pins-fruiting-096ab2)For newbie growers side pins and side growing mushrooms can be the only mushrooms to be harvested. Better than nothing! Isn't it?
[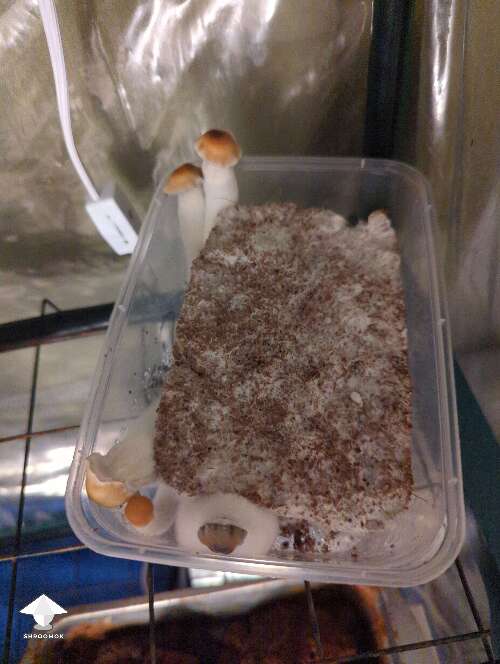](https://shroomok.com/img_orig/1ee412/4032_most-of-my-mushroom-fruits-are-sidepins.jpg) [Most of my mushroom fruits are sidepins](https://shroomok.com/en/wiki/File:most-of-my-mushroom-fruits-are-sidepins-5c546e)Even if you are experienced grower you can get side pins only, when you are trying to adjust climate conditions, while playing with new tek or new equipment for your growing setup.
[](https://shroomok.com/img_orig/ffaf52/4032_pinning-and-fruiting-in-the-grow-tent-by-imaghost-5.jpg) [Still dealing with climate conditions in the tent. Side growing mushrooms](https://shroomok.com/en/wiki/File:pinning-and-fruiting-in-the-grow-tent-by-imaghost-5-cb25ea8)Cultivators that have mushrooms on top also can have side and/or bottom growing mushrooms. They are your bonus fruits!
It's totally normal to have side pins. Let them be!
Let me share a few examples and comments from experienced growers.
> 1\. You would be surprised at the size a side pin can get if left alone. And canopy’s are not always going to happen.
[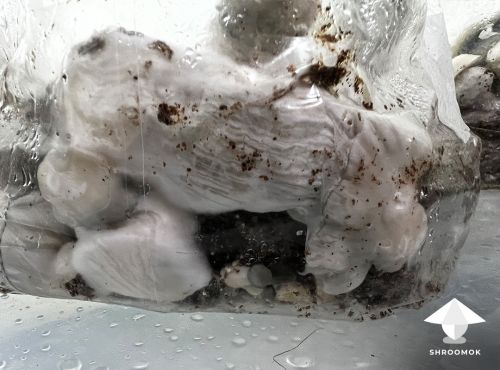](https://shroomok.com/en/wiki/File:Giant-side-pin-growing-in-bag.jpg) The side pins in grow bag grow like tar[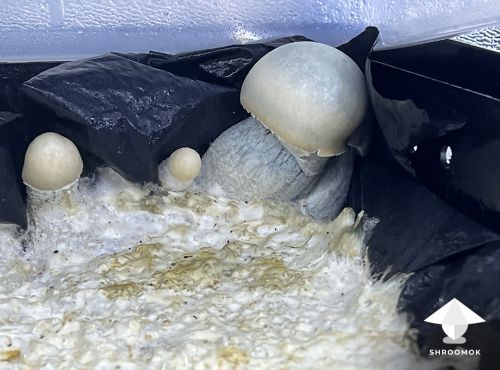](https://shroomok.com/en/wiki/File:Side-pins-with-inside-liner.jpg) Huge side growing shroom> 2\. I’ve said it maybe hundreds of times now… Some of the largest fruits I’ve ever measured have been side/bottom pins. Here is a side pin that is currently in my tent…
[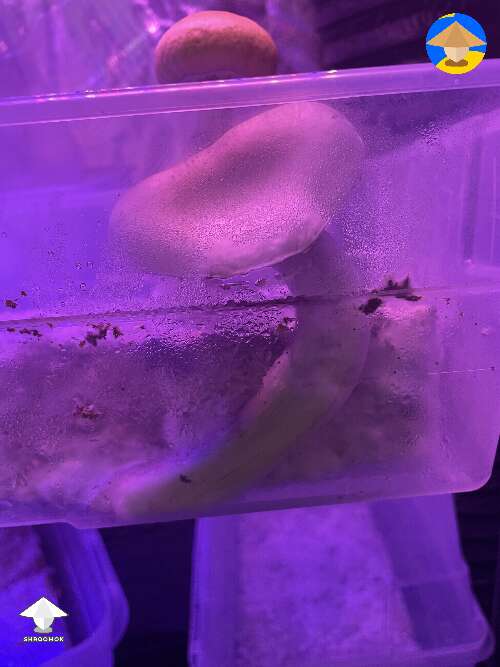](https://shroomok.com/img_orig/4906cf/4032_a-side-pin-mushroom-that-is-currently-in-the-tent.jpg) [Huge side pin](https://shroomok.com/en/wiki/File:a-side-pin-mushroom-that-is-currently-in-the-tent-d0cbfe)> Honestly, some of the largest fruits I’ve seen from better growers than I am have been sidepins too! They aren’t a bad thing, and it’s a losing/winning battle.
[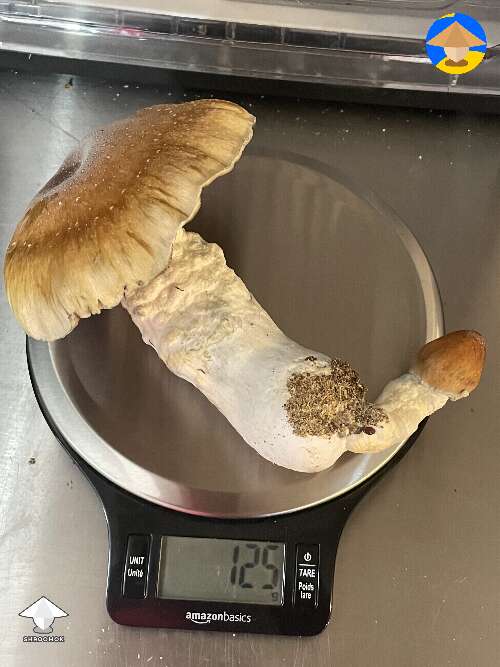](https://shroomok.com/img_orig/d0e7a6/4032_sidepins-happen-by-imaghost.jpg) [Sidepins Happen! 125 g](https://shroomok.com/en/wiki/File:sidepins-happen-by-imaghost-e6124a)> 3\. This picture doesn’t do it justice the side pinning is crazy on this one
[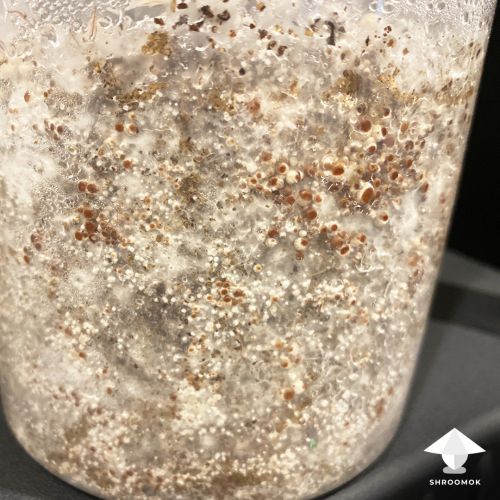](https://shroomok.com/en/wiki/File:Side-pins-bottle-tek.jpg) Testing a bottle-tek and have a crazy side pinning> A few days later. Look at this side pin city!
[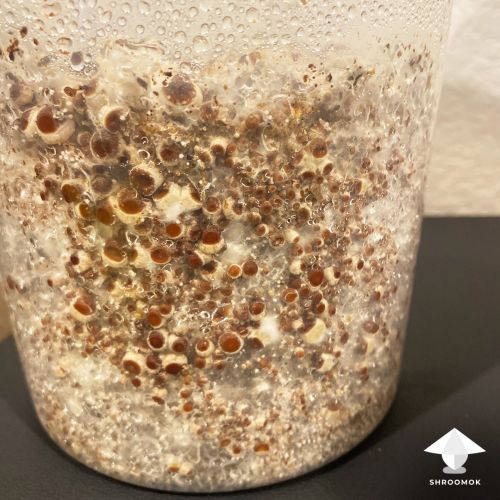](https://shroomok.com/en/wiki/File:Side-pins-city-fruiting.jpg) Side pinning bottle-tek#### Are bottom pins bad
> **Question:** How bad can side pinning be? Well, I’d say bottom pinning. I look under my tub and see a canopy of bigger pins under tub. The cake is literally being lifted off of the bottom from all the mushrooms.
[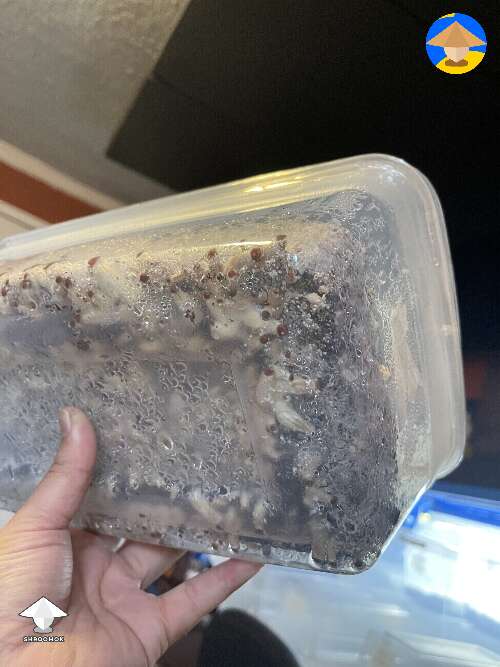](https://shroomok.com/img_orig/1d0885/4032_how-bad-can-side-pinning-be-id-say-bottom-pinning-by-mush-2.jpg) [Many bottom pins](https://shroomok.com/en/wiki/File:how-bad-can-side-pinning-be-id-say-bottom-pinning-by-mush-2-e55908)If I see that I’m getting a lot of side pins (mainly after 1st-2nd flush), I’ll put the cake on the racks or on the other side. If you have massive bottom pinning you can flip the cake upside down, thus shrooms will have more space for growth, will be more attractive and it will be easier to harvest.
> Done! Flipped the cake upside down to let bottom pins grow!
[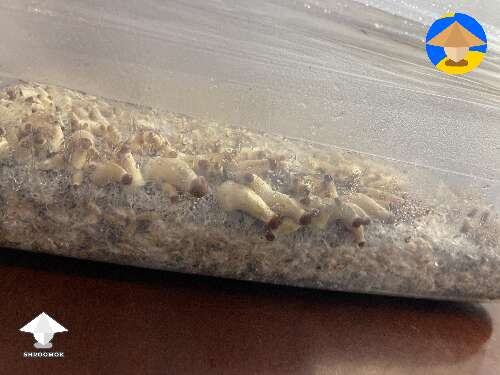](https://shroomok.com/img_orig/ae0bb1/4032_flipped-the-cake-with-bottom-pins-by-mush.jpg) [Flipped the cake with bottom pins](https://shroomok.com/en/wiki/File:flipped-the-cake-with-bottom-pins-by-mush-1b5807)> I usually pick bottom pins before anything fun happens with the cap, because they get too wet or they abort and the caps just stop. But the side pins make it eventually, so I let them keep at it. This cake is much happier upside down xD
[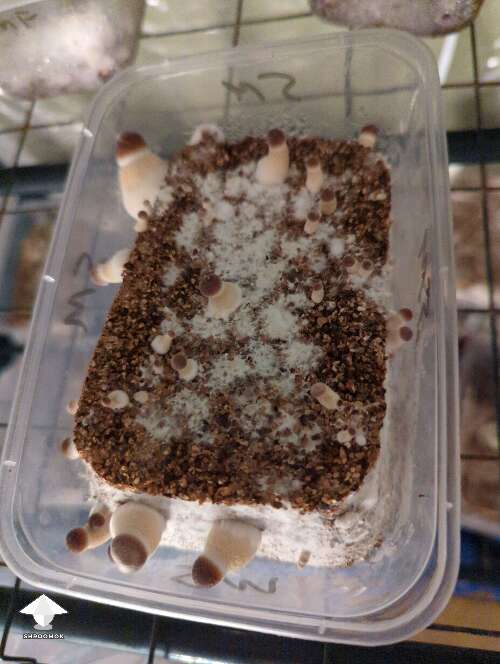](https://shroomok.com/img_orig/088ab1/4032_this-mushroom-cake-is-much-happier-upside-down.jpg) [This mushroom cake is much happier upside down](https://shroomok.com/en/wiki/File:this-mushroom-cake-is-much-happier-upside-down-04f392)#### **Side pins harvesting tips and issues**
For initiating new flush of fruiting by soaking cake in water you should pick ALL shrooms on the top, all sides and bottom. Why?
If you leave pre-mature and mature mushrooms from the sides and at the bottom they might start to decay and rot in the nearest days after soaking. Your cake will be contaminated and wasted.
You can leave tiny pins on the cake. Some of them continue growing, some of them may turn into [aborts](https://shroomok.com/en/wiki/Mushroom_aborts "Mushroom aborts").
On small tubs, shoeboxes or small mushroom cakes side pins don’t really matter since they’re easier to harvest. Just remove the cake from the box and harvest all shrooms.
[](https://shroomok.com/en/wiki/File:Psilocybe-cubensis-cake-preparation-before-rehydrating.jpg) After removing from plastic box you can see top and side growing mushrooms on small mushroom cake with pseudo casing layer. Preparation for soaking in water
For bigger mushroom cake it can be annoying to harvest side and bottom pins.
[](https://shroomok.com/en/wiki/File:Side-pins-harvesting-tips.jpg) Side growing mushrooms in monotub ready for harvesting**To make harvesting easy and to avoid crumbling/cracking cake during harvesting side and bottom pins follow the next steps:**
1. Pick all shrooms on the top. Twist mushrooms by rocking slightly to the sides and remove them gently. So that you won't damage mushroom cake.
2. Put a thick surface on the top of the cake. Use the lid from the tub of smaller size, or ceramic plate, or baking tray that +/- fits your cake size.
3. Put your hand on this lid/tray/plate.
4. Flip the tub with the other hand and remove cake from the tub. So that you have a cake on the tray upside down.
5. Voila! Now you can harvest all mushrooms grown on the sides and at the bottom without cracking the cake.
6. After harvesting put the cake back in the tub in the same way. It is ready for rehydration step.
> **Question:** I noticed I had a lot of side pins. So decided to move my cake to a bigger tub with a rack. But when I moved the cake, it broke in half, not fully to become two pieces, it’s still one piece with a big crack. Question is… have I just destroyed my grow?
It should be fine. If your cake cracked into 2-3-4 parts go ahead! Shrooms will grow even if the entire cake turns into many slices. Put them in a tub, provide proper fruiting conditions and wait. You'll get rich fruiting in your 'big crack' area.
#### Sum it up
When the cake pulls away from the wall (its normal natural process) it creates a tiny microclimate that is usually ideal surface conditions for pinning.
Mild cake shrinking is totally normal process due to evaporation and absorbing moisture by mycelium and mushrooms while growing. However it doesn't mean that any minimal gap between cake and tub is a problem to react.
It's amazing when your mushroom cake fruit everywhere! However fruiting from the sides or bottom and zero mushrooms on the top says you about mistakes in your climate conditions.
> So the microclimate in the sides of your bins is perfect, right? So ask yourself, what do you need to do to mimic THAT in the whole tub?
First of all, avoid basic mistakes, such as improper substrate field capacity, excessive fanning, excessive evaporation, low relative humidity of the environment. Create favorable microclimate for your mushroom cake.
You can counter side pinning by packing your substrate down tight and using a liner inside the tub.
Side pins and bottom pins is not a problem at all. They are your bonus mushrooms!
If you find this guide helpful, please support me with cup of coffee on [buymeacoffee](https://www.buymeacoffee.com/shroomok)
Have a happy growing!
Peace, Shroomok
# Mushroom Strains
## Mutant strain Albino Penis Envy aint just APE but King Kong of Magic Mushrooms
[Mutant strain Albino Penis Envy aint just APE but King Kong of Magic Mushrooms](https://shroomok.com/en/wiki/Mutant_strain_Albino_Penis_Envy_aint_just_APE_but_King_Kong_of_Magic_Mushrooms)
[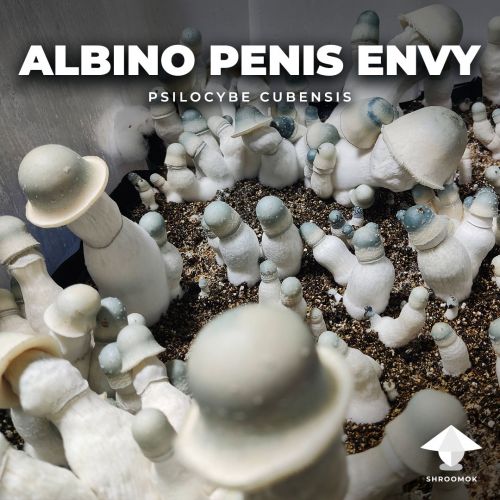](https://shroomok.com/en/wiki/File:Albino-penis-envy-APE-mushroom-strain.jpg) Psilocybe Cubensis Albino Penis Envy strain### Albino Penis Envy mushrooms: story of origin, cultivation tek and growing problems, potency and effects
There is one provocative mushroom. It resemble an intimate symbol and full of jokes about naming
[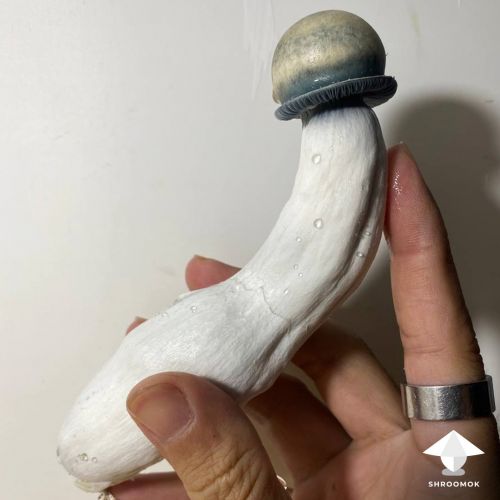](https://shroomok.com/en/wiki/File:Albino-penis-envy-huge-mushroom.jpg) APE isolated culture harvest by Costana Monovar - [Shroomok growers Community in **Discord**](https://discord.com/invite/ngKhQDmymD)Get to know it! Albino Penis Envy is one of the most desirable Psilocybe Cubensis strains among psychonauts and mushroom growers. His name speaks for itself and fully describes his physical form: thick stem and convex head (the cap usually doesn't open completely)
[](https://shroomok.com/en/wiki/File:Ape-huge-mushroom.jpg) APE giant mushroom by Costana Monovar - Shroomok growers Community on [Discord](https://discord.gg/ngKhQDmymD)> In contrast to the golden caps of regular Cubensis, APE's caps are white/beige with a blue tint. When dry they turn into a beautiful silver-blue color
Mostly used wordplay abbreviation as a name for this mushroom - APE 🦍
#### Albino Penis Envy in books and journals
This mushroom and its ancestors are featured in John Allen's book [*"Sex, Mushrooms, and Rock and Roll"*](https://www.researchgate.net/publication/350621105_Sex_Mushrooms_and_Rock_and_Roll_April_4_2021) (download free pdf book) on the title page. It is mentioned as a first sex toys of ancient people in his book [*"Sexy Sacred Mushrooms"*](https://www.amazon.com/Sexy-Sacred-Mushrooms-John-Allen/dp/1579512089?&linkCode=ll1&tag=shroomok-20&linkId=51d2f4b6299d310d5ba506b5e28eb56b&language=en_US&ref_=as_li_ss_tl) (particularly in paragraph "*Penis Worship, Penis Envy & Phallic Symbolism"*)
[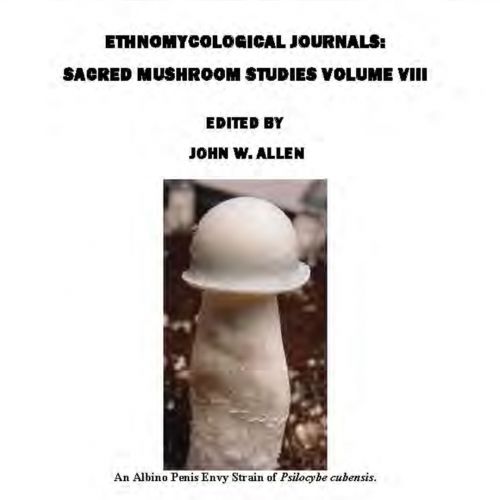](https://shroomok.com/en/wiki/File:APE-J-Allen.jpg) APE in John W. Allen study "Sex, Mushrooms and Rock and Roll"> **John W. Allen aka "Mushroom John"** is a brilliant Mushroom Pioneer, ethnomycologist, writer, artist, photographer and independent researcher of the entheogenic use of psilocybin mushrooms. He discovered many new species and strains. One of them is [Pink Buffallo](https://shroomok.com/en/wiki/Pink_Buffalo_mushrooms_from_Koh_Samui_in_Thailand "Pink Buffalo mushrooms from Koh Samui in Thailand"), also [Cambodian](https://shroomok.com/gallery/cambodian) and [Burma](https://shroomok.com/gallery/burma-magic-mushroom-strain).
Enough to talk about mushroom porn so far. Let's figure out *Albino Penis Envy* features.
#### Origin of Albino Penis Envy mushroom
You'll never find such specimen in nature. Why? Because it's a MUTANT strain created by mycologists.
Albino Penis Envy is a hybrid of two Psilocybe Cubensis strains: ***[Penis Envy](https://shroomok.com/gallery/penis-envy)*** and ***PF Albino***.
[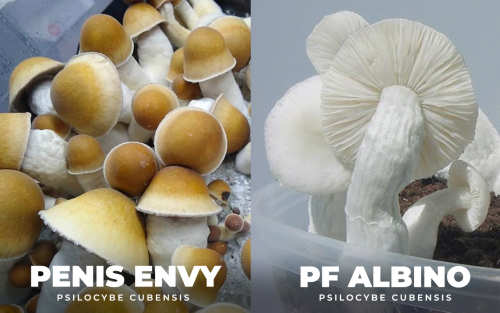](https://shroomok.com/en/wiki/File:Penis-envy-and-pf-albino.png) Penis Envy + PF Albino mushroom = APE
There are legends about how Penis Envy's ancestor came to be. This story involving ethnomologists Terence McKenna, Steven Pollock and Rich Gee. These psychonauts are so overplayed that it's almost impossible to find the true story of the Penis Envy origin.
The beginning of Penis Envy history starts in 1971 from a huge Cubensis mushroom in Amazon river area that was founded by Terence McKenna. He brought several prints of large specimens to the United States (Colorado) and gave them his friend Steven Pollock (a medical doctor, mycologist). But this finding doesn't mean Terence McKenna brought the finished version of Penis Envy genetic are known today.
Long mycological experiments were followed. Steven Pollock first tried to isolate the culture on agar. And during cultivation he noticed one fungus that stood out among all the others. This is how the mutation was identified. This mutant was cloned and became the Penis Envy.
> It is believed that a mycologist Rich Gee (it's his nickname), who wished to be anonymous, worked on this strain
[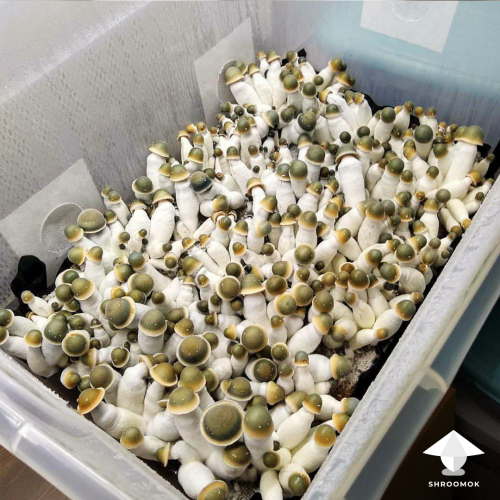](https://shroomok.com/en/wiki/File:Penis-envy-in-monotube.png) Penis Envy mushrooms in monotub
However, everyone who had a hand in this creation doesn't claim authorship, they really lost the ego. All these guys refer to each other and joking about mushroom naming.
The second ancestor of APE is PF Albino. It is a Psilocybe Cubensis mutant by famous character in the world of magic mushroom cultivation called Professor Fanaticus or Psylocybe Fanaticus). He and his PF-tek became one of the most popular and easiest mushroom cultivation teks for home growing in 1990's.
As result of all these stories and mycological manipulations, we have Albino Penis Envy strain, that is super popular today.
[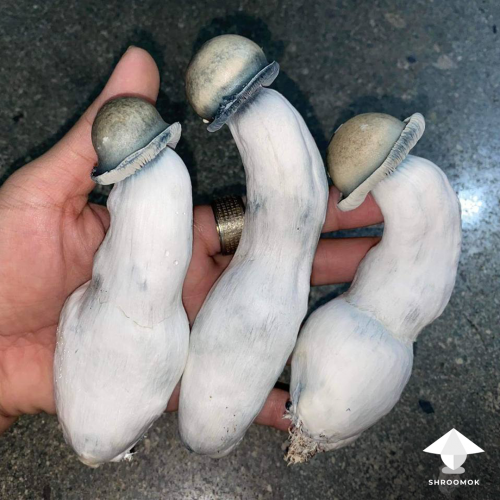](https://shroomok.com/en/wiki/File:Albino-penis-envy-harvest.png) Albino Penis Envy harvest by Costana Monovar - Shroomok growers Community on [Discord](https://discord.gg/ngKhQDmymD)#### Albino Penis Envy potency
[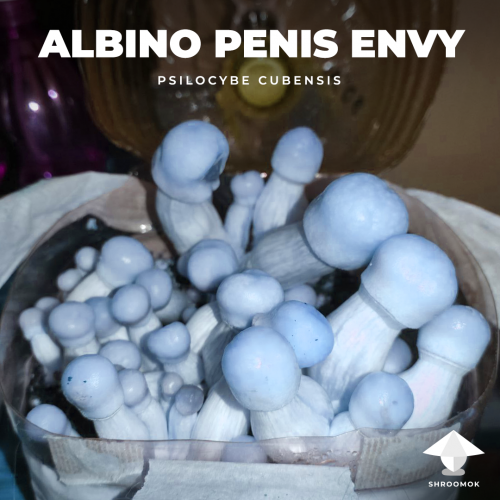](https://shroomok.com/en/wiki/File:APE-mushrooms.png) APE potency: stronger or notYou often hear from experienced growers and psychonauts:
> "All Cubes are plus-minus the same...But it's not really about APE mushroom"
Albino Penis Envy strain is known as one of the most potent among Psilocybe Cubensis magic mushrooms and even more potent than his ancestors Penis Envy and PF Albino. All albinos are considered more potent.
APE isolated culture can accumulate more alkaloids than regular Cubensis strains. Therefore, possible to grow more potent mushrooms. However, there is still insufficient data to state this fact, the strength of the mushrooms may vary considerably due to growing factors (cultivation conditions) and post-harvest storage methods.
According to Oakland Hyphae, the average alkaloid concentration of Penis Envy and Albino Penis Envy may be much higher than other strains of the Psilocybe Cubensis
[](https://shroomok.com/en/wiki/File:Psilocybe-cubensis-potency-by-strains-research.png) Psilocybe Cubensis potency by strains. Research by Oakland Hyphae> The following data is based on preliminary research and development methods, does not represent final data and requires further peer review before being taken more seriously than 'interesting'. Oakland Hyphae
Alkaloid concentrations can vary from mushroom to mushroom, from flush to flush. Moreover, even in the same mushroom there can be a significant difference in the stem and cap.
Significant difference exists **between SPECIES, not strains within one species:**
[](https://shroomok.com/en/wiki/File:Psilometric-scale-of-psilocybe-mushrooms.jpg) Psilocybe mushrooms potency by species. "Psilocybin Mushrooms of the World", Paul Stamets> Readers should note, that within any **one species**, there can be a **tenfold range** in psilocybin and psilocin production from one collection to the next. (Paul Stamets, "Psilocybin Mushrooms of the World")
> ...other indole alkaloids have been found in mushrooms besides psilocybin and psilocin. Baeocystin, norbaeocystin and/or aeruginacine are closely related to psilocin, and may be active. (Gartz, 1992)
#### Albino Penis Envy effects and tripping with APE
Psychonauts reported more intense trip with Albino Penis Envy mushrooms. Some noted more intense and active visuals. Someone have wavelike visuals, someone reported a deeper mystical experience
[](https://shroomok.com/en/wiki/File:Golden-teacher-effects-and-trip.png) Always prepare for tripping!Remember, all reports is subjective assessment of feelings. Mushroom trip depends mostly on the dosage, individual personal characteristics (metabolism, hormonal and immunity system), preparation before tripping, environment, level of stress, information background, your brain "library", set & setting etc.
> 🔴 Recommended: [Mushroom Consumption Guides](https://shroomok.com/articles:mushroom-consumption-recipes-and-tips)
#### APE for microdosing
Albino Penis Envy strain can be used for microdosing as any Psilocybe Cubensis strain. Personal dosage calibration for microdosing course is crucial importance step
[](https://shroomok.com/en/wiki/File:Capsules-with-mushroom-powder-for-microdosing.jpg) Psilocybin mushroom microdosing. Capsules with mushroom powder> 🔴 Check out: [Microdosing Guide](https://shroomok.com/en/wiki/Magic_mushrooms_microdosing "Magic mushrooms microdosing")
#### Features of growing Albino Penis Envy
[](https://shroomok.com/en/wiki/File:APE-growing.png) APE cultivation featuresCultivation steps for APE are totally the same as for other Psilocybe Cubensis strains
> 🔴 Follow step-by-step [Mushroom Cultivation Guide by Shroomok](https://shroomok.com/articles:grow-mushrooms-at-home-guide) and have a happy growing!
#### Is Albino Penis Envy suitable for newbies in mushroom growing?
Albino Penis Envy is recommended for experienced growers who have at least one successful grow from scratch (not a growkit!) and understand the basics in mushroom cultivation.
Actually attentive responsible newbies also succeed. So, don't limit yourself and be ready for hard work!
#### What is the best cultivation tek for APE mushrooms?
1️⃣ The most efficient growing tek for APE is MonoTub. These giants enjoy free space.
[](https://shroomok.com/en/wiki/File:Albino-penis-envy-ape.png) Albino Penis Envy (APE)> 🔴 Check out: [DIY Monotub for mushrooms](https://shroomok.com/en/wiki/Forget_Monotub_Kit._DIY._How_to_make_Monotub_for_Mushrooms_by_your_own "Forget Monotub Kit. DIY. How to make Monotub for Mushrooms by your own")
2️⃣ Tek №2 for APE is Bottle-tek and small mushroom cakes
[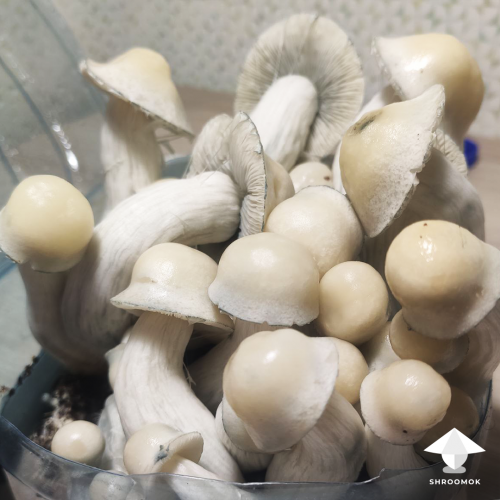](https://shroomok.com/en/wiki/File:Albino-penis-envy-in-plastic-bottle.png) APE cultivation in plastic bottle aka bottle-tek> 🔴 Check out: [Bottle-tek or How to grow mushrooms in plastic bottles](https://shroomok.com/en/wiki/Bottle-tek_or_how_to_grow_mushrooms_in_plastic_bottles "Bottle-tek or how to grow mushrooms in plastic bottles")
> 🔴 Check out: [Casing and small mushroom cakes](https://shroomok.com/en/wiki/Making_mushroom_cake,_spawn_to_bulk,_and_casing "Casing of magic mushrooms cakes")
3️⃣ Even simple PF-tek can be used for growing Albino Penis Envy mushrooms
[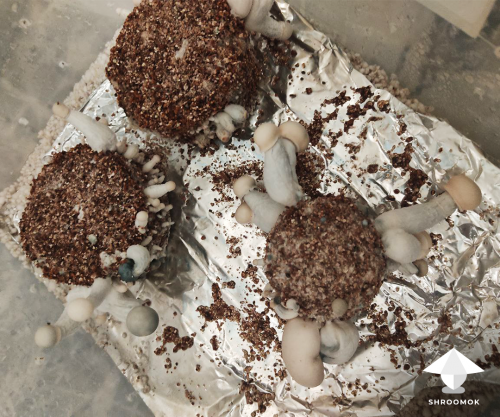](https://shroomok.com/en/wiki/File:Pf-tek-albino-penis-envy.png) PF-tek for APE growing, BRF-cakes#### APE cultivation and growing problems
Don't expect huge harvest for the first attempt. This strain is a bit capricious.
The most responsible step in the Albino Penis Envy cultivation is pinhead initiation period. This is the very first days after starting fruiting period or introducing fresh air and up to 14 days.
[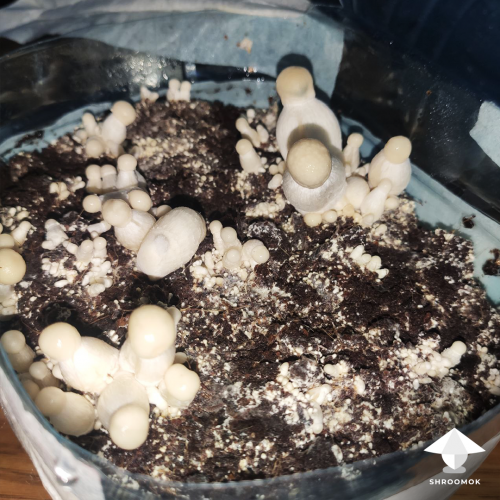](https://shroomok.com/en/wiki/File:Albino-penis-envy-pinhead-initiation-primordia-formation-fruit-bodies.png) Albino penis envy fruiting: pinheads, primordia and fruit bodies[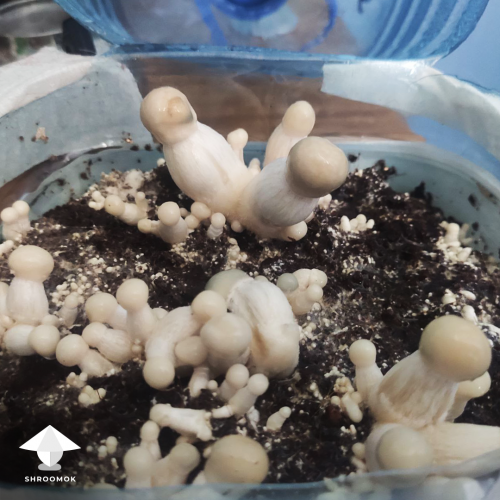](https://shroomok.com/en/wiki/File:Albino-penis-envy-fruiting.png) Normal APE mushrooms development, bottle-tek[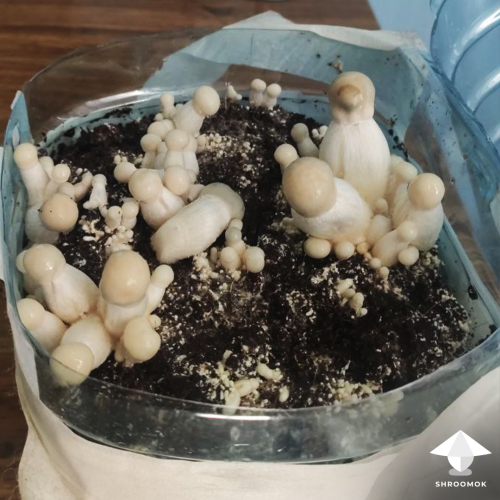](https://shroomok.com/en/wiki/File:APE-pinning-fruiting.png) Normal pinning and fruiting of Albino Penis Envy mushroomsAt this stage it is important to maintain favorable fruiting conditions for pins and primordia formation.
> ❗️Inappropriate microclimate conditions can be a trigger for genetic mutations! This is a common problem for all mutant strains
> 🔴 Check out: [Fruiting period. Pinhead initiation. Growing parameters](https://shroomok.com/en/wiki/Fruiting_period._Pinhead_initiation,_mushroom_pinning_and_mushrooms_growth_parameters "Fruiting period. Pinhead initiation, mushroom pinning and mushrooms growth parameters")
Mutated primordia are called Dino Eggs. Such mutants can be more potent than normal mature mushrooms
[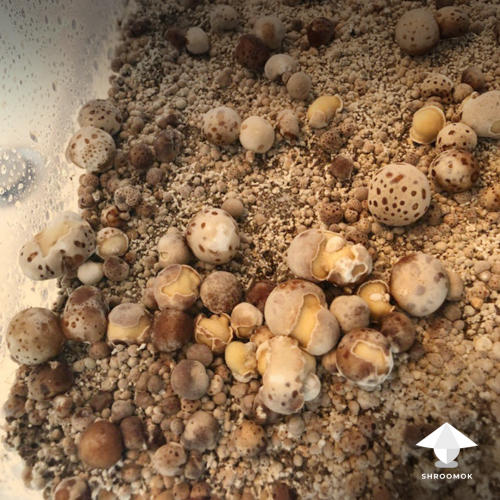](https://shroomok.com/en/wiki/File:APE-primordia-mutation.png) APE mutation is a common cultivation problem. It's not contaminationIt isn't contamination and these mutants are safe to use
[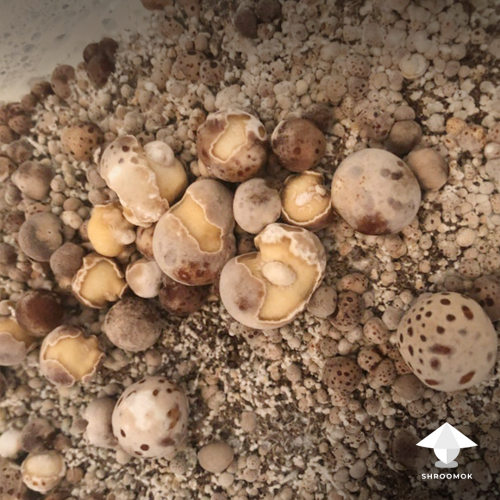](https://shroomok.com/en/wiki/File:APE-pins-mutation.png) APE mutation: pins and primordia form strange bulbs
Another example of strange mutated fruits instead of mushroom bodies. Such shrooms can't transform into a normal mushrooms with cap and stem
[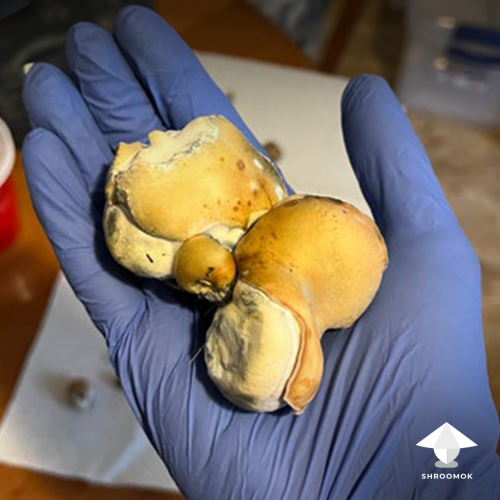](https://shroomok.com/en/wiki/File:APE-mutant.png) APE mutation
It's impossible to stop or fix this process. As a result you'll get an aesthetically unattractive crop
[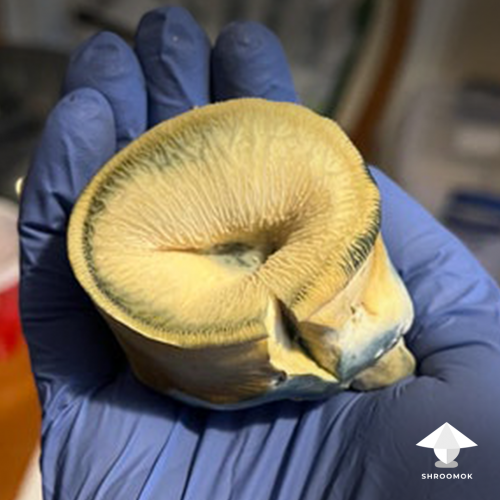](https://shroomok.com/en/wiki/File:APE-mutant-mushroom.png) Albino Penis Envy mutated mushroom
Such mutants are safe to consume. But theirs genetics are useless for any further mycological manipulations (particularly cloning). As you can see these shrooms don't have normal caps and usually don't produce spores.
[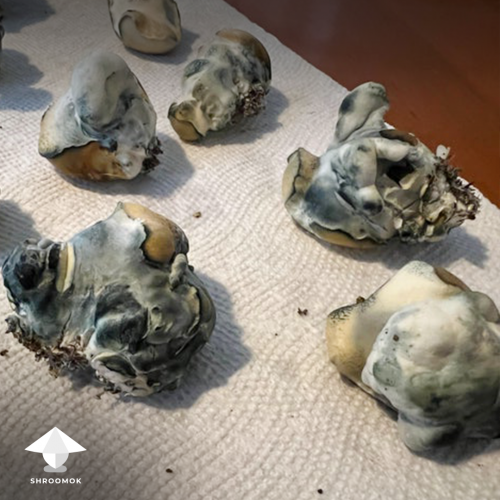](https://shroomok.com/en/wiki/File:APE-mutation.png) Albino Penis Envy genetic mutation
Sometimes APE genetic mutation looks awesome!
[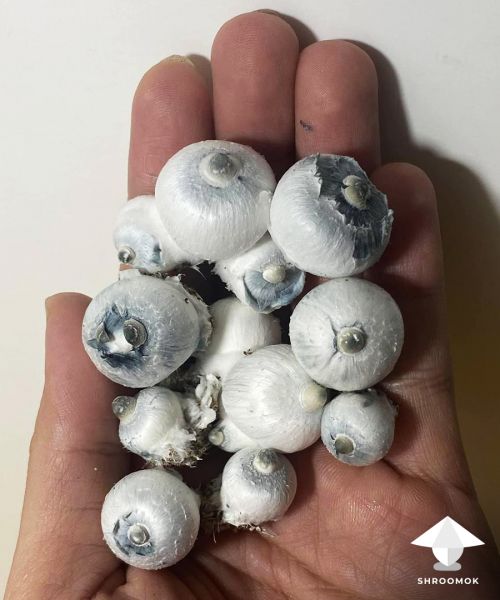](https://shroomok.com/en/wiki/File:Albino-penis-envy-mutated-mushrooms.jpg) Cute mutants without normal cap. Albino Penis Envy by Costana Monovar - [Shroomok growers Community in **Discord**](https://discord.com/invite/ngKhQDmymD)
This APE mutant looks like monster mouth 👻
[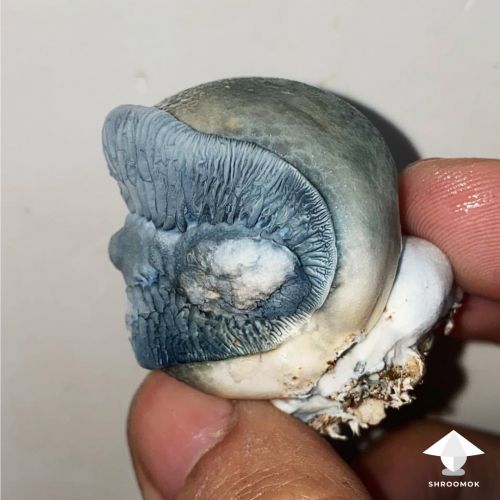](https://shroomok.com/en/wiki/File:Ape-mutant-monster-mouth.jpg) APE mutant with monster mouth by Costana Monovar - [Shroomok growers Community in **Discord**](https://discord.com/invite/ngKhQDmymD)
Another side of the same APE monster
[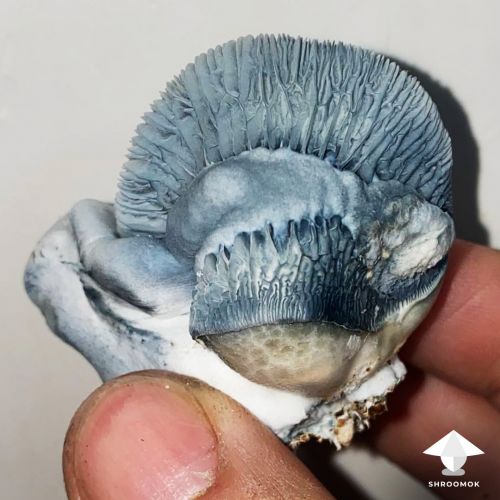](https://shroomok.com/en/wiki/File:APE-the-most-strange-mutantion.jpg) Beautiful and strange Albino Penis Envy genetic mutation by Costana Monovar - [Shroomok growers Community in **Discord**](https://discord.com/invite/ngKhQDmymD)#### How to grow big Albino Penis Envy mushrooms
From the very first harvest you can get smaller fruit bodies in comparison with photos shared on the internet. First of all it depends on genetics! If we are talking about multiculture mushrooms reach about 6 inch (15 cm).
[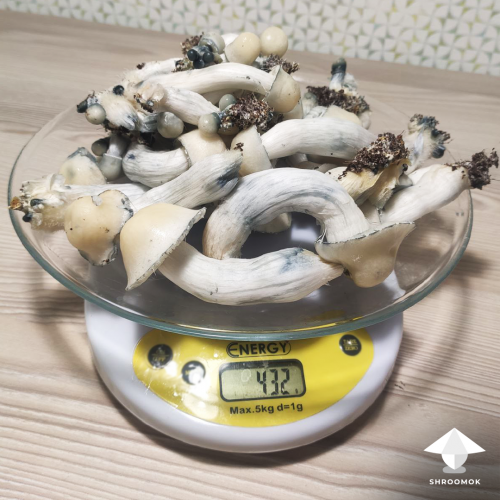](https://shroomok.com/en/wiki/File:APE-mushroom-harvest.png) APE harvest (multiculture, bottle-tek, first flush)
Isolated culture (by cloning mushroom tissue on agar or isolated colony on agar) produces giants, real mushroom King Kongs
[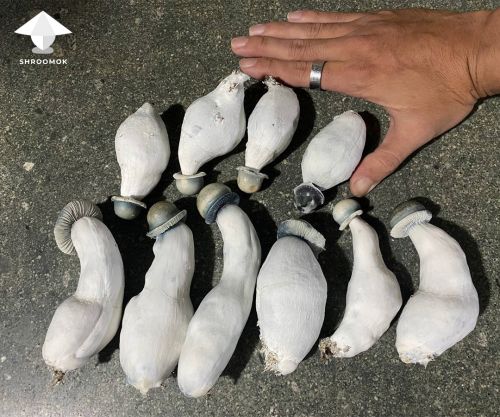](https://shroomok.com/en/wiki/File:Albino-penis-envy-harvest-shroomok-growers-community.jpg) Albino Penis Envy mushrooms harvesting by Costana Monovar - [Shroomok growers Community in **Discord**](https://discord.com/invite/ngKhQDmymD)#### How to make Albino Penis Envy spore swab or APE spore print
You may notice APE don't produce spores. The caps often don't open and don't form veil. It is almost impossible to make a spore print of Albino Penis Envy, since the caps don't fully open and don't show the gills.
[](https://shroomok.com/en/wiki/File:APE-mushroom-no-spores.png) How to gather spores of albino penis envy mushroom
Spores are white or transparent, visible only under microscope. They spill out from the very edge of the cap on the mushroom stem. That's why spore print preparation like with ordinary Psilocybe Cubensis strains won't work for APE
[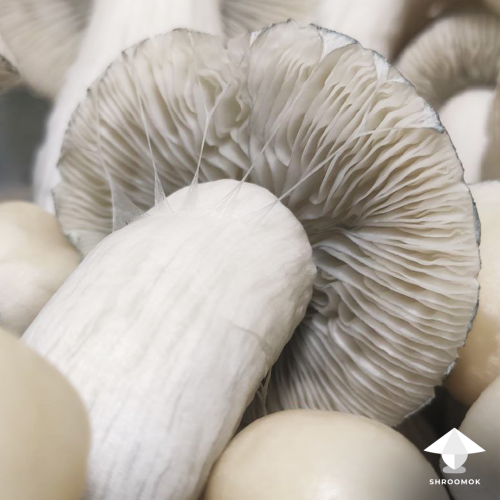](https://shroomok.com/en/wiki/File:Albino-penis-envy-mushroom.png) Albino penis envy right after torn veil[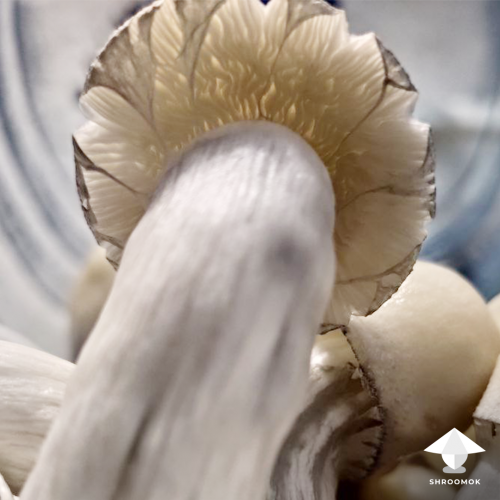](https://shroomok.com/en/wiki/File:APE-mushroom-cap.png) APE mushroom porn
Use sterile cotton swabs (available at the pharmacy) to gather and save your spores for a long time. Store them in a dark place in the refrigerator or at room temperature. Always use airtight bags to keep them sterile.
[](https://shroomok.com/en/wiki/File:Albino-penis-envy-spore-swab-preparation.jpg) Making Albino Penis Envy spore swab and mushroom tissue for cloning (from the stem)[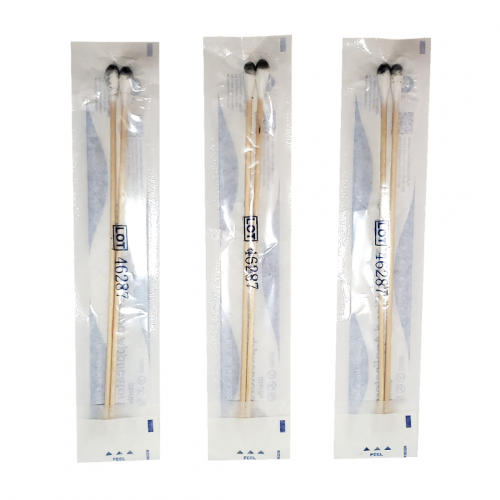](https://shroomok.com/en/wiki/File:Spore-swab-example.png) Albino Penis Envy spore swab example#### **How to work with a spore swab**
Spore swab means further work with agar and/or liquid culture. This seems to be more complicated manipulations for noobs, because required additional knowledge, skills, equipment and time. But don't worry, with time this skill can be mastered.
> Agar guide and Liquid Culture guide by Shroomok are coming soon... Stay tuned!
One more option to skip working with agar and LC is ready for inoculation liquid culture or spore syringe.
[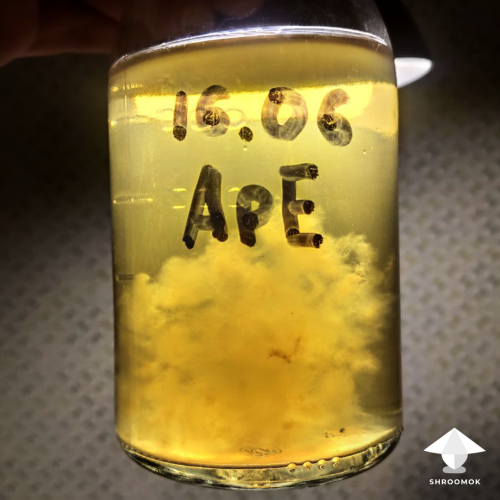](https://shroomok.com/en/wiki/File:Albino-penis-envy-liquid-culture.png) Albino penis envy liquid culture example[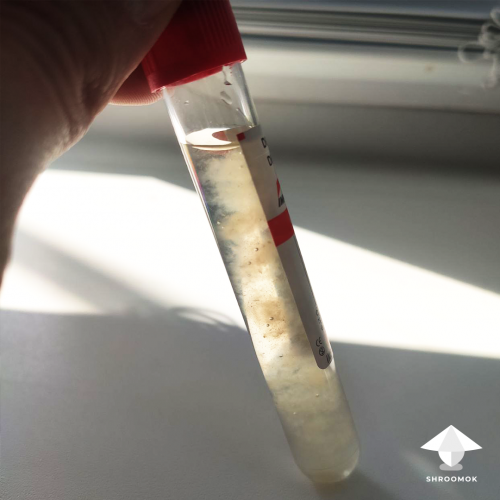](https://shroomok.com/en/wiki/File:APE-liquid-culture.png) APE liquid culture in laboratory test tubeIf you find this guide helpful, please support me with a cup of coffee on [☕️ buymeacoffee](https://www.buymeacoffee.com/shroomok)
Peace, Shroomok ❤️
📸 More photos in [APE photo gallery](https://shroomok.com/gallery/albino-penis-envy)
## Pink Buffalo mushrooms from Koh Samui in Thailand
[Pink Buffalo mushrooms from Koh Samui in Thailand](https://shroomok.com/en/wiki/Pink_Buffalo_mushrooms_from_Koh_Samui_in_Thailand)
[](https://shroomok.com/en/wiki/File:Psilocybe-cubensis-pink-buffalo-mushrooms.jpg) Pink Buffalo by Shroomok### Psilocybe Cubensis Pink Buffallo magic mushrooms: legends, cultivation, microdosing, potency and true tripping effects
It is believed in Thailand, if you see a pink buffalo it is a sign for a good day. Let's check it out and have a good day! 😉
***Pink Buffalo (aka Hairy Buffalo)*** is a representative of Psilocybe cubensis species. It belongs to the same spectrum of effects and growing conditions as other popular cubensis such as [Golden Teacher](https://shroomok.com/en/wiki/The_magic_of_Golden_Teacher_mushroom "The magic of Golden Teacher mushroom"), [B+ (B positive)](https://shroomok.com/gallery/b), [Thai Lipa Yai](https://shroomok.com/gallery/thai) [KSC (Koh Samui Classic)](https://shroomok.com/gallery/ksc-koh-samui-classic) etc.
If you are newbie at mushroom cultivation, if you are wondering about choosing a spore print, then try to make your first steps in mycology with Asian strains of Psilocybe cubensis. Pink Buffalo, in particular.
Hairy Buffalo is also a great choice for experienced growers. For those, who has already bored with [Golden Teacher](https://shroomok.com/en/wiki/The_magic_of_Golden_Teacher_mushroom "The magic of Golden Teacher mushroom") or who are looking for new mycological adventures.
Moreover, Pink Buffalos have pretty nice aesthetic differences we are going to discuss.
#### Scientific classification
Traditionally take a look at the boring (but so important!) scientific classification of the Fungi Kingdom and the place of Pink Buffalo mushroom in it
[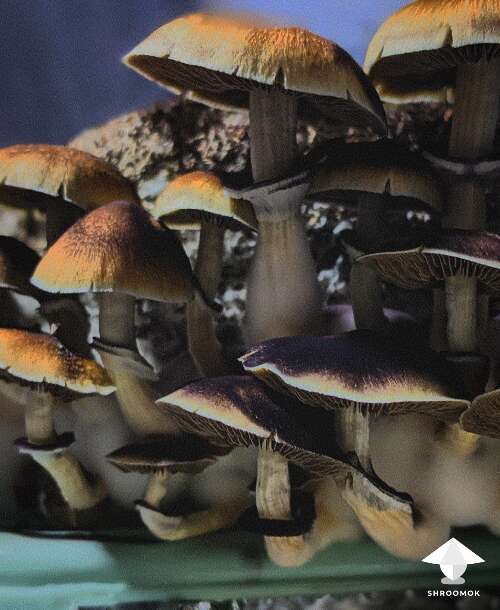](https://shroomok.com/en/wiki/File:Cubensis-pink-buffalo.png) P. cubensis Pink Buffalo aka Hairy Buffalo- Kingdom: Fungi
- Division: Basidiomycota
- Class: Agaricomycetes
- Order: Agaricales
- Family: Hymenogastraceae
- Genus: Psilocybe
- **Species:** Psilocybe Cubensis
- **Strain:** Pink Buffalo or Hairy Buffalo
Now let's get to the most exciting part of the Pink Buffalo mushroom story!
#### Origin and legends of the Pink Buffalo mushroom
[](https://shroomok.com/en/wiki/File:Psilocybe-cubensis-pink-buffalo-art.png) Psilocybe cubensis Pink Buffalo magic mushroom: story and legends
One day, one man discovered and found new strain of psilocybin mushrooms in the wild jungle of Koh Samui island in Thailand. The name of this legendary explorer is John W. Allen or "Mushroom John"
[](https://shroomok.com/en/wiki/File:John-w-allen-photo.png) John W. Allen or “Mushroom John” who discovered the Pink Buffalo mushroomsLegend says that "Mushroom John" walking through the jungles of Koh Samui Island and came to a wild field. There he saw a huge pink buffalo which turned out to be sacred! This buffalo called John after him and pointed out the magic mushroom
[](https://shroomok.com/en/wiki/File:Pink-buffalo-thailand.jpg) Pink buffalo in ThailandAnother legend says the strain is named after the sacred plant on Koh Samui, the buffalo carnation. However, no information could be found about this carnation flower.
#### How Pink Buffalo mushroom was found according to John Allen's story
How it was in reality "Mushroom John" told the true story behind the Pink Buffalo strain:
> «It was the late 1990s. During one of my expeditions to Thailand, Cambodia and Burma my colleague and I were going to ***Phang Ka beach***. We were driving on ***Highway 4173 (which turns into 4170)*** near the southwest coastline ***of Koh Samui island in Thailand***.
[](https://shroomok.com/en/wiki/File:Psilocybe-cubensis-pink-buffalo-location-an-map-by-John-Allen.png) Location where pink buffalo mushrooms have been seen in the wild by John Allen> There was also a road with giant elephant sculptures.
>
> To the right of the road were two rice paddies where alone pink buffalo was grazing. The area was fenced with barbwire and it was strange. Local Thai people don't use barbwire. But foreign immigrants (often from Australia and Germany) do.
>
> The owner of the two rice paddies and its buffalo was an Australian man and his Thai ex-wife. This land and house in Thailand (which is owned by a woman since a foreigner has no right to be an owner of land) was a place where I found the Pink Buffalo mushroom strain, sold on the internet came from.
>
> For me it was enough to explore the tracks of this buffalo (manure traces) in the rice paddies. And boom! Magic... magic mushroom!
[](https://shroomok.com/en/wiki/File:Psilocybe-cubensis-wild-thailand.png) Wild Psilocybe cubensis in Thailand> That's how the mushroom strain was found and named. In honor of this lonely pink buffalo - Psilocybe cubensis Pink Buffalo. Of course, this strain has changed a bit since my wild specimen was subsequently domesticated.By the way, no buffalo are sacred in Thailand. Yes, cows are sacred in India, but buffaloes are not. There are about 70 million buffalo in Thailand and one out of ten is pink. They are not rare, special or sacred. It is just believed in Thailand, if you see a pink buffalo it is a sign for a good day»
#### Features of Pink Buffalo appearance and cultivation
Pink Buffalo mushroom has a red-brown-gold cap, 25-75 mm in diameter
[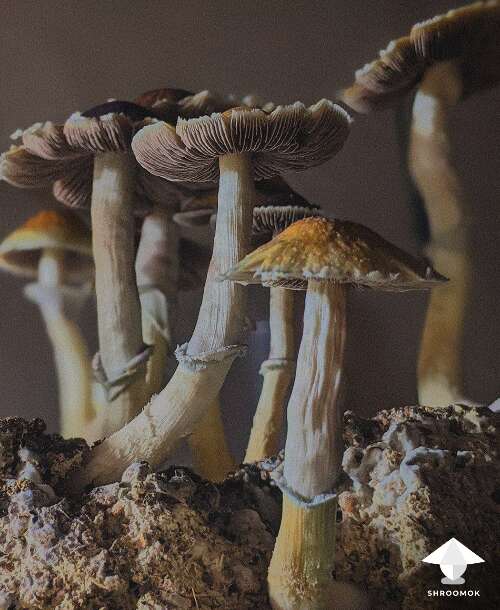](https://shroomok.com/en/wiki/File:Hairy-buffalo-magic-mushrooms.png) Cubensis Pink Buffalo mushrooms fruitingBy the time it opens, the cap is lighter amber, but darker than Golden Teacher's. The cap can reach 5-8 cm in diameter. The spores are purplish brown to dark brown, 11.5 – 17 x 8 – 11 µm, ellipsoid shape.
[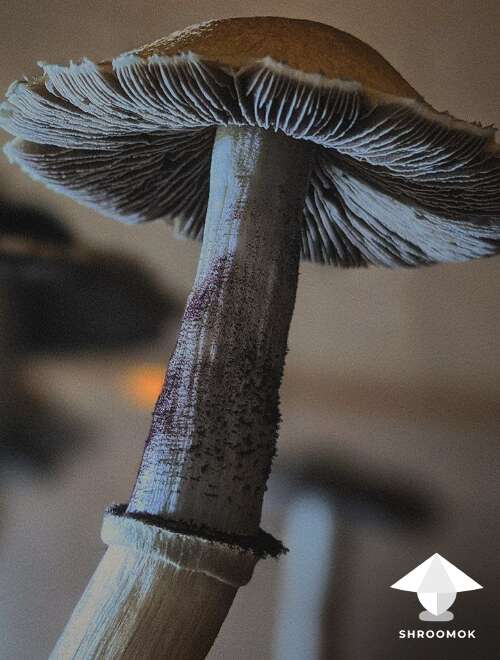](https://shroomok.com/en/wiki/File:Cubensis-pink-buffalo-magic-mushroom.png) Cubensis pink buffalo mushroom right after torn veil. Violet spores on the stemPink Buffalo have a thick powerful stem
[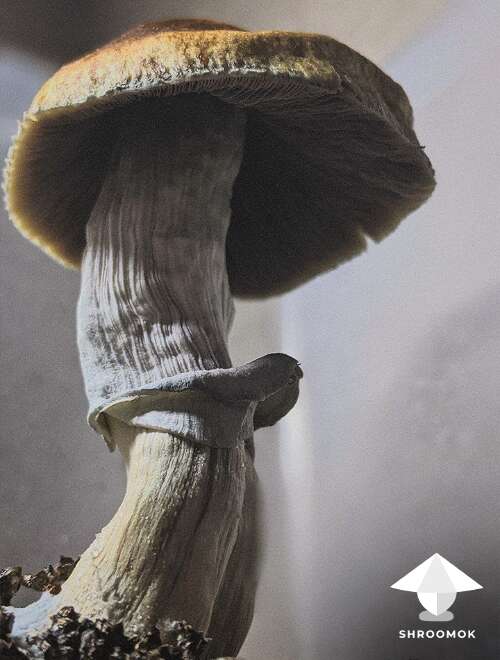](https://shroomok.com/en/wiki/File:Pink-buffalo-cultivation-and-effects.png) Psilocybe Cubensis Pink Buffalo magic mushroom
The largest mushrooms grow up to 15-25 cm in height (isolated culture). Such giants also can appear on the last flushes of fruiting (multispore)
[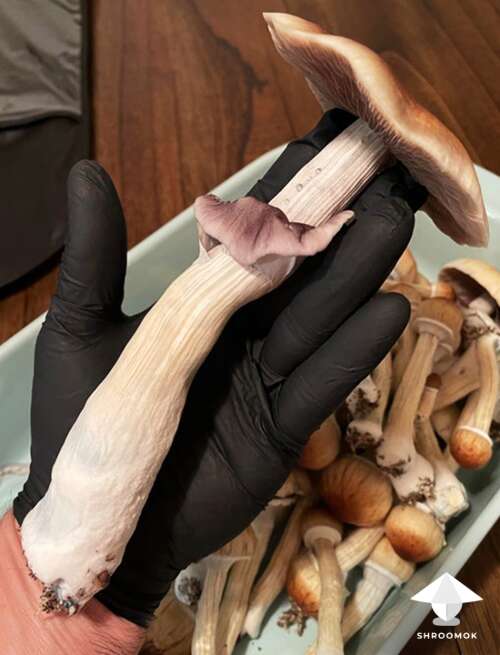](https://shroomok.com/en/wiki/File:Cubensis-pink-buffalo-monoculture.png) Psilocybe cubensis Pink Buffalo isolated strain. Monoculture cultivation. Huge Pink Buffalo mushroomThey grow in a friendly families, in clusters of 3-7 mushrooms
[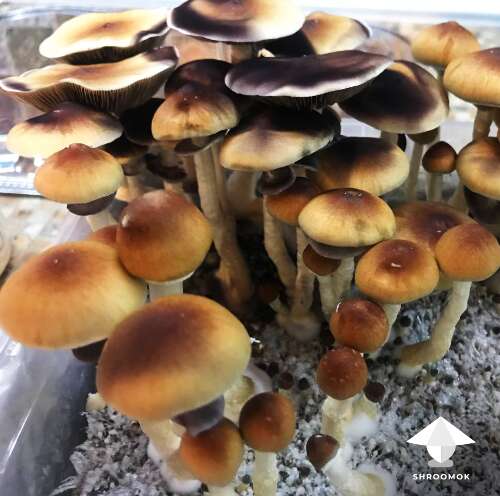](https://shroomok.com/en/wiki/File:Pink-buffalo-small-mushroom-cake-or-shoebox-cultivation.png) Pink Buffalo magic mushrooms cultivation, small mushroom cakes
❇️ Pink Buffalo mycelium is quick and active. Colonization period takes about 2-3 weeks.
🔴 But fruiting period may be delayed from the start. Sometimes [**cold shocking**](https://shroomok.com/en/wiki/All_you_need_to_know_about_cold_shock_for_magic_mushrooms "All you need to know about cold shock for magic mushrooms") or [**blanket-tek**](https://shroomok.com/en/wiki/Fruiting_period._Pinhead_initiation,_mushroom_pinning_and_mushrooms_growth_parameters#Blanket_tek_or_bubble_wrap_for_pinhead_initiation) helps with pinhead initiation.
Then the process is faster. Mushrooms break through the surface of the substrate and produce a powerful flush. Be patient with this strain, don't push slow-moving Pink Buffalo.
#### Is Pink Buffalo suitable for newbies in mushroom cultivation?
Any strain of Psilocybe Cubensis is newbie-friendly. Pink Buffalo is a great strain for beginners with "zero" experience in mushroom cultivation. Just follow Shroomok guide step by step.
> 🔴 To get started step-by-step: [Mushroom Cultivation Guide](https://shroomok.com/articles:grow-mushrooms-at-home-guide)
#### How long does it take to harvest Pink Buffalo mushrooms?
From inoculation to the first harvest it takes about 40-45 days. Pink Buffalo can be a bit slower Psilocybe cubensis mushroom in comparison with popular [Golden Teacher](https://shroomok.com/en/wiki/The_magic_of_Golden_Teacher_mushroom "The magic of Golden Teacher mushroom").
#### How many Pink Buffalo mushrooms can I pick?
You can get about 250-500 grams per 1 liter of substrate (multiculture cultivation). It is one of the most productive strains.
You can always increase yields by isolating pure culture on agar or make a clone on agar. But this technique is not recommended for beginners. For agar manipulations you need to understand basic mycological principles and have at least one success grow-story (IMHO).
#### How many flushes can I get with Hairy Buffalo?
Pink Buffalo usually produces its entire mass of mushrooms during the first 3 flushes. The 4th and 5th flushes have only minor crop residues.
#### Growing conditions for Pink Buffalo mushrooms
Hairy Buffalo is heat-loving strain from sunny Thailand, where warm subtropic climate. It means mushrooms need conditions as close as possible to their native country.
In a hot dry season (substrate colonization) it is necessary to provide temperature about +25°..+27°С (77-81°F)
In a rainy season (fruiting period) it is necessary to provide high relative humidity (~90-99%) and decrease temperature up to +20°..+25°С (68-77°F).
#### What growing tek is good for Pink Buffalo mushroom?
Any cultivation tek known today is perfect for Psilocybe cubensis Pink Buffalo mushrooms
✅ PF-tek is a old school growing-tek for all Psilocybe cubensis mushrooms and also can be used for Pink Buffalo mushrooms.
✅ Bottle-tek for cultivation Pink Buffalo mushrooms
> 🔴 Check out: [**Bottle-tek or how to grow mushrooms in plastic bottles**](https://shroomok.com/en/wiki/Bottle-tek_or_how_to_grow_mushrooms_in_plastic_bottles "Bottle-tek or how to grow mushrooms in plastic bottles")
[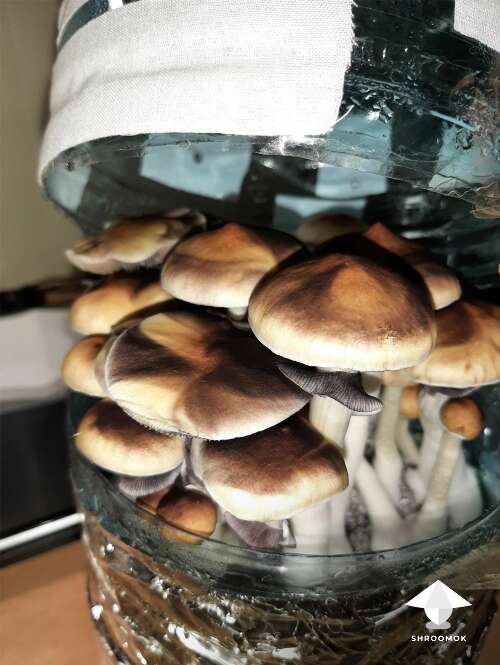](https://shroomok.com/en/wiki/File:Bottle-tek-shroomok-growers.png) Mushroom cultivation in plastic bottle aka Bottle-Tek ✅ Cubensis Pink Buffalo on small mushroom cakes or shoeboxes.
> 🔴 Check out: [**Casing & small mushroom cakes**](https://shroomok.com/en/wiki/Making_mushroom_cake,_spawn_to_bulk,_and_casing "Casing of magic mushrooms cakes")
[](https://shroomok.com/en/wiki/File:Pink-buffalo-magic-mushrooms.png) Pink Buffalo magic mushrooms fruiting - small mushroom cake tek✅ Pink Buffalo cultivation in MonoTube
> 🔴 Check out: [DIY Monotub for mushrooms](https://shroomok.com/en/wiki/Forget_Monotub_Kit._DIY._How_to_make_Monotub_for_Mushrooms_by_your_own "DIY Monotub for mushrooms")
[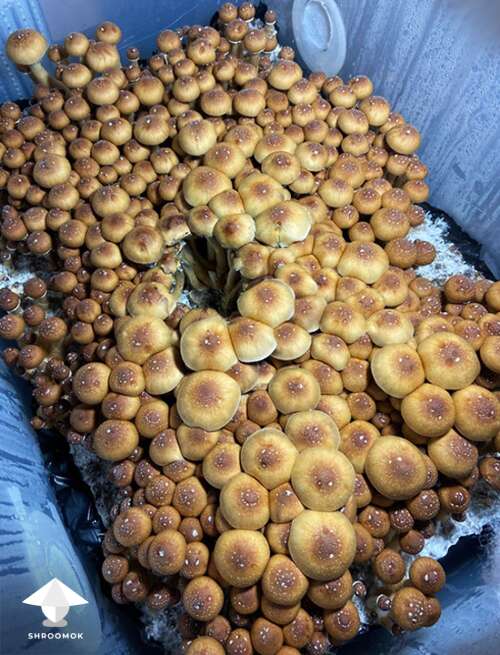](https://shroomok.com/en/wiki/File:Hairy-buffalo-mushrooms-monotube.png) Pink Buffalo magic mushrooms cultivation in modified MonoTub[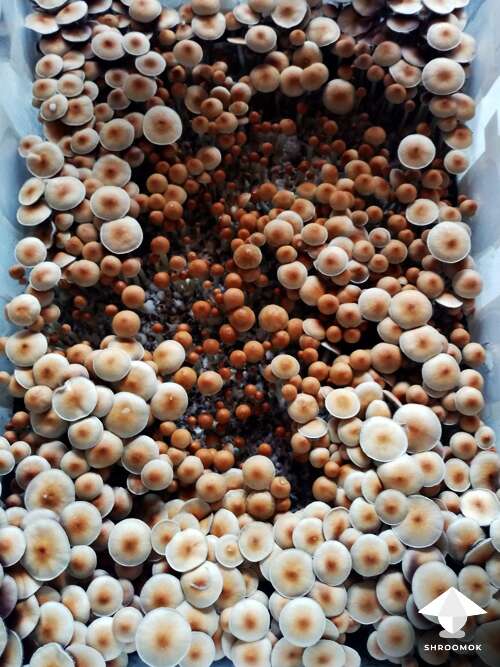](https://shroomok.com/en/wiki/File:Psilocybe-cubensis-pink-buffalo-in-monotube.png) Psilocybe Cubensis Pink Buffalo fruiting in modified MonoTub#### Pink Buffalo mushrooms for microdosing
Dry Psilocybe cubensis Pink Buffalo mushrooms are good to use for microdosing.
> 🔴 Check out: [**Microdosing guide**](https://shroomok.com/en/wiki/Magic_mushrooms_microdosing "Magic mushrooms microdosing")
#### Potency, effects and tripping with Pink Buffalo mushrooms
🚀 **Pink Buffalo potency:** medium, as all Psilocybe cubensis mushrooms.
Average alkaloid concentration in dry mushrooms for Psilocybe cubensis: psilocybin - 0.63%, psilocin - 0.6%, beeocystin - 0.025 (Gartz, 1994).
🚀 **Start of trip:** fast entry in 20-30 minutes, may be accompanied by nausea for the next 20-30 minutes.
🚀 **Average trip duration:** 2-3 hours of deep tripping with an average dosage of 1.5-2.5g of dry mushrooms. Post effect for the next 3-4 hours.
🚀 **Effects.** This is the favorite part for Shroomok. Only copywriters and psychonauts know the best about effects. So let's refer to the "experts" 😄
Copywriters and experienced psychonauts claim:
> Pink Buffalo mushrooms plunge you gently in a state of euphoria.
>
> Tripping is soft, smooth and kind. Strain is suitable for those who need the rest, self healing and calm relaxation.
>
> You feel pleasant inner peace. Shrooms lead you and help you tune into a positive vibes, feelings of beauty all around and inside you
**In fact each tripping depends on:**
🔶 dosage of mushrooms
🔶 your mood before tripping and at the moment of tripping
🔶 set&setting (environment, presence or absence of people, sounds, weather, smells etc.)
🔶 sitter (presence or absence, and his/her experience)
🔶 your health (metabolism, immunity, and hormonal systems)
🔶 preparation before tripping (diet, quality of sleep and rest)
🔶 your mental health, stresses, thoughts, quality of information, life style and overall life experience...
All these points influences your psychedelic experience greatly!
That's why even 10 trips with the same strain and even same dosage will be **completely different!** Because it's not about the cubensis strain. All Psilocybe cubensis strains genetically have the same average potency, but always vary even from one shroom on the cake to another. Such a magic!
Tripping effects is about you: response of your body and brain to psilocin! Moreover, you are different every moment of your life: your body, your health, your mental health, your stress level, combination of your feelings, emotions and life balance.
Just listen to yourself!
> 🔴 Check out [Mushroom Consumption Guides](https://shroomok.com/articles:mushroom-consumption-recipes-and-tips)
Join Shroomok Community on [Discord](https://discord.gg/ngKhQDmymD) and [Reddit](https://www.reddit.com/r/Shroomok) for questions and sharing experience or leave your comment below.
If you find this guide helpful, please support me with a cup of coffee on [☕️ buymeacoffee](https://www.buymeacoffee.com/shroomok)
Peace, Shroomok ❤️
📸 More photos in [Pink Buffalo photo gallery](https://shroomok.com/gallery/pink-buffalo)
## The magic of Golden Teacher mushroom
[The magic of Golden Teacher mushroom](https://shroomok.com/en/wiki/The_magic_of_Golden_Teacher_mushroom)
[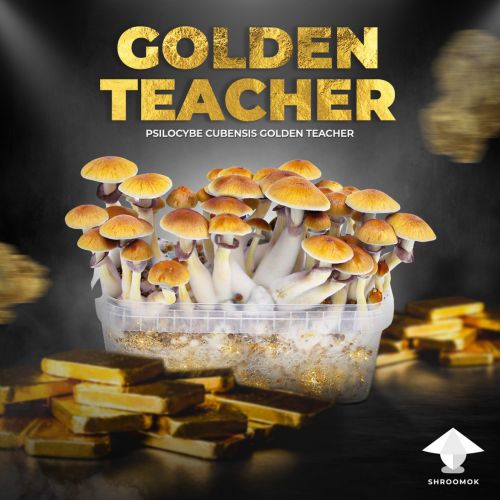](https://shroomok.com/en/wiki/File:Psilocybe-cubensis-golden-teacher-shroomok.jpg) All about Psilocybe Cubensis Golden Teacher strain### All about Psilocybe Cubensis Golden Teacher mushrooms: potency, effects, tripping, microdosing and cultivation
Welcome to the short shroom-story about one of the most popular psilocybin mushroom strains. Here we are going to simplify the science and demystify marketing. So you are able to make the best informed choice you possibly can for cultivation, [microdosing](https://shroomok.com/en/wiki/Magic_mushrooms_microdosing "Magic mushrooms microdosing") and [psychedelic trips](https://shroomok.com/en/wiki/How_to_prepare_for_psychedelic_mushroom_trip "How to prepare for psychedelic mushroom trip")
***Golden Teacher*** (also known as GT mushroom) is a classic strain of Psilocybe Cubensis magic mushrooms. It is one of the most famous psychedelic fungi in the world.
#### Scientific classification
Let's figure out the features of this strain. Traditionally take a look at the boring (but so important!) scientific classification of the Fungi Kingdom and the place of Golden Teachers in it.
[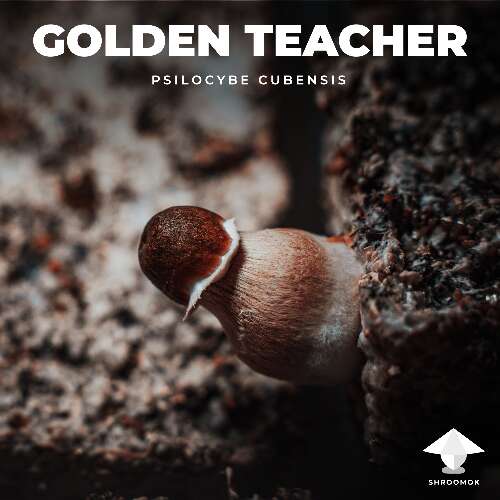](https://shroomok.com/en/wiki/File:Gt-mushroom-description.png) Psilocybe Cubensis Golden Teacher strain of magic mushrooms- Kingdom: Fungi
- Division: Basidiomycota
- Class: Agaricomycetes
- Order: Agaricales
- Family: Hymenogastraceae
- Genus: Psilocybe
- **Species:** Psilocybe Cubensis
- **Strain:** Golden Teacher
For the latin naming system uses the following format: genus (e.g. Psilocybe) followed by species (e.g. cubensis). If you’re looking at spores and the latin names are different, then you know you have different species. Remember, as you could never cross a fly with a human, you couldn’t naturally cross Psilocybe cubensis with Psilocybe natalensis.
But **strains** should all originate from the **same species** (usually Psilocybe cubensis) and can interbreed freely.
#### The origin of Golden Teacher
The species was first described in 1906 as *Stropharia cubensis* by American mycologist Franklin Sumner Earle in Cuba island (Caribbean Sea). He assigned it to the genus Stropharia and named it Stropharia cubensis.
In 1948 the German scientist Rolf Singer in his publication in the journal "Sydowia", transferred it to the genus Psilocybe.
[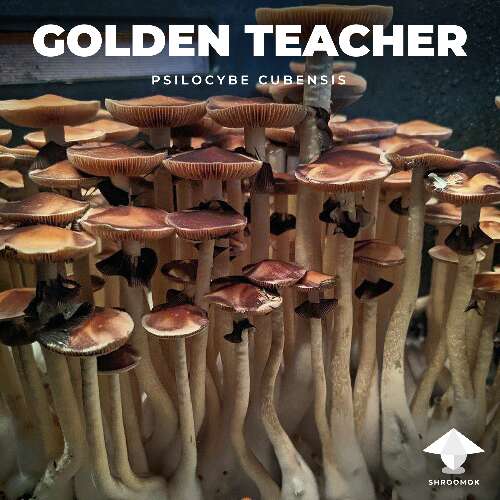](https://shroomok.com/en/wiki/File:Golden-teacher-mushroom-cultivation-and-effects.png) P. Cubensis Golden Teacher mushrooms fruiting in monotubAs for the strain of Golden Teacher its exact origin is unknown. It is believed that "golden teacher" appeared in the Florida desert in the USA in the late 1980s without any claim to authorship.
#### Features of Golden Teachers appearance
Golden Teachers have a unique appearance with golden-yellow caps. They are brightly colored around the edges with dark orange gradient in the center of the umbrella.
[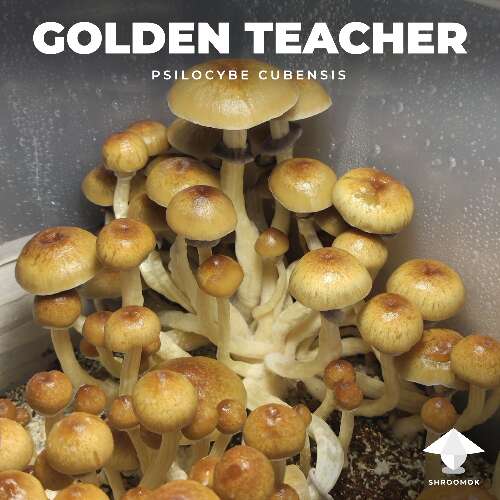](https://shroomok.com/en/wiki/File:Golden-teacher-gt-mushrooms.png) Psilocybe Cubensis Golden Teacher mushroom fruiting in monotub
A scattering of light gold-colored flecks can be seen throughout the cap.
[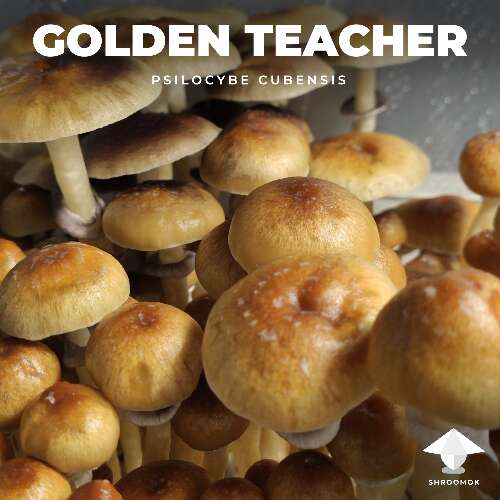](https://shroomok.com/en/wiki/File:Golden-teacher-bottle-tek.png) Main features of golden teachers
This is how the peculiarities of the color palette determined it to be GOLDEN.
[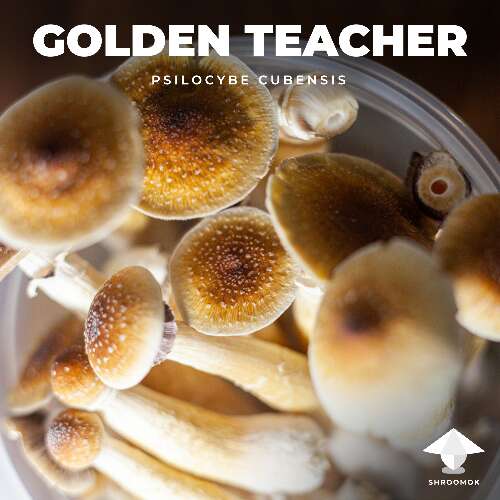](https://shroomok.com/en/wiki/File:Cubensis-golden-teacher.png) Amazing GT mushrooms
Even after drying mushrooms perfectly preserves its golden color.
[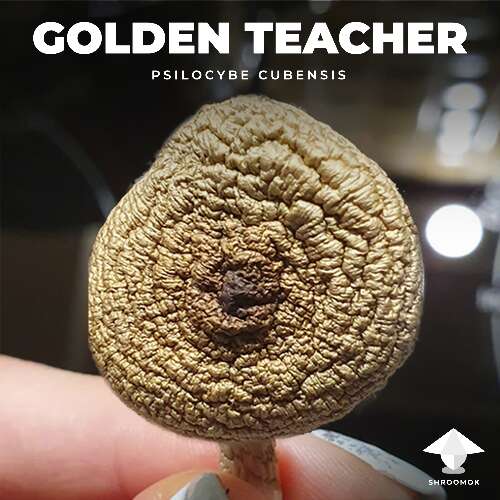](https://shroomok.com/en/wiki/File:Golden-teacher-dry.png) Dry Golden Teacher mushroom
By the time the spores mature, the cap cracks along the edge and turns a red-gray-brown color. The cap diameter is often about 3-5 cm, sometimes up to 8-10 cm.
[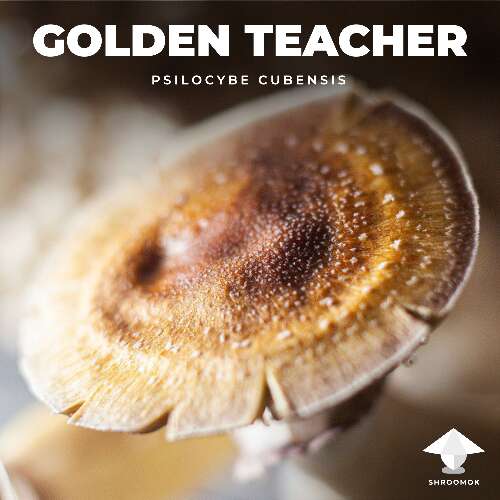](https://shroomok.com/en/wiki/File:Golden-teacher-features.png) P. Cubensis Golden Teacher mushroom cap
Mushrooms reach a height of 5-7 cm up to 20-25 cm.
[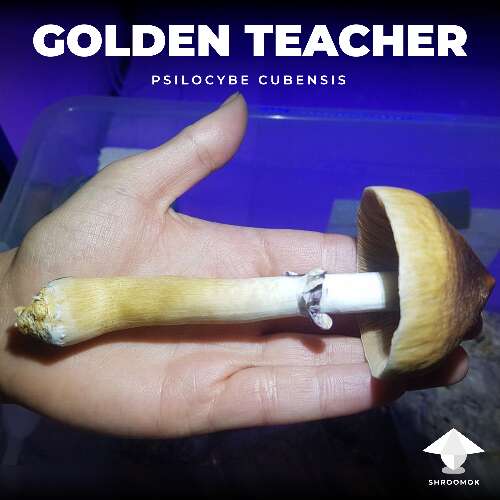](https://shroomok.com/en/wiki/File:Cubensis-golden-teacher-giant-mushroom.png) Giant golden teacher mushroom from monoculture. Photo by mrzimm on[**Discord**](https://discord.com/invite/ngKhQDmymD)
Size and yield depend on the flush of fruiting, grower's skills and cultivation techniques.
[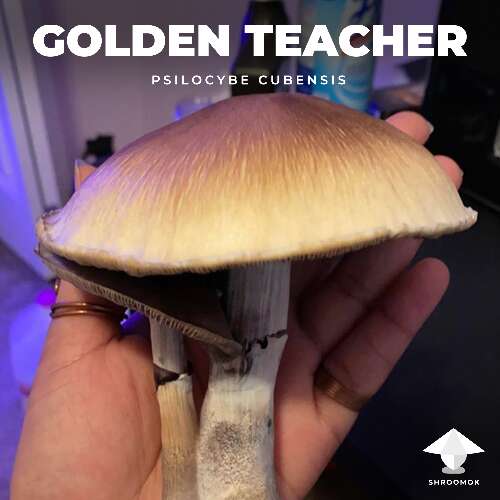](https://shroomok.com/en/wiki/File:Golden-teacher-giant.png) Big golden teacher mushroom#### Why Golden Teacher is the most popular strain?
[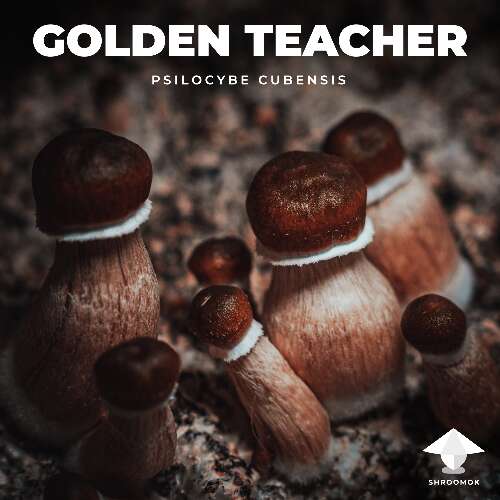](https://shroomok.com/en/wiki/File:Psilocybe-cubensis-golden-teacher.png) Cubensis GT mushroom familyGolden Teacher can be rightfully proclaimed the most important wizard among all P. Cubensis strains. But why?
✅ Golden Teacher is one of the earliest strains in home cultivation and is considered a veteran of amateur growing.
✅ As a result, the greatest number of grow-reports and trip-reports are related to Golden Teacher.
✅ It is traditionally believed that any newbie grower can cope with cultivation of "golden teachers" and doesn't matter which cultivation technique you'd like to use. This is true, but it doesn't mean you can neglect the elementary rules of sterility and cultivation basics. These rules are the same for all kinds and strains of mushrooms.
✅ Golden Teacher is one of the most hardy strains with a good strong genetic basis for mycological experiments.
✅ Mutants and different hybrids are created on the basis of Golden Teacher, which replenish the variety of strain collections every year. These include a group of albino mutants such as Leucistic Golden Teacher (Lucy GT), a group of popular mutants with True Albino Teacher (TAT) genetic - Yeti, Wombat, Jack Frost, Gandalf and over 30 more mutations involving the powerful genetics of Psilocybe Cubensis Golden Teacher.
We'll talk about variety and cultivation features of modern mutants in next article. Stay tuned for more updates! In the meantime, a few photos of these beauties as an example.
[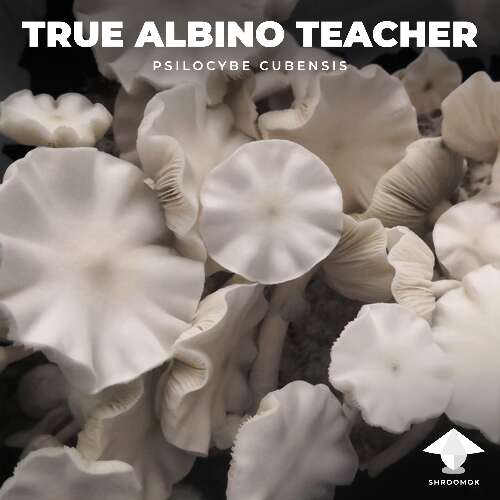](https://shroomok.com/en/wiki/File:Tat-true-albino-teacher.png) True Albino Teacher mushrooms (TAT)[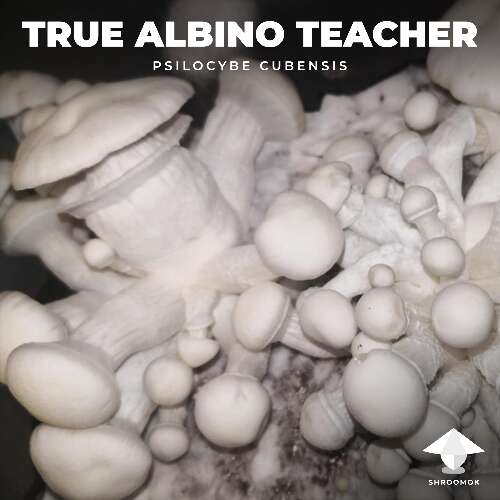](https://shroomok.com/en/wiki/File:True-albino-teacher-mutant.png) TAT strain of magic mushrooms[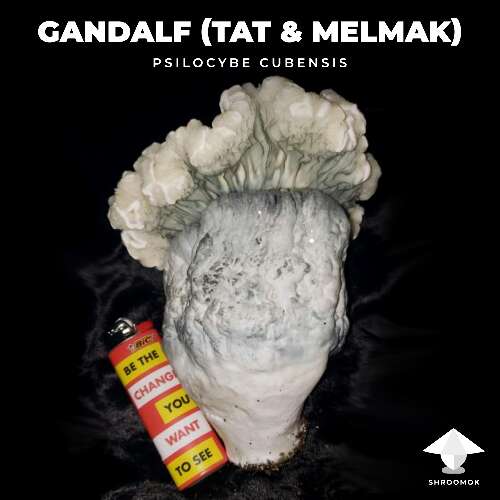](https://shroomok.com/en/wiki/File:Gandalf-true-albino-teacher-and-melmak.png) Cubensis Gandalf strain. Photo by **6~ʏʊƈǟ~9** on [**Discord**](https://discord.com/invite/ngKhQDmymD)[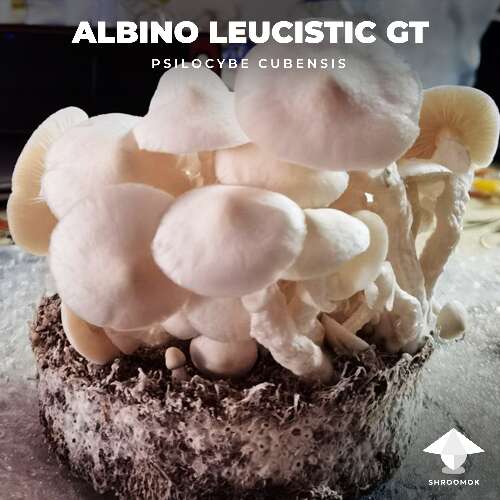](https://shroomok.com/en/wiki/File:Albino-leucistic-golden-teacher.png) Albino Leucistic Golden Teacher strain#### Is Golden Teacher suitable for noobs in mushroom growing
Any strain of Psilocybe Cubensis is newbie-friendly. Golden teacher is ideal for beginners with "zero" experience in mushroom cultivation.
> 🔴 Check out and follow: [Mushroom growing guide in 20 steps](https://shroomok.com/articles:grow-mushrooms-at-home-guide)
#### How long does it take to harvest GT mushrooms
From inoculation to the first harvest it takes about 28-35 days. GT is one of the fastest and most active strains among P. cubensis mushrooms.
#### How many GT mushrooms can I pick
You can get about 150-400 grams per 1 liter of substrate. It is not the most productive strain. Especially if you cultivate mushrooms with multiculture (spore syringe or liquid culture).
Advanced growers increase yields by isolating pure culture on agar, but this technique is not recommended for beginners. For agar manipulations you need to understand basic mycological principles and have at least one success grow-story.
#### How many flushes can I get with Golden Teacher
Golden Teacher usually produces an even number of mushrooms in each of the 4-5 flushes of fruiting.
With GT, it is not always possible to get a powerful first flush (from multiculture). However, after rehydration, the 2-nd and 3-rd flushes always please beginners.
On the 4th-5th flush the yields go down just like with any other strain of P.cubensis.
#### What tek is the best for Golden Teacher cultivation
Any growing tek known today is perfect for GT mushrooms cultivation!
✅ PF-tek or Small mushroom cakes for growing Golden Teachers
> 🔴 Check out: [How to make mushroom cake](https://shroomok.com/en/wiki/Making_mushroom_cake,_spawn_to_bulk,_and_casing "Casing of magic mushrooms cakes")
[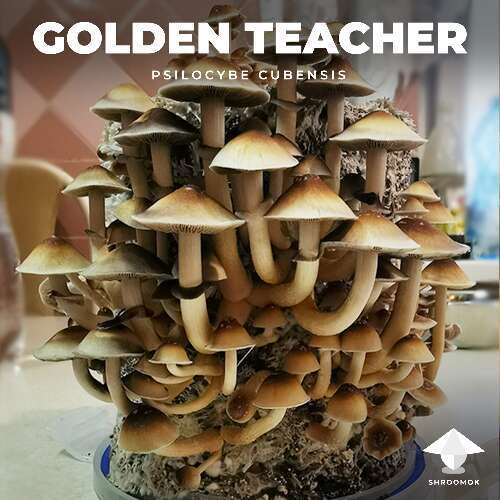](https://shroomok.com/en/wiki/File:Golden-teacher-mushroom-cake.png) Golden Teacher cultivation. Small mushroom cake tek. Photo by mrzimm - moderator [Shroomok growers Community in **Discord**](https://discord.com/invite/ngKhQDmymD)
✅ Bottle-tek for GT cultivation
> 🔴 Check out: [Bottle-tek or how to grow mushrooms in plastic bottles](https://shroomok.com/en/wiki/Bottle-tek_or_how_to_grow_mushrooms_in_plastic_bottles "Bottle-tek or how to grow mushrooms in plastic bottles")
[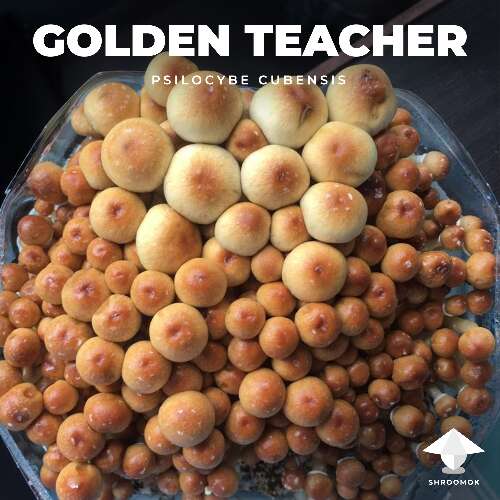](https://shroomok.com/en/wiki/File:Golden-teacher-magic-mushrooms-bottle-tek.png) Golden teacher cultivation in plastic bottle (bottle-tek). Photo by Slipkote - [Shroomok Growers Community in Telegram](https://t.me/shroomok_chat_en)[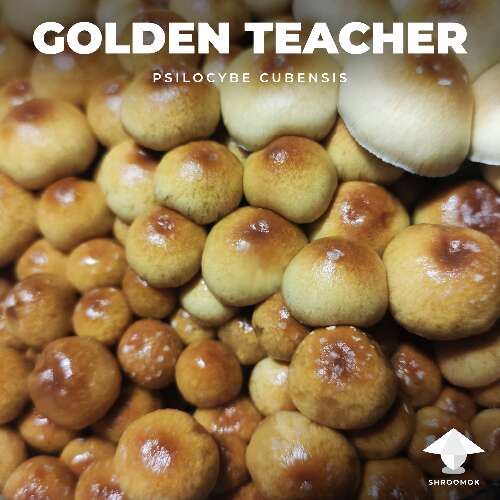](https://shroomok.com/en/wiki/File:Golden-teacher-bottle-tek-growing.png) Golden teacher harvest in plastic bottle (bottle-tek). Photo by Slipkote - [Shroomok Growers Community in Telegram](https://t.me/shroomok_chat_en)✅ Monotub for cultivation Psilocybe cubensis Golden Teacher mushrooms
> 🔴 Check out: [DIY Monotub for mushrooms](https://shroomok.com/en/wiki/Forget_Monotub_Kit._DIY._How_to_make_Monotub_for_Mushrooms_by_your_own "DIY Monotub for mushrooms")
[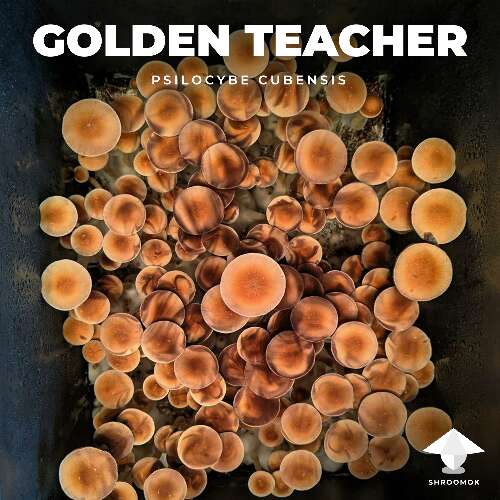](https://shroomok.com/en/wiki/File:Golden-teacher-magic-mushroom-description-and-effects.png) Psilocybe cubensis Golden Teacher growing in monotub[](https://shroomok.com/en/wiki/File:Golden-teacher-monotube.png) Psilocybe cubensis golden teacher cultivation in monotub#### Golden Teacher mushrooms for microdosing
Dry GT mushrooms are great to use for microdosing.
> 🔴 Check out: [Microdosing guide](https://shroomok.com/en/wiki/Magic_mushrooms_microdosing "Magic mushrooms microdosing")
#### Effects and tripping with Golden Teacher mushrooms
Recommended for beginners at medium dosage (1.5-2.5 grams) who are insecure in psychedelic experience. At this dosage and with the right preparation before tripping users report about calm, relaxing experience, with soft visuals.
[](https://shroomok.com/en/wiki/File:Golden-teacher-effects-and-trip.png) Golden Teacher effects, potency, psychedelic trips and microdosing🚀 **GT potency and alkaloid concentration level:** medium (as all Psilocybe cubensis mushrooms).
Average alkaloid concentration in dry mushrooms for Psilocybe cubensis: psilocybin - 0.63%, psilocin - 0.6%, beeocystin - 0.025 (Gartz, 1994).
🚀 **Trip entry:** fast entry in 20-30 minutes, may be accompanied by nausea for the next 20-30 minutes.
🚀 **Average trip duration:** 2-3 hours of deep tripping with an average dosage of 1.5-2.5g of dry mushrooms. Post effect for the next 3-4 hours.
🚀 **Effects.** Only copywriters and psychonauts know all about effects based on subjective feelings. So once again we turn to the "experts":
> Golden Teacher take you by the hand and lead you to enlightenment. They will help you connect to your origins, to dissolve, to know the true nature of yourself.
>
> Golden Wizards will help you heal your mind and spirit and give you the beauty of the visuals...
>
> Golden teachers often reward their travelers with wise lessons that leave their mark even the trip is over...
Now to be true and honest.
Let me remind you, there is currently NO scientific data or studies on the difference in effects of P. cubensis strains!
All descriptions you find on the Internet are copywriter's articles, at best are subjective evaluations and experiences of psychonauts.
Each person before taking the magic mushrooms have many individual characteristics at the start: general physical development, health, emotional state, preparation, psychological traumas, fears, goals, expectations and at least different dosage.
All of the above and 1,000 other factors significantly determine the flow of a psychedelic trip.
Remember! Every psychedelic experience you have will be unique. You will never have 2 identical trips with the same strain and with the same dosage.
It will always be a totally new adventure, new experience and a new YOU!
> 🔴 Check out: [Mushroom Consumption guides and recipes](https://shroomok.com/articles:mushroom-consumption-recipes-and-tips)
If you find this guide helpful, please support me with a cup of coffee on [☕️ buymeacoffee](https://www.buymeacoffee.com/shroomok)
Peace, Shroomok ❤️
📸 **More photos in [Golden Teacher photo gallery](https://shroomok.com/gallery/golden-teacher)**
## I mixed strains in mushroom cake by accident
[I mixed strains in mushroom cake by accident](https://shroomok.com/en/wiki/I_mixed_strains_in_mushroom_cake_by_accident)
[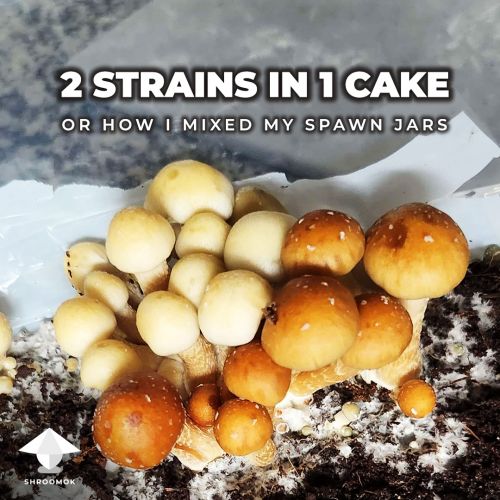](https://shroomok.com/en/wiki/File:Two-mushroom-strains-in-one-mushroom-cake.jpg) Two mushroom strains in one mushroom cake#### Story 1. How I mixed two cubensis strains in one mushroom cake and what came out of it
Hey Shroomok Community!
**@Prof. Frags** here — Magic Warrior on Shroomok Discord and, starting from this story, writer on shroomok.com
When I first began my amateur mushroom cultivation journey Shroomok told me:
> In the world of amateur mushroom growing everything is possible
Those words rang the most true on in early morning in January 2023. Let me share why from the very beginning!
##### My growing process
On a late night November 2022 I decided it was great time to inoculate a series of jars with Psilocybe Cubensis.
For my spawn jars I like to use long grain organic rice that has been boiled for ~7 minutes before being used to fill 1 quart jars to 3/4 full. Then I place the jars with the rice in them into a pressure cooker for 90 minutes at 15 psi to sterilize.
The first series of jars was for [Golden Teacher](https://shroomok.com/en/wiki/The_magic_of_Golden_Teacher_mushroom "The magic of Golden Teacher mushroom") (GT) strain and another for some Albino Penis Envy Reverts (APE-R).
When I had initially inoculated the spawn jars, I was in the middle of my last college semester, buying a house, and organising a family visit for graduation. So, I had a lot to do, a lot to worry about.
During colonization period in my eagerness to find the warmth of my bed. I failed to label the jars to know exactly which strain in each jar.
It wasn't until the middle of January 2023 that I was able to move my colonized spawn jars into substrate (spawn to bulk in 16 Qt [monotub](https://shroomok.com/en/wiki/Forget_Monotub_Kit._DIY._How_to_make_Monotub_for_Mushrooms_by_your_own "Forget Monotub Kit. DIY. How to make Monotub for Mushrooms by your own")). For my fruiting substrate I use a mix of coco coir and vermiculite. I used to just use coco coir and would consistently contaminate the substrate with [*Trichoderma* green mold](https://shroomok.com/en/wiki/Green_mold_contamination_aka_Trichoderma "Green mold contamination aka Trichoderma"), but since adding vermiculite I have not had any problems with trich contam (maybe there is another reason).
One of the first things I noticed was how rapidly the mycelium run from colonization to fruiting. On the photo below you can see 10 days after the initial transfer of spawn to bulk substrate
[](https://shroomok.com/en/wiki/File:Mushroom-cake-mycelium-run-ape-reverts-and-golden-teacher.jpg) Bulk colonization period, mix of Albino Penis Envy Reverts + Golden Teacher, 10 days after spawn to bulk. Photo by Prof. FragsAbout 5 days later (15 days after spawn to bulk) I noticed the [first pins](https://shroomok.com/en/wiki/Fruiting_period._Pinhead_initiation,_mushroom_pinning_and_mushrooms_growth_parameters "Fruiting period. Pinhead initiation, mushroom pinning and mushrooms growth parameters")
[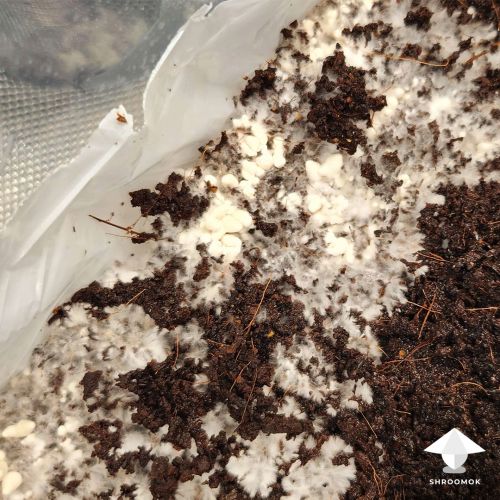](https://shroomok.com/en/wiki/File:Ape-with-gt-pinning.jpg) Start of pinning process, mix of two P. Cubensis strains APE-R with GT, 15 days after spawn to bulk. Photo by Prof. FragsWhen I lifted the lid to check my monotub again I believed it was full of Albino Penis Envy Reverts (APE-R), but I found a little golden caps scattered amongst little white caps.
First fruits are coming! Here I realized I had mixed my spawn jars, hence I mixed two strains in my mushroom cake. Golden Teacher (GT) with my Albino Penis Envy Reverts (APE-R) 🤦♂️
[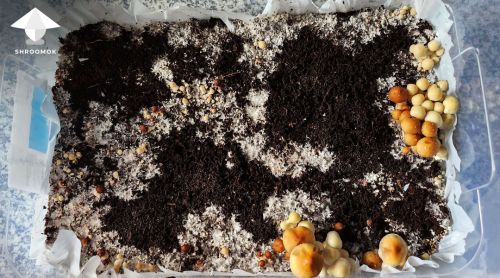](https://shroomok.com/en/wiki/File:Mix-of-two-mushroom-strains-psilocybe-cubensis.jpg) Mushroom fruiting, Golden Teacher with golden caps and APE Revert with white caps. Photo by Prof. Frags
However there is still a lot of uncolonized space on my substrate
[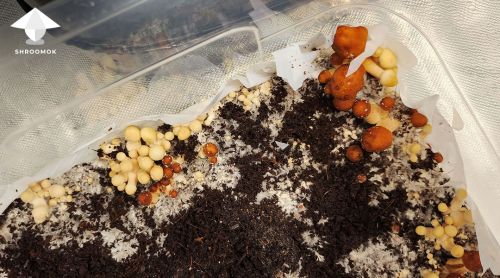](https://shroomok.com/en/wiki/File:Mixed-spawn-jars-two-cubensis-strains.jpg) Golden Teacher strain + APE Revert strain. Photo by Prof. Frags
In total it took about 21 days from moving the spawn to bulk substrate to harvesting the first mushrooms
[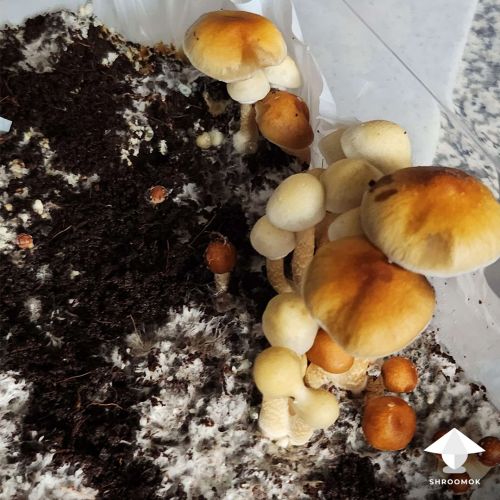](https://shroomok.com/en/wiki/File:Two-strains-in-one-mushroom-cake.jpg) APE-R + GT neighbouring. Photo by Prof. Frags
Actually, pretty good mushroom bouquet!
[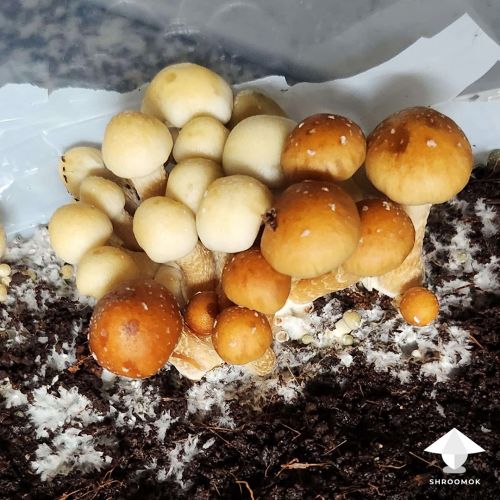](https://shroomok.com/en/wiki/File:Two-mushroom-strains-grow-together.jpg) Mushroom clusters bloom together. Photo by Prof. Frags
As a result, the mushrooms were smaller than normal
[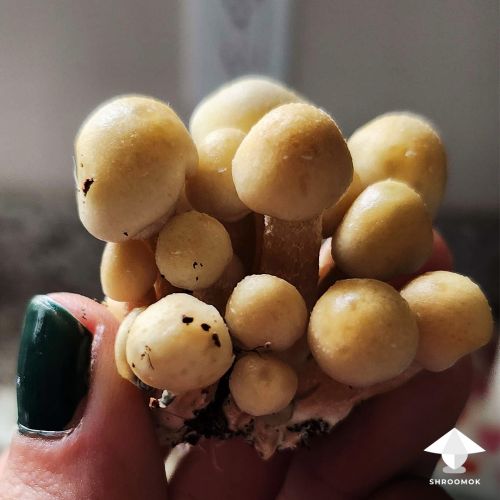](https://shroomok.com/en/wiki/File:Albino-penis-envy-revert-APE-R.jpg) Psilocybe cubensis albino penis envy revert cluster. Photo by Prof. Frags
I flushed the APE and GT combo and it's had pretty minimal growth further. Even after 12 hours soaking in water mushrooms stopped producing mushrooms. Eventually, I harvested only 1 productive flush
[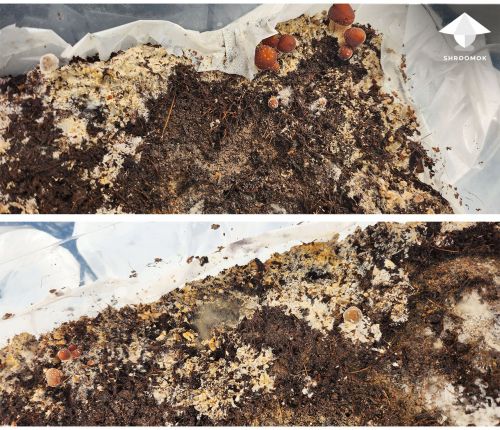](https://shroomok.com/en/wiki/File:APE-and-GT-combo-flushing.jpg) APE in GT combo flushing. Photo by Prof. Frags##### What I've learned from this case
On the top of mushroom cake you can see visible boundaries between 2 strains and between different mushroom colonies. Each colony has its own territory.
I've learned this time that rapid fruiting may be caused by contamination. In this case the mixture of 2 different strains caused the mycelium to fruit quicker. Each strain acting as 'contamination' to the other. Strains compete with each other for nutrients. As a result, fruiting started faster, but overall mushroom yield was lower, than usual.
##### My message to future newbie growers
Let's imagine that 'somebody' has just came up with the idea to mix a few strains and get the new strain. When I first started my mushroom growing I imagined that's how new strains were created lol. Bad news - it won't work in such way, this WON'T create a NEW strain.
Moreover strains compete with each other and loose energy. That's why growers try to isolate culture even within one strain, so that you'll get full colonisation and increase your harvest.
Is it possible to grow 2 strains in one cake? As you can see above it is possible!
If you just started you mushroom growing journey don't afraid to fail. Keep growing! Keep growing your mushrooms and your skills.
Sometimes fail can be turned into success. In the world of amateur mushroom growing everything is possible...
And one more important point! Label your jars and sign the strain :)
With love, **Prof. Frags 😍**
#### Story 2. I mixed cubensis strains APE with Luminous Lucy
Hey growers!
**@Mycelia P** here — MushroomHead of Shroomok Discord community.
My story is the following
I had 2 spawn jars ready for spawn to bulk. I thought both jars of spawn were Psilocybe Cubensis **[Albino Penis Envy](https://shroomok.com/en/wiki/Mutant_strain_Albino_Penis_Envy_aint_just_APE_but_King_Kong_of_Magic_Mushrooms "Mutant strain Albino Penis Envy aint just APE but King Kong of Magic Mushrooms") strain**, but one jar turned out to be Psilocybe Cubensis **Luminous Lucy strain**.
As a result, I mixed 2 different strains, but due to scientific classification it's the same species and gene Psilocybe Cubensis. They are relatives, but not at all. It's two different families, they are relatives, but they that would like to have their own apartments.
Here is a good couple of pictures to show what happens when you mix incompatible strains. This is the cake before it fruited
[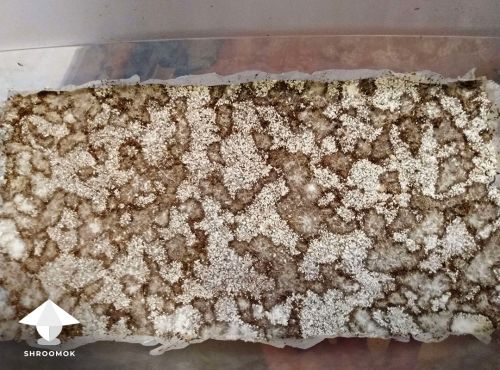](https://shroomok.com/en/wiki/File:Cubensis-luminous-lucy-strain-with-albino-penis-envy.jpg) Psilocybe Cubensis Luminous Lucy and Albino Penis Envy mix. Phoho by Mycelia P
Shows good boundary lines between different mushroom strains (mushroom colonies)
[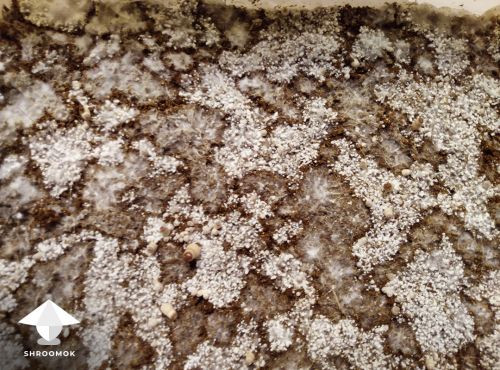](https://shroomok.com/en/wiki/File:APE-and-Luminous-Lucy-strains-mix.jpg) APE + Luminous Lucy. Phoho by Mycelia P
As a result I've harvested this
[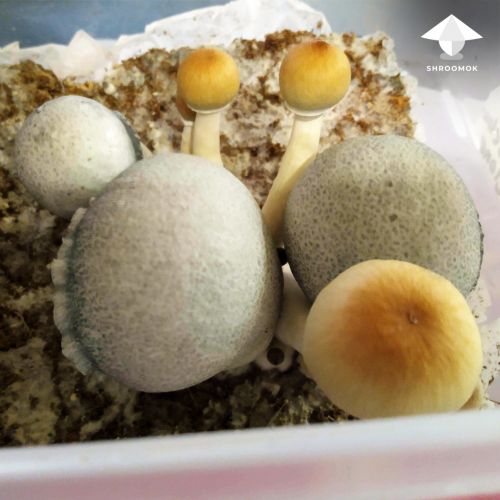](https://shroomok.com/en/wiki/File:APE-Luminous-Lucy-strain-mix.jpg) APE + Luminous Lucy fruiting together. Phoho by Mycelia PEnjoy your home mycology!
With love, **Mycelia P ❤️**
#### Story 3. I mixed different mushroom species Tampanensis with Cubensis
Howdy shroomers!
**@mrzimm** here — Tech Guru of Shroomok Discord and writer on shroomok.com
Let me share my case.
One day I mixed 2 different mushroom **species.** Not two strains of one species (cubensis strain with another cubensis strain you've seen in the stories above). I literally mixed different **species**!
Psilocybe **Tampanensis** (which develop sclerotia aka magic truffles) with [Psilocybe Cubensis Golden Teacher](https://shroomok.com/en/wiki/The_magic_of_Golden_Teacher_mushroom "The magic of Golden Teacher mushroom") (the most famous P. Cubensis strain)
> Guide to check: [How to grow magic truffles Psilocybe Mexicana and Tampanensis](https://shroomok.com/en/wiki/How_to_grow_magic_truffles_Psilocybe_Mexicana_and_Tampanensis "How to grow magic truffles Psilocybe Mexicana and Tampanensis")
How did this happen? I just used scissors to cut a piece of Tampanensis spore print after working with GT spore print. GT spores sticked to scissors, but between GT and Tampanensis manipulations some time has passed and I used these scissors for other purposes. Anyway, I couldn't find another reason how it happened!
> **I swear, I do wipe scissors with alcohol before using them, but... magic! Some GT spores survived**
Some time later I've noticed strange mycelium colonies. They differ from each other (color, thickness, structure)
[](https://shroomok.com/en/wiki/File:Tampanensis-with-cubensis-mix.jpg) Tampanensis and Cubensis mixed together and created different colonies. Photo by mrzimm
Then mushroom fruit bodies appeared that weren't Tampanensis for sure 😁
[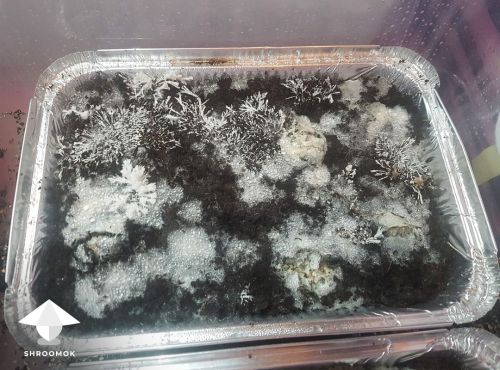](https://shroomok.com/en/wiki/File:Tampanensis-with-golden-teacher-mix.jpg) Tampanensis and GT mix. Photo by mrzimm
OMG, Cubes shrooms here! Look, cubensis cluster has thicker white mycelium and fruits are coming. Tampanensis has thiner fluffy mycelium around cubensis families
[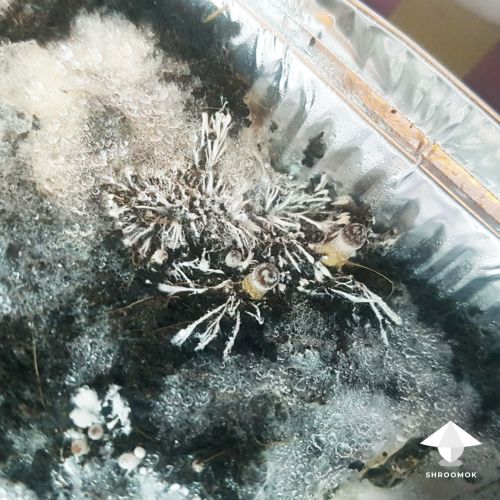](https://shroomok.com/en/wiki/File:Cubensis-gt-fruiting-and-tampanensis-mycelium.jpg) GT fruiting in tampanensis cake. Photo by mrzimm
As a result I've got truffles inside the mushroom cake, because Tampanensis continued producing magic truffles
[](https://shroomok.com/en/wiki/File:How-to-harvest-magic-truffles.jpg) Tampanensis sclerotia harvesting after mushroom fruiting. Photo by mrzimmI harvested mostly Golden Teacher mushrooms and a few Tampanensis fruitbodies
[](https://shroomok.com/en/wiki/File:How-to-dry-tampanensis-mushrooms.jpg) Tampanensis and GT dry mushrooms. Photo by mrzimmIt's not easy to make Tampanensis to fruit. In this case especially. I got lucky enough to make one spore print of Psilocybe Tampanensis from these few fruits (it is common for tampanensis that rare caps produce spores)
[](https://shroomok.com/en/wiki/File:Tampanensis-spore-print.jpg) Psilocybe tampanensis spore print. Photo by mrzimmLet's sum up!
**Competition for nutrients leads to a drop in yields for both species.** As a result, Cubensis produced not so much mushrooms. Tampanensis produced a few shrooms only and realised its potential in producing sclerotia deep inside mushroom cake instead of development fruitbodies.
**There is no benefit from such neighbouring, that's why growers try to isolate culture even within one strain.** It takes at least few transfers on agar to choose one colony or cloning mushroom on agar, so that within one family mushrooms don't need to compete, you'll get full colonisation, good pinning and increase your yield.
However, there is no tragedy if you mixed strains or species by accident. Just fun!
Enjoy your unexpected experiments!
Peace, **mrzimm 🙏**
## Growing shrooms during the hot season
[Growing shrooms during the hot season](https://shroomok.com/en/wiki/Growing_shrooms_during_the_hot_season)
[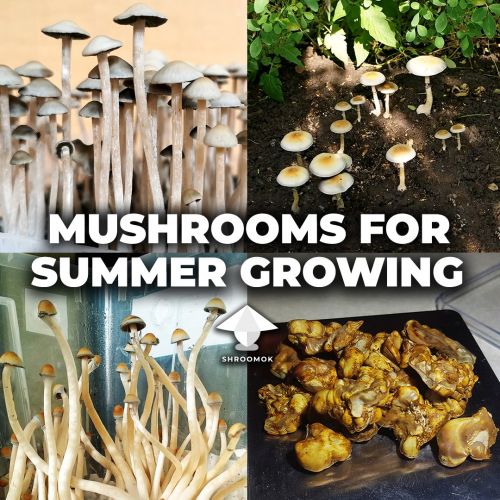](https://shroomok.com/en/wiki/File:The-best-magic-mushroom-species-for-hot-season-growing.jpg) The best magic mushroom species for growing during hot season### If you are struggling with high temperature while growing magic mushrooms
For fruiting period Psilocybe Cubensis mushrooms prefer +20..25ºC or 68-77ºF.
Starting from 25ºC or 77ºF it is possible to get a mushroom harvest, but cultivation process becomes challenging. Due to high temperature you can face some issues like extreme secondary metabolites, overlay and stroma, poor pinning etc.
Technically it is possible to create favorable conditions (cooling for fruiting chamber) or postpone your Cubensis cultivation for better times.
Today, I’d like to share some tips for those who really struggle with high temperatures while growing shrooms during the hot season.
#### Cycle mushroom species due to the season of the year
Let’s follow nature's approach first if you don’t want to bother with cooling solutions, but wish to continue your growing hobby.
> Choose the right mushroom species for hot period!
All heat tolerant species are not Psilocybe Cubensis. What are they?
##### Magic Truffles
Hot season is the best time for Magic Truffles aka sclerotia growing P. Tampanensis, P. Mexicana, P. Galindoi, P. Galindoi Atl etc.
Nature invented sclerotia exactly for the hot season of the year. Sclerotia growing is newbie-friendly true neglect tek, because you grow them in vitro (right in the jars).
[](https://shroomok.com/en/wiki/File:Galindoi-atlantis-sclerotia-development.jpg) Magic truffles growth**Temperature range for magic truffles growing: +25º..+33ºC or 77-91ºF** that makes them great for hot season!
Just inoculate the substrate, put jars in a dark place and forget about them for the next 3-6 month.
And boom! Harvesting time!
[](https://shroomok.com/en/wiki/File:Philosophers-stones-magic-truffles-cultivation.jpg) Magic truffles harvest> Ultimate guide: [Growing magic truffles Psilocybe Mexicana and Tampanensis](https://shroomok.com/en/wiki/How_to_grow_magic_truffles_Psilocybe_Mexicana_and_Tampanensis)
##### Psilocybe Natalensis
Psilocybe Natalensis aka Natal is a species of psilocybin mushroom very close to Psilocybe Cubensis, but differs in its habitat preference and genetic sequence.
[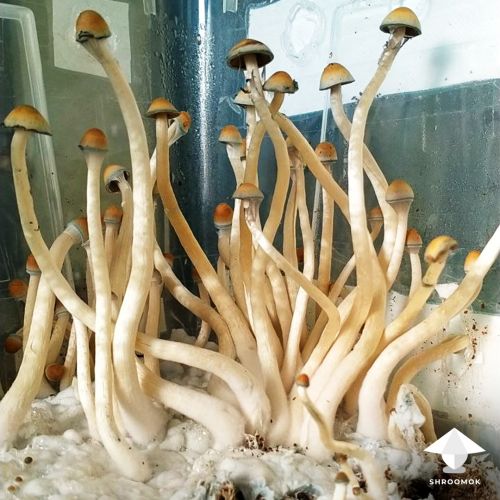](https://shroomok.com/en/wiki/File:Psilocybe-natalensis-mushroom-growing.jpg) Psilocybe Natalensis fruiting in monotubConsidered more potent than Cubensis. For instance, due to many subjective results, 3g of dry Cubes = 2g of Natalensis.
It is originally from South Africa and these mushrooms are extremely tolerant to high temperatures.
**Temperature range for Natal fruiting: +23º..+40ºC or 73-104ºF.**
Growing steps, substrate types and substrate content are totally the same as for P. Cubensis cultivation.
The main issue with P. Natalensis is making them fruit. Natal has extremely aggressive mycelium that makes this mushroom resilient to contaminants during fruiting period. However it can form marshmallow blobs and overlay instead of normal mushrooms.
[](https://shroomok.com/en/wiki/File:Psilocybe-natalensis-mycelium-colonization-and-pinning.jpg) Aggressive Natalensis mycelium colonization. Red circles - start of Natal pinningFor shoebox/monotub/growbox flip the lid to have a gap between tub and lid for natural air flow and fan the bin manually 2-3 times/day to have good pinning and great mushrooms.
[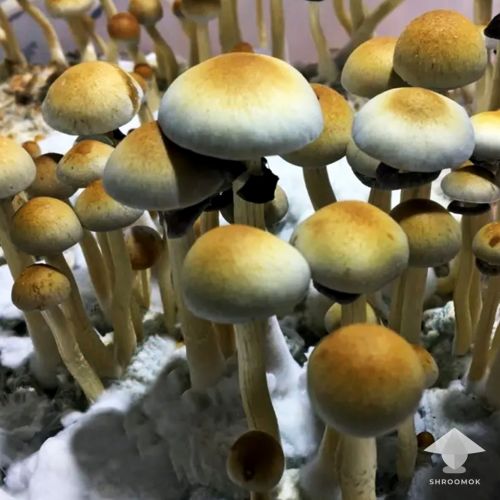](https://shroomok.com/en/wiki/File:Psilocybe-natalensis-magic-mushroom-cultivation.jpg) Psilocybe Natalensis fruiting with enough FAEFruiting chambers with automated additional FAE and humidifier or automated grow tent would be great for Natal, although not required. However Natal sensitive to CO2, if there are lack of fresh air you'll such get leggy shrooms usually called 'Natal snakes'.
[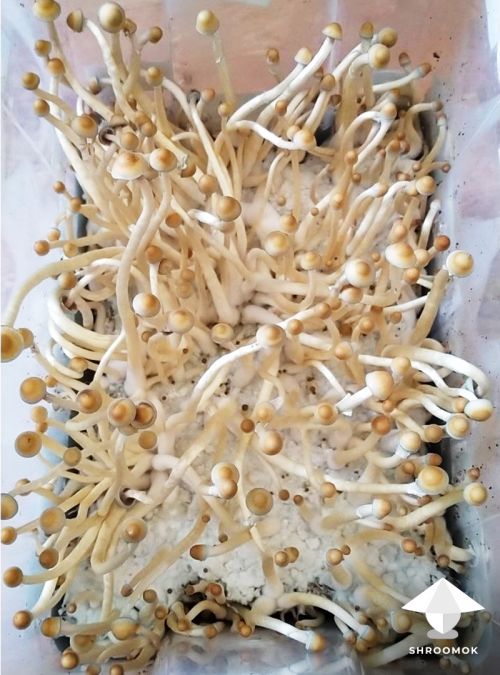](https://shroomok.com/en/wiki/File:Natalensis-mushroom-fruiting.jpg) Natal fruiting. Leggy Natalensis shrooms[Casing layer](https://shroomok.com/en/wiki/Making_mushroom_cake,_spawn_to_bulk,_and_casing#Casing) for Natalensis is optional, but extremely beneficial. It helps to maintain perfect microclimate for pinning, helps to avoid extreme mycelium overgrowth.
##### Natalensis outdoors
YES, Natal is able to cultivate outdoors successfully!
Growing Natalensis outdoors can be amazing experience. Especially if you have some space in the shades of plants, trees: backyard, garden, greenhouse for plants.
[](https://shroomok.com/en/wiki/File:Natalensis-mushrooms-outdoors.jpg) Psilocybe Natalensis fruiting outdoorsThe temperature up to 40ºC or 104ºF is not a problem for Natal growing outdoors.
Just bury colonized mushroom cake and cover it with 1/2 inch of soil.
##### Panaeolus
Panaeolus mushrooms are considered high temperature tolerant mushroom species.
**They feel good at +25º..+33ºC or 77-91ºF**
[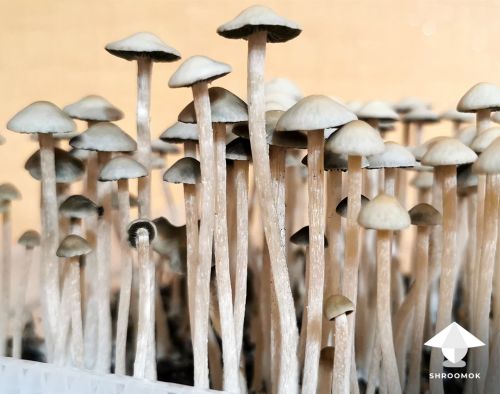](https://shroomok.com/en/wiki/File:Growing-panaeolus-cyanescens-mushrooms.jpg) Panaeolus Cyanescens aka Hawaiian Copelandia mushroom fruiting
Panaeolus are x2 or x3 more potent than Cubensis. 3g of dry Cubes = 1g of Panaeolus. Recommended for those, who usually have nausea and stomach pain while taking shrooms. With Panaeolus you don't feel any side effects at all, your trip is smooth and calm.
[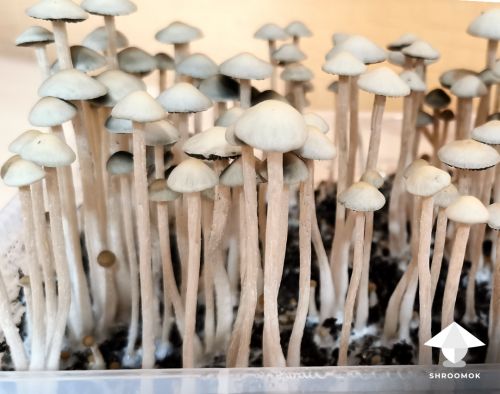](https://shroomok.com/en/wiki/File:Panaeolus-cyanescens-mushroom-growing.jpg) Brief overview on Panaeolus Cyanescens mushroom growing
**There are 4 tricky moments in Panaeolus cultivation, that we usually skip for Cubensis:**
1\. Panaeolus mushrooms need **manure** (horse, cow, camel, elephant poo or manure pellets).
2\. Panaeolus is one from the list of species that **requires a casing layer**. Otherwise it is impossible to make them fruit.
3\. They are extremely **sensitive to CO2**. Neglect tek is not about Panaeolus cultivation.
Additional FAE, automated fanning and humidifier are required for fruiting period. Or cultivation in a big volume like Grow Tent with automated humidifier and fanning. All these influence pinning and further fruiting greatly.
4\. Panaeolus is **sensitive to acidic substrates** (pH lower 7.0), pH’d casing is necessary!
[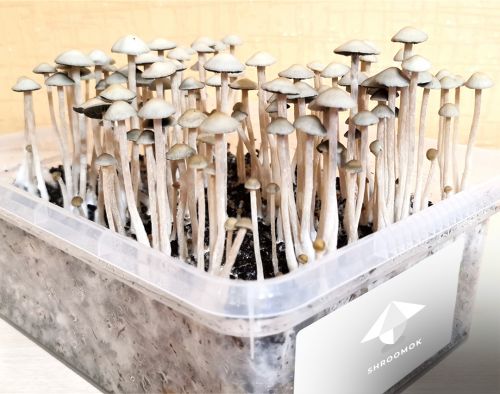](https://shroomok.com/en/wiki/File:Panaeolus-mushroom-fruiting.jpg) Pan Cyan mushroom fruitingBriefly there are **2 options for Panaeolus cultivation:**
**1. Start with manure mix in jar for inoculation**
Prepare: 30% dry poo (powder) + 70% hay soaked in water for 24 hours.
Fill the jars. Sterilization in PC for 2 hours.
Inoculate this mix. Wait for 20-30 days for full colonization.
Then cover colonized manure with sterilized [pH adjusted casing layer](https://shroomok.com/en/wiki/Making_mushroom_cake,_spawn_to_bulk,_and_casing#Casing)
**2. Start with grain spawn**
[No soak no simmer millet](https://shroomok.com/en/wiki/Cooking_the_substrate_for_psilocybes#No_soak_no_simmer_millet_substrate_for_mushroom_spawn) is perfect to use for Panaeolus. Any other types of grain also can be used.
The next step after grain colonization is spawn to bulk substrate (sterilized substrate mix) for your choice:
1\) 30% dry manure + 70% sawdust or hay + 5% gypsum and hydrated lime
2\) or 70% manure pellets + 30% vermiculite + 5% gypsum and hydrated lime
3\) or 30% dry manure or pellets + 60% sawdust + 10% bran + 5% gypsum and hydrated lime
Make spawn to bulk and small mushroom cakes.
Cover them with sterilized casing layer: soil for tomatoes or cacti, sphagnum and vermiculite 1:1:1 + Lime for pH adjusting.
> As I mentioned before, sclerotia species, Natalensis and Panaeolus are not Cubensis. So you have a great opportunity to try yourself with new species
#### Spend hot season for working on mushroom genetic
Spend this time for working on genetic - selection and strain isolation.
[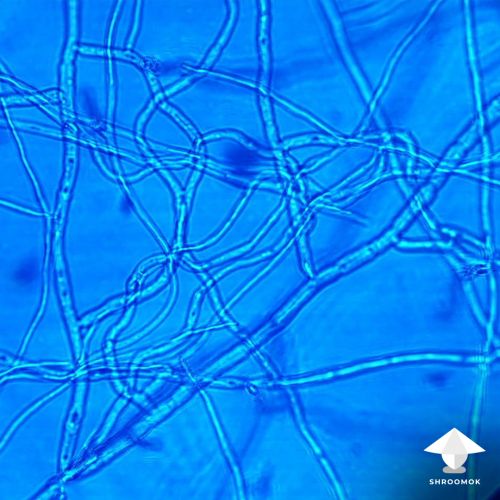](https://shroomok.com/en/wiki/File:Mycelium-microscopy.jpg) Mycelium threads microscopyThis required agar work and a series of agar to agar transfers
[](https://shroomok.com/en/wiki/File:Mycelium-ropes-on-agar.jpg) Thick mycelium ropes on agarGreat opportunity to make the full cycle: pure strain on agar -> liquid culture with great genetic -> grain spawn for the new Cubensis season.
During 'summer time' colonization process is extremely fast. You don't need incubator to speed up colonization process.
#### Make a cooling system for fruiting chamber
If you are ready to become an engineer you can make a DIY cooling system for your growbox /monotub /shoebox and/or use it as a small fridge for your LC, spawn jars, agar plates.
As an example, you can make cooling system for small fruiting chamber based on the Peltier module or water cooler with compressor
[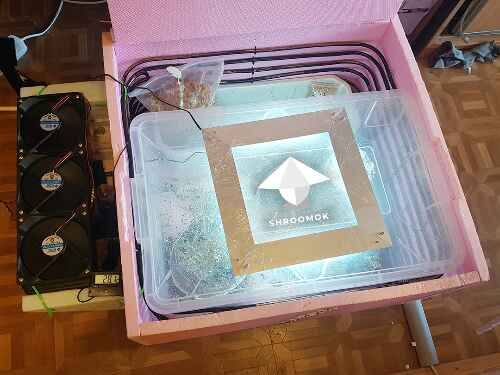](https://shroomok.com/en/wiki/File:Monotube-growbox-inside-cooling-box.png) Cooling box for fruiting chamber based on Peltier module> Check out: [Cooling for mushrooms with Peltier element](https://shroomok.com/en/wiki/Cooling_and_heating_for_mushroom_growing_with_Peltier_module)
This system also works for heating in the cold season.
#### Sum it up!
Hot season is not an obstacle for true mushroom growers.
It’s time for new mycology opportunities, new species, teks, DIY and trip experiences.
What are your solutions? How do you deal with high temperatures during hot season cultivation? Share in comments ;)
Enjoy your home mycology!
Peace, @Shroomok
# DIY equipment & Teks
## How to make a magnetic stirrer for liquid culture
[How to make a magnetic stirrer for liquid culture](https://shroomok.com/en/wiki/How_to_make_a_magnetic_stirrer_for_liquid_culture)
[](https://shroomok.com/en/wiki/File:Needed-materials-for-diy-magnetic_stirrer.png) Necessary materials for DIY magnetic stirrer### DIY Magnetic Mixer for home mycology
A magnetic stirrer aka magnetic mixer is often used in labs for buffer solutions that require constant stirring for long periods of time and of course in mycology: for preparation media for liquid culture, agar media and for stirring liquid mycelium.
Laboratory magnetic stirrers can be expensive. If you are using it rarely for home mycology it can be cost-effective to build your own mixer from scratch. Believe me, it's super easy!
The short video below describing the components needed and the steps to build it. Check it out!
**Video on YouTube:** [DIY Magnetic stirrer for liquid culture](https://www.youtube.com/watch?v=PqbLZcycY5w)
Looks easy, isn't it? Now let's check the list of necessary materials and I'll add important notes to each step of the video.
#### List of materials and supplies needed for magnetic stirrer
I'd like to share components I've used in the video from Amazon. Maybe most of these materials you already have at home and DIY magnetic stirrer can save your money!
🔶 **Laptop or PC fan/cooler with plug.** I used 90 mm cooler and AC/DC adapter. You can use coolers from 80 to 120 mm with adapter already to save money.
- [120mm Fan with AC/DC Adapter](https://amzn.to/48XoZeS) $18.99
> 💡 This fan also can be used for [incubator](https://shroomok.com/en/wiki/Magic_mushrooms_incubator_control "Magic mushrooms incubator control") and automatic incubation chamber during colonization period. Also for additional fresh air exchange in [GrowBox](https://shroomok.com/en/wiki/DIY_Grow_Box_for_Magic_mushrooms._Fruiting_conditions "DIY Grow Box for Magic mushrooms. Fruiting conditions") and [MonoTub](https://shroomok.com/en/wiki/Forget_Monotub_Kit._DIY._How_to_make_Monotub_for_Mushrooms_by_your_own "Forget Monotub Kit. DIY. How to make Monotub for Mushrooms by your own") for [fruiting period](https://shroomok.com/en/wiki/Fruiting_period._Pinhead_initiation,_mushroom_pinning_and_mushrooms_growth_parameters "Fruiting period. Pinhead initiation, mushroom pinning and mushrooms growth parameters").
🔶 **Powerful neodymium rectangular magnet block.** 20-25 mm is optimal for such version, smaller magnets can be weak for your device
- [Strong Neodymium Magnets Bars, 25 x 5 x 3mm, 30 pcs](https://www.amazon.com/LOVIMAG-Neodymium-Magnets-Rectangular-Science/dp/B09YCWKBMP?&linkCode=ll1&tag=shroomok-zm-20&linkId=6b6b7248877e12ec9f96a1c680d11a02&language=en_US&ref_=as_li_ss_tl) $6.99
🔶 **PTFE bar magnets.**
- [PTFE Magnetic Stirrer Mixer Stir Bar Set, 2 sizes, 8 pcs](https://www.amazon.com/Magnetic-Stirrer-Mixer-Laboratory-Magnet/dp/B08GFS97K4?&linkCode=ll1&tag=shroomok-zm-20&linkId=1c19b3efdd38d1237e6b377fbc629792&language=en_US&ref_=as_li_ss_tl) $9.99
🔶 **Platform for stirrer.** Small square of plastic, plexiglass or even strong cardboard as a platform for jars.
- [Acrylic Plexiglass Sheets, 5 x 7", 6 pcs.](https://amzn.to/3RY53m7) $13.49
🔶 **Strong fast glue** or **Hot Glue Gun** for crafting to stick the magnet. I have BOSCH hot glue gun, it's extremely great quality for long-term use, but costly. There are many good cheap alternatives. They are all +/- the same quality
- [Hot Mini Glue Gun with Case and 20 Sticks](https://www.amazon.com/Sticks-Melting-Carrying-School-Repairs/dp/B08H56Y4ZF?&linkCode=ll1&tag=shroomok-zm-20&linkId=46a27fc8321567403da17a8160347669&language=en_US&ref_=as_li_ss_tl) $14.29
#### How a magnetic stirrer works
The main principle of magnetic stirrer is interaction between two magnets. The rotating field created by a rotating magnet placed beneath the vessel with the liquid.
The magnet bar in the stirrer are attracted to the one on the fan, and so when the fan spins, the magnet bar spins in the solution, with no physical contact required.
#### How to assemble magnetic stirrer
Here I'd like to add more important details to my video guide.
##### Step 1
**Prepare all needed components** are listed above: PC fan/cooler, neodymium magnet block, PTFE bar magnet, plastic stand, power adapter, glue gun or fast glue, jar with water for testing.
[](https://shroomok.com/en/wiki/File:Needed-materials-for-diy-magnetic_stirrer.png) Step 1. Necessary materials for DIY magnetic stirrer##### Step 2
I've cut two edges on my fan, because they interfered with the plastic platform installing. It's just a specific of my cooler. **In your case this may not be necessary!**
[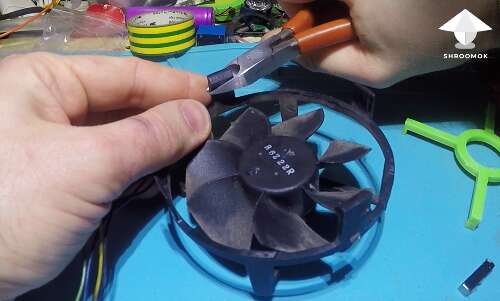](https://shroomok.com/en/wiki/File:Diy-magnetic-stirrer-guide.png) Step 2. Optional step. Cut the edges##### Step 3
Glue the magnet block to the PC fan. One of the hardest tasks is mounting the magnets correctly. That's why don't hurry up!
[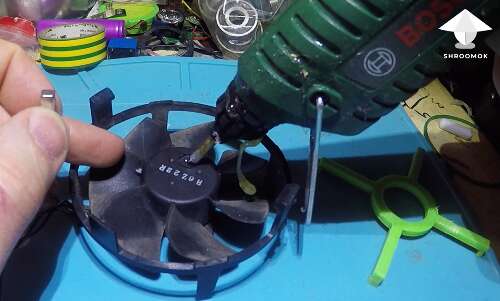](https://shroomok.com/en/wiki/File:How-to-make-magnetic-stirrer.png) Step 3. Glue the magnet block to the fan**Magnet should have its poles looking sideways.** I've found these sides experimentally (bigger side on the top) and made black mark between poles. So that, right and left sides of the magnet create magnetic field.
[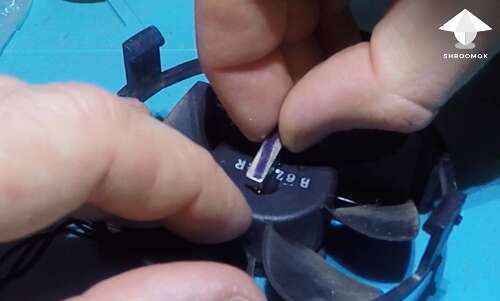](https://shroomok.com/en/wiki/File:Build-magnetic-stirrer.png) Step 3. Choose the right side of magnet block> **❗️Important note:** If you use **round** neodymium disc magnets (8-10 mm) you need to use two magnets. One magnet should have its **north facing upwards** and the other its **south facing upwards**. The magnets should be positioned directly across each other
[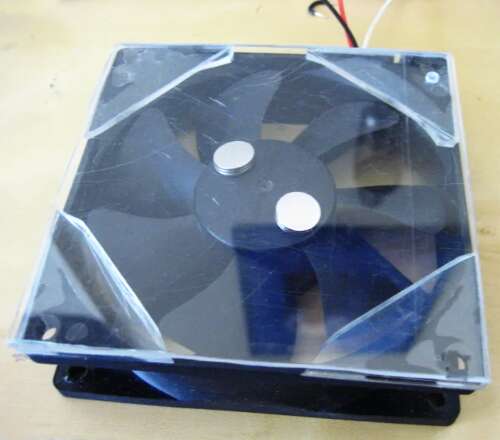](https://shroomok.com/en/wiki/File:Magnetic-stirrer-option-2.png) Magnetic stirrer with rounded magnets##### Step 4
**Add the platform.** I printed it on 3D printer. If a 3D printer isn’t available you can use any flat surface for such podium: plastic plate, strong cardboard or plexiglass square
[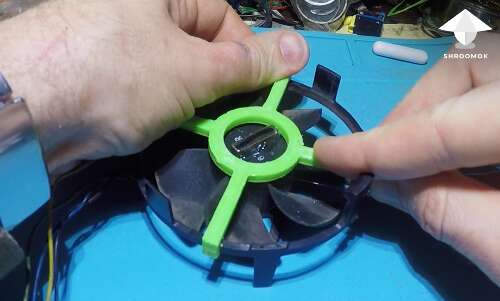](https://shroomok.com/en/wiki/File:How-to-make-magnetic-stirrer-for-mycology.png) Step 4. Add the platform for magnetic stirrer> **❗️Important note:** spacers are needed to sit between the fan and the top platform due to the extra height (3 mm) created by the magnet(s). Coins can be used here or additional small pieces of plexiglass on the corners of the fan
[](https://shroomok.com/en/wiki/File:Magnetic-stirrer-option-2.png) Magnetic stirrer with plexiglass platform and additional plexiglass on the corners to lift the platform over the magnets##### Step 5
Powering your magnetic stirrer. The magnetic stirrer can be powered by any voltage source the fan is rated to. Either battery holder, or AC/DC Adapter. Your fan should have two wires (**red** for positive and **black** for negative). If it has three wires, just skip the third one.
Put PTFE Magnetic Stir Bar in the jar with water, switch it on and test. Ready!
[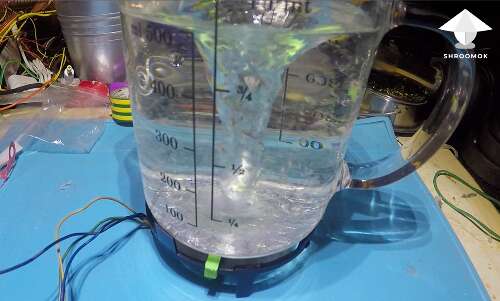](https://shroomok.com/en/wiki/File:Switch-on-and-test-magnetic-stirrer.png) Step 5. Powering magnet stirrer. Switch on and test> **❗️**There is no option of speed control if you use battery holder. With **AC/DC adapter** your magnetic stirrer will be more reliable, convenient and speed control here is available. That's why I recommend to use **AC/DC adapter** for your magnetic stirrer
#### Ready to use magnetic stirrer
If you don't want to spend time for assembling or you need to order ALL components for such device you can check ready to use magnetic stirrers on Amazon:
[INTLLAB Magnetic Stirrer with 7 pcs. stir bar set](https://www.amazon.com/INTLLAB-Magnetic-Stirrer-7PCS-Retriever/dp/B088SF2CZP?&linkCode=ll1&tag=shroomok-zm-20&linkId=9e7ad706380847af5e5f3495187a3870&language=en_US&ref_=as_li_ss_tl) $39.99
[ANZESER Magnetic Stirrer **Hot Plate**, 100-2000rpm Lab Stirrers](https://www.amazon.com/ANZESER-Magnetic-Stirrer-100-2000rpm-Heating/dp/B07S58GVCB?&linkCode=ll1&tag=shroomok-zm-20&linkId=c78a3e130f9fed51cfb62f9c84bb525c&language=en_US&ref_=as_li_ss_tl) $59.95
If you find this guide helpful, please support us with a cup of coffee on [☕️ buymeacoffee](https://www.buymeacoffee.com/shroomok)
Join Shroomok Community on **Discord** and **Reddit** for questions and sharing experience.
You can also leave your **comments on this page below** ⬇️
Have a happy growing!
Made with love by @**mrzimm** - Tech Guru of Shroomok Growers Community on Discord.
Promoted by ©Shroomok
## Bottle-tek or how to grow mushrooms in plastic bottles
[Bottle-tek or how to grow mushrooms in plastic bottles](https://shroomok.com/en/wiki/Bottle-tek_or_how_to_grow_mushrooms_in_plastic_bottles)
[](https://shroomok.com/en/wiki/File:Bottle-tek-guide-mushroom-cultivation.png) Bottle-tek guide by Shroomok### Easy guide for growing mushrooms in a bottle
This guide are going to show you simple and cheap technique for growing mushrooms at home. This method is newbie-friendly and minimum stuff required here.
[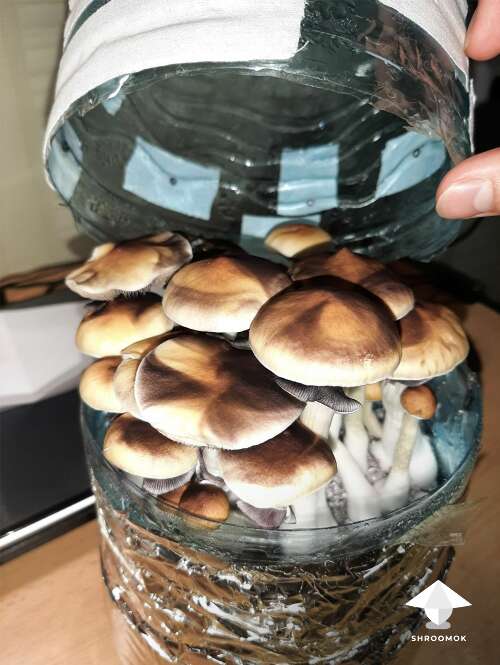](https://shroomok.com/en/wiki/File:Bottle-tek-mushroom-growing.png) Bottle-tek: cheap and easy method for mushroom cultivation at home[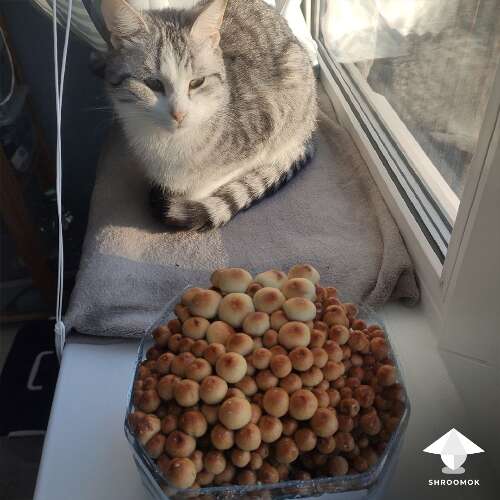](https://shroomok.com/en/wiki/File:Mushroom-cultivation-and-cat-shroomok-growers-community.png) Bottle-tek, GT mushrooms growing#### What is bottle-tek?
***Bottle-tek*** is a technique of mushroom cultivation, when we use large volume plastic bottles (5-7 liters or even 15-20 liters) as a fruiting chamber for mushroom fruiting period. This is an alternative option for [Grow Box](https://shroomok.com/en/wiki/DIY_Grow_Box_for_Magic_mushrooms._Fruiting_conditions "DIY Grow Box for Magic mushrooms. Fruiting conditions") or [MonoTub](https://shroomok.com/en/wiki/Forget_Monotub_Kit._DIY._How_to_make_Monotub_for_Mushrooms_by_your_own "DIY Monotub for mushrooms") in amateur home cultivation
[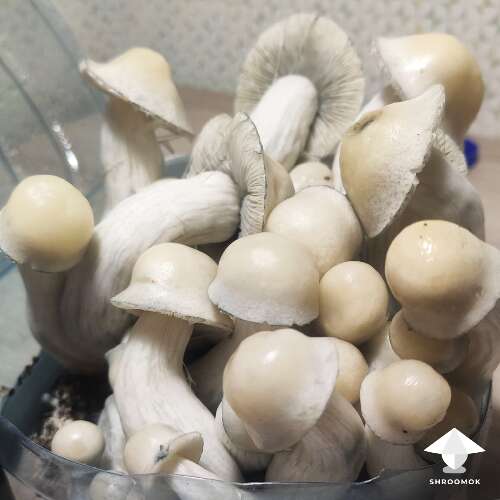](https://shroomok.com/en/wiki/File:Albino-penis-envy-in-plastic-bottle.png) [APE mushrooms](https://shroomok.com/en/wiki/Mutant_strain_Albino_Penis_Envy_aint_just_APE_but_King_Kong_of_Magic_Mushrooms "Mutant strain Albino Penis Envy aint just APE but King Kong of Magic Mushrooms"), bottle-tek> 🔴 Check out other teks:
>
> [DIY GrowBox for mushrooms](https://shroomok.com/en/wiki/DIY_Grow_Box_for_Magic_mushrooms._Fruiting_conditions "DIY Grow Box for Magic mushrooms. Fruiting conditions")
>
> [DIY MonoTub for mushrooms](https://shroomok.com/en/wiki/Forget_Monotub_Kit._DIY._How_to_make_Monotub_for_Mushrooms_by_your_own "DIY Monotub for mushrooms")
#### Pros and cons of bottle-tek
[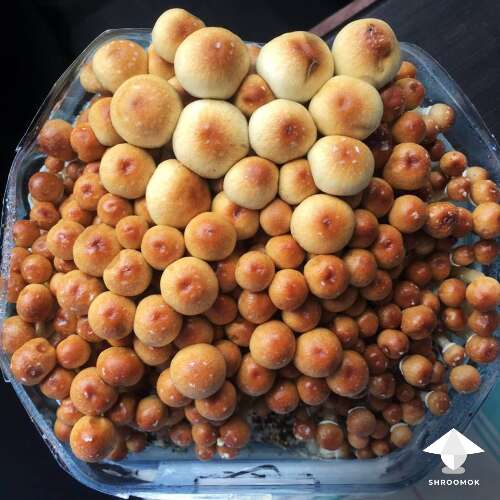](https://shroomok.com/en/wiki/File:Mshroom-harvest-bottle-tek-shroomok-community.png) Bottle-tek: pros and cons##### The main advantages of growing mushrooms in plastic bottle
✅ **Cheap method.** You don't need to buy a large plastic container for a [Grow Box](https://shroomok.com/en/wiki/DIY_Grow_Box_for_Magic_mushrooms._Fruiting_conditions "DIY Grow Box for Magic mushrooms. Fruiting conditions") or [Monotub](https://shroomok.com/en/wiki/Forget_Monotub_Kit._DIY._How_to_make_Monotub_for_Mushrooms_by_your_own "DIY Monotub for mushrooms") and additional accessories like: hygrometer, light, aquarium compressor or small fan. This means you can save a good deal at the start. In fact, the bottle is both a tray for mushroom cake and Grow Box at the same time.
✅ **Available.** In any supermarket you can buy a 5-7-liter (1,5-2 gallons) bucket of drinking water.
✅ **Easy and simple.** Bottle-tek doesn't require special additional equipment. You don't need to plug anything in. Bottle-tek requires only one-time adjustment to ensure full growth conditions for mushrooms inside. Additional devices for air exchange and humidification are **not** required (you can provide everything manually). The process of preparing the bottle is clear to any beginner who has never grown mushrooms.
✅ **Rehydration** and preparation for a new flush of fruiting can be done directly in the bottle tank.
✅ **Compact and stealth method.** Doesn't take up much space. Such bottle tank can be easily hidden in a small cupboard or inconspicuous corner from the prying eyes of visitors to your home.
[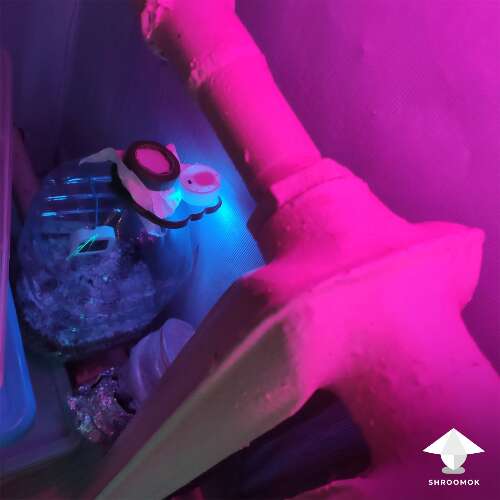](https://shroomok.com/en/wiki/File:Bottle-tek-as-stels-method.png) Bottle-tek is a stealth method for mushroom cultivation at home. Easy to hide it##### The main disadvantages of growing mushrooms in plastic bottle
➖ Beginners face with the problem of maintaining the correct microclimate in the bottle tank. Sometimes mushrooms receive too little oxygen or cover layer dries out.
➖ Monitoring the microclimate in the tank is done "by eye", without any gauges. But a basic compact thermometer and hygrometer are easy to place in the bottle.
➖ It is not convenient to take out the mushroom cake if you have to pick mushrooms from the sides.
#### What equipment do you need for bottle-tek
[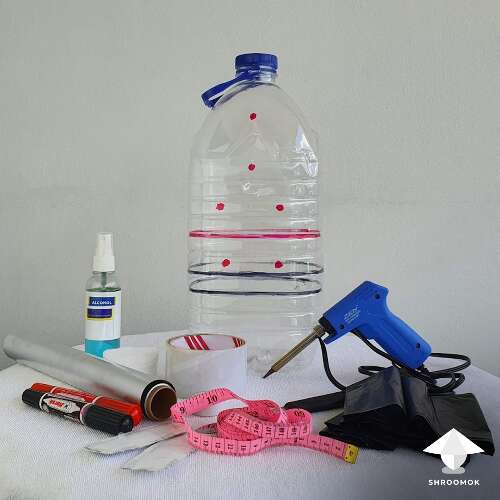](https://shroomok.com/en/wiki/File:Bottle-tek-list-of-needed-stuff.png) What equipment do you need for bottle-tek**For the bottle tank as a fruiting chamber you need to prepare:**
1️⃣ Plastic bottle of 5-7 liters (1.5-2 gallons)
2️⃣ Sharp knife or scissors.
3️⃣ Soldering iron or heat gun.
4️⃣ Aluminum foil or thick black film (for example, black garbage bags).
5️⃣ Scotch tape or masking tape.
6️⃣ Breathable synthetic patch (omnipore, micropore) or synthetic foam.
7️⃣ Cotton pads - 1-2 pcs.
8️⃣ Ethyl alcohol 70% or any disinfectant.
9️⃣ Ready for spawn to bulk spawn jars.
🔟 Sterilized or pasterized secondary substrate (coconut mix).
**For making mushroom cake in bottle you need:**
✅ 700 ml-1 liter of grain spawn or ~24-34 oz. (grain spawn is a fully colonized grain with mycelium).
✅ 1 liter (~34 oz.) of pausterized or sterilized bulk substrate (based on coco coir, vermiculite, gypsum).
✅ Casing layer is optional (sphagnum, vermiculite, hydrated lime).
#### What ratio of spawn to bulk is the best?
🔴 Shroomok recommendation is 1:1 ratio of spawn to bulk for beginners. Why? The more spawn with strong mycelium, the faster the secondary substrate (coco peat soil mix) will be colonized. This reduces the chances for molds and increases the chances of successful harvest. But this is only recommendation!
You can proceed with 1:2 or even 1:3 ratio of spawn to bulk substrate (coco peat soil mix). But in this case it takes more time for colonization and increases the risk of contamination.
#### What is the optimal volume of substrate for bottle-tek?
🔴 The optimal volume of substrate in a 5-7 liter (1.5-2 gallons) bottle tank is about 1.3-2 liters or 44-68 oz. (or no more than 1/3 of the total bottle volume). Why? The mycelium will need a free volume to breathe and for air exchange. It makes no sense to build a tower in a tank more than 12 cm (or 4.7″), because only the top of this cake will produce mushrooms.
> 🔴 Check out how to prepare bulk substrate: [Making mushroom cakes, Spawn to Bulk and Casing](https://shroomok.com/en/wiki/Making_mushroom_cake,_spawn_to_bulk,_and_casing "Casing of magic mushrooms cakes")
#### Scheme and process of preparing plastic bottle for mushroom cultivation
##### Bottle-tek scheme for mushroom growing
[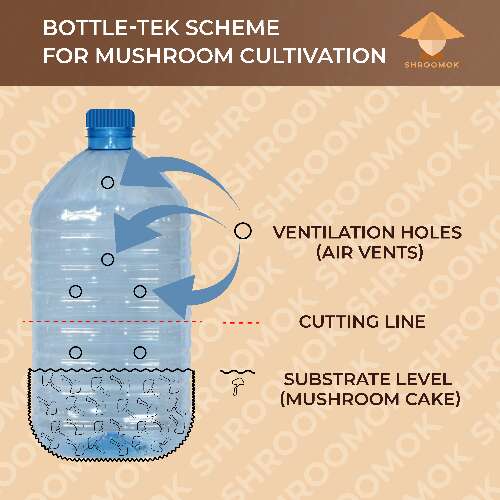](https://shroomok.com/en/wiki/File:Bottle-tek-scheme-for-mushroom-cultivation.png) Bottle-tek scheme for mushroom growing##### How to prepare bottle for mushroom cultivation
1️⃣ Take a clean plastic bottle with a capacity of 5-7 liters (6-liter bottle pictured) or 1.5-2 gallons. Mark the cut line and air vents with a marker (red).
[](https://shroomok.com/en/wiki/File:Bottle-tek-list-of-needed-stuff.png) What equipment do you need for bottle-tek
2️⃣ The substrate level with the casing layer (black line) will be within 8-11 cm.
[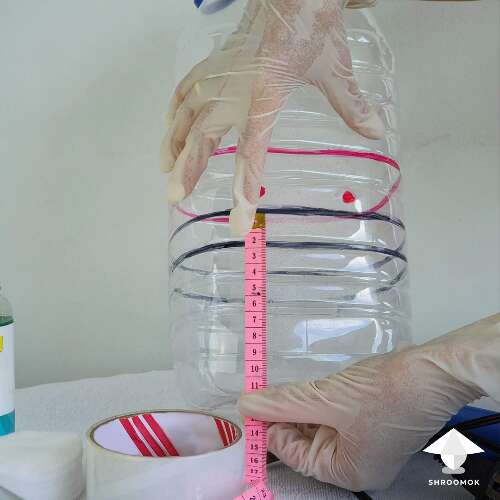](https://shroomok.com/en/wiki/File:Bottle-tek-size.png) Make marks with a marker according to scheme and indicate the level of the substrate
3️⃣ Cut the bottle along the red cutting line that divides the bottle in half.
[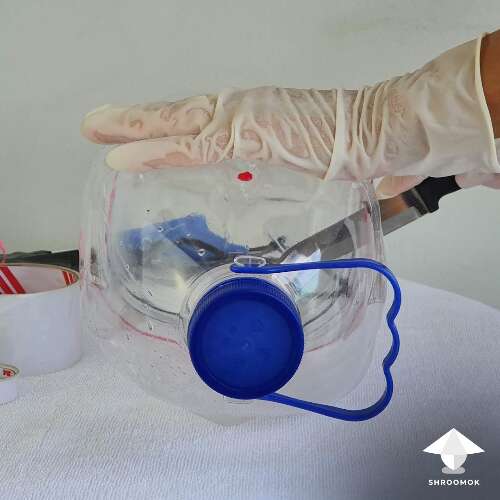](https://shroomok.com/en/wiki/File:Bottle-tek-cut-process.png) Cut the bottle in the middleLeave one edge intact to make it easy to open/close the "cap" of the tank. You can cut it off completely if that seems more convenient to you. It's a matter of convenience and not a matter of principle at all.
[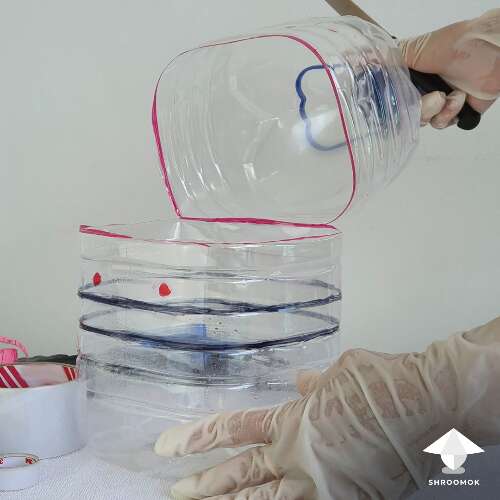](https://shroomok.com/en/wiki/File:Bottle-tek-cutted.png) Ready bottle for further steps
4️⃣ Make ventilation holes (~1cm in diameter) on each side of the bottle with a soldering iron or heat gun. The first level of air vents should be 1-2 cm above the top level of mushroom substrate. The second, third and fourth levels of ventilation holes are placed above the cut line of the tank. Level 2-3 are optional, but I recommend them for normal air exchange and natural draft. If there is too much air and the substrate dries out, they can be closed at any time.
[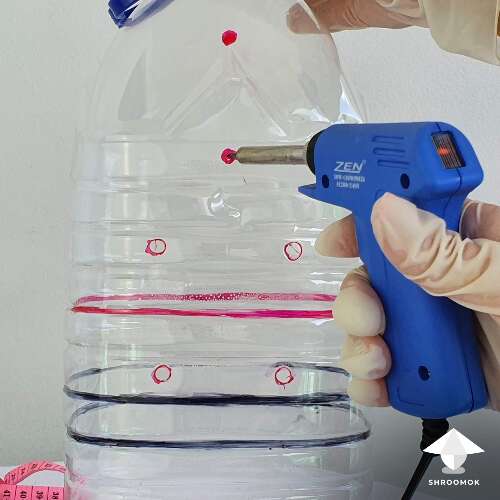](https://shroomok.com/en/wiki/File:Air-vents-bottle-tek.png) Make air vents with heat gun according to the scheme**Shroomok recommendation on Amazon:**
[Soldering Iron Kit, Ceramic Thermostatic Design](https://www.amazon.com/gp/product/B0969CV712/ref=as_li_tl?ie=UTF8&tag=shroomok-20&camp=1789&creative=9325&linkCode=as2&creativeASIN=B0969CV712&linkId=a47cbb0f55e08d92da0ed83812db5580) - $19.99
[Adjustable Temperature Solder Gun Kit](https://www.amazon.com/gp/product/B08GLVN4X9/ref=as_li_tl?ie=UTF8&tag=shroomok-20&camp=1789&creative=9325&linkCode=as2&creativeASIN=B08GLVN4X9&linkId=74caa8a98f686ca8df4e80a0a13b69e4) - $37.95
[Professional Soldering Gun Kit, Three Tips, Solder in Carrying Case](https://www.amazon.com/gp/product/B00002N7S1/ref=as_li_tl?ie=UTF8&tag=shroomok-20&camp=1789&creative=9325&linkCode=as2&creativeASIN=B00002N7S1&linkId=984397d165447ae0c396b79fcecd2896) - $39.49
Another example of bottle-tek for mushroom cultivation by Shroomok growers community
[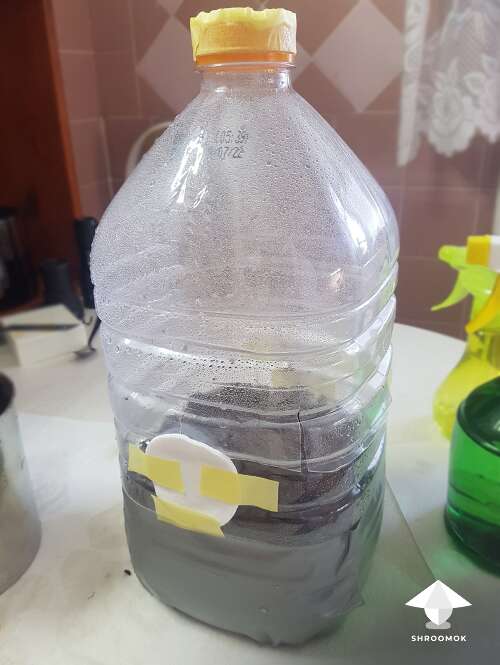](https://shroomok.com/en/wiki/File:Mushroom-cultivation-in-plastic-bottle-tek.png) One more example of bottle-tek. Photo: mrzimm on [**Discord**](https://discord.com/invite/ngKhQDmymD)A variation of rectangular air vents from 2 sides. You can also place a compact thermometer and hygrometer inside the bottle.
[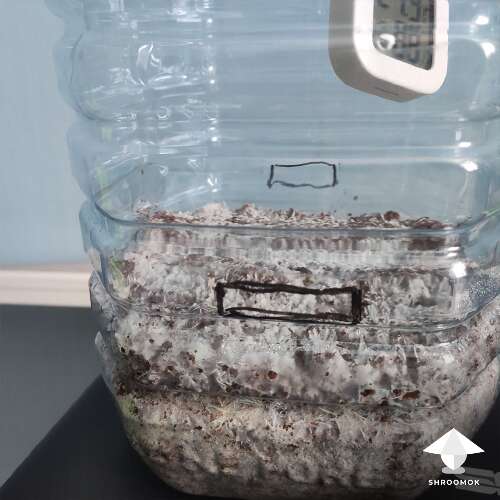](https://shroomok.com/en/wiki/File:Bottle-tek-shroomok-growers-community-example-2.png) Another version of bottle-tek for mushroom cultivation**Shroomok recommendation on Amazon:**
[Govee Bluetooth Digital Hygrometer, Thermometer with Remote App](https://www.amazon.com/gp/product/B07Y36FWTT/ref=as_li_tl?ie=UTF8&tag=shroomok-20&camp=1789&creative=9325&linkCode=as2&creativeASIN=B07Y36FWTT&linkId=244415a8d89f306fb2c96ecc7f6b961f) $12.99
[Mini Thermometer Hygrometer, Data Storage Export](https://amzn.to/3LHWPLt) 13.99
[AcuRite Digital Hygrometer with Thermometer](https://www.amazon.com/gp/product/B01HDW58GS/ref=as_li_tl?ie=UTF8&tag=shroomok-20&camp=1789&creative=9325&linkCode=as2&creativeASIN=B01HDW58GS&linkId=0cc0cc527e86e0f4e041948fa0a0613d) $14.99
[2-in-1: Professional Digital Hygrometer, Thermometer](https://www.amazon.com/gp/product/B07YY1FB9D/ref=as_li_tl?ie=UTF8&tag=shroomok-20&camp=1789&creative=9325&linkCode=as2&creativeASIN=B07YY1FB9D&linkId=4d946b984658d5478b46e13d1e17c38f) - $17.99
5️⃣ Wrap the bottom of the bottle (substrate level) with thick black film (like black garbage bags) or aluminium foil. If you don't do this mushrooms will follow the light and grow on the sides. Such fruit bodies turn out crooked, aesthetically unattractive and inconvenient to pick them.
[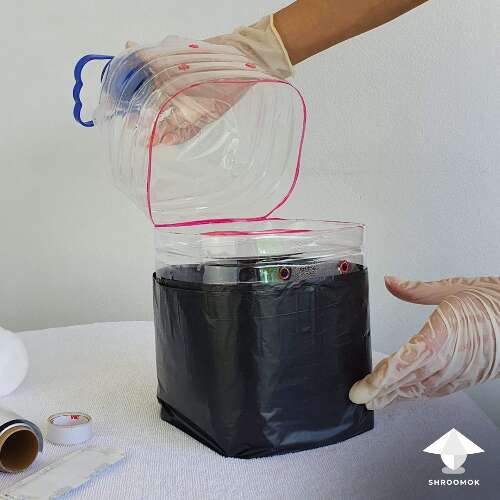](https://shroomok.com/en/wiki/File:Wrap-bottle-sides.png) Wrap bottle from the sides with black plastic bag or aluminium foil to hide from the light
6️⃣ Treat the bottle inside with ethyl alcohol (70%) or any disinfectant.
[](https://shroomok.com/en/wiki/File:Bottle-disinfection-for-mushroom-growing.png) Treat bottle with ethyl alcohol 70% or any disinfectant
Just wipe it with a cotton pad soaked in ethyl alcohol or any disinfectant.
[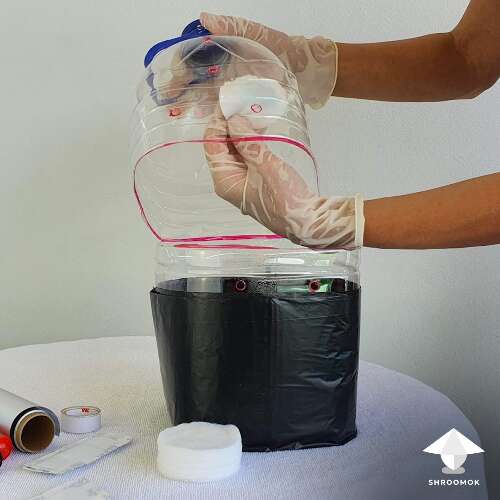](https://shroomok.com/en/wiki/File:Bottle-disinfection-for-mushroom-cultivation.png) Wipe the bottle inside with cotton pad soaked in ethyl alcohol 70% or any kind of disinfectant
7️⃣ Fill the bottle with spawn and bulk substrate (coco mix) in 1:1 ratio. Mix it carefully. The mushroom cake should be ~7-11 cm.
[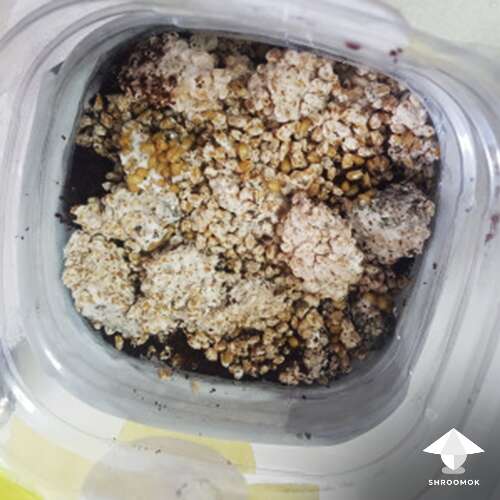](https://shroomok.com/en/wiki/File:Bottle-for-mushroom-cultivation-shroomok.png) Fill the bottle with mushroom spawn and bulk substrate (pausterized or sterilized coconut mix)
Cover this mushroom block with a top casing layer of bulk substrate no more than 1 cm. Thus, you'll get a mushroom block in bottle about ~8-12 cm.
[](https://shroomok.com/en/wiki/File:Mushroom-cultivation-on-bottle.png) Cover mushroom cake with top casing layer ~1 cm
9️⃣ Close all air vents with airtight tape or Duct Tape for colonization period. Close and tape the cut line of the bottle as well.
[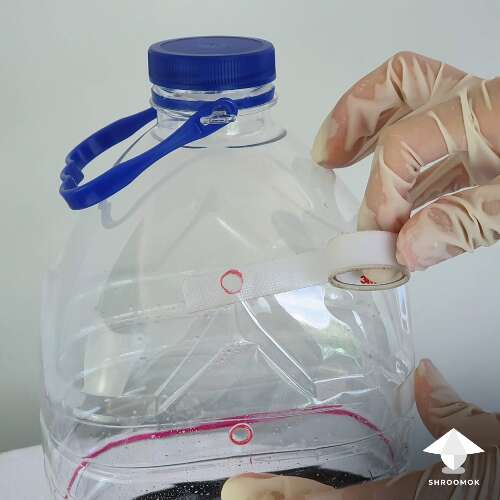](https://shroomok.com/en/wiki/File:Close-bottle-holes-for-colonization-period.png) Close air ventilation holes with airtight patch or scotch tape**Shroomok recommendation on Amazon:**
[Transparent Duct Tape, Ultra High Performance Weather Resistant Tape](https://www.amazon.com/gp/product/B076J2BS1B/ref=as_li_tl?ie=UTF8&tag=shroomok-20&camp=1789&creative=9325&linkCode=as2&creativeASIN=B076J2BS1B&linkId=14afd8afef73c04517d2b18b6cf87bc7) - $12.88
🔟 Place the prepared bottle with the substrate in a dark and warm place (+21°...+25° C).
Ready!
#### Colonization period in bottle
Wait till mycelium colonized top layer by 50-80%. It takes 3 to 7 days.
Such substrate is ready to start fruiting period
[](https://shroomok.com/en/wiki/File:Bottle-tek-start-of-mushroom-fruiting-period.png) Pinhead initiation and start of fruiting periodOne more example. Ready for fruiting period as well
[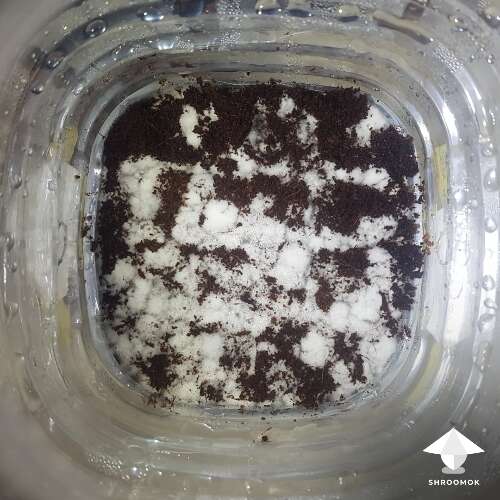](https://shroomok.com/en/wiki/File:Bottle-tek-ready-for-fruiting-period.png) Mushroom cake ready for introducing fresh air and start of fruiting period
Now open the air vents and seal them with a **breathable** synthetic bactericidal tape (omnipore, micropore tape).
[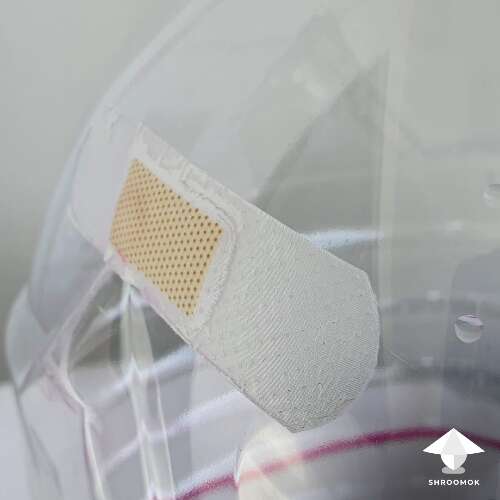](https://shroomok.com/en/wiki/File:Bottle-tek-change-micropore-tape-for-air-vents.png) Open air vents and use micropore tape to avoid contamination from the airYou can use synthetic Filter discs or Polyester fill. This will provide oxygen access and fresh air exchange for mushrooms. The micropore tape or synthetic discs or poly fill protect against the entry of mold spores from the air through these air vents.
**Shroomok recommendation on Amazon:**
[3M Micropore Tape 1530-1 (2 rolls) 1 x 10 yards](https://www.amazon.com/gp/product/B06XNP8J4R/ref=as_li_tl?ie=UTF8&tag=shroomok-20&camp=1789&creative=9325&linkCode=as2&creativeASIN=B06XNP8J4R&linkId=f560bc0e72ed7903f3f49d7d03e8b38d) - $4.39
[Micropore Surgical Tape - 3m - 2" x 10 YD - 6 rolls](https://www.amazon.com/gp/product/B0082A9GS2/ref=as_li_tl?ie=UTF8&tag=shroomok-20&camp=1789&creative=9325&linkCode=as2&creativeASIN=B0082A9GS2&linkId=002675835f06b5070b42deeb3dc5867d) - $8.80
[Polyester Fiber, Premium Fiber Fill - 100/150/600/700/900g](https://www.amazon.com/gp/product/B08QV4PQPY/ref=as_li_tl?ie=UTF8&tag=shroomok-20&camp=1789&creative=9325&linkCode=as2&creativeASIN=B08QV4PQPY&linkId=c6b2914aa2741c1ff74bb79b93475f12) - $9.99
#### Fruiting conditions for mushroom development in the bottle
[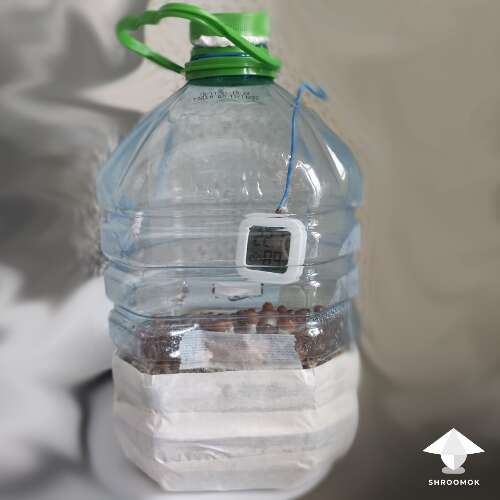](https://shroomok.com/en/wiki/File:Bottle-tek-shroomok-growers-community-example-1.png) Bottle tek and active mushroom fruiting inside the bottleSince air vents opening the fruiting period starts. You should provide the necessary climate conditions for pinhead initiation and normal mushroom development.
✅ Provide fresh air and spray the walls of the tank with clean chilled boiled water or clean drinking water.
✅ Keep the temperature about +21°...+23°C (70-74°F).
✅ Maintain a relative humidity ~92-99% by spraying the walls of the bottle. **How to spray the bottle?** You don't need to open it every time. You can spray by opening the top lid of the bottle. In this case small water drops fall on the mycelium, but it's not a problem. **Make sure no puddles form on the mycelium!**
✅ If there is not enough air exchange the ищееду should be opened and ventilated additionally 2-3 times a day. But if all air vents are made properly, natural ventilation through the vents will be enough.
Be patient and wait for pins and primordia.
🔴 The first pins and primordia usually appear after 7-14 days. Don't terrorize fungus with your curiosity and impatience every 5 minutes. Leave them alone and nature will do the rest 😉
Here are some examples of pinheads and fruit bodies formation at different stages of mushroom life cycle.
7 days after introducing fresh air. The start of pins development. Small white pinheads in a few days turn into small mushrooms.
[](https://shroomok.com/en/wiki/File:First-pins-primordia-bottle-tek.png) Pinhead initiation and first pins in bottle
9 days after introducing FAE. White pinheads form the first rudiments of future mushrooms and their brown caps.
[](https://shroomok.com/en/wiki/File:Start-of-mushroom-fruiting-bottle-tek.png) First pins and primordia development
12 days after introducing FAE. Active phase of mushrooms development
[](https://shroomok.com/en/wiki/File:Mushroom-fruiting-in-bottle.png) Start of mushroom fruiting
Quality check :)
[](https://shroomok.com/en/wiki/File:Magic-mushroom-harvest-and-cat-shroomok-community.png) Expert check!
13 days after introducing FAE. In 1-2 days such mushrooms are ready for harvesting.
[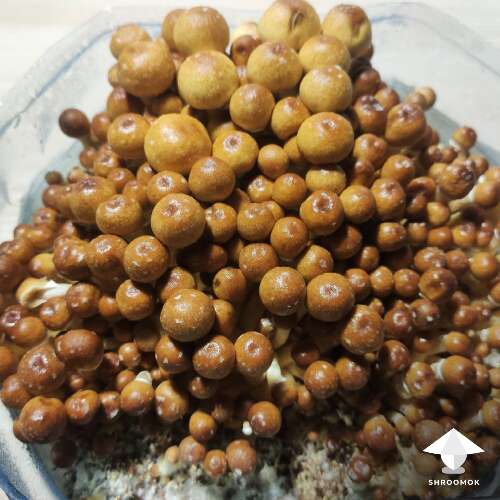](https://shroomok.com/en/wiki/File:Bottle-tek-harvest.png) Golden Teacher fruiting in bottle#### Bottle-tek and mushroom cultivation examples
A few more examples of mushroom cultivation using the bottle-tek method.
[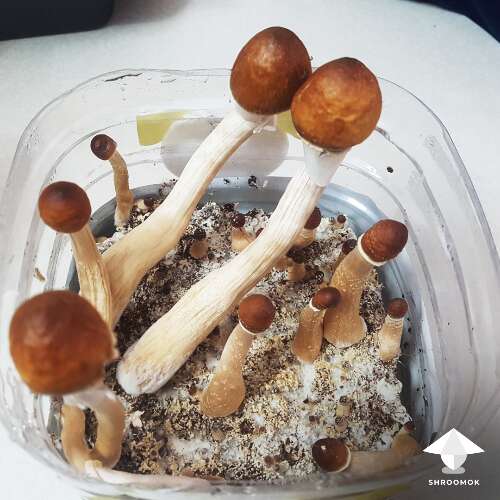](https://shroomok.com/en/wiki/File:Bottle-tek-mushroom-harvest.png) [Golden Teachers](https://shroomok.com/en/wiki/The_magic_of_Golden_Teacher_mushroom "The magic of Golden Teacher mushroom")[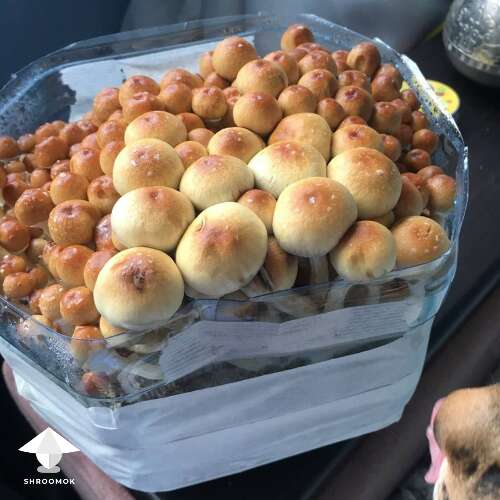](https://shroomok.com/en/wiki/File:Mushroom-harvest-in-plastic-bottle.png) Golden Teacher magic mushrooms fruiting in plastic bottle[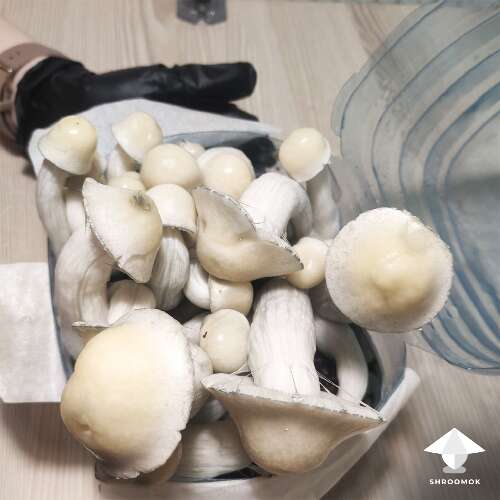](https://shroomok.com/en/wiki/File:APE-growing.png) Bottle-tek for Albino Penis Envy cultivation[](https://shroomok.com/en/wiki/File:Bottle-tek-shroomok-growers.png) Mushrooms ready for harvesting[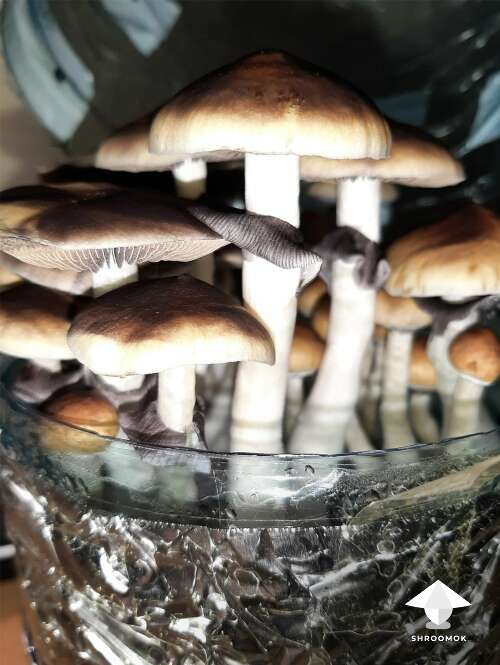](https://shroomok.com/en/wiki/File:Bottle-tek-mushroom-cultivation.png) Mushroom growing in a bottle[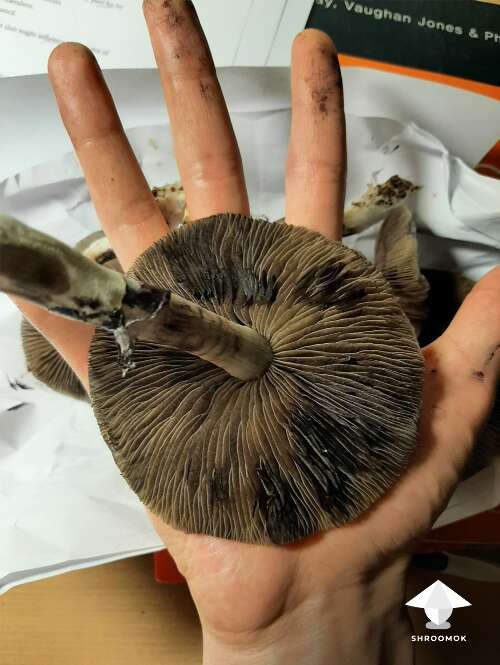](https://shroomok.com/en/wiki/File:Bottle-tek-shroomok-community.png) Magic mushroom giants and bottle tekIf you find this guide helpful, please support and [🍄 Buymeacoffee](https://www.buymeacoffee.com/shroomok)
Have a happy growing and magic bottles!
📸 **More photos in [Bottle Tek photo gallery](https://shroomok.com/gallery/bottle-tek)**
## Forget Monotub Kit. DIY. How to make Monotub for Mushrooms by your own
[Forget Monotub Kit. DIY. How to make Monotub for Mushrooms by your own](https://shroomok.com/en/wiki/Forget_Monotub_Kit._DIY._How_to_make_Monotub_for_Mushrooms_by_your_own)
[](https://shroomok.com/en/wiki/File:Monotub-guide-DIY-How-to-make-Monotub-for_mushrooms.png) How to make MonoTub for mushroom cultivation### Make effective Monotub for mushroom growing and increase your yield
There are so many different ways how to get mushroom harvest...
Monotub is just one of the methods we are going to discuss. Monotub is the most desirable tek of magic mushroom growers for cultivation at home.
> Other recommended teks:
>
> ✅ [DIY Grow Box](https://shroomok.com/en/wiki/DIY_Grow_Box_for_Magic_mushrooms._Fruiting_conditions "DIY Grow Box for Magic mushrooms. Fruiting conditions")
>
> ✅ [Bottle-tek or how to grow mushrooms in plastic bottles](https://shroomok.com/en/wiki/Bottle-tek_or_how_to_grow_mushrooms_in_plastic_bottles "Bottle-tek or how to grow mushrooms in plastic bottles")
#### What is monotub
***Monotub*** is a type of fruiting chamber for mushroom cultivation. The volume of such tub can be from 6 Qt for mini-monotube (aka shoeboxes) to 32, 54, 80 Quart sizes and even bigger. Average tubes are considered optimal.
[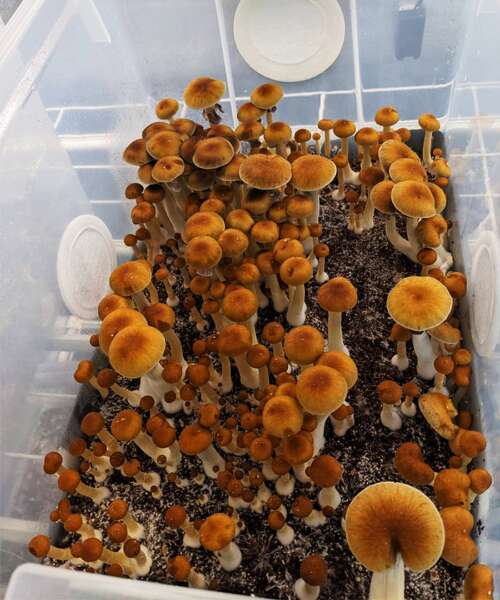](https://shroomok.com/en/wiki/File:16-monotube-in-action.png) Mushroom fruiting in monotubThe entire bottom of MonoTube is used for one mushroom block/cake. We mix fully colonized grain spawn and bulk (fruiting) substrate right in this tub.
[](https://shroomok.com/en/wiki/File:Mushroom-growing-in-monotube.png) Mushroom growing in MonoTub#### Pros and cons of MonoTub
[](https://shroomok.com/en/wiki/File:Hairy-buffalo-mushrooms-monotube.png) Mushroom harvest example in MonoTub🟢 **Once made and forget it.** Properly made MonoTub works as an autonomous system. All additional equipment is **optional** (fan, fogger/humidifier, censors etc). Additional misting or manual FAE also **optional**. Usually monotub open up only for harvesting or few times during fruiting period for check-up.
🟢 **More harvest** (in comparison with PF-tek, small mushroom cakes in Grow Box and Bottle-tek). On average 54 Quart monotub produces 2-4 productive flushes = ~2-3 kg of mushrooms and even more!
🔴 **Monotub is about "putting all the eggs in one basket"**. For spawn to bulk you mix a few spawn jars or spawn bags in one tub. If monotub contaminated, all the amount of mushrooms that could have been given from each **[small mushroom cake](https://shroomok.com/en/wiki/Making_mushroom_cake,_spawn_to_bulk,_and_casing "Casing of magic mushrooms cakes")** separately will be lost. This is the only reason why monotub isn't recommended for newbie growers.
🔴 **Dead zones in monotub.** It is a common issue for any monotub configuration. If air holes/gaps were made improperly, then natural airflow won't work.
**It cause:**
**- contamination,** because contaminants prefer stagnant air;
**-** [**overlay**](https://shroomok.com/en/wiki/Psilocybe_growing_problems_-_overlay,_abortions,_etc "Psilocybe growing problems - overlay, abortions, etc") due to high CO2 concentration;
**- dry top layer, when relative humidity in monotub is high.** This case is always confused, because our hygrometer shows us 90-99%, but top layer becomes dry. It means relative humidity maintained mainly by evaporation from top layer and goes away through air holes extremely fast. As a result we have problems with pinhead initiation, low yield or we loose all our possible harvest.
> ❗️MonoTub, built incorrectly, becomes a regular [Grow Box](https://shroomok.com/en/wiki/DIY_Grow_Box_for_Magic_mushrooms._Fruiting_conditions "DIY Grow Box for Magic mushrooms. Fruiting conditions"). Any autonomy of this design disappears. It has to be additionally misted and quite often fanned manually as a GrowBox
#### Why does some MonoTubs have air holes while other don't? Monotub configurations
The very first and the best way to increase your yield is making **balanced** fruiting chamber. It gives a chance to unlock mushroom potential for fruiting and avoid losses due to possible contamination or genetic mutation.
> There is no right or wrong way to fruit mushrooms. They need fresh air, high relative humidity, appropriate temperature and a little bit of light. Any method you can come up with to give them those required things, should work. Your choice of growing tek depends on your experience, budget, preferences, mushroom species and even imagination
Let's figure out different MonoTub configurations.
##### Modified MonoTub
***Modified monotub*** (neglect-tek) consists of plastic transparent tub that has been modified with holes and closed tightly with transparent lid. These holes (air vents) on the proper distance and height help to create air flow, fresh air exchange (FAE) and maintain humidity due the basic laws of physics: temperature changes inside and outside tube, temperature differences on the bottom and on the top of tub create air flow and influence on the relative humidity.
[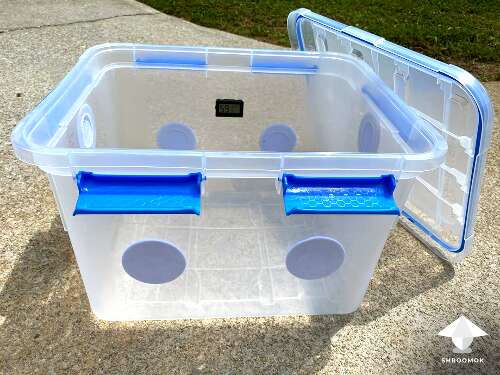](https://shroomok.com/en/wiki/File:6-monotube-for-mushroom-cultivation.png) Modified monotub for mushroom cultivation. Photo by Not Sure - [Shroomok growers Community in **Discord**](https://discord.com/invite/ngKhQDmymD)Dead zones is the main issue for such configuration.
##### **Unmodified MonoTub**
**Unmodified monotub** (neglect-tek) is a plastic transparent tub with lid, but without air holes. For fresh air exchange (FAE) during fruiting period the lid is flipped upside down or just don't close tightly. This creates air gaps around the lid locks which is important for allowing air exchange as well as substrate moisture regulation.
[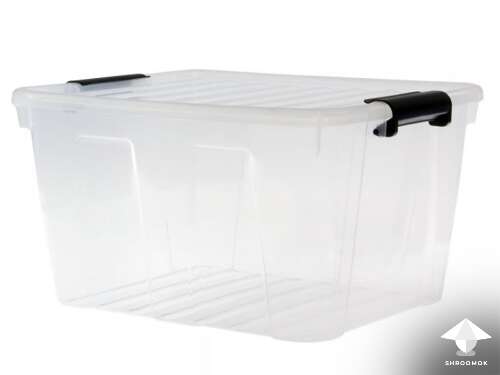](https://shroomok.com/en/wiki/File:1-box-for-monotube.png) Unmodified monotub for mushroom cultivationHumidifier/fogger often used for this tek. It helps with FAE and push out CO2.
Dead zones is the main issue for such configuration.
##### Double Tub or Twin Tub
***Double tub*** or ***Twin tub*** consists of two plastic containers and connected to each other by the container tops.
This configuration has a doubled volume of fruiting chamber and this is the main advantage for fruiting period. Can be made with air-holes (for average volume bins).
[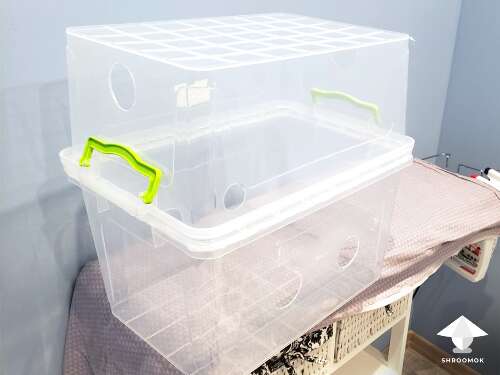](https://shroomok.com/en/wiki/File:11-double-tub-guide.png) Double tub or Twin tub as a fruiting chamber for mushroom growing##### Shoeboxes tek or Mini-tub
Usually 6Qt plastic shoeboxes use for such fruiting chamber. Can be made with air holes for fresh air exchange in the same as for modified monotub
[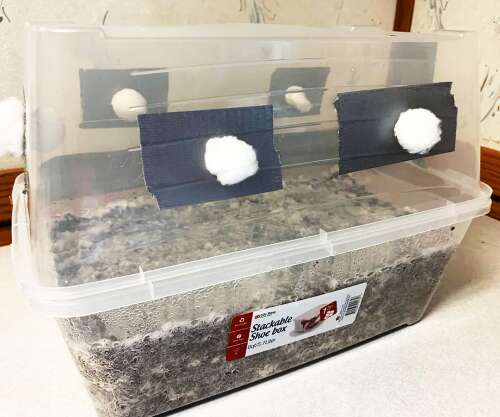](https://shroomok.com/en/wiki/File:Shoebox-for-mushrooms.png) Shoebox for mushroom growingModification without air holes, where air gaps between two bins are enough for air flow
[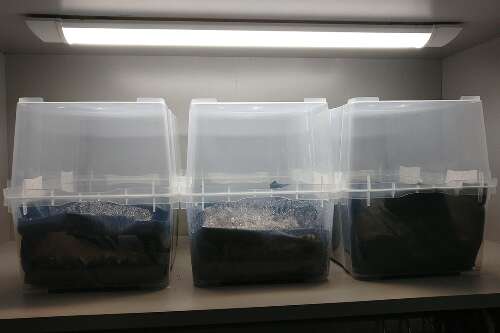](https://shroomok.com/en/wiki/File:Shoebox-tek-mushroom-growing.png) Shoeboxes for mushroom cultivation#### Influence of external factors on the MonoTub efficiency
[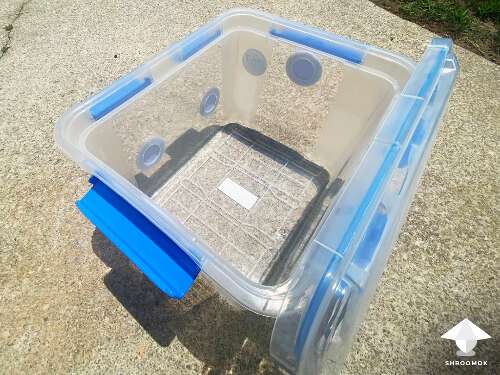](https://shroomok.com/en/wiki/File:Diy-monotub-guide.png) Modified monotub with holes for natural air flow. Photo: Not Sure1️⃣ **Relative humidity.** If RH in your room below 30%, then you won't be able to use the monotub! Whatever holes we make in it, the moisture will leave it. Making too small holes in a monotub means CO2 accumulation in it and monotub stops working. In such case you need to use humidifier either for room or inside monotub.
> Normal RH for room is 50-60%. This will allow you to make effective hole diameter in monotub without fear all moisture will evaporate or high CO2 will accumulate in it
2️⃣ **Evaporation rate, diffusion, temperature.** If the relative humidity of the outside air is below 100%, the monotub can essentially be represented as a mixing chamber.
The outside air passes through the upper holes, mixes with the humid air inside the tub and leaves it through the lower holes. This principle of operation of the monotub, can be described as the operation of an isobaric system (partial pressure difference). And also isothermal process (because of thermogenesis process).
> Mycelium is eating the substrate, it creates heat whilst digesting. This causes a thermal air current to develop inside the monotub.
This process can't come to equilibrium because the two volumes "room and container" are not commensurate in volume. When the partial pressure is equalized, due to the difference in relative humidity, the system will come to equilibrium when all the moisture inside the container has evaporated, and then the system will be in balance.
When the air is mixed, at the boundary of the holes, a third, transitional process occurs.
In fact, we have different chemical composition of air. Inside the monotube the air contains a large amount of carbon dioxide, and it is ten times different from the carbon dioxide concentration in the atmosphere!
3️⃣ **Temperature difference and condensation.** Condensation occurs due to outside air temperature drop.
> Don't assume that condensation can occur at 100% humidity only
The greater the difference in temperature, the more condensation will occur. And vice versa, the higher the air temperature, the less condensation will be on the walls of the monotub. This critical temperature is also known as the ["dew point"](https://en.wikipedia.org/wiki/Dew_point "wikipedia:Dew point") and can be observed at almost any air humidity.
Walls of plastic container don't have as good heat transfer as glass or metal. That's why due to evaporation process, the temperature will decrease, and the walls will fall out with condensation. At the same time the air inside container won't have humidity equal to 100%.
#### How Monotub works
[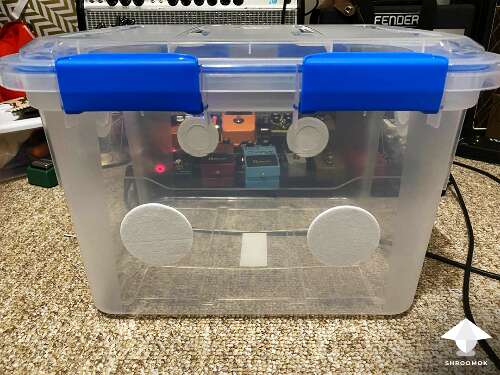](https://shroomok.com/en/wiki/File:How-to-make-monotub-and-increase-yeild.png) Properly made monotub and laws of physics can increase your yieldAccording to the previous paragraph, Monotub can be represented as a simple mixing chamber.
Mycelium is a living organism that is eating nutrients in the substrate and releases heat during digestion. As a result, a thermal airflow occurs inside the Monotube.
**The Monotub works in the following way:**
- Mycelium is spawned into bulk substrate, mixed and placed into the Monotub (with the holes taped over to prevent FAE till bulk substrate colonisation).
- Once the mycelium 80-100% colonised the substrate the tape is removed from the holes in the tub and filled with synthetic filters, polyfill, micropore tape or sponge.
- The air around the substrate is slightly heated due to mycelium heat generation during development.
- As you know, the heated air rises up. And then it comes out through the upper holes in the tub.
- At the same time fresh, cooler air enters through the lower holes of the tub.
- To prevent the substrate from drying out due to too much FAE, the polyfill in the lower holes is packed tightly, while the polyfill in the upper holes is packed more looser.
- Fresh air is a trigger for pinning process and mushroom fruiting.
> ❗️The direction of air flow can be changed manually (from top to bottom) if we use PC fan on the lid or on the wall of Monotub for additional FAE
#### How to make a MonoTub
Let's figure out modified monotub as a fruiting chamber for mushroom cultivation
[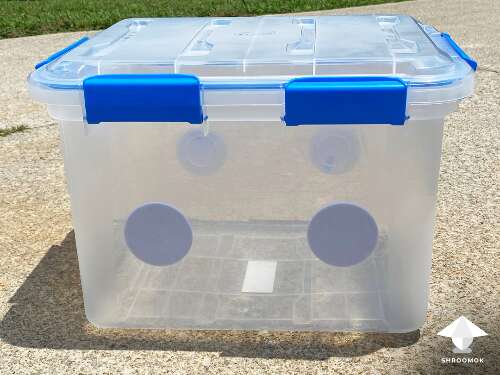](https://shroomok.com/en/wiki/File:2-monotube-construction.png) Modified monotub with air vents#### Basic rules for effective MonoTub
1️⃣ Spawn + Bulk substrate = no more than 30% of the MonoTub volume
2️⃣ Lower holes. For every 6-8 inch (15-20 cm) of length should be placed one hole (on the long side of the tub). It is often 2 holes on one side and 2 holes on the opposite side
3️⃣ Upper holes. The cross-sectional area of the upper holes must be half of the lower hole. It means if all holes are drilled with the same drill bit diameter, then we need 2 holes instead of 4
#### Materials needed for modified monotub
1️⃣ One clear plastic tub with a lid 32-91Qt sizes
[](https://shroomok.com/en/wiki/File:1-box-for-monotube.png) Plastic box for monotub (32-91Qt)**Shroomok's Choice on Amazon:**
[Clear Plastic Tub with Lid - 68Qt - 1 Pack](https://amzn.to/42cDkjP) $39.99
2️⃣ Drill with a two-inch hole saw bit (or heavy-duty pair of scissors or gardening snips) for making air vents in monotub
[](https://shroomok.com/en/wiki/File:14-drill-with-2-inch-hole-saw-for-air-vents.png) Hand drill with ~2 inch hole saw for making air vents in monotub**Shroomok's Choice on Amazon:**
[2 Inch BI-Metal Hole Saw](https://www.amazon.com/gp/product/B07SLRDW8F?&linkCode=ll1&tag=shroomok-20&linkId=2fc12f0e06edec199dabee13a7976d5e&language=en_US&ref_=as_li_ss_tl) - $13.98
3️⃣ **Synthetic filters,** or **Poly-fill,** or **micropore tape,** or **sponge for air holes** help to protect incoming air against contaminants
[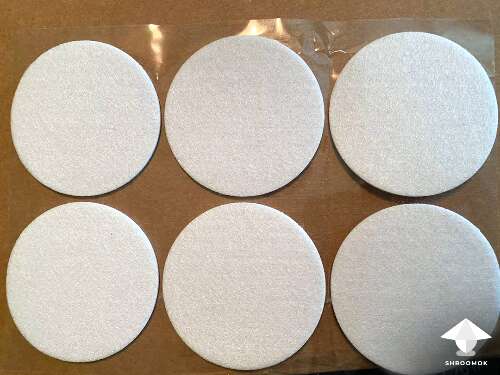](https://shroomok.com/en/wiki/File:13-air-filters-for-monotube.png) Adhesive filters for monotube**Shroomok's Choice on Amazon:**
[Micropore Tape](https://amzn.to/42a7bcO) $8.80
[Poly-Fil Premium Fiber](https://www.amazon.com/dp/B08LYJ66HN?&linkCode=ll1&tag=shroomok-20&linkId=c52463e8cc201fbf077d3bc6109f88b6&language=en_US&ref_=as_li_ss_tl) $13.99
4️⃣ Thick **opaque black trash bag** or **black spray paint** suitable for use on plastic. We need it to protect the bottom of our tub from the light and avoid side pinning. Better to use **PE bags inside**, we'll discuss details later.
[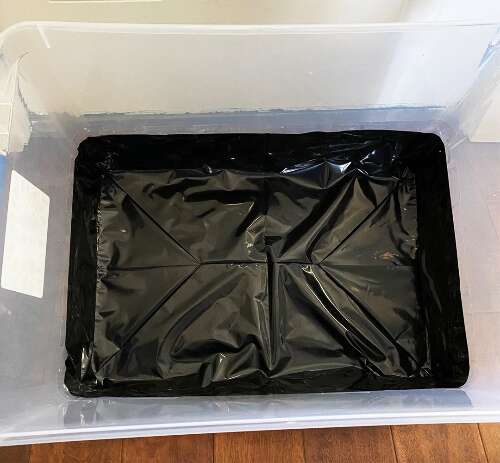](https://shroomok.com/en/wiki/File:How-to-prepare-monotub-for-spawn-to-bulk.png) Thick trash bag inside monotub prevent side pinning and help with harvesting process**Shroomok's Choice on Amazon:**
[Polyethylene black bags](https://www.amazon.com/gp/product/B000KKKPF0?&linkCode=ll1&tag=shroomok-20&linkId=ba8dc444e5179a1896dab64ad4d31b14&language=en_US&ref_=as_li_ss_tl) - $19.99
5️⃣ Duct tape or other heavy-duty tape. It is needed for closing air-vents for bulk substrate colonisation.
**Shroomok's Choice on Amazon:**
[Duck Tape, 1.88 Inch x 60 Yard, Silver - 1 Pack](https://www.amazon.com/Original-Strength-Duck-Silver-394475/dp/B0000DH4ME?&linkCode=ll1&tag=shroomok-20&linkId=119d184f38e01525bd6fdb0c1846a89a&language=en_US&ref_=as_li_ss_tl) - $7.95
#### How to set up monotub
**Step 1.** Prepare all needed materials are listed above.
**Step 2.** Attach the drill piece to the head end of the drill. Make 6 air vents in tub.
Make 4 lower holes (length side). They should be about 4-6 inches (10-15 cm) from the bottom of the MonoTub.
[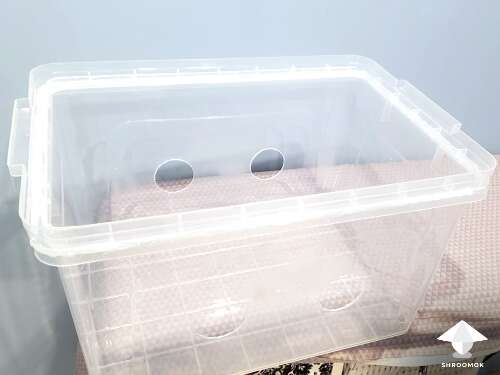](https://shroomok.com/en/wiki/File:9-air-vents-in-monotube.png) How to make air holes in monotub[](https://shroomok.com/en/wiki/File:2-monotube-construction.png) Lower air holes in monotub (4 holes)
Make 2 upper holes (width side). They should be placed about 1 inch (2 cm) from the top of MonoTub.
[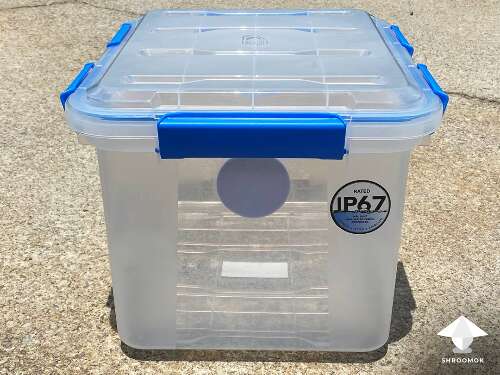](https://shroomok.com/en/wiki/File:3-monotube-air-vents.png) Upper air holes in MonoTub (2 holes)> 💡 You can paint the line of substrate level and air-holes before making them. You can make holes by melting with hot round piece. Do this outside in an open area with a mask, because melting plastic isn’t the healthiest
**Step 3.** Take a knife and clean up the edges that may remain on the holes.
**Step 4.** For bulk colonisation period close the air holes with duct tape tightly.
For fruiting period cover air-vents with filter discs /poly-fill /micropore tape /sponge. It allows air exchange, works as a filter for incoming air to prevent contaminants
[](https://shroomok.com/en/wiki/File:4-diy-monotube-for-mushroom-growing.png) Filter discs for air holes in monotub> ❗️Remember, right after spawn to bulk (for bulk colonisation period) you should totally close air vents! Use duck tape for it. Once 80-100% of top layer colonised remove duct tape for FAE. From this moment fruiting period has started!
**Step 5.** Take a piece of thick opaque black trash bag and cut it to size of MonoTub, so that edges of the bag come up to under the lower holes in the MonoTub. Place it inside your tube. Tape the sheet to the sides of the MonoTub
[](https://shroomok.com/en/wiki/File:How-to-prepare-monotub-for-spawn-to-bulk.png) Thick trash bag inside monotub prevent numerous side pinning and help with harvesting process[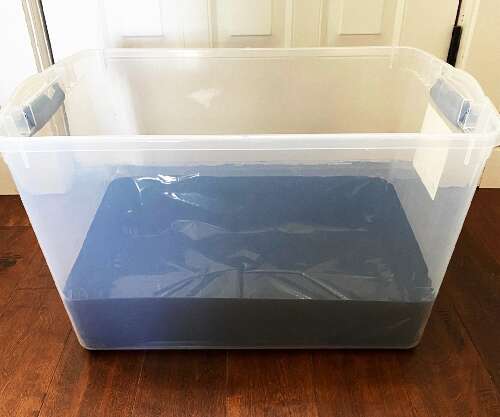](https://shroomok.com/en/wiki/File:Monotub-guide.png) Linen inside monotub prevent numerous side pinning and help with harvesting processThe lining inside is optional, you can use it or skip it. Although it has some practical advantages.
Inside lining is helpful for harvesting and further soaking in water. You can pull the whole block out without touching it or breaking it. Mushroom cake evaporates some water and mycelium absorbs water from the substrate. As a result mushroom cake begins to shrink. When the substrate shrinks it creates favorable microclimate between the substrate and the MonoTub walls. Such conditions are perfect for developing side pins. When you line the MonoTub inside, the lining shrinks with the mushroom cake as growth progresses stopping this from happening. However side pins is not a problem at all and they can grow even if you use lining inside.
**Step 6.** Keep the lid of monotub closed during bulk colonisation and fruiting period.
[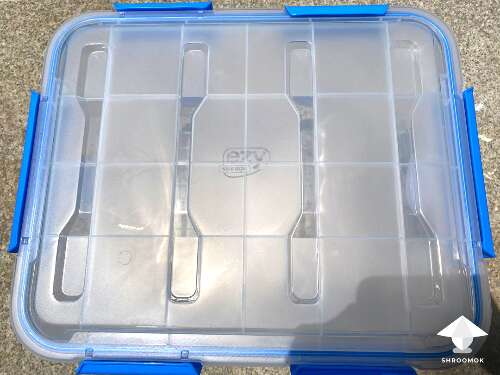](https://shroomok.com/en/wiki/File:7-monotube-for-mushrooms.png) Lid for MonoTub
**Step 7 (optional).** You can add some optional gadgets in MonoTub (light, fan, temperature/humidity/CO2 detector, humidifier, sensors, controllers etc). At least thermometer and hygrometer would be useful.
[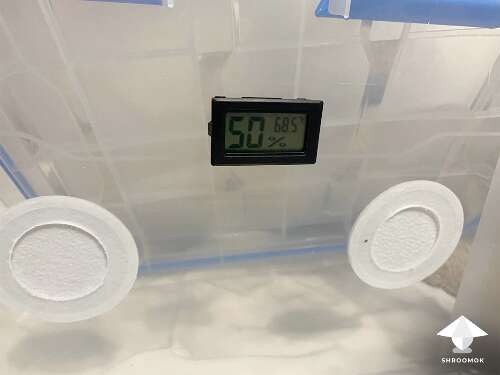](https://shroomok.com/en/wiki/File:5-how-to-build-monotub-for-mushrooms.png) Add sensors in monotub (thermometer + hygrometer)> All upgrades are optional for Psilocybe Cubensis cultivation, but can be necessary for Psilocybe Natalensis and Panaeolus. I suggest to use humidifier and fan for these species, because they required more oxygen
MonoTub is ready for the next step - Spawn to Bulk.
> 🔴 Check out guide with recipes: [Spawn to Bulk](https://shroomok.com/en/wiki/Making_mushroom_cake,_spawn_to_bulk,_and_casing#Spawn_to_Bulk)
#### Upgrades for fully automated MonoTub
**All these devices are optional if your MonoTub is made properly.** They help to maintain and control necessary fruiting parameters 24/7 for newbie growers and adjust fruiting conditions if monotub has bad airflow and issues with relative humidity.
[](https://shroomok.com/en/wiki/File:Automated-monotube-for-mushroom-cultivation.png) Automated monotub-growbox for mushroom growing. Photo on the internet for example[ 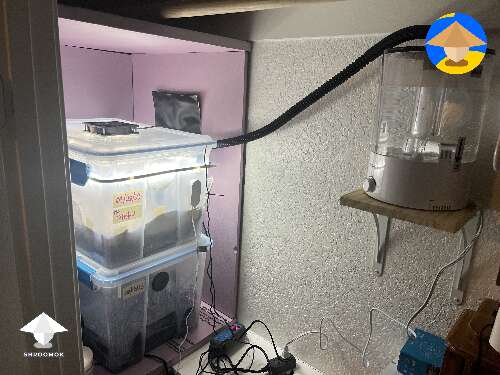](https://shroomok.com/img_orig/d9e9f9/4032_automated-mushroom-growing-setup-by-psychonautjim.jpg) [Automated MonoTub setup](https://shroomok.com/en/wiki/File:automated-mushroom-growing-setup-by-psychonautjim-5782ad)In fact such configuration is something between monotub and growbox. Because **true MonoTub is totally autonomous** fruiting chamber.
> Experienced growers feel the cultivation process and can check all parameters on the eye. But as I mentioned before ***Psilocybe Natalensis*** and ***Panaeolus*** are more sensitive to CO2 than *Psilocybe Cubensis*. That's why humidifier, PC fan or air pump can be extremely useful for these species!
1️⃣ Fruiting parameters sensor. Temperature, humidity, CO2 detector to control fruiting conditions in monotub.
**Shroomok's Choice on Amazon:**
[Govee Bluetooth Digital **Hygrometer and Thermometer,** Remote App](https://www.amazon.com/gp/product/B07Y36FWTT?&linkCode=ll1&tag=shroomok-20&linkId=2134ddd03024ca6ee93561ae56e12a17&language=en_US&ref_=as_li_ss_tl) $11.99
[Mini CO2 Detector, Temperature, Humidity](https://amzn.to/3VGLizm) $45.99
[INKBIRD WiFi Air Quality Monitor, CO2, Temperature, Humidity](https://amzn.to/41fHdmM) $79.99
2️⃣ **Light for monotub.** Additional light is optional shrooms, but recommend. Why? Briefly, light influences mushroom metabolism and pin setting. More info in the section: [Fruiting period. Pinhead initiation. Mushroom growth parameters](https://shroomok.com/en/wiki/Fruiting_period._Pinhead_initiation,_mushroom_pinning_and_mushrooms_growth_parameters "Fruiting period. Pinhead initiation, mushroom pinning and mushrooms growth parameters")
> 🔴 **Natural light is suitable, but only diffused soft light. Avoid direct sunlight!**
**Shroomok's Choice on Amazon:**
[**LED light bar** with Memory Function](https://www.amazon.com/dp/B08VDH1GJV?&linkCode=ll1&tag=shroomok-20&linkId=bbb0c451b36f1f72dc057abedd0ffb0d&language=en_US&ref_=as_li_ss_tl) $16.99
[**LED Desk Lamp** with Flexible Gooseneck](https://amzn.to/44S1e54) $16.99
[**LED Light Strip,** 6500K - 16.4ft](https://www.amazon.com/gp/product/B07XHLGSXN?&linkCode=ll1&tag=shroomok-20&linkId=8dbdf23e2926f9bc38001f7b42ffd5d4&language=en_US&ref_=as_li_ss_tl) $19.99
3️⃣ **Humidifier.** Effective with humidity controller and on/off cycle according to RH level in monotub
[Ultra Fine Mist Spray Bottle](https://www.amazon.com/gp/product/B0948WBX9L?&linkCode=ll1&tag=shroomok-20&linkId=ddad2ce6ae202d8f96aed0253a8ca814&language=en_US&ref_=as_li_ss_tl) $8.99 - cheap option for manual misting
[Fogger **with Humidity Controller**, Extended Hose, 4L](https://www.amazon.com/dp/B08NVLT6JK?&linkCode=ll1&tag=shroomok-20&linkId=680a074364c98f494a675162d8076fdc&language=en_US&ref_=as_li_ss_tl) $59.99
4️⃣ **Humidity controller** to maintain and control stable relative humidity 90-99%
[Inkbird Humidity Controller for Mushroom Growbox/Monotub/Grow Tent](https://www.amazon.com/Humidity-Controller-Inkbird-Humidistat-Pre-wired/dp/B01J1E5LWM?&linkCode=ll1&tag=shroomok-20&linkId=5042a83024c4d4a2c8facbd38d468bb8&language=en_US&ref_=as_li_ss_tl) $36.54
5️⃣ **Fan** for additional air flow and FAE. Can be installed on the lid or on the wall of the tub.
[Quiet PC Fan with power plug cord](https://www.amazon.com/gp/product/B009OWVUJ0?&linkCode=ll1&tag=shroomok-20&linkId=bba94af92491130fefdb0242b324a204&language=en_US&ref_=as_li_ss_tl) $19.99
> ❓ **Question:** I'm interested about PC fan on the top (or on the side). It's just a hole for the fan or filter used too, between the the hole and PC fan? Thanks
❗️**Shroomok answers:** The principle of PC fan in monotub the same as a ceiling-mounted exhaust fan in your bathroom. The PC fan works by **PULLING** the air up instead of the PC fan blowing air into the tub. So that it pulls old air out of the box while force the fresh air to be pulled in through the air vents, which is protected with polyfill/synthetic filters/sponge where it can be filtered. Place the PC fan on the correct side and check the airflow direction.
6️⃣ **Cycle timer for light/fan/humidifier.** You can set up on/off cycle for fan (for example, every 1 hour for 10 sec or 4-6 times/day for 1 minute). For light (12 hours on/off cycle). For humidifier (for example, every 1 hour for 10 sec or 4-6 times/day for 1 minute).
[BN-LINK Short Period Repeat Cycle Intermittent Timer](https://www.amazon.com/BN-LINK-Period-Repeat-Intermittent-Interval/dp/B0184CG9K0?&linkCode=ll1&tag=shroomok-20&linkId=cc0da24a870975b6173f8f7362ffdb7a&language=en_US&ref_=as_li_ss_tl) $26.99
[Digital Thermometer Hygrometer Temperature Controller](https://amzn.to/3rvEcTj) $49.99
#### MonoTub modifications by Shroomok Growers Community
You can change, upgrade your fruiting chamber in a different way. Experiment and you'll come up with the best solution for you. Don't afraid to make something different. The sky is the limit!
Let me show you more examples.
❇️ **Black MonoTubs** with shared automative humidifier system and temperature/humidity controller. Covered by clear plastic stretch wrap film (without lids on top)
[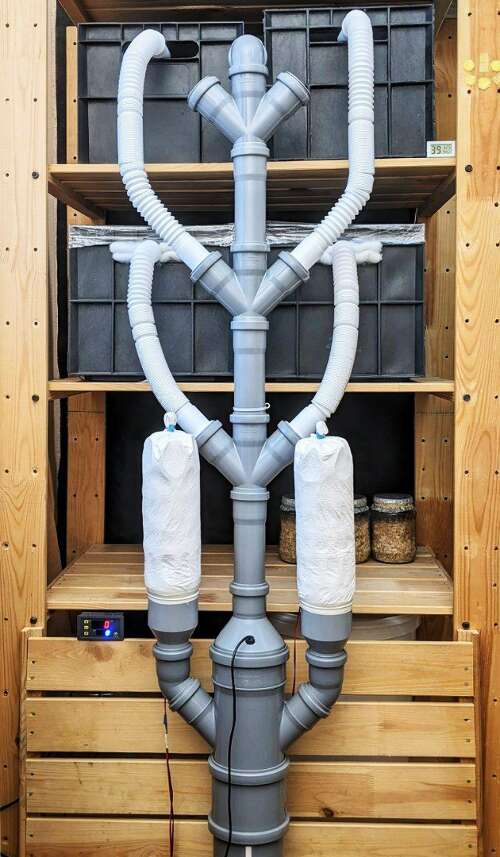](https://shroomok.com/en/wiki/File:Cultivation-set-up-shroomok-community.png) DIY mushroom fruiting chamber setup
**Shroomok's Choice on Amazon:**
[Black Storage Bin with Lid - 40/53Qt - 6 Pack](https://amzn.to/3Y0hnDF) - $80.99
[Temperature/humidity controller](https://www.amazon.com/VIGELA-STC-3028-AC110-230V-All-Purpose-Temperature/dp/B09MS3YJDN?&linkCode=ll1&tag=shroomok-20&linkId=8199b7da120c2dc2a4103bd89563af64&language=en_US&ref_=as_li_ss_tl) - $24.99
[Mxmoonant 6 Head Ultrasonic Mist Maker](https://www.amazon.com/dp/B0893768J8?&linkCode=ll1&tag=shroomok-20&linkId=3bc2e808b329d635735cf6b65f581b53&language=en_US&ref_=as_li_ss_tl) for DIY powerful humidifier $128.90 - for such fogger you need water tank and plastic pipes
❇️ **MonoTubs with temperature and humidity controllers**
[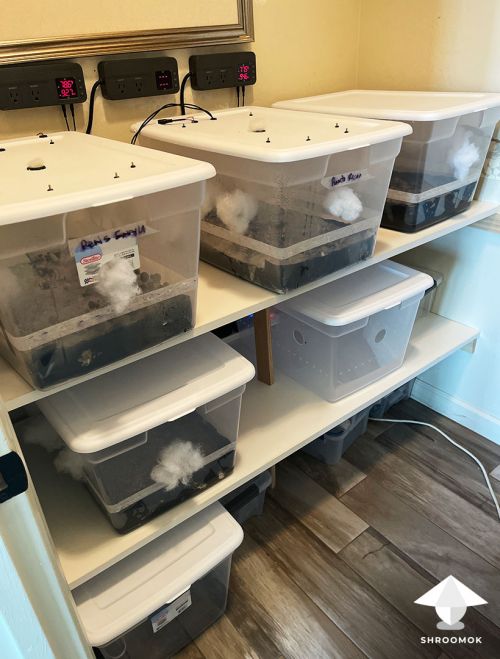](https://shroomok.com/en/wiki/File:Fruiting-chambers-shroomok-growers-community.jpg) MonoTubs with temperature and humidity controller. Photo: Vanilla Gorilla**Shroomok's Choice on Amazon:**
[Modular Stackable Storage Bins - 66 Quart - 2 Pack](https://amzn.to/3nJO1eL) $55.69
[Polyethylene black bags](https://www.amazon.com/gp/product/B000KKKPF0?&linkCode=ll1&tag=shroomok-20&linkId=ba8dc444e5179a1896dab64ad4d31b14&language=en_US&ref_=as_li_ss_tl) - $19.99
[Inkbird Temperature + Humidity Controller ITC-608T](https://www.amazon.com/dp/B07GQWY9HM?&linkCode=ll1&tag=shroomok-20&linkId=443032448df69ff1e07c2a3343a9a693&language=en_US&ref_=as_li_ss_tl) $69.99
❇️ **Plastic seedling box with lid**. Modified with additional air holes, PC fan on the top of the lid and temperature/humidity controller.
[](https://shroomok.com/en/wiki/File:Growing-set-up-shroomok-community.png) Growing set up by anthony187The only issue you can see here is too much fanning (currently 15 seconds every 30 minutes). Top layer loose moisture, there are no shrooms in the centre. But near borders more humidity and shrooms are there!
Try to use PC fan 3-4 times/day and mist the walls of the tub additionally if needed (according to humidity controller data). If natural airflow in such tub works properly you can skip additional fanning at all.
**Shroomok's Choice on Amazon:**
[Seedling box with lid and ready-made air holes](https://www.amazon.com/EarlyGrow-93763-Medium-Propagator-Extension/dp/B07HHR5DGN?&linkCode=ll1&tag=shroomok-20&linkId=ef015fc6b812776c120a953b0414cfbe&language=en_US&ref_=as_li_ss_tl) - $30.38
[Quiet Fan with power plug cord](https://www.amazon.com/gp/product/B009OWVUJ0?&linkCode=ll1&tag=shroomok-20&linkId=bba94af92491130fefdb0242b324a204&language=en_US&ref_=as_li_ss_tl)- $19.99
[Humidity Controller for monotub](https://www.amazon.com/Humidity-Controller-Inkbird-Humidistat-Pre-wired/dp/B01J1E5LWM?&linkCode=ll1&tag=shroomok-20&linkId=5042a83024c4d4a2c8facbd38d468bb8&language=en_US&ref_=as_li_ss_tl) - $42.99
[LED White **Light Strip** 6500K](https://www.amazon.com/gp/product/B07XHLGSXN?&linkCode=ll1&tag=shroomok-20&linkId=8dbdf23e2926f9bc38001f7b42ffd5d4&language=en_US&ref_=as_li_ss_tl) $19.99
❇️ **Twin fruiting chamber.** Two tubs, 16 Qt each. Humidifier shared for 2 tubs. Ultrasonic humidifier activates with humidity controller to create a fine mist (turn on/off to maintain needed relative humidity). Light LED strips on the top of lids (inside the tubs).
[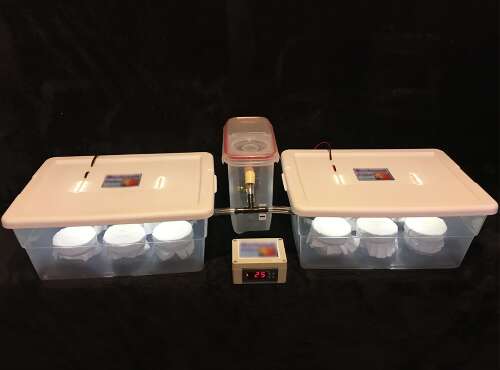](https://shroomok.com/en/wiki/File:Fruiting-chamber-for-mushrooms.png) Twin fruiting chamber📸 For more examples check out [MonotTub photo gallery](https://shroomok.com/gallery/monotub)
Join Shroomok Community on [Discord](https://discord.gg/ngKhQDmymD) and [Reddit](https://www.reddit.com/r/Shroomok) for questions and sharing experience or leave your comments below.
If you find this guide helpful, please consider supporting my work with a cup of coffee on ☕️ [buymeacoffee](https://www.buymeacoffee.com/shroomok)
Have a happy growing!
Peace, Shroomok ❤️
## How to build automatic incubation chamber for mushrooms
[How to build automatic incubation chamber for mushrooms](https://shroomok.com/en/wiki/How_to_build_automatic_incubation_chamber_for_mushrooms)
[](https://shroomok.com/en/wiki/File:Incubation-chamber-with-temperature-control-for-mushroom_growing.jpg) Incubation chamber with automated temperature control for mushroom cultivation### How to make an Incubation Chamber with automated temperature control for mushroom growing
Usually, you can colonize agar plates, liquid culture, spawn jars and spawn bags at room temperature and no incubator needed, but everything change for growers during winter season in continental climate zones. We recommend to use this set up, if you have bunch of spawn jars, spawn bags, your room temperature about 70ºF or +20ºC and lower and if you want to speed up colonization process.
Incubation chamber allows you to grow mushrooms at home any time. This design will allow you to maintain a constant stable temperature automatically.
Such modification can be built directly into the cabinet or placed on the shelf in a cabinet or might be as a mobile box.
#### Incubation Chamber Advantages
Incubation Chamber is more expensive compared to Tub in Tub (TiT) with aquarium heater, where you need one inexpensive device.
> Tub in Tub (TiT) — refers to an incubator modification consisting of 2 plastic tubs and an aquarium heater
**Incubation chamber has significant advantages:**
✅ No water tank needed
✅ Safe to use
✅ Stable temperature all the time. The temperature controller has several settings and allows you to set a temperature range. This makes it easy to keep the temperature within 1-2°
✅ Heating element goes along the wall(s) of the box. This gives more uniform heating
> In my case it is 0.3m per 1m of total perimeter, it covers 30%
✅ The sensor of the thermostat is remote. You control the air temperature in the box, not the temperature of the water in the tub or battle with aquarium heater
✅ The Heating Film or Heat Mat is flat. It doesn't take too much space in the incubation chamber. You have a lot of space for spawn jars/bags and other stuff
✅ You can use Incubator for different mushroom species, for spawn colonization, spawn run, agar plates colonization, liquid culture
Let's figure out how to make Incubator for mushroom growing with temperature control!
#### Components for Automated Incubator and easy set up
List of required stuff and Amazon links to each item for easy set up. Just connect all this stuff
1️⃣ **Heating Pad Mat**
[](https://shroomok.com/en/wiki/File:Heating-mat-for-incubator-for-mushrooms.jpg) Heating Pad Mat for Incubator, different sized for your box**Recommended stuff on Amazon:**
[Heating Pad Mat, manual temperature regulator, 25W, 220x420mm](https://www.amazon.com/Temperature-Controller-Incubator-Terrarium-Hydroponic/dp/B07K9R627G?th=1&linkCode=ll1&tag=shroomok-zm-20&linkId=3805cde8a6c9eb393ba716963d8f4d96&language=en_US&ref_=as_li_ss_tl) $10.99
[Heating Pad, manual temperature regulator, 25W, 220x420mm](https://www.amazon.com/Reptile-Heating-Terrarium-Temperature-Chameleon/dp/B07Y4Z8W43?&linkCode=ll1&tag=shroomok-zm-20&linkId=02afd2046b27208faec27eae79d13764&language=en_US&ref_=as_li_ss_tl) $13.99
[Advanced Infrared Heat Mat, w/o temperature regulator, 22W, 274x410mm](https://www.amazon.com/Komodo-Advanced-Heat-Mat-22w/dp/B00B99PGS2?&linkCode=ll1&tag=shroomok-zm-20&linkId=8b866ec76b03400a67c053f22b4c2900&language=en_US&ref_=as_li_ss_tl) $31.57
[Professional Heated Film Technology, w/o temperature regulator, 280x1524mm](https://www.amazon.com/Propagation-Seedling-Technology-Germination-Beautiful/dp/B06Y19H2LC?&linkCode=ll1&tag=shroomok-zm-20&linkId=0ebdd2414a4079df1b68792dc3068a47&language=en_US&ref_=as_li_ss_tl) $49.95
2️⃣ **Temperature Controller aka Thermostat**
This device helps you to control **air** temperature in the incubator within temperature range you set. For example 25-27°C or 77-80F. Thermostat turn ON the Heat Mat, when temperature drop down to 77°F or 25°C and turn OFF, when temperature is 27°C or 80°F. So that you always have stable temperature within 77-80°F or 25-27°C.
[](https://shroomok.com/en/wiki/File:Thermostat-for-mushroom-incubator.jpg) Temperature controller aka thermostat for incubator**Recommended stuff on Amazon:**
[BN-LINK Digital Heat Mat Thermostat Heat Controller](https://www.amazon.com/dp/B01I15S6OM?&linkCode=ll1&tag=shroomok-zm-20&linkId=1f037f067b05224771eb871818d3386a&language=en_US&ref_=as_li_ss_tl) $18.99 - Heating controller only
[BN-LINK Digital Thermostat for any DIY projects](https://www.amazon.com/BN-LINK-Temperature-Controller-Thermostat-Germination/dp/B09F7M7VPT?&linkCode=ll1&tag=shroomok-zm-20&linkId=82a2b2a1432954fe13ece7ca2caae78c&language=en_US&ref_=as_li_ss_tl) $34.99 - Heating & Cooling Thermostat
[Inkbird ITC-308 Digital Thermostat for any DIY projects](https://www.amazon.com/dp/B01HXM5UAC?&linkCode=ll1&tag=shroomok-zm-20&linkId=3a6defbc9734f1a9c41aa28b6cb4a18f&language=en_US&ref_=as_li_ss_tl) $35.00 - Heating & Cooling Thermostat
3️⃣ **Polystyrene styrofoam panel**
This helps to retain heat inside the box
[](https://shroomok.com/en/wiki/File:Polystyrene-styrofoam-panel-for-mushroom-incubation-chamber.png) Polystyrene panel for mushroom incubation chamber**Recommended stuff on Amazon:**
[Polystyrene Sheets 11x17x0.5 inch - 14 Pack](https://www.amazon.com/Silverlake-Craft-Foam-Block-Arrangements/dp/B07Z3CPQ18?&linkCode=ll1&tag=shroomok-zm-20&linkId=5239d31186bbe0a55f8f7a3225f740e0&language=en_US&ref_=as_li_ss_tl) $26.99
[STYROFOAM Polystyrene 2' x 2' Project Panels | 1" Thick - 6 Pack](https://www.amazon.com/STYROFOAM-99106444-Project-Panels-Pack/dp/B07FPL3LBB?&linkCode=ll1&tag=shroomok-zm-20&linkId=605ae8b1205d1893962f56755841e36b&language=en_US&ref_=as_li_ss_tl) - $35.99
4️⃣ **Clear thick PE Film** or **PET Flexible Plastic Sheets**
[](https://shroomok.com/en/wiki/File:Flexible-plastic-sheet.jpg) Flexible plastic sheet for incubator**Recommended stuff on Amazon:**
[PET Flexible Plastic Glass Sheets, Clear, 24x36 x 0.03 inch - 2 Pack](https://www.amazon.com/Flexible-Plexi-Glass-Protective-Langdon-House/dp/B093PPZR7X?&linkCode=ll1&tag=shroomok-zm-20&linkId=b7c028dc8d265114ab2fe608d6eb0ed4&language=en_US&ref_=as_li_ss_tl) $28.99
5️⃣ **Quiet PC Fan 90-120мм**
[](https://shroomok.com/en/wiki/File:Fan-for-incubation-chamber-for-mushroom-growing.jpg) Fan for incubator**Recommended stuff on Amazon:**
[Quiet Fan 120mm with power plug cord](https://www.amazon.com/gp/product/B009OWVUJ0?&linkCode=ll1&tag=shroomok-zm-20&linkId=e64e20d6f61b8d3e56bea84b8116f66d&language=en_US&ref_=as_li_ss_tl) $19.99
#### Cheaper components for Automated Incubator I use
You can save your money if you already have some components are listed below, so you can use them for incubator. If you are going to buy all these items, then better to take components from the previous paragraph.
> Be ready to be a Tech Guru and connect a few wires to make your incubator work!
1️⃣ **Temperature controller board 12V** or **Thermostat**
[](https://shroomok.com/en/wiki/File:Temperature-controller-w1209-for-mushroom-incubator.png) Digital temperature controller board (thermostat) for mushroom incubator**Recommended stuff on Amazon (choose one from the listed below):**
[AEDIKO Digital Temperature Controller Board W1209 DC 12V](https://www.amazon.com/AEDIKO-Temperature-Controller-Thermostat-Electronic/dp/B09STPQF7J?&linkCode=ll1&tag=shroomok-zm-20&linkId=457c254cedf5b7bdb217befb816c8eb2&language=en_US&ref_=as_li_ss_tl) $6.99 - my simple cheap option
I'd like to suggest thermostat with Heating and Cooling Controller. I also use it for cooling box (for fruiting chamber) during hot summer season.
[STC-1000 AC 110V Temperature Heating/Cooling Controller](https://www.amazon.com/STC-1000-AC-110V-Temperature-Controller/dp/B07Y7LSPDT?&linkCode=ll1&tag=shroomok-zm-20&linkId=b83e0c24fbd9767f521978dd3a7954a3&language=en_US&ref_=as_li_ss_tl) $19.56 - for those who can connect 2 wires together, it seems the best option
[MH1210W Digital Temperature Thermostat Regulator Controller 90-250V 10A 220V](https://www.amazon.com/MH1210W-Temperature-Thermostat-Regulator-Controller/dp/B07K8T2FTS?&linkCode=ll1&tag=shroomok-zm-20&linkId=630279976cf8dfa237d6f5ecb0d08d46&language=en_US&ref_=as_li_ss_tl) $11.53 - great cheap option for incubator
[Inkbird ITC-308 Digital Thermostat for any DIY projects](https://www.amazon.com/dp/B01HXM5UAC?&linkCode=ll1&tag=shroomok-zm-20&linkId=3a6defbc9734f1a9c41aa28b6cb4a18f&language=en_US&ref_=as_li_ss_tl) $35.00 - more expensive, with plug
2️⃣ **Power Adapter 12V, 10A**
[](https://shroomok.com/en/wiki/File:AC_DC_adapter.jpg) Power adapter 12V 10A for mushroom incubator[AC 110V/220V to DC 12V 10A 120W Power Supply Transformer Switch](https://www.amazon.com/Transformer-MKASYON-Switching-Converter-Security/dp/B07GFJVHRH?&linkCode=ll1&tag=shroomok-zm-20&linkId=92cc44e9f09b8bbc892938a5ed610efe&language=en_US&ref_=as_li_ss_tl) $16.99 - my adapter
[60W Power Adapter, 12V 5A, 120V AC to 12V DC Transformer](https://www.amazon.com/Power-Supply-Lights-Adapter-Transformer/dp/B07GFFG1BQ?&linkCode=ll1&tag=shroomok-zm-20&linkId=7883bc0f4a1c0069b9bfff4ab54a791f&language=en_US&ref_=as_li_ss_tl) $9.59 - cheap option
[AC 100-240V to DC 12V 10A Power Supply Adapter](https://www.amazon.com/Alarmpore-100-240V-Adapter-Converter-Charger/dp/B01JL0UJEQ?&linkCode=ll1&tag=shroomok-zm-20&linkId=8d646cda9cd05e2b146e95bc199aba4f&language=en_US&ref_=as_li_ss_tl) $18.99
3️⃣ **Infrared Heated Film** or **Infrared Heating Mat**
[](https://shroomok.com/en/wiki/File:Heating-film-for-mushroom-incubation-chamber.jpg) Infrared heating film for incubatorI used Infrared Heated Film 12V, 50-66W per 1m. Can't find the exact one on Amazon, but these options from previous paragraph are also great:
[Heating Pad Mat, manual temperature regulator, 25W, 220x420mm](https://www.amazon.com/Temperature-Controller-Incubator-Terrarium-Hydroponic/dp/B07K9R627G?th=1&linkCode=ll1&tag=shroomok-zm-20&linkId=3805cde8a6c9eb393ba716963d8f4d96&language=en_US&ref_=as_li_ss_tl) $10.99
[Heating Pad, manual temperature regulator, 25W, 220x420mm](https://www.amazon.com/Reptile-Heating-Terrarium-Temperature-Chameleon/dp/B07Y4Z8W43?&linkCode=ll1&tag=shroomok-zm-20&linkId=02afd2046b27208faec27eae79d13764&language=en_US&ref_=as_li_ss_tl) $13.99
[Advanced Infrared Heat Mat, w/o temperature regulator, 22W, 274x410mm](https://www.amazon.com/Komodo-Advanced-Heat-Mat-22w/dp/B00B99PGS2?&linkCode=ll1&tag=shroomok-zm-20&linkId=8b866ec76b03400a67c053f22b4c2900&language=en_US&ref_=as_li_ss_tl) $31.57
[Professional Heated Film Technology, w/o temperature regulator, 280x1524mm](https://www.amazon.com/Propagation-Seedling-Technology-Germination-Beautiful/dp/B06Y19H2LC?&linkCode=ll1&tag=shroomok-zm-20&linkId=0ebdd2414a4079df1b68792dc3068a47&language=en_US&ref_=as_li_ss_tl) $49.95 - this one close to my film I use
4️⃣ **Quiet PC Fan.** Any simple cheap quiet fan 90-120 mm is okay!
[](https://shroomok.com/en/wiki/File:PC-fan-for-incubator.jpg) PC fan for DIY incubator[Silent Fan 120mm](https://www.amazon.com/Kingwin-CF-012LB-Efficient-Excellent-Ventilation/dp/B002YFP8BK?&linkCode=ll1&tag=shroomok-zm-20&linkId=cac6087971051d51ce81c2545d14bb08&language=en_US&ref_=as_li_ss_tl) $6.69 - my fan
[Quiet Fan 120 mm, with power plug cord](https://www.amazon.com/gp/product/B009OWVUJ0?&linkCode=ll1&tag=shroomok-zm-20&linkId=e64e20d6f61b8d3e56bea84b8116f66d&language=en_US&ref_=as_li_ss_tl)- $19.99 - more expensive, with plug
5️⃣ **Wire Cable** (1.5 sqmm = 16 awg = 30/0.25). You need wires to connect all gadgets
[](https://shroomok.com/en/wiki/File:Wires.jpg) Wire cable[Stranded Copper Wire 16 AWG 10 ft](https://www.amazon.com/BNTECHGO-Silicone-Flexible-Strands-Stranded/dp/B00TG1TRL2?th=1&linkCode=ll1&tag=shroomok-zm-20&linkId=5fb39562f2e128c5f6ca9bc4478a9758&language=en_US&ref_=as_li_ss_tl) $7.98
6️⃣ **Cable Ties** - optional, for convenience
[Zip Cable Ties](https://www.amazon.com/Pounds-Tensile-Strength-Self-Locking-Outdoor/dp/B0B2RBYB3Y?&linkCode=ll1&tag=shroomok-zm-20&linkId=6d56a6e06f03cf2eda520241681bd7eb&language=en_US&ref_=as_li_ss_tl) $2.99
##### Important notes to this set up
🔴 The W1209 temperature controller has 20A. In fact you can give up to 5-7A, otherwise dangerous heating
🔴 Check out the power and voltage of the Infrared Film Heating. It comes in 12, 24, 220V and can vary in wattage per meter
🔴 Just with a thermal controller the power of the film should not exceed 70W. If you need more, you can do it, but you will need to put an additional relay with more power (the controller will turn on the relay with more power, and it will turn on the film)
🔴 The power adapter should be with some reserve. If you have 60-70 watt film it is better to find a power adapter for 100W and more
#### How to assemble Incubator for mushroom cultivation
First of all you need to make a box for incubator (or use a cabinet, or cardboard box, or wooden box) and cover it with Polystyrene Styrofoam panels inside, this material help to retain heat inside the box.
Here you can see my 2 incubators
[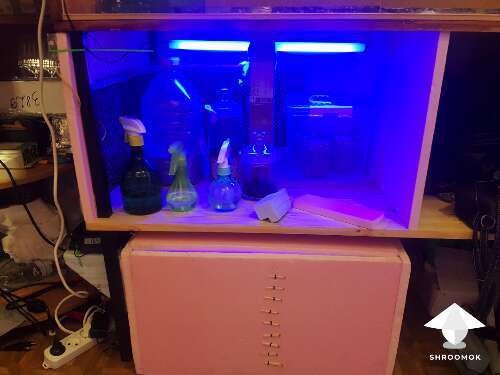](https://shroomok.com/en/wiki/File:How-to-make-automatic-incubation-chamber-for-mycology.png) Incubation chamber for mushroom growing (2 styrofoam boxes)> ✅ Styrofoam is a good insulator and quite strong material! 🔥 Keep in mind it is flammable, be careful!
1️⃣ My top incubator stands on the table as a shelf. 3 walls of my incubator are made with [Styrofoam panels](https://www.amazon.com/STYROFOAM-99106444-Project-Panels-Pack/dp/B07FPL3LBB?&linkCode=ll1&tag=shroomok-zm-20&linkId=605ae8b1205d1893962f56755841e36b&language=en_US&ref_=as_li_ss_tl). I had big panels 125x60x2 cm or 48x24x1 inch. So one sheet of styrofoam was enough for my incubator
The final size of the box for incubator is 60\*70\*40 cm or 24\*28\*16 inch
[](https://shroomok.com/en/wiki/File:Diy-automatic-mycology-incubator.png) Incubator for mushroom growing made with styrofoam sheets
You can use any sizes according to your needs, use pieces of styrofoam, cut the sheet, make a separate box of any size or buy ready styrofoam box
[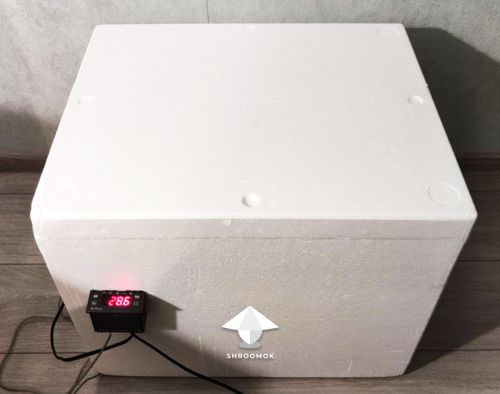](https://shroomok.com/en/wiki/File:Styrofoam-box-as-incubation-chamber-for-mushrooms.jpg) Styrofoam incubator for mushroom growing with heating pad inside and Temperature Controller> Light inside isn't necessary for colonization period, I add it just for my convenience. Sometimes I place fruiting chambers inside this box ([Bottle-tek](https://shroomok.com/en/wiki/Bottle-tek_or_how_to_grow_mushrooms_in_plastic_bottles "Bottle-tek or how to grow mushrooms in plastic bottles"), [Growbox](https://shroomok.com/en/wiki/DIY_Grow_Box_for_Magic_mushrooms._Fruiting_conditions "DIY Grow Box for Magic mushrooms. Fruiting conditions")) for spawn run
2️⃣ Heated element placed on the left wall and goes to the back wall. I use Infrared Heated Film (12V, 50-66W per 1m). You can use Heat Pad Mat or [Heated Film](https://www.amazon.com/Propagation-Seedling-Technology-Germination-Beautiful/dp/B06Y19H2LC?&linkCode=ll1&tag=shroomok-zm-20&linkId=0ebdd2414a4079df1b68792dc3068a47&language=en_US&ref_=as_li_ss_tl) as well. Use adhesive tape to stick it to the wall of the incubator
[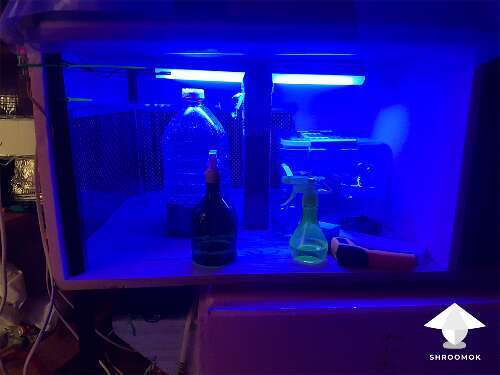](https://shroomok.com/en/wiki/File:Guide-incubation-chamber-for-mycology.png) Heating Film placed on the left wall inside the incubation chamber> ❌ Don't use heat mat on the floor of the incubator! Your jars/bags with substrate shouldn't contact with heating element directly, because you can overheat mycelium or trigger bacteria contamination
> ❌ Don't use heat mat on the ceiling of the incubator! This will make heating almost useless
3️⃣ My [Thermostat](https://www.amazon.com/AEDIKO-Temperature-Controller-Thermostat-Electronic/dp/B09STPQF7J?&linkCode=ll1&tag=shroomok-zm-20&linkId=457c254cedf5b7bdb217befb816c8eb2&language=en_US&ref_=as_li_ss_tl) for automated temperature control placed outside of the incubation chamber and connected with [Heating Film](https://www.amazon.com/Propagation-Seedling-Technology-Germination-Beautiful/dp/B06Y19H2LC?&linkCode=ll1&tag=shroomok-zm-20&linkId=0ebdd2414a4079df1b68792dc3068a47&language=en_US&ref_=as_li_ss_tl). Power goes down, the wires for the heater and the temperature controller are put inside
[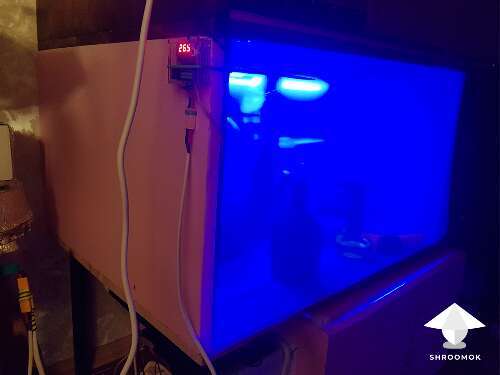](https://shroomok.com/en/wiki/File:Thermobox-for-mushroom-growing.png) Temperature controller board outside the box. Power goes down, the wires for heater and temperature sensor are insideYou can use low power heating pad without a thermocontroller, with a simple analog regulator, but it is highly NOT recommended. You can easily overheat your environment if you set it wrong or if external conditions change
> 🔴 Temperature can be adjusted manually. Just set the needed temperature and thermostat will turn on/off when it is necessary to maintain required temperature. I usually set about +25-27°C or 77-80°F for spawn colonization period. Thermostat turn ON the Heat Mat, when temperature drop down to 77°F or +25°C and turn OFF, when temperature is 27°C or 80°F. So that you always have stable temperature within 77-80°F or +25-27°C
4️⃣ I also connected a [PC fan](https://www.amazon.com/Kingwin-CF-012LB-Efficient-Excellent-Ventilation/dp/B002YFP8BK?&linkCode=ll1&tag=shroomok-zm-20&linkId=cac6087971051d51ce81c2545d14bb08&language=en_US&ref_=as_li_ss_tl). It turns on/off with the heating element
[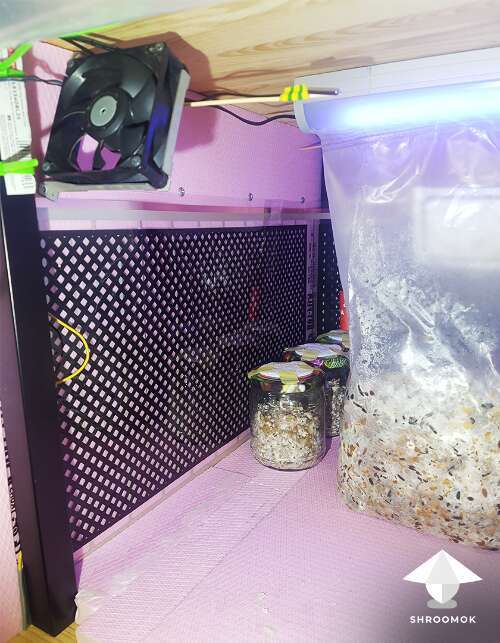](https://shroomok.com/en/wiki/File:Fan-in-incubation-chamber.png) Fan in incubation chamber for uniform temperature> 🔴 **Why I use fan?** With fan we have uniform temperature everywhere in the box. It helps to spread warm air from heat mat evenly in the box. Without fan temperature always will be higher near heat mat and lower on the opposite side. This influences the colonization process greatly!
>
> 🔴 On other side Fan can be a bad thing if you catch contamination. It helps to spread mold spores in the air
5️⃣ The front wall or door of my incubator made with [Clear PET Plastic Sheets](https://www.amazon.com/Flexible-Plexi-Glass-Protective-Langdon-House/dp/B093PPZR7X?&linkCode=ll1&tag=shroomok-zm-20&linkId=b7c028dc8d265114ab2fe608d6eb0ed4&language=en_US&ref_=as_li_ss_tl) (or thick PET film). You can use [styrofoam panels](https://www.amazon.com/STYROFOAM-99106444-Project-Panels-Pack/dp/B07FPL3LBB?&linkCode=ll1&tag=shroomok-zm-20&linkId=605ae8b1205d1893962f56755841e36b&language=en_US&ref_=as_li_ss_tl) here as well
[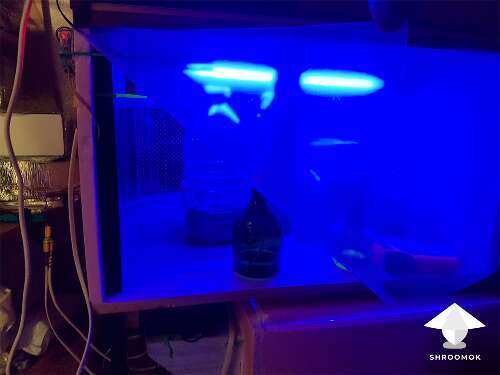](https://shroomok.com/en/wiki/File:How-to-build-automatic-incubator-for-mushroom-cultivation.png) Film or Plastic sheet "door" in incubation chamber> 🔴 Film-door fixed on top with double-sided adhesive tape
6️⃣ Incubation Chamber for mushroom cultivation is ready and loaded with spawn jars and bags. There are grow bags with shiitake and spawn jars with actives
[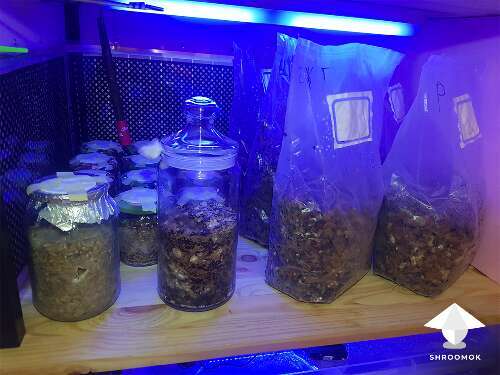](https://shroomok.com/en/wiki/File:Incubator-incubation-chamber-for-mushroom-growing.png) Incubation chamber loaded with spawn jars and grow bags#### Incubator modifications for mushroom growing
🔵 The most simple incubator: any cardboard box, bubble wrap inside to retain heat, [Shoe Heater](https://www.amazon.com/gp/product/B01M5IXYXP?ie=UTF8&linkCode=ll1&tag=shroomok-20&linkId=5079a846718eb8e933d817e2c7db9098&language=en_US&ref_=as_li_ss_tl) and Thermometer. Thermostat can be added
[](https://shroomok.com/en/wiki/File:Incubator-for-growing-psilocybe-cubensis.jpg) Simple and cheap incubator for mushroom growing
🔵 Styrofoam incubator, Heat Mat on the side
[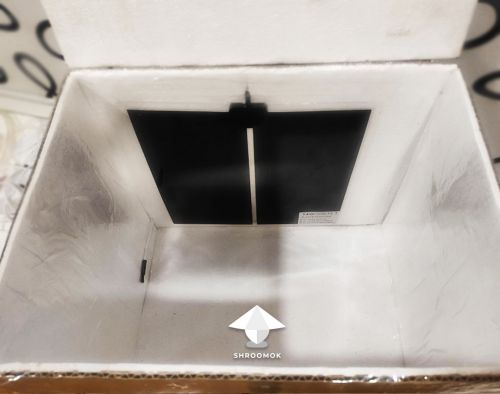](https://shroomok.com/en/wiki/File:Incubator-for-mushrooms-with-heat-mat.jpg) Styrofoam incubator with heat mat on the wallThermostat outside the box
[](https://shroomok.com/en/wiki/File:Styrofoam-box-as-incubation-chamber-for-mushrooms.jpg) Styrofoam Incubator with Thermostat> 🔴 Details about all these cheap modifications: [Simple Incubator for mushrooms and Colonization period](https://shroomok.com/en/wiki/Magic_mushrooms_incubator_control "Magic mushrooms incubator control")
Enjoy your home mycology and have a happy growing!
This guide made with love by **mrzimm** - Tech Guru of Shroomok Growers Community in [Discord](https://discord.gg/ngKhQDmymD)
Promoted by ©Shroomok
## How I built my first laminar flow hood for home mycology
[How I built my first laminar flow hood for home mycology](https://shroomok.com/en/wiki/How_I_built_my_first_laminar_flow_hood_for_home_mycology)
[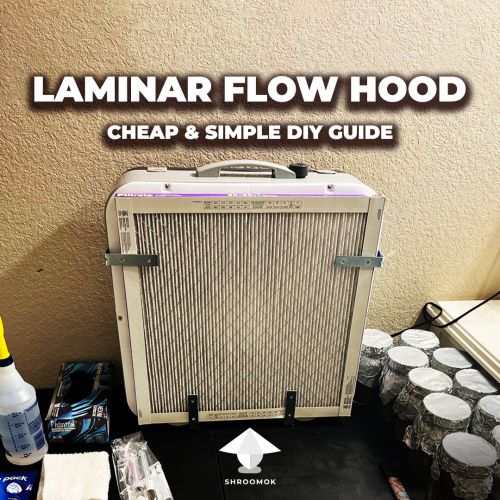](https://shroomok.com/en/wiki/File:Laminar-flow-hood-cheap-simple-diy-guide.jpg) Complete guide on DIY laminar flow hood for mushroom growing at home### Cheap and simple DIY Laminar Flow Hood setup for mushroom growing at home
Hey Shroomers!
I am @PsychonautJim, member of Shroomok Growers Community on Discord.
I grew mushrooms for a short time nearly 20 years ago. I had a good experience back then with great flushes. After recently listening to a podcast featuring Paul Stamets, I went down a rabbit hole of information about all the positive benefits of microdosing.
This reinvigorated my interest in growing mushrooms and I was also reminded of how much fun mycology is. I almost have as much fun growing mushrooms as I do eating them!
I promised Shroomok to share my experience and details on how I built my very first laminar flow hood for my amateur mycology hobby. Now I finally have a pleasure to fulfil my promise.
Let's get started!
#### What is laminar flow hood
> **Laminar flow hood** — a fan-powered HEPA-filtered device that produces a laminar flow of air that moves across the workspace allowing for open sterile work without the hassle and inconvenience of a [still air box (SAB)](https://shroomok.com/en/wiki/Still_Air_Box_for_Mycology "Still Air Box for Mycology") or glove box. The air input goes through the HEPA filter and particles less that 0.3 microns in size are filtered out and the sterile air is pushed across the work plane. Flow hood is usually used for manipulations, that require high sterility level: inoculation, working with agar, transfers etc. [Mushroom cultivation glossary](https://shroomok.com/en/wiki/Mycology_Glossary_and_common_Mushroom_Growing_Abbreviations)
#### Why I decided to make a laminar flow hood
I wanted to use a flow hood as opposed to a [still air box (SAB)](https://shroomok.com/en/wiki/Still_Air_Box_for_Mycology "Still Air Box for Mycology") or glove box, because of how cumbersome dealing within the confines of a SAB can be.
On the other hand, I’m building my tek on a budget and have space constraints to consider; and typically flow hoods are expensive and bulky.
So, I began a search to MacGyver my way to a sterile environment.
#### List of stuff for DIY laminar flow hood
My total costs for current setup: $99.86\*
> \*Prices listed are at time of purchase. Current prices may vary
🔶 1. Lasko FF305 Air Flex 2-in-1, 20-inch Box Fan and Air Purifier in one with MERV10 Air Purifying Filter for Cleaner Air and a Cooling Breeze ($59.99). I bought it on Amazon:
[Air Flex 20” Box Fan and Air Purifier in One](https://amzn.to/3Hzqljt) $69.99
[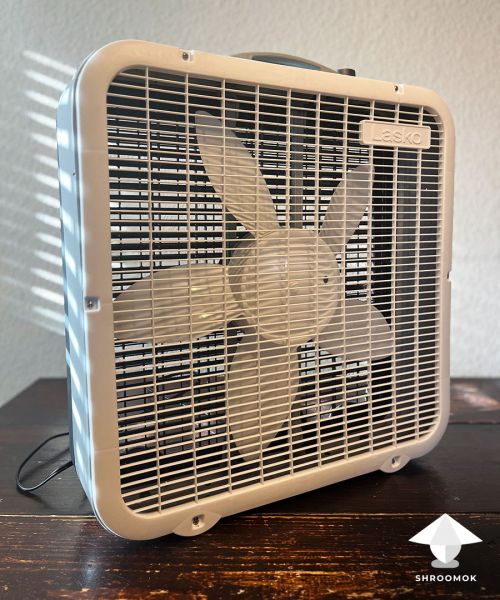](https://shroomok.com/en/wiki/File:Fan-air-purifier-for-laminar-flow-hood.jpg) Fan with air purifier for DIY laminar flow hood
🔶 2. L brackets with screws. I bought on Amazon ($8.99):
[L Brackets 5" x 3" with screws, 4 Pack](https://amzn.to/3Y1jcPl) $8.89
[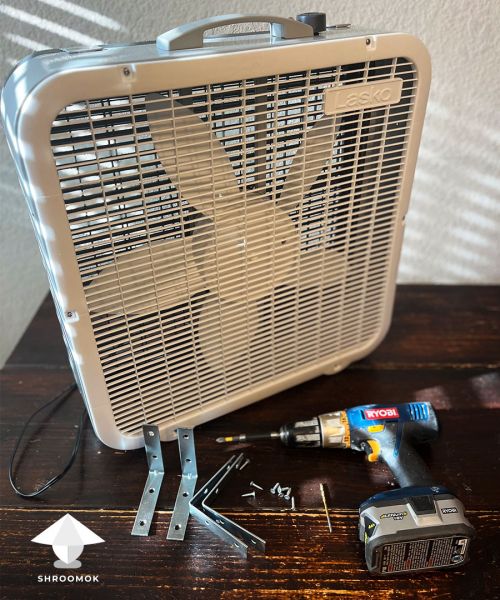](https://shroomok.com/en/wiki/File:How-to-assemble-laminar-flow-hood.jpg)
🔶 3. Two air filters Filtrete 20x20x1, MPR 1500 filtration level. I bought them for $30.88 in Walmart, also available on amazon
[Filtrete 20x20x1, MPR **1500 filtration level**, 2 Filters](https://amzn.to/3HCpNKx) $35.62
[Filtrete 20x20x1, MPR **1900 filtration level**, 2 Filters](https://amzn.to/3jj8pkG) $45.94
[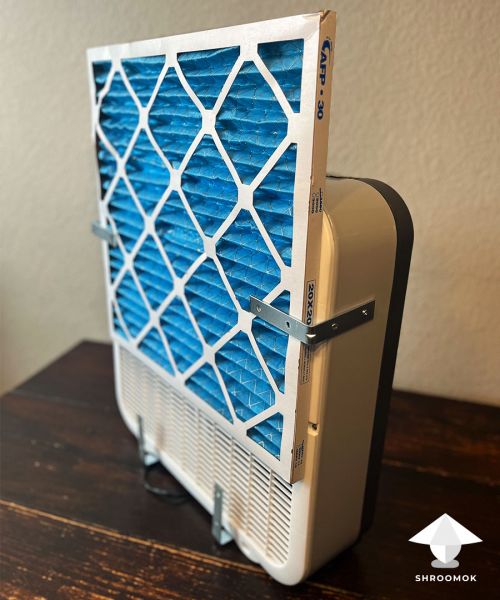](https://shroomok.com/en/wiki/File:Cheap-diy-laminar-flow-hood-for-mushroom-growing-at-home.jpg)
🔶 4. Some additional tools for assembling components: drill and marker
[Drill Set Bundle with Ryobi 18V ONE+ Drill Driver](https://amzn.to/3XWRtzG)
[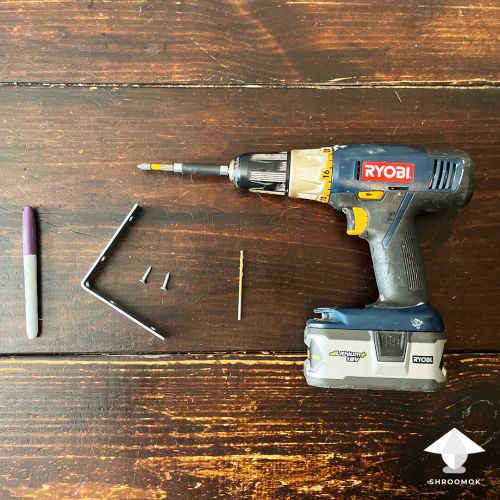](https://shroomok.com/en/wiki/File:Diy-flow-hood-for-mushroom-growing.jpg) Prepare all tools and components for setupThat's it, we are ready for assembling!
#### How to assemble laminar flow hood
⚙️ 1. Prepare all required components are listed above (fan, filters, L brackets, screws) and some additional tools for setup (drill, marker)
⚙️ 2. Lay the fan flat and place the filter on top to get right measurements for the L Bracket placement. Mark the holes to drill with a marker
[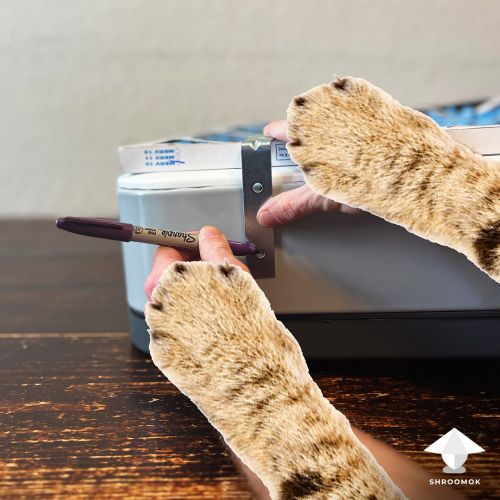](https://shroomok.com/en/wiki/File:Laminar-flow-hood-guide.jpg) Mark the holes to drill with a marker⚙️ 3. Drill holes. Ensure to use a drill bit size that fits with the screws being used to attach the L Brackets
[](https://shroomok.com/en/wiki/File:Simple-diy-laminar-flow-hood-step-by-step-guide.jpg) Drill holes in a fan frame⚙️ 4. Attach the L Brackets using the screws
[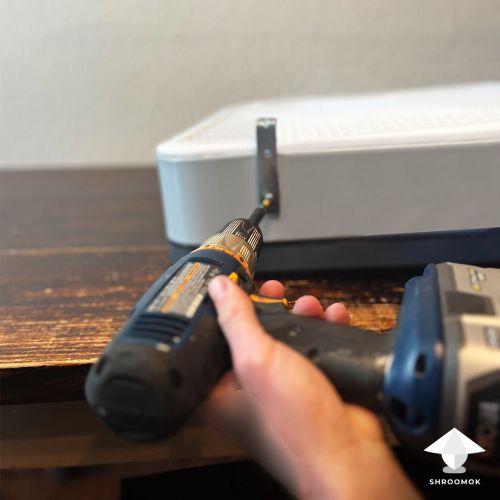](https://shroomok.com/en/wiki/File:Make-your-own-laminar-flow-hood-for-mushroom-growing-at-home.jpg) Attach the L brackets⚙️ 5. Ideally have one L Bracket on each side toward the top facing inward, along with two evenly spaced L Brackets on the bottom facing upward (4 pieces in total)
[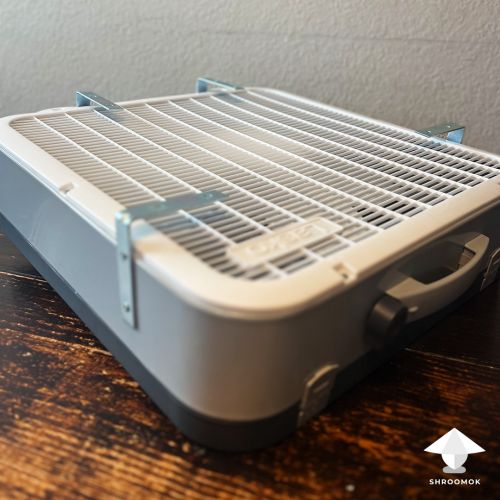](https://shroomok.com/en/wiki/File:Simple-laminar-flow-hood-for-home-mycology.jpg) Attach L bracket on each side
⚙️ 6. Now you have additional slot for air filter
[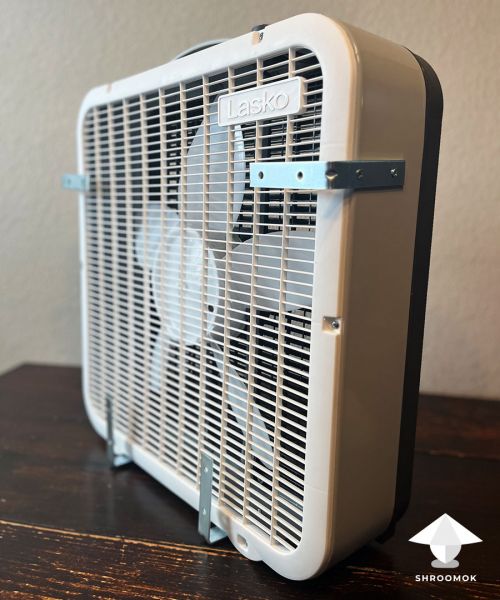](https://shroomok.com/en/wiki/File:DIY-laminar-flow-hood-for-mushroom-growing.jpg) Four L brackets on each side create a slot for air filter⚙️ 7. Slide the filter on the backside in the pre-made filter slot
[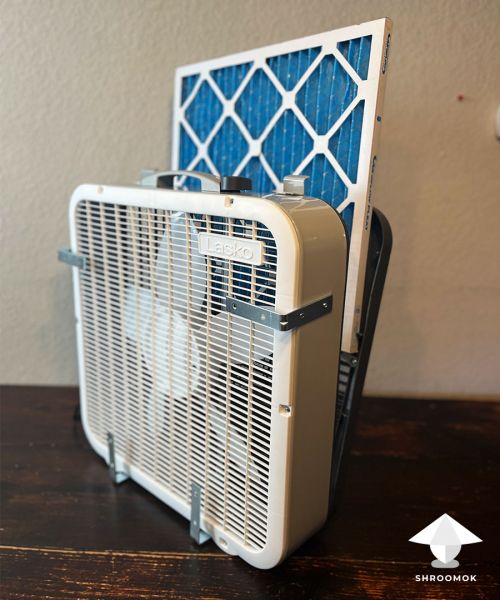](https://shroomok.com/en/wiki/File:Filters-for-diy-laminar-flow-hood.jpg) Slide the filter on the backside in the pre-made filter slot⚙️ 8. Slide another one in the slot you’ve created as well
[](https://shroomok.com/en/wiki/File:Diy-simple-laminar-flow-hood-for-mushroom-growing-at-home.jpg) Slide the filter in the slot you’ve created> ❗️Ensure you face the filters the correct direction!
⚙️ 9. Turn fan on and kill stop contaminant monsters! Now you are ready for your mycological journey 😉
[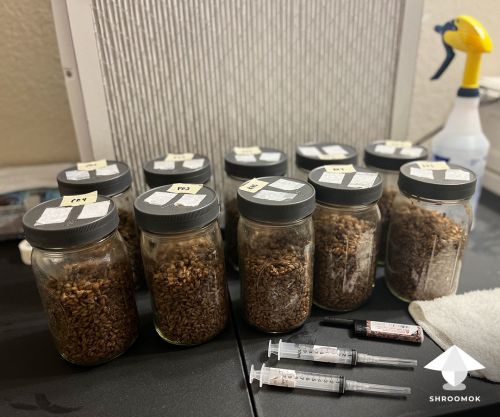](https://shroomok.com/en/wiki/File:Laminar-flow-hood-for-hobby-mycology.jpg) My DIY laminar flow hood in action#### How my laminar flow hood works
The idea is that doubling down by using two air filters with a high Microparticle Performance Rating (MPR) we will closely mimic the mechanisms of a flow hood. Basically, by working in front of the fan we ought to be blowing away unwanted particulates and spores, thus creating a more sterile work environment free of contamination.
[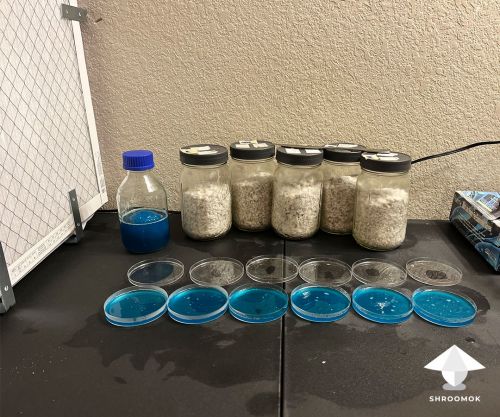](https://shroomok.com/en/wiki/File:Laminar-flow-hood-in-action.jpg) My laminar flow hood in action. How I use it for inoculation, working with agar, transfer> Here I forgot about the stand to raise my petri dishes a little bit higher from the table, in front of laminar flow
#### Pros and cons for this setup
**Pros:**
👍 Low cost
👍 Easy assembly
👍 Easy storage, compact, mobile
👍 Open air sterile work, more convenient than SAB or glove box
👍 Has successfully worked in my testing
**Cons:**
🔴 Potentially not as effective as a professional and more expensive setup for laminar flow hood. Although it works great for my home mycology
#### **Possible upgrades for this flow hood setup**
Maybe I'd like to add another unit to direct clean air from two different angles
#### Write it up!
Hope my experience will be helpful and this simple device bring more opportunities for your mycological experiments.
Feel free to ask any questions regarding my flow hood in comments to this post or in [🔧diy-growing-set-up](https://discord.com/channels/868489864310566913/969492581748707359) channel on [Shroomok Discord](https://discord.gg/ngKhQDmymD)
Enjoy your home mycology and have a happy growing!
Made with love by @PsychonautJim 🍄
Promoted by ©Shroomok
## Cooling and heating for mushroom growing with Peltier module
[Cooling and heating for mushroom growing with Peltier module](https://shroomok.com/en/wiki/Cooling_and_heating_for_mushroom_growing_with_Peltier_module)
[](https://shroomok.com/en/wiki/File:DIY-peltier-cooling-heating-for-mushroom-growing.jpg)
DIY cooling or heating for mushroom growing based on Peltier element
### **DIY thermoelectric cooler or heater for mushroom fruiting chamber based on Peltier element**
When it is getting warmer, temperature of fruiting chamber (monotub, growbox, shoebox etc) is getting harder to control. How to maintain proper temperature for mushroom fruiting period? One of the solutions is cooling/heating based on the Peltier module. I had all the components in my garage and decided to play with this DIY project.
#### What is Peltier technology
Due to wikipedia [Thermoelectric cooling with using the Peltier effect](https://en.wikipedia.org/wiki/Thermoelectric_cooling)
> Thermoelectric cooling uses the Peltier effect to create a heat flux at the junction of two different types of materials. A Peltier cooler, heater, or thermoelectric heat pump is a solid-state active heat pump which transfers heat from one side of the device to the other, with consumption of electrical energy, depending on the direction of the current
Briefly the main idea is following. Peltier element can create a temperature difference on their sides if electric current flows through it. The element cools on the one side and heats on the other side (current converter to heat + transferred heat).
[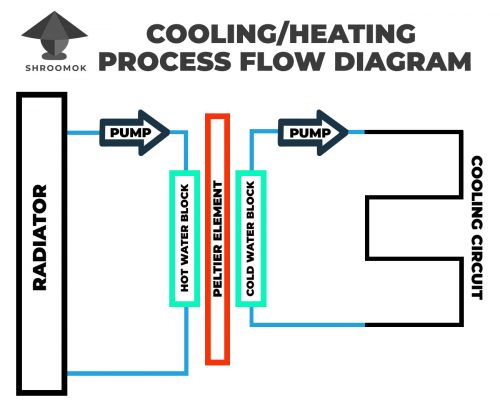](https://shroomok.com/en/wiki/File:Cooling-heating-process-flow-diagram.jpg)
Scheme 1. Cooling/heating process flow diagram based on Peltier element
This allows to create a compact cooling system almost without mechanical parts. It is often used for very small fridges such as portable car fridges.
Peltier is effective only for small-scale projects where you have compact box (up to 100L or 100Qt) to cool/heat and don't need high temperature difference (10-15°C difference). For instance, if your room temperature about 30-35°C or 85-95°F, then you can cool down your fruiting chamber up to 20-25°C or 68-77°F, that would be great for some mushroom species. The same system works for heating as well (i.g. for incubation chamber), we'll discuss it later as well.
##### Advantages
🟢 no mechanical parts, easy to use and set up, compact and mobile, totally quite system
##### **Disadvantages**
🔴 relatively low coefficient of heat transfer in comparison to high efficient compressor coolers, it becomes even lower when temperature difference rises
🔴 requires very good cooling of the hot side, otherwise you gonna lose in cooling capacity
#### How to make cooling or heating with Peltier element
Let me show you my setup. In the next section I'll show the list of components I use and possible alternatives.
> In fact, we are going to make Mini Fridge for mushroom growing that also can work as Incubation Box (heat box)
**Step 1.** I assembled prototype configuration from the basic items I already had at home (without housing and special mount)
[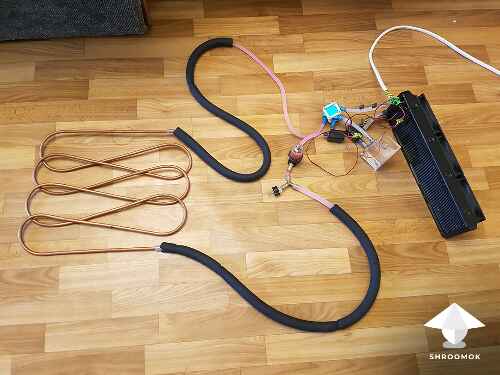](https://shroomok.com/en/wiki/File:Peltier-elements-for-monotube-growbox.png)
Test version from scratch. Peltier element for cooling monotub or growbox
I just repeated the *Scheme 1* and connected all components
[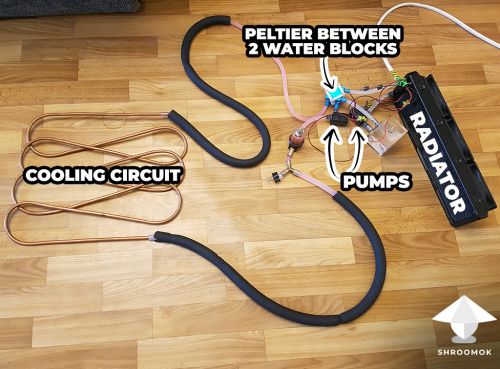](https://shroomok.com/en/wiki/File:Peltier-mvp-setup.jpg)
Basic Peltier setup. Test version from scratch. Peltier element for cooling monotub or growbox
**Step 2.** I put the cooling circuit on the lid of my fruiting chamber. The plastic tub was covered with foam thermal insulation (penofol) from the sides and on the top to retain temperature
> Penofol is a two-layer heat-insulating building material that can be made from one or 2 layers of foil deposited on a base layer of polyethylene foam
[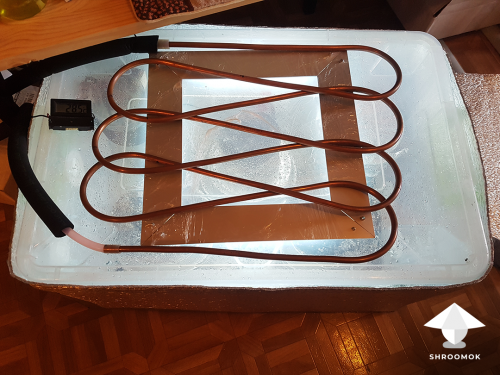](https://shroomok.com/en/wiki/File:Copper%E2%80%93water-loop-heat-pipes-for-cooling-monotube-growbox-for-mushrooms.png)
Copper water loop heat pipes for cooling monotub or growbox
All other components I put on a shelf next to it. Looks strange, but don't worry, I'll show you each component for this setup in detail
[](https://shroomok.com/en/wiki/File:Thermoelectric-cooler-for-mushroom-cultivation.png)
DIY thermoelectric cooler system
I tested this system and it was able to lower the temperature by 5°C. Not bad, but I'd like to get bigger difference!
I decided to make more effective cooling box and build a styrofoam box with lid (wall thickness = 10 mm or ~1/2 inch). Put a cooling circuit in it along the perimeter of the box
[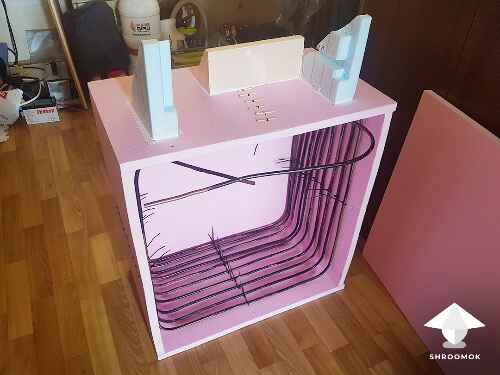](https://shroomok.com/en/wiki/File:Polystyrene-foam-box-with-copper-cooling-circuit.png)
Cooling solutions for mushroom cultivation at home. Polystyrene foam (styrofoam) box with copper cooling circuit inside it
Ready styrofoam box with lid
[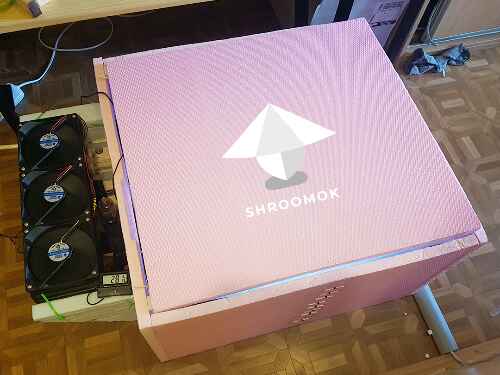](https://shroomok.com/en/wiki/File:Polystyrene-foam-box-with-lid-and-copper-cooling-circuit.png)
Thermoelectrically cooled foam box with lid for mushroom cultivation at home
Radiator and all other components are placed on a shelf I made on the side of the cooling box
[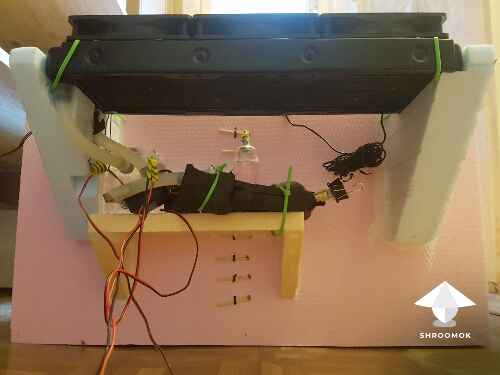](https://shroomok.com/en/wiki/File:Radiator-peltier-components.png)
Radiator and all other components are placed on a shelf from the side of the box
Cold (internal circuit) pipes are covered with pipe insulation to reduce cold loss
[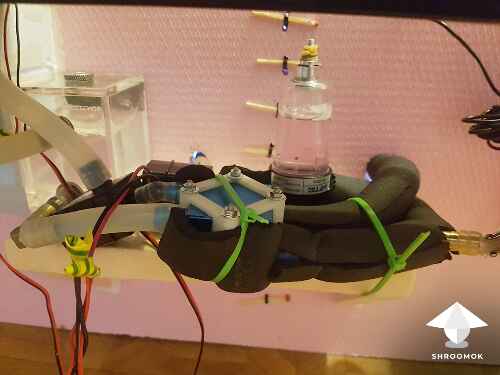](https://shroomok.com/en/wiki/File:Pipes-of-the-cold-circuit-covered-with-insulation.png)
Thermoelectrically cooled mushroom fruiting chamber. Insulated pipes of the cold circuit
My plastic tub fits inside the styrofoam box
[](https://shroomok.com/en/wiki/File:Monotube-growbox-inside-cooling-box.png)
Mushroom growbox or monotube inside DIY cooling box
Here are my mushroom cakes for testing. I put long flower pot next to it for my spawn jars/bags
[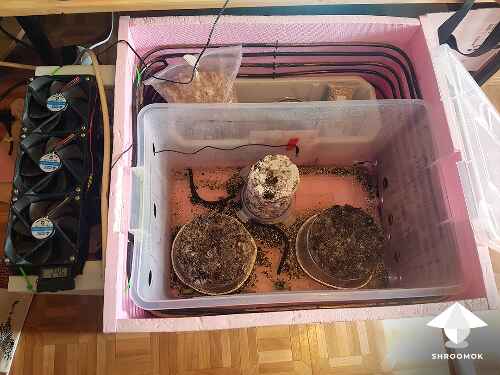](https://shroomok.com/en/wiki/File:Growbox-monotube-with-mushroom-cakes-inside-cooling-box.png)
Growbox or monotube with mushroom cakes inside DIY cooling box
#### How it works
The room temperature and temperature inside the fruiting chamber without cooling was 30°C (86°F). The system cooled the styrofoam box from 30°C to 21.5°C (from 86°F to 71°F). The temperature inside the plastic box with mushroom cakes was 22°C or 72°F
[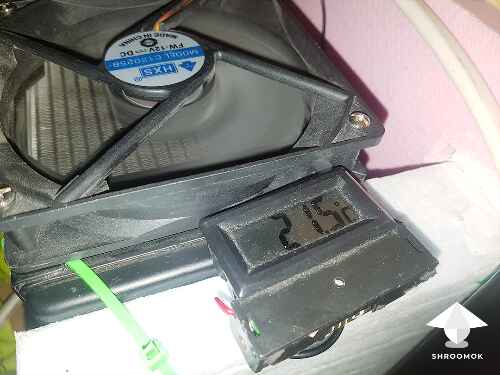](https://shroomok.com/en/wiki/File:Cooling-growbox-test.png)
Cooling growbox test
At this point, the temperature decreasing almost stopped. I run several tests. As a result, the maximum temperature difference was up to 10°C, i.e. from 30°C to 20°C (86°F to 68°F) After switching off the cooling system, the temperature rise by 2°C in an hour.
This setup is the most efficient, but costs a lot. I made it mostly because I already had most of the components.
With such setup it is possible to achieve a temperature decrease in the fruiting chamber by 10°C.
> 💡 This setup works for both **heating and cooling**. If you **change the polarity** on the element, then the system will **heat the box** and **cool the external radiator**. It means you can arrange winter and summer cultivation for any mushroom species. If you add a couple of switching relays, an arduino, a BME280 sensor and a display, you can automate this setup and maintain stable temperature within 1-2°
I haven't tested heating, but heating is more efficient and I assume it is possible to have temperature difference about 15-20°, i.e. if your room temperature 10-15°C or 50-60°F you can use this box as an incubator and maintain temperature 25-30°C or 77-85°F.
#### List of components for Peltier setup from scratch
Here is the list of components I used for my setup described in this guide. Most of these items I already had from my PC cooling and other DIY projects, so it was cheap and for fun. If you have nothing from the listed below it could be costly.
[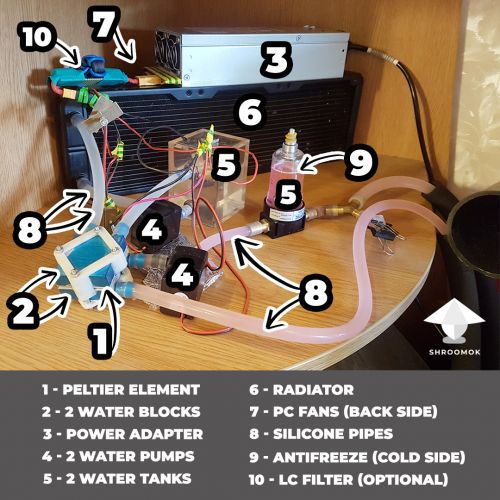](https://shroomok.com/en/wiki/File:Peltier-setup.jpg)
Components for DIY cooling
Elements and numbers on the picture match the list numbers below ⬇️
🔷 **1.** **Peltier element module** ([Amazon](https://amzn.to/3JKTGbI) $11.00)
[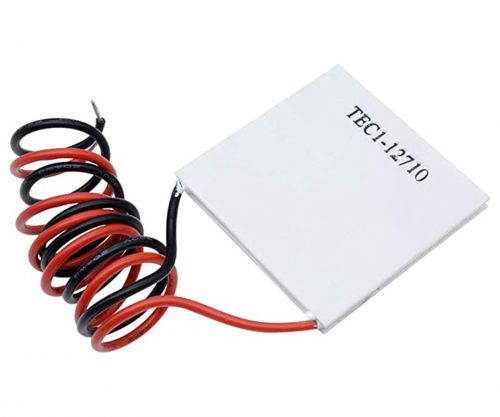](https://shroomok.com/en/wiki/File:Peltier-element-module.jpg)
Peltier element module TEC-12710
I tried to use different power modules: 50w (TEC-12706), 100w (TEC-12710) and 200w (2xTEC-12710). The optimal was 100w TEC-12710, 12V, 10A, 40x40 mm.
At this power level is possible to achieve good performance (up to 20°C difference) with moderate power consumption (approximately 120w in total).
You can use smaller elements to achieve the same power level. 2 x TEC-12706 elements produce the same amount of heat transfer in parallel.
🔷 **2.** **Water cooling blocks - 2 pcs.** ([Amazon](https://amzn.to/3LO2gc7) $8.99)
[](https://shroomok.com/en/wiki/File:Water-block.jpg)
Aluminum Water Cooling Blocks
Place the Peltier element between 2 water blocks. The first water block we use to cool the Peltier element (its hot side). The second one to cool the cooling circuit, thus cool down your fruiting chamber.
As a result you have a sandwich: water block -> Peltier element -> water block
> ❗️There is a milled side and a U-shaped side on water blocks. Better to put Peltier module on the **milled side**
If you use 2 x TEC-127**06** Peltier elements in parallel you need 80\*40mm water blocks ([Amazon](https://amzn.to/3K5wHIC))
🔷 **3.** **Power adapter** ([Amazon](https://amzn.to/40eYtZB) $18.99)
[Power Adapter (12V/15A)](https://amzn.to/40io6ZG) $29.80 - this one allows you to connect 2 Peltier modules.
[](https://shroomok.com/en/wiki/File:Power-adapter.jpg)
Power adapter for DIY projects
Choose adapter with some margin, 150-180W (around 12V, 15A). Great if you already have it from your other DIY projects. For example, I use it for my [DIY incubation chamber](https://shroomok.com/en/wiki/How_to_build_automatic_incubation_chamber_for_mushrooms) as well. If you have PC power adapter use it.
Actually use any other adapter that can give out 12V and at least 12+A. In my case, there is a server power adapter I've got as gift from my friend - 12V and 70A, such adapter is costly and too much for such project.
Or use ready Peltier Kit with power adapter 2-in-1 ([Amazon](https://amzn.to/3LS4rLT) $41.09).
And one more option of Peltier Kit like this ([Amazon](https://amzn.to/3JRB21S) $31.36).
🔷 **4.** **Water Pumps 12V - 2 pcs.** ([Amazon](https://amzn.to/408W5U2) $16.99)
[](https://shroomok.com/en/wiki/File:Water-pump.jpg)
Water Pump DC 12V
Fluid in both circuits is pumped by cheap 12V water pumps. More than enough for good circulation.
🔷 **5.** **Water Tanks - 2 pcs.** ([Amazon](https://amzn.to/3LnWNst) 2x$12.99)
[](https://shroomok.com/en/wiki/File:Water-tank.jpg)
Water tank
It is optional, but highly recommended to add buffer water tanks to both circuits. They help to fill the circuits with water (for hot side) and antifreeze (for cooling circuit). Moreover trapped air in pipes will stay in them.
You can proceed without water tanks. Put a tee in the line and fill through it, but it's so awkward.
Water pump should take liquid directly from lower port of the tank, otherwise it will be hard or impossible to fill the system and get it out.
🔷 **6.** **Cooling radiator** ([Amazon](https://amzn.to/40xiOcE) $21.79)
[](https://shroomok.com/en/wiki/File:Radiator.jpg)
Cooling radiator
I use 3-sections radiator for 120 mm fans, 1-2 sections also okay. As an alternative option you can use the heater auto radiator (not clogged of course!)
When choosing a radiator pay attention that some of them have built-in outlets and some have threaded holes for fitting that are purchased separately. Don't forget to buy fittings for the radiator if you choose one with threads
> ❗️It is recommended to use **aluminum radiator** with **aluminum water blocks**. Mixing aluminum and copper heat exchangers lead to faster corrosion since copper and aluminum create a galvanic pair
🔷 **7.** **120 mm** **PC fans for radiator** ([Amazon](https://amzn.to/40aMnR1) $10.99)
[](https://shroomok.com/en/wiki/File:Fan-for-incubation-chamber-for-mushroom-growing.jpg)
PC fan
I use the cheapest. You can use any fans you can connect to the radiator.
🔷 **8.** **Silicone Pipes** ([Amazon](https://amzn.to/3FREZSN) $16.99)
[](https://shroomok.com/en/wiki/File:Vinyl-silicone-pipes.jpg)
Silicone pipes
I used silicone pipes and cover them in foam insulation ([Amazon](https://amzn.to/3ljd1IO) $22.99) to keep them cool (outside the box).
Inner diameter of the pipe 8-10 mm, outside diameter doesn't matter. The length about 10-15ft or 3-5m in total.
🔷 **9.** **Antifreeze** ([Amazon](https://amzn.to/3JobZmz) $14.53)
It is recommended to fill the **cold circuit** with red antifreeze instead of water. You can buy it in any auto store or gas station.
If the heat load for some reason will be low (for example wrapped the cold circuit in thermal insulation or a blanket) or it will be cold enough outside, then the system can lower the temperature below 0°C and water freeze. Red antifreeze can drop to -40°C and no problem.
Note that you should use antifreeze on hot side too if you are going to use the system in reverse (as a heater).
🔷 **10. LC filter (optional)**
[](https://shroomok.com/en/wiki/File:LC-filter.jpg)
LC filter
It's optional and to be honest I'm not sure if there is huge difference for such setup.
This component can extend the life of the Peltier element. It's difficult to find LC filter for such a current. In my setup you can see DIY LC filter. I wound 5 turns of thick wire + 2 capacitors on a ferrite core.
🔷 **11. Cooling circuit** ([Amazon](https://amzn.to/3zxfp2d) $65.00)
As you can see I used cooper pipes for this purpose.
[](https://shroomok.com/en/wiki/File:Polystyrene-foam-box-with-copper-cooling-circuit.png)
Copper cooling circuit inside styrofoam box
A long silicone pipe can be a cheap alternative to expensive copper pipe. However a silicone hose doesn't transfer heat as good as copper. Moreover it's flexible, hard to layout it, hence it can block the water flow if it is bent in the corners. Therefore not recommended.
The best cheap and simple alternative is using a cooling radiator as for hot side, but smaller (the size for 1 fan). This would be enough to transfer heat efficiently.
🔷 **12. Styrofoam shipping box** or **Foam insulation** ([Amazon](https://amzn.to/3FVPvbN)) or use **Insulated Bag** ([Amazon](https://amzn.to/40DfIUj)) or any type of cooler you have on hand
[](https://shroomok.com/en/wiki/File:Polystyrene-foam-box-with-lid-and-copper-cooling-circuit.png)
Thermoelectrically cooled foam box with lid for mushroom cultivation at home
This box/insulation helps to retain the temperature, reduce temperature lose, and make your system more efficient.
> ❗️Your box should be somehow insulated in any way. Otherwise it won't be able to give you any significant cooling effect.
🔷 **13. Temperature Controller** **aka Thermostat** ([Amazon](https://amzn.to/3K644Mw) $28.00)
[](https://shroomok.com/en/wiki/File:Thermostat-for-mushroom-incubator.jpg)
Temperature controller aka thermostat
Optional, but it helps to maintain stable temperature inside the box and turn on/off the system when needed. It is used for other DIY projects for mushroom growing as well (incubation box, fruiting chamber, grow tent).
I'd recommend some cheaper options:
SЕС-1000 ([Amazon](https://amzn.to/3M5zOCP) $9.17) - it works for both cooling and heating, set what you need.
STC-3028 ([Amazon](https://amzn.to/3JYgeG3) $13.82) - this one works as Temperature + Humidity Controller, so you can use it for different types of DIY projects for mushroom growing.
🔷 **Wiring and additional tools**
How to plug everything? It seems a bit scary with all these wires. In fact the whole system connects to the thermostat.
Maybe you'll need some brass fittings to connect pipes, tees, screwdriver, additional electrical wires and stuff like that.
#### Useful notes
⛔️ Don't overload Peltier element, the efficiency drops dramatically.
⛔️ Using PWM regulators is not recommended, pulses reduces element lifetime.
⛔️ Don't turn on the circuit element for more than 1-2 seconds without a radiator, high heat can destroy the Peltier element.
#### Upgrades for cooling box
Peltier is not the most efficient way for cooling/heating, however it's simple and good enough for small projects.
I'm working on another system based on water cooler with compressor. Such setup is more efficient. You use 1 liquid loop for the hot side (water as coolant) and cool radiator connected directly to the element.
The cheapest way is radiators on both sides.
One more option is ready-made modules with radiators on sale.
Note that you need quite **big radiator on the hot side** to achieve reasonable cooling capacity.
As soon as it's ready I'll share a detailed post. Stay tuned!
Made with love by **@mrzimm** - writer and Tech Guru of Shroomok Community.
Promoted by ©Shroomok
If you find this guide helpful, please support with donation on [buymeacooffee](https://www.buymeacoffee.com/shroomok)
## Still Air Box for Mycology
[Still Air Box for Mycology](https://shroomok.com/en/wiki/Still_Air_Box_for_Mycology)
[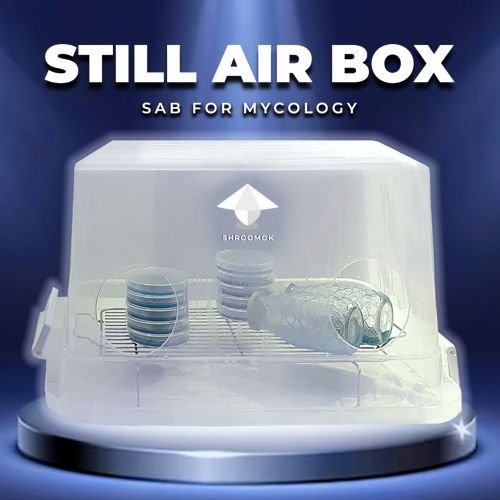](https://shroomok.com/en/wiki/File:Still-air-box-for-mycology-SAB-guide.jpg) Still Air Box step by step guide### Still Air Box Guide: why and how
Still Air Box (SAB) is an easy DIY solution for maintaining a high level of sterility in mycological procedures. Building one takes approximately 15 minutes and costs around $15. I suggest using this setup as a cheap alternative to a Laminar Flow Hood or Fan Filter Unit, especially for the first attempts in mycology. However, experienced mushroom cultivators use SAB as well.
#### What is a still air box
Still Air Box (SAB) is a transparent plastic box with limited airflow. It is used in mycology projects, such as working with syringes, grain jars/bags, and agar. The SAB is designed with armholes for accessing and manipulating the materials inside.
[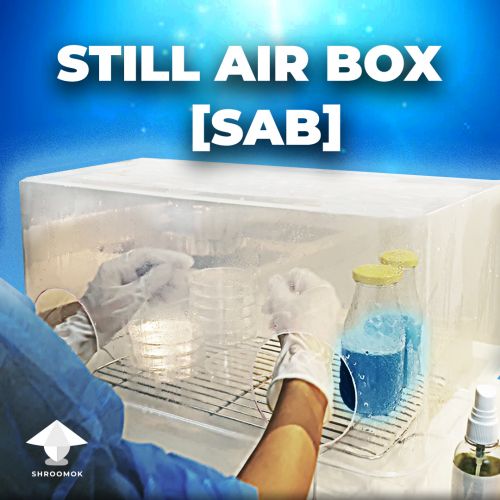](https://shroomok.com/en/wiki/File:Still-air-box-SAB-guide.jpg) Still Air Box GuideWhile the setup is **not** 100% sterile, it helps to reduce the concentration of contaminants that can be found in the air, such as mold spores, bacteria, and viruses. Although not flawless, a sterile SAB combined with proper handling techniques by the cultivator can significantly enhance the success rate of mycology projects.
#### Do you need SAB
I suggest to use Still Air Box for any contamination risky mycological operations. Mushroom culture is more susceptible to contamination when it is young and weak. Sterility is crucial during the early stages of mushroom growing such as spore germination and mycelium development.
Let's explore some cases when SAB is a must, when it is desirable, and when it may not be necessary.
**SAB is necessary for:**
🔶 Making Spore Syringe from a piece of spore print and spore syringe dilution. [Read more](https://shroomok.com/en/wiki/Liquid_psilocybe_spore_syringe "Liquid psilocybe spore syringe")
[](https://shroomok.com/en/wiki/File:How-to-make-spore-syringe-from-spore-print.jpg) Making spore syringe in Still Air Box
🔶 Grain to Grain (G2G) transfer. [Read more](https://shroomok.com/en/wiki/Grain_to_Grain_Transfer_(G2G) "Grain to Grain Transfer (G2G)")
[](https://shroomok.com/en/wiki/File:Inoculation-grain-to-grain-transfer.jpg) Grain to Grain transfer in still air box
🔶 **Agar work:** pouring hot agar, all types of agar inoculation, contamination test for liquid culture or spore syringe, making Liquid Inoculant (LI) from agar, Agar to Agar (A2A) transfer for selection and strain isolation, Agar to Agar (A2A) transfer for 'cleaning' mushroom culture with contamination.
[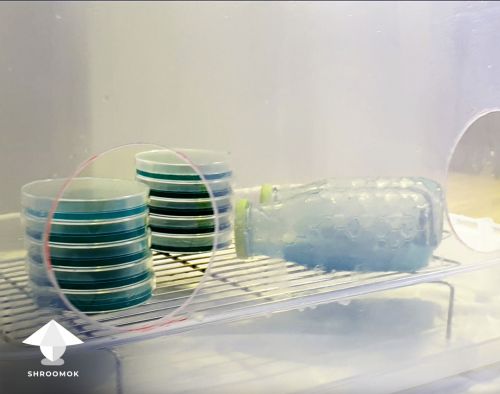](https://shroomok.com/en/wiki/File:Agar-still-air-box.jpg) Agar plates ready for inoculation in still air box> ❗️Use SAB when you need to extract and save mushroom culture from contaminated agar plate by transferring healthy mycelium samples to the new agar plate. In this case SAB is the right tool for the task. Don't use laminar flow hood, you'll spread contamination in the air.
🔶 **Mushroom cloning** on agar and making **mushroom tissue biopsy** with the next liquid culture media inoculation
[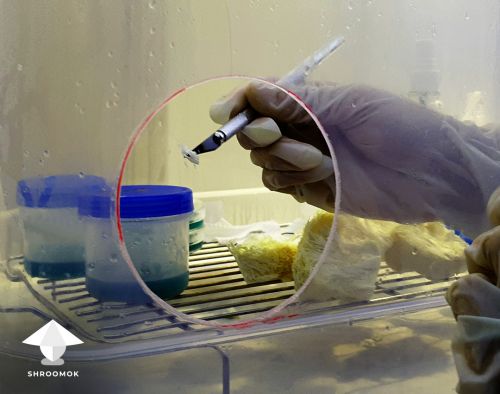](https://shroomok.com/en/wiki/File:Mushroom-cloning-in-still-air-box.jpg) Mushroom cloning in still air box**SAB would be great for:**
🔶 **Inoculation**: grain jars/bags, liquid culture media. [Read more](https://shroomok.com/en/wiki/Inoculation_without_glove_box "Inoculation without glove box")
**SAB not needed for:**
🔶 Making spore syringe in zip bag without opening it. [Read more](https://shroomok.com/en/wiki/Liquid_psilocybe_spore_syringe#Method_1._Making_spore_syringe_in_zip_bag_for_noobs)
🔶 Spawn to Bulk and Casing. [Read more](https://shroomok.com/en/wiki/Making_mushroom_cake,_spawn_to_bulk,_and_casing "Making mushroom cake, spawn to bulk, and casing")
#### Building Still Air Box
SAB implementation is dramatically simple. It consists of two main steps:
\- select appropriate plastic storage box
\- make two armholes in it
That's it! I bet most of the components and needed equipment can be found at home or garage
**Materials needed:**
- 🔹 Large transparent plastic storage box: The larger, the better. I recommend using a box that is 50+ quarts (liters) in size. Choose a box that is wider than the width of your shoulders to ensure convenience while working inside the SAB. You can find affordable boxes at major stores for $15-25, often cheaper than on Amazon.
- 🔹 Permanent Marker and Ruler
- 🔹 Raised wire rack for baking/BBQ/microwave/storage shelf: The height should be around 2-4 inches or 5-10 cm.
- 🔹 Metal tin can (such as a tuna/coffee/soup can, or metal mug) that fits the diameter of your forearm, approximately 4 inches or 10 cm in diameter.
##### How to place holes in still air box
Let's simulate the process of creating armholes in the SAB to ensure they are placed properly.
1. Position the plastic bin on your working table, with one of its wide sides facing towards you.
2. Place a raised wire rack inside the bin.
3. Sit in front of the box in a comfortable position.[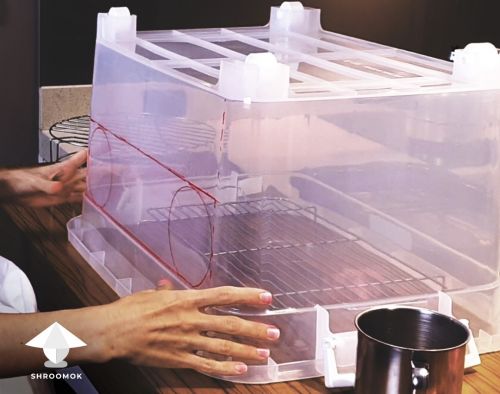](https://shroomok.com/en/wiki/File:Plan-holes-in-still-air-box.jpg) Plan holes in SAB> 💡 Tip: I personally prefer using the SAB upside down. This is because the box often has a frustum shape, resembling a truncated pyramid, where the top is wider than the bottom. By using it this way, I have more space to work with. Furthermore, if the box has wheels, it can be unstable when working in the SAB. However, some growers choose to use a box with the closed lid on top. It's not a mistake; it simply comes down to personal preference and convenience. The choice is yours!
4. Extend your hands forward towards the box, ensuring that your shoulders are lowered and relaxed. Adjust the height of your chair if necessary. To facilitate convenient work inside the SAB, the armholes should be made according to the following guidelines: **1)** Keep the armholes **shoulder-width apart** (individual).[](https://shroomok.com/en/wiki/File:Shoulder-width-holes-in-still-air-box.jpg) Imitate your work in SAB to know the right position of armholes
**2)** Position the **armholes above the raised wire rack.** The recommended height is approximately 2-4 inches or 5-10 cm. In my case, the wire rack's height is around 2" or 5 cm.[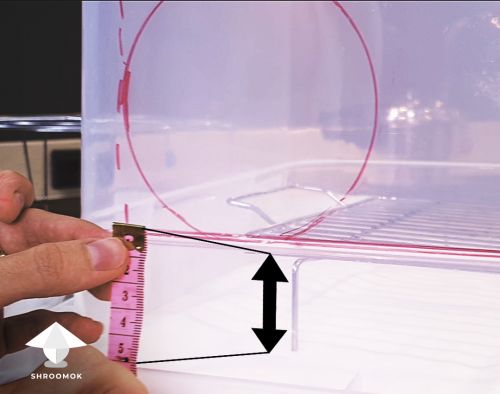](https://shroomok.com/en/wiki/File:Still-air-box-armholes-height.jpg) SAB holes height = the height of the raised wire rack> ❗️Don't place the armholes too high or very close to each other. Doing so will limit your mobility inside the SAB. Remember to keep your shoulders relaxed and, if needed, put your elbows on the table for a short break while working inside the SAB.
5. To outline the placement of the future armholes, you can use a tin can or a mug with a diameter of approximately 4 inches or 10 cm[](https://shroomok.com/en/wiki/File:Tin-can-for-making-armholes-in-still-air-box.jpg) Common armholes diameter for SAB
6. Draw two parallel circles on the box with a Permanent Marker for indicating the locations where the armholes will be made[](https://shroomok.com/en/wiki/File:Drawing-circles-for-armholes-in-still-air-box.jpg)
7. Test the future SAB again to be sure it's right for you. Make any necessary adjustments to the armhole placement if required.
##### How to cut holes in plastic box without breaking it
There are three options available for cutting the holes:
###### Option 1. Hot tin can method
**Materials needed:**
- 🔹 Metal tin can (tuna, soup, coffee, mug) with a diameter of about 4 inches or 10 cm.
- 🔹 Hot plate / Cooktop / Electric Grill
- 🔹 Oven mitt / Towel
- 🔹 Face mask
- 🔹 Sharp knife / Razor Blade / Scalpel / Utility Knife
1. Place the metal tin can or mug upside down on a hot plate, cooktop, or electric grill.[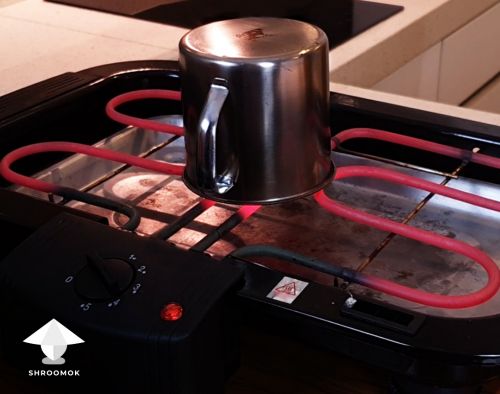](https://shroomok.com/en/wiki/File:Hot-tin-can-for-SAB-holes.jpg) Metal mug on a hot electric grill
2. Once the rim of the can is hot enough, use an oven mitt or thick towel to hold it.[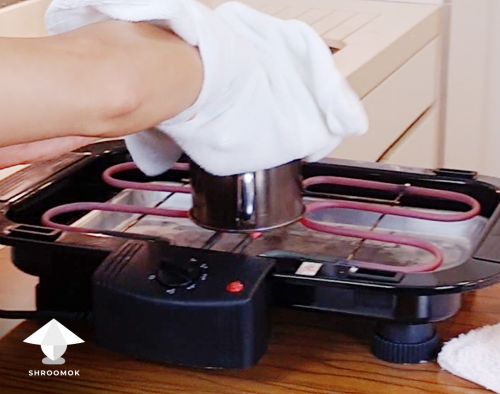](https://shroomok.com/en/wiki/File:Hold-hot-tin-can-for-making-holes-in-SAB-with-oven-mitt-or-towel.jpg) Hold the hot tin can with oven gloves or thick towel
3. Press the hot can against the plastic at one of the marked armhole locations. While pressing, twist the can to melt the plastic.[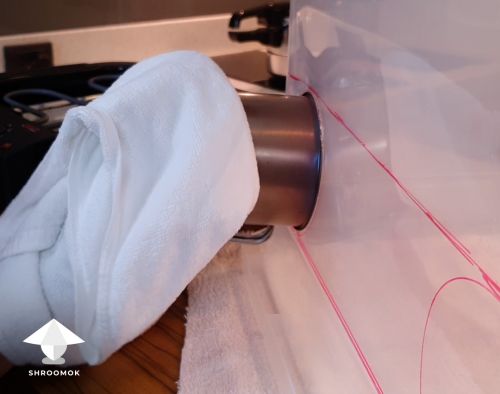](https://shroomok.com/en/wiki/File:Press-and-twist-hot-metal-can-or-mug-to-melt-the-plastic.jpg) Press hot tin can or metal mug. Twist it clockwise as you press to melt the plastic and create a hole> ❗️Wear a face mask to avoid inhaling fumes from the melting plastic. Perform this process outdoors or with proper ventilation
4. The melted plastic will form a circle that can be popped out, creating a hole.[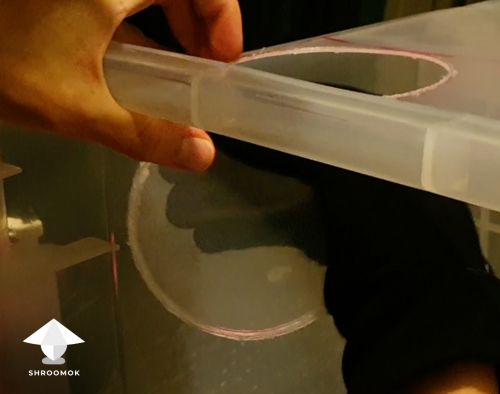](https://shroomok.com/en/wiki/File:Melted-circle-still-air-box.jpg) Melted plastic form a perfect hole in still air box
5. Repeat this process for the second armhole.
6. Use a scalpel, sharp knife, razor blade, or utility knife to trim any rough edges around the holes. The edges should be smooth to prevent snagging on gloves or irritating the skin.[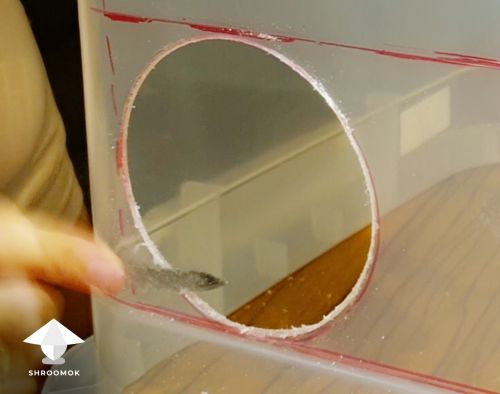](https://shroomok.com/en/wiki/File:Trim-the-edges-DIY-still-air-box.jpg) Make a smooth holes in still air box
7. Your still air box is ready!
###### Option 2. Drill with a hole saw
**Materials needed:**
- 🔹 Drill and Hole Saw Kit ([Amazon](https://amzn.to/46fS18p))
- 🔹 Sharp knife / Razor Blade / Scalpel / Utility Knife
- 🔹 Protective goggles or sunglasses
[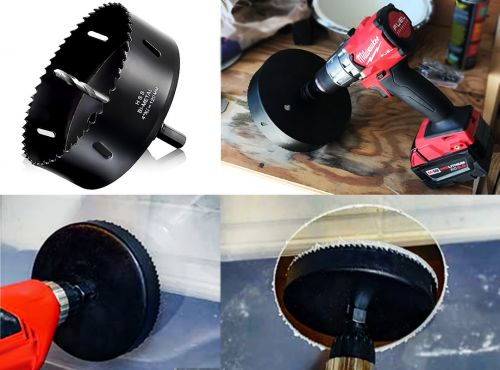](https://shroomok.com/en/wiki/File:How-to-cut-holes-in-plastic-box-drill-with-hole-saw.jpg) Drill with hole saw to cut holes in still air box
1. Assemble the 4-inch or 10 cm hole saw and attach it to the drill bit.
2. Align the drill bit with the marked hole using one hand while holding the box steady with the other hand to prevent it from moving.> ❗️Note: Remember to wear protective goggles or sunglasses to shield your eyes from any debris or plastic particles that may be generated during the drilling process.
3. Begin drilling the hole slowly and steadily. It's important to drill at a slow pace to avoid causing the plastic to crack.
4. Carefully remove the plastic ring from the drill bit.
5. Make a second hole in the box following the same procedure.
6. Trim the edges and remove any jagged edges around the holes using a scalpel, sharp knife, or razor blade. It's important to ensure that the edges are smooth to avoid snagging on your gloves and causing damage to your skin.
7. Ready!
###### Option 3. Dremel rotary tool
**Materials needed:**
- 🔹 Dremel rotary tool ([Amazon](https://amzn.to/3PugVeC))
> 💡 Tip by NightShiftNinja: For cutting hole in a plastic tub for a SAB if a person has a Dremel rotary tool the circle guide will make extremely quick work of it. It took me longer to measure out the spacing than it did to make the perfectly clean cuts
[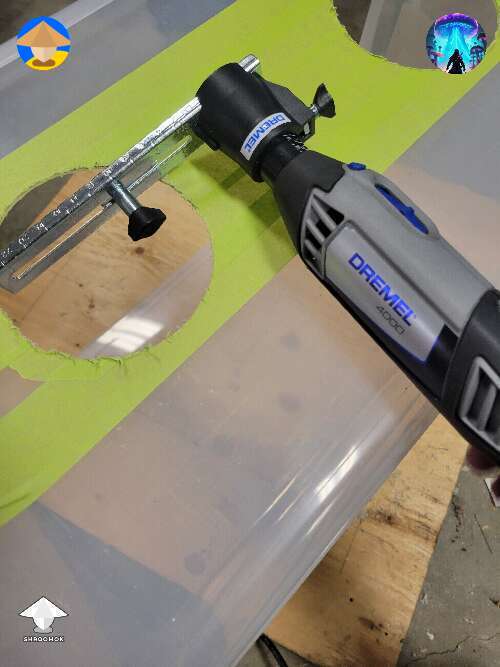](https://shroomok.com/img_orig/1b2472/4032_how-to-cut-hole-in-a-plastic-tub-for-a-sab-easy-details-in-description-by-nightshiftninja.jpg) [How to cut hole in a plastic tub for a SAB easy](https://shroomok.com/en/wiki/File:how-to-cut-hole-in-a-plastic-tub-for-a-sab-easy-details-in-description-by-nightshiftninja-510a68)#### Tips for using a still air box
**Materials needed:**
- 🔹 Still Air Box
- 🔹 Raised wire rack for baking/BBQ/microwave/shelf rack, the height ~2-4" or 5-10 cm ([Amazon](https://amzn.to/44aKfuH))
- 🔹 Disinfectant: Ethyl or Isopropyl Rubbing Alcohol 70% ([Amazon](https://amzn.to/3JrXHT2))
- 🔹 Disinfectant: bleach powder for making 1:10 solution or Clorox ready to use solution/spray/wipes ([Amazon](https://amzn.to/3NoBVk2))
- 🔹 Clean non-porous surface (smooth table surface / plastic lid from the plastic box / PE film / aluminium foil)
- 🔹 Optional: Desk Lamp
- 🔹 Optional: Towel
1\. Turn off the ventilation, air conditioning, or fan in the room 1-2 hours before working in the SAB to allow the air to settle. Ensure that the area is free from drafts and vibrations.
2\. Thoroughly wash the SAB inside and outside with dishwashing liquid or a bleach solution (1:10). If using bleach, remember to wear gloves. Rinse well and let it dry.
[](https://shroomok.com/en/wiki/File:Wash-still-air-box.jpg) Wash still air box inside and outside3\. Prepare a sterile non-porous surface for the SAB, such as a table, plastic lid from the box, or cover the table with PE film or aluminum foil. Wipe it thoroughly with 70% ethyl/isopropyl alcohol.
[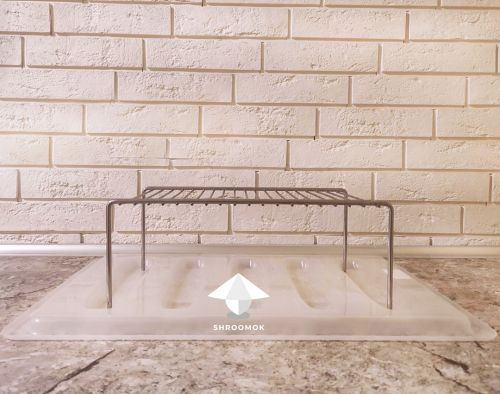](https://shroomok.com/en/wiki/File:Plastic-lid-and-raised-wire-rack-for-still-air-box.jpg) Plastic lid wiped with iso alcohol at the bottom and raised wire rack for SAB> 💡 Tip: To protect the bottom of your SAB, you can use a towel or fabric soaked in a bleach solution (1:10). Squeeze out excess liquid and place it at the bottom of your SAB.
> 💡 Tip: You can use soap solution (a few cc/ml per cup of water) to spray the towel on the bottom to help airborne contaminants stick to the soap film.
[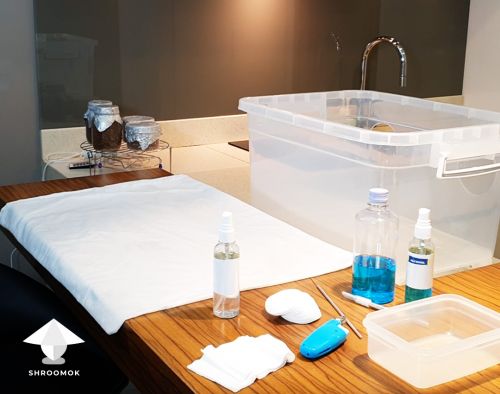](https://shroomok.com/en/wiki/File:How-to-prepare-still-air-box-for-work.jpg) Prepare sterile non-porous surface for SAB or towel soaked in bleach or sprayed with soap solution
4\. Wash your hands, wear a lab coat or clean light clothes, and put on a face mask for contamination protection and to reduce air currents from breathing. Wear disposable medical nitrile gloves and treat them with ethyl/iso alcohol 70%. Remember, the cultivator themselves can be a vector of contamination.
[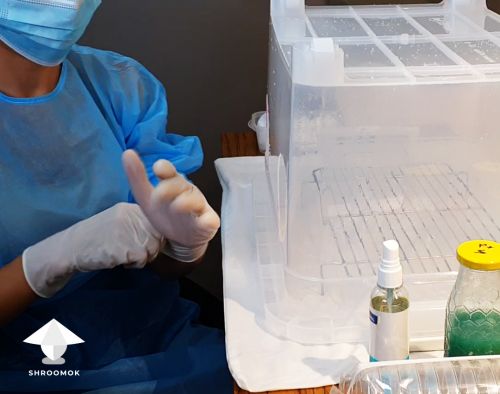](https://shroomok.com/en/wiki/File:Gloves-mask-preparation-for-manipulations-in-still-air-box.jpg) Wear gloves, face mask and clean/protective cloth[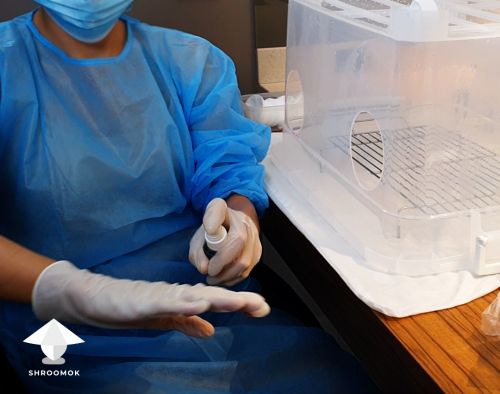](https://shroomok.com/en/wiki/File:Spray-alcohol-on-gloves.jpg) Treat gloves with alcohol 70%
5\. Use a raised wire rack to elevate the working surface inside the SAB. Contaminants tend to fall from the air and accumulate mostly at the bottom, so raising the working surface helps reduce contamination risks.
[](https://shroomok.com/en/wiki/File:Raised-wire-rack-for-still-air-box.jpg) Raised wire rack for still air box[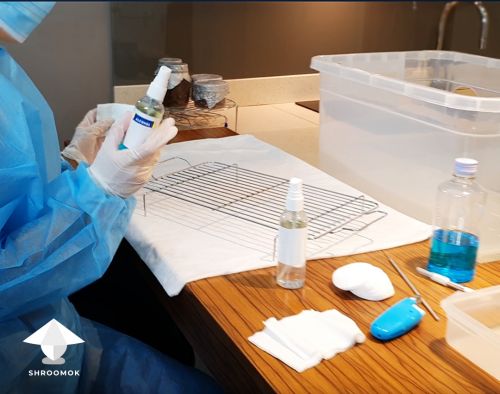](https://shroomok.com/en/wiki/File:Prepare-SAB-for-mycology-project.jpg) Wipe all tools with ethyl or iso alcohol 70%[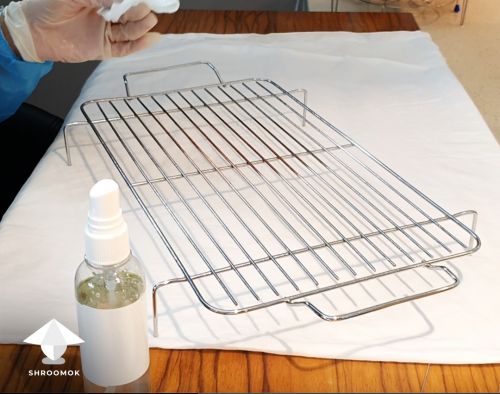](https://shroomok.com/en/wiki/File:Raised-wire-rack-still-air-box.jpg) Raised wire rack for SAB6\. Spray or wipe the inside of the SAB with ethyl/iso alcohol (70%).
[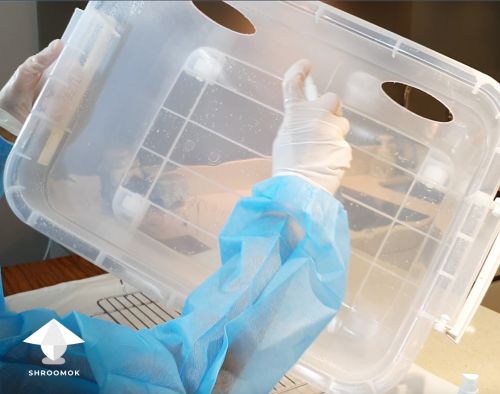](https://shroomok.com/en/wiki/File:Spray-still-air-box-inside.jpg) Spray/wipe the walls of SAB inside with alcohol> 💡 Tip: You can use soap solution instead of alcohol (a few cc/ml per cup of water). Spray the walls of the box (except the front wall) and towel on the bottom to help airborne contaminants stick to the soap film.
7\. Before and after any item enters the still air box, wipe it with ethyl/isopropyl alcohol 70%.
[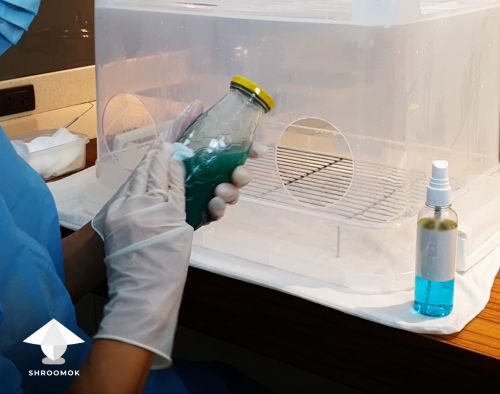](https://shroomok.com/en/wiki/File:Wipe-with-alcohol-before-placing-in-still-air-box.jpg) Wipe everything with alcohol before placing in SAB (agar project)[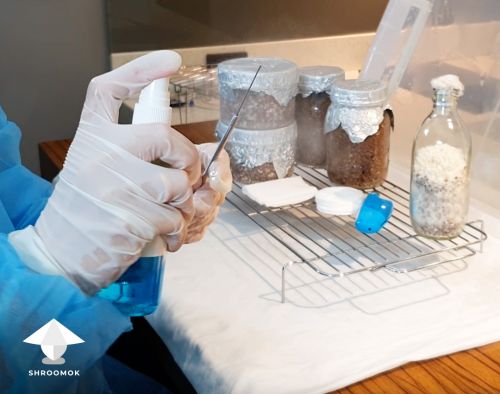](https://shroomok.com/en/wiki/File:Treat-tools-before-placing-in-still-air-box.jpg) Treat all tools with disinfectant (grain to grain project)
8\. Double-check that everything you need for your current project is already inside the SAB.
[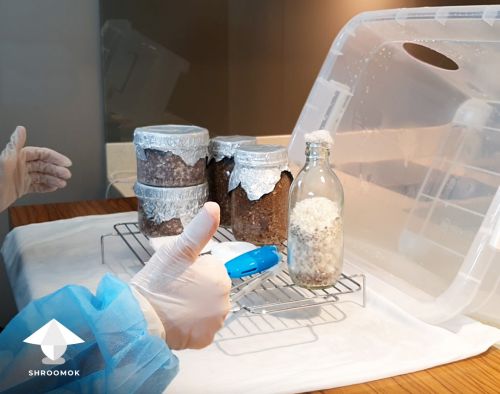](https://shroomok.com/en/wiki/File:Tools-and-jars-in-still-air-box.jpg) Mycology project in still air box - grain to grain transfer9\. Spray the air inside the SAB with 70% isopropyl alcohol and let it sit for a few minutes. This will cause drops to cling to any contamination and pull it down to the bottom.
10\. Plan your moves and visualize each step of your work inside the SAB. Once your arms are inside the SAB, avoid taking them out until the job is done. In-and-out movements create additional airflows and increase the risk of contamination.
11\. Wipe your gloves with ethyl or isopropyl alcohol (70%).
[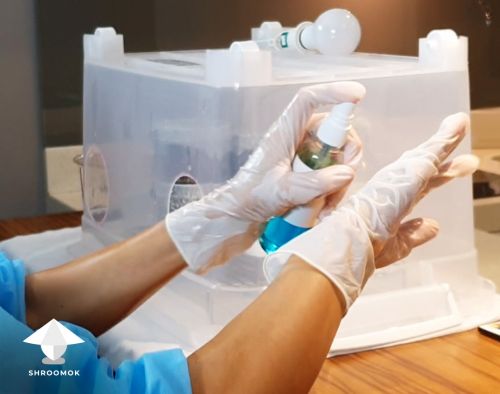](https://shroomok.com/en/wiki/File:Wipe-gloves-with-alcohol-before-entering-still-air-box.jpg) Treat your gloves with alcohol before entering SAB12\. Enter the SAB and start your work.
[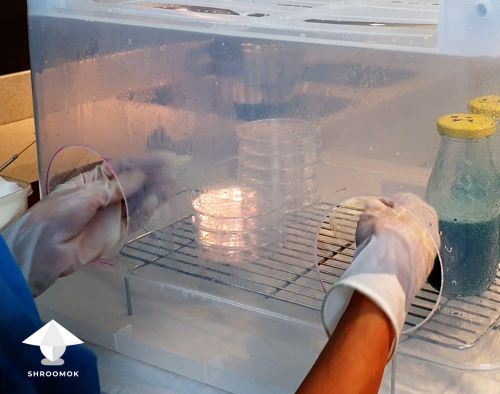](https://shroomok.com/en/wiki/File:How-to-work-in-SAB.jpg) Move in and start your work in SAB13\. Try to work closer to the back wall of the SAB and move smoothly inside. Avoid rushing, but be fast when working with open jars, bags, or agar plates.
[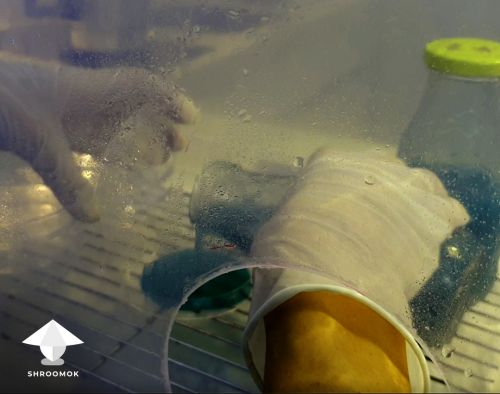](https://shroomok.com/en/wiki/File:Working-with-agar-in-still-air-box.jpg) Pouring agar plates in a still air box#### Still Air Box mistakes
Avoid using matted opaque plastic boxes as they make it difficult to see what's happening inside your box. If you have such a box, you can create a 'window' as a workaround. However, working with such a SAB is painful and you can't focus on your moves.
[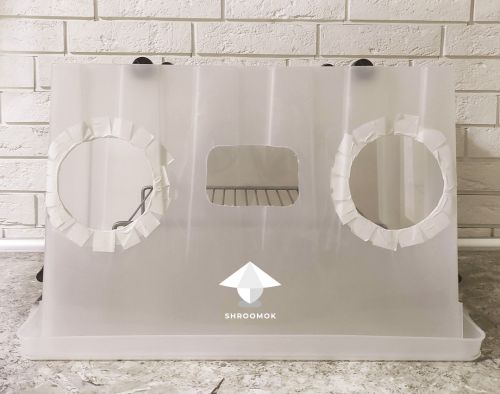](https://shroomok.com/en/wiki/File:Still-air-box-mistakes.jpg) Not the best SAB for mycologyOpt for plastic boxes without stiffeners and with flat, smooth walls. Thick plastic is unnecessary and can make it more challenging to make clean cuts for the armholes.
#### Still Air Box upgrades
**💡 Tip**: Consider using an additional light source above the SAB or a Desk Lamp ([Amazon](https://amzn.to/3qN57JV)). Transparent plastic can slightly distort your vision, so having extra lighting helps. Relying solely on ceiling lights may not provide sufficient illumination while working in the SAB.
[](https://shroomok.com/en/wiki/File:Working-in-SAB.jpg) Use good light while working in SAB**💡 Tip:** For additional SAB and tools sterilization you can use UV Sanitizer Lamp ([Amazon](https://amzn.to/43VEAsu)). UVC light with a wavelength of 200-280 nm wavelength effectively kills contaminants like bacteria, mold fungus, and viruses in the air and on surfaces.
[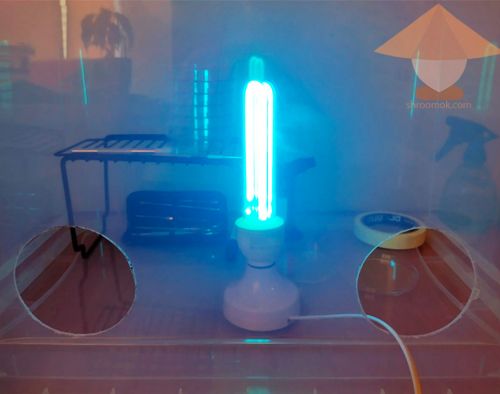](https://shroomok.com/en/wiki/File:UVC-lamp-for-still-air-box-sterilization.jpg) UVC lamp in still air box before manipulations in SAB[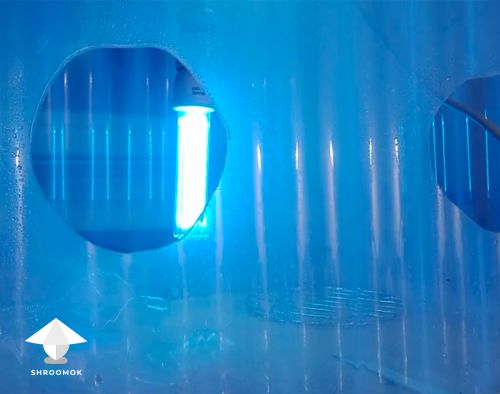](https://shroomok.com/en/wiki/File:UV-light-for-still-air-box.jpg) UV lamp in still air box placed on top> ❗️Be careful when using UV light! Never expose your eyes, skin, plants, pets, mushroom spores and mycelium!
You can make as big still air box as you want with using polyethylene and metal/plastic frame. For instance, such SAB setup by Woolf:
[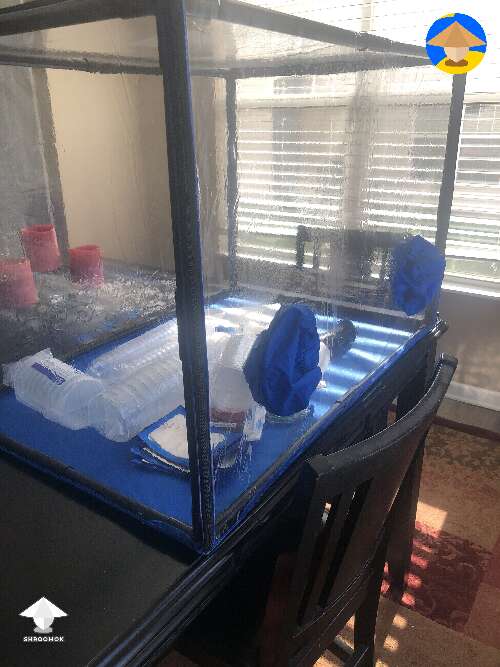](https://shroomok.com/img_orig/22882b/4032_did-i-show-you-my-still-air-box-by-woolf.jpg) [Large Still Air Box](https://shroomok.com/en/wiki/File:did-i-show-you-my-still-air-box-by-woolf-3545ca)> **💡** You can find such ready to use [Still Air Box on Amazon](https://amzn.to/43UzqNp)
[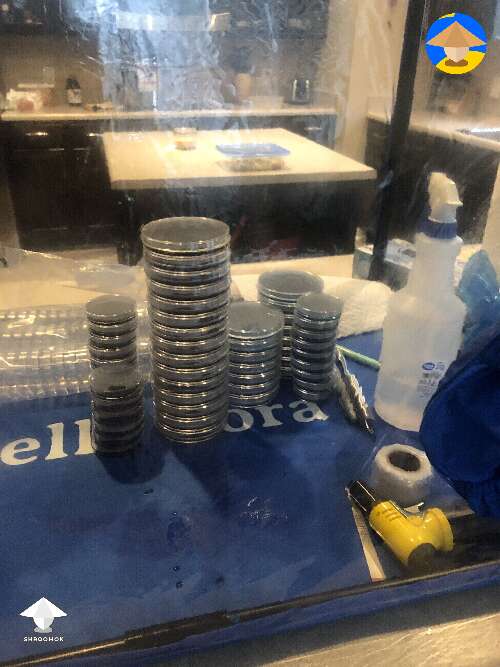](https://shroomok.com/img_orig/e2399e/4032_did-i-show-you-my-sab-for-agar-work-by-woolf.jpg) [Soft Still Air Box](https://shroomok.com/en/wiki/File:did-i-show-you-my-sab-for-agar-work-by-woolf-747681)Although it's cost-effective to make it much cheaper by your own.
#### Can I use flame inside still air box
It is possible to use flame sterilization in a big volume SAB and if you wipe you Still Air Box with soapy water instead of using ethyl/iso alcohol. However, fire creates air currents due to temperature differences inside and outside the SAB, it increases the risk of contamination.
🔥🚫 **Don't use flame in the SAB if you use alcohol inside!** SAB doesn't have a ventilation; in a small volume alcohol fumes can explode and hurt you. Just wipe your tools with cotton pad soaked in alcohol for sterilization instead of fire.
#### Can I use SAB as a fruiting chamber
Yes, it is possible to convert the SAB into GrowBox for mushroom fruiting. Simply close the armholes (PE film or plastic circles that were initially cut for making armholes), close the lid on top, and maintain proper fruiting conditions.
Remember to wash and disinfect the box thoroughly if you intend to use it as a Still Air Box again.
#### Afterwords
During your initial attempts, it's normal to experience uncertain movements in the SAB, which may lead to contaminations.
Keep practicing! With each new project, you'll increase your success rate and advance your skills in mycology.
📸 For more SAB examples check out [Still Air Box photo gallery](https://shroomok.com/gallery/sab-still-air-box)
Join [Shroomok Discord Community](https://discord.gg/ngKhQDmymD) for questions and sharing your experience.
If you find this guide helpful support my work with subscription or one-time donation on [buymeacoffee](https://www.buymeacoffee.com/shroomok)
Have a happy growing!
Peace, Shroomok ❤️
# Mushroom Consumption
## Magic mushroom tea
[Magic mushroom tea](https://shroomok.com/en/wiki/Magic_mushroom_tea)
### Psilocybin mushroom tea recipe for tripping
Do you want to brew an elixir with magic mushrooms but don't know how to prepare it properly?
In this section we explain the most important aspects of making tea with psilocybin mushrooms.
[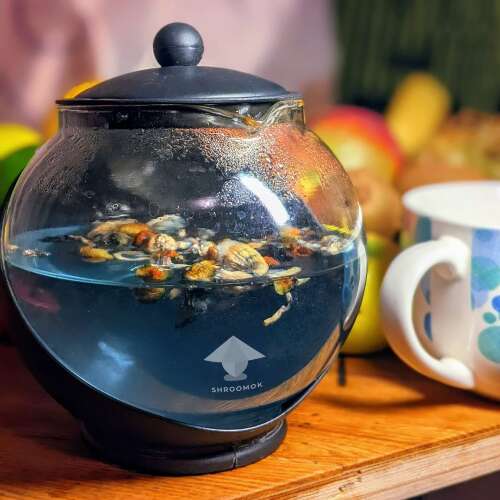](https://shroomok.com/en/wiki/File:Mushroom-tea-1.png) Magic mushroom tea recipe#### Common methods of consuming magic mushrooms
Let's briefly discuss the various ways to consume psilocybin mushrooms.
The easiest way to consume is to simply chew whole dried mushrooms and wash them down with water.
But many psychonauts don't like the taste of psilocybin mushrooms. After all, they don't taste like ordinary edible or gourmet mushrooms.
🍫 If you are among such people then you can eat mushrooms in form of mushroom chocolates. You can find how to make them in the Recipe for making mushroom sweets and mushroom chocolate section
☕️ Or you can make delicious mushroom tea or mushroom broth.
#### What mushrooms are needed for mushroom tea?
For making magic tea are suitable:
🔸 fresh whole mushrooms
🔸 dried whole or dry grinded mushrooms (in a coffee grinder)
🔸 frozen whole mushrooms
Fresh and frozen mushrooms have the highest concentration of psychoactive ingredients!
The way of drying/freezing and storing magic mushrooms affects the psychoactive substances content in mushrooms. Therefore, even with proper drying up to 50% of the psilocybin activity is lost.
How to dry or freeze mushrooms for storage and consumption you can find in the next guides
> 🔴 Recommended: [How to dry and store psilocybin mushrooms](https://shroomok.com/en/wiki/How_to_dry_and_store_psilocybe_mushrooms "How to dry and store psilocybe mushrooms")
#### Mushroom tea vs chewing. How does water temperature affect psilocybin in mushrooms?
🌡 Partial decomposition of psilocybin into psilocin starts from +50°C or 122°F. That's why higher temperature isn't recommended for drying magic mushrooms in order to save the psilocybin in the mushrooms for long-term storage.
If heat mushrooms in water from +87°C or 189°F psilocybin is quickly and completely transformed into psilocin.
As we know, psilocin affects the brain and makes a transition into psychedelic trip.
Therefore, if consume mushrooms in the form of tea your body doesn't waste time on this metamorphosis and assimilates it faster. This is the main feature of mushroom tea! Mushroom tea works faster and the entrance to the trip is also faster.
Higher temperatures for making tea are acceptable to speed up the reaction.
However, such product must be taken fresh. It doesn't retain its psychoactive ingredients for a long period of time.
🌡 If heated from +137°C or 279°F or during prolonged boiling psychoactive components of psilocybin mushrooms are completely destroyed. They remain edible, but useless.
#### Simple recipe of mushroom tea
[](https://shroomok.com/en/wiki/File:Shroom-tea-2.png) Ready mushroom tea
1️⃣ Weigh the required dose of mushrooms. Do not exceed the dosage!
2️⃣ Put prepared mushrooms (fresh, frozen or dried) in a thermos, tea pot or thermo-mug.
**Choose magic cups and mugs for your mushroom tea on Amazon:**
[Mushroom Tea Cup](https://www.amazon.com/Mushroom-Glass-Filter-Coaster-Ounces/dp/B09VZM2SV8?&linkCode=ll1&tag=shroomok-20&linkId=6b950472bb39e1cebb019ee7cf5d835b&language=en_US&ref_=as_li_ss_tl) - $15.91
[Mushroom Tumbler](https://www.amazon.com/Mushroom-Tumbler-Lovers-Accessories-Birthday/dp/B09P59XQ4J?&linkCode=ll1&tag=shroomok-20&linkId=4debd9be9a1ce866e318bab19b44c91d&language=en_US&ref_=as_li_ss_tl) - $22.00
[Mushroom Mug for Mushroom Lovers](https://www.amazon.com/MYMISOR-Stainless-Mushrooms-Inspiration-Insulation/dp/B0B1WBRJMZ?&linkCode=ll1&tag=shroomok-20&linkId=b5b8edd6abc03e0e564dfe428132f9d9&language=en_US&ref_=as_li_ss_tl) - $24.95
[Mushroom Tumbler Travel Mug](https://www.amazon.com/Qdkva-Mushroom-Tumbler-Stainless-Travel-Tumbler/dp/B09J1Z1FVT?&linkCode=ll1&tag=shroomok-20&linkId=516461d774b4dcc4edf79f4b500824a1&language=en_US&ref_=as_li_ss_tl) - $23.99
[Glass Teapot with Removable Infuser](https://www.amazon.com/Removable-Blooming-Stovetop-Microwave-Borosilicate/dp/B096LY5S8T?&linkCode=ll1&tag=shroomok-20&linkId=47a8c68a04e165624111b7d28f0bea48&language=en_US&ref_=as_li_ss_tl) - $17.51
3️⃣ Boil clean drinking water.
4️⃣ Pour hot water over the mushrooms (250-350 ml per one serving of mushrooms). **The water temperature within +70°..+90°С or 160-195°F will be okay. But don't boil mushrooms!**
5️⃣ Let mushroom tea brew for 10-20 minutes.
6️⃣ Filter mushroom tea to get clear drink. Mushrooms can be thrown away, because almost all the psilocybin from the mushrooms has already dissolved in water.
**Filters for tea on Amazon:**
[Tea Filter bags, safe natural material - 100 pcs.](https://www.amazon.com/Tinkee-material-disposable-drawstring-100%EF%BC%883-15/dp/B07QRF4PSD?&linkCode=ll1&tag=shroomok-20&linkId=8536f5b8afb07725666806e84ea449ce&language=en_US&ref_=as_li_ss_tl) - $5.99
[Stainless Steel Tea Strainer - 1,2 Pack](https://www.amazon.com/Threaded-Connection-Stainless-Extended-Seasonings/dp/B075K57B73?&linkCode=ll1&tag=shroomok-20&linkId=8e3684bf098910f25816f58fe189353f&language=en_US&ref_=as_li_ss_tl) - $6.99
[Stainless Steel Tea Ball Strainer - 2 Pack](https://www.amazon.com/dp/B09V78VD6W?&linkCode=ll1&tag=shroomok-20&linkId=a8b60a7a63e3d75e4c737a0eb7901e2b&language=en_US&ref_=as_li_ss_tl) - $13.99
7️⃣ If you want rich flavor you can add ginger, cinnamon, vanilla, any spices, sweet syrup, honey etc. It's up to your tastes. Actually mushroom tea itself without any additives tastes really great, like mushroom soup.
🍋 You can also add lemon or orange juice 🍊
☕️ Magic Tea is ready!
🌟 Drink fresh mushroom tea right after preparation or within a few hours
> 🔴 **Check out more recipes and guides: [Mushroom Consumption](https://shroomok.com/articles:mushroom-consumption-recipes-and-tips)**
Enjoy your magic tea 🙏🏻
## Magic mushrooms microdosing
[Magic mushrooms microdosing](https://shroomok.com/en/wiki/Magic_mushrooms_microdosing)
### Psilocybin mushroom microdosing guide
#### **How to prepare mushrooms for microdosing?**
You can check details on mushroom preparation for storage and consumption in the
> Recommended guide: [**How to Dry and Store mushrooms properly**](https://shroomok.com/en/wiki/How_to_dry_and_store_psilocybe_mushrooms "How to dry and store psilocybe mushrooms")
Mushrooms should be dried thoroughly until they crisp like chips.
Also, you can use an **electric fruit/vegetable dryer (dehydrator)** at low power (temperature up to 50°C).
[](https://shroomok.com/en/wiki/File:How-to-dry-magic-mushrooms-in-dehydrator.jpg) How to dry mushrooms in dehydrator**Shroomok's Choice on Amazon from Simple Cheap to Premium:**
[Standard Electric Food Dehydrator, White](https://www.amazon.com/gp/product/B008H2OELY/ref=as_li_tl?ie=UTF8&tag=shroomok-20&camp=1789&creative=9325&linkCode=as2&creativeASIN=B008H2OELY&linkId=cf42d1210f8a406fa239da1a74dbe5aa) - $39.82
[Professional Food Dehydrator Machine](https://www.amazon.com/gp/product/B01DO0ZR7I/ref=as_li_tl?ie=UTF8&tag=shroomok-20&camp=1789&creative=9325&linkCode=as2&creativeASIN=B01DO0ZR7I&linkId=5720d629a5523f9714c54b5b02d00530) - $42.99
[Electric Food Dryer Machine, 5 BPA-Free Trays, Dishwasher Safe](https://www.amazon.com/gp/product/B0828613J4/ref=as_li_tl?ie=UTF8&tag=shroomok-20&camp=1789&creative=9325&linkCode=as2&creativeASIN=B0828613J4&linkId=0a89548b410de3c4817f4c3cba87c470) - $54.99
[Food Dehydrator Machine, Digital Timer](https://www.amazon.com/gp/product/B0947S12WP/ref=as_li_tl?ie=UTF8&tag=shroomok-20&camp=1789&creative=9325&linkCode=as2&creativeASIN=B0947S12WP&linkId=5c6dae7a10a195bd8f1e565e4ac3c567) - $76.89
[Dryer Machine, Overheat Protection](https://www.amazon.com/gp/product/B07MPC7C8G/ref=as_li_tl?ie=UTF8&tag=shroomok-20&camp=1789&creative=9325&linkCode=as2&creativeASIN=B07MPC7C8G&linkId=1be3944f3db8e7f52c2653d0f6ad570e) - $79.99
[Food Dehydrator Machine, Digital Timer - Black, Silver](https://www.amazon.com/gp/product/B07QXNSSJM/ref=as_li_tl?ie=UTF8&tag=shroomok-20&camp=1789&creative=9325&linkCode=as2&creativeASIN=B07QXNSSJM&linkId=47ee6e12b4c9883806215955471fff09) - $87.99
[Premium Stylish Food Dehydrator - Stainless Steel, Led Touch Digital Timer](https://www.amazon.com/gp/product/B093GGCX8Z/ref=as_li_tl?ie=UTF8&tag=shroomok-20&camp=1789&creative=9325&linkCode=as2&creativeASIN=B093GGCX8Z&linkId=9a2fa5f60c80ea97e0a8ab906e7d5362) - $109.99
[Premium Food Dehydrator Machine - Digital Timer, 9 Drying Trays, Stainless Steel, Black](https://www.amazon.com/gp/product/B01M6AZ863/ref=as_li_tl?ie=UTF8&tag=shroomok-20&camp=1789&creative=9325&linkCode=as2&creativeASIN=B01M6AZ863&linkId=5595497f038a836bd9c82e0ccdffbf40) - $114.89
[Premium Food Dehydrator Machine - 6 Stainless Steel Trays, 50 Free Recipes, Silver or Black](https://www.amazon.com/gp/product/B07PY5M579/ref=as_li_tl?ie=UTF8&tag=shroomok-20&camp=1789&creative=9325&linkCode=as2&creativeASIN=B07PY5M579&linkId=897e543a841f2a5f5922260b969c36f9) - $169.99
Or use an oven (temperature up to 50°C). Or simply wrap the mushrooms **in parchment paper** and place them **on a warm radiator for 1-2 days**.
🔴 **If mushrooms are not dry enough, then you won't be able to grind them evenly in a coffee grinder to prepare microdoses!**
You can store dried mushrooms in zip-bags, vacuum bags or in glass jars with tightly closed lids. For convenience Shroomok recommend to divide all mushrooms into 5-10g portions.
[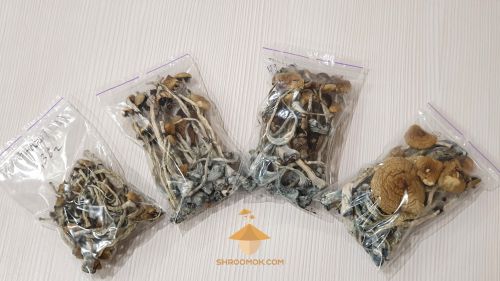](https://shroomok.com/en/wiki/File:Dried-psilocybin-mushrooms-psilocybe-cubensis-ready-for-storing.jpg) Dried psilocybin mushrooms in zip-bags for storage
Store in a cool and dark place or in the refrigerator. When stored properly, mushrooms fully retain their properties for up to 2 years. After 2 years, they are okay as well, just loose psychoactive potency over the years.
#### **How to prepare psilocybin mushroom microdoses?**
For convenience, you can fill in empty Vegetarian or Gelatin capsules to prepare your individual **[Capsules for microdosing](https://shroomok.com/en/wiki/Psilocybine_magic_mushroom_capsules_for_microdosing "Psilocybine capsules for microdosing").**
[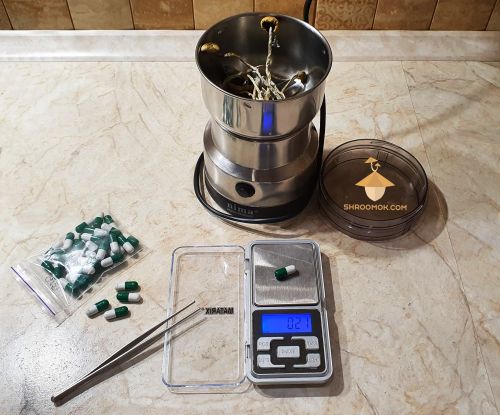](https://shroomok.com/en/wiki/File:How-to-prepare-capsules-for-microdosing-psilocybe-mushrooms.jpg) Capsules for microdosing with magic mushrooms powder. Preparation process
If you don't like mushroom taste you can make **[Mushroom Chocolates](https://shroomok.com/en/wiki/Magic_mushroom_chocolate_and_psilocybin_candy_recipes "Magic mushroom chocolate and psilocybin candy recipes")**. However, there is also a minus in mushroom chocolate: it does not allow you to measure the required microdose in each candy accurately, because the chocolate is not uniform. This method is great for preparing shrooms for trip.
[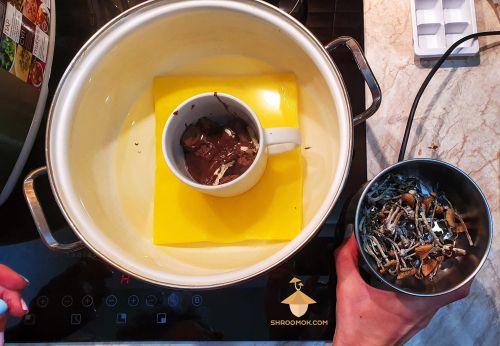](https://shroomok.com/en/wiki/File:Mushroom-chocolate-cooking-process.jpg) Mushroom chocolate cooking process[](https://shroomok.com/en/wiki/File:Mushroom-chocolate-recipe.jpg) Magic Mushroom chocolate sweets recipe[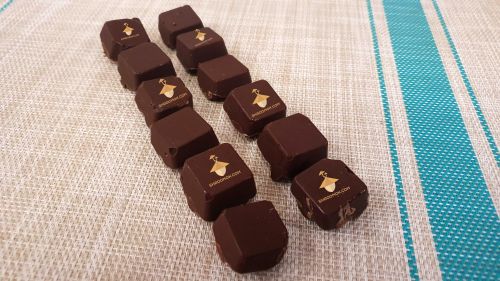](https://shroomok.com/en/wiki/File:Mushroom-chocolate-simple-recipe.jpg) Chocolate sweets with psilocybin mushrooms#### **Mushroom microdosing schedule**
There are 2 protocols for microdosing: Fadiman protocol and Paul Stamets protocol
[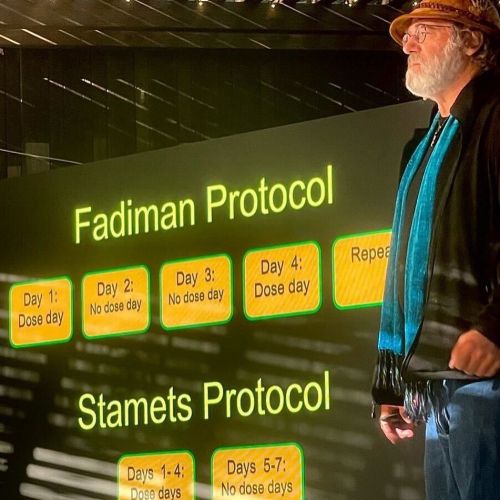](https://shroomok.com/en/wiki/File:Paul-stamets-protocol-microdosing.jpg) Stamets and Fadiman protocol for microdosing. Credit: Paul Stamets##### Fadiman Protocol for microdosing
Fadiman protocol considered as a standard practice of microdosing.
Microdoses should be taken 1 time in 3 days, i.e. take a microdose 1 day and skip 2 days. This break is important since even on a low dose your body can still build up a tolerance. Hence, you can loose all positive effects of microdosing.
[](https://shroomok.com/en/wiki/File:Microdosing-schedule-eng.jpg) Standard schedule for microdosing psilocybin mushrooms##### Stamets Protocol for microdosing
The Stamets Protocol differs in two main aspects: schedule and combining the psilocybin mushroom with other components.
Starting with the Stamets schedule a person takes their microdose for the first 4 days of the week. Then the other 3 days are a tolerance break.
**Days 1-4: Dose days** --> **Days 5-7: No dose days** --> **Repeat**
The second difference of Stamets protocol is taking dried magic mushrooms (or pure psilocybin) in combination with **Lion’s Mane** mushroom microdosing and **Niacin (vitamin B3 aka nicotinic acid)**.
**Lion's Mane** works as natural nootropic. Supports cognitive performance, memory, nerve and immunity systems. The dosage 5 to 20 grams of fresh or 50 to 200 milligrams of extract. Stamets notes that Lion’s Mane mycelium instead of the mushroom fruiting body, may be most beneficial for microdosing. Lion's Mane is totally legal mushroom and available for purchase or home cultivation.
**Amazon products:**
[Lion's Mane Capsules, 30/60/120 caps.](https://www.amazon.com/Host-Defense-Mushroom-Capsules-Cerebral/dp/B002WJ2ALO?&linkCode=ll1&tag=shroomok-20&linkId=f172d0d84571a09b80a6d07fe5cdc651&language=en_US&ref_=as_li_ss_tl) - from $13.13 - made with Lion's Mane mushroom mycelium
[Lion's Mane Extract](https://www.amazon.com/Host-Defense-Mushroom-Extract-Cerebral/dp/B00J816AIS?&linkCode=ll1&tag=shroomok-20&linkId=4a0e0d4f63908b801aa2fea43c37aea3&language=en_US&ref_=as_li_ss_tl) - $14.96 - blend of Lion's Mane mycelium and fruit bodies
[Lion's Mane Mushroom Powder](https://www.amazon.com/dp/B01DKZZFCE?&linkCode=ll1&tag=shroomok-20&linkId=4f1840e722ced133f983959d63fbd8e2&language=en_US&ref_=as_li_ss_tl) - $26.96 - fruit bodies powder supplement
**Niacin (vitamin B3)** is one of many essential B-complex vitamins. The quantity recommended in the Stamets protocol is 100-200mg up to 500mg. Higher dosages can provoke unwanted side effects. Niacin supports nervous system, digestive system, metabolism and skin.
[Solgar Niacin 500 mg, 250 Veg. Caps](https://www.amazon.com/Solgar-Niacin-Vitamin-Vegetable-Capsules/dp/B0001VUOMM?&linkCode=ll1&tag=shroomok-20&linkId=c43638ca301ad8910df1e5281db84bc2&language=en_US&ref_=as_li_ss_tl) - $24.99
[Niacin 100mg | 300 Veg. Tablets](https://www.amazon.com/dp/B09C92DZM2?&linkCode=ll1&tag=shroomok-20&linkId=f6d6784679397e5c106b9b5415532090&language=en_US&ref_=as_li_ss_tl) - $9.99
[Niacin 500mg, 250 Capsules](https://www.amazon.com/dp/B09ZF7QRT6?&linkCode=ll1&tag=shroomok-20&linkId=21963750aaa167edcb500c7bc279c584&language=en_US&ref_=as_li_ss_tl) - $15.99
[Niacin (B3), 500mg, 220 Caps](https://www.amazon.com/Capsules-Non-GMO-Essential-Vitamin-Carlyle/dp/B09XFJNY95?&linkCode=ll1&tag=shroomok-20&linkId=5c6cddf209c92128d0409fe9115b335b&language=en_US&ref_=as_li_ss_tl) - $19.99
#### Duration of microdosing. When to take microdose
Microdosing course duration **from 3 to 6 months** (due to individual choice and individual feelings). You should take a **1-3 month break** after the course.
**Do NOT take microdoses daily and do not increase your microdose!** It won't be a microdose, it will be a stimulation. As a consequence, a decrease in energy, concentration, and cognitive abilities is possible.
Some adjustments can be made to the microdose schedule, e.g. every other day or every 4-5 days. Adjustment can be due to the physical and psychological condition of the patient.
**Take mushrooms only in the morning**, because they activate the cerebral cortex. Evening intake may cause problems with sleep.
Eating (breakfast) not earlier than **1-2 hours** after taking the microdose.
#### **How to determine your individual microdose**
A microdose is the maximum dose of psilocybin mushrooms, when taken without any change in consciousness or perception (including visual, sound, taste, smell, or tactile sensations).
Individual microdose depends on many factors: your tolerance to psilocybin, metabolism, hormonal background, the variety of mushrooms and their storage time. But it does not depend on your body weight.
Before the course, you should calibrate your individual mushroom dose.
To do this, grind in a **Coffee Grinder** a small portion (about 3-5 or 10 grams) of **dried** psilocybin mushrooms.
**Shroomok's Choice on Amazon:**
[Mueller Austria HyperGrind Precision Coffee Grinder - Compact & Stylish, White](https://www.amazon.com/gp/product/B076FJ92M4/ref=as_li_tl?ie=UTF8&tag=shroomok-20&camp=1789&creative=9325&linkCode=as2&creativeASIN=B076FJ92M4&linkId=a9a0116bd7a6ff7f07848c837b005893) $19.97
[Electric Coffee Grinder - Stainless Steel Blades, Black](https://www.amazon.com/gp/product/B005EPRFKO/ref=as_li_tl?ie=UTF8&tag=shroomok-20&camp=1789&creative=9325&linkCode=as2&creativeASIN=B005EPRFKO&linkId=7adfeccaf26a5afae5d8a2cc06855a33) $19.99
[Stainless Steel Coffee Grinder, One Touch Push-Button Control](https://www.amazon.com/gp/product/B07Z8G97PY/ref=as_li_tl?ie=UTF8&tag=shroomok-20&camp=1789&creative=9325&linkCode=as2&creativeASIN=B07Z8G97PY&linkId=b4658287ac01f4d9119d3471b37e01c3) $19.99
[Stainless Steel Electric Coffee Grinder, Silver](https://www.amazon.com/gp/product/B07P6SGD8B/ref=as_li_tl?ie=UTF8&tag=shroomok-20&camp=1789&creative=9325&linkCode=as2&creativeASIN=B07P6SGD8B&linkId=0d9f8c10adeda8b32776eab0aa82ed2e) $21.20
[Spice Herb Coffee Grinder with Pollen Catcher](https://www.amazon.com/gp/product/B093K75YX1?&linkCode=ll1&tag=shroomok-20&linkId=ce1af201e71a95475b3eca6fe1a3084e&language=en_US&ref_=as_li_ss_tl) $23.99
[Multi-Grind Automatic Coffee Grinder - With chamber cleaning system, Black](https://www.amazon.com/gp/product/B08RQZ39WC/ref=as_li_tl?ie=UTF8&tag=shroomok-20&camp=1789&creative=9325&linkCode=as2&creativeASIN=B08RQZ39WC&linkId=e1ec23fe761f622f69b875a393a23511) $24.99
Use **Medical** or **Jewelry scales** to know the exact dose.
[](https://shroomok.com/en/wiki/File:Weighter-scales-for-weighting-magic-mushrooms.jpg) Scales for weighting mushroom microdose**Shroomok's Choice on Amazon:**
[Digital Pocket Jewelry Scales - Scale Capacity 200 g, Scale Accuracy 0.01 g](https://www.amazon.com/gp/product/B091678KNF/ref=as_li_tl?ie=UTF8&tag=shroomok-20&camp=1789&creative=9325&linkCode=as2&creativeASIN=B091678KNF&linkId=6a106202fe009e78bcebbda93f5fa7b8) - $10.95
[Mini Digital Jewelry Scale - Capacity 500g, Accuracy 0.01g](https://www.amazon.com/gp/product/B07H3CCY59/ref=as_li_tl?ie=UTF8&tag=shroomok-20&camp=1789&creative=9325&linkCode=as2&creativeASIN=B07H3CCY59&linkId=c0230409c605193608d3f1bebfb48d59) - $9.99
[Professional USB Milligrams Scale - Capacity 50g, Accuracy 0.001g](https://www.amazon.com/gp/product/B07XXYHWJD/ref=as_li_tl?ie=UTF8&tag=shroomok-20&camp=1789&creative=9325&linkCode=as2&creativeASIN=B07XXYHWJD&linkId=0e26751f9eea9db98d26e35ffdaf0100) - $22.78
[Kit: Scales, Case, Tweezers, Calibration, Weighting Pans - Capasity 50g, Accuracy 0.001g](https://www.amazon.com/gp/product/B011J88S8M/ref=as_li_tl?ie=UTF8&tag=shroomok-20&camp=1789&creative=9325&linkCode=as2&creativeASIN=B011J88S8M&linkId=162d89981048c3558625cdff8245135c) - $34.99
**In the morning on an empty stomach, take 0.3g of mushroom powder with water.** A clean gastrointestinal tract will allow you to immediately calibrate the necessary dose and determine tolerance.
**How to determine the ideal microdose?** It should not cause any changes in perception and consciousness.
> If you feel any side effects (dizziness, sleepiness, nausea, visual effects, fractals, color spots, amplification of sounds, changes in tactile sensations), then at each subsequent intake reduce the portion with 0.05g step until these effects disappear.
>
> 📉 **Downward scheme: 0.3 > 0.25 > 0.2 > 0.15 > 0.1 > 0.05**
>
> 🔴 Decrease the dose until the effects or side effects are gone at all.
For example, if at 0.3g you have any unusual sensations, decrease the next microdose and take 0.25g two days after the first dose.If at 0.25g you have also mushroom effects, decrease the microdose to 0.2g.
> If you don't feel any changes with 0.3g, you can go with the microdose increase scheme. Increase by 0.05 g until you feel any effects. As soon as you feel changes in sensation, then the microdose should be lowered by 0.05 g. When increasing the microdose stop at the dosage which there is no change of senses.📈 **Increase scheme: 0.3 > 0.35 > 0.4 > 0.45 > 0.5 > 0.55**
Individual microdose can be 0.05 g and sometimes as high as 0.8 g.
The microdose which doesn't cause any change in consciousness or perception at all is considered an **individual** dose for you and it **shouldn't change until the end of the course.** This dosage is calibrated only for this portion of mushrooms (this bag, this strain, this species).
For your next bag of mushrooms, new crop and new strain of mushrooms, you will have to calibrate your microdose again. Because the psilocybin content will vary.
##### How many mushrooms needed for microdosing?
From 0.5g to 8g (3g on average) of dried mushrooms will be enough for **1 month** of microdosing course.
#### **Microdosing tips**
❇️ Grinding the mushrooms in a coffee grinder gives a homogeneous mass and allows you to average the content of psilocybin in the total mass of mushrooms. Because each single mushroom, mushroom stem or cap can contain a different concentration of psilocybin. By taking stem, or cap, or abortion, or small whole mushroom you will take a different dose of psilocybin all the time. **Grinded mushrooms have more stable psilocybin concentration** and you can calibrate precisely your mushroom dose for system microdosing course.
❇️ The most convenient way to take it is to prepare **[Mushroom Capsules for Microdosing](https://shroomok.com/en/wiki/Psilocybine_magic_mushroom_capsules_for_microdosing "Psilocybine capsules for microdosing").**
❇️ It is better to take **the very first microdose on a day off**, so that you can track your sensations. In case you need to go to the toilet or have "entry syndrome", you can not hurry anywhere, be alone with yourself and take time for yourself and your sensations.
❇️ **Don't drive a car** on the first day of taking microdosing.
❇️ Keep a **microdosing diary** where you can make notes about all your sensations (physical and psycho-emotional) and note any changes in the quality of your life on a daily basis (mood, activity, reactions, emotions, etc.)
#### **Positive effects of microdosing**
❇️ Empathy for the people and nature around. The person becomes more social, open, easier to make contact and communicate with people.
❇️ Reduction of aggression, irritability, fears, obsessions. Release from feelings of anxiety, danger, inevitability, guilt.
❇️ Person begins to notice the beauty around yourself.
❇️ Increased productivity of the brain, creativity and design thinking.
❇️ Energy effect, improved mood and vitality that lasts 6-10 hours after intake. Followed by a pleasant relaxation is felt in the muscles and brain (but not drowsiness).
❇️ Increased balance, strength, focus when doing sports.
❇️ Giving up bad habits (alcohol particularly). People note that they begin to see the absurdity in their addictions and give them up easily.
❇️ Eating behavior is normalized. Lack of overeating, excessive appetite. Preference for a healthy and balanced diet.
❇️ Improvement of cognitive functions: memory, speech, communication skills, ability to concentrate, ability to recognize objects (by sight, hearing, touch, ability to make purposeful movements).
❇️ Improved quality of sleep and pleasant dreams.
❇️ Assistance in self-discovery and hidden talents disclosure.
❇️ Establishing balance and harmony within yourself.
Once you've experienced the beauty of at least 1 or 2 of the above items, there's a good chance and temptation to start taking bigger dosage and/or with greater frequency.
⛔️ **DO NOT take microdose every day!**
⛔️ **DO NOT increase your microdose during the whole microdosing course!**
⛔️ "More" and "more often" will lead to a **limbo state** (a state of "neither here nor there", feelings between the start of trip and sober state). It have a stimulating effect on your brain. As a result, you'll get **the opposite effect: drop in energy, state of fatigue, decreased concentration, cognitive deterioration.**
#### **Effects to look out for**
❗️ 1-1.5 hours after taking a microdose you may have soft stools. It often occurs if your diet is dominated by low-quality food (fast food, semi-finished products, canned foods, sausages, etc.). Don't worry, it's okay! In such way mushrooms purifies your body. This is a sign to pay attention to the quality of food in your diet.
❗️ In the first month of taking microdoses, there is a possible "entry syndrome" that occurs 15-30 minutes after taking the microdose. Nausea, cold sensation, salivation, gastrointestinal cramps, dizziness, headache. These conditions are not observed in everyone and disappear quickly within 15-30 minutes.
❗️ No dilation of the pupils is observed with microdoses. The person is fully functional without any changes or abnormalities.
❗️ With microdosing there is no risk of a "bad trip" or strong psychedelic effects cannot be controlled. Microdosing is the ideal way to get a safe and comfortable introduction to the world of psychedelics.
#### **When should microdoses be stopped?**
⛔️ If "entry syndrome" (nausea, feeling cold, salivation, gastrointestinal cramps, dizziness, headache) lasts longer (1 hour or more) during the first 1-2 weeks of microdosing.
⛔️ If the "entry syndrome" doesn't disappear and isn't reduced after 1-2 weeks of microdosing.
⛔️ Decrease of energy and general activity, drowsiness, weakness, dizziness, headache, increase/decrease of blood pressure during the days of taking microdoses.
⛔️ Decreased cognitive functions.
⛔️ Any negative effects of the body (physical and psycho-emotional).
#### **Contraindications for mushroom microdosing**
⛔️ Age under 18 years
⛔️ Pregnancy
⛔️ Breastfeeding period
⛔️ Mixing microdoses with alcohol and any drugs
⛔️ Microdosing in parallel with the use of antidepressants, tranquilizers
⛔️ Rehabilitation period after injury and/or surgery
⛔️ Chronic heart problems (arrhythmia, tachycardia, brachycardia, sinus rhythm disorder, heart failure and others).
⛔️ During exacerbation of gastrointestinal diseases (ulcers, ulcerative colitis, acute gastritis, intestinal obstruction, intestinal adhesions, etc.)
⛔️ In states of acute stress or panic attack
⛔️ Diagnosed mental illness
⛔️ For fun
Microdosing is a responsible process that should be approached with proper preparation and awareness. First of all, answer yourself the question «Why did I decide to start microdosing?
Stick to your individual dosage throughout the entire microdosing course and follow the schedule of intake. Listen to yourself and how you feel.
Make sure you are aware with basic microdosing principles and pass the [**QUIZ**](https://shroomok.com/en/are-you-ready-for-magic-mushroom-microdosing-quiz/)
#### Support Shroomok
If you find my work, articles, advices I've sharing helpful you can support Shroomok in the following way.
🍄 [**Buy Shroomok a mushroom**](https://www.buymeacoffee.com/shroomok) as a donation and say something nice!
Join Shroomok Growers Community, ask questions and share your experience in [Discord](https://discord.com/invite/ngKhQDmymD) and [Reddit](https://www.reddit.com/r/Shroomok/)
Take care!
Peace, Shroomok 🤍
## Psilocybine magic mushroom capsules for microdosing
[Psilocybine magic mushroom capsules for microdosing](https://shroomok.com/en/wiki/Psilocybine_magic_mushroom_capsules_for_microdosing)
[](https://shroomok.com/en/wiki/File:Capsules-with-mushroom-powder-for-microdosing.jpg) DIY capsules with mushroom powder### How to make capsules with mushroom powder for microdosing
Capsules with mushroom powder is the most convenient way for taking mushroom microdoses. This method saves your time and helps to take constant dosage every time, that is very important.
For a conscious microdosing follow the schedule and take a break between microdosing courses. If you don't know exactly your own microdose you can prepare capsules of different weights and determine it experimentally during your calibration period.
> ❗️Check out: [**Mushroom Microdosing Guide**](https://shroomok.com/en/wiki/Magic_mushrooms_microdosing "Microdosing psilocybin mushrooms (psilocybe cubensis)")
Before making capsules for microdosing many questions arise. Let's figure out!
#### How much mushroom powder contains in one capsule? Capsule size for mushroom microdosing
Capsule sizes and approximate content of powder in their volume are given in the table below.
[](https://shroomok.com/en/wiki/File:Common-capsule-sizes.jpg) Table of capsule sizes and volumes for psilocybe cubensis microdoses> \#00 or #0 or #1 are optimal sizes
On the photo below you can see **"0" size hard vegetarian stomach-soluble capsules** we used for preparation mushroom microdoses. This capsule size allows you to adjust the **microdose up to 0.3g** of mushroom powder in one capsule
[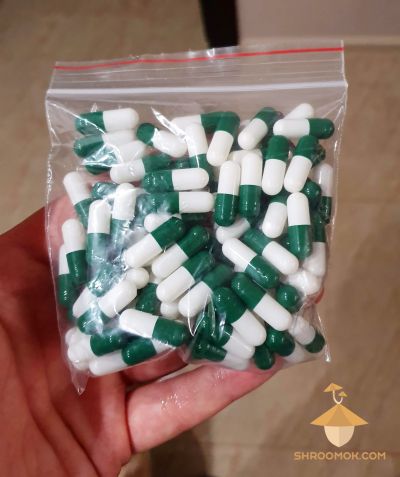](https://shroomok.com/en/wiki/File:Capsules-for-psilocybe-mushrooms-microdosing.jpg) Hard gelatin capsule "0" size (0.68 ml) - 100 pcs. Empty gastric soluble capsules for mushroom microdosingThe weight can be adjusted based on your individual microdose. It's easy to guess if you need 0.4 grams, then prepare 2 capsules 0.2g each.
#### What capsules to choose for mushroom microdosing?
Stomach-soluble or intestine-soluble? Gelatin or Vegetarian?
There are capsules soluble in the stomach and capsules soluble in the intestines. For mushroom microdosing **choose stomach-soluble capsules**, as absorption of alkaloids with the stomach is a standard practice for microdosing.
**Vegetarian** or **Gelatin** capsules is up to you. It doesn't influence on microdosing effects at all. Choose according to your individual preferences and lifestyle.
#### DIY capsule filling for microdosing
[](https://shroomok.com/en/wiki/File:How-to-prepare-capsules-for-microdosing-psilocybe-mushrooms.jpg) Preparation capsules for microdosing psilocybin mushrooms at home**What you need for making capsules for microdosing:**
**1. Dry Mushrooms.** They should crumble easily, like chips. If mushrooms aren't dried enough, you won't be able to turn them into a powder
> 🔴 Recommended: [**How to Dry and Store Magic Mushrooms**](https://shroomok.com/en/wiki/How_to_dry_and_store_psilocybe_mushrooms "How to dry and store psilocybe mushrooms")
**2. Empty stomach-soluble capsules.** Use #00 or #0 or #1.
**Shroomok's Choice on Amazon:**
[Size **00** - Empty **Vegan** Capsules - 100/500/1000 Count - Dif. Colors](https://www.amazon.com/gp/product/B07X5N553Y/ref=as_li_tl?ie=UTF8&tag=shroomok-20&camp=1789&creative=9325&linkCode=as2&creativeASIN=B07X5N553Y&linkId=6fac8d7161d74fce9a8395236f7699d2) - $7.89
[Size 0 - Empty **Vegan** Capsules - 100/500/1000 Count - Dif. Colors](https://www.amazon.com/gp/product/B07X6KT8LC/ref=as_li_tl?ie=UTF8&tag=shroomok-20&camp=1789&creative=9325&linkCode=as2&creativeASIN=B07X6KT8LC&linkId=d92d3177dd8c41b5936b8bcebd841a87) - $6.99
**3. Jewelry** or **Medical** or **Laboratory milligram scales.**
It is important to know the exact weight of each microdose. Never take microdoses on eye!
**Shroomok's Choice on Amazon:**
[Digital Mini Scales - Capacity 200g, Accuracy 0.01 g](https://www.amazon.com/dp/B07XL756FP?&linkCode=ll1&tag=shroomok-20&linkId=23b63fbc9b462bbe7e6ccb7ebbfa07cd&language=en_US&ref_=as_li_ss_tl) - $10.99
**4.** **Coffee grinder** to turn dried mushrooms into powder
**Shroomok's Choice on Amazon:**
[Stainless Steel Coffee Grinder w/Cleaning Brush, Different Designs](https://amzn.to/3IHwzPx) $23.95
**5.** **Tweezers** or **Capsule Filling Tools** for fast and easy capsule filling.
You can also use Capsule Filling Machine for fast filling a bunch of capsules (100 capsules at a time). However you don't need so much at once.
**Shroomok's Choice on Amazon:**
[Capsule Filling Kit for Pill Filler](https://amzn.to/42f9r1R) $9.99 - for filling capsules one by one
#### DIY microdosing capsules
**1.** Grind dried mushrooms in coffee grinder. Open capsule's cap and fill it with mushroom powder. Tamp it with Tweezers or Capsule tamper
[](https://shroomok.com/en/wiki/File:Psilocybe-mushrooms-capsules-for-microdosing.jpg) Preparation capsules for microdosing psilocybin mushrooms. Put grinded psilocybe cubensis powder in a capsule and tamp it down with tweezers
**2.** Close your capsule. Check the weight with **milligram scales.** When weighting a capsule note that the weight of empty capsule is 0.05 grams.
**3.** Store ready-made capsules for microdosing in the refrigerator or dark place at room temperature. Take microdoses according to your schedule
[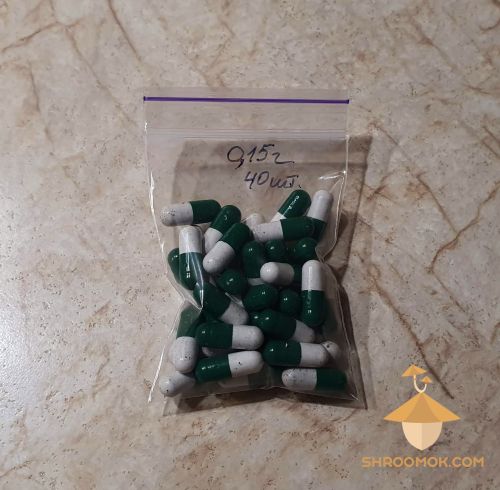](https://shroomok.com/en/wiki/File:Ready-to-use-mushroom-capsule.jpg) Ready to use microdoses of psilocybin mushrooms (0,15 gram/capsule) for storing in refrigerator and further consumption according to microdosing scheduleIf you find this guide helpful you can 🍄 [Buy Shroomok a mushroom as a donation](https://www.buymeacoffee.com/shroomok) and say something nice!
Take care!
Peace, Shroomok 🤍
## How to prepare for psychedelic mushroom trip
[How to prepare for psychedelic mushroom trip](https://shroomok.com/en/wiki/How_to_prepare_for_psychedelic_mushroom_trip)
### All you need to know about mushroom trip: preparation, dosage, side effects, contraindications, recovery after tripping
#### Disclaimer
Hey Humanity!
Remember! No one guide save you from facing with yourself and your fears.
Mushrooms are not a silver bullet or pill against all problems. Mushrooms are just a tool.
YOU and only YOU are responsible for the possible consequences when using psychoactive substance.
All materials in this article are only recommendations according to our own experience. They are meant to encourage you to think and take responsibility for your actions.
[](https://shroomok.com/en/wiki/File:Mushroom-trip-guide-2.jpg) How to prepare for psychedelic mushroom trip#### Introduction
Mushroom is a unique tool. It should be used with specific intentions, goals and proper physical and psycho-emotional preparation.
This is not just a way to have fun and look at visual effects. There is much more to it.
In this section we will not talk about psychedelic experiences, because for each person it is a unique, unforgettable and intimate experience.
We'd like to warn you that the effect can be severe or scaring.
Therefore, you should prepare well. Knowing about all the pitfalls you can relax and enjoy magic trip.
Psilocybin mushrooms are powerful stimulant of nervous system. Therefore, in this section we will cover everything you need to remember BEFORE, DURING, and AFTER your psychedelic trip. It will help you to be prepared physically for the trip, maintain emotional balance, and recover after psychedelic experience.
#### Psilocybin mushrooms are contraindicated
⛔️ People under 18 years.
⛔️ Pregnant women and during breastfeeding period.
⛔️ People with epilepsy or latent epilepsy.
⛔️ People with schizophrenia or latent neuropsychiatric disorders.
⛔️ People with chronic heart disease.
❌ Do not consume psilocybin mushrooms if you are sick (including colds), in post-operative period, or just for fun.
❌ Do not combine with stimulants or alcohol.
#### How to take psilocybin mushrooms for a psychedelic trip?
You can simply chew on whole dried mushrooms and wash them down with water.
If you don't like mushroom taste you can prepare chocolates with mushrooms. Take a look at [Magic mushroom chocolate recipes](https://shroomok.com/en/wiki/Magic_mushroom_chocolate_and_psilocybin_candy_recipes "Magic mushroom chocolate and psilocybin candy recipes")
Another option of consumption is Magic mushroom tea. Take a look at [Magic mushroom tea recipe](https://shroomok.com/en/wiki/Magic_mushroom_tea "Magic mushroom tea")
#### Dosage of psilocybin mushrooms for a psychedelic trip
If you have any doubts and fears don't take a trip dose. Your fears are the basis for the Bad Trip.
Check out [**How to deal and prevent Psychedelic Bad trip**](https://shroomok.com/en/wiki/How_to_deal_with_or_prevent_psychedelic_bad_trip "How to deal and prevent Psychedelic Bad trip") section.
Start your acquaintance with mushrooms with smooth and save microdosing.
Check out [**Psilocybin Mushroom Microdosing Guide**](https://shroomok.com/en/wiki/Magic_mushrooms_microdosing "Magic mushrooms microdosing").
Don't push yourself. Don't let anyone pressure you in this process. Don't force this path. Your acquaintance with mushrooms should be mutual and calm.
If you decide to take a trippy dose it is important to know the right dosage.
**Trip dose depends on many factors:**
🔺 Overall tolerance to psilocybin
🔺 Ingestion frequency of psilocybin mushrooms
🔺 Individual features of hormonal and nervous system
🔺 Metabolism
🔺 Different types of mushrooms have different concentrations of psilocybin. For example, Panaeolus is more powerful than Psilocybe Cubensis.
🔺 Terms and conditions of storage of mushrooms. With prolonged storage mushrooms gradually lose the concentration of psychoactive substances.
🔴 The dosage does NOT correlate directly with body weight.
🔴 It is impossible to know and measure the required concentration of psilocybin at home!
Every single mushroom has different psilocybin concentration.
Moreover, small mushroom or mushroom abort can be more powerful than mature mushrooms.
Fresh mushrooms have higher potency than dried. Dried mushrooms can lose up to 50% of psilocybin concentration.
How to store properly, dry and freeze psilolocybin mushrooms you can check in [**How to dry and store psilocybe mushrooms**](https://shroomok.com/en/wiki/How_to_dry_and_store_psilocybe_mushrooms "How to dry and store psilocybe mushrooms")
❇️ For the very first psychedelic experience **1.5 - 2.0 grams** **of dried** Psilocybe Cubensis mushrooms (or 10-15 g fresh) are sufficient. With such dose your trip will be calm. You'll get acquainted with all its charms and be able to control yourself and overall situation. You won't run away in an unknown direction, you will not harm yourself. Even with Bad Trip symptoms you will be able to cope with it (with help of experienced sitter).
❇️ For the next experiments you can take **2.5 - 3.5 grams of dried** Psilocybe Cubensis mushrooms (or 15-25 g fresh). The dosage is individual! It is important to analyze and take into account previous psychedelic experiences. Despite the fact that each trip will be unique and unrepeatable.
❇️ Dosages **from 5 grams of dried** Psilocybe Cubensis mushrooms (or from 40 grams fresh) **and higher** can be completely unpredictable and even dangerous for inexperienced person. This dosage can only be afforded by experienced psychonauts.
Use **Medical** or **Jewelry scales** to know the exact dose.
[](https://shroomok.com/en/wiki/File:Weighter-scales-for-weighting-magic-mushrooms.jpg) Scales for weighting mushroom microdose**Shroomok's Choice on Amazon:**
[Digital Pocket Jewelry Scales - Scale Capacity 200 g, Scale Accuracy 0.01 g](https://www.amazon.com/gp/product/B091678KNF/ref=as_li_tl?ie=UTF8&tag=shroomok-20&camp=1789&creative=9325&linkCode=as2&creativeASIN=B091678KNF&linkId=6a106202fe009e78bcebbda93f5fa7b8) - $10.75
[Mini Digital Jewelry Scale - Capacity 500g, Accuracy 0.01g](https://www.amazon.com/gp/product/B07H3CCY59/ref=as_li_tl?ie=UTF8&tag=shroomok-20&camp=1789&creative=9325&linkCode=as2&creativeASIN=B07H3CCY59&linkId=c0230409c605193608d3f1bebfb48d59) - $10.99
[Professional USB Milligrams Scale - Capacity 50g, Accuracy 0.001g](https://www.amazon.com/gp/product/B07XXYHWJD/ref=as_li_tl?ie=UTF8&tag=shroomok-20&camp=1789&creative=9325&linkCode=as2&creativeASIN=B07XXYHWJD&linkId=0e26751f9eea9db98d26e35ffdaf0100) - $22.78
[All in One: Scales, Case, Tweezers, Calibration, Weighing Pans - Capacity 50 g, Acuracy 0.001g](https://www.amazon.com/gp/product/B011J88S8M/ref=as_li_tl?ie=UTF8&tag=shroomok-20&camp=1789&creative=9325&linkCode=as2&creativeASIN=B011J88S8M&linkId=162d89981048c3558625cdff8245135c) - $37.99
#### Psilocybin mushroom adverse reactions and entry syndrome
Taking mushrooms can cause a variety of physical discomfort. It can be minimized or even avoided by proper preparation for the psychedelic trip. You must be aware of them so as not to panic.
🔴 **Nausea.** With a right diet nausea may be minor or absent. It also depends on the dose.
🔴 **Stomach pain and gastrointestinal cramps.** It would be better to postpone psychedelic trip for a period of exacerbation of gastritis or ulcers.
🔴 **Soft intestinal stool.** When entering a trip there is often a desire to go to the toilet "in a big way." This is a normal reaction. It is also a mushroom hint that after the trip you should also pay attention to some detox for your body.
🔴 **Dizziness.** Normal reaction before starting visual effects.
🔴 **Fever and chills.** This is a normal reaction that lasts about 30 minutes.
🔴 **Increased salivation.**
🔴 **Sweating.** It comes closer to the middle or to the end of trip, when the body temperature drops.
🔴 **Rapid heartbeat and increased heart rate.**
All these are symptoms of the "trip entry syndrome". In general they last up to 1 hour.
After Entry Syndrome all of your senses will be more receptive (sounds, tastes, smells, visuals, tactile sensations).
As you close your eyes you'll see a range of colorful visual effects. Various figures and worlds in the form of mandalas or images of gods and elves. The world will become much brighter.
Everything around begins to move, breathe and the limits of the outer world, the macrocosm, are erased to the borders of the inner microcosm.
#### Trip timing
❓ **When do the first signs of Entry Syndrome appear?**
The magic mushrooms begin to work approximately 20-60 minutes after ingestion. Sometimes the first effects are noticeable within 10 minutes.
**❓ How long does the psychedelic mushroom trip last?**
The psychedelic trip lasts 3-6 hours. After that, the effect of the mushrooms gradually fades away.
The first hour is a "trip entry syndrome", when side reactions appear and a transition to the trip state occurs.
The next 2-3 hours of trip are the brightest and most intense.
#### Preparing for a psychedelic trip
[](https://shroomok.com/en/wiki/File:Psychedelic-mushroom-trip-preparation-set-and-setting.jpg) Mushroom trip preparation, set and settingProper preparation reduce side effects, which usually appear 20-60 minutes after consumption.
**There are 3 important things to take into account before tripping:**
1. **Physical preparation** — nutritional diet and general nervous system preparation.
2. **Human environment** — tripping with sitter, in a group of people or alone.
3. **Set & Setting** — preparation of the space and environment for the trip (home space, trip in nature, walking). Psychological preparation, informational diet, psycho-emotional attitude.
❗️During psychedelic trip your brain will work hard. It engages and uses many vital resources in a very short time.
❗️ It is important to prepare your body for such experience, so that during and after the tripping you won't feel weak and exhausted.
##### **Physical and informational preparation before a psychedelic trip**
This preparation starts 3 days (preferably 1 week) in advance. Perfect if all or some of these points are the foundation of your life style:
✅ Quit alcohol.
✅ Avoid heavy food. Follow lean vegetarian diet. Eat cereals, vegetable soups, fruits, vegetables, dried fruits, juices, tea. Eliminate meat, fat and fried food. Ideally to do a fasting day before the trip, or even go hungry.
Such diet will relieve the digestive tract and liver. This helps ease the nausea during the trip and provide a cushion for the liver to be loaded during the trip.
✅ Start consuming vitamins or food containing **B-vitamins** and **Magnesium**. They are important for nervous and immunity system support. Because your brain will work at its maximum capacity during the trip.
**Shroomok's Choice on Amazon:**
[**Magnesium** 500 mg | Vegan | 100 Caps.](https://www.amazon.com/gp/product/B00A7HDABW?&linkCode=ll1&tag=shroomok-20&linkId=3029817a1dab952190694e8c5b9b1bf8&language=en_US&ref_=as_li_ss_tl) - $9.63
[**Magnesium Complex** Capsules 500mg | 120 Caps.](https://www.amazon.com/gp/product/B094J1N8PF?&linkCode=ll1&tag=shroomok-20&linkId=8a4b1dff7c4c187bec18d91576960db8&language=en_US&ref_=as_li_ss_tl) - $13.95
[**Magnesium 250 mg** | Formulated for Enhanced Absorption | 240 Caps.](https://www.amazon.com/gp/product/B00Y3NPVMC?&linkCode=ll1&tag=shroomok-20&linkId=688b2b3b4b4719662a62a0e1d0ef28a1&language=en_US&ref_=as_li_ss_tl) - $33.47
[**B Complex**, Supports Immune and Energy Metabolism | Vegan | 65 Caps.](https://www.amazon.com/gp/product/B071J572QG?&linkCode=ll1&tag=shroomok-20&linkId=133f8395e4a0d08dd834de088e6537e5&language=en_US&ref_=as_li_ss_tl) - $14.34
[**Vitamin B Complex** (Vitamin B1, B2, B3, B6, B9, B12 Folic Acid) | 100 Caps.](https://www.amazon.com/gp/product/B0006ZNFMO?&linkCode=ll1&tag=shroomok-20&linkId=8dfb00f78399403bbcd5efa5332ad01d&language=en_US&ref_=as_li_ss_tl) - $19.97
[**Vitamin B Complex & Vitamin C** - Immune & Nervous System Support | Vegan | 250 Caps.](https://www.amazon.com/gp/product/B08KGXBF43?&linkCode=ll1&tag=shroomok-20&linkId=89db66bafdc77fe1e191c6f23c94c69b&language=en_US&ref_=as_li_ss_tl) - $14.99
[**B Complex** – Complete Formula for Vitamin B Benefits | Vegan | 60 Caps.](https://www.amazon.com/gp/product/B00DHTQNQ6?&linkCode=ll1&tag=shroomok-20&linkId=1a933311ac409718105aa9bb9739912e&language=en_US&ref_=as_li_ss_tl) - $9.98
[**Super B Complex Vitamins** - B1, B2, B3, B5, B6, B7, B9, B12 Folic Acid | Vegan | 90 Caps.](https://www.amazon.com/gp/product/B07414752B?&linkCode=ll1&tag=shroomok-20&linkId=593084a08b693109e4d8ae9eff50d700&language=en_US&ref_=as_li_ss_tl) - $16.49
✅ Practice information hygiene. Exclude stressful news, social networks for your information diet. It would be better to read a good book, watch a documentary, listen to music, playing music, walking, spend time for hobbies.
✅ Try to avoid stressful situations.
##### Preparation on the day of taking psilocybin mushrooms
You should get a good night's sleep and rest.
It is advisable nothing to eat this day. Psilocybin is more efficiently absorbed on an empty stomach and there will be fewer side effects in the form of nausea. After eating mushrooms your appetite will be instantly reduced to zero.
Better to organize your trip on a weekend. Greta if the next day you have a day-off for rethinking, post-effects, relax and restore your body.
In order not to lose your biorhythms, take mushrooms before 17:00 - 18:00. Then you can fall asleep by midnight. If you take mushrooms in the evening you should understand your trip can drag on for the whole night.
In some situations people specifically take mushrooms at night (silence, nobody disturb you, children sleep, etc.). In addition, in a dark room are always brighter visual effects.
In most ancient cultures the ceremony takes place from sunset to sunrise. A wonderful time of silence when the evening begins and you head out into the night.
If you decide tripping at home, then make cleaning in advance, prepare a relaxing place, candles, calm music, musical instruments, stuff for art etc.
If you are fond of creativity, you may want to draw, play musical instruments, record something during a trip, etc. Have everything you need for a hobby at your fingertips.
Prepare a blanket or warm cloth. During the tripping there will be a feeling of chills due to the increasing body temperature. It can even be during the hot season of the year.
Be sure to prepare mineral water (not soda!) or **water with electrolytes** to restore the conduction of signals from the nervous system. **You definitely need to drink every 30-60 minutes!** This is often forgotten during a trip. You don't need dehydration!
**Shroomok's Choice on Amazon:**
[Coconut Water Powder HYDRATE ORIGINAL | No Added Sugars | Gluten Free | Vegan - 8 oz](https://www.amazon.com/gp/product/B0748ZCLX4?&linkCode=ll1&tag=shroomok-20&linkId=8e6d9887ed25899a458b253292fbf02c&language=en_US&ref_=as_li_ss_tl) - $14.81
[Organic Electrolyte + Mineral Powder, No Added Sugar](https://www.amazon.com/gp/product/B08KGPJJ7D?&linkCode=ll1&tag=shroomok-20&linkId=388d1bcb4ba6475631eac925195f28ca&language=en_US&ref_=as_li_ss_tl) - $14.99
[Electrolyte Supplement Drink Mix | Single-Serving Sticks | Low Sugar - 16 Count](https://www.amazon.com/gp/product/B01IT9NLHW?&linkCode=ll1&tag=shroomok-20&linkId=44f0b695cd5ccf44bebcf75a4a31654c&language=en_US&ref_=as_li_ss_tl) - $23.95
If this is your first time eating magic mushrooms, it is not recommended to go to any parties. Spend this time for observing your feelings. Stay with yourself.
##### Trip with a sitter
If this is your first time taking mushrooms, don't do it alone. The first trip and the experimental high dose mushroom trips are better to take with an experienced sitter.
The presence of sitter gives a sense of calm and wellbeing. Sitter remains completely sober during the trip. Therefore, you can fully focus on yourself.
Sitter is someone who takes care of you during your whole journey and does so discreetly. He observes and notices your needs, so that you are not distracted by trifles.
For example, he/she will give you a glass of water.
Sitter notices when you are cold and cover you with a blanket.
He/she can calm you down if you are confused. The sitter helps you stay calm and fully experience the trip.
Sitter should not act like a psychologist or psychoanalyst. He is silent for the whole trip, calmly observes, does not distract with conversations and questions.
**Sitter shouldn't guide the trip!**
The best option for a sitter is a trusted friend of yours who understands how to trip. Or an experienced psychonaut.
Sitter's role is a passive contribution to your trip.
Sitter can guide, soothe, touch you only if something goes wrong and you slide into a Bad Trip. In other cases sitter is a passive observer.
##### Group trip
If you decide to do a trip with a group of people, do it in a small group. 2-4 people is the best option. Otherwise, you will really interfere with each other and clog the air. Each participant can be on his own wave and it is important not to pull back or interrupt each other.
If no one in the group has experience with psilocybin mushrooms, we suggest choosing a responsible “senior” and that person should take a lower dose than the others.
In a group trip the most important thing is the trust between participants. You must coordinate your actions BEFORE the trip. For example, someone will offer to listen to music, while the other person needs silence. It is important to discuss such things in advance, before tripping.
##### Trip in nature
Make sure to "pack" a few days before the trip. Fill your brain with interesting information from books, documentaries, or just walk around, reflect and write down your own thoughts and questions. Don't litter your head with trash information.
📍 Plan in advance the location for your psychedelic journey.
☀️ Tripping in nature should be during the daytime.
🚴♀️ Don't drive a car! Before starting a trip, you must clearly think about how you will get to your destination and how to come back home.
🌦 Pay attention to weather forecast and arrange in advance what you need to bring with you in case of rain and some insect protection etc. Regardless of the weather forecast take a warm blanket or warm clothes with you.
🧻 Be sure to take a toilet paper. It is not a joke! The mushrooms will help you with "detox" before entering the trip. You must be fully armed!
💧 Take mineral water (not soda!) or water with electrolytes. You can take hot tea with you in a thermos. Remember to drink every hour.
👥 Inform somebody (for example, your close friend) where are you going. Not necessary with details about the main purpose.
##### Surrounding area
[](https://shroomok.com/en/wiki/File:Golden-teacher-effects-and-trip.png) Surrounding area and set&setting for tripping
For most people their first trip is an unforgettable experience. The environment for tripping has a big impact on how you feel during a trip.
The body under the influence of psychedelics has a very subtle sense of nature and space. The weather has a particular impact. Try to eat mushrooms in good clear weather.
The moon and lunar cycles affect the fluids in our body, which make up 80% of our body. Try to refrain from psychedelic trips on the 19-th and 29-th lunar days. You may think this advice is something like esoteric, but it is not. The influence of the Moon on the world's oceans is incredible! So why do you think the Moon does not affect the human body!?
Always start a trip in a pleasant, comfortable and familiar place. It should be calm and safe in this place. Your home is a great place for your first mushroom trip.
You can also go outside, into a garden, park, forest or field.
But the bustling city is not the best place. The tranquility and beauty of nature works much better.
It is not recommended, especially during the first trip, to make contact with the "outside world". For example, appearing in public, calling friends, sticking to the phone, messaging, or going to parties.
Mushroom is not a party psychedelic!
It would be better turn off your phone and do without the Internet, so that you can fully immerse yourself in the atmosphere and focus on your feelings without being distracted.
##### **Set & Setting**
It is not recommended to go on a psychedelic trip after a stressful day or a traumatic event. Why?
A trip can focus on negative emotions and events. This can be an extremely difficult journey called the Bad Trip.
> Check out [**How to deal with or prevent psychedelic Bad Trip**](https://shroomok.com/en/wiki/How_to_deal_with_or_prevent_psychedelic_bad_trip "How to deal with or prevent psychedelic bad trip")
A large group of strange people can occur bad influence. Except the groups are led by an experienced shaman.
Examples of favorable settings: nature, where there is no hustle and bustle of civilization; a clean bedroom with dim lights, a pleasant landscape, or a favorite quiet place where no one will disturb you.
Prepare your favorite music, your favorite blanket and things for psychedelic creativity.
#### Recovering after psychedelic trip
❇️ Drink **mineral water** or **water with electrolytes** to rebalance your body.
**Shroomok's Choice on Amazon:**
[Coconut Water **Powder HYDRATE** ORIGINAL | No Added Sugars | Gluten Free | Vegan - 8 oz](https://www.amazon.com/gp/product/B0748ZCLX4?&linkCode=ll1&tag=shroomok-20&linkId=ccbc7630d1d41f0be71464a3e6453841&language=en_US&ref_=as_li_ss_tl) - $14.81
[Organic Electrolyte + Mineral Powder, No Added Sugar](https://www.amazon.com/gp/product/B08KGPJJ7D?&linkCode=ll1&tag=shroomok-20&linkId=dceb1ecbf2fc385183847b77dabb66a2&language=en_US&ref_=as_li_ss_tl) - $14.99
[**Electrolyte** Supplement Drink Mix | Single-Serving Sticks | Low Sugar - 16 Count](https://www.amazon.com/gp/product/B01IT9NLHW?&linkCode=ll1&tag=shroomok-20&linkId=20796c89a6bc809376db28d1a6541ddc&language=en_US&ref_=as_li_ss_tl) - $23.95
❇️ Add vitamins or eat food with high **vitamin B** for Immune and Nervous System Support.
**Shroomok's Choice on Amazon:**
[Solgar B-Complex (B1, B2, B3, B6) | Vegan | 100 Caps.](https://www.amazon.com/dp/B000RZQNV8?&linkCode=ll1&tag=shroomok-20&linkId=d29d25487b88948f064867813ef841a8&language=en_US&ref_=as_li_ss_tl) - $17.94
[**B Complex**, Supports Immune and Energy Metabolism | Vegan | 65 Caps.](https://www.amazon.com/gp/product/B071J572QG?&linkCode=ll1&tag=shroomok-20&linkId=133f8395e4a0d08dd834de088e6537e5&language=en_US&ref_=as_li_ss_tl) - $14.34
[**Vitamin B Complex** (Vitamin B1, B2, B3, B6, B9, B12 Folic Acid) | 100 Caps.](https://www.amazon.com/gp/product/B0006ZNFMO?&linkCode=ll1&tag=shroomok-20&linkId=8dfb00f78399403bbcd5efa5332ad01d&language=en_US&ref_=as_li_ss_tl) - $19.97
[**Vitamin B Complex & Vitamin C** - Immune & Nervous System Support | Vegan | 250 Caps.](https://www.amazon.com/gp/product/B08KGXBF43?&linkCode=ll1&tag=shroomok-20&linkId=89db66bafdc77fe1e191c6f23c94c69b&language=en_US&ref_=as_li_ss_tl) - $14.99
[**B Complex** – Complete Formula for Vitamin B Benefits | Vegan | 60 Caps.](https://www.amazon.com/gp/product/B00DHTQNQ6?&linkCode=ll1&tag=shroomok-20&linkId=1a933311ac409718105aa9bb9739912e&language=en_US&ref_=as_li_ss_tl) - $9.98
[**Super B Complex Vitamins** - B1, B2, B3, B5, B6, B7, B9, B12 Folic Acid | Vegan | 90 Caps.](https://www.amazon.com/gp/product/B07414752B?&linkCode=ll1&tag=shroomok-20&linkId=593084a08b693109e4d8ae9eff50d700&language=en_US&ref_=as_li_ss_tl) - $16.49
❇️ Add vitamins or eat food with **Magnesium** content.
**Shroomok's Choice on Amazon:**
[Solgar Magnesium with B6, 250 Tablets](https://www.amazon.com/Solgar-Magnesium-Vitamin-250-Tablets/dp/B00020ICAI?&linkCode=ll1&tag=shroomok-20&linkId=92748176288adb780dff64718c02cbb6&language=en_US&ref_=as_li_ss_tl) - $16.82
[**Magnesium** 500 mg | Vegan | 100 Caps.](https://www.amazon.com/gp/product/B00A7HDABW?&linkCode=ll1&tag=shroomok-20&linkId=3029817a1dab952190694e8c5b9b1bf8&language=en_US&ref_=as_li_ss_tl) - $9.63
[**Magnesium Complex** Capsules 500mg | 120 Caps.](https://www.amazon.com/gp/product/B094J1N8PF?&linkCode=ll1&tag=shroomok-20&linkId=8a4b1dff7c4c187bec18d91576960db8&language=en_US&ref_=as_li_ss_tl) - $13.95
[**Magnesium 250 mg** | Formulated for Enhanced Absorption | 240 Caps.](https://www.amazon.com/gp/product/B00Y3NPVMC?&linkCode=ll1&tag=shroomok-20&linkId=688b2b3b4b4719662a62a0e1d0ef28a1&language=en_US&ref_=as_li_ss_tl) - $33.47
❇️ Add vitamins or eat food with high **vitamin C** content to support your body metabolism after tripping. Drink juices and eat fruits with high **vitamin C** content (orange, grapefruit, kiwi, pineapple, broccoli, cauliflower).
**Shroomok's Choice on Amazon:**
[Solgar Vitamin C 1000 mg, 250 Veg. Capsules](https://www.amazon.com/Solgar-Vitamin-1000-Vegetable-Capsules/dp/B00014D1QU?&linkCode=ll1&tag=shroomok-20&linkId=e8cb7582fbc2673b5d1df61844ddb936&language=en_US&ref_=as_li_ss_tl) - $27.81
[**Vitamin C w/Rose Hips, Acerola & Bioflavonoids** | 1000mg | Vegan | 250 Caps. as trip stopper](https://www.amazon.com/gp/product/B006H9RESE?&linkCode=ll1&tag=shroomok-20&linkId=65a477e300c155e1241cd8752c833c7f&language=en_US&ref_=as_li_ss_tl) - $26.09
❇️ **Don't eat too much especially heavy food right after tripping!** Prefer light food, fruits, vegetables and gradually move on to heavier food. The principle is similar to the way out of fasting.
❇️ Give yourself good **rest and sleep**. Healthy sleep is especially important for **nervous and immunity system** recovery.
Remember, preparing for a trip and recovering after tripping are very important for your health!
#### Afterword
Reflect and think about questions you would like to be answered during your trip.
Why do you need this experience?
Prepare and tune in for the trip like a real journey. This will be a journey to another world. Let go control and allow yourself to be observer.
Expect nothing.
Allow yourself to meet with yourself without conditional dividing into micro- and macro-
Be prepared for the thought of the trip and its post-effects to accompany you for about a month. It takes more time for insights, rethinking, changes and conclusions...
> 🔴 **Recommended:** [**Bad Trip: How to stay safe? How to reduce the effect of psilocybin mushrooms**](https://shroomok.com/en/wiki/How_to_deal_with_or_prevent_psychedelic_bad_trip "How to deal with or prevent psychedelic bad trip")
#### Support Shroomok
If you find my work, articles, advices I've sharing helpful you can support Shroomok in the following way.
🍄 [**Buy Shroomok a mushroom**](https://www.buymeacoffee.com/shroomok) as a donation and say something nice!
Join Shroomok Growers Community, ask questions and share your experience in **[Discord](https://discord.com/invite/ngKhQDmymD) and [Reddit](https://www.reddit.com/r/Shroomok/).**
Have a safe trip! Take care!
Peace, Shroomok 🤍
## How to deal with or prevent psychedelic bad trip
[How to deal with or prevent psychedelic bad trip](https://shroomok.com/en/wiki/How_to_deal_with_or_prevent_psychedelic_bad_trip)
[](https://shroomok.com/en/wiki/File:Bad-trip-illustration.png) Bad trip with psilocybin mushrooms### Mushroom Bad Trip experience
#### Disclamer
Hey Humanity, remember! No one guide save you from facing with yourself and your fears.
Mushrooms are not a silver bullet or pill against all problems. Mushrooms are just a tool.
YOU and only YOU are responsible for the possible consequences when using psychedelics.
All materials in this article is only recommendations according to our own experience. They are meant to encourage you to think and be responsible for your actions.
#### Psilocybin mushrooms are contraindicated
⛔️ People under 18 years.
⛔️ Pregnant women and during breastfeeding period.
⛔️ People with epilepsy or latent epilepsy.
⛔️ People with schizophrenia or latent neuropsychiatric disorders.
⛔️ People with chronic heart disease.
❌ Do not consume psilocybin mushrooms if you are sick (including colds), depressed, in post-operative period, or just want to forget and escape from worries.
❌ Never mix Psilocybin mushrooms with alcohol.
#### What is Bad Trip?
Bad Trip — is a slang expression, a state of fear and panic during a psychedelic trip session.
#### Bad trip causes and condition
If you have any doubts and fears don't take a trip dose. Your fears are the basis for Bad Trip.
Don't pressure yourself. Don't let anyone pressure you in this process. Don't force. Your introduction should be smooth, soft and relaxed. The main reason for the "bad trip" can be your own doubts and fears.
Those who take mushrooms for the first time may have negative feelings caused by uncertainty: "What have I done to myself?"
Or fear: "Will I ever get out of this trip?"
Both states are tricks of the mind. Your ego doesn't want to let go of control. This is the situation where panic can take control of you completely and put you in its time loop. You will walk in a vicious circle and be afraid to jump out of it. This state can last for hours.
Another example is when you completely lose control and your sense of time. You can find yourself in a frightening situation that has to do with your past (flashback) or present.
#### When Bad Trip can be helpful
Bad Trip experience can be a meeting with your hurt, pain and thoughts you need to let go. You can meet with real "Me" who can be scary. Or with your real desires you actually ignore and it makes you feel scared and hurt.
Such states are not dangerous. On the contrary, they work to expand your boundaries. The more difficult this process the more work is required of you.
Bad Trips can turn out to be even helpful trips. You acknowledge something, let go of something, understand something, rethink or learn something.
Try to turn this bad trip to your advantage. After all, there is a reason why you had such kind of experience.
#### How to deal with mushroom bad trip
Once the psychedelics start working you can't stop their effects. It is useless to resist! You can only accept it.
Bad thoughts, fears, traumas, resentments, worries and mental wounds cause a bad trip. Emotions that lie on the surface or deep mental wounds can have a particularly negative effect.
Of course, each person accumulates a different set of this junk over the course of his or her life. But what matters here is how far and deep this dump of emotional junk and fears is buried.
In this situation you need to try to calm down, breathe evenly, drink water and take bad thoughts as a process of clearing your mind.
Try not to panic when your mind is full of negative images and thoughts.
Don't look at the clock waiting for the moment when you finally let go.
First, you will have an altered sense of time.
And secondly, you will only concentrate on your fears in this way, thus driving yourself into a repeating and reinforcing loop of experience. This is a system with positive feedback loop. But the word "positive" in this case doesn't describe something good, but something that reinforces itself. There is a risk of sinking very deeply.
If a person slips into a bad trip it is important to have experiences sitter who can guide you in the right direction.
Sitter doesn't ignore pain or trauma. Doesn't walk away from the topic. Sitter is supposed to help the person through this pain.
At the same time, sitter helps not to get stuck in that state until the end of the trip and leads smoothly to the bright side of life.
If you feel you need to call somebody for help, contact someone who has experience with psychedelics. You can make arrangements in advance and warn this person to be your sitter during the trip in person or be available via phone.
Don't call close family members, as these people usually don't know how to help you. They can only make the situation worse by adding their panic. Perhaps even more than you panic.
#### How to reduce the effects of psilocybin mushrooms?
❇️ **Vitamin C** in pills (1000 mg), glass of orange or grapefruit juice can help to reduce the effects of psilocybin mushrooms.
**Shroomok's choice on Amazon:**
[Solgar Vitamin C 1000 mg, 90 Tablets](https://www.amazon.com/Solgar-Vitamin-1000-Mg-Tablets/dp/B000Z8WY3I?&linkCode=ll1&tag=shroomok-20&linkId=782699c35c7b9a131ef0a98016b4efa6&language=en_US&ref_=as_li_ss_tl) - $13.20
[**Vitamin C w/Rose Hips, Acerola & Bioflavonoids** | 1000mg | Vegan | 250 Caps. as trip stopper](https://www.amazon.com/gp/product/B006H9RESE?&linkCode=ll1&tag=shroomok-20&linkId=576710dc8f34514928152b7612066e01&language=en_US&ref_=as_li_ss_tl) - $25.99
❇️ **Valerian** pills are also effective in addition to vitamin C (1000 mg).
[Solgar Valerian Root Vegetable Capsules, 100 Count](https://www.amazon.com/Solgar-Valerian-Vegetable-Capsules-Count/dp/B0001VW3YY?&linkCode=ll1&tag=shroomok-20&linkId=e2b13c5f21dd03c5d35a4cddacdd1c17&language=en_US&ref_=as_li_ss_tl) - $31.80
❇️ **Glucose** pills are also effective in addition to Vitamin C (1000 mg) and Valerian.
[Fast-Acting Glucose Chewable Energy Tablets, Different tastes](https://www.amazon.com/dp/B08DJ67YC9?&linkCode=ll1&tag=shroomok-20&linkId=f797f32da1a608d1f1e4b418a84bbb7e&language=en_US&ref_=as_li_ss_tl) - $26.99
Sweet chocolate and sweet tea reduce the effects.
Sometimes a quiet calm walking can help. But it depends on the outside conditions. Noisy and crowded outside environments, on the contrary, cause anxiety.
Start your introduction to mushrooms with microdosing.
> 🔴 Recommended: **[Psilocybin Mushroom Microdosing Guide](https://shroomok.com/en/wiki/Magic_mushrooms_microdosing "Magic mushrooms microdosing")**
To reduce the risk of Bad Trip always prepare for your journey.
> 🔴 Recommended: **[How to prepare for psychedelic mushroom trip and recovering after tripping](https://shroomok.com/en/wiki/How_to_prepare_for_psychedelic_mushroom_trip "How to prepare for psychedelic mushroom trip")**
#### Support Shroomok
If you find my work, articles, advices I've sharing helpful you can support Shroomok in the following way.
🍄 [Buy Shroomok a mushroom as a donation](https://www.buymeacoffee.com/shroomok) and say something nice!
Join Shroomok community, ask for advice and share your trip report in [Discord](https://discord.com/invite/ngKhQDmymD) and [Reddit](https://www.reddit.com/r/Shroomok/)
Have a safe trips!
Peace, Shroomok 🤍
## Magic mushroom chocolate and psilocybin candy recipes
[Magic mushroom chocolate and psilocybin candy recipes](https://shroomok.com/en/wiki/Magic_mushroom_chocolate_and_psilocybin_candy_recipes)
[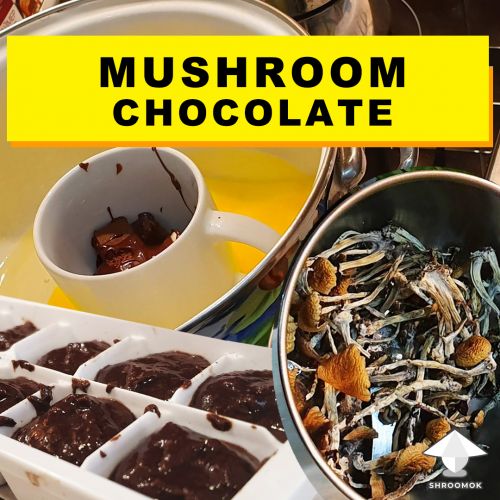](https://shroomok.com/en/wiki/File:Magic_mushroom_chocolate_recipe.jpg) Own mushroom chocolate is a great way to make sure you have total control over its quality. Also, it's another option to store shrooms for a long period### Magic Shroom Chocolate
This option of taking magic mushrooms especially appeal to those who don't like shroom taste and aroma. Chocolate masks it perfectly!
Moreover, chocolate (especially dark chocolate, 70% of cocoa and higher) has some additional benefits as the delivery system for psilocybin; it contains plant chemicals called flavanols (help to protect the heart), caffeine and magnesium (stimulate nervous system and improve cognitive function) and rich in antioxidants.
You can use shroom sweets for [psychedelic mushroom trip](https://shroomok.com/en/wiki/How_to_prepare_for_psychedelic_mushroom_trip "How to prepare for psychedelic mushroom trip") and [microdosing](https://shroomok.com/en/wiki/Magic_mushrooms_microdosing "Magic mushrooms microdosing").
It’s super easy to prepare a mushroom chocolate bar or homemade shroom candies.
#### 5 reasons you should make shroom chocolate at home
[](https://shroomok.com/en/wiki/File:Chocolate-sweets-with-magic-mushrooms.jpg) Chocolate with magic psilocybin mushroomsMaking your own shroom chocolate with your home grown shrooms is a great way to make sure you have total control over its quality.
1. **The quality of magic mushrooms.** As a mushroom cultivator you know everything about the quality of mushrooms you are going to add into chocolate: growing conditions, possible contaminations and diseases during the growing cycle, the quality of harvested mushrooms, how they were dried, storage conditions and how long they were stored before adding to chocolate.
2. **Dosage.** You can add any amount of dried magic mushrooms in chocolate bar and be sure about the dosage you take. It is extremely important for conscious microdosing course and tripping as well.
3. **Type and amount of sugar.** You can replace sugar with honey or syrup; make a low-carb chocolate with stevia; sugar-free chocolate with allulose sweetener or sea salt.
4. **Customize with your favourite add-ins.** Play with different tastes, the possibilities abound! dried fruits: freeze-dried strawberries, crushed banana chips, dried blueberries, candied fruits, coconut flasks; seeds: sesame, chia, hemp; spices: cinnamon, cardamom, vanilla, peppermint extract, a pinch of cayenne, coffee, sea salt; nuts: crushed pecans, pistachios, almonds, walnuts, peanuts or peanut butter.
5. **Vegan, dairy free, additives and allergens free.** Remove/replace any ingredient according to your personal diet and preferences. Create premium chocolate with high quality ingredients.
#### How to prepare magic mushrooms for shroom chocolate
The following steps apply to any mushroom chocolate recipe.
**Step 1. Dry magic mushrooms.**
The best way to dry shrooms is dehydrator ([Amazon](https://amzn.to/43nJa1D)). Set the temperature 95-122°F or +35°..+50°C. Drying time depends the weight of mushrooms and temperature (from 5 to 16 hours).
Properly dried shrooms should crisp like chips and have minimal color changes (not burned black!)
You can also dry shrooms with fan, heat fan, on radiator or in the oven (low heat mode).
> Read more: [How to dry and store magic mushrooms](https://shroomok.com/en/wiki/How_to_dry_and_store_psilocybe_mushrooms "How to dry and store psilocybe mushrooms")
**Step 2. Weigh the necessary amount of dry shrooms.**
Use high precision gram scale, jewellery or medical scales ([Amazon](https://amzn.to/3PXsRWu)).
Weight of mushrooms is up to you. It is based on your goals (for tripping or microdosing).
For instance, for microdosing add **3 grams of dried mushrooms.** Mixed them with chocolate, poured it into an ice cube tray (10 cells), so that on average each chocolate cube = 0.3g of mushrooms, which is average microdose.
For tripping you can add 10 grams of of dried mushrooms. Poured chocolate into an ice tray/mold (10 cells), so that on average each chocolate candy = 1g of mushrooms. You can add less or more, depends on your individual microdose or tripping dose.
**Step 3. Turn dry mushrooms into a powder** in a coffee grinder ([Amazon](https://amzn.to/43pcSU0))
Now your mushroom powder ready to use for any shroom chocolate recipe!
#### **Simple recipe of shroom chocolate**
[](https://shroomok.com/en/wiki/File:Mushroom-chocolate-simple-recipe.jpg) Ready mushroom chocolates##### Ingredients
1. Dry magic mushrooms (follow [Mushroom Growing Guide](https://shroomok.com/articles:grow-mushrooms-at-home-guide) to grow your own shrooms)
2. Your favourite chocolate bar ([Amazon](https://amzn.to/3ru78v5)). I prefer dark chocolate 70% of cocoa and higher. It lasts longer and higher in flavanols; though keep in mind the higher % of cocoa, the greater the bitter flavor.
##### Equipment
1. Gram scales
2. Coffee grinder
3. Ice tray or silicone chocolate/baking mold ([Amazon](https://amzn.to/3risXNV))
4. Cup or mug
5. Saucepan
6. Tablespoon
7. Stove
##### Shroom chocolate cooking
[](https://shroomok.com/en/wiki/File:Mushroom-chocolate-cooking-process.jpg) Psilocybin mushroom chocolate cooking process1. Weigh the necessary amount of dry mushrooms and grind them in a in a coffee grinder.
2. Melt chocolate over a double boiler. Break the chocolate bar into small pieces. Put it in a cup. Fill the saucepan with some water (about 1-2 inches) and put the cup in it. Turn on the stove top and bring the water to a gentle simmer over medium-low heat. In this way chocolate melts slowly and won't scorching. Melt slowly and stir continually. This may be done on a stove top on low heat or in a microwave oven on 50% power.
3. Add mushroom powder in a melted chocolate. Mix thoroughly.> Don't afraid to add shroom powder in warm chocolate, shrooms won't lose their potency. Usually I put shrooms when chocolate is around 60-70C or 140-160F
4. Pour chocolate evenly into the ice tray or silicone chocolate mold. Try to do it fast, because chocolate hardens quickly.[](https://shroomok.com/en/wiki/File:Chocolate-sweets-with-psilocybe-mushrooms.jpg) Chocolate sweets with magic mushrooms psilocybe cubensis
5. Let the magic sweets harden for 1-2 hours in the fridge or 20-30 minutes in the freezer. [](https://shroomok.com/en/wiki/File:Mushroom-chocolate-sweets-cooking-process.jpg) Mushroom chocolate sweets cooking process
6. Release chocolate bar/shapes from the ice tray/mold. Ready](https://shroomok.com/en/wiki/File:Mushroom-chocolate-sweets-for-microdosing.jpg) Mushroom chocolates for microdosing . Each candy has 0,25 gram of psilocybe cubensis
##### How and how long to store shroom chocolate
Store this shroom chocolate in a cool dry place (60-70F or 15-20C) in a tightly sealed food container.
Storing in refrigerator or freezer can promote the chocolate to “bloom,” a whitish coating caused by sugar rising to the surface due to excess moisture. It does not affect the flavor or quality, but does not look appealing. However while storing in freezer you can be sure that shroom chocolates are good.
Such pure dark chocolate lasts longer, than milk chocolate and homemade chocolate with additional ingredients (milk, milk butter, nuts, seeds etc).
If stored in freezer dark shroom chocolate lasts **up to two years.** Maybe longer, but I haven't been storing shroom sweets for longer than 2 years. Anyway, I know for sure from personal experience, that chocolates were good and shrooms didn't lose their potency for this time.
#### Homemade milk and white mushroom chocolate
[](https://shroomok.com/en/wiki/File:Chocolate-sweets-with-magic-mushroom.jpg) Magic chocolate with psilocybin mushrooms##### Ingredients
**for milk chocolate:**
1. Dry magic mushrooms
2. Cacao/cocoa butter or coconut oil ([Amazon](https://amzn.to/44Q8sa1)) - 1/2 cup
3. Unsweetened cacao/cocoa powder ([Amazon](https://amzn.to/44Gxpo6)) - 1/2 cup
4. Powdered sugar - 1/2 cup (use stevia, or erythritol as a substitution for sugar)
5. Dry milk powder or coconut/soy milk powder for a dairy-free version - 1/4 cup ([Amazon](https://amzn.to/3PYQfTj))
**for white chocolate (without cocoa):**
1. Dry magic mushrooms
2. Cocoa butter / coconut oil - 1/2 cup
3. Powdered sugar - 1/4 cup
4. Milk powder - 3/4 cup
> Optional: pinch of salt or sea salt, vanilla extract, spices, seeds, nuts for your choice
##### Equipment
1. High precision gram scales
2. Coffee grinder
3. Ice tray or silicone chocolate mold
4. Saucepan
5. Stir spoon or silicone spatula
6. Stove
##### Cooking
Step 1. Melt cocoa butter or coconut oil over double boiler method.
Step 2. Mix dry ingredients (cacao powder, sugar, milk powder and magic mushrooms powdered in a coffee grinded). Add them to melted cocoa butter. Whisk the chocolate paste.
Step 3. Pour the mixture in the ice tray or moulds.
Step 4. Let it harden in refrigerator for 1-2 hours or in a freezer for 20-30 mins.
Step 5. Remove from the mold. Ready!
##### Storage instructions
Store shroom chocolate in an airtight container in the fridge for 1 month or in the freezer up to 6 months.
#### **Craft mushroom chocolate recipe**
This recipe will appeal to those who want to make 100% craft chocolate from natural ingredients at home.
[](https://shroomok.com/en/wiki/File:Psilocybe-mushroom-chocolate-ingredients.jpg) Ingredients for making magic mushroom chocolate##### **Ingredients**
1. Dry magic mushrooms (Psilocybe Cubensis) - 3-4 grams (for microdoses) or 10-20 grams (for trip doses). In current recipe I added 3 grams of dried mushrooms (for microdosing).
2. Cocoa powder - 70 grams ([Amazon](https://amzn.to/44Gxpo6))
3. Milk butter or cocoa butter or coconut oil — 50-70 grams.
4. Wheat flour — 2 teaspoons.
5. Whole milk (use coconut/almond/soy milk for a dairy-free version) — 3-5 tablespoons.
6. Honey — 2-3 tablespoons (5-7 tablespoons for sweet tooth). Use sugar, cane sugar, stevia or sweetener instead of honey.
7. Pinch of sea salt.
8. Optional for decoration and additional flavor: sesame seeds, walnuts, vanilla extract, cinnamon, coconut flakes etc.
**Total: ~200 grams of mushroom chocolate**
##### Equipment
1. High precision gram scales.
2. Coffee grinder.
3. Ice tray or silicone chocolate/bakery mold
4. Saucepan
5. Stir spoon
6. Stove
7.
##### **Mushroom chocolate cooking**
**Step 1.** Melt the butter on the lowest heat or use a double boiler method.
[](https://shroomok.com/en/wiki/File:Psilocybe-mushrooms-chocolate-cooking-process.jpg) Step 1. Melt butter (70-100 grams)**Step 2.** Add wheat flour to the melted butter. Stir it. Then add honey or sugar/stevia/sweetener. The saucepan should just barely warm up. The temperature of the ingredients up to +70°C or 160°F (this is because I use honey and high temperature bad for honey).
[](https://shroomok.com/en/wiki/File:Psilocybe-mushrooms-chocolate-cooking-recipe.jpg) Step 2. Add flour (1,5 teaspoon). Add honey or sugar (1-3 tablespoons)
**Step 3.** While stirring, slowly pour the milk and mix thoroughly. You may use milk powder or vegan milk as well (e.g. coconut/almond/soy milk)
[](https://shroomok.com/en/wiki/File:Magic-chocolate-sweets-with-mushrooms-recipe.jpg) Step 3. Add milk (3-5 tbsp)
**Step 4.** While stirring all the ingredients slowly add the cocoa/cacao powder. Stir until a smooth mass is formed.
[](https://shroomok.com/en/wiki/File:Mushroom-chocolate.jpg) Step 4. Slowly add cocoa powder ~70 grams
**Step 5.** Add dried psilocybin mushrooms Psilocybe Cubensis. Mushrooms should be grinded into a powder (i.g. with coffee grinder). The weight of the mushrooms is up to you. This mixture can easily consist of 3-4 grams (for micro doses) or 10-20 grams (for trip doses). Stir thoroughly!
[](https://shroomok.com/en/wiki/File:Mushroom-chocolate-sweets-recipe.jpg) Step 5. Add dried grinded magic mushrooms and mix it well
**Step 6.** Prepare ice tray or any molds you have at home (silicone chocolate or bakery molds).
[](https://shroomok.com/en/wiki/File:Handmade-mushroom-chocolate-forms.jpg) Step 6. Prepare molds for magic chocolate
**Step 7.** Pour prepared mushroom chocolate into ice tray/chocolate mold. Then put it in the fridge and let your chocolates harden for 1-2 hours; in freezer for 20-30 mins.
[](https://shroomok.com/en/wiki/File:Mushroom-chocolate-sweets-cooking-process.jpg) Step 7. Pour chocolate with magic mushrooms into ice molds and put to fridge for 1-2 hours**Step 7.** Remove chocolate molds from the fridge. Take out chocolate candies. The chocolate will be soft a little - this is normal. You can roll the chocolates in sesame seeds, chopped walnuts or cocoa powder. The magic chocolate box is ready!
[](https://shroomok.com/en/wiki/File:Mushroom-chocolate-recipe.jpg) Step 7. Ready mushroom chocolateHere are 200 grams of chocolate = **20 sweets** which contain **3 grams** of dried mushrooms = **0.15g of shrooms per 1 sweet.**
If you divide your chocolate into **20 sweets** with **20 grams of dry mushrooms** = **1g of shrooms per 1 sweet.**
[](https://shroomok.com/en/wiki/File:Magic-mushroom-chocolate-candy-sweets-recipe.jpg) Chocolate sweets recipe with magic mushrooms Psilocybe Cubensis. Let's cook together!##### Storage instructions
This recipe includes such ingredients as butter and milk that can't last for a long time. Store this shroom candies in an airtight container in the fridge for 2-3 weeks or in the freezer up to 6 months.
#### Afterwords
Magic chocolates surprise anyone with its look and taste.
Play with different shapes, types of chocolate and ingredients to make unique magic sweets.
[](https://shroomok.com/img_orig/f84be5/4032_micro-and-some-macro-doses-chocolates-by-6u9.jpg) [Micro and some macro doses chocolates by 6~ʏʊƈǟ~9🍄](https://shroomok.com/en/wiki/File:micro-and-some-macro-doses-chocolates-by-6u9-1c3a6f)[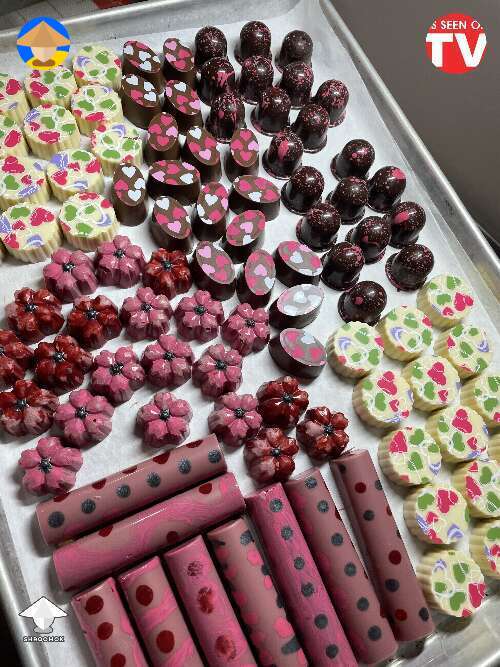](https://shroomok.com/img_orig/ece58b/4032_that-was-the-valentines-day-batch-mushroom-sweets-by-imaghost.jpg) [That was the Valentine’s Day batch - mushroom sweets by I’mAGhost](https://shroomok.com/en/wiki/File:that-was-the-valentines-day-batch-mushroom-sweets-by-imaghost-be0a09)Bon appetit! Take proper microdoses and have save magic trips!
If you find my work helpful support me with subscription or one-time donation on [buymeacoffee](https://www.buymeacoffee.com/shroomok)
Join Shroomok Community on [Discord](https://discord.com/invite/ngKhQDmymD) and [Reddit](https://www.reddit.com/r/Shroomok/) for questions and sharing your experience.
Peace, Shroomok 🤍
# Mushrooms Q&A
## How to store mushroom spore syringe
[How to store mushroom spore syringe](https://shroomok.com/en/wiki/How_to_store_mushroom_spore_syringe)
### How to store Mushroom Spore Syringes for a long time
***Liquid spore syringe*** is a sterile syringe with **mushroom spores** and **sterile water**. It is a fast method for substrate inoculation, agar inoculation or making liquid culture (LC). Spore syringe is easy to make by your own.
> 🔴 Recommended: [How to make Mushroom Spore Syringe](https://shroomok.com/en/wiki/Liquid_psilocybe_spore_syringe "Liquid psilocybe spore syringe")
What to do if you have ready to use spore syringe, but need time for growing preparation or postpone your cultivation process?
#### How long mushroom spore syringe can be stored?
Ready-made mushroom spore syringe if stored properly stay viable for mycological manipulations **up to 12 month** and even more.
#### What temperature should spore syringes be stored?
If you are going to start your mushroom growing process in the nearest 1-3 weeks, no problem to store spore syringe at room temperature **+20..25°C** or **68-77°F** in **dark place** and **airtight zip bag** for additional sterility.
For long term storage spore syringe should be stored in the refrigerator **at +2°..+8°C** or **35-46°F** in airtight zip bag.
#### How to use spore syringe after long term storage?
Shake the syringe thoroughly before inoculation to spread spores evenly in liquid.
> Spores can stick together over time and clot of spores formed. Shake spore syringe every few weeks to avoid it
#### Can spore syringe go bad?
Yes, if spore syringe was contaminated. Mold contamination usually not visible, but bacteria contamination is visible. You can see some kind of slime or turbid solution is formed in syringe.
Healthy spore syringe has transparent liquid!
#### Thin dust like threads in spore syringe. Contamination or not?
Sometimes you can find something like thin dust threads in liquid. They can appear after 2-3 weeks after making spore syringe. There are germinated spores and nothing to worry about. Moreover, such spores colonise substrate faster.
[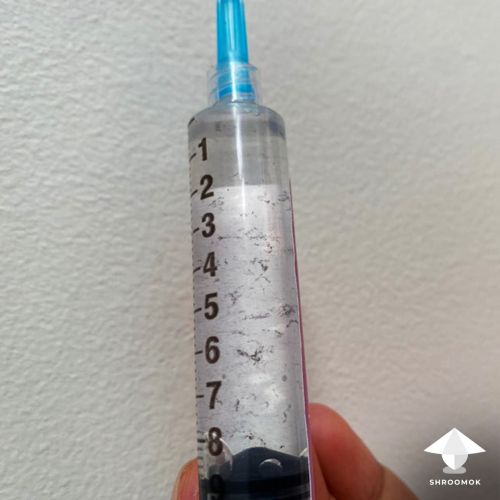](https://shroomok.com/en/wiki/File:Germinated-spores-in-spore-syringe.jpg) Germinated spores in spore syringe (like thin dust threads) is not contamination
Sometimes even mycelium is formed in syringe
[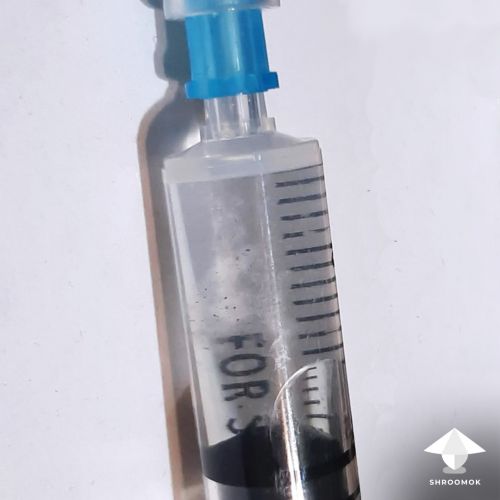](https://shroomok.com/en/wiki/File:Spore-syringe-to-store.jpg) Mycelium is formed in spore syringe
🍄 [Buy Shroomok a mushroom as a donation](https://www.buymeacoffee.com/shroomok), ask a question and say something nice!
Enjoy your home mycology!
## For how long dried Magic Mushrooms can be stored
[For how long dried Magic Mushrooms can be stored](https://shroomok.com/en/wiki/How_long_can_I_store_dried_Magic_Mushrooms)
[](https://shroomok.com/en/wiki/File:Do-shrooms-go-bad.jpg) Do magic mushrooms lose their potency over time or go bad?### Magic mushroom storage and potency loses over time
It is possible to store fresh magic mushrooms in the same way as any edible mushrooms. Cover them in baking paper or plastic bag and put in a refrigerator. But the storage time for fresh mushrooms only 4-5 days, then their tissues start to decompose, decay and shrooms go bad.
You can also freeze magic mushrooms, but improper freezing can spoil your harvest easy.
> Check out: [Does it make sense to freeze shrooms](https://shroomok.com/en/wiki/How_to_freeze_fresh_magic_mushrooms "How to freeze fresh magic mushrooms")
That's why so far **drying** magic mushrooms is the best and easy way **for long term storage.**
> Check out: [How to Dry Psilocybin Mushrooms](https://shroomok.com/en/wiki/How_to_dry_and_store_psilocybe_mushrooms "How to dry and store psilocybe mushrooms")
#### How long can I store dried psilocybin mushrooms?
Properly stored dried psilocybin mushrooms fully retain their properties and psychoactive alkaloids for **up to 2 years.**
#### Do psilocybin mushrooms go bad after years of storage?
After 2-3-4 years properly stored dry psilocybin mushrooms WON’T spoil. WON’T get worse or go bad. Magic mushrooms WON’T become poisonous or dangerous for consuming.
#### Dried mushrooms lose their potency over time?
As time passes, mushrooms slowly lose their magic. It means the main alkaloid's (psilocybin) concentration decreases over time. Therefore, shrooms are still edible, but become useless for [microdosing](https://shroomok.com/en/wiki/Magic_mushrooms_microdosing "Magic mushrooms microdosing") or [psychedelic trips](https://shroomok.com/en/wiki/How_to_prepare_for_psychedelic_mushroom_trip "How to prepare for psychedelic mushroom trip")
Using proper storage techniques of drying process and storage help to keep mushrooms safe and active.
#### Mushroom powder or ground mushrooms lose potency faster than whole mushrooms?
Powdered/ground mushrooms have a shorter life of alkaloids than dried whole mushrooms due to additional contact with oxygen. But with proper storage the lifetime can be pretty similar.
#### How to store dry magic mushrooms
[](https://shroomok.com/en/wiki/File:Dry-psilocybin-mushrooms-to-store.jpg) How long dry magic mushrooms can be storedMain rules for storage dry psilocybin mushrooms:
🔴 Mushroom should be well dried and crisp like cracker or fruit chips.
🔴 Store dry magic mushrooms in **airtight** zip bags, sealed bags or airtight jars. It is important to avoid contact with oxygen in order to keep psilocybin in mushrooms for longer.
🔴 Add food grade silica gel in each bag/jar to absorb moisture and keep shrooms dry.
🔴 Dry psilocybin mushrooms should be stored in a **dark place**. Avoid direct sunlight!
🔴 Dry magic mushrooms should be stored **in the refrigerator or at room temperature (+20°..+25°C or 68–77°F)** in a dark place.
❗️ Throw away mushrooms if you find powdery mold or slime on them!
Join Shroomok Community on [Discord](https://discord.gg/ngKhQDmymD) and [Reddit](https://www.reddit.com/r/Shroomok) for questions and sharing your experience.
If you find this guide helpful support my work with subscription or one-time donation on ☕️ [buymeacoffee](https://www.buymeacoffee.com/shroomok)
Have a shroomy day!
Peace, Shroomok ❤️
## How to store Mushroom Spawn for a long time and postpone Spawn to Bulk
[How to store Mushroom Spawn for a long time and postpone Spawn to Bulk](https://shroomok.com/en/wiki/How_to_store_Mushroom_Spawn_for_a_long_time_and_postpone_Spawn_to_Bulk)
[](https://shroomok.com/en/wiki/File:Spawn-jars-colonisation.png) Spawn jars colonisation### Mushroom Spawn storage
Let's figure out real case and real questions from member of Shroomok Growers Community in [Discord](https://discord.com/invite/ngKhQDmymD)
> Hi Shroomok, please help!
>
> Let me describe the situation.
>
> Spawn jars and spawn bags are fully colonised with healthy mushroom mycelium, everything is okay, I'm happy with results. But I need to keep them and postpone further mycological manipulations (casing or spawn to bulk) for a week or maybe two
[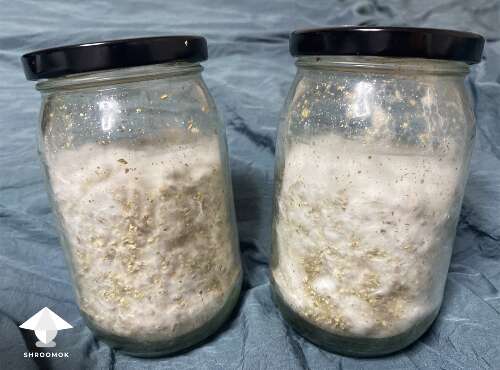](https://shroomok.com/en/wiki/File:Spawn-to-store.png) Colonised mushroom spawn> ❓Can Mushroom Spawn Jars and Spawn Bags be stored at room temperature (about 27°C or 80°F) in the dark place for 1-2 weeks?
>
> ❓Is it better to store spawn in the refrigerator or even in fridge till it's time for Spawn to Bulk and Casing?
>
> ❓How long can Grain Spawn be stored?
>
> ❓How can I "reanimate" mushroom mycelium for further steps and fruiting period?
>
> Thank you 🙏🏻
☝️**Answer from Shroomok**
#### How to store mushroom spawn in refrigerator?
Spawn Jars or Spawn Bags with healthy mycelium can be stored in the refrigerator **at +2°...+12°C (or 36-54°F)**. Optimal temperatures are **+5°...+8°C (or 41-46°F).**
#### Is it safe to freeze mushroom spawn?
**Not recommended!** It is believed too low temperatures **lower than 0°C or 32 °F** can destroy mycelium cells or even kill mycelium.
Actually, we know a real case when mycelium stored in -40°C or -40°F and its viability was fully retained. Actually, there is no advantage for exposing mycelium to such risks.
#### How long can I store mushroom spawn?
Shroomok can admit from own experience that you can store colonised grain spawn in the refrigerator for 1–2 months and everything will be fine for sure!
Storing in refrigerator is a kind of prolonged **[cold shocking](https://shroomok.com/en/wiki/All_you_need_to_know_about_cold_shock_for_magic_mushrooms "All you need to know about cold shock for magic mushrooms")**. In such way you can slow down the mycelium growth.
This option allows you to plan your growing process and postpone further manipulations if your life circumstances require it. Or if you plan Grain to Grain Transfer (G2G), so that you can easily share a single colonised quart spawn jar for about 5-10 jars via G2G transfer
> 🔴 Recommended guide: **[Grain to Grain Transfer (G2G)](https://shroomok.com/en/wiki/Grain_to_Grain_Transfer_(G2G) "Grain to Grain Transfer (G2G)")**
There are examples of longer storage of grain spawn from our subscribers — 3-4 months and even longer. As a result fruiting and harvesting were successful. There were admitted a slightly slowed down processes of top layer colonisation. Start of fruiting was delayed for a few days.
> Use the mushroom spawn within 2-4 months for the best results
#### How can I reanimate mushroom mycelium before spawn to bulk?
Before Spawn to Bulk and/or Casing small mushroom cakes just leave spawn jars/bags for 1–2 days at room temperature to get mycelium some time to wake up. Then continue your further cultivation manipulations.
> 🔴 Recommended: [How to make mushroom spawn guide. Step 1](https://shroomok.com/en/wiki/Choose_and_prepare_substrate_for_magic_mushrooms "Choose and prepare substrate for magic mushrooms")
> 🔴 Recommended: [DIY Incubator. Grain Colonisation. Problems during colonisation period](https://shroomok.com/en/wiki/Magic_mushrooms_incubator_control "Magic mushrooms incubator control")
🍄 [Buy Shroomok a coffee as a donation](https://www.buymeacoffee.com/shroomok), ask question and say something nice!
Have a happy growing!
## Mushroom Spore Print Storage
[Mushroom Spore Print Storage](https://shroomok.com/en/wiki/Mushroom_Spore_Print_Storage)
[](https://shroomok.com/en/wiki/File:Psilocybe-cubensis-spore-prints.jpg) Mushroom spore prints### Mushroom spore print lifetime and storage
Spores is the best way for mushrooms to save their population in nature. It is also the best way to save collection of species and strains for mushroom cultivator.
#### How long can I store mushroom spore prints?
☝️The guaranteed shelf life for spore prints is up to 5 years. For the first 2 years spores almost completely remain viable. Each spore print contains millions of spores (about 3-5% are capable of continuing life for the first 2 years of storage.
> 🔬 A laboratory case of spore germination after 20 years of storage is known. It means mushroom spores can be viable up to 20 years (maybe more, we know about 20 years experiment so far)
If spore print has been stored for 2 years or more a longer spore rehydration required for [Liquid spore syringe](https://shroomok.com/en/wiki/Liquid_psilocybe_spore_syringe "Liquid psilocybe spore syringe"). It helps to germinate spores faster. Each year of spore print storage increases the time of rehydration by 1 day. For example, 2 years of storage is 2 days of rehydration, 3 years is 3 days of rehydration, etc. Or you can just leave spores in sterile water in syringe for a week to let them wake up before further mycological manipulations.
#### How to store mushroom spore prints properly?
✅ Spore prints should be stored in sealed airtight zip bags in a cool dry dark place, preferably in the refrigerator or room temperature (+20°..+25°C or 68–77°F).
Once you get your first crop you can easily make your own spore prints and provide yourself with mushroom spores for years to come.
> 🔴 How to make spore prints from your own mushroom harvest check out in step-by-step guide [How to make magic mushroom spore prints](https://shroomok.com/en/wiki/How_to_make_magic_mushrooms_spore_prints "How to make magic mushrooms spore prints")
[🍄 Buy Shroomok a mushroom](https://www.buymeacoffee.com/shroomok) as a donation, ask a question and say something nice!
Have a happy growing and magic spore prints!
## Liquid spore vs Liquid culture
[Liquid spore vs Liquid culture](https://shroomok.com/en/wiki/Liquid_spore_vs_Liquid_culture)
[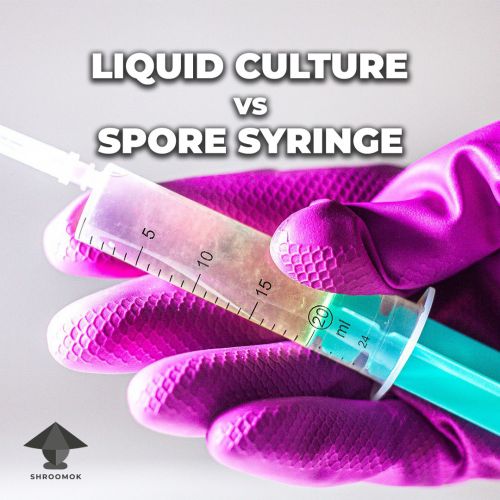](https://shroomok.com/en/wiki/File:Liquid-culture-vs-spore-syringe.jpg) Liquid culture syringe vs liquid spore syringe### What is the difference between Liquid spore syringe and Liquid culture?
Let's figure out how mushrooms multiply in mushroom cultivator experience.
Hope mycologists forgive me, because in this article we are going to skip scientific terminology and try to explain this process literally on the fingers and analogies.
Newbies always confuse liquid spore syringe and liquid culture (LC). But they are not the same thing!
🍄 For example, we have a mushroom with a cap. Each cap has spores underneath. It's like the seeds for plants. As long as they're under the cap they're moist.
When we have a spore print on our hands, those spores are dehydrated. That is, they are dry. Their cell shells are compressed toward the center to seal themselves. In this way they try to persist. And wake up to germinate if favorable climate conditions.
How can we initiate their awakening?
#### 1️⃣ **Liquid spore syringe aka spore suspension**
[](https://shroomok.com/en/wiki/File:Germinated-spores-in-spore-syringe.jpg) Spore syringe. Mushroom spores in sterile waterThe spore **suspension** is a syringe with mushroom spores and sterile water. This is how they get soaked in moisture and are ready to germinate. Without this rehydration, the spores will not germinate in the substrate.
🔴 This method takes more time for spores germination, mycelium development and substrate colonisation.
✅ But it is the easiest and fastest method for beginners.
✅ It doesn't require any special skills or experience.
✅ No need to use a glove box or [SAB](https://shroomok.com/en/wiki/Still_Air_Box_for_Mycology "Still Air Box for Mycology"). It's optional.
✅ This is a basic skill, which will come in handy for more complicated mushroom cultivation methods.
> How to make spore syringe. How to dilute it and get more material for grain inoculation? Check out: [**Liquid spore syringe**](https://shroomok.com/en/wiki/Liquid_psilocybe_spore_syringe "Liquid psilocybe spore syringe")
#### 2️⃣ Liquid culture aka liquid mycelium
[](https://shroomok.com/en/wiki/File:Liquid-mycelium-sclerotia-magic-mushroom-growing-guide.jpg) Mushroom liquid culture aka liquid myceliumLiquid culture (LC) aka liquid mycelium is already germinated spores that have begun to form mycelium in sterile liquid nutrient medium.
Main ingredients for preparing a liquid culture consists a liquid spore syringe and a nutrient medium (for example, based on honey, dextrose, fructose, potato flakes, corn syrup, grain broth). This nutrient medium becomes a food for mycelium and support its development.
✅ LC has a higher viability than the spore suspension.
✅ A lot of material can be made from it by multiplying LC in nutrient solutions.
✅ Colonization process will start sooner (a few days faster) and more actively if inoculation was done with liquid culture.
🔴 But the process of preparing LC requires time for mycelial development in a liquid nutrient medium.
In fact, it is a ready-made mycelium, which quickly begins to grow in the substrate. It has already germinated. And these sprouts (hyphae) have begun to weave together to form mycelium.
When we inoculate grain substrate with LC colonization is much faster, because mycelium has ALREADY formed and continue its development. It's easier and faster from this point than to start from scratch.
✅ Liquid culture has a higher viability.
✅ The process of colonization of the substrate when inoculated with liquid culture starts several days faster and develops very active.
✅ Liquid culture allows to get ahead of contaminants.
🔴 Liquid culture preparation requires sterile conditions, additional manipulations with sterile liquid preparation and about 2 weeks of time before grain inoculation.
✅ With LC you can inoculate an incredible volume of substrate! And from the same LC you can prepare an unlimited amount of LC by multiplying it in new clean sterile nutrient solution.
> Check out full guide: [How to make mushroom Liquid Culture](https://shroomok.com/en/wiki/How_to_make_mushroom_Liquid_Culture "How to make mushroom Liquid Culture")
**In the next articles we'll get acquainted with other methods of mycelium reproduction:**
🧬 [Grain-to-grain inoculation or G2G transfer](https://shroomok.com/en/wiki/Grain_to_Grain_Transfer_(G2G) "Grain to Grain Transfer (G2G)")
🧬 Growing mycelium on agar or spores to agar (S2A)
🧬 Agar to agar transfer (A2A)
🧬 Cloning mushroom tissue on agar
Enjoy the world of Fungi and home mycology!
## Mycology Glossary and common Mushroom Growing Abbreviations
[Mycology Glossary and common Mushroom Growing Abbreviations](https://shroomok.com/en/wiki/Mycology_Glossary_and_common_Mushroom_Growing_Abbreviations)
[](https://shroomok.com/en/wiki/File:Mycology-terminology-and-mushroom-growing-abbreviations.jpg) Glossary of Mycology Terms and popular abbreviations in mushroom growing communities### Mycology Terminology list and Abbreviations in mushroom cultivation
Here you can find common abbreviations and detailed mycological terminology for your help. They are widespread in mushroom cultivation guides and mushroom growers communities. Also common internet acronyms were added, because they are also used by mushroom cultivators in Shroomok international community.
Use a sidebar to move between paragraphs and letters in glossary or use "Search" to find the exact term faster.
#### Mushroom growing abbreviations
**A2A** = Agar to Agar (transfer)
**A2G** = Agar to Grain (inoculation)
**[AA](https://www.amazon.com/All-American-2-Quart-Pressure-Cooker/dp/B00004S88Z?&linkCode=ll1&tag=shroomok-20&linkId=0b8b32b9fadb0905e42104df0e49d3d8&language=en_US&ref_=as_li_ss_tl)** = All American (company that makes the best pressure cookers)
**[AAPC](https://www.amazon.com/All-American-2-Quart-Pressure-Cooker/dp/B00004S88Z?&linkCode=ll1&tag=shroomok-20&linkId=b87bbe2caede8ebaef837520268d9fcc&language=en_US&ref_=as_li_ss_tl)** = All American Pressure Cooker
[**APE**](https://shroomok.com/en/wiki/Mutant_strain_Albino_Penis_Envy_aint_just_APE_but_King_Kong_of_Magic_Mushrooms "Mutant strain Albino Penis Envy aint just APE but King Kong of Magic Mushrooms") = Albino Penis Envy (P. Cubensis strain)
**AQ** = aqueous, water based
**BE** = Biological Efficiency
**BRF** = Brown Rice Flour
**BT** = Bacillus thuringiensis, (i.e. Gnatrol) kills fungus gnats and other pests
**B&S** = Break and Shake
**cc** = cubic centimeter, 1 cc = 1 ml
**CEV** = Closed Eye Visuals
**CFM** = Cubic Feet per Minute
**coir** = coco coir, coconut fiber
**CO2** = Carbon dioxide
**CV** = coco coir + vermiculite substrate
**CVG** = Coco coir + Vermiculite + Gypsum substrate
**contam** = contamination
**Cubes** = Cubensis
**D&R** = Dunk & Roll
**DNR** = Dunk N' Roll
**DDI** = Double distilled De-Ionized water
**DE** = Diatomaceous Earth
**DEC** = Double Ended Casing
**dH2O** = distilled H2O (water)
**DI** = De-Ionized water
**DT** = Double Tub
**[Dunk](https://shroomok.com/en/wiki/Rehydration_of_psilocybe_cakes "Rehydration of psilocybe cakes")** = submerging the mushroom cake/substrate in water to rehydrate
**EtOH** = Ethanol
**FAE** = Fresh Air Exchange, Free Air Exchange
**FFAE** = Frequent Fresh Air Exchange
**FC** = Fruiting Conditions, Fruiting Chamber or Field Capacity
**FH** = Flow Hood
**Flush** = the development of many fruiting bodies
**FSR** = Free Spore Ring
**[G2G](https://shroomok.com/en/wiki/Grain_to_Grain_Transfer_(G2G) "Grain to Grain Transfer (G2G)")** = Grain to Grain (transfer)
**GB** = Glove Box
**GE** = Gas Exchange
**GGMM** = Paul Stamets' "Growing Gourmet and Medicinal Mushrooms"
[**GT**](https://shroomok.com/en/wiki/The_magic_of_Golden_Teacher_mushroom "The magic of Golden Teacher mushroom") = Golden Teacher, P. Cubensis strain
**H2O2** = Hydrogen Peroxide (3% is the standard available concentration)
**HEPA** = High Efficiency Particulate Air filter is used in [laminar flow hoods](https://shroomok.com/en/wiki/How_I_built_my_first_laminar_flow_hood_for_home_mycology "How I built my first laminar flow hood for home mycology")
**Hpoo** = horse dung
**HWFP** = hardwood fuel pellets
**HW** = Honey Water
**INC** = Incubator
**INOC** = inoculate
**IPA** = IsoPropyl Alcohol
**ISO** = isopropyl/rubbing alcohol
**karo** = a brand of light corn syrup (dextrose)
**KOH** = Potassium (K) Hydroxide (OH), a strong base
**LECA** = Lightweight Expanded Clay Aggregate
**Lime** = hydrated lime, calcium hydroxide
**LC** = Liquid Culture
**LME** = Light Malt Extract
**LS** = Laboratory Strain
**MC** = MonoCulture or Mushroom Community
**MEA** = Malt Extract Agar
**MEAC** = Malt Extract Activated Charcoal agar
**MEP** = Malt Extract with Peptone agar
**MYA** = Malt-Yeast Agar
**ml** = milliliter, 1mL=1cc
**MeOH** = Methanol
**MIC** = Minimum Inhibitory Concentration
**MMGG** = Magic Mushroom Growing Guide
**MS** = Multi-Spore
**MSI** = Multi-Spore Inoculation
**MSS** = Multi-Spore Syringe
**MSS** = Multi-Spore Single Strain
**[MT](https://shroomok.com/en/wiki/Forget_Monotub_Kit._DIY._How_to_make_Monotub_for_Mushrooms_by_your_own "Forget Monotub Kit. DIY. How to make Monotub for Mushrooms by your own")** = MonoTub
**myc** = mycelium
[**myc piss**](https://shroomok.com/en/wiki/Mycelium_metabolites_or_mushroom_pee "Mycelium metabolites or mushroom pee") = mycelium piss, secondary metabolites created by mycelium
**Mycogone** = wet bubble disease
**NOC** = inoculate
**Newb/Noob** = a person who is new to the hobby
**Pans** = Panaeolus aka Copelandia (mushroom genus)
**[PC](https://www.amazon.com/Presto-01781-23-Quart-Pressure-Canner/dp/B0000BYCFU?&linkCode=ll1&tag=shroomok-zm-20&linkId=b9500b3a38dd248ef8bbfc6165ac7583&language=en_US&ref_=as_li_ss_tl)** = Pressure Cook(er)
**PDA** = Potato Dextrose Agar
**PDYA** = Potato Dextrose Yeast Agar
**Peat** = peat moss
**PF** = Psylocybe Fanaticus, creator of the PF-tek
**pH** = potential of hydrogen (scale of acidity)
**Poo** = Poop/Manure
**PSI** = pounds per square inch
**RH** = Relalitive Humidity (%)
**RR** = Roger Rabbit, prominent figure in mushroom growing community
[**SAB** = Still Air Box](https://shroomok.com/en/wiki/Still_Air_Box_for_Mycology "Still Air Box for Mycology")
**SB** = shoebox
**S2B** = Spawn to Bulk
**SGFC** = Shotgun Fruiting Chamber
**Scope** = microscope
**Spawn** = grain spawn (rice, rye, oats, corn, wheat, millet etc.)
**Stickers** = multi spore syringes
**SUB** = Substrate (usually refers to bulk substrate)
**Swab** = cotton swab with spores
**TEK** = Technical Educational Knowledge, used as a short term for "Technique" in mushroom growing
**TiT** = Tub In Tub (Tote In Tote), refers to an incubator consisting of 2 plastic tubs and an aquarium heater
**[Trich](https://shroomok.com/en/wiki/Green_mold_contamination_aka_Trichoderma "Green mold contamination aka Trichoderma")** = Trichoderma mold
**UB** = uncle bens
**Verm** = Vermiculite
**Vert** = verticillium (dry bubble disease)
**WBR** = whole brown rice
**WBS** = Wild Bird Seeds
50/50 = 50% vermiculite and 50% peat moss
50/50 = 50/50 with gypsum/lime, or oyster shell added to buffer the pH
#### Mycology Terminology
##### A
**[Abort](https://shroomok.com/en/wiki/Mushroom_aborts "Mushroom aborts")** — a small pinning mushroom that ceases to grow and never reaches full maturity. The cap of aborted shroom turn black color.
**Acidic** — pH lower than 7.0 indicates acidity level. The lower pH level the more acid substance.
**Adnate** — where the gills or tubes under the cap of a fungus are perpendicular to the stipe or stem at the point of attachment.
**Adnexed** — Where the gills or tubes under the cap of a fungus sweep upwards before being attached to the stem.
**Aerial mycelium** — hyphal elements growing above the agar or substrate surface.
**Agar** — is a gelatinous substance that is extracted from seaweed and processed into flakes, powders and sheets. It is commonly used in Asian cuisines and as a flavorless vegan substitute for gelatin. The agar used in mushroom cultivation and bacteriological labs is usually available in powder form and using sterile preparation poured into a petri dish or slant for spores to be inoculated, cloning mushroom tissue, agar to agar transfers (A2A) etc.
**Agarics** — mushrooms with gills.
[**Air filter**](https://shroomok.com/en/wiki/How_to_make_jars_with_substrate_for_mushroom_spawn#What_is_inoculation_port_and_air_filter.3F "How to make jars with substrate for mushroom spawn") — is a synthetic filter that provides gas exchange during the colonisation period (in spawn jar/bag and jar with liquid culture). It must be protected by bactericidal layer to prevent any competing microorganisms from entering through it. Bactericidal breathing patch, Luer lock syringe filters, and synthetic filter disks are used for this purpose.
**Alkaline** — a pH greater than 7.0 indicates alkalinity in ascending level. The higher the pH the more alkaline the substance.
**Annulus** — a ring of thin tissue left attached to the stem of a mushroom when the veil connecting the cap and stem ruptures as the mushroom cap opens to maturity.
**Antibiotic** — a class of natural and synthetic compounds that inhibit the growth or kill bacterial microorganisms.
**Apex** — the top or highest point.
**Ascomycetes** — A group of fungi that produce their sexual spores inside specialised cells known as asci, which usually contain eight spores
**Aseptic** — sterile environment, sterile condition in which no living microorganisms are present. Usually chemicals, extreme heat or UVC germicidal light are used to make an environment aseptic.
**Autoclave** — a laboratory chamber used to sterilize equipment and supplies by subjecting them to pressurized saturated steam at 121 °C (250 °F) for around 30-60 minutes at a pressure of 15 psi (103 kPa or 1.02 atm) depending on the size of the load and the contents.
**Axenic** — relating to a culture that is free from all living organisms except for the species intended to host within it. Refers to a non-contaminated grow medium.
##### B
**Bacteria** — single cell microorganisms that can invade and easily breakdown and kill healthy tissue. On the other hand there are some bacteria that are needed for the fruiting of fungi. These are present in the bulk substrate, survive pasteurization and have a symbiotic relationship with mycelium.
[**Bad Trip**](https://shroomok.com/en/wiki/How_to_deal_with_or_prevent_psychedelic_bad_trip "How to deal with or prevent psychedelic bad trip") — is a slang expression, a state of fear and panic attack during a psychedelic trip session.
**Basidiomycetes** — a group of fungi which produce their spores externally on basidia. Often four spores are produced per basidium. Many basidiomycetes show clamp connections on their hyphae. Most mushrooms are classified as basidiomycetes, whereas most ***molds are ascymycetes.***
**Basidium (pl. basidia)** — a cell that gives rise to a basidiospore. Basidia are characteristic of the basidiomycetes.
**Biological efficiency** **(BE)** — the definition of biological efficiency in mushroom cultivation is: 1 pound fresh mushrooms from 1 pound dry substrate indicates 100% biological efficiency. This definition was first used by the agaricus industry to be able to compare different grow setups and substrate compositions. Note that this is not the same as true thermodynamic efficiency.
**Biospore tape** — a low adhesive paper type tape with pours approximately 2 nanometers in diameter or even smaller. The pores in the tape make the product breathable.
**Birthing** — removing the fully colonized growth medium (like a cake or its spawn jar) from whatever container it was kept in for colonization purposes and placing in an environment like a bulk substrate conducive to fruiting.
**Bleach bombing** — an industry-used phrase to describe the use of bleach sprayed on the walls and floors. The rooms so treated are usually sealed tight for 24 hours, allowing the chlorine gas to thoroughly disinfect the environment.
**Block** — aka "mushroom cake" refers to a fully colonized bulk substrate in the fruiting phase of cultivation. Also referring to the cube-shaped mass of sawdust substrate contained within plastic bags. Once the mycelium has grown through the substrate, the plastic can be stripped off, and the mycelium holds the mass together. Blocks can be used individually or collectively to build “walls” of mushroom mycelium.
**Bolete** — a group of fungi having tubes rather than gills beneath the cap.
[**Bottle-tek**](https://shroomok.com/en/wiki/Bottle-tek_or_how_to_grow_mushrooms_in_plastic_bottles "Bottle-tek or how to grow mushrooms in plastic bottles") — is a technique of mushroom cultivation, when we use large volume plastic bottles (5-7 liters or even 15-20 liters) as a fruiting chamber for mushroom fruiting period. This is an alternative option for [Grow Box](https://shroomok.com/en/wiki/DIY_Grow_Box_for_Magic_mushrooms._Fruiting_conditions "DIY Grow Box for Magic mushrooms. Fruiting conditions") or [MonoTube](https://shroomok.com/en/wiki/Forget_Monotub_Kit._DIY._How_to_make_Monotub_for_Mushrooms_by_your_own "DIY Monotub for mushrooms") in amateur home cultivation
**Brown Rice Flour (BRF)** — ground brown rice, usually used for making BRF cakes according to PF-tek guide.
**BRF cake, Rice cake** — making a mushroom mix of brown rice flour (BRF) with vermiculite and water, and injecting it with mushroom spores.
[**Bruising or Bruises on mushrooms and mycelium**](https://shroomok.com/en/wiki/Mycelium_Bruises_or_Mold_Contamination "Mycelium Bruises or Mold Contamination")— is the reaction between psilocyn and oxygen. In the presence of oxygen psilocybin is more stable. But psilocyn readily forms bluish and dark-blue decomposition products. The bluish reaction or bluish-green is obvious in the most potent species. The less psilocyn there is in a species, the more subtle the bluish reaction. Bruising is a result of mechanical impact or dehydrated mycelium.
**Buffer** — a system capable of resisting changes in pH even when acid or base is added, consisting of a conjugate acid-base pair in which the ratio of proton acceptor to proton donor is near unity.
**Buffer** **agent** — buffers are necessary to adjust and maintain the pH. Buffering agents can be **salts of a weak acid and a weak base**. In mushroom cultivation buffer agents used on the base of calcium carbonate (CaCO3): Limestone flour (CaCO3), Limestone grit (CaCO3), Dolomitic limestone flour (CaCO3-MgCO3), Marl, Chalk, ground Oyster shell, Hydrated Lime (calcium hydroxide). All these additives increases substrate's pH while helping to buffer it, or keep it within a desirable (and higher) pH range, so that prevent [Trichoderma mold contamination](https://shroomok.com/en/wiki/Green_mold_contamination_aka_Trichoderma "Green mold contamination aka Trichoderma") and support mushroom development
**Bulk substrate** — secondary substrate in mushroom cultivation also called fruiting substrate for producing mushrooms (after spawn added to bulk). Bulk substrate is less nutrient than grain substrate. Fruiting substrate is a source of additional water and ingredients for mushroom metabolism and fruit development.
##### C
**Canopy** — an overhanging protection of the caps of mushroom fruits.
**Cake** — aka mushroom cake, refers to a fully colonized bulk substrate in the fruiting phase of cultivation
**Carbon dioxide (CO2)** — a colorless, odorless, incombustible gas produced from fungi metabolism. Fresh fruiting fungi take up oxygen and produce carbon dioxide. Formed during respiration, combustion, and organic decomposition. A waste product of fungi that when levels of concentration become over 1000 ppm inhibits normal growth and can cause environmental conditions that can create conditions for contamination, [overlay and stroma](https://shroomok.com/en/wiki/Psilocybe_growing_problems_-_overlay,_abortions,_etc "Psilocybe growing problems - overlay, abortions, etc"), [hypertrophic stipes and "fuzzy feet"](https://shroomok.com/en/wiki/Why_Mushrooms_too_Leggy,_Fuzzy_Feet_and_White_Dots_on_Caps "Why Mushrooms too Leggy, Fuzzy Feet and White Dots on Caps"), [secondary metabolites](https://shroomok.com/en/wiki/Mycelium_metabolites_or_mushroom_pee "Mycelium metabolites or mushroom pee") and effect pining from occurring.
**Carpophore(s)** — Commonly known as "mushrooms", the reproductive organs of the truebody of the fungus, formed by the web of mycelium that colonize a substrate.
**Casing** — a layer of water-retentive materials applied to a substrate to encourage and enhance fruitbody production.
> Usually casing materials including peat moss and vermiculite; additives include hydrated lime or limestone flour. Casing should not have any nutrients, it's non-nutrient substrate. Casing layers serve to hold moisture, promote and hold humidity and when pH buffered between 8.0 - 9.0 can create a hostile environment for certain contamination like [Trichoderma mold](https://shroomok.com/en/wiki/Green_mold_contamination_aka_Trichoderma "Green mold contamination aka Trichoderma") to live
**Cellulose** — Glucose polysaccharide that is the most abundant polysaccharide on earth, and common source of nourishment for cultivated fungi.
**Clone** — a population of individuals all derived asexually from the same single parent. Great care should be taken to select a fruiting body (parent) of the highest quality, size, color, shape or any highly desired characteristic.
**Cloning** — in mushroom cultivation placing a piece of mushroom tissue on agar medium in order to obtain growing mycelium. This is not strictly related to the colloquial notion of cloning, and is simply a manipulation of the natural asexual reproduction system of fungi.
**[Cobweb mold](https://shroomok.com/en/wiki/How_to_identify_and_get_rid_of_Cobweb_Mold "How to identify and get rid of Cobweb Mold")** — mold contamination, fungal disease that is commonly seen on the surface of the substrate or parasitizing commercially and home cultivated mushrooms. Can be caused by several related pathogens: *Dactylium spp., Cladobotryum spp., Hypomyces spp*. etc. It is cobweb-like in appearance and first shows up in small scattered patches that have a greyish color. Cobweb is invasive and can quickly run over the entire surface of the substrate.
**Coir** — aka coco coir, a short coarse fiber from the outer husk of a coconut. Used as a bulk substrate usually in combination with vermiculite to grow mushrooms..
**[Cold Shock](https://shroomok.com/en/wiki/All_you_need_to_know_about_cold_shock_for_magic_mushrooms "All you need to know about cold shock for magic mushrooms")** — is a procedure when the colonized mushroom cake with a casing layer is stressed by a sudden drop in temperature for 12-24 hours in the refrigerator at +2ºC to 4ºC (35-39°F) before introducing it to the fruiting conditions.
**Colonization** — the period of the mushroom cultivation starting at Inoculation during which the mycelium grows through the Substrate until it is totally permeated and overgrown. Can refer to either spawn grain colonization or bulk substrate colonization.
**Compost** — selectively-fermented organic material. Compost is one of many desirable substrates for certain species of mushrooms, but may vary in its components. Usually combined with straw, manure and other organic substances and designed for mushroom fruitbody production.
**Coniferous** — pertaining to conifers, which bear woody cones containing naked seeds. Relevant in mushroom hunting.
**Contam Grave** — a hole people dig in their yard to put all their shroom contamination so it’s within a wind gust away from sporulating right back into their grow again. Highly inadvisable.
**Contamination** — undesired organic foreign pathogens that invade the mycelium colonization and begin growing in the host medium. They are frequently bacterial or fungal micro-organisms and often the primary result of insufficient sterilisation, improper sterile technique or not meeting the proper pasteurization times and temperatures for bulk substrate prior to adding grain spawn.
**Cottony** — having a loose and coarse texture. Referred to a mycelium growth pattern of some fungi species or strains.
**[Cropping](https://shroomok.com/en/wiki/Magic_mushroom_harvesting_time,_first_flush "Magic mushroom harvesting time, first flush")** — the time of mushroom formation, development and harvesting.
**Culture** — a sample of a given microorganism, or a spore In mycology that is grown in a culture medium. A culture is ordinarily grown in a nutrient rich (MEA or PDA) agar in petri or a liquid culture medium. Usually a culture is grown for a relatively short period of time before it is put into another grow medium to spawn colonies.
**Culture medium** — the material growth medium upon which a culture is developed. Microorganisms differ in their nutritional needs, and a large number of different growth media have been developed: PDA (potato dextrose yeast agar) and MEA (malt seaweed extract agar) can be used for most cultivated mushrooms.
**CVG** — aka **Coir Vermiculite Gypsum** mix is one of the most commonly used substrates for growing P.Cubensis. CVG can be pasteurized just like any other bulk substrate used for spawning to bulk in open air. coco coir only, Coir+Verm, Coir+Gypsum and Coir+Verm+Gypsum are all usable combinations.
**Cycling the Block** — aka flushing, it refers to the cycling of the bulk substrate when rehydration is introduced by submersion of the block under water immediately after harvest, when flushing of fruit has subsided and a slow in the fruiting cycle has occurred.
##### D
**Desiccant** — an anhydrous substance, usually a powder or gel, used to absorb water from other substances. Two commonly used desiccants are calcium hydroxide and silica gel. Desiccant packs can be placed in dehydrated mushrooms to assist in preserving them for extended periods.
**Dextrose** — a simple sugar used in agar formulations. Synonymous with glucose.
**Dikaryotic mycelium** — the state wherein two individual nuclei are present in each fungal cell.
**Dimitic hyphae** — fungal flesh typified by two kinds of hyphae.
**Dimorphic** — having two forms.
**Diploid** — a genetic condition wherein each cell has a full complement of chromosomes necessary for sexual reproduction, denoted as 2N.
**Disk** — the central portion of the mushroom cap.
**Diffusion** — the movement of suspended or dissolved particles from a more concentrated region to a less concentrated region as a result of random movement on the microscopic scale. Diffusion tends to distribute particles uniformly throughout the available volume, given enough time, and occurs more rapidly at higher temperatures.
**Disinfection** — synonymous with Decontamination. It is a thorough protocol to cleanse a specified area to destroy or prevent the growth of microorganisms (molds, bacteria, viruses). It is usually referring to rubbing, soaking or spraying the surfaces one wants to disinfect with chemicals such as: isopropyl alcohol, lysol, diluted bleach solutions, and other chemical disinfectants and exposure to UVC germicidal light.
**Dwarf Fruit** — a miniature sized mushroom usually characterized by a girthy ballooning stipe. Their veils break and the cap canopies open, due to high CO2 levels for extended periods of time during the fruiting stage. Typically a dwarf will grow to full maturity at about ¼ the stature of a normal fruit. It’s especially common to grow dwarf mushrooms for tent growers or any grow medium without ventilation or windows, such as rooms that had been closets.
##### E
**Endospore** — spores formed internally.
> A metabolically dormant state by which some bacteria become more resistant to heat, chemicals, and other adverse conditions. Given the proper conditions, they will reactivate (germinate) and begin to multiply. Many bacterial endospores cannot be destroyed at boiling temperatures. This is important to mycologists because grains contain a high number of dormant endospores, thus, many grains must be pressure cooked (or autoclaved) to achieve sterilization
**Entheogen** — any naturally occurring substance that, when ingested, produces a profound religious state of mind, often described as God-like.
**Evanescent** — fragile and soon disappearing.
**Enzyme** — a protein, synthesized by a cell, that acts as a catalyst for a specific chemical reaction.
##### F
**Fresh Air Exchange (FAE)** — the act of opening the fruiting chamber and gently wafting fresh air into the tub with the lid or fanning tool. Fresh air is defined by the normal atmospheric air ratios of O2 and CO2 in the free air around us. Fungi consume oxygen like humans do to use for fuel unlike plants that do the opposite. Fresh air exchange is necessary to keep CO2 levels about 600-800 ppm. Fresh air exchange is what is accomplished by natural air flows in monotub, fanning gently with the lid on the tub, fanning with PC cooler, air pump for 24/7 FAE. FAE is a major key to initiating fruiting conditions once the bulk substrate has fully colonized.
**Fermentation** — the state of actively growing microorganisms, usually in a liquid environment. Smell is a good indicator of fermentation, it starts out with a sweet vinegary odor and then turns to a denatured alcohol smell. Fermentation in cultivation is a sign of contamination. The bacteria are breaking down the yeast and causing the fermentation of the tissue.
**Fibrillose** — fine, thin, hair-like filaments.
**Filamentous** — composed of hyphae or thread-like cells.
**Field capacity** — perfect substrate moisture conditions. A good way to test for this is to grab a handful of the substrate mixture and squeeze it in your hand. If you are unable to squeeze out any water, it is too dry. If a light squeeze causes a stream of water to come out, it’s too wet. You want to be able to squeeze the mixture as hard as you can, and only have a few steady drops come out to have a field capacity moisture level.
**[Flush](https://shroomok.com/en/wiki/Magic_mushroom_harvesting_time,_first_flush "Magic mushroom harvesting time, first flush")** — the collective formation and development of mushrooms within a short time period, often occurring in a rhythmic manner. Usually there is a resting period between flushes. A flushing can also refer to the cycling of the bulk substrate when rehydration is introduced by submersion of the block under water immediately after harvest when flush of fruit has subsided.
**[Flushing](https://shroomok.com/en/wiki/Rehydration_of_psilocybe_cakes "Rehydration of psilocybe cakes")** — it refers to the cycling of the bulk substrate when rehydration is introduced by submersion of the block under water immediately after harvest, when flushing of fruit has subsided and a slow in the fruiting cycle has occurred.
**Fruitbody** — a mushroom. The meaty part of the mushroom that grows above ground. The sexual reproductive body of the mushroom.
**Fruiting** — the event of mushroom formation and development.
**Fruiting chamber (FC)** — an enclosed space with high humidity and fresh air exchange where mushrooms may fruit from the substrate under proper conditions ([GrowBox](https://shroomok.com/en/wiki/DIY_Grow_Box_for_Magic_mushrooms._Fruiting_conditions "DIY Grow Box for Magic mushrooms. Fruiting conditions"), [MonoTub](https://shroomok.com/en/wiki/Forget_Monotub_Kit._DIY._How_to_make_Monotub_for_Mushrooms_by_your_own "Forget Monotub Kit. DIY. How to make Monotub for Mushrooms by your own"), [Bottle-tek](https://shroomok.com/en/wiki/Bottle-tek_or_how_to_grow_mushrooms_in_plastic_bottles "Bottle-tek or how to grow mushrooms in plastic bottles") etc.)
**[Fruiting conditions](https://shroomok.com/en/wiki/Fruiting_period._Pinhead_initiation,_mushroom_pinning_and_mushrooms_growth_parameters "Fruiting period. Pinhead initiation, mushroom pinning and mushrooms growth parameters")** — climate parameters for pinhead initiation and mushroom fruiting (temperature, relative humidity, CO2 level, light). These parameters depends on mushroom species.
**Fungicide** — a class of chemical pesticides used to kill fungi (usually mold spores).
**Fungus** — a group of organisms that includes mushrooms and molds. These organisms are decomposers of organic material.
[**Fuzzy feet**](https://shroomok.com/en/wiki/Why_Mushrooms_too_Leggy,_Fuzzy_Feet_and_White_Dots_on_Caps "Why Mushrooms too Leggy, Fuzzy Feet and White Dots on Caps") — when the base of mushroom stems are fuzzy due to lack fresh air exchange (FAE) and high relative humidity level in combination with lack of FAE.
##### G
[**Grain-to-grain transfer (G2G)**](https://shroomok.com/en/wiki/Grain_to_Grain_Transfer_(G2G) "Grain to Grain Transfer (G2G)") — inoculation of grain by already-colonized grain. This procedure involves exposing uncolonized, sterilized grain, and is prone to contamination. As such it should only be performed with a glove box, Still air box, HEPA laminar flow hood, under the most sterile conditions possible.
**Genotype** — the set of genes possessed by an individual organism.
**Gentamicin** — a broad-spectrum antibiotic mixture used to treat gram negative bacterial infections and often used in petri agar and liquid cultures for contamination prevention. The antibiotics are easily obtained at a pet store or online in the aquarium section however knowledge of proper sterilization through microfiltration is necessary prior to use in cultures.
**Germination** — the spreading of hyphae from a spore. It is the initial stage of development in fungus where mycelium forms from a spore.
**Gills** — the tiny segments on the underside of the cap. This is where the spores propagate within the fruiting body.
**Glovebox** — is a device used to Isolate an area for work with potentially hazardous substances or sensetive materials which need to be free from direct contact with the outside environment for any reason. Most glove boxes are tightly enclosed boxes having a glass panel for viewing inside and special airtight gloves attached inward in which a person on the outside can use to manipulate objects inside. Many times this can be made from a large size monotub and differs from a still air box or chamber in that it's a complete isolation chamber.
**Glucose** — a sugar in simple form. Dextrose is a simple sugar made from corn.
[**Golden Teacher**](https://shroomok.com/en/wiki/The_magic_of_Golden_Teacher_mushroom "The magic of Golden Teacher mushroom") — aka GT mushroom is a classic strain of Psilocybe Cubensis magic mushrooms. It is one of the most famous psychedelic fungi in the world.
**Grain substrate** — highly nutrient substrate for producing mycelium (mushroom spawn), usually first substrate for mushroom cultivation.
[**GrowBox**](https://shroomok.com/en/wiki/DIY_Grow_Box_for_Magic_mushrooms._Fruiting_conditions "DIY Grow Box for Magic mushrooms. Fruiting conditions") — a technique for mushroom cultivation, when we use plastic container, aquarium or terrarium as a fruiting chamber for mushroom fruiting period.
**Gypsum** — aka calcium sulfate (CaSO4), a greyish powder often used in spawn preparation and bulk substrate preparation. It prevents the clumping of the grain kernels, support aeration, gives substrate a more optimal texture. Has neutral pH 7.0, may affect pH by half of a point initially.
##### H
**Habitat** — the substrate in which mushrooms grow.
**[Heat Shock](https://shroomok.com/en/wiki/All_you_need_to_know_about_cold_shock_for_magic_mushrooms "All you need to know about cold shock for magic mushrooms")** — is a procedure when the colonized mushroom cake with a casing layer is stressed by raising the temperature for 3 hours at +35°C to +37°C (95-99°F) before introducing it to the fruiting conditions.
**HEPA** — High Efficiency Particulate Air filter is used in laminar flow hoods.
**H2O2** — molecular formula for Hydrogen peroxide.
**Hydrogen peroxide (H2O2)** — a clear aqueous solution usually available in concentrations from 3% to 35% that is easily decomposed into water and oxygen by enzymes like catalase, which is found in desirable mushrooms but not in many bacteria. This makes it capable of selectively destroying some competitors of contamination like cobweb mold, and a tool sometimes used in cultivation.
**Hypha, hyphae** — individual cells of mycelium.
**Hyphal aggregate** — a concentration of mycelium; a 'knot' in the mycelial network which often differentiates into a primordium.
##### I
**In vitro** — from the Latin, in glass, isolated from the living organism and artificially maintained (as in a petri dish, slant or a jar).
[**Incubation** **period**](https://shroomok.com/en/wiki/Magic_mushrooms_incubator_control "Magic mushrooms incubator control") — aka colonization, the period after inoculation (preferably at a temperature optimal for mycelial growth) during which the Mycelium grows vegetatively (mycelium forming in spawn jar/bag).
[**Incubator**](https://shroomok.com/en/wiki/Magic_mushrooms_incubator_control "Magic mushrooms incubator control") — is a special box or cabinet used at the first stage of cultivation - colonisation period of growing mycelium. In the incubator should be DRY, WARM, DARK
[**Inoculation**](https://shroomok.com/en/wiki/Inoculation_without_glove_box "Inoculation without glove box") — introduction of spores into grain substrate, agar media, liquid media.
[**Inoculation port**](https://shroomok.com/en/wiki/How_to_make_jars_with_substrate_for_mushroom_spawn#What_is_inoculation_port_and_air_filter.3F "How to make jars with substrate for mushroom spawn") — aka injection port is an entry point for a syringe needle containing the liquid spore solution or liquid culture to inoculate the sterile substrate or media. Bactericidal breathable patch, butyl rubber self-healing injection ports (aka bottle stoppers) or heat-resistant RTV-silicone sealant is used for this purpose.
**Isolate** — a strain of a fungus brought into pure culture (i.e. isolated) from a specific environment
##### K
**Karyogamy** — the fusion of two sexually opposite nuclei within a singlecell.
##### L
**Lamellae** — the gills of a mushroom.
**[Laminar Flow hood](https://shroomok.com/en/wiki/How_I_built_my_first_laminar_flow_hood_for_home_mycology "How I built my first laminar flow hood for home mycology")** — A fan-powered HEPA-filtered device that produces a laminar flow of air that moves across the workspace allowing for open sterile work without the hassle and inconvenience of a still air box (SAB) or glove box. The air input goes through the HEPA and particles less that 0.3 microns in size are filtered out and the sterile air is pushed across the work plane.
**Language of Mycelium** — The ways in which the colonies as a whole speak. It is a language learned based on years of observation and mycology experience and is similar to sign language. Mycelium speaks by showing us what is stressing or causing it issues by how it behaves and spawns. For instance if Mycelium produces secondary metabolites it is a sign that it is in immediate need of something like FAE, or that a contaminating pathogen has invaded, etc. Learn the language of mycelium and you will have an insight to mycology that can only be learned if you allow mycelium to teach you. Keen observation, strong foundation in mycology, and trusting instinct is key.
**Limestone** — calcium carbonate (CaCO3), hydrated lime, garden lime. A white powder. Used to rise the pH level of the bulk substrate or casing layer.
**[Liquid Culture](https://shroomok.com/en/wiki/How_to_make_mushroom_Liquid_Culture "How to make mushroom Liquid Culture")** — a nutrient enriched liquid solution, similar to agar, where mycelium cells can germinate and multiply producing clones.
**Liquid Inoculant** — abbreviated LI, Liquid Inoculant is a suspension of mycelium in water. This is different from a LC in that the mycelium did not grow in the medium. The most common way to make a LI is to blend up a wedge/dish of clean mycelium on agar with sterilized water. Pore syringes are often referred to as an LI.
**Lux** — a measurement of light received by a surface equal to 1 lumen at a distance of 1 meter over a surface area of 1 square meter.
##### M
**Macroscopic** — visible to the naked eye.
**Maltose** — malt sugar, used for agar media recipes.
**Martha** — Martha Stewart everyday stationary storage closet, a shelf inside a zippered plastic cover
**Martha Tek** — Refers to a fruiting chamber based on a Martha Stewart-brand translucent vinyl closet. Martha Tek is also known as Myco-Tent growing in mushroom cultivation where instead of enclosed monotubs with manual interventions to cultivate, tents with open bins are placed inside the enclosure and the environmental factors, such as, temperature, relative humidity, fresh air exchange, lighting and watering misters, are individually controlled outside the tent and create the conditions necessary to cultivate fungi.
**Mesophile** — an organism thriving in moderate temperature zone, usually between 40–90°F (4–32°C).
**[Metabolites](https://shroomok.com/en/wiki/Mycelium_metabolites_or_mushroom_pee "Mycelium metabolites or mushroom pee")** — aka secondary metabolites or "myc piss". Product of intermediary metabolism released from a cell, such as naturally excreted antibiotic of mushrooms. Secondary metabolites excreted from mushroom tissue indicates a symptom or sign of another problem, and could be signs of lack of enough FAE, nutritional deficiencies or excesses, a sight of trauma or signal that a pathogenic microorganism is getting ready to invade.
**Metabolism** — the biochemical synthesis that turn nutrients into energy for the growth processes that sustain a living cell or organism.
**[Microdosing](https://shroomok.com/en/wiki/Magic_mushrooms_microdosing "Magic mushrooms microdosing")** — involves taking a very small dose of a substance, such as Psilocybin, that is not potent enough to cause a psychedelic trip but has long term subconscious effects. Proponents of microdosing believe that the practice benefits the mind, and research has recently started to explore this possibility.
**Microscopic** — visible only with the aid of a microscope.
[**MonoTub**](https://shroomok.com/en/wiki/Forget_Monotub_Kit._DIY._How_to_make_Monotub_for_Mushrooms_by_your_own "Forget Monotub Kit. DIY. How to make Monotub for Mushrooms by your own") — is a type of fruiting chamber for mushroom cultivation. The volume of such tub can be from 6 Qt for mini-monotube (aka shoeboxes) to 32, 54, 80 Quart sizes and even bigger. Average tubes are considered optimal.
- [**Modified MonoTub**](https://shroomok.com/en/wiki/Forget_Monotub_Kit._DIY._How_to_make_Monotub_for_Mushrooms_by_your_own#Modified_MonoTub "Forget Monotub Kit. DIY. How to make Monotub for Mushrooms by your own") — consists of plastic transparent tub that has been modified with holes and closed tightly with transparent lid. These holes (air vents) on the proper distance and height help to create air flow, fresh air exchange (FAE) and maintain humidity due the basic laws of physics: temperature changes inside and outside tube, temperature differences on the bottom and on the top of tub create air flow and influence on the relative humidity.
- **[Unmodified monotub (neglect-tek)](https://shroomok.com/en/wiki/Forget_Monotub_Kit._DIY._How_to_make_Monotub_for_Mushrooms_by_your_own#Unmodified_MonoTub "Forget Monotub Kit. DIY. How to make Monotub for Mushrooms by your own")** — is a plastic transparent tub with lid, but without air holes. For fresh air exchange (FAE) during fruiting period the lid is flipped upside down or just don't close tightly. This creates air gaps around the lid locks which is important for allowing air exchange as well as substrate moisture regulation.
- [**Double tub** or **Twin tub**](https://shroomok.com/en/wiki/Forget_Monotub_Kit._DIY._How_to_make_Monotub_for_Mushrooms_by_your_own#Double_Tub_or_Twin_Tub "Forget Monotub Kit. DIY. How to make Monotub for Mushrooms by your own") — consists of two plastic containers and connected to each other by the container tops. This configuration has a doubled volume of fruiting chamber and this is the main advantage for fruiting period. Can be made with air-holes (for average volume bins).
- [**Shoebox tek**](https://shroomok.com/en/wiki/Forget_Monotub_Kit._DIY._How_to_make_Monotub_for_Mushrooms_by_your_own#Shoeboxes_tek_or_Mini-tub "Forget Monotub Kit. DIY. How to make Monotub for Mushrooms by your own") — usually 6Qt plastic shoeboxes use for such fruiting chamber. Can be made with air holes for fresh air exchange in the same as for modified monotub or without air holes, where air gaps between two bins support air flow and FAE.
**Multispore** — refers to an inoculation where multiple germinations and matings occur due to the use of various spores, as in a spore solution (e.g. spore syringe) and as opposed to an isolate. Liquid cultures may sometimes be called multispore (though they contain no spores) if they were produced from a spore solution, rather than an isolate.
**Mycelium (pl. mycelia)** — a network of hyphae; the white and often filamentous and fuzzy portion of the mushroom that grows under and on the surface of the ground. They are similar to a plant's roots in that they deliver nutrients and O2 gas to fungi. Mycelium networks can be huge. The largest living thing in the world is a single underground mycelium complex. There are two types of Mycelial growth: Rhizomorph and Tomentose.
**[Myc Piss or Myc Pee](https://shroomok.com/en/wiki/Mycelium_metabolites_or_mushroom_pee "Mycelium metabolites or mushroom pee")** — an abbreviated term for Secondary Metabolites referring to an yellowish-orange oily appearing secretion mycelium produces when under stress or attack of contamination.
**Mycology** — the study of fungi.
**Mycophagist** — a person or animal that eats fungi.
**Mycophile** — a person who likes mushrooms.
**Mycophobe** — a person who fears mushrooms.
**Mycorrhiza** — a symbiotic state wherein mushroom mycelium forms on or in the roots of trees and other plants. Mycorrhizal mushrooms impossible to grow at home (for example, Amanita Muscaria aka Fly Agaricus).
**Mycosphere** — the environment in which the mycelium operates.
**Mycotopia** — a term coined by Paul Stamets to describe an environment in which fungi are actively used to enhance and/or preserve ecological equilibrium.
##### N
**Natural culture** — the invitro cultivation of mushrooms by transplanting living mycelium, usually from a natural habitat
##### O
[**Overlay**](https://shroomok.com/en/wiki/Psilocybe_growing_problems_-_overlay,_abortions,_etc "Psilocybe growing problems - overlay, abortions, etc") — a condition of the casing where mycelium been allowed to completely cover the surface. Overlay is cause by prolonged vegetative growth temperatures, high CO2 levels and excessive humidity. Or dry casing, high CO2 level and/or low humidity and failure to meet the proper fruiting conditions once the bulk substrate is colonized. Overlay, if overwatered, becomes mated. Overlay shows little or no inclination to form pinheads.
**Oyster shells** — see calcium carbonate or hydrated lime. Used as a pH buffering agent.
##### P
**Parafilm tape** — a semi-transparent, flexible film composed of a proprietary blend of waxes and polyolefins. It is a self-sealing thermoplastic non adhesive tape used in laboratory procedures to seal petri dishes from contaminants entering and cultures escaping.
**Parasitic** — organisms that grow by taking nourishment from other living organisms.
**Pasteurization** — heat treatment applied to a bulk and casing substrate to destroy unwanted organisms utilizing a reduced concentration of heat while keeping favorable microorganisms alive. The temperature range is between 140-180°F (+60..+80°C). The time required for pasteurization is variable dependent upon temperature, which is anywhere from 30-90 minutes. The treatment is different from sterilization, which aims at destroying ALL organisms in the substrate.
**Phenotype** — the observable physical characteristics expressed from the genotype.
**Photosensitive** — sensitive to light.
**Phototropic** — growing towards light.
**Peat moss** — aka sphagnum moss, unconsolidated soil material consisting largely of slightly decomposed, organic matter accumulated under conditions of excessive moisture. Used as a casing ingredient in mushroom culture due to its ability to hold more than 10 times its weight in water and lack of nutrients.
**Perlite** — is a very light mineral, often found next to the vermiculite in gardening stores. It has millions of microscopic pores, which when it gets damp, allow it to 'breathe' lots of water into the air, aiding in humidification, which is beneficial to mushroom fruiting.
**Petri dish** — a round glass or plastic dish with a cover to observe the growth of microscopic organisms. The dishes are partly filled with sterile growth medium such as agar (or sterilized after they have been filled). Petri Dishes are used to grow cultures and produce isolates.
**PF** — Psylocybe Fanaticus. The original spore provider and originator of the PF-Tek, one of the original home growing techniques on which many others are based today
**pH** — A measure to describe the acidity of a medium. pH 7 is neutral; higher than 7.0 pH is Alkaline, lower than 7.0 pH is Acidic
**Pileus** — the cap of a mushroom.
**[Pin, Pinhead](https://shroomok.com/en/wiki/Fruiting_period._Pinhead_initiation,_mushroom_pinning_and_mushrooms_growth_parameters "Fruiting period. Pinhead initiation, mushroom pinning and mushrooms growth parameters")** — a term to describe a very young mushroom, so-named for the pin-sized developing cap. Synonym with "primordium".
**Polyfill** — a synthetic polyester fiber, used as a filter medium for monotubs, growbox and spawn jars to allow for air exchange.
**Pressure cooker (PC)** — a pot with a tight locking lid in which things can be cooked quickly with steam under higher pressure. The reason for it is that at 15 PSI (pound per square inch) pressure the water boils at a higher temperature (250°F or 121°C) than at ambient pressure. In mushroom cultivation a PC is used to thoroughly sterilize substrates, agar media, liquid media and cultivation tools.
**Primordium (pl.primordia)** — the initial fruiting body, the first recognizable but undifferentiated mass of hyphae that develops into a mushroom fruitbody. Synonym with "pinhead".
**Primordial growth** — The first point at which the development of a mushroom fruit body is visible to the naked eye. Primordia often appear as a balling up of mycelium strands which will eventually develop a cap. They are often referred to as knots and form the hyphal knots in the bulk substrate of a fruiting block.
**Psilocybian** — having psilocybin and/or psilocin. (Not necessarily belonging to the genus Psilocybe).
**Pure culture** — an isolated culture of a micro-organism, uncontaminated with others. Pure cultures are essential to the production of spawn because a culture is sensitive to contamination.
##### R
**[Rehydration](https://shroomok.com/en/wiki/Rehydration_of_psilocybe_cakes "Rehydration of psilocybe cakes")** — aka Flushing or cycling of the mushroom cake/block that includes submersion the entire block substrate in cold water and allowing waste products to flush out and the bulk substrate to rehydrate with water in preparation of the next cycle. This creates a shock to the block that stimulates now mycelial growth to flush again. Often aborts and secondary metabolites will appear after a block cycle rehydration.
**Rhizomorphic mycelium** — cord-like or strand-like hyphae. "Root-like" outward flat growing mycelium characterised by a round shaped growth with filamentous extensions on the outer edges. An adjective used to describe the rhizomorphic mycelium is taken as a sign of fast colonization and qualities desirable for fruiting. It is more optimal type of mycelium and usually targeted for cloning.
**Rice cake, BRF cake** — many of the growing methods involve making a mushroom "cake" of brown rice flour (BRF), vermiculite and water, and injecting it with mushroom spores.
**Rye Berry Seed** — a hardy annual cereal grass related to wheat *(lat. secale cereale)*. In mushroom cultivation rye grain is used as a popular spawn grain medium.
##### S
**Saprophyte** — a fungus that lives on dead organic matter. A decomposer.
**Scratching** **(aka fork-tek)**— ruffling of the substrate or casing surface in order to maintain an open, porous condition conducive to primordia formation.
**[Sclerotium](https://shroomok.com/en/wiki/How_to_grow_magic_truffles_Psilocybe_Mexicana_and_Tampanensis "How to grow magic truffles Psilocybe Mexicana and Tampanensis")** — A hard surfaced resting body of fungal cells resistant to unfavorable conditions, which may remain dormant for long periods of time and resume growth on the return of favorable conditions.
**Secondary metabolites** — product of intermediary metabolism released from a cell, such as naturally excreted antibiotic of mushrooms. Referred to as, "myc piss" in modern day culture. Secondary metabolites excreted from mushroom tissue indicates a symptom or sign of another problem, and could be signs of lack of enough FAE, nutritional deficiencies or excesses, a sight of trauma or signal that a pathogenic microorganism is getting ready to invade.
**Selective medium** — Medium that allows the growth of certain types of organisms.
**Slant** — a test tube with growth medium, which has been sterilized and slanted to increase the surface area of a spawn culture.
**Soy Hulls** — the "skin" of the soybean which comes off during processing. These hulls make an excellent nutrient rich substrate for mushroom growing.
**Sphagnum** — aka **sphagnum moss**, **peat moss**, **bog moss** and **quacker moss.** Used as a casing ingredient in mushroom culture due to its ability to hold more than 10 times its weight in water and lack of nutrients.
**Spawn** — culture of mycelium on grain used to inoculate the final substrate called bulk substrate or fruiting substrate.
**[Spawn to Bulk](https://shroomok.com/en/wiki/Making_mushroom_cake,_spawn_to_bulk,_and_casing "Making mushroom cake, spawn to bulk, and casing")** — transfer grain spawn to secondary fruiting substrate (bulk) for further bulk colonisation and mushroom fruiting.
**Spawn run** — the vegetative growth period of the mycelium after spawn to bulk substrate.
**Species** — Fundamental unit of biological taxonomy. Generally spoken, two individuals belong to the same species if they can produce fertile offspring.
**Spore** — a minute, typically one-celled, reproductive unit capable of giving rise to a new individual without sexual fusion, characteristic of lower plants, fungi, and protozoans.
**[Spore print](https://shroomok.com/en/wiki/How_to_make_magic_mushrooms_spore_prints "How to make magic mushrooms spore prints")** — A collection of spores taken from a mushroom cap, often collected on sterile card stock, aluminum foil, biofilm or some other flat surface.
**Spore Swab** — cotton sterile swab with spores.
**Spore Reproduction** — spores thus differ from gametes, which are reproductive cells that must fuse in pairs in order to give rise to a new individual. Spores are agents of asexual reproduction, whereas gametes are agents of sexual reproduction.
**[Spore syringe](https://shroomok.com/en/wiki/Liquid_psilocybe_spore_syringe "Liquid psilocybe spore syringe")** — a solution of spores in sterile water collected in a syringe, usually scraped from a spore print under sterile conditions. It is one of the fastest and easiest method for transporting spores to a sterile substrate, agar media or liquid media ([inoculation](https://shroomok.com/en/wiki/Inoculation_without_glove_box "Inoculation without glove box")).
**Spore Washing** — a procedure in which cells are sterilized from a print in preparation for inoculation to a petri or slant agar, LC or syringe. There are several ways to wash spores, one uses several sizes of micron syringe filters in combination with UVC germicidal lights. This process is also known as **spore cleaning** or **spore sterilization**.
**Stem** — the stipe or stalk of a growing mushroom.
**[Sterilization](https://shroomok.com/en/wiki/Substrate_sterilization_before_adding_psilocybe_spores "Substrate sterilization before adding psilocybe spores")** — any process that eliminates and kills all forms of life, including transmissible agents such as viruses, bacteria, fungi and spore forms. Usually involves a process using heat, chemicals and/or UVC germicidal light. Objective is to create an environment or condition free from pathogenic microorganisms.
**[Still Air Box (SAB)](https://shroomok.com/en/wiki/Still_Air_Box_for_Mycology "Still Air Box for Mycology")** — an enclosed area to do semi-sterile culture work in. It has a window so you can see into and two holes in the front to put your hands through. Inside the still air box is still. The particles that encounter still air lose their velocity quickly and tend to fall straight downwards. Thus by cleverly working in a SAB and never moving any non-sterile things over the top of sterile things you can achieve great success.
**Stipe** — the stem or stalk of a fungus.
**Strain** — a race of individuals within a species sharing a common genetic heritage, but differing in some observable features of no taxonomic significance. A genetic line considered to have common traits, usually identified for artificial selection
> Many strains of P. Cubensis have geographical names (e.g. Ecuador, Amazonian, Tasmanian etc.), but point of natural origin is not necessarily the source of the name. Remember that strains are a human notion. Vendors often differentiate between stocks that are not visibly different to everyone, but which have been perceived to have different characteristics, whether visual, chemical, or behavioral (relating to the mushroom's response to environment, colonization speed). There must be a differential characteristic between the numerous variety of strains that makes it unique to the others
**Straw** — the dried remains of fine-stemmed cereals (wheat, rye, barley etc.) without seeds. Used as a spawn substrate and in the bulk substrate by the agricultural mushroom industry.
**[Stroma](https://shroomok.com/en/wiki/Psilocybe_growing_problems_-_overlay,_abortions,_etc "Psilocybe growing problems - overlay, abortions, etc")** — (aka overlay) a dense, cushion-like aggregation of mycelium forming on the surface of composts or casings and indicative of somatic (vegetative), not generative growth.
**[Substrate](https://shroomok.com/en/wiki/Choose_and_prepare_substrate_for_magic_mushrooms "Choose and prepare substrate for magic mushrooms")** — whatever you're using for spawn (grain substrate: wheat, oats, rye, millet etc) and grow the mushrooms on (bulk or fruiting substrate: coco coir, hay, straw, seed hulls, sawdust etc). Different varieties of mushroom like to eat different things. Different techniques involve inoculating substrates with spores than allowing the spawn to bulk substrate and casing substrate.
**Super-pasteurization** — prolonged pasteurization utilizing steam. Super-pasteurization typically is for 12–48 hours at or near 100°C (212°F) at or near atmospheric pressure. Super-pasteurization is a method commonly used to render sawdust substrates, in bulk, into a form usable for the cultivation of Shiitake, Oyster, and/or similar mushrooms.
##### T
**Taxon (pl. taxa)** — a taxonomic unit, usually in reference to a species.
**Tek** — short for technique in mushroom cultivation. Often prefaced with something to tell you what type of tek (PF-Tek, BRF Cake-Tek, Martha-Tek, Poor Boi Tek, UB-Tek, [Monotub-Tek](https://shroomok.com/en/wiki/Forget_Monotub_Kit._DIY._How_to_make_Monotub_for_Mushrooms_by_your_own "Forget Monotub Kit. DIY. How to make Monotub for Mushrooms by your own"), [Bottle-Tek](https://shroomok.com/en/wiki/Bottle-tek_or_how_to_grow_mushrooms_in_plastic_bottles "Bottle-tek or how to grow mushrooms in plastic bottles") etc) are all varieties of different methods. The PF-Tek is one of the original home growing techniques on which many others are based.
**Thermogenesis** — the process of heat generation by microorganisms.
**Thermophile** — an organism thriving in 75-140°F (+24°..+60°C) temperature zone.
**Through-spawning** — mixing spawn evenly throughout the substrate.
**Top-spawning** — placing spawn as a layer on the top of a substrate.
**Tissue culture** — is the simplest way to obtain a mycelial culture. Tissue culture is essentially a clone of a mushroom, defined as a genetic duplicate of an organism. The basic procedure is to remove a piece of the mushroom cap or stem, and place it on an agar plate. After 7-10 days mycelium grows from the tissue and colonizes the agar. Great care should be taken to select a fruiting body of the highest quality, size, color, shape or any highly desired characteristic.
**Tomentose mycelium** — a fuzzy cotton-like appearing type of mycelial growth lacking the characteristics of the other type of mycelia: rhizomorphic growth.
**Tub in Tub (TiT)** — refers to an incubator modification consisting of 2 plastic tubs and an aquarium heater
**[Trichoderma](https://shroomok.com/en/wiki/Green_mold_contamination_aka_Trichoderma "Green mold contamination aka Trichoderma")** — a common green mold in the fungi family that is the number one contamination enemy in mushroom cultivation. This mold is saprotrophic and pathogenic fungus with an invasive growth pattern that starts to appear white but then turns green quickly and spreads. Trichoderma Harzianum won’t grow in pH levels above 8.0.
**[Trip](https://shroomok.com/en/wiki/How_to_prepare_for_psychedelic_mushroom_trip "How to prepare for psychedelic mushroom trip")** — psychedelic mushroom journey happens when you take your cultivating hallucinogenic varieties. With psilocybin species a trip tends to last from three to six hours. May range from mild visual effects and lightly enhanced perceptions, to a totally altered state of consciousness and deep philosophical thinking. Generally, this can be controlled to some degree by mindset, setting and dosage.
**Tyndallization** — aka fractional sterilization or discontinuous heating, is a form of sterilization that involves boiling substrate in jars for about 20 minutes a day, for three days in a row. Tyndallization can be used to destroy the spores (bacterial and molds). But it is not considered completely reliable — some spores may survive and later germinate and multiply. It is not often used today, but is used for sterilizing items that cannot withstand pressurized heating, such as plant seeds.
##### U
**Umbonate** — used to describe a cap with a raised central area above the point where the stipe meets the pileu.
##### V
**Variety** — a sub-species epithet used to describe a consistently appearing variation of a particular mushroom species.
**Vector** — the pathway through or carrier on which an organism travels.
**Veil** — when a mushroom is growing the edges of the cap are joined to the stem. As the mushroom grows larger, the cap spreads and the edges tearaway, often leaving a very paper thin veil of material hanging from the stem.
**Vermiculite** — a highly absorbent material made from puffed mica that is sold in different grades of coarseness. The mycelium likes room to breathe and grow and vermiculite is the “V” in a CVG or CV bulk substrate in which it serves as a moisture-retentive medium for growing mushrooms in the fruiting stage. Vermiculite serves as a great casing layer due to the lack of nutrients within it.
##### W
**Wedge-transfer** — the cutting of triangular-shaped sections of mycelium from agar and their transfer into other vessels or substrates.
**Wild bird seed (WBS)** — millet-based birdseed; used as spawn and substrate in mushroom cultivation.
##### Z
**Zonate** — having a band-like region darker in color or diferent in form than the surrounding tissue.
#### Common internet acronyms
**abv**. = abbreviation
**AFA** = As Far As
**AFAIK** = As Far As I Know
**ATM** = At The Moment
**BFE** = Bum-Fuck Egypt
**BTW** = By The Way
**ETA** = Estimated Time of Arrival
**FOAF** = Friend Of A Friend
**GJ** = Good Job
**GL** = Good Luck
**IDK** = I Don't Know
**IIRC** = If I Remember Correctly
**IMAO** = In My Arrogant Opinion
**IMHO** = In My Humble Opinion
**IME** = In My Experience
**IMO** = In My Opinion
**IYE** = In Your Experience
**KISS** = Keep It Simple Stupid
**LMAO** = Laughing My Ass Off
**LITFA** = Leave It The F\* Alone
**MYG** = Mega You Grow
**mod** = moderator
**OMG** = Oh My God
**OTOH** = On The Other Hand
**PITA** = Pain In The Ass
**ppl** = people
**pwn me plz** = own me please (asking to be put in their place)
**RTF** = Read The FAQ
**RTFM** = Read The F\*cking Manual
**SWIM** = Someone Who Isn't Me
**TC** = Take Care
**TIA** = Thanks In Advance
**TLC** = Tender Loving Care
**TY** = Thank You
**UTFSE** = Use The F\*cking Search Engine
**wot** = what (that extra letter is just too much)
**WTF** = What The F\*ck
**YMMV** = Your Mileage May Vary
## How to freeze fresh magic mushrooms
[How to freeze fresh magic mushrooms](https://shroomok.com/en/wiki/How_to_freeze_fresh_magic_mushrooms)
[](https://shroomok.com/en/wiki/File:Can-you-freeze-magic-mushrooms.jpg) How to freeze fresh magic mushrooms and save potency### How to freeze psilocybin mushrooms properly
#### Can I freeze fresh magic mushrooms
It is common question we get and the short answer is YES. Freezing has been widely used as an alternative to drying. (for edibles as well).
Proper freezing allows you to save alkaloids in mushrooms. This is the main advantage of such storage method.
However this method has disadvantages as well, because it's easy to spoil the harvest with improper freezing and all magic disappears.
#### How freezing can spoil your magic mushrooms
Water, which makes up to 90% of the mass of the fungus, crystallizes when freezing. Thus, frozen mushrooms will retain their shape with ice crystals instead of their own cellular structure.
Since ice expands during crystallization, cell walls are destroyed and loose alkaloids.
Frozen mushrooms after defrosting can turn into a shapeless mass and have zero effect.
[](https://shroomok.com/en/wiki/File:Magic-mushrooms-wrong-freezing.jpg) Magic mushrooms after improper freezing (extreme bruising, shapeless and they lost their potency
One more example how you can spoil your magic mushrooms.
[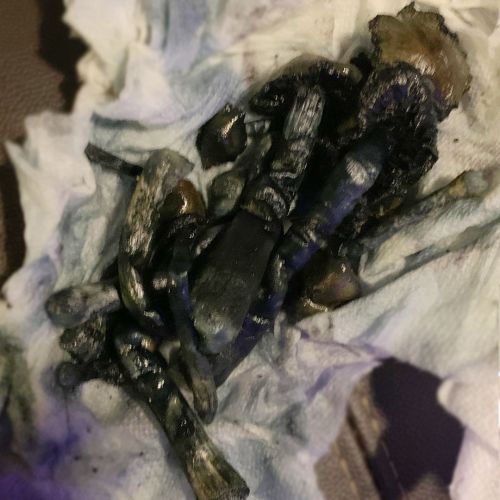](https://shroomok.com/en/wiki/File:Mushrooms-after-improper-freezing.jpg) How freezing magic mushrooms can spoil your shrooms and ruin their potency#### How to freeze fresh magic mushrooms and save potency
Remember, the faster and deeper mushrooms are frozen, the less and smaller ice crystals are formed in them. Thus, the structure of mushroom cells is preserved better.
🔵 Don't wash your shrooms!
🔵 Don't cut mushrooms, whole fruits save more potency.
🔵 Pack them in plastic sealed containers or airtight zip bags for freezing (available [on Amazon](https://www.amazon.com/gp/product/B00CQG5QUA?&linkCode=ll1&tag=shroomok-20&linkId=4f59b918f6c790e0f24253d627441758&language=en_US&ref_=as_li_ss_tl))
🔵 Put them in the freezer at -4°F (-20°C) and lower temperatures. **Don't freeze mushrooms if you have higher temperatures!** If we freeze fresh shrooms at 14-23°F (-5..-10°C) then we can move them to trash bin from the start, they will loose potency for sure.
❄️ **Ideal is «quick dry freeze» mode at -4..-22°F (-20°..- 30°C).** This temperatures work good for freezing mushrooms
> ❗️If you are not sure about freezing conditions don't use this method, just dry mushrooms. Check out: [How to dry and store psilocybe mushrooms](https://shroomok.com/en/wiki/How_to_dry_and_store_psilocybe_mushrooms "How to dry and store psilocybe mushrooms")
❗️**Defrost mushrooms before consumption only!**❌ Psilocybin mushrooms shouldn't be frozen again after defrosting. This is the main disadvantage of this storage method. Since any sudden shutdowns of the refrigerator can ruin the frozen crop. Therefore, drying mushrooms is still preferable method.
> 💡 In case of using **liquid N2** for freezing we don't have water crystallization, don't ruin cell walls and don't have oxidation. However it's not an easy way to implement at home
#### Freeze-drying method
Freeze-drying is used in industrial scale.
**Freeze-drying (aka lyophilisation or cryodesiccation)** [read more on Wikipedia](https://en.wikipedia.org/wiki/Freeze_drying "wikipedia:Freeze drying") — is a low temperature dehydration process that involves freezing the product, lowering pressure, then removing the ice by sublimation.
In contrast to dehydration by most conventional methods that evaporate water using heat. This is the best and most expensive method that totally preserves mushroom structure, shape and color.
#### Can I freeze dried magic mushrooms
Yes, it's safe for mushrooms, because they already dehydrated. For dry mushrooms freezing slowing chemical kinetics of reaction and preserves the mushroom tissue better.
Although you can store dry mushrooms at refrigerator or room temperature in dark place and airtight bags/jars for 1-2 years.
#### Can I freeze magic mushroom chocolate with dried mushroom powder
Yes, you can freeze magic mushroom chocolate (chocolate with dried mushroom powder). Make sense to do this if you want to prolong chocolate expiration date. Such magic chocolate don't lose potency in freezer and can be stored for 1-2 years.
> 🔴 Check out: [Magic mushroom chocolate recipes](https://shroomok.com/en/wiki/Magic_mushroom_chocolate_and_psilocybin_candy_recipes "Magic mushroom chocolate and psilocybin candy recipes")
Have a shroomy day!
## Sterilization vs Pasteurization for bulk substrate
[Sterilization vs Pasteurization for bulk substrate](https://shroomok.com/en/wiki/Sterilization_vs_Pasteurization_for_bulk_substrate)
This discussion happened on the [🆘**contamination-id**](https://discord.com/channels/868489864310566913/967276105126015016) channel on [Shroomok Discord Community](https://discord.gg/ngKhQDmymD)
**The main topics are:** mold contamination, possible reasons, what is better sterilization or pasteurisation for bulk substrate.
In all the quotes, the original spelling and punctuation has been retained.
Let's get started and check out important points from the members of Shroomok Growers Community!
🟣 **learnhouser1:** Anyone know what happened here any way to bring it back or should I throw this all out ! 1st time
[](https://shroomok.com/en/wiki/File:Comtamination-id.jpg) Photo for contamination idYou never learn all the way until you fail!
Too much humidity maybe? Or I just need to be allowing more air and fanning more often?
[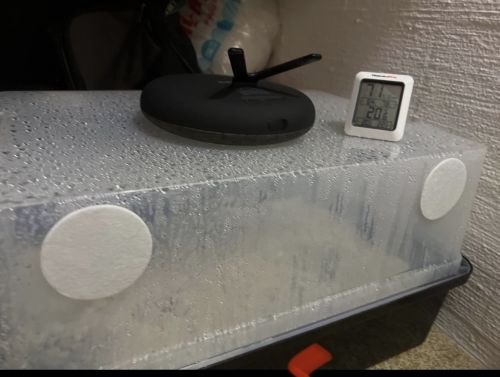](https://shroomok.com/en/wiki/File:Tub-with-mushroom-cake.jpg) Fruiting period conditions
🟠 **Shroomok:** It's mold contamination. RIP, sorry. Toss it immediately!
More about this contam: [Green mold contamination aka Trichoderma](https://shroomok.com/en/wiki/Green_mold_contamination_aka_Trichoderma "Green mold contamination aka Trichoderma")
So great example of marshmallow texture around green area
🟡 **GT:** That is Trich… either toss it or bury it in the yard.
🟣 **learnhouser1:** Thanks guys ! Any idea what could have caused it?
🟠 **Shroomok:** I think problem with: poor bulk substrate pasteurization, poor FAE or you caught mold spores from the air. Really huge area of contamination
🟣 **learnhouser1:** I bought the bulk substrate from \*\*\*! Looks like I’ll never buy that again thanks for the response I really appreciate it
🟠 **Shroomok:** We don't discuss vendors/shops here. Check out the other reasons also, bulk sub is the 1st vector of contam
🟣 **learnhouser1:** Well I’ll just try again. Gonna go toss this somewhere in the woods
🔵 **ʂƙı℘ɬཞı℘℘ıŋ:** Did you do your own spawn or buy the grains pre made?
**learnhouser1:** I purchased the grain and the bulk substrate . Everything was fine this is about 2 months in. Grain spawn pure white then moved it to the max yeild bin mixed in bulk substrate and everything has looked good for 3 weeks in the bin pure white. I just turned the light on couple days ago and now this. I may have waited to long to induce pinning . Trial and error I’ll just try again ! 😇😇
🔵 **ʂƙı℘ɬཞı℘℘ıŋ:** Did you iso wipe bin before using?
🟣 **learnhouser1:** Oh yes multiple times thank you. I opened the bin a couple times to take a picture other then that it’s been closed for weeks
🔵 **ʂƙı℘ɬཞı℘℘ıŋ:** If you had a PC you could sterilize substrate again to make sure it was good
🟣 **learnhouser1:** Good idea re sterilization of the bulk substrate I’ll do that!
🟡 **GT:** You CAN sterilize, but I prefer to pasteurize. Think of your sub as a sponge… an empty sponge can suck up more stuff (good and bad), but if you pasteurize, you are left with some good and no bad with less room for the bad to propagate. Ya feel?
🟣 **learnhouser1:** A real big nice pressure cooker and bal jars are gonna be my best friend soon seems like ! Perfect thank you sir
🔵 **ʂƙı℘ɬཞı℘℘ıŋ:** In my opinion cubensis doesn’t benefit from any of the leftovers from the pasteurizing process . Why leave any competing organisms. Cubensis will colonize a sterilized substrate easily with no issues or competition.
Why take the risks
Pasteurizing has inherent risks as the person may not eliminated the organisms that will grow as competition for food or growth sources
Not saying it won’t work but there are better options
🟣 **learnhouser1:** Interesting 🧐 I think I may have just not had any fresh air exchange. I’m gonna hook up a air pump next time so the air isn’t so stagnant.
🟠 **Shroomok:** We can use sterilized and pasteurized bulk substrate - that's true
> **Sterilization** is a rendering of substrate free from viable microorganisms (bacteria, fungi, mold spores) as by the use of a high temperature in pressure cooker for heat sterilization (250°F or 121°C at 15psi for 90 mins).
>
> **Pasteurization** or pasteurisation is a process of preservation in which substrate is treated with mild heat, usually to less than 212°F (100°C), to eliminate pathogens and extend shelf life.
However we usually use pasteurization for bulk, because 140F (+60C) for at least 30 mins kill molds (trich particularly) and we save useful microorganisms in soil, that support mushroom grow and inhibit molds For spawn we use sterilization only, because not enough to kill molds in grain. We need to kill bacteria and endospores of bacteria. It is possible with high temperature for a long time (to increase temp we increase pressure)
🔵 **ʂƙı℘ɬཞı℘℘ıŋ:** Yes both methods can be used. I have done plenty each way and my experience shows me that the pasteurized substrate has shown more contamination issues than my sterilized batches so given the evidence by experience I go with sterile methods and give my mycelium a blank canvas to start with then taking the risk. Like I said my opinion.
🟠 **Shroomok:** any sterilized soil/grain unprotected and so "sweet area" for all microorganisms, they try to be the first settlers and they fight for a place to be the first
🔵 **ʂƙı℘ɬཞı℘℘ıŋ:** Just the same you wouldn’t just pastuerize grains you want them sterile.
🟠 **Shroomok:** Here we have only one way (I mean for grain)
**ʂƙı℘ɬཞı℘℘ıŋ:** You don’t want the competition either way. You want your mycelium to be the winner so why not give them the best chance at winning the fight.
🔵 **ʂƙı℘ɬཞı℘℘ıŋ:** Yes you want sterile environment no competition
I see a lot of new people to the hobby and their failure rates are high because of improper technique. If they are to pastuerize then they need to know the process to do it for a successful grow
If you are just doing coir only with no additional nutrients than pasteurizing will be fine. Even commercial growers have to sterilize any nutrient rich/ hardwood substrate to eliminate all other competitive organisms.
🟠 **Shroomok:** I also used both options for bulk/casing and both work for me
It is supposed that sterilisation treatment due to high temperature and the cooking effect, released nutrients that benefited the green mold.
> It is also considered that the reduction of the natural microbial flora of the substrate by the sterilization action increases Trichoderma sp. opportunities to colonize the substrate because of a lower presence of competitive micro flora which reduces the possibility of mycelial growth. Bacterial strains can inhibit the growth of Trichoderma sp by production of volatile organic compounds (Mackie and Whetley, 1999) or by releasing antibiotics (Nielsen et al., 2000)
And remember about pH adjusting for bulk and casing, because trich love acid soil. More about it here: [How soil pH affect Trichoderma](https://shroomok.com/en/wiki/Green_mold_contamination_aka_Trichoderma#How_soil_pH_affect_Trichoderma)
Rehydration in alkaline water also can be a preventive measure
🔵 **ʂƙı℘ɬཞı℘℘ıŋ:** Yes sterilizing produces a clean slate. Afterwards any competition can take hold of it but that being said at that point there is no trichoderma or anything there . You would have had to introduce whatever contamination or mycelium for it to take hold. If your spawn is clean then rapid colonization of the sterile substrate would occur.
🟠 **Shroomok:** Yeah, clean state and clean environment is the main difference with natural environment. That's why we keep everything sterile just for one microorganism we'd like to get
Or a crowd of other 'guys' will occupy everything
🟣 **learnhouser1:** Well I’ll go ahead and try both then sterile and pasteurized bulk substrate. I just bought a pressure cooker. So hoping this will never happen again. Also my air in the bin was extremely stagnant. I basically made the perfect environment for trich to grow. Next I will be placing a glass cup and water with air stone and air pump. When I’m ready to induce pining I’ll turn it on couple times a day for a couple minutes or so. Excited to see my next run and if I can beat the trich! Thanks guys !
I have a picture from just 5 days ago and everything was fine. It’s crazy how fast things can turn !
5 days ago ⬇️
[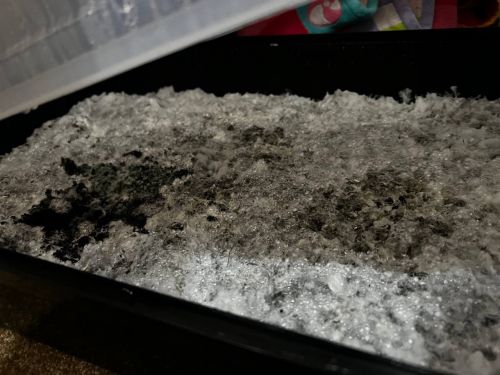](https://shroomok.com/en/wiki/File:Mushroom-cake-5-days-before.jpg) Mushroom cake 5 days before
🟠 **Shroomok:** You already had trich 5 days ago on the area without mycelium, it's so common case
Keep us updated and good luck **🤞**
## What is the best ratio of spawn to bulk for mushroom growing
[What is the best ratio of spawn to bulk for mushroom growing](https://shroomok.com/en/wiki/What_is_the_best_ratio_of_spawn_to_bulk_for_mushroom_growing)
Let's discuss how spawn to bulk ratio influences the speed of mycelium growth and overall results!
🔴 **User 1:** I have a question, when it's time to mix with the bulk substrate, is there a disadvantage/advantage to use a sub 1:1 spawn:bulk ratio? Or 1:2?
[](https://shroomok.com/en/wiki/File:Spawn-to-bulk-optimal-ratio.jpg) What is the best ratio of grain spawn to bulk substrate - Shroomok Growers Community on [Discord](https://discord.gg/ngKhQDmymD)
🔵 **User 2:** Not necessarily bad but typically 1:2 - 1:3 is ideal.
🔴 **User 1:** First of all, thanks for answering, I have gathered info on multiple forums and they all recommend anywhere between 1:1 and 1:4, but the definition of ideal is a bit blurry for me. Ideal in the sense that we can 'dilute' the spawn into larger volumes of bulk without affecting too much the yield of a single tub, effectively meaning I would 'waste' spawn if my spawn ratio is higher? Or ideal in the sense, that it's the ratio that maximizes the yield in any given tub?
I have also read that much higher bulk ratios increase the risk of contamination by increasing the time of colonization post spawn-to-bulk transfer, so that's a no go since my environment isn't as sterile as I would like it to be...
🔵 **User 2:** Well your theory on that is correct, the longer it takes for your myc to colonize the higher chances something else can grow first. If you are using coir it's borderline impossible to contam the sub by itself, now if your spawn isn't clean, well that's a diff story. What im saying is that typically contam is introduced via spawn since coir has little to no nutrients for contam to thrive on. Now in regards to your question regarding the ratio of spawn look at it this way....the whole point of using a 1:3 for example over a 1:1 is that your cakes/spawn provides enough nutrients for your tub. The increased amount of sub gives your mycellium more surface area to colonize. More mycellium means you can bear more fruits. On the low end (1:1) you get less mycellium area but faster colonization as compared to 1:3, etc. The opposite is true for higher ratios. You get more surface area to colonize but it colonizes slower. I typically do 1:2 or 1:3 as I find it is a good mean choice between colonization speeds and surface area. Hope that answered all your questions.
Also I would like to mention that colonization speed is primarily determined by genetics, but when I refer to colonization speed in this sense it is simply due to it having to colonize more area to achieve full colonization, however the rate of colonization is the same.
Ex. ) 2 cars traveling at the same speed but different distances will reach their destination at different times
🟠 **User 3:** Agree with the 1:3
🔵 **User 2:** I use 1:5 sometimes. But mind you higher ratios, you HAVE to have good technique, as higher ratios allows much more leniency for contamination to take over before full colonization. Regarding all your discussion of additives, you could always try compost experiments are fun, but coco coir has already tried and true been used and it is for a reason! It is inherently not able to be contaminated (until nutrients and water are added). But basically just remember your substrate is there to provide a scaffold or surface area for the mycelium network to expand and to provide and hold water. Typically with ratios your nutrients are already in excess.
🔴 **User 1:** Thank you, I get your point. So as long as I can cover the whole surface area with the right depth requirement for fruiting to occur, I should be good no matter the ratio, as long as it stays in the accepted ranges. The question was asked because I have 'too much' spawn compared to what is typically used in a 66 qt mono tub. What I have seen is people using 3 lbs of spawn + 3-6 lbs of bulk for this size of tub, since I have 4.5 lbs of spawn, I was just wondering if using 3 lbs of bulk (on the low end) was problematic, from what I understand, it shouldn't be.
🔵 **User 2:** I dont think it would necessarily be problematic, more so a waste of spawn at that point.
🔴 **User 1:** Exactly what I thought, might just use some to inoculate my next spawn bags and use one of my tubs with the extra spawn to see if there's a difference
To clarify, I have three bags destined to three tubs, one would be the experiment
🔵 **User 2:** Send it
🔴 **User 1:** Sure will, if everything won't crash in my face until the end, I will share my results with you guys! Oh that gives me an idea, maybe we can start a spreadsheet with everyone's experiments and draw our own analysis for optimal growth! Data is my specialty
🔵 **User 2:** That's been done already not here but there is a journal like that
🔴 **User 1:** Alright! Will look it up, thanks!
Closer photo of Trich contam on mushroom cake in monotub. Photo by pvestal - Shroomok Growers Community on Discord
```
[](https://shroomok.com/en/wiki/File:Green-mold-trichoderma-contamination.jpg) Same photo, Trichoderma contam. White area - early stage, green - sporulating phase. Photo by **pvestal** - Shroomok Growers Community on [Discord](https://discord.gg/ngKhQDmymD)✅ **Smell.** Usually hard to feel in home cultivation due to small amount of contamination. On mushroom farm you can feel **coconut smell** as sign of Trichoderma contamination.
> Clear liquid with a typical coconut smell produced by Trichoderma species is called *[6-Amyl-α-pyrone](https://en.wikipedia.org/wiki/6-Amyl-%CE%B1-pyrone "wikipedia:6-Amyl-α-pyrone")*
Of course you can use microscope for identification, but it is possible to id on eye. All questionable cases are easier to determine with macro photo (as close as possible) and good light or use simple Magnifying Glass with light on Amazon
[Magnifying Glass with 12 LED Lights, 30X](https://www.amazon.com/Magnifying-Illuminated-Magnifier-Inspection-Degeneration/dp/B08PP4RJ5J?&linkCode=ll1&tag=shroomok-20&linkId=b9f024ed48b7a483b0bb72c7855e3742&language=en_US&ref_=as_li_ss_tl) $8.99
#### Mushroom bruises or Trichoderma contamination?
It's always confused newbie growers, because *Trichoderma spp. (T. harzianum, T. viride, T. koningi)* have white color at the very beginning and sometimes have even blue tinge.
Green color you can admit only on the latest stage (sporulating phase).
Mycelium bruising and Trichoderma contamination on mushroom spawn
[](https://shroomok.com/en/wiki/File:Mushroom-bruises-vs-trich-mold.jpg) Mushroom bruising and Green Mold contamination in spawn jar
Mycelium bruises and green mold contamination on mushroom cake
[](https://shroomok.com/en/wiki/File:Trich-and-bruises.jpg) Mycelium bruising (blue) and Trichoderma mold (green) on the same cake. Photo by Claudius - Shroomok Growers Community> 🔴 Check out more examples for id: [Mycelium Bruises or Mold Contamination](https://shroomok.com/en/wiki/Mycelium_Bruises_or_Mold_Contamination "Mycelium Bruises or Mold Contamination")
#### Q-Tip Test or Swab Test for green mold identification
Q-tip test isn't scientific test, but popular life hack among newbie mushroom growers.
Swab test can be used to determine whether your mycelium is just bruised or contaminated with mold *(green mold Trichoderma spp. or blue mold Penicillium spp)*. This test is possible to use during fruiting period only. The test is based on the fact that mold spores are sticky and would be stuck on any surface that comes into contact.
To do this you have to take a clean white cotton swab or a fresh Q-tip and swipe it across the contaminated area.
If your cotton swab rubs the green powder on to it, it is highly likely that you are looking at a Trich contamination.
If your cotton swab comes out clean without any color on it, your mycelium may be simply bruised.
#### Main causes of Trich mold contamination
⛔️ Contaminated spore syringe or liquid culture.
⛔️ Poor sterility of mycological manipulations, especially during inoculation process (also transfer, spawn to bulk, casing etc.)
⛔️ Poor bulk substrate pasteurisation. At a temperature over **140°F (+60°C) for at least 30+ minutes** Trichoderma spores die. Pasteurization helps to kill Trich and save useful microflora, that's why pasteurisation method is preferable for bulk substrate. Check out why in Shroomok Community discussion: [Sterilization vs Pasteurization for bulk substrate](https://shroomok.com/en/wiki/Sterilization_vs_Pasteurization_for_bulk_substrate "Sterilization vs Pasteurization for bulk substrate")
> It is supposed that sterilisation treatment due to high temperature and the cooking effect, released nutrients that benefited the green mold. It is also considered that the reduction of the natural microbial flora of the substrate by the sterilization action increases Trichoderma sp. opportunities to colonize the substrate because of a lower presence of competitive micro flora which reduces the possibility of mycelial growth. Bacterial strains can inhibit the growth of *Trichoderma sp* by production of volatile organic compounds (Mackie and Whetley, 1999) or by releasing antibiotics (Nielsen *et al.*, 2000)
> [Efficiency of treatments for controlling *Trichoderma* spp during spawning in cultivation of lignicolous mushrooms](https://www.ncbi.nlm.nih.gov/pmc/articles/PMC4323299/)
⛔️ Trichoderma spp. spread by airflows (spores in the air, in air conditioning and ventilation system), water (misting), tools and insects
⛔️ High concentration of Trichoderma spores in the growing room. Especially if you had Trich contamination before. During sporulating phase mold easily spreads in the air when you introducing fresh air and misting growbox or monotube.
⛔️ Plant pots near fruiting chamber. Plants and Trich can form symbiotic associations and support each other, but such neighbouring may be harmful for your mushrooms
⛔️ High temperature. Trichoderma molds enjoy 80–86 °F (27–30 °C)
⛔️ Low pH level (acid soil). Trich molds enjoy pH 4-6.
#### How to prevent Trichoderma Mold contamination?
##### Basic rules for Trich prevention
✅ Make up your room regularly. Use non-toxic odor-free fungicide, especially on porous surfaces and if you have molds in your accommodation
[Disinfectant Spray Cleaner Fungicide](https://www.amazon.com/dp/B07FDL9RK1?&linkCode=ll1&tag=shroomok-20&linkId=28af31a917b82906468f9aae58e55ca8&language=en_US&ref_=as_li_ss_tl) $16.99
✅ Treat all your stuff (tub, tools, jars) with bleach if you had Trichoderma contamination before
[Bleach Germicidal Cleaner Spray, 1 Qt](https://www.amazon.com/Clorox-Healthcare-Bleach-Germicidal-Cleaner/dp/B000GULS3W?&linkCode=ll1&tag=shroomok-20&linkId=dbc0b3685180ffa1c6ec7e06d2326ea8&language=en_US&ref_=as_li_ss_tl) $13.83
[Bleach Germicidal Wipes for surfaces, 150 Count](https://www.amazon.com/Clorox-Healthcare-Bleach-Germicidal-Canister/dp/B078MVPF95?&linkCode=ll1&tag=shroomok-20&linkId=3a7976335239d91f208ee349d3d9e6be&language=en_US&ref_=as_li_ss_tl) - $12.49
✅ Keep all mycological manipulations as sterile as possible. Always wear gloves. Use isopropyl alcohol to treat all tools and wipe all surfaces (especially for inoculation process)
[Isopropyl Alcohol 70% USP Grade - One Quart Spray](https://www.amazon.com/gp/product/B08LW5P844/ref=as_li_tl?ie=UTF8&tag=shroomok-20&camp=1789&creative=9325&linkCode=as2&creativeASIN=B08LW5P844&linkId=de58e8e2a98ad37b75f875c879a5e62e) $21.99
[Disposable Gloves, Black, 50/100 Pack](https://www.amazon.com/dp/B0B71BGZBQ?&linkCode=ll1&tag=shroomok-20&linkId=aff7970bd3e1271f88d400e7cedb55ad&language=en_US&ref_=as_li_ss_tl) - $9.99
✅ Turn off ventilation and air conditioning 1 hour before any mycological manipulations.
✅ Use SAB (still air box), or glovebox, or air flow hood for inoculation process ([grain inoculation](https://shroomok.com/en/wiki/Inoculation_without_glove_box "Inoculation without glove box"), agar inoculation) and transfer (agar transfer, [Grain2Grain](https://shroomok.com/en/wiki/Grain_to_Grain_Transfer_(G2G) "Grain to Grain Transfer (G2G)") transfer).
✅ Control **pH level** of bulk substrate and casing soil to prevent Trichoderma mold. Use buffering agents for pH level adjusting. We'll figure out this important step in the next paragraph.
✅ Sterilise or pasteurise bulk substrate, because it can contain Trichoderma spores. At a temperature 140 °F (+60°C) for 30 minutes Trichoderma spores die. Bulk pasteurisation is easy and cheaper to make by your own. Just pour hot boiled water in coco coir mix in bucket and leave it to chill overnight.
> Trichoderma prefer wood-based, hay, straw fruiting substrate more than manure.
✅ Protect air vents in [MonoTub](https://shroomok.com/en/wiki/Forget_Monotub_Kit._DIY._How_to_make_Monotub_for_Mushrooms_by_your_own "Forget Monotub Kit. DIY. How to make Monotub for Mushrooms by your own") with **Synthetic Filters** or **Polyfill** or **breathable tape**
[](https://shroomok.com/en/wiki/File:4-diy-monotube-for-mushroom-growing.png) *Use Adhesive Synthetic Filters or Polyfill for air vents***Shroomok's Choice on Amazon:**
[Synthetic Filter Discs - 16/30 Pieces](https://www.amazon.com/dp/B08RYNCZM7?&linkCode=ll1&tag=shroomok-20&linkId=b9e856c23dae70a417635f16d9400cf7&language=en_US&ref_=as_li_ss_tl) $14.99
[Poly-Fill Premium Fiber - 250g/8.8oz](https://www.amazon.com/dp/B08LYJ66HN?&linkCode=ll1&tag=shroomok-20&linkId=e4acbbbadf32c0375f30be505f6932ea&language=en_US&ref_=as_li_ss_tl) $12.99
[Micropore Paper Tape - 3m](https://www.amazon.com/3M-Micropore-Paper-Tape-White/dp/B003TXPZ64?&linkCode=ll1&tag=shroomok-20&linkId=c4d61a7d462de08fbf5a945f42fdf4a7&language=en_US&ref_=as_li_ss_tl) $9.43
✅ Wait for 80-100% of top/casing layer colonisation before introducing fresh air and overall fruiting conditions. Trichoderma mold (any mold, for that matter) love and enjoy uncolonised spots
✅ Keeping your fruiting chamber cooler than 80–86 °F (27–30 °C) can discourage Trichoderma growth. Most of mushroom species prefer lower temperature than Trichoderma, there is no conflict with fruiting conditions here
✅ Keep your fruiting chamber on the table or shelf, pick up from the floor. Usually molds flow on the floor with drafts
✅ Good fresh air exchange (FAE)
> Trich and all other molds prefer stagnant air in fruiting chamber
✅ Use clean water for humidifier or spray/mister bottle
✅ Keep your gardening projects and plant pots separately from mushroom cultivation projects
##### Additional recommendations for Trich prevention
✅ Use UV germicidal lamp as additional method for sterilisation tools and air in the room
[UVC Light Lamp (110V 6W with Ozone)](https://www.amazon.com/dp/B0B5CV9PB5?&linkCode=ll1&tag=shroomok-20&linkId=cb3c7a7c1a4e7a10418aaf6e2fe75ff0&language=en_US&ref_=as_li_ss_tl) $20.99
[UV Germicidal Lamp with Timer](https://amzn.to/3OQVrXK) $36.99
✅ Use air purifiers for home
[Air Purifiers for Home Bedroom with H13 HEPA Air Filter](https://amzn.to/3ZL7f46) $37.99
[Ionic Air Purifier Ionizer with UV-C Sanitizer](https://www.amazon.com/OION-Technologies-B-1000-Permanent-Sanitizer/dp/B00FBMJK9Y?&linkCode=ll1&tag=shroomok-20&linkId=5aa16cba96715fbe6b06afb01c5c554d&language=en_US&ref_=as_li_ss_tl) $99.95
✅ Use aquarium air pump for [GrowBox](https://shroomok.com/en/wiki/DIY_Grow_Box_for_Magic_mushrooms._Fruiting_conditions "DIY Grow Box for Magic mushrooms. Fruiting conditions") to introduce fresh air. There is a stone at the end of the aquarium air pump hose; it should be dipped in water. This will filter the incoming air from spores of contaminants through water.
[](https://shroomok.com/en/wiki/File:Growbox-with-air-pump-for-air-exchange-and-humidification.jpg) Growbox with air pump for filtering incoming air[](https://shroomok.com/en/wiki/File:Fruiting-chamber-for-mushrooms-with-air-pump-for-FAE.jpg) Growbox/monotub for mushrooms with air pump (right corner) for introducing fresh air. Incoming air is filtering trough water. Photo by **H워얼V** - Shroomok Growers Community**Shroomok's Choice on Amazon:**
[Quiet Oxygen Pump for 20-100 Gallon - 2 Outlets](https://www.amazon.com/gp/product/B07RJ3XLM8/ref=as_li_tl?ie=UTF8&tag=shroomok-20&camp=1789&creative=9325&linkCode=as2&creativeASIN=B07RJ3XLM8&linkId=a95f2e7fd5ddd905a223db6e6ef7b9e3) - $14.97
[Adjustable Oxygen Pump for 20-100 Gallon - 2 Outlets](https://www.amazon.com/gp/product/B01EBXI7PG/ref=as_li_tl?ie=UTF8&tag=shroomok-20&camp=1789&creative=9325&linkCode=as2&creativeASIN=B01EBXI7PG&linkId=a0a86a19ba80cf22326ca33748ae2c6c) - $14.99
[Powerful Air Pump - for 20-200 Gallon - 2 Outlets](https://www.amazon.com/gp/product/B08HMZSH9J/ref=as_li_tl?ie=UTF8&tag=shroomok-20&camp=1789&creative=9325&linkCode=as2&creativeASIN=B08HMZSH9J&linkId=129cc0f3bc777d413baed339a79e2a6c) - $21.97
✅ Regular cleaning of the air conditioning and ventilation system at least once a year. It's also important for your health. A/C spread spores extremely effective and mold can grow in your A/C system
#### How soil pH affect Trichoderma
Trichoderma mold prefer acidic soils (pH 4-6). This is actually a good news, because most mushrooms required neutral or slightly alkaline soil. The optimum pH for actives and edibles is about 6.5-8.5 (except acid-loving edible species, pH 5.5-6.5). This means you can control Trichoderma growing by pH level adjusting.
[](https://shroomok.com/en/wiki/File:PH-scale.jpg) pH scaleWhy is it important?
As the mushroom mycelium colonises the bulk substrate its pH gradually falls. Moreover, flush by flush the substrate is gradually acidified by mushroom waste products, which makes it even more vulnerable for Trichoderma mold.
For example, if we applied a bulk substrate and casing layer with pH 7.5, it gradually drops to pH 6.0-6.5 after the 1st-2nd flush of fruiting. If we used a bulk substrate with pH 5.5-6.5, then after the 1st-2nd flush we'll get acid soil and high risk of Trich contamination.
> ❗️**That's why Trich contamination often appear on the 2nd, 3rd or even 4th flush of fruiting when mushroom cake is acidified**
##### Additives for bulk and casing substrates
For pH adjusting we need to add buffering agent.
The casing ingredients as a buffering agents described in the book "*The Mushroom Cultivator: A Practical Guide to Growing Mushrooms at Home" by Jeff S. Chilton and Paul Stamets are based on **Calcium carbonate*** **CaCO3** - limestone flour, limestone grit, dolomitic limestone flour, chalk, marl, oyster shells. There are a few recommend formulas with using some of these ingredients for growing *Agaricus culture*. BUT! Dolomitic limestone flour is high in magnesium, thus depressed mycelial growth. Limestone flour and limestone grit (aka garden lime) is possible to use for **bulk** substrate, but it is less effective for pH adjusting than **Calcium Hydroxide Ca(OH)2** (aka hydrated lime, slaked lime). Eventually, such ingredient as limestone almost useless for **casing** substrate that required rapid pH raise.
Limestone is intended for long-term decomposing, for example in the garden, in the soil. Substrates that bear fruit for a month or so do not require long-term pH adjustment. They need a short, fast pH changes.
> Hydrated lime (**Calcium Hydroxide Ca(OH)2** ) works within 24 hours. That's why hydrated (slaked) lime is what you need to consider for rapid pH adjustment, especially for casing
**What about gypsum?**
**Gypsum** or Calcium Sulfate (CaSO4) is often added into bulk substrate (2-5% to dry mass of substrate), but it is NOT a buffering agent itself. It is chemically neutral or near-neutral (pH ~6–7) and does not significantly raise or lower the pH, but it has another influence on pH.
Gypsum contains both calcium carbonate and sulphur. While it doesn’t directly shift the pH, it helps stabilize pH fluctuations in the substrate over time by neutralizing certain acids and bases. Therefore, it tends to maintain pH around neutral, as metabolites are released to lower the pH. This action promotes proper pH balance in the substrate. These effects improve the physical structure of the substrate by aggregating colloidal particles giving a looser, more porous structure, which leads to increased aeration within the substrate.
> ❗️ Gypsum provides looseness (particle separation) to reduce soil compaction and increase drainage, aeration in soils.
>
> 🔴 Gypsum may affect pH by half of a point initially. Its pH-altering ability is minor until the sulfur evolves into sulfuric acid. Calcium and sulfur are essential elements in mushroom metabolic processes. If the substrate is lacking in these essential elements, yields are adversely affected.
##### Bulk substrate and Trichoderma prevention
You need to know the pH of your initial substrate before and after mixing all ingredients. Check the pH every time you work with new pack/brick.
For bulk substrate the main ingredient is coco coir (loose in pack or pressed in bricks). The pH on label is 6.5. In fact the pH of each pack/brick is varied - pH 5.5 - 6.5.
The best basic recipe for bulk substrate is CVG (Coco coir + Vermiculite + Gypsum) or CVG with added lime (hydrated aka slaked lime):
- Coco coir - 1 brick (650g = 1,4 Lbs)
- Vermiculite - 8 cups (2 qts)
- Gypsum - 1 cup **OR** Gypsum 1/2 cup + Lime 1/2 cup
- Water - 18 cups of water (4.5 qts)
All you need on Amazon here -> [Ingredients for Coco Coir mix or CVG substrate](https://shroomok.com/amazon-kits/bulk-coco-coir-CVG-substrate-ingredients)
Prepare more or less, just follow the ratio.
##### How to prepare pH adjusted casing substrate
Actually, pH adjusted casing is a main protection against Trichoderma mold. The base for Casing layer is peat moss aka sphagnum, vermiculite and water. The additive for pH adjusting is hydrated (slaked) lime.
Sphagnum is acid, its pH vary from 2.5-3.5 to 4.5. We need pH 7.8-8.5.
The recipe below always works perfect! It can be used for Psilocybe Cubensis, Psilocybe Natalensis, Panaeolus and other species for which casing is a required cultivation step.
**The optimal casing substrate recipe:**
- peat moss (aka sphagnum) - 2 cups (Amazon)
- vermiculite - 1 cup (Amazon)
- hydrated lime (aka calcium hydroxide) - 1 tablespoon (Amazon)
- water - 1 cup
All you need on Amazon here -> [Ingredients for pH adjusted Casing substrate](https://shroomok.com/amazon-kits/casing-layer-ingredients)
Prepare as much as you need, just follow the ratio.
Peat based casing doesn't require sterilization (high pressure and high temperature) and rarely require pasteurization as it is non-nutrient type of substrate. However, I recommend pausterization for casing.
- Mix your substrate ingredients thoroughly.
- Place the prepared mix into a heat-safe bag, 5PP container or Mason canning jar.
- Heat water in pot with lid to around **65-75°C (149-167°F)** and immerse the jar with substrate. Or you can use a bain-marie (water bath) for pasteurization.
- Keep the substrate at this temperature for **1-2 hours**. Avoid letting the temperature exceed 80°C (176°F), as this can move toward sterilization and kill beneficial bacteria.
- Allow the substrate to cool completely in a clean area. Better to leave it for 24 hours before using it for pH stabilization.
- Before applying the casing, test the pH to ensure it is within the ideal range (7.8-8.2, up to 8.5). Adjust with more lime or water if needed.
- Casing layer should be applied with clean tools and in a sanitized area on **colonized bulk substrate.** The casing layer should be even, around 1/5-1/3 inch or 0.5-1 cm.
- Fruiting conditions should be provided right after casing.
> 💡 If you find products like "Trich preventer additive" it's mostly marketing. In fact the main content of such products are calcium carbonate or gypsum + hydrated lime, which are 10 times cheaper. Save your money ;)
##### How to check soil pH level?
✅ The best and the most accurate method is **Soil pH meter** or **Digital soil tester**
[](https://shroomok.com/en/wiki/File:Soil-pH-meter-for-mushroom-bulk-substrate-and-casing.jpg) Soil pH meter to check pH level of mushroom bulk substrate and casingInsert the tester tip into substrate and in a few minutes check the result. Such simple device may be useful in gardening.
**Shroomok's Choice on Amazon:**
[Luster Leaf Digital Soil pH Meter](https://www.amazon.com/BioLogic-MK1845-Digital-Meter-Plots/dp/B091FXGCTB?th=1&linkCode=ll1&tag=shroomok-20&linkId=2f941eb1ac782982a3634dec927bb241&language=en_US&ref_=as_li_ss_tl) $14.41
[Digital, Luster Leaf, Soil pH Meter](https://www.amazon.com/gp/product/B0786YZMC8?ie=UTF8&linkCode=ll1&tag=shroomok-20&linkId=bf7983b2bcb3a955a98997a7832518ce&language=en_US&ref_=as_li_ss_tl) - $23.25
[Digital, Luster Leaf, 3 Way Analyzer for Soil pH](https://www.amazon.com/Luster-Leaf-Fertility-Temperature-1836/dp/B08X6PM984?&linkCode=ll1&tag=shroomok-20&linkId=b6c5c23b4313010ffbdf54225b50f0a0&language=en_US&ref_=as_li_ss_tl) - $26.90
✅ Cheap and easy way is **pH Paper Test Strips**. Such tests may be useful in gardening as well
[](https://shroomok.com/en/wiki/File:How-to-check-soil-ph-for-mushroom-substrate-with-test-strips.jpg) pH test strips to check pH level of bulk substrate and casingUse **distilled water** and mix it with the soil in 1:1 ratio. Use paper test strips to determine the pH level based on the color chart.
**Shroomok's Choice on Amazon:**
[Soil pH Test Strips Kit, 3.5-9 Range, 100 Tests](https://www.amazon.com/gp/product/B07YZT5ZPJ/ref=as_li_tl?ie=UTF8&tag=shroomok-20&camp=1789&creative=9325&linkCode=as2&creativeASIN=B07YZT5ZPJ&linkId=64a76f9f1778c4e5b55cbd8839e5704c) - $12.98
✅ Improvised amateur method to determine pH level is **acetic acid** or **vinegar**.
Take a sample of wet soil and add a few drops of vinegar. If bubbles and foam appear, then soil is alkaline. If the amount of bubbles is small, then neutral, if no bubbles at all - soil is acidic.
Of course, this method will be rough and approximate. You won't be able to adjust accurately the pH level in this way.
##### Rehydration in pH adjusted water to prevent Trichoderma contamination
One of the methods to reboot pH level for mushrooms after harvesting is rehydration in alkaline water pH 8.0 - 9.0. The main ingredient we use here is hydrated lime (soluble in water):
> 💡 Check out details: [Soaking mushroom cake in alkaline water](https://shroomok.com/en/wiki/Rehydration_of_psilocybe_cakes#Soaking_mushroom_cake_in_alkaline_water)
Reapply casing layer to prevent green mold contamination (optional step, but may be beneficial if you catch contam often). Adding new layer of **pH adjusted casing** (about 0,5 cm) after rehydration helps to manage pH and protect mycelium.
> ⛔ Don't scrap mushroom cake and previous casing layer! Just add new thin layer to reboot pH, thus protecting mycelium
Casing layer is non-nutrient substrate. It is based on peat moss, vermiculite and pH adjusted. That's why casing content is unattractive for molds, but beneficial for mushrooms. Moreover casing top layer retains moisture extremely great and acts as a security guard for shrooms.
> 💡 Check out details: [Casing layer for growing magic mushrooms](https://shroomok.com/en/wiki/Making_mushroom_cake,_spawn_to_bulk,_and_casing)
#### What do I do if I see green mold growing?
Trichoderma spp. grow quickly and spread spores like wildfire. That's why isolation is a key.
🔴 Get contaminated mushroom cake/block/spawn/agar out of your house immediately! Keep healthy spawn bags/jars, tools, substrates, fruiting chambers, mushrooms far away from contaminated.
🔴 Don't open the spawn jar/bag with contaminated spawn indoor, because you can spread mold spores in your room. It's a high contamination risk for your future cultivations.
🔴 Treat affected tools/tubs and surfaces with a bleach solution and wipe with alcohol to kill the mold spores. You need to bleach and alcohol everything you think you touched, change the clothes and take a shower.
[Bleach Germicidal Cleaner Spray, 1 Qt](https://www.amazon.com/Clorox-Healthcare-Bleach-Germicidal-Cleaner/dp/B000GULS3W?&linkCode=ll1&tag=shroomok-20&linkId=dbc0b3685180ffa1c6ec7e06d2326ea8&language=en_US&ref_=as_li_ss_tl) $13.83
[Bleach Germicidal Wipes for surfaces, 150 Count](https://www.amazon.com/Clorox-Healthcare-Bleach-Germicidal-Canister/dp/B078MVPF95?&linkCode=ll1&tag=shroomok-20&linkId=3a7976335239d91f208ee349d3d9e6be&language=en_US&ref_=as_li_ss_tl) - $12.49
This will at least prevent the Trichoderma from infecting more of your current and future crops. You can bury contaminated mushroom cake and spawn in the garden.
> 💡 Contaminated cakes/blocks/spawn buried in the garden can produce healthy mushroom fruiting outdoor
#### Is it possible to treat Green Mold contamination on mushroom cake or spawn?
*Trichoderma* species are resistant to most agricultural chemicals, including fungicides. It is extremely aggressive and fast growing mold.
Trich spores easy spread in the air. Once you had green mold contamination you have high risk of contamination for the future cultivations and be ready to fight for a long time...
⛔️ No sense to treat contaminated spawn jars/bags. Throw them away without opening in the room. Open contaminated jars outdoor only!
[](https://shroomok.com/en/wiki/File:Spawn-jar-contamination-green-mold-trich.jpg) Mushroom spawn contaminated by green mold Trichoderma. Throw it away](https://shroomok.com/en/wiki/File:Green-mold-in-spawn-bag.jpg) Spawn bag contaminated by green mold Trichoderma. Toss it!
Even such tiny contamination should be tossed!
[](https://shroomok.com/en/wiki/File:Trich-mold-contam-in-spawn-jar.jpg) Green mold contam on mushroom spawn⛔️ No sense to treat contaminated mushroom cakes/blocks when green color detected on top layer.
Even if you see small green area. Throw it away immediately or bury in the garden
[](https://shroomok.com/en/wiki/File:Trich-mold-contamination-on-bulk-substrate.jpg) Trich mold contamination, start of sporulating. RIP[](https://shroomok.com/en/wiki/File:Start-of-trichoderma-sporulating-on-mushroom-cake.jpg) Trich contam, color changes from white to green[](https://shroomok.com/en/wiki/File:Green-mold-on-casing-layer-and-mushroom-mycelium.jpg) Contaminated cake in shoebox. Green mold contaminationGreen mold powder (spores of Trich) and such huge area of contamination is a dangerous sporulating phase. Don't let it get to such critical state!
[](https://shroomok.com/en/wiki/File:Monotub-mushroom-block-contaminated-by-trichoderma-mold.jpg) DANGER! TOSS IT IMMEDIATELY!⛔️ Don't use mushroom caps for making spore prints from contaminated mushroom cake. Trichoderma spores may be on mushroom stems and caps as well and you'll get contaminated spore print from the very beginning.
⛔️ Any treatment for Trichoderma mold is impossible and risks of future contamination increases greatly. I still recommend to throw away contaminated cakes/blocks to avoid INEVITABLE spreading of spores and work on prevention
> Preventive measures are always the best treatment!
⛔️ If you decide to cut contaminated green area it won't work, after 2-3 days Trichoderma will say hello again, even more than before, because you pushed spores during cutting process on the entire mushroom cake ⛔️ If you decide to spray contaminated area with alcohol or hydrogen peroxide (H2O2) you'll spread the spores of Trichoderma with aerosol flow and Trich will appear again soon
> 🔥 Keep in mind wildfire example as an analogue of spreading Trichoderma spores
##### Can I save mushroom culture on agar contaminated with Trichoderma mold?
Yes, you can save mushroom culture on agar by transferring healthy part of mycelium to new agar plate. Sometimes it takes 5-10 transfers to get clean culture. It makes sense for rare expensive mushroom cultures or if you have a patience and great desire to play with it.
##### How to treat Trichoderma mold on the early stage?
Any recommendations on treatment green mold isn't professional advice.
> If you are newbie grower toss contaminated cake immediately and forget about this paragraph
You can save the flush if you have pins or small shrooms on the cake and suddenly **early stage** of Trich contam happen.
> It is possible to stop **mild** green mold contamination **on the early stage** of Trichoderma development only. **If you see green color, it's too late to bother about treatment.** Throw it away immediately or you'll have to burn down your house, because it's too hard to fight with green mold after sporulating and spreading in the air
Again, this applies to small areas on the early stage (totally white!) of Trich contamination and it doesn't mean you can stop it for sure!
[](https://shroomok.com/en/wiki/File:Early-stage-of-trich-green-mold-contam.jpg) Early stage of Trich mold (totally white) possible to treat. Chances always 50/50. Photo by Almrey - Shroomok Growers Community on [Discord](https://discord.com/invite/ngKhQDmymD)For such cases mushroom farmers use salt application (or baking soda application, or garden lime application). It is more popular method for [Cobweb disease](https://shroomok.com/en/wiki/How_to_identify_and_get_rid_of_Cobweb_Mold "How to identify and get rid of Cobweb Mold") treatment, parasitic pathogen [Mycogone or Wet Bubble disease](https://shroomok.com/en/wiki/Mycogone_contamination_aka_wet_bubble_disease "Mycogone contamination aka wet bubble disease") and possible to use for Trichoderma as well
[](https://shroomok.com/en/wiki/File:Salt-application-for-cobweb.png) Salt application for mold. Credit: "Identification and control of Cobweb disease on mushrooms" by Helen Grogan, Teagasc and Richard Gaze, WHRI & ADAS> ❗️Edge of tissue should be totally sealed with salt!
This way you can seal and stop contamination development and possible spores spreading. But it doesn't mean it won't show up elsewhere on the cake. Trich can grow deep inside mushroom cake. ❇️ One more method is acid 30% hydrogen peroxide solution. Spray directly on contaminated area as soon as you noticed bright white area. Don't wait till it turns green!
> ❗️30% H2O2 is very acidic, protect your skin (wear gloves) and eyes!
Usually both methods works for one flush you are waiting for. It is not recommended to soak such mushroom cake in water after harvesting to avoid possible mold spreading all over the cake.
Such manipulations (salt/soda/lime application) helped me to save the Panaeolus cake that produced 3 more flushes after treatment (size of early Trich was like a coin). Also helped to save Oysters block. So, it works for cultivators! However mycologists don't do this and don't recommend any treatment, because they prefer to work on prevention. Although mushroom farmers and home growers don't hesitate to use treatment for saving harvest. Just keep balance between two points of view!
##### Can I reuse jars and tubs after contamination?
Yes, it is possible to reuse jars and fruiting chambers **after washing them in bleach solution** to kill mold spores. Wipe fruiting chamber (shoebox/growbox/monotub) with isopropyl alcohol for additional treatment before spawn to bulk.
#### Mushroom Mycelium vs Trichoderma battle
Mushroom mycelia not so defenseless. Mycelia have immunity and always struggle with any kind of contamination. Sometimes can literally eat bacteria or mold contamination.
This battle between mycelium and green mold contamination was shared by **Mycelia P** in Shroomok Growers Community on [Discord](https://discord.gg/ngKhQDmymD).
Who will win this time!? Take a look day by day fighting
[](https://shroomok.com/en/wiki/File:Mycelia-vs-trich-contam-day-1.jpg) Mycelia vs Trich contam. Day 1[](https://shroomok.com/en/wiki/File:Mycelium-vs-trichoderma-contamination-battle-day-4.jpg) Battle between mycelium and trich. Day 4[](https://shroomok.com/en/wiki/File:Mycelia-vs-green-mold-contam-battle-day-6.jpg) Mycelia vs Trich. Day 6[](https://shroomok.com/en/wiki/File:Mushroom-mycelium-vs-trichoderma-mold-contamination-battle-day-8.jpg) Battle between mushroom mycelia and green mold. Day 8[](https://shroomok.com/en/wiki/File:Mushroom-mycelia-vs-green-mold-contamination-day-11.jpg) Mycelium vs Green Mold. Day 11#### Is Trichoderma useful for anything?
Many species have found wide practical application: for food production, pulp and paper production, textile industries, for disposing of waste and especially in agriculture as biocontrol.
Being a mycoparasite, the *Trichoderma* *viride* are very popular natural anti-fungal treatment for plants and bio-fertilizer for seed preparation. Trich creates a protection for plant roots against other fungi. It is natural antifungal treatment for plants. It is also antibiotic producers, especially of wood-rotting fungi. Trich promotes the growth of the plants and plant defense responses.
*Trichoderma harzianum is also* well-known species and is widely used as a biocontrol agent and for enzyme production.
*Trichoderma reesei is a* highly efficient producers of many extracellular enzymes*.* They are frequently used in the food and textile industries for these purposes. For example, cellulases from these fungi are used for denim fabrics (soft, stone-washed effect denim).
So funny, isn't it? Trichoderma is useful... if you’re not trying to grow mushrooms!
#### Is *Trichoderma* toxic for people?
Human infection by species of *Trichoderma* (T. atroviride, T. harzianum, T. koningii, T. longibrachiatum, T. viride, T. citrinoviride, T. pseudokoningii, T. reeseiis) limited to individuals with severely weakened immune systems, provoke allergic reaction, coughing, sneezing, sore throats, and asthma.
However, some species are producers of potent mycotoxins.
*Trichoderma longibrachiatum* (produces small toxic peptides trilonginsis) often found in air conditioner filters, window filters, natural carpets, cabinets, on water-saturated wood items, wallpapers, gypsum walls, mattress dust, bathroom corners, and kitchen.
It can cause adverse health effects in **immunocompromised individuals:** mycosis, invasive sinusitis (inflamed sinuses), brain abscess, liver infection, necrotizing stomatitis (inflamed mouth), hypersensitivity pneumonitis, skin infections.
*Trichoderma viride* can produce gliotoxin, that inhibit immunity system and can also be neurotoxic.
> Normally, we are capable of fighting off any inhaled or ingested *Trichoderma spp.* spores. We don't live in a sterile environment, we contact with thousands of molds every day and our immunity system manage it every day. Don't be paranoid! Illness related to Trichoderma is rare in healthy people but common in those with compromised immune systems.
Regular overall cleaning, regular ventilation of the property, cleaning air conditioning and ventilation filters, using air purifiers, regular monitoring of your property/furniture for signs of moisture and stagnant air are preventing measures to combat mold and protect both your health and your shrooms
> Mold spores concentration (any mold, for that matter) differ from house to house. It also depends on the climate conditions and season of the year greatly. This can influence your growing cycles planning and preventive measures
#### Afterword
I know how contamination cases hurts, especially on the first try. In fact contamination happen to all cultivators, even experienced ones.
Don't regret throwing away the contaminated mushroom cake/jar/bag. Don't afraid to start again. Don't give up, my dear grower. Keep learning and keep growing!
If you find this guide helpful you can [🍄 Buy Shroomok a mushroom](https://www.buymeacoffee.com/shroomok) as a donation, ask a question in comments to donation or just say something nice!
You can also request a [Personal Consultation](https://www.buymeacoffee.com/shroomok/extras) with Shroomok
Have a happy growing and healthy shrooms!
## Why Mushrooms too Leggy, Fuzzy Feet and White Dots on Caps
[Why Mushrooms too Leggy, Fuzzy Feet and White Dots on Caps](https://shroomok.com/en/wiki/Why_Mushrooms_too_Leggy,_Fuzzy_Feet_and_White_Dots_on_Caps)
[](https://shroomok.com/en/wiki/File:Fuzzy-feet-caps-in-mushroom-cultivation.jpg) Fuzzy feet and caps in mushroom growing### What the long stems, fuzzy feet and fuzzy caps indicate
Okay, grower! You’re enjoying your own cultivation process, and suddenly notice your mushrooms are starting to grow a fuzzy stem, become leggy and strange fluffy white dots appear on the mushroom caps. Why this happen?
What is this fuzzy stuff? Is it contamination? What's wrong with such mushrooms? Is it possible to fix?
Lots of questions, so let’s get started!
First of all, it's not contamination! All these cases have the same main reason - lack of oxygen, lack of fresh air exchange (FAE) in fruiting chamber during fruiting period
#### Mushrooms too leggy
Mushrooms and mycelium breath like humans. They inhale oxygen (O2) and exhale carbon dioxide (CO2).
When oxygen level is too low, fruit bodies grow long stems to search for fresh air. As a result mushrooms have small caps and spindly stems.
[](https://shroomok.com/en/wiki/File:Leggy-mushrooms.jpg) Long stems and small caps due to lack of FAE#### Fuzzy feet
In fact fuzzy feet is mushroom mycelium. It isn't huge problem. Moreover not contamination case!
[](https://shroomok.com/en/wiki/File:Fluffy-feet.png) Fluffy base of mushroom stems[](https://shroomok.com/en/wiki/File:Fuzzy-feet.png) Fuzzy feet[](https://shroomok.com/en/wiki/File:Fuzzy-feet-in-mushroom-cultivation.jpg) The base of mushroom stems are fuzzy. Photo by **ChanandlerBong** - Shroomok Growers Community on [Discord](https://discord.gg/ngKhQDmymD)Such fuzziness is typically caused by two growing factors.
1️⃣ Lack of fresh air exchange (FAE) in fruiting chamber
As we know, CO2 is heavier than oxygen and concentration is higher at the bottom of the tube and lower as we go up. So that, the base of our shrooms will be the first area struggling to breathe.
2️⃣ High relative humidity level in combination with lack of FAE
So strange, isn't it? We know that mushrooms enjoy high humidity! It's true, however in this case high relative humidity influences gases ratio in fruiting chamber. When we increase humidity and add moisture, we are removing free space for oxygen in the air – thus, our mushrooms suffocate, and the fuzzy feet result.
[](https://shroomok.com/en/wiki/File:Fuzzy-stems-in-mushroom-growing.jpg) Fuzzy base of stems. Photo by Leo - Shroomok Growers Community on [Discord](https://discord.gg/ngKhQDmymD)#### Fuzziness or contamination?
Usually newbie growers confuse fuzziness symptom on stems and white dots on caps with Cobweb Mold contamination.
It's easy to identify fuzzy feet and cobweb disease. Just remember, cobweb has thiner threads and greyish color in comparison with snow-white mycelium
[](https://shroomok.com/en/wiki/File:Fluffy-mushroom-stems-or-contamination.jpg) Snow-white Fuzzy Feet and white dots on caps is mycelium, not contam! Photo by **ChanandlerBong** - Shroomok Growers Community on [Discord](https://discord.gg/ngKhQDmymD)[](https://shroomok.com/en/wiki/File:Cobweb-mold-and-mushrooms.png) Thin grey Cobweb Mold contamination on mushroom cake> 🔴 More examples: [How to identify and get rid of Cobweb Mold](https://shroomok.com/en/wiki/How_to_identify_and_get_rid_of_Cobweb_Mold "How to identify and get rid of Cobweb Mold")
#### White dots or fluffy mushroom caps
One more example usually confused with mold contamination or mutation. But the reason is poor FAE again.
[](https://shroomok.com/en/wiki/File:Fuzzy-mushroom-cap-shroomok-community.jpg) Fuzzy cap. Photo by **ʂƙı℘ɬཞı℘℘ıŋ** - Shroomok Growers Community on [Discord](https://discord.gg/ngKhQDmymD)Let me show you real case in Shroomok Growers Community on Reddit
[](https://shroomok.com/en/wiki/File:Fuzzy-mushroom-caps.jpg) Fuzzy mushroom caps. Case and photo by **u/angelinejovan** - Shroomok Growers Community on [Reddit](https://www.reddit.com/r/Shroomok/comments/v9exua/contamination/)> **angelinejovan:** Contamination? Fuzzy caps! What the hell is this!?
> **shroomok:** Looks ok so far, don't worry. It's just mycelium, not contam! Your shrooms need more fresh air, that's why fuzzy. Try to FAE 4-6 times/day
> **angelinejovan:** Thank you for all your help! What a difference a day makes. Yesterday they were fuzzy, then after fanning every four hours religiously overnight the fuzzies have stopped growing. And I’ve been able to harvest over 7 ounces today. I am so ecstatic!! (BTW the fuzzies peel off the caps & stems)
#### How to fix fuzzy feet, fluffy caps and long stems?
Try to introduce more fresh air for your mushrooms. Usually in 2-3 days you can fix it easy.
✅ **Manual FAE.** Open your fruiting chamber for 3-5 minutes at least 4-6 times/day.
✅ **Natural airflow in MonoTub.** Properly made air vents in MonoTub create natural airflow. If air vents made wrong you have "dead zones" in the corners of your tub and poor overall FAE
> 🔴 Recommended: [Monotub Guide](https://shroomok.com/en/wiki/Forget_Monotub_Kit._DIY._How_to_make_Monotub_for_Mushrooms_by_your_own "Forget Monotub Kit. DIY. How to make Monotub for Mushrooms by your own")
✅ **Use additional gadgets for FAE in fruiting chamber:** aquarium air pump, PC fan or combination PC fan + humidifier
**Shroomok's choice on Amazon:**
[Quiet PC Fan with power plug cord](https://www.amazon.com/gp/product/B009OWVUJ0?&linkCode=ll1&tag=shroomok-20&linkId=b06971d01b5cc8b91e373b531ed5d290&language=en_US&ref_=as_li_ss_tl) $19.99
[Powerful Air Pump - for 20-200 Gallon - 2 Outlets](https://www.amazon.com/gp/product/B08HMZSH9J/ref=as_li_tl?ie=UTF8&tag=shroomok-20&camp=1789&creative=9325&linkCode=as2&creativeASIN=B08HMZSH9J&linkId=129cc0f3bc777d413baed339a79e2a6c) - $19.99
[Humidifier Fog Machine Mister 3L](https://www.amazon.com/Coospider-Terrariums-Humidifier-Paludarium-Amphibians/dp/B07VVNP7F3?&linkCode=ll1&tag=shroomok-20&linkId=34c372047e4963ecfbf583c1bf7bce03&language=en_US&ref_=as_li_ss_tl) $49.77
✅ **Use CO2 detector to monitor air quality.** CO2 level in fruiting chamber should be 600-800 ppm (up to 1000 ppm)
**Shroomok's choice on Amazon:**
[Coreel Portable CO2 Monitor + Temperature & Humidity, LCD Display](https://www.amazon.com/gp/product/B08NP3L8JK?&linkCode=ll1&tag=shroomok-20&linkId=8d141ab041cf69b289f6ddeca342c3b6&language=en_US&ref_=as_li_ss_tl) $46.99
[INKBIRDPLUS Air Quality Monitor: CO2, Temperature, Relative Humidity for Grow Tents](https://www.amazon.com/dp/B09MRX4F12?&linkCode=ll1&tag=shroomok-20&linkId=98b6d38b888809159cdd64094523ed0b&language=en_US&ref_=as_li_ss_tl) $69.99
[7-in-1 Air Quality Monitor, Real Time Data Recording](https://www.amazon.com/dp/B09FRYZCD9?&linkCode=ll1&tag=shroomok-20&linkId=2429fbd773f4596320f4fed83f1ae856&language=en_US&ref_=as_li_ss_tl) $129.99
#### Wrap it Up!
Mushrooms interact with us, always give us an exact sign what they need. Long stems, fuzzy feet and fluffy caps mean mushrooms are begging for a breath of fresh air.
Learn mushroom language, grower!
If you find this guide helpful you can [🍄 Buy Shroomok a mushroom](https://www.buymeacoffee.com/shroomok) as a donation and say something nice!
You can also request a Personal consultation on [Growing Mushroom Troubleshooting](https://www.buymeacoffee.com/shroomok/extras)
Be attentive to your shroom pets and have a happy growing!
## Black spots on Mushrooms and Mycelium
[Black spots on Mushrooms and Mycelium](https://shroomok.com/en/wiki/Black_spots_on_Mushrooms_and_Mycelium)
[](https://shroomok.com/en/wiki/File:Dark-spots-on-mushroom-caps-contam-or-not.jpg) Mushroom caps and mycelium turned black### Strange black color on mushroom caps and mycelium
You can observe such dark spots on mushroom caps and mycelium right after torn veil. Since this moment sporulating phase is started. It is vital importance for mushrooms to spread all mature spores and continue fungi life
#### Black spots on mushrooms and mycelium: contamination or not?
The color of fungi spores are black-violet or brown-violet. At first spores appear on the torn veil and mushroom stem.
[](https://shroomok.com/en/wiki/File:Spores-on-mushroom-stem-and-veil.jpg) Mushroom spores (brown-violet color) on stem and torn veil. It's normal!If you leave mushrooms on the cake to sporulate for 1-2 days they drop huge amount of spores on the substrate, other cakes, mushrooms and even walls of fruiting chamber. Total mess at first glance looks like contamination. Extreme sporulating aesthetically looks unattractive.
[](https://shroomok.com/en/wiki/File:Spores-on-mushroom-cake.jpg) Spores everywhere in fruiting chamber: on mushroom cakes, on mushroom caps and walls of the growbox. Photo by mrzimm - Shroomok Growers Community on [Discord](https://discord.gg/ngKhQDmymD)Newbie growers often confuse such case with black mold contamination, inky cap disease or bacteria contam.
Usually noobs so surprised and scared to see "horrible" changes that can appear just a few hours after or one day after
> "Holy black crap - is this the nasty stuff I think it is? Wwwaaahhhh"
[](https://shroomok.com/en/wiki/File:Spores-on-mushroom-cake-after-harvesting.jpg) Black spots of spores on mushroom cake after harvesting. Photo: **angeline** on Shroomok [Discord](https://discord.gg/ngKhQDmymD)When realised it's just spores:
> "OMG what a f\*vking noob I am! Not black mold but SPORES! Took three (shrooms) this size out of tub… they all looked like this - spores ejected! Hahahaha learning - all the time learning"
[](https://shroomok.com/en/wiki/File:Shroom-sporulating.jpg) Harvested mushroom that started sporulatingNothing to worry about, grower! It’s not a contamination, just mushroom spores create such layer.
#### Mushrooms spores on mycelium and shrooms. Is it safe or not?
Since torn veil mushrooms stop their growth. Spores spreading in the air. After sporulating fruit body become useless, life cycle closed.
[](https://shroomok.com/en/wiki/File:Spores-on-mushrooms-before-harvesting.jpg) Spores released on shroom caps and mycelium. Hurry up! After spore releasing, the process of decomposition of the fungus cells begins. Mushroom body literally dying and slowly loses its quality and potency. That's why no sense to wait too long. Moreover, it influences pin development of the next flush and can provoke contamination.
[](https://shroomok.com/en/wiki/File:Spores-on-mushroom-caps.jpg) Mushroom caps turned black with spores. Hurry up!In fact we wait for torn veil if we are going to make spore prints.
> 🔴 Recommended: [How to make magic mushroom spore print](https://shroomok.com/en/wiki/How_to_make_magic_mushrooms_spore_prints "How to make magic mushrooms spore prints")
It's too late to make spore prints after releasing spores, because they are mostly on caps and mycelium.
[](https://shroomok.com/en/wiki/File:Dark-mushroom-caps-sporulating.jpg) Spores on caps and mycelium. Photo by **mrzimm** - Shroomok Growers Community on [Discord](https://discord.gg/ngKhQDmymD)If you don't need prints you can crop your mushrooms anytime: before torn veil, or right after torn veil.
> For consuming I crop shrooms earlier, before torn veil. Such mushrooms are denser and taste better to me IMHO
There is one more reason to avoid such rich sporulating. Spores create a layer on mycelium and inhibit pins development.
[](https://shroomok.com/en/wiki/File:Mushroom-sporulating-phase.jpg) Spores on mushroom caps and cake. Photo by Leo - Shroomok Growers Community
The last point. If the fruiting bodies begin to rot, it can lead to contamination of the entire mushroom cake/block.
[](https://shroomok.com/en/wiki/File:Spores-on-mushrooms-and-mycelium.jpg) Spores on mushrooms and mycelium#### Beautiful cases of mushroom sporulating
Right after torn veil air currents carry spores and deposit them on the tops of the caps and sometimes creating beautiful arts.
[](https://shroomok.com/en/wiki/File:Spores-art.png) Spores art on mushroom caps
Such mild signs of sporulating on mushroom caps is totally normal and cute
[](https://shroomok.com/en/wiki/File:Gt-harvest-and-spores-on-mushroom-caps.png) Mild spores signs on mushroom caps
Check out spores on gills under the microscope. Here are the billions of spores produced by mushroom fruit body
[](https://shroomok.com/en/wiki/File:Mushroom-spores-on-gills.jpg) Spores on gills, microscopySpores of Golden Teacher for microscopy use
[](https://shroomok.com/en/wiki/File:Mushroom-spores-golden-teacher-microscopy.jpg) Spores of Psilocybe Cubensis Golden Teacher, microscopy. Photo by **mrzimm** - Shroomok Growers Community on [Discord](https://discord.gg/ngKhQDmymD)
Harvest your shrooms in time and ave a happy growing!
If you find this guide helpful, please support me with a cup of coffee on [☕️ buymeacoffee](https://www.buymeacoffee.com/shroomok)
Join Shroomok on **Discord** and **Reddit** for questions and sharing your experience.
You can also leave your **comments on this page below** ⬇️
Peace, Shroomok ❤️
## Mycogone contamination aka wet bubble disease
[Mycogone contamination aka wet bubble disease](https://shroomok.com/en/wiki/Mycogone_contamination_aka_wet_bubble_disease)
[](https://shroomok.com/en/wiki/File:Wet-bubble-mycogone-contamination-shroomok.jpg) Wet bubble aka Mycogone contamination guide by Shroomok### Wet bubble or Mycogone contamination: how to identify, prevent and treat it
#### What is wet bubble disease?
This is a fungal disease caused by parasitic pathogen ***Mycogone perniciosa,*** that usually affected pinheads and mushroom fruitbody. It has a few often used names: mycogone, wet bubble, white mushroom mold, vesicular disease, La Mole.
It is one the most common problems of commercially cultivated edible mushrooms.
> *Mycogone perniciosa n*ot known to be pathogenic to people or animals!
Usually we can find many examples of mycogone contamination from Agaricus bisporus mushroom farmers. Although wet bubble affected magic mushrooms, i.g. Psilocybe Cubensis quite often.
Let's figure out mycogone contamination in magic mushrooms cultivation, mostly for Cubensis.
#### Symptoms of wet bubble contamination
🔴 The early stage of *Mycogone perniciosa* is characterized by the development of **dense** **white fluffy mycelial growth or wart-like growths**, that usually appear on pinheads and mushroom fruiting bodies.
[](https://shroomok.com/en/wiki/File:Wet-bubble-contamination-mycogone.jpg) White fluffy mycelial growth of Mycogone on all mushroom pinheads. Orange cycle - early mycogone contamination, red circle - late wet bubble disease
🔴 On the later stage of Mycogone contamination you can admit pins and mushrooms **deformation** or development of **distorted masses** of mushroom tissues, or **fluffy blobs** instead of normal pinheads and mushrooms. As a result pinheads and mushrooms can't develop at all
[](https://shroomok.com/en/wiki/File:Mycogone-perniciosa-aka-wet-bubble-disease.jpg) Pinheads and mushroom deformation as a symptom of mycogone perniciosa contamination in mushroom growing. Photo by Gorka on Shroomok Discord
🔴 The shapeless mass initially is white and fluffy, but become brown with age and then decay.
[](https://shroomok.com/en/wiki/File:Mycogone-contamination-aka-wet-bubble-in-mushroom-growing.jpg) Mycogone blobs become brown with age and start to rot. Photo by Gorka on Shroomok Discord🔴 On the late stage of wet bubble an **amber liquid** (yellowish, orange, brown) oozes from pins, blobs and mycelium clots
[](https://shroomok.com/en/wiki/File:Mycogone-wet-bubble-contamination-in-mushroom-growing.jpg) Yellow, brown, orange, amber liquid oozes from mushrooms, pinheads or mycelium clots is a sign of wet bubble disease
🔴 This fluid contains spores and bacteria that spread all over the mushroom cake and accompanied by objectionable odor, distinctive **rotten smell.** Although, the smell is imperceptible with a small area of contamination
[](https://shroomok.com/en/wiki/File:Wet-bubble-contamination-mycogone-on-mushroom-cake.jpg) Wet bubble disease spread over the Cubensis mushroom cake in monotub. Late stage of mycogone contamination. Photo by kp shrooms on Shroomok Discord> 🔴 In dry conditions, the shapeless masses remain dry in appearance and similar to ***Verticillium*** contamination or ***Dry Bubble disease***
#### How to recognize whether it's mycogone contamination or mycelium piss
Wet bubble contamination seems similar to mycelium metabolites, but Mycogon has some differences.
Mycogone usually appears on pinheads and mushrooms. Wet bubble creates a blob with porous surface, like a sponge. Look, each yellow-brown drop has its place. Usually this liquid is slimy and smelly.
[](https://shroomok.com/en/wiki/File:Wet-bubble-or-metabolites.jpg) Mycogone contamination or mycelium metabolites? Porous blob like a sponge with oozes yellow-brown liquid is wet bubble disease. Photo by Gorka on Shroomok Discord
Mycelium piss, also known as mycelium metabolites, usually appear due to stress on mushroom mycelium. Metabolites are transparent. Without any odor at all. Without slime, like water, but with yellow-brown color.
[](https://shroomok.com/en/wiki/File:Mycelium-metabolites-piss-and-overlay.jpg) Mycelium piss due to stress and overlayMycelium piss is not a contamination itself and totally save.
> 🟠 Recommended guide: [Mycelium metabolites or mushroom piss](https://shroomok.com/en/wiki/Mycelium_metabolites_or_mushroom_pee "Mycelium metabolites or mushroom pee")
#### Main causes of mycogone contamination
[](https://shroomok.com/en/wiki/File:Yellow-liquid-on-mycelium-wet-bubble-contamination.jpg) Wet bubble on mushroom cake, Psilocybe Cubensis growingMycogone perniciosa forms two kinds of spores:
🧬 **conidiospores** — unicellular, thin-walled spores, with a relatively short life, very light, therefore, they can be carried by air currents
🧬 **chlamydospores** — consist of two cells, thick-walled, brown spores, they stay viable for several years
The main Mycogone habitat is soil, that's why the main source of contamination is mostly the bulk substrate and casing substrate.
The disease can spread by spores and pieces of mycogone mycelium, adhering to any objects that touch the fungus (air flow, dust, tools, flies and mites, grower's hands and clothes).
Incubation period for Mycogone is two weeks. What does it mean?
If Mycogone appears during the first flush, then it spores were probably introduced via the bulk or casing substrate at the time of its application or during spawn run.
Later contamination (more than 2 weeks after spawn to bulk and casing, 2-3 flush) are more probably spread by air, grower's hand and clothes, insects etc.
#### Preventive measures of wet bubble disease
Substrate pausterization (sterilization) and sterility is a key!
[](https://shroomok.com/en/wiki/File:Mushroom-contaminants-wet-bubble-disease.jpg) Mycogone contamination on P. Cubensis mycelium✔️ Bulk and casing substrate pausterization in bucket. Spores of *Mycogone perniciosa* are killed at 120F or +49C and higher when exposed to moist heat (pasteurization) for 24 hours.
✔️ Bulk and casing substrate pausterization in the oven also works great (at least 160F or +70C for 1-2 hours).
✔️ Sterilized bulk and casing substrate (pressure cooker or autoclave at 15 psi for 1 hour). Although pausterization is preferable for bulk and casing.
✔️ Good fresh air exchange (FAE) in fruiting chamber. Stagnant air causes a wide range of contaminants.
✔️ Lowering temperature. Mycogone doesn't grow at temperatures lower than 60F or 15C. For many edible mushroom species it's a good point, however not for warm-loving magic mushroom species.
✔️ Strict hygienic conditions before and during any mycological manipulations (use sterile tools, wipe surfaces and tools with iso alcohol, wash your hands, wear gloves and face mask)
#### Wet bubble treatment
Mycogone is a vigorous and resilient contaminant. More effective to prevent this contamination than treat it.
[](https://shroomok.com/en/wiki/File:Wet-bubble-disease-cubensis-cultivation.jpg) Shapeless mass with rotted smell is a sign of late mycogone contaminationSmall mushroom cakes or mushroom blocks in monotub usually have not so big surface as mushroom bed on the farms. If you have Mycogone on top layer probably the entire bulk substrate and/or casing layer is contaminated with Mycogone spores, if it is you can’t just scoop it out. It means Mycogone can appear again and again...That's why the most effective and popular advises here are: toss it immediately, bury in the backyard or burn it!
Let's look at the experience of mushroom farmers! Do they really burn mushroom blocks/beds with infected area **size of a coin**?
**1) Non toxic, the most common method is used by mushroom farmers for Mycogone treatment (the size of a coin!)**
Remove localised pieces of Wet Bubble disease carefully, using a disposable glove or plastic bag. Once in the bag or glove, carefully invert the bag or glove over it, close securely and dispose of safely.
Then the localized area is:
a) sprinkled with salt, baking soda or ground lime
[](https://shroomok.com/en/wiki/File:Salt-application-for-cobweb.png) Salt application. Credit: "Identification and control of Cobweb disease on mushrooms" by Helen Grogan, Teagasc and Richard Gaze, WHRI & ADASb) or watered with a formalin (formaldehyde) solution and then strewed with ground lime. These areas can be completely removed the next day, grasping the casing layer of a larger diameter.
> ❗️Don't mist/spray/water/rehydrate mushroom cake until the contaminated area is treated to avoid infection spreading all over the mushroom cake
**In literature, the following recommendations for Mycogone prevention and treatment are given:**
2\) According to *Kneebone (1961)* he recommends the use of chlorinated water (150-250 ppm) for misting/watering to prevent Mycogone spores germination.
**How to prepare 150-250 ppm Chlorinated Water?**
Dissolve the bleach (Sodium Hypochlorite - NaOCl) in 1 liter of water according to these ratios:
- NaOCl **5.25%** ([Amazon](https://amzn.to/3RPvnic)) - add **3.0-5.0 ml** per 1L of water
- NaOCl **6.0%** ([Amazon](https://amzn.to/45qU9IG)) - add **2.6-4.4 ml** per 1L of water
- NaOCl **7.5%** ([Amazon](https://amzn.to/3rGVs8y)) - add **2.1-3.5 ml** per 1L of water
- NaOCl **12.5%** ([Amazon](https://amzn.to/3ZTQSAz)) - add **1.3-2.1 ml** per 1L of water
- Fill a spray bottle with the solution and spray it on casing surface.
3\) Spray of Benomyl 0,1% (also marketed as Benlate) fungicide immediately after casing has been found one of the most effective *(Gupta et al., 2018).*
4\) Application of fungicides: Carbendazim, Chlorothalonil, Prochloraz Manganese complex (Sportak 50 WP) 0,1% into casing material *(Gupta et al., 2018).*
5\) A spray of 0,8% Formalin (formaldehyde) on casing surface, immediately after its application is also effective *(Gupta et al., 2018).*
If you find this guide helpful support my work and [buymeacoffee](https://www.buymeacoffee.com/shroomok)
Feel free to ask your questions on [Shroomok Discord](https://discord.gg/ngKhQDmymD) or [Reddit](https://www.reddit.com/r/Shroomok) or **in comments** to this post ⬇️
Have a happy growing and healthy shrooms!
## My incubator with spawn jars was overheated
[My incubator with spawn jars was overheated](https://shroomok.com/en/wiki/My_incubator_with_spawn_jars_was_overheated)
[](https://shroomok.com/en/wiki/File:Incubator-high-heat-for-mycelium.jpg) High heat in incubation box, 105F for a few hours. Original photo by D!NGO on Shroomok Discord### Will mycelium survive if my incubator accidentally overheated
A real case that can happen to every mushroom grower
> D!NGO: So my thermometer fell out of the box while I was away at work… I'm screwed on this, aren't I? Is it possible they survived at 105°F (40°C)? That would be such a life saver! It's B+ strain btw, if that means anything
**Answer from Shroomok:** Temperature is one of the most critical factors in mushroom cultivation for any kind of fungi as it affects survival overall, growth rate, time of fruiting, yields, **molecular changes in protein structure** and even mushroom morphology.
The survival of fungi is determined **by temperature**, but also **exposure time**.
Mycelium perishes at high temperatures **around 113°F (45°C)**. However, prolonged exposure at temperatures above 95°F (35°C) more than 3-4 hours can also destroy mycelium cells and eventually kill mycelium.
> It was shown in researches and experiments with shiitake and warm-weather species by *Tokimoto and Komatsu (1978, 1982)*
**D!NGO:** This is very helpful! Thank you. I haven't thrown anything away yet so fingers crossed
**Shroomok:** Let's hope for the best 🤞 Keep us updated please!
**D!NGO:** Dito! I be sure to document everything and go from there!
**Notes to consider for other growers:**
1. If you are using a thermostat aka temperature controller, make sure to place the temperature sensor inside the box.
2. Temperature controller is optional, but very helpful device. It turns on/off the heating element (i.g. heat mat) within required temperature range (typically we need around 75-80F).
3. If you don't have thermostat, test the box (temperature inside for a few hours) before using it as an incubation box for jars/bags. Use at least simple thermometer inside the box.
**Useful stuff on Amazon:**
- [Digital Thermometer, Hygrometer with Remote App](https://amzn.to/3vcCHLH) $12.99 - you'll receive an alert once the temp. is out of its preset range
- [Reptile Heat Mat 9" x 16"](https://amzn.to/41AtSHP) $10.99 - budget option, with manual temperature regulator, but w/o thermostat.
- [Inkbird Digital Temperature Controller](https://amzn.to/48dT7Cc) $35.00 - good quality thermostat w/o heating mat
- [VIVOSUN Heat Mat 10"x 20.75" with Digital Thermostat](https://amzn.to/48wc8zq) $30.99 - 2-in-1 Combo Set
Some time later…
**Shroomok:** Hey D!NGO! Do you remember when you accidentally left spawn jars at 105°F? Did the jars survive? Any updates?
**D!NGO:** They did not unfortunately. They ended up dying off after a few days. Apparently it was left at that temperature for a few hours
**Shroomok: A**ll the jars dead? And mycelium was already there, right?
**D!NGO:** Yeah they all turned black and just stayed that way. I kept them 3 weeks to see if anything would change and it didn't. And yeah... They were about 1/8th colonized
**Shroomok:** You're not alone with this case. Thank you for update!
One more case later:
> Hey guys, quick one, stupidly left my heater on for about an hour and a half and the room got to 120°Fahrenheit (49°C). Will the jars be ok? It’s cooled down now. Quite a lot of condensation in the jars but they seemed to have cooled off
What do you think happened next? :(
## Mushroom caps splitting and cracking issue
[Mushroom caps splitting and cracking issue](https://shroomok.com/en/wiki/Mushroom_caps_splitting_and_cracking_issue)
[](https://shroomok.com/en/wiki/File:Mushroom-caps-splitting-cracking-issue.jpg) Mushroom caps and stems split in mushroom growing### Split or cracked mushroom caps: main reasons and how to fix them
Split or cracked mushroom caps (stems as well) can occur in any active or edible mushroom species. Let's explore the main causes and how to address this issue.
[](https://shroomok.com/en/wiki/File:Cracked-shroom-caps.jpg) Cracked shrooms caps#### Main causes of cracked or split mushroom caps
As you probably know, mushrooms consist of about 90% water and require high relative humidity (RH) of around 90% for pinhead initiation and fruit body growth.
The mushroom cake/block may be moist enough, but the air outside the cake/block is too dry. Usually, room RH varies from 30% to 70%. This means that for mushrooms, you need to maintain higher humidity than in your room. That's why we use fruiting chambers as closed environments with specific climate conditions for mushrooms (such as monotubs, shoeboxes, growboxes, dub tubs, plastic bottles, grow tents, and grow rooms).
🔴 **Fluctuations in relative humidity (RH).** The sharp difference between the required humidity (90%) and the low humidity for mushrooms (lower than 85%) causes a fast evaporation rate, moisture loss, and mushroom dehydration.
[](https://shroomok.com/en/wiki/File:Mushroom-cap-split-deformation.jpg) Mushroom cap split[](https://shroomok.com/en/wiki/File:Cracks-on-mushroom-caps.jpg) Caps cracks due to dehydration - low RH and dry mushroom cake
🔴 Moisture loss also occurs due to **active fresh air exchange (FAE) and frequent aggressive fanning**. As a result, we experience rapid moisture loss, leading to cracks on caps and stems as well.
[](https://shroomok.com/en/wiki/File:Mushroom-stem-split.jpg) Mushroom stem split🔴 Another reason for split caps is a **high temperature in the fruiting chamber.** In this case, yellowish pigmentations and secondary metabolites usually appear on mushrooms and mycelium.
> Imbalanced or incorrect fruiting parameters can impact the development of mushroom fruit body
🔴 Lastly, cracked mushroom caps and abnormal growth can be a result of **genetic factors, mutations.**
[](https://shroomok.com/en/wiki/File:Cracked-split-mushroom-caps-APE.jpg) APE shroom caps are cracked. Photo: Mycelia PSome mutations are triggered by sharp changes or improper fruiting conditions. Certain genetic mutations are already present in cells (for instance, mushroom spores with genetic mutations) from the very beginning of mycelium development. Sometimes mutations look funny.
[](https://shroomok.com/en/wiki/File:Cracked-mushroom-cap-genetic-mutation.jpg) Mushroom cap cracked due to genetic mutation> ❗️ Pay attention! If cracked caps and/or split stems have color changes (yellow, brown, gray, black), have spotting or necrotic symptoms, abnormal deformations, then it can be a sign of contamination!
#### How to fix mushroom cracking
You cannot fix it if it has already happened; however, it is possible to prevent it in future flushes.
##### Maintain a balance between fruiting parameters
Track your fruiting parameters using a simple device (available on [Amazon](https://amzn.to/3O2vbKK)): relative humidity, temperature, and CO2 level (optional).
##### Maintain relative humidity
To maintain high RH, use ultra-fine water mist. The Flairosol spray bottle (available on [Amazon](https://amzn.to/44IMZAq)) is a cheap and effective solution for manual misting. Mist the walls of your tub! Don't spray on mycelium and mushrooms directly!
A fogger/humidifier (available on [Amazon](https://amzn.to/3nM5jrY)) can also be used, although it is more suitable for large tubs or grow tents. Avoid water pools on mushroom cake.
##### Provide gentle fresh air exchange to reduce CO2 level
Passive natural FAE through air vents in your tub or gaps between the tub and lid is sufficient. Avoid vigorous fanning as it can dry out your cake and mushrooms.
> Active FAE involves using a fan or waving a lid, while passive FAE relies on allowing air to naturally flow and diffuse
An aquarium air pump ([Amazon](https://amzn.to/3LTrC76)) or any small PC fan ([Amazon](https://amzn.to/3pYbdag)) are good solutions for additional FAE in a growbox.
If you use a fan, turn it on a few times a day for 1-2 minutes. Mist immediately after fanning.
##### Proper temperature for the mushroom fruiting period
Each mushroom species requires a specific temperature range for normal fruiting, and the temperature difference can vary significantly between species. For edible mushrooms, the temperature ranges from 50°F to 82°F (10°C to 27°C), while for active mushrooms, it can range from 50°F up to 100°F (10°C to 40°C).
> Fresh air exchange, relative humidity, and temperature should be balanced during the fruiting period
##### Genetic isolation
Starting your growing journey with a spore syringe is always like a lottery. You never know what you'll end up with. Many mushroom colonies coexist, resulting in a wide genetic variety within the same mushroom cake/block.
You cannot fix genetic mutations during the cultivation process. However, you can work on genetic isolation (strain isolation, selection, cloning) to achieve perfect mushroom fruits in the future.
#### To sum it up
Mushroom splitting and cracking are neither contamination nor a disease. Such mushrooms are safe to consume.
However, you should check your fruiting parameters: relative humidity (should be 85-95%), temperature (check this parameter for each species), and fresh air exchange (natural FAE or active FAE with a timer and schedule).
All these factors should coincide and be balanced.
If you find this guide helpful support my work with subscription or one-time donation on ☕️ [buymeacoffee](https://www.buymeacoffee.com/shroomok)
Join Shroomok Community on [Discord](https://discord.gg/ngKhQDmymD) or [Reddit](https://www.reddit.com/r/Shroomok) for questions and sharing your experience.
Have a happy growing and healthy shrooms!
Peace, Shroomok ❤️
## Natalensis grow bag fruiting and overlay problems
[Natalensis grow bag fruiting and overlay problems](https://shroomok.com/en/wiki/Natalensis_grow_bag_fruiting_and_overlay_problems)
[](https://shroomok.com/en/wiki/File:Natalensis-growing-troubleshooting.jpg) Psilocybe Natalensis mushroom growing troubleshooting### My all in one bags with Natalensis don’t fruit and produce weird mycelium
Let's figure out real case with Psilocybe Natalensis growing.
#### Natalensis cultivation problems and growing details
> Hello Shroomok,
>
> I did a search on google and found your page. It was very helpful. I was hoping to get help with my **Psilocybe Natalensis** that I started growing almost one month ago. I am attaching some photos. Would you be so kind and give me your opinion on how to proceed?
>
> This is my first grow and the overlay seems to be too much? I used **two all in one manure grow bags** and think maybe the cake was left for too long before introducing FAE? I poked holes around the bag but things started to get weird then since there still wasn't enough air. I cut the top of the bag open but there has been no progress since I did that. I read on your blog that burying the cake in potting soil might save it?
>
> I'm at a loss. Any advice would be appreciated. Thank you in advance!
All in one bag 1, view on top and from the sides
[](https://shroomok.com/en/wiki/File:Natalensis-grow-bag-1-top-view.jpg) Natalensis - all in one bag 1 - top view[](https://shroomok.com/en/wiki/File:Natalensis-grow-bag-1.jpg) Natalensis - all in one bag 1 - view from the side[](https://shroomok.com/en/wiki/File:Natalensis-grow-bag-1-another-side.jpg) Natalensis - all in one bag 1 - another sideAll in one bag 2, view on top and from the sides
[](https://shroomok.com/en/wiki/File:Natalensis-all-in-one-bag-2-top-view.jpg) Natalensis - all in one bag 2 - top view[](https://shroomok.com/en/wiki/File:Natalensis-overlay-fruiting-issue-bag-2.jpg) Natalensis - bag 2 - view from the side[](https://shroomok.com/en/wiki/File:Natalensis-growing-overlay-fruiting-problem.jpg) Nastalensis - bag 2 - another side#### Shroomok answers about Psilocybe Natalensis cultivation and how to make Natal fruit
Hello,
Regarding your questions about Natalensis grow bags. I’ve checked all the pics you’ve shared (thank you! it's very helpful). You have some yellow-brown liquid on top, which are [mycelium metabolites](https://shroomok.com/en/wiki/Mycelium_metabolites_or_mushroom_pee "Mycelium metabolites or mushroom pee"). It's not contamination, so don't worry.
##### **A few comments from my side for the future attempts with Natalensis**
1\) **Manure substrate is not necessary** for Natalensis, it's more nutritious and mycelium growth is more aggressive. Substrates based on coco coir would be better. However it’s not a problem if you use this type of substrate.
2\) For Natal better to **start with grain substrate for Spawn** first -> then make **Spawn to Bulk** (bulk substrate based on coco coir mix, 1:3 ratio) -> then after bulk colonization cover the cake with non-nutrient **Casing layer** (based on peat moss mix) to initiate pinning and create good microclimate for fruiting.
3\) Typically **Natalensis mycelium is very aggressive** from the very beginning. Mycelium overgrowth aka overlay is a common issue for this species. Also Natal forms weird marshmallow blobs of mycelium and it can happen on any flush, even if before you had good normal fruit bodies. BTW you can harvest these blobs and take them (fresh or dried).
4\) Yes, Natalensis needs to **start fruiting conditions earlier** and **requires more FAE** (fresh air exchange).
It is **hard to make them fruit right in the bag** as Cubensis. Better to make flat mushroom cake and use plastic tub as a fruiting chamber, so that you have **more volume of air** and easier to maintain fruiting conditions. You can make air vents (like in a [MonoTub](https://shroomok.com/en/wiki/Forget_Monotub_Kit._DIY._How_to_make_Monotub_for_Mushrooms_by_your_own "Forget Monotub Kit. DIY. How to make Monotub for Mushrooms by your own")) or just **flip the lid upside down,** so that we have gaps between lid and tub for natural air flow.
5\) Flat mushroom cake covered with a **casing layer** is highly recommended for Natalensis.
> Casing is a non-nutrient substrate, that promote mycelium for pinning and helps to reduce mycelium overgrowth. Usually we think the more nutrients the better. But it doesn't work for shrooms. Till mycelium has too much nutrient it will develop mycelium only and won't produce shrooms. When mycelium has a sign 'no more nutrients' it starts to form pins and fruits. Casing is exactly this sign and also a source of additional moisture and protection against contaminants. Read more: [Casing](https://shroomok.com/en/wiki/Making_mushroom_cake,_spawn_to_bulk,_and_casing#Casing)
##### **What to do in your case?**
1. Prepare a plastic box with a lid (20-40Qt or 20-40 liters or 2 plastic tubs 6-10 Qt each for DubTub), wipe it with 70% iso/ethyl alcohol.
2. Wear gloves on your hands, wipe them with alcohol.
3. Wipe fork with alcohol.
4. Remove blobs and overlayed mycelium with a sterile fork and your hands.
5. Crumble the block in a plastic box, don't be afraid to do this! You can find an example of this process here: [How to make mushroom cake](https://shroomok.com/en/wiki/Making_mushroom_cake,_spawn_to_bulk,_and_casing#Make_small_mushroom_cake_step_by_step). The process for **small or big** mushroom cake **is the same**.
6. So that you have a flat cake (the height should be about 2-4 inches or 5-10 cm).
7. Cover the cake with **casing layer** (1/3 inch or ~1 cm).[](https://shroomok.com/en/wiki/File:Mushroom-cake-with-pseudo-casing-layer.jpg) Mushroom cake with applied casing layer on top
##### How to prepare substrate for the casing layer
###### **Ingredients**
- peat moss (aka sphagnum) - 2 cups ([Amazon](https://amzn.to/46VIpjj))
- vermiculite - 1 cup ([Amazon](https://amzn.to/44xqlKO))
- hydrated lime (aka calcium hydroxide) - 1 tablespoon ([Amazon](https://amzn.to/3pNDIrp))
- water - 1 cup
Prepare as much as you need, just follow the ratio.
In your case prepare x2 for each bag (4 cups of peat moss per each bag and add other ingredients accordingly).
###### **Step by step process**
1. Fill the jar with this mix, close the lid. Put it in an instant pot, saucepan with lid or pressure cooker. Add water in a pot and bring it to a boil. For casing layer we don't need high pressure and you can use just pot with lid.
2. Sterilize/pausterize the casing substrate for ~60 mins. Let it cool down to room temperature.
3. Cover the cake with a thin casing layer on top (1/3 inch or ~1 cm).
4. Mist the walls of the plastic tub with water (clean drinking water).
5. Close the lid or flip it upside down.
6. Open the tub every day to check the progress and for additional FAE.
7. Mist the walls of the tub, if you find out they are dry out.
> Usually in the nearest 3-7-10 days you'll see first pins
If not, then we can try to make them fruit outdoors (mushroom bed) or in a plant pot outdoors. But let's try indoor growing first.
Or you can use **one bag indoors** and **another one for outdoor** growing.
##### **A few words about growing Natalensis outdoors**
Natalensis mycelium when it's strong enough is highly resistant to contaminants and high temperatures. It makes this species great for outdoor hot season cultivation.
[](https://shroomok.com/en/wiki/File:Natalensis-mushrooms-outdoors.jpg) Psilocybe Natalensis mushrooms growing outdoors> Natalensis withstands air temperature up to 104**°**F or 40**°**C. The optimal temperature range for fruiting is 77-86**°**F or 25-30**°**C.
1. Remove mycelium blobs/overlay from the block.
2. Find the right place for 'mushroom bed'. The best place -> no sunlight and wet -> in the shadows of plants/fence or greenhouse/tent for plants. Or use a plant pot, you can move it anytime and anywhere you want.
3. **Easiest method.** Dig out the soil about 4-5 inches. Break the mushroom block and bury it in soil. Cover with soil on top - 1-2 cm or 1 inch. Don't be afraid to crumble the block.
4. **Another method.** Prepare simple coco coir substrate (just [coco coir](https://amzn.to/3NXgzL8) and water; other ingredients like vermiculite, gypsum and hydrated lime are optional). Mix mushroom block with wet coco coir. Or crumble the block and mix it with wet coco coir in a plant pot. The ratio of mycelium to coco coir substrate is up to you, 1:1 or 1:2 or 1:3 or even more.
5. Mist the top layer.
6. Cover the bed with plastic fruit/farm box. This helps to reduce sunlight, retain moisture, create good microclimate.
7. Mist the bed/pot from time to time and you'll get a few flushes in the summer and autumn season ;)
Feel free to ask any questions on e-mail, [Discord](https://discord.gg/ngKhQDmymD) or [Reddit](https://www.reddit.com/r/Shroomok)
I can check the progress with you, just share pics ;)
Growing Psilocybe Natalensis is challenging, for newbie growers especially, but it worth it!
I believe we make your bags fruit.
Best regards, Shroomok
> Thank you so much Shroomok, for taking the time to help me with such a detailed explanation! I am beyond grateful.
>
> I will get the supplies for the casing layer within the next couple of days and I'll let you know how it goes. This is literally my very first grow and I still don't understand what mushrooms need when it comes to the different substrates. I was told that dung loving mushrooms should grow in manure based substrate, so this is new information for me.
>
> The other thing that I think may have gone wrong is, the instructions for the bag tek said to use 4-5 cc of liquid culture but maybe I should have used less which would have resulted in less or no overlay... Many thanks!
#### Natalensis pinhead initiation after casing day by day
##### Day 2-3 of Natalensis fruiting period
> Hi Shroomok, I just wanted to send you this obit to see what you think. I know you said pinning would start 3-10 days from initiating the casing layer which I started 3 days ago. Does this look like mycelium or co Ramos took growing on the substrate? Please see photos below. Thank you in advance!
2 days after casing
[](https://shroomok.com/en/wiki/File:Psilocybe-Natalensis-progress-2-days-after-casing.jpg) Natalensis cake #1 - 2 days after casing and providing fruiting conditions3 days after casing
[](https://shroomok.com/en/wiki/File:Psilocybe-Natalensis-progress-3-days-after-casing.jpg) Natalensis cake #1 - 3 days after casing and providing fruiting conditions##### Shroomok comments on Natalensis progress after casing
Hey, thanks for updates!
It's definitely Natalensis mycelium growth. Good job! So far so good ;)
Mist **the walls of the tub** from time to time (maybe once a day or once in 2 days, or if you see the walls are dry).
**Don't mist on mycelium directly!**
If possible open the tub for **FAE at least 1-2 times/day.**
**Air vents** in your tub or **gaps between the top lid and the bottom box** are also helpful for natural airflow and FAE.
**Don’t keep your tub on the floor!** 90% of all contaminants in the air are closer to the floor and spread by drafts.
Keep me updated as often as you can.
Good luck! Hope to see pins soon, fingers crossed 🤞
> Thank you for the quick response. I feel so relieved!
>
> There is one bag in the grow box which has four ventilation ports. I open the lid 3-4 times a day just for a moment and spray once a day since the moisture seems to evaporate. I will find an alternative to the floor.
>
> Thank you again for your help and the encouragement!
##### Day 5-7 of Natalensis progress for both mushroom cakes
> Hi again Shroomok. Just wanted to show you the progress of both tubs after casing. I made 2 separate tubs from 2 all in one bags I had.
**Tub #1** - mushroom cake made from all in one **bag #1** - casing layer added **7 days ago**
[](https://shroomok.com/en/wiki/File:Natalensis-7-days-after-casing-fruiting-period.jpg) Natalensis mushroom cake #1- 7 days after casing and fruiting conditions
**Tub #2** - mushroom cake made from all in one **bag #2** - casing layer added **5 days ago**
[](https://shroomok.com/en/wiki/File:Natalensis-progress-second-cake-5-days-after-casing.jpg) Natalensis mushroom cake #2 - 5 days after casing and providing fruiting conditions##### Shroomok comments on Natalensis progress 5-7 days after casing
Hey buddy!
Thank you for updates! So far so good. Both tubs are good and healthy.
**Tub #1 casing layer added 7 days ago** - I like the result!
**Tub #2 casing layer added 5 days ago** - mycelium is more aggressive and fluffy, but don't worry.
Let me show you the example when Natalensis mushrooms grow through the fluffy mycelium that look like overlay
[](https://shroomok.com/en/wiki/File:Natalensis-mycelium-overlay.jpg) Aggressive fluffy Natalensis mycelium look like overlay
Here you can see pins!
[](https://shroomok.com/en/wiki/File:Psilocybe-natalensis-mycelium-colonization-and-pinning.jpg) Psilocybe Natalensis first mushroom pins
Natal shrooms are coming!
[](https://shroomok.com/en/wiki/File:Natalensis-fruiting.jpg) Natalensis mushrooms fruiting
**What to do next?**
FAE, misting as before and... patience.
After casing usually it takes 3-10 days for pinning, up to 15 days.
Hope for shroom babies soon. Share updates in the nearest 2-3 days pls.
Have a great weekend!
> Awesome, thanks for the feedback! I really appreciate it. I was concerned about the 2nd tub since the mycelium is so aggressive. I wonder why? I'll send you updates in a few days. I think I saw something pop up in tub #1 so let's see. Also, the examples of the aggressive mycelium were very helpful. Enjoy your weekend!
##### Day 9-11 of Natalensis fruiting period
> Hi Shroomok! Here are the updated photos. The #1 tray is doing very well and coming along. Not sure about #2 tray. See photos below. Thank you again!
Natalensis mushroom cake #1 - 11 days after casing and providing fruiting conditions. First shroom and pins appeared!
[](https://shroomok.com/en/wiki/File:Natalensis-pins-11-days-fruiting-period.jpg) Natalensis cake #1 - 11 days of fruiting period - first pins and shroom
Natalensis mushroom cake #2 - 9 days after casing and providing fruiting conditions. Aggressive mycelium growth.
[](https://shroomok.com/en/wiki/File:Natalensis-9-days-fruiting-period-cake-2.jpg) Natalensis cake #2 - 9 days of fruiting period##### Shroomok comments on Natal updates: 9-11 days after casing
Hey! Hooray, finally we have first Natalensis shroom on the cake #1. I'm so happy!
**The #1 tray** is able to fruit and I see some small hyphal knots and pins ;)
Introduce FAE and misting as before.
**The #2 tray** - usually fluffy mycelium needs more time and more FAE. So if possible try to introduce FAE for this tray more frequently.
I'd suggest you make a spore print(s) from the **\#1 tray.** So that you'll have your own spores for new growing attempts and save money for genetic material for the future.
🔴 **Check out detailed guide here:** [How to make mushroom spore prints](https://shroomok.com/en/wiki/How_to_make_magic_mushrooms_spore_prints "How to make magic mushrooms spore prints")
Thank you for good news! Keep going, keep growing!
> Thank you for helping get here and all of your support! I will attempt making a spore print, good idea! Thank you for all your encouragement.
##### Day 11-13 of Natalensis fruiting period
> Hi again, just updating the pictures (see below). Thanks again!
Natalensis cake #1 - 13 days of fruiting period
[](https://shroomok.com/en/wiki/File:Natalensis-progress-cake-1-fruiting-period-13-days.jpg) Natalensis cake #1 - 13 days
Natalensis cake #2 - 11 days of fruiting period
[](https://shroomok.com/en/wiki/File:Natalensis-growing-cake-2-fruiting-period-day-11.jpg) Natal cake #2 - 11 days##### Shroomok answers on Natal updates 11-13 days
Hello! The cake with a few mushrooms looks good.
I just can't see the pins that I saw from the photo of the previous day. Are they still there? I mean these pins (see on the photo).
[](https://shroomok.com/en/wiki/File:Natalensis-pins-11-days-fruiting-period.jpg) Natal pins
When you'll see a **torn veil** it's time for making spore prints and harvesting. Here is a torn veil example:
[](https://shroomok.com/en/wiki/File:Mushroom-ready-for-harvesting-example.jpg) Mushroom ready for making spore print and harvesting. Torn veil exampleRight after harvesting it's time to rehydrate (soaking/dunking) mushroom cake in cold water.
Soak the cake **for 4 hours in cold clean water without any additives, you can add some ice in water to make it colder.**
Usually after rehydration we get more shrooms and rich flush.
🔴 **Detailed guide with examples here**: [Mushroom cake rehydration](https://shroomok.com/en/wiki/Rehydration_of_psilocybe_cakes "Rehydration of psilocybe cakes")
**Regarding the 2nd tub** we have some marshmallow growth. Can be a kind of mutation. It's not a contamination, don't worry. Just some genetic issue.
Anyway, let's wait the next **3-5 days** for shrooms in the central area here:
[](https://shroomok.com/en/wiki/File:Natalensis-mushroom-cake-and-area-for-pins.jpg) Waiting for Natalensis pins here
You can harvest these blobs further, dry them and take them as shrooms. Let me show you an example of such growth, so that you can compare it with your growth further.
[](https://shroomok.com/en/wiki/File:Natalensis-mushrooms-fruiting-and-blobs-mutation-growing.jpg) P. Natalensis mushroom fruiting 1st flush and strange marshmallow mycelium blobs growth on the cake (red circles)[](https://shroomok.com/en/wiki/File:Natalensis-mutation-growing.jpg) Marshmallow Natalensis mycelium blob mutation growing after the 1st flush and rehydrationDon't hesitate to share photos day by day and I'll check them.
Feel free to ask any questions about our next steps.
Cheers, Shroomok :)
> Hello Shroomok,
>
> 1\) The picture of **tub #1** with the pinning is from a couple days ago. The area where you circled the three pins, one was harvested today. The other two pins are still there and one near the edge of the tub will be ready by tomorrow. Should I wait for the little pins to come up first before the cold water bath?
>
> 2\) **Tub #2**, asking for clarification about the marshmallow blobs. How do I harvest the blobs? Very interesting, how does genetic mutation happen? Both tubs are from the same liquid culture... What is the best way to harvest the blob?
>
> Thank you again!
**Shroomok answers:**
1\) **Tub #1.**
If pins are stalled and you don't see visible growth for the next 1-2 days you can pick these small shrooms/pins and soak the whole mushroom cake. The earlier you make 'water bath' the earlier you get next flush of better shrooms
2\) **Tub #2.**
Let's wait for shrooms in the centre first. Maybe smth will appear in the next few days.
If not, then pick the blobs just with your hands (in sterile gloves, wipe with iso/ethyl alcohol 70%) or use sterile knife (wipe with iso/ethyl alcohol 70%).
Then also make 'water bath' for this cake.
Such blobs growth can appear even near good mushrooms. Can vary cake by cake and flush by flush. Why?
One liquid culture (in our case multiculture) can create many mushroom couples and 'families'. You never know which family(-ies) will grow on the grain/block/cake.
We have the same growth on each cake if we work with **isolated culture**, when we choose the only one 'family' genetic. This is possible with agar work and by agar to agar transferring 5-10 times and even more.
It's roughly explanation. I'll try to do this in a better way in a long-read post with pics/photos/schemes and share with you ;)
> That would be great! Thank you again for the detailed explanation. I'll keep you posted.
##### Day 12-14 of Natalensis fruiting period
> Hello again, Here are some updated photos from today.
>
> Tub #1 I just want to clarify, you said to do a cold water bath, correct?
>
> Tub #2 I see pins!
>
> Thanks again
Cake #1 after harvesting 1st flush, ready for rehydration:
[](https://shroomok.com/en/wiki/File:Natalensis-mushroom-cake-1-ready-for-soaking-in-water-14-days-fruiting-period.jpg) Natalensis cake #1 ready for soaking in water. 14 days of fruiting period
Natal first pins appeared in marshmallow mycelium:
[](https://shroomok.com/en/wiki/File:Natalensis-mushroom-cake-2-fruiting-period-day-12.jpg) Natalensis first pins - day 12 of fruiting period##### Shroomok answers on Natalensis updates 12-14 days
Hello!
**Tub #1** - YES, cold water bath. Just use cold tap water.
If the water is not cold for your arms add some ice. Let's say 10 ice cubes per 1-2 Qt (liters) of water.
Submerge the cake in water and leave it to soak for **±4 hours.**
You can do this right in the tub!
Black spots on the cake are just mushroom spores, it's okay (see the photo below).
[](https://shroomok.com/en/wiki/File:Natalensis-cake-1-spores-on-mycelium.jpg) Natalensis spores on mycelium after harvestingBy the way, have you made a spore print(s)? How many shrooms have you harvested? Do you have a photo of your first harvest?
**Tub #2** - the first pins I've noticed in the photo below :)
[](https://shroomok.com/en/wiki/File:Natalensis-first-pins-12-days-fruiting-period.jpg) First Natal pins on mushroom cake #2 - day 12 of fruiting periodBest regards, Shroomok
> \- Great, I'll work on the bath today.
>
> \- I don't have any photos of my first harvest, other than what I sent you because it was so sad, lol. The pictures that I sent you where one mushroom came at a time is all I have...a total of three mushrooms, lol. They do look good though. I will take photos of the second flush for sure.
>
> \- I will take a spore sprint after I get the supplies, i.e a surgical knife and baggies to store them in afterwards. I don't think I can get a still air box yet but will see.
>
> \- I'm so happy about the pins in bin #2. They're even coming up through the marshmallow. There's one more above the two you circled. I don't have high hopes for this bin so thank you for the encouragement.
>
> Thanks again.
##### Day 13-15 of Natalensis fruiting period
> Good morning, here are some updated photos.
Tub #1: while trying to wash the cake, it cracked. It was too light for me to hold under the faucet.
[](https://shroomok.com/en/wiki/File:Natalensis-cake-1-after-soaking-in-water-fruiting-period-day-15.jpg) Natalensis mushroom cake 1 day after soaking in water, day 15 of fruiting period. A few new pins appeared (red circles)
Tub #2: some good pinning going on!
[](https://shroomok.com/en/wiki/File:Natalensis-cake-2-pinning-fruiting-period-day-13.jpg) Natalensis cake #2 - first pins appeared on the day 13th of fruiting period
Same Natalensis mushroom cake #2, another angle
[](https://shroomok.com/en/wiki/File:Natalensis-cake-2-pinning-day-13.jpg) Natalensis mushroom pinning, day 13th of fruiting period##### Day 14-16 of Natalensis fruiting period
> Good morning, another update. Thanks again!
Natalensis mushroom cake #1 - 2 days after water bath - 2nd flush - day 16 of fruiting period. Some pins on the cake
[](https://shroomok.com/en/wiki/File:Natalensis-mushroom-cake-1-after-rehydration-day-16.jpg) Natalensis cake #1 - 2 days after soaking in water, day 16 of fruiting period
Natalensis mushroom cake #2 - first flush - day 14 of fruiting period
[](https://shroomok.com/en/wiki/File:Natalensis-mushroom-cake-2-fruiting-period-day-14.jpg) Natal cake #2, first flush, day 14 of fruiting period
Natalensis mushroom cake #2 - first flush - day 14 of fruiting period
[](https://shroomok.com/en/wiki/File:Natalensis-mushroom-cake-fruiting-day-14.jpg) Natalensis growing - day 14 of fruiting period##### Shroomok answers on Natalensis progress 14-16 days
Hey hey, that's an amazing result!
Thank you for your efforts and time! Good job!
I've checked all the photos and comments you shared...
**Tub #1 (after soaking in water):** looks good and new pins are coming. Cracked cake is not a problem for further fruiting.
**Tub #2:** as I said before it takes **7-15 days** for pinning and some shrooms **can appear in fluffy marshmallow mycelium**.
As a result, we had pins on the day **13 or 14.**
###### **Making a spore print(s)**
A few comments here.
You don't need special tools and supplies.
So here are what you need:
1\) **aluminum foil** is the best to use for prints - cut rectangular pieces and wipe them with 70% iso/ethyl alcohol 70%.
2\) To **cut the mushroom cap** you can use sharp kitchen knife, or a stationery knife, or a razor or cutter like [this](https://amzn.to/44TvQD5).
Scalpel (aka surgical knife) is optional ([Amazon](https://amzn.to/3Pn4WO4))
Just wipe the knife/razor with 70% iso/ethyl alcohol and cut the cap.
3\) Put the mushroom cap on foil.
4\) [Still Air Box](https://shroomok.com/en/wiki/Still_Air_Box_for_Mycology "Still Air Box for Mycology") **is not** necessary, UVC lamp **is not** necessary as well.
5\) Cover shroom caps with a glass or any plastic box for food, leave them **for ~24 hours** for sporulating.
5\) Use any tweezers ([Amazon](https://amzn.to/3RncMKa)) and put ready prints in **airtight zip bags for storage** - yes, you need some **zip bags** ([Amazon](https://amzn.to/45ZZJDe))
Ready!
Let me know if you have any questions.
Regards, Shroomok
> One more question about bin #2. After I harvest the mushrooms, should I remove the marshmallow before soaking in cold water for the second flush?
>
> I have several syringes of different strains of liquid culture in my fridge. Blue Meanies, Albinos, Lions Mane, Shiitake and Blue Oyster.
>
> I have one more all in one manure grow bag left and trying to decide which one to use in it. This is very exciting! Thank you for your interest in such a newbie like myself! I will definitely try the different growing projects on your website.
###### **Shroomok answers:**
**Yes, remove marshmallow growth before soaking** (with sterile fork or sterile hands in gloves).
If you leave it, then after soaking it will be like a slimy sponge.
Zero benefits from the marshmallow growth after soaking, but the risk of contamination increases.
Just a reminder! Don't remove the casing layer! Don't remove normal mycelium on the cake!
**What to do with all in one manure bag?**
The **manure bag** you can inoculate with **Cubensis** Blue Meanie (check the label, maybe you have **Panaeolus** Blue Meanie).
Or use it for your **Cubensis albino strain** (also check the exact name of strain).
You need only 1-3 ml of LC per bag for inoculation. Don't use the whole LC syringe for one bag only.
**Plans for the next mushroom growing**
The next mushroom growing (I mean species/strains) is up to you :)
🔷 **Basic** step-by-step guide is here: [Mushroom Growing in 20 steps](https://shroomok.com/articles:grow-mushrooms-at-home-guide)
**First 7 steps** are applicable almost for all mushroom species (Cubensis, Natalensis, Panaeolus, Lions Mane, Shiitake, Oysters).
The next steps are applicable for Cubensis, Natalensis, Panaeolus.
🔷 For edibles like **Lions Mane, Shiitake** we need to create mushroom **blocks** with bulk substrate based on **sawdust**. This is the main difference!
🔷 **Shiitake** growing guide is here: [My first Shiitake Mushroom growing](https://shroomok.com/en/wiki/Grow_your_first_Shiitake_mushrooms_at_home)
Also applicable for Lions Mane and Oysters. However for LM we can try simpler tek ;)
🔷 How to make 100-200-1000 **Liquid Culture** syringes from 1 LC syringe you already have in your fridge, save money for expensive genetic and use it even for experiments and fails: [Liquid Culture Guide](https://shroomok.com/en/wiki/How_to_make_mushroom_Liquid_Culture)
If you don't have a Pressure Cooker it's not a problem. You can use an instant pot, or oven, or pot with a lid. It takes more time, but it works.
Actually you can use/reuse most of the stuff you already have at home (for instance, canning jars), and grow mushrooms successfully.
Wish you good luck with the current Natalensis cultivation and waiting for updates.
Enjoy the magic of mushroom growing!
Best regards, Shroomok
> Thank you for the links. I have one bag inoculated about a month ago, that I just did a break and shake a couple days ago. Will see how that goes...
>
> I will definitely give making my own LC a try to save money.
>
> I have a very tall stainless steel stock pot with a lid that should work.
>
> Will keep you updated!
##### Day 17-19 of Natalensis fruiting period
> Hello,
>
> Bin #1 looks like it might have stalled? I'm not sure...
>
> [](https://shroomok.com/en/wiki/File:Natalensis-cake-1-fruiting-period-day-19.jpg) Natal cake #1 - second flush - 5 days after soaking in water - day 19 of fruiting periodI'm attaching photos of the removal of the marshmallow. There were quite a few pins that just never made it through...
>
> [](https://shroomok.com/en/wiki/File:Natalensis-cake-2-ready-for-rehydration-fruiting-period-day-17.jpg) Natalensis cake #2 after harvesting. Removing marshmallow mycelium overgrowth before soaking in water. Day 17 of fruiting period
##### Shroomok comments on Natalensis progress 17-19 days
Hello! How are you doing?
Bin #1. It might have stalled, but let's wait till **Day 10-12 after soaking** in water. I assume new mycelium and pins will appear.
**Usually it takes 3-14 days for the new flush of fruiting after 'water bath'.**
**If there are zero signs of growth, then we can:**
1\) add a new casing layer again (just 0.5 cm or 1/5 inch)
2\) or we can try outdoor growing. I'll provide you with the details if you're going to try growing outdoors.
**Bin #2.** Looks okay. The removal of marshmallow areas is also ok.
How's it going after soaking in water? Any signs of new pins?
Have you tried to make spore prints from the harvested mushrooms?
Cheers, Shroomok
##### Day 22-24 of Natalensis fruiting period - updates after soaking cake in water
> Hi Shroomok, Please find some updated pictures. All is going very well. I plan on taking a spore print the next flush.
Natalensis mushroom cake #1 - 2nd flush - 11 days after rehydration - 24 days of fruiting period
[](https://shroomok.com/en/wiki/File:Natalensis-mushroom-cake-1-fruiting-period-day-24.jpg) Natalensis cake #2 - 2nd flush of fruiting - 11 days after soaking in water - 24 days of fruiting periodNatalensis mushroom cake #2 - 2nd flush - 5 days after rehydration - 22 days of fruiting period. No pins yet!
[](https://shroomok.com/en/wiki/File:Natalensis-mushroom-cake-2-fruiting-period-day-22.jpg) Natalensis mushroom cake #2 - 5 days after soaking in cold water. Day 22 of fruiting period##### Shroomok comments on Natal progress 22-24 days
Hello! I'm glad that the tub didn't stall and produce some shrooms.
What about bin #2?
After harvesting you can make a water bath again.
You can also apply a new casing layer (1/5 inch or 0.5 cm), although it's an optional step.
Or skip the water bath and just mist hard the top layer and create water pools. Cake will absorb the water and it will be enough!
Cheers, Shroomok
> Thank you Shroomok! I think I will try the misting this time.Bin #2 - there are some pins showing already.
##### Day 30-32 of Natalensis fruiting period
> Hi Shroomok,
>
> Just wanted to send you an update. Probably the last? I think the flushes are done. Tub #2 produced four more fruits but not more than that. The biggest flush was the first flush but unfortunately many of the pins were trapped under the marshmallow and never made it to maturity.
>
> Tub #1, I did soak one more time for a third flush and will see if anything happens. It's interesting because this tub didn't produce much at all. Not sure why.
>
> Please find two pictures attached. I did try to make a spore print. Will see how it came out tonight...
[](https://shroomok.com/en/wiki/File:Natalensis-cake-1-fruiting-period-day-32.jpg) Natalensis mushroom cake #1 - 32 days of fruiting period[](https://shroomok.com/en/wiki/File:Natalensis-cake-2-fruiting-period-day-30.jpg) Natalensis mushroom cake #2 - day 30 of fruiting period> Bonus: Just want to share some beautiful pics of Cubensis Casper's Ghost. It's first flush in a all in one bag. I think I will harvest these tonight. All the best!
>
> [](https://shroomok.com/en/wiki/File:Cubensis-Caspers-Ghost-magic-mushrooms-fruiting.jpg) Caspers Ghost mushrooms fruiting in the all in one bag, manure substrate, 1st flush[](https://shroomok.com/en/wiki/File:Caspers-Ghost-mushroom-fruiting-all-in-one-bag.jpg) Caspers Ghost magic mushroom fruiting
##### Shroomok comments on Natal growing 30-32 days
Hello!
If no more pins/shrooms appear (for the next 10-14 days after soaking in water), then try to bury the cake in the plant pot or garden/backyard/forest/under the fence (anywhere in the shadow of fence or trees/bushes).
Mist it well and let nature do the rest. Maybe you'll get some outdoor shrooms ;)
Your albino Ghosts 👻 are gorgeous, thanks for sharing the beauty 😍
> Casper's Ghost = MakShak x APE cross = (Melmak x Shakti) x APE cross
Try to make a spore swabs/prints to save genetics for the new attempts ;)
From the moment I see in the photo you can wait for 1-2 days more and shrooms continue growing.
If you already harvested them, it's okay!
Mist the bag hard and wait for the new flush.
Regards, Shroomok
> Thanks Shroomok! I decided to let them grow a little more and picked them last night since I'm leaving for a few days. I did mist the bag and hope to see another flush when I get back. There were a few aborts in the end, I think it happened after opening the bag so I'm not sure if that did it? But I still harvested them and dried them after reading your blog. Thank you again!
**Shroomok comments:**
It's totally normal to have some aborts on the cake/block.
In your case they appeared in some clusters, because shrooms compete with each other and the smallest are stalled.
They are potent and safe. So don't worry.
Have a lovely day!
> Awesome, thank you so much! Will send you updates when ready. I think next time I'll try growing this Cubensis strain in a monotub to give them more room or a wider bag.
P.S. Do you mind if I share your case/questions and my answers on shroomok.com?
> I don't mind the use of my case study at all. You're very welcome. I'm happy because I hope it helps someone else who may find themselves in a similar situation. You helped me and now you and I can help others. It's been my pleasure to contribute! It's been so rewarding.
Thank you! Peace ❤️
## Air sampling in mycology check the room for mold contamination with diy agar test
[Air sampling in mycology check the room for mold contamination with diy agar test](https://shroomok.com/en/wiki/Air_sampling_in_mycology_check_the_room_for_mold_contamination_with_diy_agar_test)
[](https://shroomok.com/en/wiki/File:DIY_mold_test_on_agar_to_check_air_quility_in_your_home_for_contaminants.jpg) DIY air quality test on agar### DIY air testing to check your home for mold contaminants
#### Air as a vector of contamination
Many factors influence the mushroom cultivation process and harvest outcome. Contamination is one of them.
Let’s talk about how air quality (i.e. mold concentration) in your workspace affects mushroom growing processes and mycological procedures. Because **the AIR** is one of the main vectors of contamination in mycology.
> 📖 **5 main vectors** of contamination in mycology are: 1) the cultivator itself; 2) the AIR; 3) the substrate to be inoculated; 4) the mycelium that was being transferred; 5) the inoculating tools, equipment, containers, facilities etc.
Probably, you’ve seen many times such cases when growers accurately follow sterility rules but fail, while others totally neglect this routine and still succeed.
Of course, cultivation skills matter. However even experienced growers face contamination. They observe some patterns and periods, when contaminations appear more or less frequently.
Hopefully, it won’t surprise you, but concentration and quality of contaminants may vary from corner to corner, among the rooms, certainly between the apartments, from country to country with different climates. That’s why you will never have the same environmental conditions even with your neighbour. And, of course, cultivators from Australia, Canada or Costa Rica struggle with such contamination issues which are specific to the region they live in.
Vectors of contamination and basic principles of contamination management are fundamental for everybody. But ‘neglect practices’ from one grower won’t work for another.
Imagine 2 people who grow mushrooms in monotubs. Usually, most mold spores concentrated closer to the floor and spread with drafts. It’s better to place tubs on some podium (rack, table, shelf, etc), but don’t put them on a floor, to reduce risks of possible contamination from the air. One grower places tubs even on the floor and bragging about zero contamination. Another guy follows all recommendations and cries because of green/blue mold contamination.
> ❗️90% of all contaminants in the air are closer to the floor and spread by drafts. Don’t keep your fruiting chambers on the floor!
#### Factors that influence on the air quality
The main factors of such differences:
- **Climate zone.** Bacterial and mold variety, concentration, aggressiveness in moderate and (sub)tropical climates may change your “best practices” and cultivation plans.
- **Season of the year.** Hot/cold and dry/rainy seasons affect temperature and humidity in nature, hence the concentration of mold.
- **Cleaning routine.** Ventilation and air conditioning; how often you change air filters, wash your carpets and curtains, wipe the dust, clean your bathroom and kitchen; waste management (throw away food waste every day!) – everything counts.
- **Pets, indoor plants, or insects** play a role in the pollution level of your space becoming another vector of contamination. Pet hair spreads mold spores. Insects like fungal gnats can appear in plant pots, move to your tubs with mushrooms and destroy your harvest. Green mold that is beneficial for plants becomes a green monster for your shrooms.
- It’s funny, but depending on the climate/season, there could be a case when outdoor mushroom cultivation is more favorable than indoor.
> ❗️Leaking, poor ventilation, irregular cleaning provoke mold growth that affects not only mushroom growing, but human health as well!
#### Agar recipes and necessary equipment for DIY mold test
Let’s make a simple agar test to check the “sterility” level of your environment and the palette of contaminants in your room.
Prepare agar media. There are more than 100 different agar recipes and their variations. Use any simple recipe with ingredients you have at home. Here are a few for your choice.
##### Recipe 1. Malt Extract Agar recipe
- Water - 500 mL
- Agar - 10 g
- Malt/light malt extract - 10 g
- Optional - Food coloring - few drops
###### **Ingredients on Amazon for recipe 1**
- [Agar](https://amzn.to/3rFFLhE) $6.95
- [Light malt extract, 1lb](https://amzn.to/45imiCn) $14.00
##### Recipe 2. Potato Dextrose Agar recipe
- Water - 500 mL
- Agar - 10 g
- Potato starch - 10 g
- Dextrose (Glucose) powder - 7 g
- Optional - Food coloring - few drops
###### **Ingredients on Amazon for recipe 2**
- [All in one - Potato Dextrose Agar Powder](https://amzn.to/3qgLXfw) $33.99
##### **Equipment**
- Weight Gram scales
- Saucepan
- Tablespoon
- Stove
- Canning jar with lid or Lab Bottle
- Pressure cooker or Autoclave or Instant Pot Pot with Lid
- [Reusable autoclavable **Plastic** Petri dishes, 6/12 Pack](https://amzn.to/3Oe2R6L) $11.19
- [Temperature Gun](https://amzn.to/470sYGF) $18.74
- [Parafilm](https://amzn.to/3O805zM) $39.99 or **PE food film** or **Clear Packing Tape**
##### Ready to use Mold Test Kit
You can also buy ready to use mold tests on Amazon and send them to the lab for accurate identification (it costs 25-40$ additionally):
- [Mold Test Kit for Home - 10 Tests](https://amzn.to/3Qagsyp) $45.99
#### Agar preparation for air sampling test
1. Measure required water volume. Distilled water is typically recommended for preparing nutrient mediums. However, reverse osmosis (RO) cleaned, filtered, and chlorine-free drinking water can also be effectively used.[](https://shroomok.com/en/wiki/File:Agar-cooking-process-for-mycology.jpg) Measure the required volume of water (500 ml)> You can prepare more or less, just follow the ratio of water and other ingredients
2. Heat required water volume in a saucepan on the stove. [](https://shroomok.com/en/wiki/File:Agar-preparation-for-mycology.jpg) Heat required water volume in a saucepan
3. Weight dry ingredients according to the recipe (agar powder and nutrients like LME/Dextrose/Potato starch etc.) [](https://shroomok.com/en/wiki/File:Agar-recipe-for-mycology.jpg) Weight dry ingredients
4. Dissolve all ingredients in **hot water.** Stir well. [](https://shroomok.com/en/wiki/File:Agar-cooking-for-ycology.jpg) Agar cooking. Dissolve dry ingredients in hot water
5. Bring agar and added ingredients to boil. Turn off the stove. Ready](https://shroomok.com/en/wiki/File:How-to-prepare-agar-for-mushroom-growing-mycology.jpg) Bring agar with added ingredients to boil
6. Fill any heat resistant jar with lid, or canning jar, or Lab Bottle with liquid agar mix. [](https://shroomok.com/en/wiki/File:Agar-in-bottle-for-sterilization.jpg) Fill the bottle with liquid agar
7. Sterilize agar in pressure cooker at 15 psi for 30 minutes; in instant pot or saucepan with lid for 45-60 minutes. [](https://shroomok.com/en/wiki/File:Agar-sterilization-for-mycology.jpg) Agar sterilization
8. After sterilization let it cool down to 140°F or +60°C.
9. Pour agar in Petri dishes. Close the lids. Let agar harden and cool down to room temperature.
> 💡 At 105°F or 40°C some clumps appear in agar. At 86°F or 30°C the agar solidifies. If this happen you can put the jar with agar in hot water or microwave to make it liquid again
#### Run air sampling test for airborne contaminants
1. For testing your environment take a ready to use agar plate. [](https://shroomok.com/en/wiki/File:Agar-for-air-sample-test.jpg) Agar plate for air sampling
2. Put agar plate on your work space (for example, your work table or near the tub with mushroom cake/block). Open Petri dish and leave it for **10-60 mins.** The longer agar exposed to open air the more mold spores settle. You can play with different time and compare results. Start with 10 mins if you want to check your working area for mycology, 20 mins - to check grow room/tent for mushroom cultivation. [](https://shroomok.com/en/wiki/File:Check_the_room_for_mold_contamination_with_diy_agar_test.jpg) Agar plate on the working table for mycology work
3. Close the agar plate (use parafilm, food film, tape for fixation the lid) and leave it for incubation/colonization period **at room temperature (around 72°F or 22°C) in a dark place for 48-96 hours.**
4. Check the agar sample. Usually, the first signs of fast growing molds appear in 48 hours.
5. Check again in 3-4-5 days, you can see bright colonies development and maybe new species of molds are present in your work space.[](https://shroomok.com/en/wiki/File:DIY-mold-test-air-sampling.jpg) Mold development and changes day by day
You won't confuse whether it is a mycelium or contamination, because any growth on your agar is 100% contamination.
> 🔬To confirm the identity of any contaminant, compare it sporulating structures with the acсompanying microscopic illustrations and/or micrographs.
Some species you can identify easily (such as blue-green mold *Penicillium*) or ask Shroomok Community on Discord and Reddit for approximate identification. Of course, it’s impossible to identify accurately each sample by photo. However, such capture will give insights to determine the main monsters you will fight with. Know your enemies!
#### Ideas and experiments on how to use DIY Mold Test
[](https://shroomok.com/en/wiki/File:Mold-test-on-agar-air-sampling.jpg) Mold art- Take **air samples anywhere you want** to check and compare your rooms or specific areas: grow tent, grow room, working space for mycology work, kitchen, bathroom, bedroom, basement, HVAC system.
- You can compare the difference between **air samples taken at different heights:** on the floor, on the table and closer to the ceiling.
- If you use a UVC light lamp for sterilization you can compare the CFUs on agar **with** **UVC lamp vs without UVC lamp**, so that you’ll see the difference and efficiency of using UVC light for mycology.> 📖 **CFU (Colony Forming Units)** is the number of alive and active microorganisms in one serving of supplement (in our case per agar plate). These are typically measured in CFUs per gram or per milliliter. A colony refers to the individual colonies of mold, bacteria, yeast growing together. The more colonies the higher contamination concentration.
- Count the CFUs **before and after cleaning** the grow room/tent to know how effective the cleaning routine.
- This approach is suitable for testing **SAB (Still Air Box), Fan Filter Box** and **Laminar Flow Hood efficiency.**
- You can open the agar plate and **imitate any mycological procedure.** Then close the plate and check it after 2-5 days. In this way you’ll see **how sterile your routine is.**
- **Compare indoor and outdoor samples** to get a read on whether there's excess mold in your home and if it's different than what's outside.
- Compare your agar test with contaminations during cultivation process. This can help you to improve cleaning process, to know the vector of contamination. For instance, if you have totally different mold sample on mushroom block/cake, then more likely the vector of contamination is a substrate, not from airborne spores.
- Create beautiful arts with molds, bacteria, yeast. They look beautiful :)
#### Conclusions
Each workplace for mycology and growing room for mushrooms is unique. It differs in mold varieties and concentration level. Thus directly affects your success in mushroom cultivation.
[](https://shroomok.com/en/wiki/File:Mold-test-on-agar.jpg) Different mold species on agarAir is one of the vectors of contamination. Remember that you can bring contamination with tools; substrate; your breath, hands and clothes; genetic materials; insects etc.
We don't live in a sterile environment, billions of spores are in the air. Simple mold test can show you the most popular varieties of mold contaminants. It’s an indicator that particular species are present in the air of your room.
There are over **100 000 different types of mold.** Not all molds are a threat, however. Some species are safe for people and animals. Some molds only become toxic when they reach certain concentration. Toxic species can be harmful to individuals with severely weakened immune systems, but it needs some level to cause such problems as allergic reactions, coughing, sneezing, sore throats, asthma etc.
Don't be paranoid! We are exposed to mold spores every day and everywhere. Normally, we are capable of fighting off any inhaled or ingested mold spores. When you walk in a forest/park you breathe with billions of different mold spores. You eat some spores with food every day and gastric juice does its job.
A small patch of green mold the size of a coin on your cake or agar plate is certainly not a significant problem.
Our main concern with molds (for mushroom cultivation) is their fast growth and ability to consume nutrients faster, they are competitors with our mushrooms. They reduce the chances of a successful mushroom harvest and increase the likelihood of contamination in future attempts.
**It is important to control mold contamination in our living spaces by:**
- regularly cleaning, maintaining ventilation, cleaning air conditioning and ventilation filters;
- monitoring for signs of moisture and leaks in the bathroom and kitchen;
- monitoring for signs of molds on the furniture and fridge;
- throwing away trash and spoiled food every day;
- washing fruits and vegetables thoroughly.
> ❗️All these simple actions are preventing measures to combat molds and protect both your health and your shrooms.
Enjoy your home mycology!
Join Shroomok Community on [Discord](https://discord.gg/ngKhQDmymD) and [Reddit](https://www.reddit.com/r/Shroomok) for questions and sharing experience.
If you find this guide helpful, please support me with subscription or cup of coffee on ☕️ [buymeacoffee](https://www.buymeacoffee.com/shroomok)
Peace, Shroomok ❤️
## Bacterial brown blotch disease on mushrooms
[Bacterial brown blotch disease on mushrooms](https://shroomok.com/en/wiki/Bacterial_brown_blotch_disease_on_mushrooms)
[](https://shroomok.com/en/wiki/File:Bacterial-blotch-disease-mushroom-cultivation.jpg) Bacterial blotch disease caused by *Pseudomonas* pathogen. Symptoms, prevention, and treatment guide### Brown Spot on Mushroom Caps: Symptoms, Prevention, and Treatment Guide
#### What is Bacterial Blotch disease
Bacterial Blotch, also known as Brown Spot or Brown Blotch, stands as the most prevalent bacterial disease affecting both commercially cultivated and home-grown mushrooms. This disease has far-reaching economic implications for mushroom farms worldwide, primarily due to its impact on quality of edible mushrooms, though it poses no health risks to humans.
This type of contamination has less dramatic impact to cultivators who grow magic mushrooms in bags, fruiting chambers or grow tents, but this annoying disease has happened to all growers from time to time.
Bacterial Blotch can be caused by various pathogens within the Pseudomonas genus, characterized as aerobic, Gram-negative soil bacteria. These motile, non-spore forming pathogens include:
- **Brown Spot, Bacterial Blotch,** and **Brown Blotch:** Caused by *Pseudomonas tolaasii, which is the most common cause of this type of contamination.*
- **Ginger Blotch:** Attributed to the *P. fluorescens* species group, collectively referred to as Pseudomonas 'gingeri'.
- **Brown Speckling** or **Pitting on Mushroom Caps:** Resulting from *Pseudomonas costantinii.*
- **Mild Yellow Blotch Disease** on **Oyster Mushroom Species:** Linked to *Pseudomonas reactans* and *Pseudomonas agarici.*
##### Scientific classification
- Domain: Bacteria
- Phylum: Pseudomonadota
- Class: Pseudomonadota (synonym Proteobacteria)
- Order: Pseudomonadales
- Family: Pseudomonadaceae
- Genus: Pseudomonas
- Species: *P. tolaasii, P. agarici, P. costantinii etc.*
> 🔮 Pseudomonas bacterium, and *Pseudomonas tolaasii* particularly, is a fluorescent bacterium (*P. fluorescens* group), which is known for its ability to produce a fluorescent pigment. The production of this pigment is one of the identifying characteristics of many Pseudomonas species (but not for all!) used in the laboratory for differentiating it from other bacteria. This fluorescence can be observed under UV light at 365 nm, which causes the bacterial colonies to emit a bluish-green or greenish-yellow glow
#### Symptoms of Bacterial Blotch contamination on mushrooms
Under optimal conditions, the population of *P. tolaasii* experiences rapid growth, accompanied by increased production of the toxin known as tolaasin.
Tolaasin disrupts the plasma membranes of mushroom cells, leading to their eventual collapse. This impact isn't confined to the mushroom's surface; when secreted, tolaasin can infiltrate deeper into the hypha tissues within the mushroom. Furthermore, tolaasin acts as an effective biosurfactant, reducing the surface tension of water. Lower surface tension allows water to spread over a larger area, facilitating the colonization of fresh areas on the mushroom cap by *P. tolaasii*.
**The contamination process unfolds as follows:**
*P. tolaasii* is deposited on the mushroom's surface -> senses the mushroom's presence -> moves towards it -> then releases tolaasin to compromise the plasma membrane of mushroom cells -> and access the nutrients within.
Initially, the affected areas exhibit a pale yellow hue, which later deepens to golden yellow or even a deep brown, eventually forming sunken lesions.
[](https://shroomok.com/en/wiki/File:Bacterial-brown-spot-sunken-lesions.jpg) Mushroom cap with bacterial blotch (*P. tolaasii)* contamination has golden yellow color and sunken lesions
Typically these brown spots are wet and slightly slimy or can have brown dry speckles and pits on mushroom caps
[](https://shroomok.com/en/wiki/File:Bacterial-brown-spot-on-mushrooms.jpg) Wet slimy brown spots on mushroom cap as a symptom of Bacterial Blotch contamination
As the blotch disease progresses, these spots transform into dark brown lesions.
[](https://shroomok.com/en/wiki/File:Wet-brown-spot-on-mushroom-cap-bacterial-blotch-contamination.jpg) Brown spot on mushroom caps
Yellow-brown or black blotches become evident at or near the edges of mushroom caps, at the points where two mushroom caps make contact, or within a cluster where mushrooms touch each other.
[](https://shroomok.com/en/wiki/File:Bacterial-black-brown-blotch-on-mushroom-cluster.jpg) Late stage of bacterial blotch disease. Black blotches on mushroom caps within one cluster
In the advanced stages of blotch development, the affected areas turn black, indicating the bacterial decomposition of mushroom tissue. In this case (see photo below) most of pins were affected and they stalled. There are mild brown and black blotch on mature shrooms.
[](https://shroomok.com/img_orig/084d14/4032_mushroom-aborts-with-black-caps.jpg) [Aborts or Bacterial Blotch contamination](https://shroomok.com/en/wiki/File:mushroom-aborts-with-black-caps-26e208)#### Main Causes of Bacterial Brown Spot in Mushroom Cultivation
The primary sources of the blotch pathogen responsible for Bacterial Brown Spot in mushroom cultivation include bulk substrate, casing substrate, airborne dust, clothing, tools, equipment, insects.
These bacteria is likely present in most bulk and casing substrates, even after pasteurization. Healthy mushrooms may carry a small population of this bacteria on their caps, but this alone does not necessarily lead to bacterial blotch disease. The key factor seems to be the size of the bacterial population on the cap, rather than within the casing.
All bacteria need water to thrive, reproduce, and colonize. Water is a crucial factor for the growth and spreading of most bacteria, including *Pseudomonas tolaasii species* in mushroom cultivation. Bacterial blotch disease typically occurs when **water droplets remain on mushroom caps and stems for an extended period, usually between 4 to 8 hours or longer** after the application of water. Excessive misting and water splashes can cause the bacterial population to increase and spread.
[](https://shroomok.com/en/wiki/File:Bacterial-blotch-pseudomonas-tolaasii-contamination-on-mushroom-cap.jpg) Mild brown blotch contamination on mushroomsThis situation often arises due to the following reasons:
1. **Direct and Excessive Misting:** Misting on mushroom fruit bodies directly and too much. Using a spray bottle with large water droplets. Using fogger for too long and lack of fresh air exchange.
2. **Water Pools:** The top layer of the substrate retains moisture for an extended period after misting or rehydration (soaking mushroom cake in water). By the way, dry top layer absorbs water poorly and more often such cake has water pools on top layer.
3. **Fluctuations in Temperature and Humidity:** Changes in temperature or relative humidity can alter evaporation rates and condensation, creating favorable conditions for bacterial pathogens.
4. **Condensation on fruits:** Condensation can form on mushroom caps and stems, either due to spraying or temperature fluctuations.
5. Additionally, **condensation water drops falling from the lid** of the fruiting chamber directly onto the mushrooms can contribute to the development of bacterial blotch disease.
#### How to Prevent Bacterial Blotch Contamination
Preventing Bacterial Blotch contamination is essential for successful mushroom cultivation. Here are some effective measures to consider:
1. **Misting Technique:** Instead of spraying water directly onto the mushrooms, mist the walls of your tub or fruiting chamber. This approach helps maintain optimal humidity without saturating the mushroom caps.
2. **Use of Ultra Fine Mist** or **Humidifier with Humidity Controller:** Use an [Ultra Fine Mist Spray Bottle](https://www.amazon.com/gp/product/B0948WBX9L?&linkCode=ll1&tag=shroomok-20&linkId=b2568ccef0151facd2ee37e2e2c156c1&language=en_US&ref_=as_li_ss_tl) ($8.99) for manual misting. Or invest in simple equipment like a [Fogger/Humidifier](https://amzn.to/3ZMEceT) ($59.99) to ensure that water droplets are finely dispersed and accurate [Humidity Controller](https://amzn.to/48Elzh4) ($30.09) to maintain stable humidity level automatically. These help to reduce the risk of excess moisture on mushroom surfaces.
3. **Manage Water Pools:** After misting or [rehydrating the mushroom cake](https://shroomok.com/en/wiki/Rehydration_of_psilocybe_cakes "Rehydration of psilocybe cakes") to initiate the next flush, ensure that any pooled water disappears within 12-16 hours. If it persists, don't mist the fruiting chamber and lower the relative humidity to 80-85% until the top layer of the substrate is dry.
4. **Casing Layer:** Soft, airy casing layer on the mushroom cake is beneficial. This layer enhances water absorption and creates an ideal microclimate for mushroom growth.
5. **Address Condensation Issues:** If you have temperature fluctuations in your growing environment (typically during the cold season) condensation on the lid of the fruiting chamber can lead to water droplets falling onto the mushrooms. To tackle this problem, I'd like to share a useful technique from my gardening (greenhouse) experience, that also effective for mushroom fruiting chamber and mushroom grow tent. Let's call it the **"WD-40 Tek":**
- Take [WD-40](https://amzn.to/48DJ6Pr) ($14.99) and spray it 5 times into 1 quart (1 liter) of water.
- Shake well and fill a spray bottle with this solution.
- Wipe the lid of your fruiting chamber (e.g., GrowBox, MonoTub, shoebox) to ensure it's completely dry.
- Spray the WD-40 solution on the lid of your fruiting chamber.
- Wipe the lid with a cloth or paper towel, moving from side to side.
This method helps prevent condensation water drops from forming on the lid and falling onto your mushrooms. Excess water will flow down the chamber walls, reducing the risk of bacterial blotch contamination on the caps.
> WD-40 doesn't come into contact with the mushrooms and is not harmful to them
Compare results BEFORE/AFTER on the photos below.
Before using WD-40 method. The condensation droplets appear large and are prone to falling off the surface easily. This can lead to unwanted moisture on mushroom caps, potentially increasing the risk of bacterial blotch contamination.
[](https://shroomok.com/en/wiki/File:Condensation-on-the-lid-before-WD-40.jpg) BEFORE using WD-40 tek. Excessive condensation on the lid of the mushroom fruiting chamber
After using the WD-40 solution. Remarkable change in condensation patterns. Water droplets are now notably smaller and remain adhered to the lid's surface. Excess water is less likely to fall onto the mushrooms below, decreasing the risk of bacterial blotch disease on their caps.
[](https://shroomok.com/en/wiki/File:Condensation-on-the-lid-after-WD-40.jpg) Condensation on the lid AFTER using WD-40 method. Small water drops are sticked to the lid and don't fall off even if you shake it#### Bacterial Blotch Treatment
In 1972, Nairand Fahy put forward a biological control approach for managing the *Pseudomonas tolaasii* species. He illustrated that the introduction of *Pseudomonas fluorescens*, a natural antagonist to P*. tolaasii,* effectively diminished the incidence of blotch without impacting the yield of Agaricus brunescens. Nonetheless, some experts suggesting that *P. fluorescens* might be considered a variant of *P. tolaasii.* As a result, are cautious in approving its use.
Brown mushrooms exhibit a natural resistance to brown blotch disease in contrast to their white counterparts. However, the specific gene responsible for this resistance remains unidentified at this time.
> Melanins represent a defence system in all organisms as well as a resistance mechanism to stress. In fungi, melanins also appear to be important in conferring resistance to microbial attacks. They can also have an antibiotic effect against antagonist organisms. The main role of fungal melanins is probably to provide protection against hydrolytic enzymes, such as glucanases and chitinases, thus preventing cell wall lysis. [Biochemical and physiological aspects of brown blotch disease of *Agaricus bisporus*](https://academic.oup.com/femsre/article/23/5/591/533240)
Today, the most common treatments for Bacterial Blotch include:
1. **Isolation (Pick and Toss):** Remove the most affected mushroom bodies to prevent the spread of bacteria to nearby mushrooms.
2. **Chlorinated Water (150-250 ppm concentrate):** This weak solution is not harmful to mushrooms but is effective against Bacterial Blotch pathogens and also [Mycogone Wet Bubble disease](https://shroomok.com/en/wiki/Mycogone_contamination_aka_wet_bubble_disease "Mycogone contamination aka wet bubble disease")
##### **How to prepare 150-250 ppm Chlorinated Water?**
Dissolve the bleach (Sodium Hypochlorite - NaOCl) in 1 liter of water according to these ratios:
- NaOCl **5.25%** ([Amazon](https://amzn.to/3RPvnic)) - add **3.0-5.0 ml** per 1L of water
- NaOCl **6.0%** ([Amazon](https://amzn.to/45qU9IG)) - add **2.6-4.4 ml** per 1L of water
- NaOCl **7.5%** ([Amazon](https://amzn.to/3rGVs8y)) - add **2.1-3.5 ml** per 1L of water
- NaOCl **12.5%** ([Amazon](https://amzn.to/3ZTQSAz)) - add **1.3-2.1 ml** per 1L of water
- Fill a spray bottle with the solution.
- Open the lid of the fruiting chamber and try to dry the water drops on the mushrooms, at least the biggest and the most visible. You can gently use a fan or leave the tub open for 30-40 minutes to allow the water droplets to evaporate.
> 💡 **Pro Tip:** Chlorinated water is an effective disinfectant, but it works best when the mushrooms are dry. If the mushrooms are wet, the Pseudomonas bacteria can reproduce faster than the disinfectant can kill them. Therefore, sodium hypochlorite (NaOCl) solution is sometimes ineffective on wet mushrooms.
- Lightly mist the mushrooms once a day for 3 days; or make 3 treatments with a 12-hour break between each misting.
> ❗️Important: Use the bleach solution when you see signs of Bacterial Blotch contamination. Don't use bleach solution as a prevention measure. It is for treatment purposes only!
- Keep relative humidity 80-85% during treatment session and for the few days.
- Monitor the progress. In some cases, a single treatment may yield positive results.
If the blotches are treated at an early stage, right after the first signs of brown spots appear, they may disappear before the mushrooms mature. After treatment or in very dry conditions following the appearance of blotch, the caps of the mushrooms may crack radially as they expand. Such shrooms with cracks are totally normal for harvesting!
[](https://shroomok.com/en/wiki/File:Mushroom-caps-crack-radially-after-bacterial-blotch.jpg) Mushroom caps crack radially after treatment or in dry conditions following the appearance of blotch#### Is it safe to consume mushrooms with Bacterial Brown Spot
There are over 150-200 validly described species within the Pseudomonas genus. The one known to cause infections in humans is called *Pseudomonas aeruginosa*. However, only a few of Pseudomonas species affect mushrooms.
The Pseudomonas species that cause bacterial blotch on mushrooms, including *P. tolaasii, P. costantinii, P. reactans, P. agarici, and P. 'gingeri',* are not toxic and do not pose any threat to human health.
Once you dry mushrooms well, they'll be fine for sure. Bacterial cells can't survive without water. Hence, mushrooms affected by bacterial blotch are safe to take after being dehydrated at a 120°F (50°C).
You can also trim away the affected parts before drying your shrooms.
If your mushrooms are not looking their best or excessively slimy, don't dry and take them. They might have an unpleasant odor and turn into a mushy mess in dehydrator. It's perfectly fine to bid farewell and send them off to the trash bin.
#### Afterwords
Check out more photo examples of different contaminations and cultivation issues in [📸 Growing Problems photo gallery](https://shroomok.com/gallery/growing-problems)
Join Shroomok Community on [Discord](https://discord.gg/ngKhQDmymD) and [Reddit](https://www.reddit.com/r/Shroomok) for questions and sharing experience.
You can also leave your **comments on this page below ⬇️**
If you find this guide helpful, please support me with cup of coffee on [**☕️ buymeacoffee**](https://www.buymeacoffee.com/shroomok)
Have a happy growing and healthy shrooms!
Peace, Shroomok ❤️
## Mushrooms side and bottom pinning
[Mushrooms side and bottom pinning](https://shroomok.com/en/wiki/Mushrooms-side-and-bottom-pinning)
[](https://shroomok.com/en/wiki/File:Bottom-and-side-pins-problem-or-bonus.jpg) Bottom pins and side pinning#### Mushroom growth only on the sides and bottom of the cake
> Question: Are my side pins caused by light?
[](https://shroomok.com/img_orig/0ca766/4032_what-are-these-guys-doing-side-pinning-by-johnson617.jpg) [What are these guys doing here? Side pins](https://shroomok.com/en/wiki/File:what-are-these-guys-doing-side-pinning-by-johnson617-454e5b)For a long time, mushroom cultivators believed that side pinning occurred by light. Light influence on the pinning process of Basidiomycetes Fungi, but it is a secondary trigger, that mostly influence on active phase of fruit body development. Actually side pins are mostly from microclimate, not light. Basically when your substrate colonizes and pulling away as it dehydrates, the tiny gap between the cake and tub creates the perfect microclimate for side pins and even for bottom pins, where enough moisture.
> Question: Why my mushrooms are only growing around the edges of the cake or underneath and not growing evenly across the entire cake?
[](https://shroomok.com/img_orig/faf204/4032_why-are-my-mushrooms-fruiting-on-the-sides-and-underneath-can-you-eat-this-does-it-have-any-potency-by-mysterytour2000.jpg) [Why are my mushrooms fruiting only on the sides and underneath and not growing on the top?](https://shroomok.com/en/wiki/File:why-are-my-mushrooms-fruiting-on-the-sides-and-underneath-can-you-eat-this-does-it-have-any-potency-by-mysterytour2000-23fea3)[](https://shroomok.com/img_orig/1215b2/4032_why-are-my-mushrooms-fruiting-on-the-sides-and-underneath-can-you-eat-this-does-it-have-any-potency-by-mysterytour2000-3.jpg) [Bottom pins fruiting](https://shroomok.com/en/wiki/File:why-are-my-mushrooms-fruiting-on-the-sides-and-underneath-can-you-eat-this-does-it-have-any-potency-by-mysterytour2000-3-85420a)It is not a problem when mushroom cake has rich fruiting 360 degrees or just a single side pin. The real issue, when mushrooms don't fruit on the top at all, but on the sides or at the bottom only. Z**ero pins on the top layer and side pins can be an indication that your surface level field conditions aren’t right!**
Each environment is unique. Season of the year, climate zone, thus temperature and humidity fluctuations are different. Hence each mushroom cultivator should adjust growing conditions according to shrooms needs. Although there are some basic mistakes to avoid.
#### Common newbie mistakes causing side pinning and zero pins on top layer
##### **Improper field capacity of bulk substrate**
[](https://shroomok.com/img_orig/853125/4032_whats-my-problem-here-first-flush-no-yield-so-i-rehydrated-mushroom-cake-and-now-shrooms-just-came-out-from-the-sides-only-by-renbo.jpg) [Only side growing shrooms](https://shroomok.com/en/wiki/File:whats-my-problem-here-first-flush-no-yield-so-i-rehydrated-mushroom-cake-and-now-shrooms-just-came-out-from-the-sides-only-by-renbo-10b738)Mistake from the start. Perhaps you used too dry bulk substrate on spawn to bulk step. This moisture was enough for bulk colonization, but not enough for further mushroom fruiting.
It's a huge mistake and you should learn this basic lesson to avoid it for the future!
**What to do?**
1. Check the field capacity of bulk substrate BEFORE using it. Field capacity means a perfect substrate moisture conditions. A good way to test for this is to grab a handful of the substrate mixture and squeeze it in your hand. If you are unable to squeeze out any water, it is too dry. If a light squeeze causes a stream of water to come out, it’s too wet. You want to be able to squeeze the mixture as hard as you can, and only have a few steady drops come out to have a field capacity moisture level.
2. Harvest the side growing mushrooms and rehydrate (soak) mushroom cake in water for a few hours. Rehydration helps to saturate the mushroom cake with missed water.
> Recommended guide: [Rehydration aka soaking mushroom cake](https://shroomok.com/en/wiki/Rehydration_of_psilocybe_cakes "Rehydration of psilocybe cakes")
##### Low relative humidity in fruiting chamber
When relative humidity (RH) in the fruiting chamber lower than 90% substrate looses moisture faster. Moisture evaporation from the top layer is higher than from the sides. Mushroom cake shrinks, hence the gap between the walls of the tub and mushroom cake appears.
If you use liner (plastic bag inside) mushrooms appear near the walls, where cake more moisturised. Cracked caps are also the sign of low humidity environment.
[](https://shroomok.com/en/wiki/File:Dry-environment-mushrooms-fruiting-on-the-sides.jpg) Dry environment - cracked caps and mushroom fruiting near the walls of the tubThis is a common problem for grow tent setup (especially for the first run) or while you testing new tek, new equipment.
[](https://shroomok.com/en/wiki/File:Side-pins-fruiting-near-the-walls-of-fruiting-chamber.jpg) Side pins fruiting near the walls of fruiting chamber and zero mushrooms on the top surfaceBut it is more common case for the impatient growers, who open the fruiting chamber every hour to check the progress and they literally drying out their cake.
**What to do?**
1. Monitor RH level with any simple hygrometer. Place the sensor inside the tub and the screen outside the tub.
2. As in natural environment humidity fluctuations is totally normal and even beneficial for promoting pinning. You don't need to maintain stable humidity all the time. However if you see on hygrometer 85-89% it means you need additional misting (mist the walls of your tub) or use humidifier/fogger, especially after each opening the tub.
##### **Excessive evaporation rate, air flow and fanning**
Very often newbie growers show me a common case, when relative humidity in tub is 90-99%, there are condensation water drops, but top layer of the cake looks dry. Mostly this humidity level maintained by extreme evaporation from the substrate. The more moisture evaporates in the air the less moisture inside the substrate. It's conrintuitive sometimes.
[](https://shroomok.com/en/wiki/File:Side-pins-bonus-mushrooms.jpg) Side pinning and side growing mushroomsUsing fan, ventilation, air conditioning in your room where you have a fruiting chamber can create additional air currents that drying out the substrate through air vents in tub.
> Excessive water loss, thus extreme shrinkage, creates the gap between cake and tub. Hence, there are perfect microclimate for fruiting in this gap, along the edges of the tub, while the top layer becomes a desert for mycelium
As mushrooms are 90% water, the better places for growing are more hydrated areas where water loss are less. Mycelium think: "We need more moisture to form fruit bodies. Too dry here. Let's search for a better place. The sides and at the bottom are pretty good conditions. Here are more chances for development fruit body and producing mature spores for our next generation. Let's do it!"
That's why we have pins and then shrooms on the sides, sometimes at the bottom, where climate conditions are more favorable.
**What to do?**
1. **Adjust FAE with fan.** If you use fan for Fresh Air Exchange (FAE) avoid extreme air flow and avoid fanning for too long. In this way you remove moisture and dry the cake. Adjust your FAE if you noticed that top layer drying out. Change the time and frequency, i.g. 2-3 times a day for 20-30 seconds. Or don't use fan at all.
2. **Misting or Humidifier.** Don't forget to mist the walls of your tub or use fogger after each opening/fanning to maintain proper humidity level without extreme evaporation from the substrate. Avoid misting/spraying water on mycelium directly.
3. **Adjust ventilation air holes in tub.** If you have air holes in your fruiting chamber you can adjust the natural airflow, that remove moisture out of your tub. Use tape to adjust for more or less FAE as needed. Sometimes closing air holes by half saves situation. Sometimes closing air holes completely and flipping the lid of the tub is a great FAE adjustment as well. Sometimes you need to close the air vents completely and get your hands out of your tub. Don't open it every hour to check how's it going. Often LITFA tek creates perfect microclimate balance!
> LITFA - Leave It The F\*ck Alone - common acronym among mushroom cultivators for impatient newbie growers
##### Vermiculite top layer
Only vermiculite as a top layer for mushroom cakes often works bad. Vermiculite retain water worse, tends to dry out faster than true [casing layer](https://shroomok.com/en/wiki/Making_mushroom_cake,_spawn_to_bulk,_and_casing#Casing) or thin coco coir mix layer. It is a common problem for growkits.
[](https://shroomok.com/en/wiki/File:Pinning-issue-side-pins-growkit.jpg) A few side growing mushrooms and zero shrooms on the top layer of growkit**What to do?**
1. Use coco coir mix or peat moss (sphagnum + lime) as a main ingredients for top layer (1/3 inch or up to 1cm). They keep moisture much better. You can use it for your growkit as well.
#### How to prevent side pinning
##### Inside liner for preventing side pinning
For most of growers inside liner is just a personal preference to use it or not.
It can be any plastic trash bag. The only downside of it that you can't see signs of contamination if the color of this bag is black (or any other color).
Much better option for inside liner is transparent painters plastic. It sticks to the substrate very well, it's super cheap and easy to work with it. You can still see if you get side and bottom pins or signs of contamination.
As long as those inside liner sticks to the cake really well it will prevent from side and bottom pinning.
> When you line the tub inside, the lining shrinks with the mushroom cake and shrooms won't have such conditions between tub and cake. As far as side pinning is because the microclimate between the cake and bin is ideal for fruiting conditions. The purpose of the liner is to adhere to the cake and move with the shrinking cake thus preventing or reducing the microclimate between the two surfaces/sides.
Trim the liner after Spawn to Bulk to match the substrate level. If the liner over the substrate it creates excess of moisture on mycelium and issues with Fresh Air Exchange (FAE).Liner is a pretty simple way to prevent side pins. Not really any cons to using them either.
> **Tip:** Inside liner is also helpful for harvesting process and further soaking mushroom cake in water (mostly for big cakes). It helps against cracking the cake
Anyway, if something wrong with your environment mushrooms will grow close to the wall of your tub even if you use inside liner
[](https://shroomok.com/en/wiki/File:Side-pins-growing-mushrooms.jpg) Side growing shrooms##### **Press down the bulk substrate on around the outside perimeter**
It doesn't matter if you use or don't use an inside liner, **pack the substrate down during Spawn to Bulk a little tighter, especially near the tub walls.** It will prevent some of the side pinning on the initial flush. This tamping down the substrate enough keeps the cake against the wall longer.
> I never line my shoebox tubs, because side pins are really easy to harvest in them. Just make sure you pack the substrate down pretty tight to avoid massive side pins for the first 1-2 flushes
Here is an example when bulk substrate wasn't compacted along the tub walls. Mushrooms grow on the top and from the sides.
[](https://shroomok.com/en/wiki/File:Side-growing-mushrooms-monotub.jpg) Side growing mushrooms in monotub#### Promote pinning on the top of the cake with Bubble Wrap
You can lay bubble wrap or food film (aka [bubble wrap tek or blanket-tek](https://shroomok.com/en/wiki/Fruiting_period._Pinhead_initiation,_mushroom_pinning_and_mushrooms_growth_parameters#Blanket_tek_or_bubble_wrap_for_pinhead_initiation)) to promote pinning on the top of your mushroom cake. This method works if the top layer still have some moisture, not dried.
In this way, we save moisture inside the cake and replicate a climate conditions between the mushroom cake and the film, close to the conditions between the cake and the tub, that favorable for side pinning.
Spray some water on the piece of bubble wrap or food film and put it on top of the cake. Remove the film once a day to introduce fresh air and check the progress.
[](https://shroomok.com/en/wiki/File:Blanket-tek-for-pinhead-initiation.jpg) Bubble wrap tek or Blanket tek with food filmTypically in 3-5 days you can see first pins on the top. From this moment remove the film completely and provide normal fruiting conditions for pins transformation into mature mushrooms.
#### Are side pins bad
> Question: Are side pins bad? Can you eat this? Does it have any potency?
[](https://shroomok.com/img_orig/a4ac17/4032_why-are-my-mushrooms-fruiting-on-the-sides-and-underneath-can-you-eat-this-does-it-have-any-potency-by-mysterytour2000-2.jpg) [Are side pins bad? Can you eat this? Does it have any potency?](https://shroomok.com/en/wiki/File:why-are-my-mushrooms-fruiting-on-the-sides-and-underneath-can-you-eat-this-does-it-have-any-potency-by-mysterytour2000-2-3c26cd)Side and bottom growing pins that are able to develop into mature mushrooms are totally healthy shrooms. They may look ugly, curved, may be too wet. But they are totally normal for harvesting, potent and save to consume.
[](https://shroomok.com/img_orig/7fafd1/4032_side-pins-fruiting.jpg) [Side and bottom growing mushrooms](https://shroomok.com/en/wiki/File:side-pins-fruiting-096ab2)For newbie growers side pins and side growing mushrooms can be the only mushrooms to be harvested. Better than nothing! Isn't it?
[](https://shroomok.com/img_orig/1ee412/4032_most-of-my-mushroom-fruits-are-sidepins.jpg) [Most of my mushroom fruits are sidepins](https://shroomok.com/en/wiki/File:most-of-my-mushroom-fruits-are-sidepins-5c546e)Even if you are experienced grower you can get side pins only, when you are trying to adjust climate conditions, while playing with new tek or new equipment for your growing setup.
[](https://shroomok.com/img_orig/ffaf52/4032_pinning-and-fruiting-in-the-grow-tent-by-imaghost-5.jpg) [Still dealing with climate conditions in the tent. Side growing mushrooms](https://shroomok.com/en/wiki/File:pinning-and-fruiting-in-the-grow-tent-by-imaghost-5-cb25ea8)Cultivators that have mushrooms on top also can have side and/or bottom growing mushrooms. They are your bonus fruits!
It's totally normal to have side pins. Let them be!
Let me share a few examples and comments from experienced growers.
> 1\. You would be surprised at the size a side pin can get if left alone. And canopy’s are not always going to happen.
[](https://shroomok.com/en/wiki/File:Giant-side-pin-growing-in-bag.jpg) The side pins in grow bag grow like tar[](https://shroomok.com/en/wiki/File:Side-pins-with-inside-liner.jpg) Huge side growing shroom> 2\. I’ve said it maybe hundreds of times now… Some of the largest fruits I’ve ever measured have been side/bottom pins. Here is a side pin that is currently in my tent…
[](https://shroomok.com/img_orig/4906cf/4032_a-side-pin-mushroom-that-is-currently-in-the-tent.jpg) [Huge side pin](https://shroomok.com/en/wiki/File:a-side-pin-mushroom-that-is-currently-in-the-tent-d0cbfe)> Honestly, some of the largest fruits I’ve seen from better growers than I am have been sidepins too! They aren’t a bad thing, and it’s a losing/winning battle.
[](https://shroomok.com/img_orig/d0e7a6/4032_sidepins-happen-by-imaghost.jpg) [Sidepins Happen! 125 g](https://shroomok.com/en/wiki/File:sidepins-happen-by-imaghost-e6124a)> 3\. This picture doesn’t do it justice the side pinning is crazy on this one
[](https://shroomok.com/en/wiki/File:Side-pins-bottle-tek.jpg) Testing a bottle-tek and have a crazy side pinning> A few days later. Look at this side pin city!
[](https://shroomok.com/en/wiki/File:Side-pins-city-fruiting.jpg) Side pinning bottle-tek#### Are bottom pins bad
> **Question:** How bad can side pinning be? Well, I’d say bottom pinning. I look under my tub and see a canopy of bigger pins under tub. The cake is literally being lifted off of the bottom from all the mushrooms.
[](https://shroomok.com/img_orig/1d0885/4032_how-bad-can-side-pinning-be-id-say-bottom-pinning-by-mush-2.jpg) [Many bottom pins](https://shroomok.com/en/wiki/File:how-bad-can-side-pinning-be-id-say-bottom-pinning-by-mush-2-e55908)If I see that I’m getting a lot of side pins (mainly after 1st-2nd flush), I’ll put the cake on the racks or on the other side. If you have massive bottom pinning you can flip the cake upside down, thus shrooms will have more space for growth, will be more attractive and it will be easier to harvest.
> Done! Flipped the cake upside down to let bottom pins grow!
[](https://shroomok.com/img_orig/ae0bb1/4032_flipped-the-cake-with-bottom-pins-by-mush.jpg) [Flipped the cake with bottom pins](https://shroomok.com/en/wiki/File:flipped-the-cake-with-bottom-pins-by-mush-1b5807)> I usually pick bottom pins before anything fun happens with the cap, because they get too wet or they abort and the caps just stop. But the side pins make it eventually, so I let them keep at it. This cake is much happier upside down xD
[](https://shroomok.com/img_orig/088ab1/4032_this-mushroom-cake-is-much-happier-upside-down.jpg) [This mushroom cake is much happier upside down](https://shroomok.com/en/wiki/File:this-mushroom-cake-is-much-happier-upside-down-04f392)#### **Side pins harvesting tips and issues**
For initiating new flush of fruiting by soaking cake in water you should pick ALL shrooms on the top, all sides and bottom. Why?
If you leave pre-mature and mature mushrooms from the sides and at the bottom they might start to decay and rot in the nearest days after soaking. Your cake will be contaminated and wasted.
You can leave tiny pins on the cake. Some of them continue growing, some of them may turn into [aborts](https://shroomok.com/en/wiki/Mushroom_aborts "Mushroom aborts").
On small tubs, shoeboxes or small mushroom cakes side pins don’t really matter since they’re easier to harvest. Just remove the cake from the box and harvest all shrooms.
[](https://shroomok.com/en/wiki/File:Psilocybe-cubensis-cake-preparation-before-rehydrating.jpg) After removing from plastic box you can see top and side growing mushrooms on small mushroom cake with pseudo casing layer. Preparation for soaking in water
For bigger mushroom cake it can be annoying to harvest side and bottom pins.
[](https://shroomok.com/en/wiki/File:Side-pins-harvesting-tips.jpg) Side growing mushrooms in monotub ready for harvesting**To make harvesting easy and to avoid crumbling/cracking cake during harvesting side and bottom pins follow the next steps:**
1. Pick all shrooms on the top. Twist mushrooms by rocking slightly to the sides and remove them gently. So that you won't damage mushroom cake.
2. Put a thick surface on the top of the cake. Use the lid from the tub of smaller size, or ceramic plate, or baking tray that +/- fits your cake size.
3. Put your hand on this lid/tray/plate.
4. Flip the tub with the other hand and remove cake from the tub. So that you have a cake on the tray upside down.
5. Voila! Now you can harvest all mushrooms grown on the sides and at the bottom without cracking the cake.
6. After harvesting put the cake back in the tub in the same way. It is ready for rehydration step.
> **Question:** I noticed I had a lot of side pins. So decided to move my cake to a bigger tub with a rack. But when I moved the cake, it broke in half, not fully to become two pieces, it’s still one piece with a big crack. Question is… have I just destroyed my grow?
It should be fine. If your cake cracked into 2-3-4 parts go ahead! Shrooms will grow even if the entire cake turns into many slices. Put them in a tub, provide proper fruiting conditions and wait. You'll get rich fruiting in your 'big crack' area.
#### Sum it up
When the cake pulls away from the wall (its normal natural process) it creates a tiny microclimate that is usually ideal surface conditions for pinning.
Mild cake shrinking is totally normal process due to evaporation and absorbing moisture by mycelium and mushrooms while growing. However it doesn't mean that any minimal gap between cake and tub is a problem to react.
It's amazing when your mushroom cake fruit everywhere! However fruiting from the sides or bottom and zero mushrooms on the top says you about mistakes in your climate conditions.
> So the microclimate in the sides of your bins is perfect, right? So ask yourself, what do you need to do to mimic THAT in the whole tub?
First of all, avoid basic mistakes, such as improper substrate field capacity, excessive fanning, excessive evaporation, low relative humidity of the environment. Create favorable microclimate for your mushroom cake.
You can counter side pinning by packing your substrate down tight and using a liner inside the tub.
Side pins and bottom pins is not a problem at all. They are your bonus mushrooms!
If you find this guide helpful, please support me with cup of coffee on [buymeacoffee](https://www.buymeacoffee.com/shroomok)
Have a happy growing!
Peace, Shroomok
# Mushroom Strains
## Mutant strain Albino Penis Envy aint just APE but King Kong of Magic Mushrooms
[Mutant strain Albino Penis Envy aint just APE but King Kong of Magic Mushrooms](https://shroomok.com/en/wiki/Mutant_strain_Albino_Penis_Envy_aint_just_APE_but_King_Kong_of_Magic_Mushrooms)
[](https://shroomok.com/en/wiki/File:Albino-penis-envy-APE-mushroom-strain.jpg) Psilocybe Cubensis Albino Penis Envy strain### Albino Penis Envy mushrooms: story of origin, cultivation tek and growing problems, potency and effects
There is one provocative mushroom. It resemble an intimate symbol and full of jokes about naming
[](https://shroomok.com/en/wiki/File:Albino-penis-envy-huge-mushroom.jpg) APE isolated culture harvest by Costana Monovar - [Shroomok growers Community in **Discord**](https://discord.com/invite/ngKhQDmymD)Get to know it! Albino Penis Envy is one of the most desirable Psilocybe Cubensis strains among psychonauts and mushroom growers. His name speaks for itself and fully describes his physical form: thick stem and convex head (the cap usually doesn't open completely)
[](https://shroomok.com/en/wiki/File:Ape-huge-mushroom.jpg) APE giant mushroom by Costana Monovar - Shroomok growers Community on [Discord](https://discord.gg/ngKhQDmymD)> In contrast to the golden caps of regular Cubensis, APE's caps are white/beige with a blue tint. When dry they turn into a beautiful silver-blue color
Mostly used wordplay abbreviation as a name for this mushroom - APE 🦍
#### Albino Penis Envy in books and journals
This mushroom and its ancestors are featured in John Allen's book [*"Sex, Mushrooms, and Rock and Roll"*](https://www.researchgate.net/publication/350621105_Sex_Mushrooms_and_Rock_and_Roll_April_4_2021) (download free pdf book) on the title page. It is mentioned as a first sex toys of ancient people in his book [*"Sexy Sacred Mushrooms"*](https://www.amazon.com/Sexy-Sacred-Mushrooms-John-Allen/dp/1579512089?&linkCode=ll1&tag=shroomok-20&linkId=51d2f4b6299d310d5ba506b5e28eb56b&language=en_US&ref_=as_li_ss_tl) (particularly in paragraph "*Penis Worship, Penis Envy & Phallic Symbolism"*)
[](https://shroomok.com/en/wiki/File:APE-J-Allen.jpg) APE in John W. Allen study "Sex, Mushrooms and Rock and Roll"> **John W. Allen aka "Mushroom John"** is a brilliant Mushroom Pioneer, ethnomycologist, writer, artist, photographer and independent researcher of the entheogenic use of psilocybin mushrooms. He discovered many new species and strains. One of them is [Pink Buffallo](https://shroomok.com/en/wiki/Pink_Buffalo_mushrooms_from_Koh_Samui_in_Thailand "Pink Buffalo mushrooms from Koh Samui in Thailand"), also [Cambodian](https://shroomok.com/gallery/cambodian) and [Burma](https://shroomok.com/gallery/burma-magic-mushroom-strain).
Enough to talk about mushroom porn so far. Let's figure out *Albino Penis Envy* features.
#### Origin of Albino Penis Envy mushroom
You'll never find such specimen in nature. Why? Because it's a MUTANT strain created by mycologists.
Albino Penis Envy is a hybrid of two Psilocybe Cubensis strains: ***[Penis Envy](https://shroomok.com/gallery/penis-envy)*** and ***PF Albino***.
[](https://shroomok.com/en/wiki/File:Penis-envy-and-pf-albino.png) Penis Envy + PF Albino mushroom = APE
There are legends about how Penis Envy's ancestor came to be. This story involving ethnomologists Terence McKenna, Steven Pollock and Rich Gee. These psychonauts are so overplayed that it's almost impossible to find the true story of the Penis Envy origin.
The beginning of Penis Envy history starts in 1971 from a huge Cubensis mushroom in Amazon river area that was founded by Terence McKenna. He brought several prints of large specimens to the United States (Colorado) and gave them his friend Steven Pollock (a medical doctor, mycologist). But this finding doesn't mean Terence McKenna brought the finished version of Penis Envy genetic are known today.
Long mycological experiments were followed. Steven Pollock first tried to isolate the culture on agar. And during cultivation he noticed one fungus that stood out among all the others. This is how the mutation was identified. This mutant was cloned and became the Penis Envy.
> It is believed that a mycologist Rich Gee (it's his nickname), who wished to be anonymous, worked on this strain
[](https://shroomok.com/en/wiki/File:Penis-envy-in-monotube.png) Penis Envy mushrooms in monotub
However, everyone who had a hand in this creation doesn't claim authorship, they really lost the ego. All these guys refer to each other and joking about mushroom naming.
The second ancestor of APE is PF Albino. It is a Psilocybe Cubensis mutant by famous character in the world of magic mushroom cultivation called Professor Fanaticus or Psylocybe Fanaticus). He and his PF-tek became one of the most popular and easiest mushroom cultivation teks for home growing in 1990's.
As result of all these stories and mycological manipulations, we have Albino Penis Envy strain, that is super popular today.
[](https://shroomok.com/en/wiki/File:Albino-penis-envy-harvest.png) Albino Penis Envy harvest by Costana Monovar - Shroomok growers Community on [Discord](https://discord.gg/ngKhQDmymD)#### Albino Penis Envy potency
[](https://shroomok.com/en/wiki/File:APE-mushrooms.png) APE potency: stronger or notYou often hear from experienced growers and psychonauts:
> "All Cubes are plus-minus the same...But it's not really about APE mushroom"
Albino Penis Envy strain is known as one of the most potent among Psilocybe Cubensis magic mushrooms and even more potent than his ancestors Penis Envy and PF Albino. All albinos are considered more potent.
APE isolated culture can accumulate more alkaloids than regular Cubensis strains. Therefore, possible to grow more potent mushrooms. However, there is still insufficient data to state this fact, the strength of the mushrooms may vary considerably due to growing factors (cultivation conditions) and post-harvest storage methods.
According to Oakland Hyphae, the average alkaloid concentration of Penis Envy and Albino Penis Envy may be much higher than other strains of the Psilocybe Cubensis
[](https://shroomok.com/en/wiki/File:Psilocybe-cubensis-potency-by-strains-research.png) Psilocybe Cubensis potency by strains. Research by Oakland Hyphae> The following data is based on preliminary research and development methods, does not represent final data and requires further peer review before being taken more seriously than 'interesting'. Oakland Hyphae
Alkaloid concentrations can vary from mushroom to mushroom, from flush to flush. Moreover, even in the same mushroom there can be a significant difference in the stem and cap.
Significant difference exists **between SPECIES, not strains within one species:**
[](https://shroomok.com/en/wiki/File:Psilometric-scale-of-psilocybe-mushrooms.jpg) Psilocybe mushrooms potency by species. "Psilocybin Mushrooms of the World", Paul Stamets> Readers should note, that within any **one species**, there can be a **tenfold range** in psilocybin and psilocin production from one collection to the next. (Paul Stamets, "Psilocybin Mushrooms of the World")
> ...other indole alkaloids have been found in mushrooms besides psilocybin and psilocin. Baeocystin, norbaeocystin and/or aeruginacine are closely related to psilocin, and may be active. (Gartz, 1992)
#### Albino Penis Envy effects and tripping with APE
Psychonauts reported more intense trip with Albino Penis Envy mushrooms. Some noted more intense and active visuals. Someone have wavelike visuals, someone reported a deeper mystical experience
[](https://shroomok.com/en/wiki/File:Golden-teacher-effects-and-trip.png) Always prepare for tripping!Remember, all reports is subjective assessment of feelings. Mushroom trip depends mostly on the dosage, individual personal characteristics (metabolism, hormonal and immunity system), preparation before tripping, environment, level of stress, information background, your brain "library", set & setting etc.
> 🔴 Recommended: [Mushroom Consumption Guides](https://shroomok.com/articles:mushroom-consumption-recipes-and-tips)
#### APE for microdosing
Albino Penis Envy strain can be used for microdosing as any Psilocybe Cubensis strain. Personal dosage calibration for microdosing course is crucial importance step
[](https://shroomok.com/en/wiki/File:Capsules-with-mushroom-powder-for-microdosing.jpg) Psilocybin mushroom microdosing. Capsules with mushroom powder> 🔴 Check out: [Microdosing Guide](https://shroomok.com/en/wiki/Magic_mushrooms_microdosing "Magic mushrooms microdosing")
#### Features of growing Albino Penis Envy
[](https://shroomok.com/en/wiki/File:APE-growing.png) APE cultivation featuresCultivation steps for APE are totally the same as for other Psilocybe Cubensis strains
> 🔴 Follow step-by-step [Mushroom Cultivation Guide by Shroomok](https://shroomok.com/articles:grow-mushrooms-at-home-guide) and have a happy growing!
#### Is Albino Penis Envy suitable for newbies in mushroom growing?
Albino Penis Envy is recommended for experienced growers who have at least one successful grow from scratch (not a growkit!) and understand the basics in mushroom cultivation.
Actually attentive responsible newbies also succeed. So, don't limit yourself and be ready for hard work!
#### What is the best cultivation tek for APE mushrooms?
1️⃣ The most efficient growing tek for APE is MonoTub. These giants enjoy free space.
[](https://shroomok.com/en/wiki/File:Albino-penis-envy-ape.png) Albino Penis Envy (APE)> 🔴 Check out: [DIY Monotub for mushrooms](https://shroomok.com/en/wiki/Forget_Monotub_Kit._DIY._How_to_make_Monotub_for_Mushrooms_by_your_own "Forget Monotub Kit. DIY. How to make Monotub for Mushrooms by your own")
2️⃣ Tek №2 for APE is Bottle-tek and small mushroom cakes
[](https://shroomok.com/en/wiki/File:Albino-penis-envy-in-plastic-bottle.png) APE cultivation in plastic bottle aka bottle-tek> 🔴 Check out: [Bottle-tek or How to grow mushrooms in plastic bottles](https://shroomok.com/en/wiki/Bottle-tek_or_how_to_grow_mushrooms_in_plastic_bottles "Bottle-tek or how to grow mushrooms in plastic bottles")
> 🔴 Check out: [Casing and small mushroom cakes](https://shroomok.com/en/wiki/Making_mushroom_cake,_spawn_to_bulk,_and_casing "Casing of magic mushrooms cakes")
3️⃣ Even simple PF-tek can be used for growing Albino Penis Envy mushrooms
[](https://shroomok.com/en/wiki/File:Pf-tek-albino-penis-envy.png) PF-tek for APE growing, BRF-cakes#### APE cultivation and growing problems
Don't expect huge harvest for the first attempt. This strain is a bit capricious.
The most responsible step in the Albino Penis Envy cultivation is pinhead initiation period. This is the very first days after starting fruiting period or introducing fresh air and up to 14 days.
[](https://shroomok.com/en/wiki/File:Albino-penis-envy-pinhead-initiation-primordia-formation-fruit-bodies.png) Albino penis envy fruiting: pinheads, primordia and fruit bodies[](https://shroomok.com/en/wiki/File:Albino-penis-envy-fruiting.png) Normal APE mushrooms development, bottle-tek[](https://shroomok.com/en/wiki/File:APE-pinning-fruiting.png) Normal pinning and fruiting of Albino Penis Envy mushroomsAt this stage it is important to maintain favorable fruiting conditions for pins and primordia formation.
> ❗️Inappropriate microclimate conditions can be a trigger for genetic mutations! This is a common problem for all mutant strains
> 🔴 Check out: [Fruiting period. Pinhead initiation. Growing parameters](https://shroomok.com/en/wiki/Fruiting_period._Pinhead_initiation,_mushroom_pinning_and_mushrooms_growth_parameters "Fruiting period. Pinhead initiation, mushroom pinning and mushrooms growth parameters")
Mutated primordia are called Dino Eggs. Such mutants can be more potent than normal mature mushrooms
[](https://shroomok.com/en/wiki/File:APE-primordia-mutation.png) APE mutation is a common cultivation problem. It's not contaminationIt isn't contamination and these mutants are safe to use
[](https://shroomok.com/en/wiki/File:APE-pins-mutation.png) APE mutation: pins and primordia form strange bulbs
Another example of strange mutated fruits instead of mushroom bodies. Such shrooms can't transform into a normal mushrooms with cap and stem
[](https://shroomok.com/en/wiki/File:APE-mutant.png) APE mutation
It's impossible to stop or fix this process. As a result you'll get an aesthetically unattractive crop
[](https://shroomok.com/en/wiki/File:APE-mutant-mushroom.png) Albino Penis Envy mutated mushroom
Such mutants are safe to consume. But theirs genetics are useless for any further mycological manipulations (particularly cloning). As you can see these shrooms don't have normal caps and usually don't produce spores.
[](https://shroomok.com/en/wiki/File:APE-mutation.png) Albino Penis Envy genetic mutation
Sometimes APE genetic mutation looks awesome!
[](https://shroomok.com/en/wiki/File:Albino-penis-envy-mutated-mushrooms.jpg) Cute mutants without normal cap. Albino Penis Envy by Costana Monovar - [Shroomok growers Community in **Discord**](https://discord.com/invite/ngKhQDmymD)
This APE mutant looks like monster mouth 👻
[](https://shroomok.com/en/wiki/File:Ape-mutant-monster-mouth.jpg) APE mutant with monster mouth by Costana Monovar - [Shroomok growers Community in **Discord**](https://discord.com/invite/ngKhQDmymD)
Another side of the same APE monster
[](https://shroomok.com/en/wiki/File:APE-the-most-strange-mutantion.jpg) Beautiful and strange Albino Penis Envy genetic mutation by Costana Monovar - [Shroomok growers Community in **Discord**](https://discord.com/invite/ngKhQDmymD)#### How to grow big Albino Penis Envy mushrooms
From the very first harvest you can get smaller fruit bodies in comparison with photos shared on the internet. First of all it depends on genetics! If we are talking about multiculture mushrooms reach about 6 inch (15 cm).
[](https://shroomok.com/en/wiki/File:APE-mushroom-harvest.png) APE harvest (multiculture, bottle-tek, first flush)
Isolated culture (by cloning mushroom tissue on agar or isolated colony on agar) produces giants, real mushroom King Kongs
[](https://shroomok.com/en/wiki/File:Albino-penis-envy-harvest-shroomok-growers-community.jpg) Albino Penis Envy mushrooms harvesting by Costana Monovar - [Shroomok growers Community in **Discord**](https://discord.com/invite/ngKhQDmymD)#### How to make Albino Penis Envy spore swab or APE spore print
You may notice APE don't produce spores. The caps often don't open and don't form veil. It is almost impossible to make a spore print of Albino Penis Envy, since the caps don't fully open and don't show the gills.
[](https://shroomok.com/en/wiki/File:APE-mushroom-no-spores.png) How to gather spores of albino penis envy mushroom
Spores are white or transparent, visible only under microscope. They spill out from the very edge of the cap on the mushroom stem. That's why spore print preparation like with ordinary Psilocybe Cubensis strains won't work for APE
[](https://shroomok.com/en/wiki/File:Albino-penis-envy-mushroom.png) Albino penis envy right after torn veil[](https://shroomok.com/en/wiki/File:APE-mushroom-cap.png) APE mushroom porn
Use sterile cotton swabs (available at the pharmacy) to gather and save your spores for a long time. Store them in a dark place in the refrigerator or at room temperature. Always use airtight bags to keep them sterile.
[](https://shroomok.com/en/wiki/File:Albino-penis-envy-spore-swab-preparation.jpg) Making Albino Penis Envy spore swab and mushroom tissue for cloning (from the stem)[](https://shroomok.com/en/wiki/File:Spore-swab-example.png) Albino Penis Envy spore swab example#### **How to work with a spore swab**
Spore swab means further work with agar and/or liquid culture. This seems to be more complicated manipulations for noobs, because required additional knowledge, skills, equipment and time. But don't worry, with time this skill can be mastered.
> Agar guide and Liquid Culture guide by Shroomok are coming soon... Stay tuned!
One more option to skip working with agar and LC is ready for inoculation liquid culture or spore syringe.
[](https://shroomok.com/en/wiki/File:Albino-penis-envy-liquid-culture.png) Albino penis envy liquid culture example[](https://shroomok.com/en/wiki/File:APE-liquid-culture.png) APE liquid culture in laboratory test tubeIf you find this guide helpful, please support me with a cup of coffee on [☕️ buymeacoffee](https://www.buymeacoffee.com/shroomok)
Peace, Shroomok ❤️
📸 More photos in [APE photo gallery](https://shroomok.com/gallery/albino-penis-envy)
## Pink Buffalo mushrooms from Koh Samui in Thailand
[Pink Buffalo mushrooms from Koh Samui in Thailand](https://shroomok.com/en/wiki/Pink_Buffalo_mushrooms_from_Koh_Samui_in_Thailand)
[](https://shroomok.com/en/wiki/File:Psilocybe-cubensis-pink-buffalo-mushrooms.jpg) Pink Buffalo by Shroomok### Psilocybe Cubensis Pink Buffallo magic mushrooms: legends, cultivation, microdosing, potency and true tripping effects
It is believed in Thailand, if you see a pink buffalo it is a sign for a good day. Let's check it out and have a good day! 😉
***Pink Buffalo (aka Hairy Buffalo)*** is a representative of Psilocybe cubensis species. It belongs to the same spectrum of effects and growing conditions as other popular cubensis such as [Golden Teacher](https://shroomok.com/en/wiki/The_magic_of_Golden_Teacher_mushroom "The magic of Golden Teacher mushroom"), [B+ (B positive)](https://shroomok.com/gallery/b), [Thai Lipa Yai](https://shroomok.com/gallery/thai) [KSC (Koh Samui Classic)](https://shroomok.com/gallery/ksc-koh-samui-classic) etc.
If you are newbie at mushroom cultivation, if you are wondering about choosing a spore print, then try to make your first steps in mycology with Asian strains of Psilocybe cubensis. Pink Buffalo, in particular.
Hairy Buffalo is also a great choice for experienced growers. For those, who has already bored with [Golden Teacher](https://shroomok.com/en/wiki/The_magic_of_Golden_Teacher_mushroom "The magic of Golden Teacher mushroom") or who are looking for new mycological adventures.
Moreover, Pink Buffalos have pretty nice aesthetic differences we are going to discuss.
#### Scientific classification
Traditionally take a look at the boring (but so important!) scientific classification of the Fungi Kingdom and the place of Pink Buffalo mushroom in it
[](https://shroomok.com/en/wiki/File:Cubensis-pink-buffalo.png) P. cubensis Pink Buffalo aka Hairy Buffalo- Kingdom: Fungi
- Division: Basidiomycota
- Class: Agaricomycetes
- Order: Agaricales
- Family: Hymenogastraceae
- Genus: Psilocybe
- **Species:** Psilocybe Cubensis
- **Strain:** Pink Buffalo or Hairy Buffalo
Now let's get to the most exciting part of the Pink Buffalo mushroom story!
#### Origin and legends of the Pink Buffalo mushroom
[](https://shroomok.com/en/wiki/File:Psilocybe-cubensis-pink-buffalo-art.png) Psilocybe cubensis Pink Buffalo magic mushroom: story and legends
One day, one man discovered and found new strain of psilocybin mushrooms in the wild jungle of Koh Samui island in Thailand. The name of this legendary explorer is John W. Allen or "Mushroom John"
[](https://shroomok.com/en/wiki/File:John-w-allen-photo.png) John W. Allen or “Mushroom John” who discovered the Pink Buffalo mushroomsLegend says that "Mushroom John" walking through the jungles of Koh Samui Island and came to a wild field. There he saw a huge pink buffalo which turned out to be sacred! This buffalo called John after him and pointed out the magic mushroom
[](https://shroomok.com/en/wiki/File:Pink-buffalo-thailand.jpg) Pink buffalo in ThailandAnother legend says the strain is named after the sacred plant on Koh Samui, the buffalo carnation. However, no information could be found about this carnation flower.
#### How Pink Buffalo mushroom was found according to John Allen's story
How it was in reality "Mushroom John" told the true story behind the Pink Buffalo strain:
> «It was the late 1990s. During one of my expeditions to Thailand, Cambodia and Burma my colleague and I were going to ***Phang Ka beach***. We were driving on ***Highway 4173 (which turns into 4170)*** near the southwest coastline ***of Koh Samui island in Thailand***.
[](https://shroomok.com/en/wiki/File:Psilocybe-cubensis-pink-buffalo-location-an-map-by-John-Allen.png) Location where pink buffalo mushrooms have been seen in the wild by John Allen> There was also a road with giant elephant sculptures.
>
> To the right of the road were two rice paddies where alone pink buffalo was grazing. The area was fenced with barbwire and it was strange. Local Thai people don't use barbwire. But foreign immigrants (often from Australia and Germany) do.
>
> The owner of the two rice paddies and its buffalo was an Australian man and his Thai ex-wife. This land and house in Thailand (which is owned by a woman since a foreigner has no right to be an owner of land) was a place where I found the Pink Buffalo mushroom strain, sold on the internet came from.
>
> For me it was enough to explore the tracks of this buffalo (manure traces) in the rice paddies. And boom! Magic... magic mushroom!
[](https://shroomok.com/en/wiki/File:Psilocybe-cubensis-wild-thailand.png) Wild Psilocybe cubensis in Thailand> That's how the mushroom strain was found and named. In honor of this lonely pink buffalo - Psilocybe cubensis Pink Buffalo. Of course, this strain has changed a bit since my wild specimen was subsequently domesticated.By the way, no buffalo are sacred in Thailand. Yes, cows are sacred in India, but buffaloes are not. There are about 70 million buffalo in Thailand and one out of ten is pink. They are not rare, special or sacred. It is just believed in Thailand, if you see a pink buffalo it is a sign for a good day»
#### Features of Pink Buffalo appearance and cultivation
Pink Buffalo mushroom has a red-brown-gold cap, 25-75 mm in diameter
[](https://shroomok.com/en/wiki/File:Hairy-buffalo-magic-mushrooms.png) Cubensis Pink Buffalo mushrooms fruitingBy the time it opens, the cap is lighter amber, but darker than Golden Teacher's. The cap can reach 5-8 cm in diameter. The spores are purplish brown to dark brown, 11.5 – 17 x 8 – 11 µm, ellipsoid shape.
[](https://shroomok.com/en/wiki/File:Cubensis-pink-buffalo-magic-mushroom.png) Cubensis pink buffalo mushroom right after torn veil. Violet spores on the stemPink Buffalo have a thick powerful stem
[](https://shroomok.com/en/wiki/File:Pink-buffalo-cultivation-and-effects.png) Psilocybe Cubensis Pink Buffalo magic mushroom
The largest mushrooms grow up to 15-25 cm in height (isolated culture). Such giants also can appear on the last flushes of fruiting (multispore)
[](https://shroomok.com/en/wiki/File:Cubensis-pink-buffalo-monoculture.png) Psilocybe cubensis Pink Buffalo isolated strain. Monoculture cultivation. Huge Pink Buffalo mushroomThey grow in a friendly families, in clusters of 3-7 mushrooms
[](https://shroomok.com/en/wiki/File:Pink-buffalo-small-mushroom-cake-or-shoebox-cultivation.png) Pink Buffalo magic mushrooms cultivation, small mushroom cakes
❇️ Pink Buffalo mycelium is quick and active. Colonization period takes about 2-3 weeks.
🔴 But fruiting period may be delayed from the start. Sometimes [**cold shocking**](https://shroomok.com/en/wiki/All_you_need_to_know_about_cold_shock_for_magic_mushrooms "All you need to know about cold shock for magic mushrooms") or [**blanket-tek**](https://shroomok.com/en/wiki/Fruiting_period._Pinhead_initiation,_mushroom_pinning_and_mushrooms_growth_parameters#Blanket_tek_or_bubble_wrap_for_pinhead_initiation) helps with pinhead initiation.
Then the process is faster. Mushrooms break through the surface of the substrate and produce a powerful flush. Be patient with this strain, don't push slow-moving Pink Buffalo.
#### Is Pink Buffalo suitable for newbies in mushroom cultivation?
Any strain of Psilocybe Cubensis is newbie-friendly. Pink Buffalo is a great strain for beginners with "zero" experience in mushroom cultivation. Just follow Shroomok guide step by step.
> 🔴 To get started step-by-step: [Mushroom Cultivation Guide](https://shroomok.com/articles:grow-mushrooms-at-home-guide)
#### How long does it take to harvest Pink Buffalo mushrooms?
From inoculation to the first harvest it takes about 40-45 days. Pink Buffalo can be a bit slower Psilocybe cubensis mushroom in comparison with popular [Golden Teacher](https://shroomok.com/en/wiki/The_magic_of_Golden_Teacher_mushroom "The magic of Golden Teacher mushroom").
#### How many Pink Buffalo mushrooms can I pick?
You can get about 250-500 grams per 1 liter of substrate (multiculture cultivation). It is one of the most productive strains.
You can always increase yields by isolating pure culture on agar or make a clone on agar. But this technique is not recommended for beginners. For agar manipulations you need to understand basic mycological principles and have at least one success grow-story (IMHO).
#### How many flushes can I get with Hairy Buffalo?
Pink Buffalo usually produces its entire mass of mushrooms during the first 3 flushes. The 4th and 5th flushes have only minor crop residues.
#### Growing conditions for Pink Buffalo mushrooms
Hairy Buffalo is heat-loving strain from sunny Thailand, where warm subtropic climate. It means mushrooms need conditions as close as possible to their native country.
In a hot dry season (substrate colonization) it is necessary to provide temperature about +25°..+27°С (77-81°F)
In a rainy season (fruiting period) it is necessary to provide high relative humidity (~90-99%) and decrease temperature up to +20°..+25°С (68-77°F).
#### What growing tek is good for Pink Buffalo mushroom?
Any cultivation tek known today is perfect for Psilocybe cubensis Pink Buffalo mushrooms
✅ PF-tek is a old school growing-tek for all Psilocybe cubensis mushrooms and also can be used for Pink Buffalo mushrooms.
✅ Bottle-tek for cultivation Pink Buffalo mushrooms
> 🔴 Check out: [**Bottle-tek or how to grow mushrooms in plastic bottles**](https://shroomok.com/en/wiki/Bottle-tek_or_how_to_grow_mushrooms_in_plastic_bottles "Bottle-tek or how to grow mushrooms in plastic bottles")
[](https://shroomok.com/en/wiki/File:Bottle-tek-shroomok-growers.png) Mushroom cultivation in plastic bottle aka Bottle-Tek ✅ Cubensis Pink Buffalo on small mushroom cakes or shoeboxes.
> 🔴 Check out: [**Casing & small mushroom cakes**](https://shroomok.com/en/wiki/Making_mushroom_cake,_spawn_to_bulk,_and_casing "Casing of magic mushrooms cakes")
[](https://shroomok.com/en/wiki/File:Pink-buffalo-magic-mushrooms.png) Pink Buffalo magic mushrooms fruiting - small mushroom cake tek✅ Pink Buffalo cultivation in MonoTube
> 🔴 Check out: [DIY Monotub for mushrooms](https://shroomok.com/en/wiki/Forget_Monotub_Kit._DIY._How_to_make_Monotub_for_Mushrooms_by_your_own "DIY Monotub for mushrooms")
[](https://shroomok.com/en/wiki/File:Hairy-buffalo-mushrooms-monotube.png) Pink Buffalo magic mushrooms cultivation in modified MonoTub[](https://shroomok.com/en/wiki/File:Psilocybe-cubensis-pink-buffalo-in-monotube.png) Psilocybe Cubensis Pink Buffalo fruiting in modified MonoTub#### Pink Buffalo mushrooms for microdosing
Dry Psilocybe cubensis Pink Buffalo mushrooms are good to use for microdosing.
> 🔴 Check out: [**Microdosing guide**](https://shroomok.com/en/wiki/Magic_mushrooms_microdosing "Magic mushrooms microdosing")
#### Potency, effects and tripping with Pink Buffalo mushrooms
🚀 **Pink Buffalo potency:** medium, as all Psilocybe cubensis mushrooms.
Average alkaloid concentration in dry mushrooms for Psilocybe cubensis: psilocybin - 0.63%, psilocin - 0.6%, beeocystin - 0.025 (Gartz, 1994).
🚀 **Start of trip:** fast entry in 20-30 minutes, may be accompanied by nausea for the next 20-30 minutes.
🚀 **Average trip duration:** 2-3 hours of deep tripping with an average dosage of 1.5-2.5g of dry mushrooms. Post effect for the next 3-4 hours.
🚀 **Effects.** This is the favorite part for Shroomok. Only copywriters and psychonauts know the best about effects. So let's refer to the "experts" 😄
Copywriters and experienced psychonauts claim:
> Pink Buffalo mushrooms plunge you gently in a state of euphoria.
>
> Tripping is soft, smooth and kind. Strain is suitable for those who need the rest, self healing and calm relaxation.
>
> You feel pleasant inner peace. Shrooms lead you and help you tune into a positive vibes, feelings of beauty all around and inside you
**In fact each tripping depends on:**
🔶 dosage of mushrooms
🔶 your mood before tripping and at the moment of tripping
🔶 set&setting (environment, presence or absence of people, sounds, weather, smells etc.)
🔶 sitter (presence or absence, and his/her experience)
🔶 your health (metabolism, immunity, and hormonal systems)
🔶 preparation before tripping (diet, quality of sleep and rest)
🔶 your mental health, stresses, thoughts, quality of information, life style and overall life experience...
All these points influences your psychedelic experience greatly!
That's why even 10 trips with the same strain and even same dosage will be **completely different!** Because it's not about the cubensis strain. All Psilocybe cubensis strains genetically have the same average potency, but always vary even from one shroom on the cake to another. Such a magic!
Tripping effects is about you: response of your body and brain to psilocin! Moreover, you are different every moment of your life: your body, your health, your mental health, your stress level, combination of your feelings, emotions and life balance.
Just listen to yourself!
> 🔴 Check out [Mushroom Consumption Guides](https://shroomok.com/articles:mushroom-consumption-recipes-and-tips)
Join Shroomok Community on [Discord](https://discord.gg/ngKhQDmymD) and [Reddit](https://www.reddit.com/r/Shroomok) for questions and sharing experience or leave your comment below.
If you find this guide helpful, please support me with a cup of coffee on [☕️ buymeacoffee](https://www.buymeacoffee.com/shroomok)
Peace, Shroomok ❤️
📸 More photos in [Pink Buffalo photo gallery](https://shroomok.com/gallery/pink-buffalo)
## The magic of Golden Teacher mushroom
[The magic of Golden Teacher mushroom](https://shroomok.com/en/wiki/The_magic_of_Golden_Teacher_mushroom)
[](https://shroomok.com/en/wiki/File:Psilocybe-cubensis-golden-teacher-shroomok.jpg) All about Psilocybe Cubensis Golden Teacher strain### All about Psilocybe Cubensis Golden Teacher mushrooms: potency, effects, tripping, microdosing and cultivation
Welcome to the short shroom-story about one of the most popular psilocybin mushroom strains. Here we are going to simplify the science and demystify marketing. So you are able to make the best informed choice you possibly can for cultivation, [microdosing](https://shroomok.com/en/wiki/Magic_mushrooms_microdosing "Magic mushrooms microdosing") and [psychedelic trips](https://shroomok.com/en/wiki/How_to_prepare_for_psychedelic_mushroom_trip "How to prepare for psychedelic mushroom trip")
***Golden Teacher*** (also known as GT mushroom) is a classic strain of Psilocybe Cubensis magic mushrooms. It is one of the most famous psychedelic fungi in the world.
#### Scientific classification
Let's figure out the features of this strain. Traditionally take a look at the boring (but so important!) scientific classification of the Fungi Kingdom and the place of Golden Teachers in it.
[](https://shroomok.com/en/wiki/File:Gt-mushroom-description.png) Psilocybe Cubensis Golden Teacher strain of magic mushrooms- Kingdom: Fungi
- Division: Basidiomycota
- Class: Agaricomycetes
- Order: Agaricales
- Family: Hymenogastraceae
- Genus: Psilocybe
- **Species:** Psilocybe Cubensis
- **Strain:** Golden Teacher
For the latin naming system uses the following format: genus (e.g. Psilocybe) followed by species (e.g. cubensis). If you’re looking at spores and the latin names are different, then you know you have different species. Remember, as you could never cross a fly with a human, you couldn’t naturally cross Psilocybe cubensis with Psilocybe natalensis.
But **strains** should all originate from the **same species** (usually Psilocybe cubensis) and can interbreed freely.
#### The origin of Golden Teacher
The species was first described in 1906 as *Stropharia cubensis* by American mycologist Franklin Sumner Earle in Cuba island (Caribbean Sea). He assigned it to the genus Stropharia and named it Stropharia cubensis.
In 1948 the German scientist Rolf Singer in his publication in the journal "Sydowia", transferred it to the genus Psilocybe.
[](https://shroomok.com/en/wiki/File:Golden-teacher-mushroom-cultivation-and-effects.png) P. Cubensis Golden Teacher mushrooms fruiting in monotubAs for the strain of Golden Teacher its exact origin is unknown. It is believed that "golden teacher" appeared in the Florida desert in the USA in the late 1980s without any claim to authorship.
#### Features of Golden Teachers appearance
Golden Teachers have a unique appearance with golden-yellow caps. They are brightly colored around the edges with dark orange gradient in the center of the umbrella.
[](https://shroomok.com/en/wiki/File:Golden-teacher-gt-mushrooms.png) Psilocybe Cubensis Golden Teacher mushroom fruiting in monotub
A scattering of light gold-colored flecks can be seen throughout the cap.
[](https://shroomok.com/en/wiki/File:Golden-teacher-bottle-tek.png) Main features of golden teachers
This is how the peculiarities of the color palette determined it to be GOLDEN.
[](https://shroomok.com/en/wiki/File:Cubensis-golden-teacher.png) Amazing GT mushrooms
Even after drying mushrooms perfectly preserves its golden color.
[](https://shroomok.com/en/wiki/File:Golden-teacher-dry.png) Dry Golden Teacher mushroom
By the time the spores mature, the cap cracks along the edge and turns a red-gray-brown color. The cap diameter is often about 3-5 cm, sometimes up to 8-10 cm.
[](https://shroomok.com/en/wiki/File:Golden-teacher-features.png) P. Cubensis Golden Teacher mushroom cap
Mushrooms reach a height of 5-7 cm up to 20-25 cm.
[](https://shroomok.com/en/wiki/File:Cubensis-golden-teacher-giant-mushroom.png) Giant golden teacher mushroom from monoculture. Photo by mrzimm on[**Discord**](https://discord.com/invite/ngKhQDmymD)
Size and yield depend on the flush of fruiting, grower's skills and cultivation techniques.
[](https://shroomok.com/en/wiki/File:Golden-teacher-giant.png) Big golden teacher mushroom#### Why Golden Teacher is the most popular strain?
[](https://shroomok.com/en/wiki/File:Psilocybe-cubensis-golden-teacher.png) Cubensis GT mushroom familyGolden Teacher can be rightfully proclaimed the most important wizard among all P. Cubensis strains. But why?
✅ Golden Teacher is one of the earliest strains in home cultivation and is considered a veteran of amateur growing.
✅ As a result, the greatest number of grow-reports and trip-reports are related to Golden Teacher.
✅ It is traditionally believed that any newbie grower can cope with cultivation of "golden teachers" and doesn't matter which cultivation technique you'd like to use. This is true, but it doesn't mean you can neglect the elementary rules of sterility and cultivation basics. These rules are the same for all kinds and strains of mushrooms.
✅ Golden Teacher is one of the most hardy strains with a good strong genetic basis for mycological experiments.
✅ Mutants and different hybrids are created on the basis of Golden Teacher, which replenish the variety of strain collections every year. These include a group of albino mutants such as Leucistic Golden Teacher (Lucy GT), a group of popular mutants with True Albino Teacher (TAT) genetic - Yeti, Wombat, Jack Frost, Gandalf and over 30 more mutations involving the powerful genetics of Psilocybe Cubensis Golden Teacher.
We'll talk about variety and cultivation features of modern mutants in next article. Stay tuned for more updates! In the meantime, a few photos of these beauties as an example.
[](https://shroomok.com/en/wiki/File:Tat-true-albino-teacher.png) True Albino Teacher mushrooms (TAT)[](https://shroomok.com/en/wiki/File:True-albino-teacher-mutant.png) TAT strain of magic mushrooms[](https://shroomok.com/en/wiki/File:Gandalf-true-albino-teacher-and-melmak.png) Cubensis Gandalf strain. Photo by **6~ʏʊƈǟ~9** on [**Discord**](https://discord.com/invite/ngKhQDmymD)[](https://shroomok.com/en/wiki/File:Albino-leucistic-golden-teacher.png) Albino Leucistic Golden Teacher strain#### Is Golden Teacher suitable for noobs in mushroom growing
Any strain of Psilocybe Cubensis is newbie-friendly. Golden teacher is ideal for beginners with "zero" experience in mushroom cultivation.
> 🔴 Check out and follow: [Mushroom growing guide in 20 steps](https://shroomok.com/articles:grow-mushrooms-at-home-guide)
#### How long does it take to harvest GT mushrooms
From inoculation to the first harvest it takes about 28-35 days. GT is one of the fastest and most active strains among P. cubensis mushrooms.
#### How many GT mushrooms can I pick
You can get about 150-400 grams per 1 liter of substrate. It is not the most productive strain. Especially if you cultivate mushrooms with multiculture (spore syringe or liquid culture).
Advanced growers increase yields by isolating pure culture on agar, but this technique is not recommended for beginners. For agar manipulations you need to understand basic mycological principles and have at least one success grow-story.
#### How many flushes can I get with Golden Teacher
Golden Teacher usually produces an even number of mushrooms in each of the 4-5 flushes of fruiting.
With GT, it is not always possible to get a powerful first flush (from multiculture). However, after rehydration, the 2-nd and 3-rd flushes always please beginners.
On the 4th-5th flush the yields go down just like with any other strain of P.cubensis.
#### What tek is the best for Golden Teacher cultivation
Any growing tek known today is perfect for GT mushrooms cultivation!
✅ PF-tek or Small mushroom cakes for growing Golden Teachers
> 🔴 Check out: [How to make mushroom cake](https://shroomok.com/en/wiki/Making_mushroom_cake,_spawn_to_bulk,_and_casing "Casing of magic mushrooms cakes")
[](https://shroomok.com/en/wiki/File:Golden-teacher-mushroom-cake.png) Golden Teacher cultivation. Small mushroom cake tek. Photo by mrzimm - moderator [Shroomok growers Community in **Discord**](https://discord.com/invite/ngKhQDmymD)
✅ Bottle-tek for GT cultivation
> 🔴 Check out: [Bottle-tek or how to grow mushrooms in plastic bottles](https://shroomok.com/en/wiki/Bottle-tek_or_how_to_grow_mushrooms_in_plastic_bottles "Bottle-tek or how to grow mushrooms in plastic bottles")
[](https://shroomok.com/en/wiki/File:Golden-teacher-magic-mushrooms-bottle-tek.png) Golden teacher cultivation in plastic bottle (bottle-tek). Photo by Slipkote - [Shroomok Growers Community in Telegram](https://t.me/shroomok_chat_en)[](https://shroomok.com/en/wiki/File:Golden-teacher-bottle-tek-growing.png) Golden teacher harvest in plastic bottle (bottle-tek). Photo by Slipkote - [Shroomok Growers Community in Telegram](https://t.me/shroomok_chat_en)✅ Monotub for cultivation Psilocybe cubensis Golden Teacher mushrooms
> 🔴 Check out: [DIY Monotub for mushrooms](https://shroomok.com/en/wiki/Forget_Monotub_Kit._DIY._How_to_make_Monotub_for_Mushrooms_by_your_own "DIY Monotub for mushrooms")
[](https://shroomok.com/en/wiki/File:Golden-teacher-magic-mushroom-description-and-effects.png) Psilocybe cubensis Golden Teacher growing in monotub[](https://shroomok.com/en/wiki/File:Golden-teacher-monotube.png) Psilocybe cubensis golden teacher cultivation in monotub#### Golden Teacher mushrooms for microdosing
Dry GT mushrooms are great to use for microdosing.
> 🔴 Check out: [Microdosing guide](https://shroomok.com/en/wiki/Magic_mushrooms_microdosing "Magic mushrooms microdosing")
#### Effects and tripping with Golden Teacher mushrooms
Recommended for beginners at medium dosage (1.5-2.5 grams) who are insecure in psychedelic experience. At this dosage and with the right preparation before tripping users report about calm, relaxing experience, with soft visuals.
[](https://shroomok.com/en/wiki/File:Golden-teacher-effects-and-trip.png) Golden Teacher effects, potency, psychedelic trips and microdosing🚀 **GT potency and alkaloid concentration level:** medium (as all Psilocybe cubensis mushrooms).
Average alkaloid concentration in dry mushrooms for Psilocybe cubensis: psilocybin - 0.63%, psilocin - 0.6%, beeocystin - 0.025 (Gartz, 1994).
🚀 **Trip entry:** fast entry in 20-30 minutes, may be accompanied by nausea for the next 20-30 minutes.
🚀 **Average trip duration:** 2-3 hours of deep tripping with an average dosage of 1.5-2.5g of dry mushrooms. Post effect for the next 3-4 hours.
🚀 **Effects.** Only copywriters and psychonauts know all about effects based on subjective feelings. So once again we turn to the "experts":
> Golden Teacher take you by the hand and lead you to enlightenment. They will help you connect to your origins, to dissolve, to know the true nature of yourself.
>
> Golden Wizards will help you heal your mind and spirit and give you the beauty of the visuals...
>
> Golden teachers often reward their travelers with wise lessons that leave their mark even the trip is over...
Now to be true and honest.
Let me remind you, there is currently NO scientific data or studies on the difference in effects of P. cubensis strains!
All descriptions you find on the Internet are copywriter's articles, at best are subjective evaluations and experiences of psychonauts.
Each person before taking the magic mushrooms have many individual characteristics at the start: general physical development, health, emotional state, preparation, psychological traumas, fears, goals, expectations and at least different dosage.
All of the above and 1,000 other factors significantly determine the flow of a psychedelic trip.
Remember! Every psychedelic experience you have will be unique. You will never have 2 identical trips with the same strain and with the same dosage.
It will always be a totally new adventure, new experience and a new YOU!
> 🔴 Check out: [Mushroom Consumption guides and recipes](https://shroomok.com/articles:mushroom-consumption-recipes-and-tips)
If you find this guide helpful, please support me with a cup of coffee on [☕️ buymeacoffee](https://www.buymeacoffee.com/shroomok)
Peace, Shroomok ❤️
📸 **More photos in [Golden Teacher photo gallery](https://shroomok.com/gallery/golden-teacher)**
## I mixed strains in mushroom cake by accident
[I mixed strains in mushroom cake by accident](https://shroomok.com/en/wiki/I_mixed_strains_in_mushroom_cake_by_accident)
[](https://shroomok.com/en/wiki/File:Two-mushroom-strains-in-one-mushroom-cake.jpg) Two mushroom strains in one mushroom cake#### Story 1. How I mixed two cubensis strains in one mushroom cake and what came out of it
Hey Shroomok Community!
**@Prof. Frags** here — Magic Warrior on Shroomok Discord and, starting from this story, writer on shroomok.com
When I first began my amateur mushroom cultivation journey Shroomok told me:
> In the world of amateur mushroom growing everything is possible
Those words rang the most true on in early morning in January 2023. Let me share why from the very beginning!
##### My growing process
On a late night November 2022 I decided it was great time to inoculate a series of jars with Psilocybe Cubensis.
For my spawn jars I like to use long grain organic rice that has been boiled for ~7 minutes before being used to fill 1 quart jars to 3/4 full. Then I place the jars with the rice in them into a pressure cooker for 90 minutes at 15 psi to sterilize.
The first series of jars was for [Golden Teacher](https://shroomok.com/en/wiki/The_magic_of_Golden_Teacher_mushroom "The magic of Golden Teacher mushroom") (GT) strain and another for some Albino Penis Envy Reverts (APE-R).
When I had initially inoculated the spawn jars, I was in the middle of my last college semester, buying a house, and organising a family visit for graduation. So, I had a lot to do, a lot to worry about.
During colonization period in my eagerness to find the warmth of my bed. I failed to label the jars to know exactly which strain in each jar.
It wasn't until the middle of January 2023 that I was able to move my colonized spawn jars into substrate (spawn to bulk in 16 Qt [monotub](https://shroomok.com/en/wiki/Forget_Monotub_Kit._DIY._How_to_make_Monotub_for_Mushrooms_by_your_own "Forget Monotub Kit. DIY. How to make Monotub for Mushrooms by your own")). For my fruiting substrate I use a mix of coco coir and vermiculite. I used to just use coco coir and would consistently contaminate the substrate with [*Trichoderma* green mold](https://shroomok.com/en/wiki/Green_mold_contamination_aka_Trichoderma "Green mold contamination aka Trichoderma"), but since adding vermiculite I have not had any problems with trich contam (maybe there is another reason).
One of the first things I noticed was how rapidly the mycelium run from colonization to fruiting. On the photo below you can see 10 days after the initial transfer of spawn to bulk substrate
[](https://shroomok.com/en/wiki/File:Mushroom-cake-mycelium-run-ape-reverts-and-golden-teacher.jpg) Bulk colonization period, mix of Albino Penis Envy Reverts + Golden Teacher, 10 days after spawn to bulk. Photo by Prof. FragsAbout 5 days later (15 days after spawn to bulk) I noticed the [first pins](https://shroomok.com/en/wiki/Fruiting_period._Pinhead_initiation,_mushroom_pinning_and_mushrooms_growth_parameters "Fruiting period. Pinhead initiation, mushroom pinning and mushrooms growth parameters")
[](https://shroomok.com/en/wiki/File:Ape-with-gt-pinning.jpg) Start of pinning process, mix of two P. Cubensis strains APE-R with GT, 15 days after spawn to bulk. Photo by Prof. FragsWhen I lifted the lid to check my monotub again I believed it was full of Albino Penis Envy Reverts (APE-R), but I found a little golden caps scattered amongst little white caps.
First fruits are coming! Here I realized I had mixed my spawn jars, hence I mixed two strains in my mushroom cake. Golden Teacher (GT) with my Albino Penis Envy Reverts (APE-R) 🤦♂️
[](https://shroomok.com/en/wiki/File:Mix-of-two-mushroom-strains-psilocybe-cubensis.jpg) Mushroom fruiting, Golden Teacher with golden caps and APE Revert with white caps. Photo by Prof. Frags
However there is still a lot of uncolonized space on my substrate
[](https://shroomok.com/en/wiki/File:Mixed-spawn-jars-two-cubensis-strains.jpg) Golden Teacher strain + APE Revert strain. Photo by Prof. Frags
In total it took about 21 days from moving the spawn to bulk substrate to harvesting the first mushrooms
[](https://shroomok.com/en/wiki/File:Two-strains-in-one-mushroom-cake.jpg) APE-R + GT neighbouring. Photo by Prof. Frags
Actually, pretty good mushroom bouquet!
[](https://shroomok.com/en/wiki/File:Two-mushroom-strains-grow-together.jpg) Mushroom clusters bloom together. Photo by Prof. Frags
As a result, the mushrooms were smaller than normal
[](https://shroomok.com/en/wiki/File:Albino-penis-envy-revert-APE-R.jpg) Psilocybe cubensis albino penis envy revert cluster. Photo by Prof. Frags
I flushed the APE and GT combo and it's had pretty minimal growth further. Even after 12 hours soaking in water mushrooms stopped producing mushrooms. Eventually, I harvested only 1 productive flush
[](https://shroomok.com/en/wiki/File:APE-and-GT-combo-flushing.jpg) APE in GT combo flushing. Photo by Prof. Frags##### What I've learned from this case
On the top of mushroom cake you can see visible boundaries between 2 strains and between different mushroom colonies. Each colony has its own territory.
I've learned this time that rapid fruiting may be caused by contamination. In this case the mixture of 2 different strains caused the mycelium to fruit quicker. Each strain acting as 'contamination' to the other. Strains compete with each other for nutrients. As a result, fruiting started faster, but overall mushroom yield was lower, than usual.
##### My message to future newbie growers
Let's imagine that 'somebody' has just came up with the idea to mix a few strains and get the new strain. When I first started my mushroom growing I imagined that's how new strains were created lol. Bad news - it won't work in such way, this WON'T create a NEW strain.
Moreover strains compete with each other and loose energy. That's why growers try to isolate culture even within one strain, so that you'll get full colonisation and increase your harvest.
Is it possible to grow 2 strains in one cake? As you can see above it is possible!
If you just started you mushroom growing journey don't afraid to fail. Keep growing! Keep growing your mushrooms and your skills.
Sometimes fail can be turned into success. In the world of amateur mushroom growing everything is possible...
And one more important point! Label your jars and sign the strain :)
With love, **Prof. Frags 😍**
#### Story 2. I mixed cubensis strains APE with Luminous Lucy
Hey growers!
**@Mycelia P** here — MushroomHead of Shroomok Discord community.
My story is the following
I had 2 spawn jars ready for spawn to bulk. I thought both jars of spawn were Psilocybe Cubensis **[Albino Penis Envy](https://shroomok.com/en/wiki/Mutant_strain_Albino_Penis_Envy_aint_just_APE_but_King_Kong_of_Magic_Mushrooms "Mutant strain Albino Penis Envy aint just APE but King Kong of Magic Mushrooms") strain**, but one jar turned out to be Psilocybe Cubensis **Luminous Lucy strain**.
As a result, I mixed 2 different strains, but due to scientific classification it's the same species and gene Psilocybe Cubensis. They are relatives, but not at all. It's two different families, they are relatives, but they that would like to have their own apartments.
Here is a good couple of pictures to show what happens when you mix incompatible strains. This is the cake before it fruited
[](https://shroomok.com/en/wiki/File:Cubensis-luminous-lucy-strain-with-albino-penis-envy.jpg) Psilocybe Cubensis Luminous Lucy and Albino Penis Envy mix. Phoho by Mycelia P
Shows good boundary lines between different mushroom strains (mushroom colonies)
[](https://shroomok.com/en/wiki/File:APE-and-Luminous-Lucy-strains-mix.jpg) APE + Luminous Lucy. Phoho by Mycelia P
As a result I've harvested this
[](https://shroomok.com/en/wiki/File:APE-Luminous-Lucy-strain-mix.jpg) APE + Luminous Lucy fruiting together. Phoho by Mycelia PEnjoy your home mycology!
With love, **Mycelia P ❤️**
#### Story 3. I mixed different mushroom species Tampanensis with Cubensis
Howdy shroomers!
**@mrzimm** here — Tech Guru of Shroomok Discord and writer on shroomok.com
Let me share my case.
One day I mixed 2 different mushroom **species.** Not two strains of one species (cubensis strain with another cubensis strain you've seen in the stories above). I literally mixed different **species**!
Psilocybe **Tampanensis** (which develop sclerotia aka magic truffles) with [Psilocybe Cubensis Golden Teacher](https://shroomok.com/en/wiki/The_magic_of_Golden_Teacher_mushroom "The magic of Golden Teacher mushroom") (the most famous P. Cubensis strain)
> Guide to check: [How to grow magic truffles Psilocybe Mexicana and Tampanensis](https://shroomok.com/en/wiki/How_to_grow_magic_truffles_Psilocybe_Mexicana_and_Tampanensis "How to grow magic truffles Psilocybe Mexicana and Tampanensis")
How did this happen? I just used scissors to cut a piece of Tampanensis spore print after working with GT spore print. GT spores sticked to scissors, but between GT and Tampanensis manipulations some time has passed and I used these scissors for other purposes. Anyway, I couldn't find another reason how it happened!
> **I swear, I do wipe scissors with alcohol before using them, but... magic! Some GT spores survived**
Some time later I've noticed strange mycelium colonies. They differ from each other (color, thickness, structure)
[](https://shroomok.com/en/wiki/File:Tampanensis-with-cubensis-mix.jpg) Tampanensis and Cubensis mixed together and created different colonies. Photo by mrzimm
Then mushroom fruit bodies appeared that weren't Tampanensis for sure 😁
[](https://shroomok.com/en/wiki/File:Tampanensis-with-golden-teacher-mix.jpg) Tampanensis and GT mix. Photo by mrzimm
OMG, Cubes shrooms here! Look, cubensis cluster has thicker white mycelium and fruits are coming. Tampanensis has thiner fluffy mycelium around cubensis families
[](https://shroomok.com/en/wiki/File:Cubensis-gt-fruiting-and-tampanensis-mycelium.jpg) GT fruiting in tampanensis cake. Photo by mrzimm
As a result I've got truffles inside the mushroom cake, because Tampanensis continued producing magic truffles
[](https://shroomok.com/en/wiki/File:How-to-harvest-magic-truffles.jpg) Tampanensis sclerotia harvesting after mushroom fruiting. Photo by mrzimmI harvested mostly Golden Teacher mushrooms and a few Tampanensis fruitbodies
[](https://shroomok.com/en/wiki/File:How-to-dry-tampanensis-mushrooms.jpg) Tampanensis and GT dry mushrooms. Photo by mrzimmIt's not easy to make Tampanensis to fruit. In this case especially. I got lucky enough to make one spore print of Psilocybe Tampanensis from these few fruits (it is common for tampanensis that rare caps produce spores)
[](https://shroomok.com/en/wiki/File:Tampanensis-spore-print.jpg) Psilocybe tampanensis spore print. Photo by mrzimmLet's sum up!
**Competition for nutrients leads to a drop in yields for both species.** As a result, Cubensis produced not so much mushrooms. Tampanensis produced a few shrooms only and realised its potential in producing sclerotia deep inside mushroom cake instead of development fruitbodies.
**There is no benefit from such neighbouring, that's why growers try to isolate culture even within one strain.** It takes at least few transfers on agar to choose one colony or cloning mushroom on agar, so that within one family mushrooms don't need to compete, you'll get full colonisation, good pinning and increase your yield.
However, there is no tragedy if you mixed strains or species by accident. Just fun!
Enjoy your unexpected experiments!
Peace, **mrzimm 🙏**
## Growing shrooms during the hot season
[Growing shrooms during the hot season](https://shroomok.com/en/wiki/Growing_shrooms_during_the_hot_season)
[](https://shroomok.com/en/wiki/File:The-best-magic-mushroom-species-for-hot-season-growing.jpg) The best magic mushroom species for growing during hot season### If you are struggling with high temperature while growing magic mushrooms
For fruiting period Psilocybe Cubensis mushrooms prefer +20..25ºC or 68-77ºF.
Starting from 25ºC or 77ºF it is possible to get a mushroom harvest, but cultivation process becomes challenging. Due to high temperature you can face some issues like extreme secondary metabolites, overlay and stroma, poor pinning etc.
Technically it is possible to create favorable conditions (cooling for fruiting chamber) or postpone your Cubensis cultivation for better times.
Today, I’d like to share some tips for those who really struggle with high temperatures while growing shrooms during the hot season.
#### Cycle mushroom species due to the season of the year
Let’s follow nature's approach first if you don’t want to bother with cooling solutions, but wish to continue your growing hobby.
> Choose the right mushroom species for hot period!
All heat tolerant species are not Psilocybe Cubensis. What are they?
##### Magic Truffles
Hot season is the best time for Magic Truffles aka sclerotia growing P. Tampanensis, P. Mexicana, P. Galindoi, P. Galindoi Atl etc.
Nature invented sclerotia exactly for the hot season of the year. Sclerotia growing is newbie-friendly true neglect tek, because you grow them in vitro (right in the jars).
[](https://shroomok.com/en/wiki/File:Galindoi-atlantis-sclerotia-development.jpg) Magic truffles growth**Temperature range for magic truffles growing: +25º..+33ºC or 77-91ºF** that makes them great for hot season!
Just inoculate the substrate, put jars in a dark place and forget about them for the next 3-6 month.
And boom! Harvesting time!
[](https://shroomok.com/en/wiki/File:Philosophers-stones-magic-truffles-cultivation.jpg) Magic truffles harvest> Ultimate guide: [Growing magic truffles Psilocybe Mexicana and Tampanensis](https://shroomok.com/en/wiki/How_to_grow_magic_truffles_Psilocybe_Mexicana_and_Tampanensis)
##### Psilocybe Natalensis
Psilocybe Natalensis aka Natal is a species of psilocybin mushroom very close to Psilocybe Cubensis, but differs in its habitat preference and genetic sequence.
[](https://shroomok.com/en/wiki/File:Psilocybe-natalensis-mushroom-growing.jpg) Psilocybe Natalensis fruiting in monotubConsidered more potent than Cubensis. For instance, due to many subjective results, 3g of dry Cubes = 2g of Natalensis.
It is originally from South Africa and these mushrooms are extremely tolerant to high temperatures.
**Temperature range for Natal fruiting: +23º..+40ºC or 73-104ºF.**
Growing steps, substrate types and substrate content are totally the same as for P. Cubensis cultivation.
The main issue with P. Natalensis is making them fruit. Natal has extremely aggressive mycelium that makes this mushroom resilient to contaminants during fruiting period. However it can form marshmallow blobs and overlay instead of normal mushrooms.
[](https://shroomok.com/en/wiki/File:Psilocybe-natalensis-mycelium-colonization-and-pinning.jpg) Aggressive Natalensis mycelium colonization. Red circles - start of Natal pinningFor shoebox/monotub/growbox flip the lid to have a gap between tub and lid for natural air flow and fan the bin manually 2-3 times/day to have good pinning and great mushrooms.
[](https://shroomok.com/en/wiki/File:Psilocybe-natalensis-magic-mushroom-cultivation.jpg) Psilocybe Natalensis fruiting with enough FAEFruiting chambers with automated additional FAE and humidifier or automated grow tent would be great for Natal, although not required. However Natal sensitive to CO2, if there are lack of fresh air you'll such get leggy shrooms usually called 'Natal snakes'.
[](https://shroomok.com/en/wiki/File:Natalensis-mushroom-fruiting.jpg) Natal fruiting. Leggy Natalensis shrooms[Casing layer](https://shroomok.com/en/wiki/Making_mushroom_cake,_spawn_to_bulk,_and_casing#Casing) for Natalensis is optional, but extremely beneficial. It helps to maintain perfect microclimate for pinning, helps to avoid extreme mycelium overgrowth.
##### Natalensis outdoors
YES, Natal is able to cultivate outdoors successfully!
Growing Natalensis outdoors can be amazing experience. Especially if you have some space in the shades of plants, trees: backyard, garden, greenhouse for plants.
[](https://shroomok.com/en/wiki/File:Natalensis-mushrooms-outdoors.jpg) Psilocybe Natalensis fruiting outdoorsThe temperature up to 40ºC or 104ºF is not a problem for Natal growing outdoors.
Just bury colonized mushroom cake and cover it with 1/2 inch of soil.
##### Panaeolus
Panaeolus mushrooms are considered high temperature tolerant mushroom species.
**They feel good at +25º..+33ºC or 77-91ºF**
[](https://shroomok.com/en/wiki/File:Growing-panaeolus-cyanescens-mushrooms.jpg) Panaeolus Cyanescens aka Hawaiian Copelandia mushroom fruiting
Panaeolus are x2 or x3 more potent than Cubensis. 3g of dry Cubes = 1g of Panaeolus. Recommended for those, who usually have nausea and stomach pain while taking shrooms. With Panaeolus you don't feel any side effects at all, your trip is smooth and calm.
[](https://shroomok.com/en/wiki/File:Panaeolus-cyanescens-mushroom-growing.jpg) Brief overview on Panaeolus Cyanescens mushroom growing
**There are 4 tricky moments in Panaeolus cultivation, that we usually skip for Cubensis:**
1\. Panaeolus mushrooms need **manure** (horse, cow, camel, elephant poo or manure pellets).
2\. Panaeolus is one from the list of species that **requires a casing layer**. Otherwise it is impossible to make them fruit.
3\. They are extremely **sensitive to CO2**. Neglect tek is not about Panaeolus cultivation.
Additional FAE, automated fanning and humidifier are required for fruiting period. Or cultivation in a big volume like Grow Tent with automated humidifier and fanning. All these influence pinning and further fruiting greatly.
4\. Panaeolus is **sensitive to acidic substrates** (pH lower 7.0), pH’d casing is necessary!
[](https://shroomok.com/en/wiki/File:Panaeolus-mushroom-fruiting.jpg) Pan Cyan mushroom fruitingBriefly there are **2 options for Panaeolus cultivation:**
**1. Start with manure mix in jar for inoculation**
Prepare: 30% dry poo (powder) + 70% hay soaked in water for 24 hours.
Fill the jars. Sterilization in PC for 2 hours.
Inoculate this mix. Wait for 20-30 days for full colonization.
Then cover colonized manure with sterilized [pH adjusted casing layer](https://shroomok.com/en/wiki/Making_mushroom_cake,_spawn_to_bulk,_and_casing#Casing)
**2. Start with grain spawn**
[No soak no simmer millet](https://shroomok.com/en/wiki/Cooking_the_substrate_for_psilocybes#No_soak_no_simmer_millet_substrate_for_mushroom_spawn) is perfect to use for Panaeolus. Any other types of grain also can be used.
The next step after grain colonization is spawn to bulk substrate (sterilized substrate mix) for your choice:
1\) 30% dry manure + 70% sawdust or hay + 5% gypsum and hydrated lime
2\) or 70% manure pellets + 30% vermiculite + 5% gypsum and hydrated lime
3\) or 30% dry manure or pellets + 60% sawdust + 10% bran + 5% gypsum and hydrated lime
Make spawn to bulk and small mushroom cakes.
Cover them with sterilized casing layer: soil for tomatoes or cacti, sphagnum and vermiculite 1:1:1 + Lime for pH adjusting.
> As I mentioned before, sclerotia species, Natalensis and Panaeolus are not Cubensis. So you have a great opportunity to try yourself with new species
#### Spend hot season for working on mushroom genetic
Spend this time for working on genetic - selection and strain isolation.
[](https://shroomok.com/en/wiki/File:Mycelium-microscopy.jpg) Mycelium threads microscopyThis required agar work and a series of agar to agar transfers
[](https://shroomok.com/en/wiki/File:Mycelium-ropes-on-agar.jpg) Thick mycelium ropes on agarGreat opportunity to make the full cycle: pure strain on agar -> liquid culture with great genetic -> grain spawn for the new Cubensis season.
During 'summer time' colonization process is extremely fast. You don't need incubator to speed up colonization process.
#### Make a cooling system for fruiting chamber
If you are ready to become an engineer you can make a DIY cooling system for your growbox /monotub /shoebox and/or use it as a small fridge for your LC, spawn jars, agar plates.
As an example, you can make cooling system for small fruiting chamber based on the Peltier module or water cooler with compressor
[](https://shroomok.com/en/wiki/File:Monotube-growbox-inside-cooling-box.png) Cooling box for fruiting chamber based on Peltier module> Check out: [Cooling for mushrooms with Peltier element](https://shroomok.com/en/wiki/Cooling_and_heating_for_mushroom_growing_with_Peltier_module)
This system also works for heating in the cold season.
#### Sum it up!
Hot season is not an obstacle for true mushroom growers.
It’s time for new mycology opportunities, new species, teks, DIY and trip experiences.
What are your solutions? How do you deal with high temperatures during hot season cultivation? Share in comments ;)
Enjoy your home mycology!
Peace, @Shroomok
# DIY equipment & Teks
## How to make a magnetic stirrer for liquid culture
[How to make a magnetic stirrer for liquid culture](https://shroomok.com/en/wiki/How_to_make_a_magnetic_stirrer_for_liquid_culture)
[](https://shroomok.com/en/wiki/File:Needed-materials-for-diy-magnetic_stirrer.png) Necessary materials for DIY magnetic stirrer### DIY Magnetic Mixer for home mycology
A magnetic stirrer aka magnetic mixer is often used in labs for buffer solutions that require constant stirring for long periods of time and of course in mycology: for preparation media for liquid culture, agar media and for stirring liquid mycelium.
Laboratory magnetic stirrers can be expensive. If you are using it rarely for home mycology it can be cost-effective to build your own mixer from scratch. Believe me, it's super easy!
The short video below describing the components needed and the steps to build it. Check it out!
**Video on YouTube:** [DIY Magnetic stirrer for liquid culture](https://www.youtube.com/watch?v=PqbLZcycY5w)
Looks easy, isn't it? Now let's check the list of necessary materials and I'll add important notes to each step of the video.
#### List of materials and supplies needed for magnetic stirrer
I'd like to share components I've used in the video from Amazon. Maybe most of these materials you already have at home and DIY magnetic stirrer can save your money!
🔶 **Laptop or PC fan/cooler with plug.** I used 90 mm cooler and AC/DC adapter. You can use coolers from 80 to 120 mm with adapter already to save money.
- [120mm Fan with AC/DC Adapter](https://amzn.to/48XoZeS) $18.99
> 💡 This fan also can be used for [incubator](https://shroomok.com/en/wiki/Magic_mushrooms_incubator_control "Magic mushrooms incubator control") and automatic incubation chamber during colonization period. Also for additional fresh air exchange in [GrowBox](https://shroomok.com/en/wiki/DIY_Grow_Box_for_Magic_mushrooms._Fruiting_conditions "DIY Grow Box for Magic mushrooms. Fruiting conditions") and [MonoTub](https://shroomok.com/en/wiki/Forget_Monotub_Kit._DIY._How_to_make_Monotub_for_Mushrooms_by_your_own "Forget Monotub Kit. DIY. How to make Monotub for Mushrooms by your own") for [fruiting period](https://shroomok.com/en/wiki/Fruiting_period._Pinhead_initiation,_mushroom_pinning_and_mushrooms_growth_parameters "Fruiting period. Pinhead initiation, mushroom pinning and mushrooms growth parameters").
🔶 **Powerful neodymium rectangular magnet block.** 20-25 mm is optimal for such version, smaller magnets can be weak for your device
- [Strong Neodymium Magnets Bars, 25 x 5 x 3mm, 30 pcs](https://www.amazon.com/LOVIMAG-Neodymium-Magnets-Rectangular-Science/dp/B09YCWKBMP?&linkCode=ll1&tag=shroomok-zm-20&linkId=6b6b7248877e12ec9f96a1c680d11a02&language=en_US&ref_=as_li_ss_tl) $6.99
🔶 **PTFE bar magnets.**
- [PTFE Magnetic Stirrer Mixer Stir Bar Set, 2 sizes, 8 pcs](https://www.amazon.com/Magnetic-Stirrer-Mixer-Laboratory-Magnet/dp/B08GFS97K4?&linkCode=ll1&tag=shroomok-zm-20&linkId=1c19b3efdd38d1237e6b377fbc629792&language=en_US&ref_=as_li_ss_tl) $9.99
🔶 **Platform for stirrer.** Small square of plastic, plexiglass or even strong cardboard as a platform for jars.
- [Acrylic Plexiglass Sheets, 5 x 7", 6 pcs.](https://amzn.to/3RY53m7) $13.49
🔶 **Strong fast glue** or **Hot Glue Gun** for crafting to stick the magnet. I have BOSCH hot glue gun, it's extremely great quality for long-term use, but costly. There are many good cheap alternatives. They are all +/- the same quality
- [Hot Mini Glue Gun with Case and 20 Sticks](https://www.amazon.com/Sticks-Melting-Carrying-School-Repairs/dp/B08H56Y4ZF?&linkCode=ll1&tag=shroomok-zm-20&linkId=46a27fc8321567403da17a8160347669&language=en_US&ref_=as_li_ss_tl) $14.29
#### How a magnetic stirrer works
The main principle of magnetic stirrer is interaction between two magnets. The rotating field created by a rotating magnet placed beneath the vessel with the liquid.
The magnet bar in the stirrer are attracted to the one on the fan, and so when the fan spins, the magnet bar spins in the solution, with no physical contact required.
#### How to assemble magnetic stirrer
Here I'd like to add more important details to my video guide.
##### Step 1
**Prepare all needed components** are listed above: PC fan/cooler, neodymium magnet block, PTFE bar magnet, plastic stand, power adapter, glue gun or fast glue, jar with water for testing.
[](https://shroomok.com/en/wiki/File:Needed-materials-for-diy-magnetic_stirrer.png) Step 1. Necessary materials for DIY magnetic stirrer##### Step 2
I've cut two edges on my fan, because they interfered with the plastic platform installing. It's just a specific of my cooler. **In your case this may not be necessary!**
[](https://shroomok.com/en/wiki/File:Diy-magnetic-stirrer-guide.png) Step 2. Optional step. Cut the edges##### Step 3
Glue the magnet block to the PC fan. One of the hardest tasks is mounting the magnets correctly. That's why don't hurry up!
[](https://shroomok.com/en/wiki/File:How-to-make-magnetic-stirrer.png) Step 3. Glue the magnet block to the fan**Magnet should have its poles looking sideways.** I've found these sides experimentally (bigger side on the top) and made black mark between poles. So that, right and left sides of the magnet create magnetic field.
[](https://shroomok.com/en/wiki/File:Build-magnetic-stirrer.png) Step 3. Choose the right side of magnet block> **❗️Important note:** If you use **round** neodymium disc magnets (8-10 mm) you need to use two magnets. One magnet should have its **north facing upwards** and the other its **south facing upwards**. The magnets should be positioned directly across each other
[](https://shroomok.com/en/wiki/File:Magnetic-stirrer-option-2.png) Magnetic stirrer with rounded magnets##### Step 4
**Add the platform.** I printed it on 3D printer. If a 3D printer isn’t available you can use any flat surface for such podium: plastic plate, strong cardboard or plexiglass square
[](https://shroomok.com/en/wiki/File:How-to-make-magnetic-stirrer-for-mycology.png) Step 4. Add the platform for magnetic stirrer> **❗️Important note:** spacers are needed to sit between the fan and the top platform due to the extra height (3 mm) created by the magnet(s). Coins can be used here or additional small pieces of plexiglass on the corners of the fan
[](https://shroomok.com/en/wiki/File:Magnetic-stirrer-option-2.png) Magnetic stirrer with plexiglass platform and additional plexiglass on the corners to lift the platform over the magnets##### Step 5
Powering your magnetic stirrer. The magnetic stirrer can be powered by any voltage source the fan is rated to. Either battery holder, or AC/DC Adapter. Your fan should have two wires (**red** for positive and **black** for negative). If it has three wires, just skip the third one.
Put PTFE Magnetic Stir Bar in the jar with water, switch it on and test. Ready!
[](https://shroomok.com/en/wiki/File:Switch-on-and-test-magnetic-stirrer.png) Step 5. Powering magnet stirrer. Switch on and test> **❗️**There is no option of speed control if you use battery holder. With **AC/DC adapter** your magnetic stirrer will be more reliable, convenient and speed control here is available. That's why I recommend to use **AC/DC adapter** for your magnetic stirrer
#### Ready to use magnetic stirrer
If you don't want to spend time for assembling or you need to order ALL components for such device you can check ready to use magnetic stirrers on Amazon:
[INTLLAB Magnetic Stirrer with 7 pcs. stir bar set](https://www.amazon.com/INTLLAB-Magnetic-Stirrer-7PCS-Retriever/dp/B088SF2CZP?&linkCode=ll1&tag=shroomok-zm-20&linkId=9e7ad706380847af5e5f3495187a3870&language=en_US&ref_=as_li_ss_tl) $39.99
[ANZESER Magnetic Stirrer **Hot Plate**, 100-2000rpm Lab Stirrers](https://www.amazon.com/ANZESER-Magnetic-Stirrer-100-2000rpm-Heating/dp/B07S58GVCB?&linkCode=ll1&tag=shroomok-zm-20&linkId=c78a3e130f9fed51cfb62f9c84bb525c&language=en_US&ref_=as_li_ss_tl) $59.95
If you find this guide helpful, please support us with a cup of coffee on [☕️ buymeacoffee](https://www.buymeacoffee.com/shroomok)
Join Shroomok Community on **Discord** and **Reddit** for questions and sharing experience.
You can also leave your **comments on this page below** ⬇️
Have a happy growing!
Made with love by @**mrzimm** - Tech Guru of Shroomok Growers Community on Discord.
Promoted by ©Shroomok
## Bottle-tek or how to grow mushrooms in plastic bottles
[Bottle-tek or how to grow mushrooms in plastic bottles](https://shroomok.com/en/wiki/Bottle-tek_or_how_to_grow_mushrooms_in_plastic_bottles)
[](https://shroomok.com/en/wiki/File:Bottle-tek-guide-mushroom-cultivation.png) Bottle-tek guide by Shroomok### Easy guide for growing mushrooms in a bottle
This guide are going to show you simple and cheap technique for growing mushrooms at home. This method is newbie-friendly and minimum stuff required here.
[](https://shroomok.com/en/wiki/File:Bottle-tek-mushroom-growing.png) Bottle-tek: cheap and easy method for mushroom cultivation at home[](https://shroomok.com/en/wiki/File:Mushroom-cultivation-and-cat-shroomok-growers-community.png) Bottle-tek, GT mushrooms growing#### What is bottle-tek?
***Bottle-tek*** is a technique of mushroom cultivation, when we use large volume plastic bottles (5-7 liters or even 15-20 liters) as a fruiting chamber for mushroom fruiting period. This is an alternative option for [Grow Box](https://shroomok.com/en/wiki/DIY_Grow_Box_for_Magic_mushrooms._Fruiting_conditions "DIY Grow Box for Magic mushrooms. Fruiting conditions") or [MonoTub](https://shroomok.com/en/wiki/Forget_Monotub_Kit._DIY._How_to_make_Monotub_for_Mushrooms_by_your_own "DIY Monotub for mushrooms") in amateur home cultivation
[](https://shroomok.com/en/wiki/File:Albino-penis-envy-in-plastic-bottle.png) [APE mushrooms](https://shroomok.com/en/wiki/Mutant_strain_Albino_Penis_Envy_aint_just_APE_but_King_Kong_of_Magic_Mushrooms "Mutant strain Albino Penis Envy aint just APE but King Kong of Magic Mushrooms"), bottle-tek> 🔴 Check out other teks:
>
> [DIY GrowBox for mushrooms](https://shroomok.com/en/wiki/DIY_Grow_Box_for_Magic_mushrooms._Fruiting_conditions "DIY Grow Box for Magic mushrooms. Fruiting conditions")
>
> [DIY MonoTub for mushrooms](https://shroomok.com/en/wiki/Forget_Monotub_Kit._DIY._How_to_make_Monotub_for_Mushrooms_by_your_own "DIY Monotub for mushrooms")
#### Pros and cons of bottle-tek
[](https://shroomok.com/en/wiki/File:Mshroom-harvest-bottle-tek-shroomok-community.png) Bottle-tek: pros and cons##### The main advantages of growing mushrooms in plastic bottle
✅ **Cheap method.** You don't need to buy a large plastic container for a [Grow Box](https://shroomok.com/en/wiki/DIY_Grow_Box_for_Magic_mushrooms._Fruiting_conditions "DIY Grow Box for Magic mushrooms. Fruiting conditions") or [Monotub](https://shroomok.com/en/wiki/Forget_Monotub_Kit._DIY._How_to_make_Monotub_for_Mushrooms_by_your_own "DIY Monotub for mushrooms") and additional accessories like: hygrometer, light, aquarium compressor or small fan. This means you can save a good deal at the start. In fact, the bottle is both a tray for mushroom cake and Grow Box at the same time.
✅ **Available.** In any supermarket you can buy a 5-7-liter (1,5-2 gallons) bucket of drinking water.
✅ **Easy and simple.** Bottle-tek doesn't require special additional equipment. You don't need to plug anything in. Bottle-tek requires only one-time adjustment to ensure full growth conditions for mushrooms inside. Additional devices for air exchange and humidification are **not** required (you can provide everything manually). The process of preparing the bottle is clear to any beginner who has never grown mushrooms.
✅ **Rehydration** and preparation for a new flush of fruiting can be done directly in the bottle tank.
✅ **Compact and stealth method.** Doesn't take up much space. Such bottle tank can be easily hidden in a small cupboard or inconspicuous corner from the prying eyes of visitors to your home.
[](https://shroomok.com/en/wiki/File:Bottle-tek-as-stels-method.png) Bottle-tek is a stealth method for mushroom cultivation at home. Easy to hide it##### The main disadvantages of growing mushrooms in plastic bottle
➖ Beginners face with the problem of maintaining the correct microclimate in the bottle tank. Sometimes mushrooms receive too little oxygen or cover layer dries out.
➖ Monitoring the microclimate in the tank is done "by eye", without any gauges. But a basic compact thermometer and hygrometer are easy to place in the bottle.
➖ It is not convenient to take out the mushroom cake if you have to pick mushrooms from the sides.
#### What equipment do you need for bottle-tek
[](https://shroomok.com/en/wiki/File:Bottle-tek-list-of-needed-stuff.png) What equipment do you need for bottle-tek**For the bottle tank as a fruiting chamber you need to prepare:**
1️⃣ Plastic bottle of 5-7 liters (1.5-2 gallons)
2️⃣ Sharp knife or scissors.
3️⃣ Soldering iron or heat gun.
4️⃣ Aluminum foil or thick black film (for example, black garbage bags).
5️⃣ Scotch tape or masking tape.
6️⃣ Breathable synthetic patch (omnipore, micropore) or synthetic foam.
7️⃣ Cotton pads - 1-2 pcs.
8️⃣ Ethyl alcohol 70% or any disinfectant.
9️⃣ Ready for spawn to bulk spawn jars.
🔟 Sterilized or pasterized secondary substrate (coconut mix).
**For making mushroom cake in bottle you need:**
✅ 700 ml-1 liter of grain spawn or ~24-34 oz. (grain spawn is a fully colonized grain with mycelium).
✅ 1 liter (~34 oz.) of pausterized or sterilized bulk substrate (based on coco coir, vermiculite, gypsum).
✅ Casing layer is optional (sphagnum, vermiculite, hydrated lime).
#### What ratio of spawn to bulk is the best?
🔴 Shroomok recommendation is 1:1 ratio of spawn to bulk for beginners. Why? The more spawn with strong mycelium, the faster the secondary substrate (coco peat soil mix) will be colonized. This reduces the chances for molds and increases the chances of successful harvest. But this is only recommendation!
You can proceed with 1:2 or even 1:3 ratio of spawn to bulk substrate (coco peat soil mix). But in this case it takes more time for colonization and increases the risk of contamination.
#### What is the optimal volume of substrate for bottle-tek?
🔴 The optimal volume of substrate in a 5-7 liter (1.5-2 gallons) bottle tank is about 1.3-2 liters or 44-68 oz. (or no more than 1/3 of the total bottle volume). Why? The mycelium will need a free volume to breathe and for air exchange. It makes no sense to build a tower in a tank more than 12 cm (or 4.7″), because only the top of this cake will produce mushrooms.
> 🔴 Check out how to prepare bulk substrate: [Making mushroom cakes, Spawn to Bulk and Casing](https://shroomok.com/en/wiki/Making_mushroom_cake,_spawn_to_bulk,_and_casing "Casing of magic mushrooms cakes")
#### Scheme and process of preparing plastic bottle for mushroom cultivation
##### Bottle-tek scheme for mushroom growing
[](https://shroomok.com/en/wiki/File:Bottle-tek-scheme-for-mushroom-cultivation.png) Bottle-tek scheme for mushroom growing##### How to prepare bottle for mushroom cultivation
1️⃣ Take a clean plastic bottle with a capacity of 5-7 liters (6-liter bottle pictured) or 1.5-2 gallons. Mark the cut line and air vents with a marker (red).
[](https://shroomok.com/en/wiki/File:Bottle-tek-list-of-needed-stuff.png) What equipment do you need for bottle-tek
2️⃣ The substrate level with the casing layer (black line) will be within 8-11 cm.
[](https://shroomok.com/en/wiki/File:Bottle-tek-size.png) Make marks with a marker according to scheme and indicate the level of the substrate
3️⃣ Cut the bottle along the red cutting line that divides the bottle in half.
[](https://shroomok.com/en/wiki/File:Bottle-tek-cut-process.png) Cut the bottle in the middleLeave one edge intact to make it easy to open/close the "cap" of the tank. You can cut it off completely if that seems more convenient to you. It's a matter of convenience and not a matter of principle at all.
[](https://shroomok.com/en/wiki/File:Bottle-tek-cutted.png) Ready bottle for further steps
4️⃣ Make ventilation holes (~1cm in diameter) on each side of the bottle with a soldering iron or heat gun. The first level of air vents should be 1-2 cm above the top level of mushroom substrate. The second, third and fourth levels of ventilation holes are placed above the cut line of the tank. Level 2-3 are optional, but I recommend them for normal air exchange and natural draft. If there is too much air and the substrate dries out, they can be closed at any time.
[](https://shroomok.com/en/wiki/File:Air-vents-bottle-tek.png) Make air vents with heat gun according to the scheme**Shroomok recommendation on Amazon:**
[Soldering Iron Kit, Ceramic Thermostatic Design](https://www.amazon.com/gp/product/B0969CV712/ref=as_li_tl?ie=UTF8&tag=shroomok-20&camp=1789&creative=9325&linkCode=as2&creativeASIN=B0969CV712&linkId=a47cbb0f55e08d92da0ed83812db5580) - $19.99
[Adjustable Temperature Solder Gun Kit](https://www.amazon.com/gp/product/B08GLVN4X9/ref=as_li_tl?ie=UTF8&tag=shroomok-20&camp=1789&creative=9325&linkCode=as2&creativeASIN=B08GLVN4X9&linkId=74caa8a98f686ca8df4e80a0a13b69e4) - $37.95
[Professional Soldering Gun Kit, Three Tips, Solder in Carrying Case](https://www.amazon.com/gp/product/B00002N7S1/ref=as_li_tl?ie=UTF8&tag=shroomok-20&camp=1789&creative=9325&linkCode=as2&creativeASIN=B00002N7S1&linkId=984397d165447ae0c396b79fcecd2896) - $39.49
Another example of bottle-tek for mushroom cultivation by Shroomok growers community
[](https://shroomok.com/en/wiki/File:Mushroom-cultivation-in-plastic-bottle-tek.png) One more example of bottle-tek. Photo: mrzimm on [**Discord**](https://discord.com/invite/ngKhQDmymD)A variation of rectangular air vents from 2 sides. You can also place a compact thermometer and hygrometer inside the bottle.
[](https://shroomok.com/en/wiki/File:Bottle-tek-shroomok-growers-community-example-2.png) Another version of bottle-tek for mushroom cultivation**Shroomok recommendation on Amazon:**
[Govee Bluetooth Digital Hygrometer, Thermometer with Remote App](https://www.amazon.com/gp/product/B07Y36FWTT/ref=as_li_tl?ie=UTF8&tag=shroomok-20&camp=1789&creative=9325&linkCode=as2&creativeASIN=B07Y36FWTT&linkId=244415a8d89f306fb2c96ecc7f6b961f) $12.99
[Mini Thermometer Hygrometer, Data Storage Export](https://amzn.to/3LHWPLt) 13.99
[AcuRite Digital Hygrometer with Thermometer](https://www.amazon.com/gp/product/B01HDW58GS/ref=as_li_tl?ie=UTF8&tag=shroomok-20&camp=1789&creative=9325&linkCode=as2&creativeASIN=B01HDW58GS&linkId=0cc0cc527e86e0f4e041948fa0a0613d) $14.99
[2-in-1: Professional Digital Hygrometer, Thermometer](https://www.amazon.com/gp/product/B07YY1FB9D/ref=as_li_tl?ie=UTF8&tag=shroomok-20&camp=1789&creative=9325&linkCode=as2&creativeASIN=B07YY1FB9D&linkId=4d946b984658d5478b46e13d1e17c38f) - $17.99
5️⃣ Wrap the bottom of the bottle (substrate level) with thick black film (like black garbage bags) or aluminium foil. If you don't do this mushrooms will follow the light and grow on the sides. Such fruit bodies turn out crooked, aesthetically unattractive and inconvenient to pick them.
[](https://shroomok.com/en/wiki/File:Wrap-bottle-sides.png) Wrap bottle from the sides with black plastic bag or aluminium foil to hide from the light
6️⃣ Treat the bottle inside with ethyl alcohol (70%) or any disinfectant.
[](https://shroomok.com/en/wiki/File:Bottle-disinfection-for-mushroom-growing.png) Treat bottle with ethyl alcohol 70% or any disinfectant
Just wipe it with a cotton pad soaked in ethyl alcohol or any disinfectant.
[](https://shroomok.com/en/wiki/File:Bottle-disinfection-for-mushroom-cultivation.png) Wipe the bottle inside with cotton pad soaked in ethyl alcohol 70% or any kind of disinfectant
7️⃣ Fill the bottle with spawn and bulk substrate (coco mix) in 1:1 ratio. Mix it carefully. The mushroom cake should be ~7-11 cm.
[](https://shroomok.com/en/wiki/File:Bottle-for-mushroom-cultivation-shroomok.png) Fill the bottle with mushroom spawn and bulk substrate (pausterized or sterilized coconut mix)
Cover this mushroom block with a top casing layer of bulk substrate no more than 1 cm. Thus, you'll get a mushroom block in bottle about ~8-12 cm.
[](https://shroomok.com/en/wiki/File:Mushroom-cultivation-on-bottle.png) Cover mushroom cake with top casing layer ~1 cm
9️⃣ Close all air vents with airtight tape or Duct Tape for colonization period. Close and tape the cut line of the bottle as well.
[](https://shroomok.com/en/wiki/File:Close-bottle-holes-for-colonization-period.png) Close air ventilation holes with airtight patch or scotch tape**Shroomok recommendation on Amazon:**
[Transparent Duct Tape, Ultra High Performance Weather Resistant Tape](https://www.amazon.com/gp/product/B076J2BS1B/ref=as_li_tl?ie=UTF8&tag=shroomok-20&camp=1789&creative=9325&linkCode=as2&creativeASIN=B076J2BS1B&linkId=14afd8afef73c04517d2b18b6cf87bc7) - $12.88
🔟 Place the prepared bottle with the substrate in a dark and warm place (+21°...+25° C).
Ready!
#### Colonization period in bottle
Wait till mycelium colonized top layer by 50-80%. It takes 3 to 7 days.
Such substrate is ready to start fruiting period
[](https://shroomok.com/en/wiki/File:Bottle-tek-start-of-mushroom-fruiting-period.png) Pinhead initiation and start of fruiting periodOne more example. Ready for fruiting period as well
[](https://shroomok.com/en/wiki/File:Bottle-tek-ready-for-fruiting-period.png) Mushroom cake ready for introducing fresh air and start of fruiting period
Now open the air vents and seal them with a **breathable** synthetic bactericidal tape (omnipore, micropore tape).
[](https://shroomok.com/en/wiki/File:Bottle-tek-change-micropore-tape-for-air-vents.png) Open air vents and use micropore tape to avoid contamination from the airYou can use synthetic Filter discs or Polyester fill. This will provide oxygen access and fresh air exchange for mushrooms. The micropore tape or synthetic discs or poly fill protect against the entry of mold spores from the air through these air vents.
**Shroomok recommendation on Amazon:**
[3M Micropore Tape 1530-1 (2 rolls) 1 x 10 yards](https://www.amazon.com/gp/product/B06XNP8J4R/ref=as_li_tl?ie=UTF8&tag=shroomok-20&camp=1789&creative=9325&linkCode=as2&creativeASIN=B06XNP8J4R&linkId=f560bc0e72ed7903f3f49d7d03e8b38d) - $4.39
[Micropore Surgical Tape - 3m - 2" x 10 YD - 6 rolls](https://www.amazon.com/gp/product/B0082A9GS2/ref=as_li_tl?ie=UTF8&tag=shroomok-20&camp=1789&creative=9325&linkCode=as2&creativeASIN=B0082A9GS2&linkId=002675835f06b5070b42deeb3dc5867d) - $8.80
[Polyester Fiber, Premium Fiber Fill - 100/150/600/700/900g](https://www.amazon.com/gp/product/B08QV4PQPY/ref=as_li_tl?ie=UTF8&tag=shroomok-20&camp=1789&creative=9325&linkCode=as2&creativeASIN=B08QV4PQPY&linkId=c6b2914aa2741c1ff74bb79b93475f12) - $9.99
#### Fruiting conditions for mushroom development in the bottle
[](https://shroomok.com/en/wiki/File:Bottle-tek-shroomok-growers-community-example-1.png) Bottle tek and active mushroom fruiting inside the bottleSince air vents opening the fruiting period starts. You should provide the necessary climate conditions for pinhead initiation and normal mushroom development.
✅ Provide fresh air and spray the walls of the tank with clean chilled boiled water or clean drinking water.
✅ Keep the temperature about +21°...+23°C (70-74°F).
✅ Maintain a relative humidity ~92-99% by spraying the walls of the bottle. **How to spray the bottle?** You don't need to open it every time. You can spray by opening the top lid of the bottle. In this case small water drops fall on the mycelium, but it's not a problem. **Make sure no puddles form on the mycelium!**
✅ If there is not enough air exchange the ищееду should be opened and ventilated additionally 2-3 times a day. But if all air vents are made properly, natural ventilation through the vents will be enough.
Be patient and wait for pins and primordia.
🔴 The first pins and primordia usually appear after 7-14 days. Don't terrorize fungus with your curiosity and impatience every 5 minutes. Leave them alone and nature will do the rest 😉
Here are some examples of pinheads and fruit bodies formation at different stages of mushroom life cycle.
7 days after introducing fresh air. The start of pins development. Small white pinheads in a few days turn into small mushrooms.
[](https://shroomok.com/en/wiki/File:First-pins-primordia-bottle-tek.png) Pinhead initiation and first pins in bottle
9 days after introducing FAE. White pinheads form the first rudiments of future mushrooms and their brown caps.
[](https://shroomok.com/en/wiki/File:Start-of-mushroom-fruiting-bottle-tek.png) First pins and primordia development
12 days after introducing FAE. Active phase of mushrooms development
[](https://shroomok.com/en/wiki/File:Mushroom-fruiting-in-bottle.png) Start of mushroom fruiting
Quality check :)
[](https://shroomok.com/en/wiki/File:Magic-mushroom-harvest-and-cat-shroomok-community.png) Expert check!
13 days after introducing FAE. In 1-2 days such mushrooms are ready for harvesting.
[](https://shroomok.com/en/wiki/File:Bottle-tek-harvest.png) Golden Teacher fruiting in bottle#### Bottle-tek and mushroom cultivation examples
A few more examples of mushroom cultivation using the bottle-tek method.
[](https://shroomok.com/en/wiki/File:Bottle-tek-mushroom-harvest.png) [Golden Teachers](https://shroomok.com/en/wiki/The_magic_of_Golden_Teacher_mushroom "The magic of Golden Teacher mushroom")[](https://shroomok.com/en/wiki/File:Mushroom-harvest-in-plastic-bottle.png) Golden Teacher magic mushrooms fruiting in plastic bottle[](https://shroomok.com/en/wiki/File:APE-growing.png) Bottle-tek for Albino Penis Envy cultivation[](https://shroomok.com/en/wiki/File:Bottle-tek-shroomok-growers.png) Mushrooms ready for harvesting[](https://shroomok.com/en/wiki/File:Bottle-tek-mushroom-cultivation.png) Mushroom growing in a bottle[](https://shroomok.com/en/wiki/File:Bottle-tek-shroomok-community.png) Magic mushroom giants and bottle tekIf you find this guide helpful, please support and [🍄 Buymeacoffee](https://www.buymeacoffee.com/shroomok)
Have a happy growing and magic bottles!
📸 **More photos in [Bottle Tek photo gallery](https://shroomok.com/gallery/bottle-tek)**
## Forget Monotub Kit. DIY. How to make Monotub for Mushrooms by your own
[Forget Monotub Kit. DIY. How to make Monotub for Mushrooms by your own](https://shroomok.com/en/wiki/Forget_Monotub_Kit._DIY._How_to_make_Monotub_for_Mushrooms_by_your_own)
[](https://shroomok.com/en/wiki/File:Monotub-guide-DIY-How-to-make-Monotub-for_mushrooms.png) How to make MonoTub for mushroom cultivation### Make effective Monotub for mushroom growing and increase your yield
There are so many different ways how to get mushroom harvest...
Monotub is just one of the methods we are going to discuss. Monotub is the most desirable tek of magic mushroom growers for cultivation at home.
> Other recommended teks:
>
> ✅ [DIY Grow Box](https://shroomok.com/en/wiki/DIY_Grow_Box_for_Magic_mushrooms._Fruiting_conditions "DIY Grow Box for Magic mushrooms. Fruiting conditions")
>
> ✅ [Bottle-tek or how to grow mushrooms in plastic bottles](https://shroomok.com/en/wiki/Bottle-tek_or_how_to_grow_mushrooms_in_plastic_bottles "Bottle-tek or how to grow mushrooms in plastic bottles")
#### What is monotub
***Monotub*** is a type of fruiting chamber for mushroom cultivation. The volume of such tub can be from 6 Qt for mini-monotube (aka shoeboxes) to 32, 54, 80 Quart sizes and even bigger. Average tubes are considered optimal.
[](https://shroomok.com/en/wiki/File:16-monotube-in-action.png) Mushroom fruiting in monotubThe entire bottom of MonoTube is used for one mushroom block/cake. We mix fully colonized grain spawn and bulk (fruiting) substrate right in this tub.
[](https://shroomok.com/en/wiki/File:Mushroom-growing-in-monotube.png) Mushroom growing in MonoTub#### Pros and cons of MonoTub
[](https://shroomok.com/en/wiki/File:Hairy-buffalo-mushrooms-monotube.png) Mushroom harvest example in MonoTub🟢 **Once made and forget it.** Properly made MonoTub works as an autonomous system. All additional equipment is **optional** (fan, fogger/humidifier, censors etc). Additional misting or manual FAE also **optional**. Usually monotub open up only for harvesting or few times during fruiting period for check-up.
🟢 **More harvest** (in comparison with PF-tek, small mushroom cakes in Grow Box and Bottle-tek). On average 54 Quart monotub produces 2-4 productive flushes = ~2-3 kg of mushrooms and even more!
🔴 **Monotub is about "putting all the eggs in one basket"**. For spawn to bulk you mix a few spawn jars or spawn bags in one tub. If monotub contaminated, all the amount of mushrooms that could have been given from each **[small mushroom cake](https://shroomok.com/en/wiki/Making_mushroom_cake,_spawn_to_bulk,_and_casing "Casing of magic mushrooms cakes")** separately will be lost. This is the only reason why monotub isn't recommended for newbie growers.
🔴 **Dead zones in monotub.** It is a common issue for any monotub configuration. If air holes/gaps were made improperly, then natural airflow won't work.
**It cause:**
**- contamination,** because contaminants prefer stagnant air;
**-** [**overlay**](https://shroomok.com/en/wiki/Psilocybe_growing_problems_-_overlay,_abortions,_etc "Psilocybe growing problems - overlay, abortions, etc") due to high CO2 concentration;
**- dry top layer, when relative humidity in monotub is high.** This case is always confused, because our hygrometer shows us 90-99%, but top layer becomes dry. It means relative humidity maintained mainly by evaporation from top layer and goes away through air holes extremely fast. As a result we have problems with pinhead initiation, low yield or we loose all our possible harvest.
> ❗️MonoTub, built incorrectly, becomes a regular [Grow Box](https://shroomok.com/en/wiki/DIY_Grow_Box_for_Magic_mushrooms._Fruiting_conditions "DIY Grow Box for Magic mushrooms. Fruiting conditions"). Any autonomy of this design disappears. It has to be additionally misted and quite often fanned manually as a GrowBox
#### Why does some MonoTubs have air holes while other don't? Monotub configurations
The very first and the best way to increase your yield is making **balanced** fruiting chamber. It gives a chance to unlock mushroom potential for fruiting and avoid losses due to possible contamination or genetic mutation.
> There is no right or wrong way to fruit mushrooms. They need fresh air, high relative humidity, appropriate temperature and a little bit of light. Any method you can come up with to give them those required things, should work. Your choice of growing tek depends on your experience, budget, preferences, mushroom species and even imagination
Let's figure out different MonoTub configurations.
##### Modified MonoTub
***Modified monotub*** (neglect-tek) consists of plastic transparent tub that has been modified with holes and closed tightly with transparent lid. These holes (air vents) on the proper distance and height help to create air flow, fresh air exchange (FAE) and maintain humidity due the basic laws of physics: temperature changes inside and outside tube, temperature differences on the bottom and on the top of tub create air flow and influence on the relative humidity.
[](https://shroomok.com/en/wiki/File:6-monotube-for-mushroom-cultivation.png) Modified monotub for mushroom cultivation. Photo by Not Sure - [Shroomok growers Community in **Discord**](https://discord.com/invite/ngKhQDmymD)Dead zones is the main issue for such configuration.
##### **Unmodified MonoTub**
**Unmodified monotub** (neglect-tek) is a plastic transparent tub with lid, but without air holes. For fresh air exchange (FAE) during fruiting period the lid is flipped upside down or just don't close tightly. This creates air gaps around the lid locks which is important for allowing air exchange as well as substrate moisture regulation.
[](https://shroomok.com/en/wiki/File:1-box-for-monotube.png) Unmodified monotub for mushroom cultivationHumidifier/fogger often used for this tek. It helps with FAE and push out CO2.
Dead zones is the main issue for such configuration.
##### Double Tub or Twin Tub
***Double tub*** or ***Twin tub*** consists of two plastic containers and connected to each other by the container tops.
This configuration has a doubled volume of fruiting chamber and this is the main advantage for fruiting period. Can be made with air-holes (for average volume bins).
[](https://shroomok.com/en/wiki/File:11-double-tub-guide.png) Double tub or Twin tub as a fruiting chamber for mushroom growing##### Shoeboxes tek or Mini-tub
Usually 6Qt plastic shoeboxes use for such fruiting chamber. Can be made with air holes for fresh air exchange in the same as for modified monotub
[](https://shroomok.com/en/wiki/File:Shoebox-for-mushrooms.png) Shoebox for mushroom growingModification without air holes, where air gaps between two bins are enough for air flow
[](https://shroomok.com/en/wiki/File:Shoebox-tek-mushroom-growing.png) Shoeboxes for mushroom cultivation#### Influence of external factors on the MonoTub efficiency
[](https://shroomok.com/en/wiki/File:Diy-monotub-guide.png) Modified monotub with holes for natural air flow. Photo: Not Sure1️⃣ **Relative humidity.** If RH in your room below 30%, then you won't be able to use the monotub! Whatever holes we make in it, the moisture will leave it. Making too small holes in a monotub means CO2 accumulation in it and monotub stops working. In such case you need to use humidifier either for room or inside monotub.
> Normal RH for room is 50-60%. This will allow you to make effective hole diameter in monotub without fear all moisture will evaporate or high CO2 will accumulate in it
2️⃣ **Evaporation rate, diffusion, temperature.** If the relative humidity of the outside air is below 100%, the monotub can essentially be represented as a mixing chamber.
The outside air passes through the upper holes, mixes with the humid air inside the tub and leaves it through the lower holes. This principle of operation of the monotub, can be described as the operation of an isobaric system (partial pressure difference). And also isothermal process (because of thermogenesis process).
> Mycelium is eating the substrate, it creates heat whilst digesting. This causes a thermal air current to develop inside the monotub.
This process can't come to equilibrium because the two volumes "room and container" are not commensurate in volume. When the partial pressure is equalized, due to the difference in relative humidity, the system will come to equilibrium when all the moisture inside the container has evaporated, and then the system will be in balance.
When the air is mixed, at the boundary of the holes, a third, transitional process occurs.
In fact, we have different chemical composition of air. Inside the monotube the air contains a large amount of carbon dioxide, and it is ten times different from the carbon dioxide concentration in the atmosphere!
3️⃣ **Temperature difference and condensation.** Condensation occurs due to outside air temperature drop.
> Don't assume that condensation can occur at 100% humidity only
The greater the difference in temperature, the more condensation will occur. And vice versa, the higher the air temperature, the less condensation will be on the walls of the monotub. This critical temperature is also known as the ["dew point"](https://en.wikipedia.org/wiki/Dew_point "wikipedia:Dew point") and can be observed at almost any air humidity.
Walls of plastic container don't have as good heat transfer as glass or metal. That's why due to evaporation process, the temperature will decrease, and the walls will fall out with condensation. At the same time the air inside container won't have humidity equal to 100%.
#### How Monotub works
[](https://shroomok.com/en/wiki/File:How-to-make-monotub-and-increase-yeild.png) Properly made monotub and laws of physics can increase your yieldAccording to the previous paragraph, Monotub can be represented as a simple mixing chamber.
Mycelium is a living organism that is eating nutrients in the substrate and releases heat during digestion. As a result, a thermal airflow occurs inside the Monotube.
**The Monotub works in the following way:**
- Mycelium is spawned into bulk substrate, mixed and placed into the Monotub (with the holes taped over to prevent FAE till bulk substrate colonisation).
- Once the mycelium 80-100% colonised the substrate the tape is removed from the holes in the tub and filled with synthetic filters, polyfill, micropore tape or sponge.
- The air around the substrate is slightly heated due to mycelium heat generation during development.
- As you know, the heated air rises up. And then it comes out through the upper holes in the tub.
- At the same time fresh, cooler air enters through the lower holes of the tub.
- To prevent the substrate from drying out due to too much FAE, the polyfill in the lower holes is packed tightly, while the polyfill in the upper holes is packed more looser.
- Fresh air is a trigger for pinning process and mushroom fruiting.
> ❗️The direction of air flow can be changed manually (from top to bottom) if we use PC fan on the lid or on the wall of Monotub for additional FAE
#### How to make a MonoTub
Let's figure out modified monotub as a fruiting chamber for mushroom cultivation
[](https://shroomok.com/en/wiki/File:2-monotube-construction.png) Modified monotub with air vents#### Basic rules for effective MonoTub
1️⃣ Spawn + Bulk substrate = no more than 30% of the MonoTub volume
2️⃣ Lower holes. For every 6-8 inch (15-20 cm) of length should be placed one hole (on the long side of the tub). It is often 2 holes on one side and 2 holes on the opposite side
3️⃣ Upper holes. The cross-sectional area of the upper holes must be half of the lower hole. It means if all holes are drilled with the same drill bit diameter, then we need 2 holes instead of 4
#### Materials needed for modified monotub
1️⃣ One clear plastic tub with a lid 32-91Qt sizes
[](https://shroomok.com/en/wiki/File:1-box-for-monotube.png) Plastic box for monotub (32-91Qt)**Shroomok's Choice on Amazon:**
[Clear Plastic Tub with Lid - 68Qt - 1 Pack](https://amzn.to/42cDkjP) $39.99
2️⃣ Drill with a two-inch hole saw bit (or heavy-duty pair of scissors or gardening snips) for making air vents in monotub
[](https://shroomok.com/en/wiki/File:14-drill-with-2-inch-hole-saw-for-air-vents.png) Hand drill with ~2 inch hole saw for making air vents in monotub**Shroomok's Choice on Amazon:**
[2 Inch BI-Metal Hole Saw](https://www.amazon.com/gp/product/B07SLRDW8F?&linkCode=ll1&tag=shroomok-20&linkId=2fc12f0e06edec199dabee13a7976d5e&language=en_US&ref_=as_li_ss_tl) - $13.98
3️⃣ **Synthetic filters,** or **Poly-fill,** or **micropore tape,** or **sponge for air holes** help to protect incoming air against contaminants
[](https://shroomok.com/en/wiki/File:13-air-filters-for-monotube.png) Adhesive filters for monotube**Shroomok's Choice on Amazon:**
[Micropore Tape](https://amzn.to/42a7bcO) $8.80
[Poly-Fil Premium Fiber](https://www.amazon.com/dp/B08LYJ66HN?&linkCode=ll1&tag=shroomok-20&linkId=c52463e8cc201fbf077d3bc6109f88b6&language=en_US&ref_=as_li_ss_tl) $13.99
4️⃣ Thick **opaque black trash bag** or **black spray paint** suitable for use on plastic. We need it to protect the bottom of our tub from the light and avoid side pinning. Better to use **PE bags inside**, we'll discuss details later.
[](https://shroomok.com/en/wiki/File:How-to-prepare-monotub-for-spawn-to-bulk.png) Thick trash bag inside monotub prevent side pinning and help with harvesting process**Shroomok's Choice on Amazon:**
[Polyethylene black bags](https://www.amazon.com/gp/product/B000KKKPF0?&linkCode=ll1&tag=shroomok-20&linkId=ba8dc444e5179a1896dab64ad4d31b14&language=en_US&ref_=as_li_ss_tl) - $19.99
5️⃣ Duct tape or other heavy-duty tape. It is needed for closing air-vents for bulk substrate colonisation.
**Shroomok's Choice on Amazon:**
[Duck Tape, 1.88 Inch x 60 Yard, Silver - 1 Pack](https://www.amazon.com/Original-Strength-Duck-Silver-394475/dp/B0000DH4ME?&linkCode=ll1&tag=shroomok-20&linkId=119d184f38e01525bd6fdb0c1846a89a&language=en_US&ref_=as_li_ss_tl) - $7.95
#### How to set up monotub
**Step 1.** Prepare all needed materials are listed above.
**Step 2.** Attach the drill piece to the head end of the drill. Make 6 air vents in tub.
Make 4 lower holes (length side). They should be about 4-6 inches (10-15 cm) from the bottom of the MonoTub.
[](https://shroomok.com/en/wiki/File:9-air-vents-in-monotube.png) How to make air holes in monotub[](https://shroomok.com/en/wiki/File:2-monotube-construction.png) Lower air holes in monotub (4 holes)
Make 2 upper holes (width side). They should be placed about 1 inch (2 cm) from the top of MonoTub.
[](https://shroomok.com/en/wiki/File:3-monotube-air-vents.png) Upper air holes in MonoTub (2 holes)> 💡 You can paint the line of substrate level and air-holes before making them. You can make holes by melting with hot round piece. Do this outside in an open area with a mask, because melting plastic isn’t the healthiest
**Step 3.** Take a knife and clean up the edges that may remain on the holes.
**Step 4.** For bulk colonisation period close the air holes with duct tape tightly.
For fruiting period cover air-vents with filter discs /poly-fill /micropore tape /sponge. It allows air exchange, works as a filter for incoming air to prevent contaminants
[](https://shroomok.com/en/wiki/File:4-diy-monotube-for-mushroom-growing.png) Filter discs for air holes in monotub> ❗️Remember, right after spawn to bulk (for bulk colonisation period) you should totally close air vents! Use duck tape for it. Once 80-100% of top layer colonised remove duct tape for FAE. From this moment fruiting period has started!
**Step 5.** Take a piece of thick opaque black trash bag and cut it to size of MonoTub, so that edges of the bag come up to under the lower holes in the MonoTub. Place it inside your tube. Tape the sheet to the sides of the MonoTub
[](https://shroomok.com/en/wiki/File:How-to-prepare-monotub-for-spawn-to-bulk.png) Thick trash bag inside monotub prevent numerous side pinning and help with harvesting process[](https://shroomok.com/en/wiki/File:Monotub-guide.png) Linen inside monotub prevent numerous side pinning and help with harvesting processThe lining inside is optional, you can use it or skip it. Although it has some practical advantages.
Inside lining is helpful for harvesting and further soaking in water. You can pull the whole block out without touching it or breaking it. Mushroom cake evaporates some water and mycelium absorbs water from the substrate. As a result mushroom cake begins to shrink. When the substrate shrinks it creates favorable microclimate between the substrate and the MonoTub walls. Such conditions are perfect for developing side pins. When you line the MonoTub inside, the lining shrinks with the mushroom cake as growth progresses stopping this from happening. However side pins is not a problem at all and they can grow even if you use lining inside.
**Step 6.** Keep the lid of monotub closed during bulk colonisation and fruiting period.
[](https://shroomok.com/en/wiki/File:7-monotube-for-mushrooms.png) Lid for MonoTub
**Step 7 (optional).** You can add some optional gadgets in MonoTub (light, fan, temperature/humidity/CO2 detector, humidifier, sensors, controllers etc). At least thermometer and hygrometer would be useful.
[](https://shroomok.com/en/wiki/File:5-how-to-build-monotub-for-mushrooms.png) Add sensors in monotub (thermometer + hygrometer)> All upgrades are optional for Psilocybe Cubensis cultivation, but can be necessary for Psilocybe Natalensis and Panaeolus. I suggest to use humidifier and fan for these species, because they required more oxygen
MonoTub is ready for the next step - Spawn to Bulk.
> 🔴 Check out guide with recipes: [Spawn to Bulk](https://shroomok.com/en/wiki/Making_mushroom_cake,_spawn_to_bulk,_and_casing#Spawn_to_Bulk)
#### Upgrades for fully automated MonoTub
**All these devices are optional if your MonoTub is made properly.** They help to maintain and control necessary fruiting parameters 24/7 for newbie growers and adjust fruiting conditions if monotub has bad airflow and issues with relative humidity.
[](https://shroomok.com/en/wiki/File:Automated-monotube-for-mushroom-cultivation.png) Automated monotub-growbox for mushroom growing. Photo on the internet for example[ ](https://shroomok.com/img_orig/d9e9f9/4032_automated-mushroom-growing-setup-by-psychonautjim.jpg) [Automated MonoTub setup](https://shroomok.com/en/wiki/File:automated-mushroom-growing-setup-by-psychonautjim-5782ad)In fact such configuration is something between monotub and growbox. Because **true MonoTub is totally autonomous** fruiting chamber.
> Experienced growers feel the cultivation process and can check all parameters on the eye. But as I mentioned before ***Psilocybe Natalensis*** and ***Panaeolus*** are more sensitive to CO2 than *Psilocybe Cubensis*. That's why humidifier, PC fan or air pump can be extremely useful for these species!
1️⃣ Fruiting parameters sensor. Temperature, humidity, CO2 detector to control fruiting conditions in monotub.
**Shroomok's Choice on Amazon:**
[Govee Bluetooth Digital **Hygrometer and Thermometer,** Remote App](https://www.amazon.com/gp/product/B07Y36FWTT?&linkCode=ll1&tag=shroomok-20&linkId=2134ddd03024ca6ee93561ae56e12a17&language=en_US&ref_=as_li_ss_tl) $11.99
[Mini CO2 Detector, Temperature, Humidity](https://amzn.to/3VGLizm) $45.99
[INKBIRD WiFi Air Quality Monitor, CO2, Temperature, Humidity](https://amzn.to/41fHdmM) $79.99
2️⃣ **Light for monotub.** Additional light is optional shrooms, but recommend. Why? Briefly, light influences mushroom metabolism and pin setting. More info in the section: [Fruiting period. Pinhead initiation. Mushroom growth parameters](https://shroomok.com/en/wiki/Fruiting_period._Pinhead_initiation,_mushroom_pinning_and_mushrooms_growth_parameters "Fruiting period. Pinhead initiation, mushroom pinning and mushrooms growth parameters")
> 🔴 **Natural light is suitable, but only diffused soft light. Avoid direct sunlight!**
**Shroomok's Choice on Amazon:**
[**LED light bar** with Memory Function](https://www.amazon.com/dp/B08VDH1GJV?&linkCode=ll1&tag=shroomok-20&linkId=bbb0c451b36f1f72dc057abedd0ffb0d&language=en_US&ref_=as_li_ss_tl) $16.99
[**LED Desk Lamp** with Flexible Gooseneck](https://amzn.to/44S1e54) $16.99
[**LED Light Strip,** 6500K - 16.4ft](https://www.amazon.com/gp/product/B07XHLGSXN?&linkCode=ll1&tag=shroomok-20&linkId=8dbdf23e2926f9bc38001f7b42ffd5d4&language=en_US&ref_=as_li_ss_tl) $19.99
3️⃣ **Humidifier.** Effective with humidity controller and on/off cycle according to RH level in monotub
[Ultra Fine Mist Spray Bottle](https://www.amazon.com/gp/product/B0948WBX9L?&linkCode=ll1&tag=shroomok-20&linkId=ddad2ce6ae202d8f96aed0253a8ca814&language=en_US&ref_=as_li_ss_tl) $8.99 - cheap option for manual misting
[Fogger **with Humidity Controller**, Extended Hose, 4L](https://www.amazon.com/dp/B08NVLT6JK?&linkCode=ll1&tag=shroomok-20&linkId=680a074364c98f494a675162d8076fdc&language=en_US&ref_=as_li_ss_tl) $59.99
4️⃣ **Humidity controller** to maintain and control stable relative humidity 90-99%
[Inkbird Humidity Controller for Mushroom Growbox/Monotub/Grow Tent](https://www.amazon.com/Humidity-Controller-Inkbird-Humidistat-Pre-wired/dp/B01J1E5LWM?&linkCode=ll1&tag=shroomok-20&linkId=5042a83024c4d4a2c8facbd38d468bb8&language=en_US&ref_=as_li_ss_tl) $36.54
5️⃣ **Fan** for additional air flow and FAE. Can be installed on the lid or on the wall of the tub.
[Quiet PC Fan with power plug cord](https://www.amazon.com/gp/product/B009OWVUJ0?&linkCode=ll1&tag=shroomok-20&linkId=bba94af92491130fefdb0242b324a204&language=en_US&ref_=as_li_ss_tl) $19.99
> ❓ **Question:** I'm interested about PC fan on the top (or on the side). It's just a hole for the fan or filter used too, between the the hole and PC fan? Thanks
❗️**Shroomok answers:** The principle of PC fan in monotub the same as a ceiling-mounted exhaust fan in your bathroom. The PC fan works by **PULLING** the air up instead of the PC fan blowing air into the tub. So that it pulls old air out of the box while force the fresh air to be pulled in through the air vents, which is protected with polyfill/synthetic filters/sponge where it can be filtered. Place the PC fan on the correct side and check the airflow direction.
6️⃣ **Cycle timer for light/fan/humidifier.** You can set up on/off cycle for fan (for example, every 1 hour for 10 sec or 4-6 times/day for 1 minute). For light (12 hours on/off cycle). For humidifier (for example, every 1 hour for 10 sec or 4-6 times/day for 1 minute).
[BN-LINK Short Period Repeat Cycle Intermittent Timer](https://www.amazon.com/BN-LINK-Period-Repeat-Intermittent-Interval/dp/B0184CG9K0?&linkCode=ll1&tag=shroomok-20&linkId=cc0da24a870975b6173f8f7362ffdb7a&language=en_US&ref_=as_li_ss_tl) $26.99
[Digital Thermometer Hygrometer Temperature Controller](https://amzn.to/3rvEcTj) $49.99
#### MonoTub modifications by Shroomok Growers Community
You can change, upgrade your fruiting chamber in a different way. Experiment and you'll come up with the best solution for you. Don't afraid to make something different. The sky is the limit!
Let me show you more examples.
❇️ **Black MonoTubs** with shared automative humidifier system and temperature/humidity controller. Covered by clear plastic stretch wrap film (without lids on top)
[](https://shroomok.com/en/wiki/File:Cultivation-set-up-shroomok-community.png) DIY mushroom fruiting chamber setup
**Shroomok's Choice on Amazon:**
[Black Storage Bin with Lid - 40/53Qt - 6 Pack](https://amzn.to/3Y0hnDF) - $80.99
[Temperature/humidity controller](https://www.amazon.com/VIGELA-STC-3028-AC110-230V-All-Purpose-Temperature/dp/B09MS3YJDN?&linkCode=ll1&tag=shroomok-20&linkId=8199b7da120c2dc2a4103bd89563af64&language=en_US&ref_=as_li_ss_tl) - $24.99
[Mxmoonant 6 Head Ultrasonic Mist Maker](https://www.amazon.com/dp/B0893768J8?&linkCode=ll1&tag=shroomok-20&linkId=3bc2e808b329d635735cf6b65f581b53&language=en_US&ref_=as_li_ss_tl) for DIY powerful humidifier $128.90 - for such fogger you need water tank and plastic pipes
❇️ **MonoTubs with temperature and humidity controllers**
[](https://shroomok.com/en/wiki/File:Fruiting-chambers-shroomok-growers-community.jpg) MonoTubs with temperature and humidity controller. Photo: Vanilla Gorilla**Shroomok's Choice on Amazon:**
[Modular Stackable Storage Bins - 66 Quart - 2 Pack](https://amzn.to/3nJO1eL) $55.69
[Polyethylene black bags](https://www.amazon.com/gp/product/B000KKKPF0?&linkCode=ll1&tag=shroomok-20&linkId=ba8dc444e5179a1896dab64ad4d31b14&language=en_US&ref_=as_li_ss_tl) - $19.99
[Inkbird Temperature + Humidity Controller ITC-608T](https://www.amazon.com/dp/B07GQWY9HM?&linkCode=ll1&tag=shroomok-20&linkId=443032448df69ff1e07c2a3343a9a693&language=en_US&ref_=as_li_ss_tl) $69.99
❇️ **Plastic seedling box with lid**. Modified with additional air holes, PC fan on the top of the lid and temperature/humidity controller.
[](https://shroomok.com/en/wiki/File:Growing-set-up-shroomok-community.png) Growing set up by anthony187The only issue you can see here is too much fanning (currently 15 seconds every 30 minutes). Top layer loose moisture, there are no shrooms in the centre. But near borders more humidity and shrooms are there!
Try to use PC fan 3-4 times/day and mist the walls of the tub additionally if needed (according to humidity controller data). If natural airflow in such tub works properly you can skip additional fanning at all.
**Shroomok's Choice on Amazon:**
[Seedling box with lid and ready-made air holes](https://www.amazon.com/EarlyGrow-93763-Medium-Propagator-Extension/dp/B07HHR5DGN?&linkCode=ll1&tag=shroomok-20&linkId=ef015fc6b812776c120a953b0414cfbe&language=en_US&ref_=as_li_ss_tl) - $30.38
[Quiet Fan with power plug cord](https://www.amazon.com/gp/product/B009OWVUJ0?&linkCode=ll1&tag=shroomok-20&linkId=bba94af92491130fefdb0242b324a204&language=en_US&ref_=as_li_ss_tl)- $19.99
[Humidity Controller for monotub](https://www.amazon.com/Humidity-Controller-Inkbird-Humidistat-Pre-wired/dp/B01J1E5LWM?&linkCode=ll1&tag=shroomok-20&linkId=5042a83024c4d4a2c8facbd38d468bb8&language=en_US&ref_=as_li_ss_tl) - $42.99
[LED White **Light Strip** 6500K](https://www.amazon.com/gp/product/B07XHLGSXN?&linkCode=ll1&tag=shroomok-20&linkId=8dbdf23e2926f9bc38001f7b42ffd5d4&language=en_US&ref_=as_li_ss_tl) $19.99
❇️ **Twin fruiting chamber.** Two tubs, 16 Qt each. Humidifier shared for 2 tubs. Ultrasonic humidifier activates with humidity controller to create a fine mist (turn on/off to maintain needed relative humidity). Light LED strips on the top of lids (inside the tubs).
[](https://shroomok.com/en/wiki/File:Fruiting-chamber-for-mushrooms.png) Twin fruiting chamber📸 For more examples check out [MonotTub photo gallery](https://shroomok.com/gallery/monotub)
Join Shroomok Community on [Discord](https://discord.gg/ngKhQDmymD) and [Reddit](https://www.reddit.com/r/Shroomok) for questions and sharing experience or leave your comments below.
If you find this guide helpful, please consider supporting my work with a cup of coffee on ☕️ [buymeacoffee](https://www.buymeacoffee.com/shroomok)
Have a happy growing!
Peace, Shroomok ❤️
## How to build automatic incubation chamber for mushrooms
[How to build automatic incubation chamber for mushrooms](https://shroomok.com/en/wiki/How_to_build_automatic_incubation_chamber_for_mushrooms)
[](https://shroomok.com/en/wiki/File:Incubation-chamber-with-temperature-control-for-mushroom_growing.jpg) Incubation chamber with automated temperature control for mushroom cultivation### How to make an Incubation Chamber with automated temperature control for mushroom growing
Usually, you can colonize agar plates, liquid culture, spawn jars and spawn bags at room temperature and no incubator needed, but everything change for growers during winter season in continental climate zones. We recommend to use this set up, if you have bunch of spawn jars, spawn bags, your room temperature about 70ºF or +20ºC and lower and if you want to speed up colonization process.
Incubation chamber allows you to grow mushrooms at home any time. This design will allow you to maintain a constant stable temperature automatically.
Such modification can be built directly into the cabinet or placed on the shelf in a cabinet or might be as a mobile box.
#### Incubation Chamber Advantages
Incubation Chamber is more expensive compared to Tub in Tub (TiT) with aquarium heater, where you need one inexpensive device.
> Tub in Tub (TiT) — refers to an incubator modification consisting of 2 plastic tubs and an aquarium heater
**Incubation chamber has significant advantages:**
✅ No water tank needed
✅ Safe to use
✅ Stable temperature all the time. The temperature controller has several settings and allows you to set a temperature range. This makes it easy to keep the temperature within 1-2°
✅ Heating element goes along the wall(s) of the box. This gives more uniform heating
> In my case it is 0.3m per 1m of total perimeter, it covers 30%
✅ The sensor of the thermostat is remote. You control the air temperature in the box, not the temperature of the water in the tub or battle with aquarium heater
✅ The Heating Film or Heat Mat is flat. It doesn't take too much space in the incubation chamber. You have a lot of space for spawn jars/bags and other stuff
✅ You can use Incubator for different mushroom species, for spawn colonization, spawn run, agar plates colonization, liquid culture
Let's figure out how to make Incubator for mushroom growing with temperature control!
#### Components for Automated Incubator and easy set up
List of required stuff and Amazon links to each item for easy set up. Just connect all this stuff
1️⃣ **Heating Pad Mat**
[](https://shroomok.com/en/wiki/File:Heating-mat-for-incubator-for-mushrooms.jpg) Heating Pad Mat for Incubator, different sized for your box**Recommended stuff on Amazon:**
[Heating Pad Mat, manual temperature regulator, 25W, 220x420mm](https://www.amazon.com/Temperature-Controller-Incubator-Terrarium-Hydroponic/dp/B07K9R627G?th=1&linkCode=ll1&tag=shroomok-zm-20&linkId=3805cde8a6c9eb393ba716963d8f4d96&language=en_US&ref_=as_li_ss_tl) $10.99
[Heating Pad, manual temperature regulator, 25W, 220x420mm](https://www.amazon.com/Reptile-Heating-Terrarium-Temperature-Chameleon/dp/B07Y4Z8W43?&linkCode=ll1&tag=shroomok-zm-20&linkId=02afd2046b27208faec27eae79d13764&language=en_US&ref_=as_li_ss_tl) $13.99
[Advanced Infrared Heat Mat, w/o temperature regulator, 22W, 274x410mm](https://www.amazon.com/Komodo-Advanced-Heat-Mat-22w/dp/B00B99PGS2?&linkCode=ll1&tag=shroomok-zm-20&linkId=8b866ec76b03400a67c053f22b4c2900&language=en_US&ref_=as_li_ss_tl) $31.57
[Professional Heated Film Technology, w/o temperature regulator, 280x1524mm](https://www.amazon.com/Propagation-Seedling-Technology-Germination-Beautiful/dp/B06Y19H2LC?&linkCode=ll1&tag=shroomok-zm-20&linkId=0ebdd2414a4079df1b68792dc3068a47&language=en_US&ref_=as_li_ss_tl) $49.95
2️⃣ **Temperature Controller aka Thermostat**
This device helps you to control **air** temperature in the incubator within temperature range you set. For example 25-27°C or 77-80F. Thermostat turn ON the Heat Mat, when temperature drop down to 77°F or 25°C and turn OFF, when temperature is 27°C or 80°F. So that you always have stable temperature within 77-80°F or 25-27°C.
[](https://shroomok.com/en/wiki/File:Thermostat-for-mushroom-incubator.jpg) Temperature controller aka thermostat for incubator**Recommended stuff on Amazon:**
[BN-LINK Digital Heat Mat Thermostat Heat Controller](https://www.amazon.com/dp/B01I15S6OM?&linkCode=ll1&tag=shroomok-zm-20&linkId=1f037f067b05224771eb871818d3386a&language=en_US&ref_=as_li_ss_tl) $18.99 - Heating controller only
[BN-LINK Digital Thermostat for any DIY projects](https://www.amazon.com/BN-LINK-Temperature-Controller-Thermostat-Germination/dp/B09F7M7VPT?&linkCode=ll1&tag=shroomok-zm-20&linkId=82a2b2a1432954fe13ece7ca2caae78c&language=en_US&ref_=as_li_ss_tl) $34.99 - Heating & Cooling Thermostat
[Inkbird ITC-308 Digital Thermostat for any DIY projects](https://www.amazon.com/dp/B01HXM5UAC?&linkCode=ll1&tag=shroomok-zm-20&linkId=3a6defbc9734f1a9c41aa28b6cb4a18f&language=en_US&ref_=as_li_ss_tl) $35.00 - Heating & Cooling Thermostat
3️⃣ **Polystyrene styrofoam panel**
This helps to retain heat inside the box
[](https://shroomok.com/en/wiki/File:Polystyrene-styrofoam-panel-for-mushroom-incubation-chamber.png) Polystyrene panel for mushroom incubation chamber**Recommended stuff on Amazon:**
[Polystyrene Sheets 11x17x0.5 inch - 14 Pack](https://www.amazon.com/Silverlake-Craft-Foam-Block-Arrangements/dp/B07Z3CPQ18?&linkCode=ll1&tag=shroomok-zm-20&linkId=5239d31186bbe0a55f8f7a3225f740e0&language=en_US&ref_=as_li_ss_tl) $26.99
[STYROFOAM Polystyrene 2' x 2' Project Panels | 1" Thick - 6 Pack](https://www.amazon.com/STYROFOAM-99106444-Project-Panels-Pack/dp/B07FPL3LBB?&linkCode=ll1&tag=shroomok-zm-20&linkId=605ae8b1205d1893962f56755841e36b&language=en_US&ref_=as_li_ss_tl) - $35.99
4️⃣ **Clear thick PE Film** or **PET Flexible Plastic Sheets**
[](https://shroomok.com/en/wiki/File:Flexible-plastic-sheet.jpg) Flexible plastic sheet for incubator**Recommended stuff on Amazon:**
[PET Flexible Plastic Glass Sheets, Clear, 24x36 x 0.03 inch - 2 Pack](https://www.amazon.com/Flexible-Plexi-Glass-Protective-Langdon-House/dp/B093PPZR7X?&linkCode=ll1&tag=shroomok-zm-20&linkId=b7c028dc8d265114ab2fe608d6eb0ed4&language=en_US&ref_=as_li_ss_tl) $28.99
5️⃣ **Quiet PC Fan 90-120мм**
[](https://shroomok.com/en/wiki/File:Fan-for-incubation-chamber-for-mushroom-growing.jpg) Fan for incubator**Recommended stuff on Amazon:**
[Quiet Fan 120mm with power plug cord](https://www.amazon.com/gp/product/B009OWVUJ0?&linkCode=ll1&tag=shroomok-zm-20&linkId=e64e20d6f61b8d3e56bea84b8116f66d&language=en_US&ref_=as_li_ss_tl) $19.99
#### Cheaper components for Automated Incubator I use
You can save your money if you already have some components are listed below, so you can use them for incubator. If you are going to buy all these items, then better to take components from the previous paragraph.
> Be ready to be a Tech Guru and connect a few wires to make your incubator work!
1️⃣ **Temperature controller board 12V** or **Thermostat**
[](https://shroomok.com/en/wiki/File:Temperature-controller-w1209-for-mushroom-incubator.png) Digital temperature controller board (thermostat) for mushroom incubator**Recommended stuff on Amazon (choose one from the listed below):**
[AEDIKO Digital Temperature Controller Board W1209 DC 12V](https://www.amazon.com/AEDIKO-Temperature-Controller-Thermostat-Electronic/dp/B09STPQF7J?&linkCode=ll1&tag=shroomok-zm-20&linkId=457c254cedf5b7bdb217befb816c8eb2&language=en_US&ref_=as_li_ss_tl) $6.99 - my simple cheap option
I'd like to suggest thermostat with Heating and Cooling Controller. I also use it for cooling box (for fruiting chamber) during hot summer season.
[STC-1000 AC 110V Temperature Heating/Cooling Controller](https://www.amazon.com/STC-1000-AC-110V-Temperature-Controller/dp/B07Y7LSPDT?&linkCode=ll1&tag=shroomok-zm-20&linkId=b83e0c24fbd9767f521978dd3a7954a3&language=en_US&ref_=as_li_ss_tl) $19.56 - for those who can connect 2 wires together, it seems the best option
[MH1210W Digital Temperature Thermostat Regulator Controller 90-250V 10A 220V](https://www.amazon.com/MH1210W-Temperature-Thermostat-Regulator-Controller/dp/B07K8T2FTS?&linkCode=ll1&tag=shroomok-zm-20&linkId=630279976cf8dfa237d6f5ecb0d08d46&language=en_US&ref_=as_li_ss_tl) $11.53 - great cheap option for incubator
[Inkbird ITC-308 Digital Thermostat for any DIY projects](https://www.amazon.com/dp/B01HXM5UAC?&linkCode=ll1&tag=shroomok-zm-20&linkId=3a6defbc9734f1a9c41aa28b6cb4a18f&language=en_US&ref_=as_li_ss_tl) $35.00 - more expensive, with plug
2️⃣ **Power Adapter 12V, 10A**
[](https://shroomok.com/en/wiki/File:AC_DC_adapter.jpg) Power adapter 12V 10A for mushroom incubator[AC 110V/220V to DC 12V 10A 120W Power Supply Transformer Switch](https://www.amazon.com/Transformer-MKASYON-Switching-Converter-Security/dp/B07GFJVHRH?&linkCode=ll1&tag=shroomok-zm-20&linkId=92cc44e9f09b8bbc892938a5ed610efe&language=en_US&ref_=as_li_ss_tl) $16.99 - my adapter
[60W Power Adapter, 12V 5A, 120V AC to 12V DC Transformer](https://www.amazon.com/Power-Supply-Lights-Adapter-Transformer/dp/B07GFFG1BQ?&linkCode=ll1&tag=shroomok-zm-20&linkId=7883bc0f4a1c0069b9bfff4ab54a791f&language=en_US&ref_=as_li_ss_tl) $9.59 - cheap option
[AC 100-240V to DC 12V 10A Power Supply Adapter](https://www.amazon.com/Alarmpore-100-240V-Adapter-Converter-Charger/dp/B01JL0UJEQ?&linkCode=ll1&tag=shroomok-zm-20&linkId=8d646cda9cd05e2b146e95bc199aba4f&language=en_US&ref_=as_li_ss_tl) $18.99
3️⃣ **Infrared Heated Film** or **Infrared Heating Mat**
[](https://shroomok.com/en/wiki/File:Heating-film-for-mushroom-incubation-chamber.jpg) Infrared heating film for incubatorI used Infrared Heated Film 12V, 50-66W per 1m. Can't find the exact one on Amazon, but these options from previous paragraph are also great:
[Heating Pad Mat, manual temperature regulator, 25W, 220x420mm](https://www.amazon.com/Temperature-Controller-Incubator-Terrarium-Hydroponic/dp/B07K9R627G?th=1&linkCode=ll1&tag=shroomok-zm-20&linkId=3805cde8a6c9eb393ba716963d8f4d96&language=en_US&ref_=as_li_ss_tl) $10.99
[Heating Pad, manual temperature regulator, 25W, 220x420mm](https://www.amazon.com/Reptile-Heating-Terrarium-Temperature-Chameleon/dp/B07Y4Z8W43?&linkCode=ll1&tag=shroomok-zm-20&linkId=02afd2046b27208faec27eae79d13764&language=en_US&ref_=as_li_ss_tl) $13.99
[Advanced Infrared Heat Mat, w/o temperature regulator, 22W, 274x410mm](https://www.amazon.com/Komodo-Advanced-Heat-Mat-22w/dp/B00B99PGS2?&linkCode=ll1&tag=shroomok-zm-20&linkId=8b866ec76b03400a67c053f22b4c2900&language=en_US&ref_=as_li_ss_tl) $31.57
[Professional Heated Film Technology, w/o temperature regulator, 280x1524mm](https://www.amazon.com/Propagation-Seedling-Technology-Germination-Beautiful/dp/B06Y19H2LC?&linkCode=ll1&tag=shroomok-zm-20&linkId=0ebdd2414a4079df1b68792dc3068a47&language=en_US&ref_=as_li_ss_tl) $49.95 - this one close to my film I use
4️⃣ **Quiet PC Fan.** Any simple cheap quiet fan 90-120 mm is okay!
[](https://shroomok.com/en/wiki/File:PC-fan-for-incubator.jpg) PC fan for DIY incubator[Silent Fan 120mm](https://www.amazon.com/Kingwin-CF-012LB-Efficient-Excellent-Ventilation/dp/B002YFP8BK?&linkCode=ll1&tag=shroomok-zm-20&linkId=cac6087971051d51ce81c2545d14bb08&language=en_US&ref_=as_li_ss_tl) $6.69 - my fan
[Quiet Fan 120 mm, with power plug cord](https://www.amazon.com/gp/product/B009OWVUJ0?&linkCode=ll1&tag=shroomok-zm-20&linkId=e64e20d6f61b8d3e56bea84b8116f66d&language=en_US&ref_=as_li_ss_tl)- $19.99 - more expensive, with plug
5️⃣ **Wire Cable** (1.5 sqmm = 16 awg = 30/0.25). You need wires to connect all gadgets
[](https://shroomok.com/en/wiki/File:Wires.jpg) Wire cable[Stranded Copper Wire 16 AWG 10 ft](https://www.amazon.com/BNTECHGO-Silicone-Flexible-Strands-Stranded/dp/B00TG1TRL2?th=1&linkCode=ll1&tag=shroomok-zm-20&linkId=5fb39562f2e128c5f6ca9bc4478a9758&language=en_US&ref_=as_li_ss_tl) $7.98
6️⃣ **Cable Ties** - optional, for convenience
[Zip Cable Ties](https://www.amazon.com/Pounds-Tensile-Strength-Self-Locking-Outdoor/dp/B0B2RBYB3Y?&linkCode=ll1&tag=shroomok-zm-20&linkId=6d56a6e06f03cf2eda520241681bd7eb&language=en_US&ref_=as_li_ss_tl) $2.99
##### Important notes to this set up
🔴 The W1209 temperature controller has 20A. In fact you can give up to 5-7A, otherwise dangerous heating
🔴 Check out the power and voltage of the Infrared Film Heating. It comes in 12, 24, 220V and can vary in wattage per meter
🔴 Just with a thermal controller the power of the film should not exceed 70W. If you need more, you can do it, but you will need to put an additional relay with more power (the controller will turn on the relay with more power, and it will turn on the film)
🔴 The power adapter should be with some reserve. If you have 60-70 watt film it is better to find a power adapter for 100W and more
#### How to assemble Incubator for mushroom cultivation
First of all you need to make a box for incubator (or use a cabinet, or cardboard box, or wooden box) and cover it with Polystyrene Styrofoam panels inside, this material help to retain heat inside the box.
Here you can see my 2 incubators
[](https://shroomok.com/en/wiki/File:How-to-make-automatic-incubation-chamber-for-mycology.png) Incubation chamber for mushroom growing (2 styrofoam boxes)> ✅ Styrofoam is a good insulator and quite strong material! 🔥 Keep in mind it is flammable, be careful!
1️⃣ My top incubator stands on the table as a shelf. 3 walls of my incubator are made with [Styrofoam panels](https://www.amazon.com/STYROFOAM-99106444-Project-Panels-Pack/dp/B07FPL3LBB?&linkCode=ll1&tag=shroomok-zm-20&linkId=605ae8b1205d1893962f56755841e36b&language=en_US&ref_=as_li_ss_tl). I had big panels 125x60x2 cm or 48x24x1 inch. So one sheet of styrofoam was enough for my incubator
The final size of the box for incubator is 60\*70\*40 cm or 24\*28\*16 inch
[](https://shroomok.com/en/wiki/File:Diy-automatic-mycology-incubator.png) Incubator for mushroom growing made with styrofoam sheets
You can use any sizes according to your needs, use pieces of styrofoam, cut the sheet, make a separate box of any size or buy ready styrofoam box
[](https://shroomok.com/en/wiki/File:Styrofoam-box-as-incubation-chamber-for-mushrooms.jpg) Styrofoam incubator for mushroom growing with heating pad inside and Temperature Controller> Light inside isn't necessary for colonization period, I add it just for my convenience. Sometimes I place fruiting chambers inside this box ([Bottle-tek](https://shroomok.com/en/wiki/Bottle-tek_or_how_to_grow_mushrooms_in_plastic_bottles "Bottle-tek or how to grow mushrooms in plastic bottles"), [Growbox](https://shroomok.com/en/wiki/DIY_Grow_Box_for_Magic_mushrooms._Fruiting_conditions "DIY Grow Box for Magic mushrooms. Fruiting conditions")) for spawn run
2️⃣ Heated element placed on the left wall and goes to the back wall. I use Infrared Heated Film (12V, 50-66W per 1m). You can use Heat Pad Mat or [Heated Film](https://www.amazon.com/Propagation-Seedling-Technology-Germination-Beautiful/dp/B06Y19H2LC?&linkCode=ll1&tag=shroomok-zm-20&linkId=0ebdd2414a4079df1b68792dc3068a47&language=en_US&ref_=as_li_ss_tl) as well. Use adhesive tape to stick it to the wall of the incubator
[](https://shroomok.com/en/wiki/File:Guide-incubation-chamber-for-mycology.png) Heating Film placed on the left wall inside the incubation chamber> ❌ Don't use heat mat on the floor of the incubator! Your jars/bags with substrate shouldn't contact with heating element directly, because you can overheat mycelium or trigger bacteria contamination
> ❌ Don't use heat mat on the ceiling of the incubator! This will make heating almost useless
3️⃣ My [Thermostat](https://www.amazon.com/AEDIKO-Temperature-Controller-Thermostat-Electronic/dp/B09STPQF7J?&linkCode=ll1&tag=shroomok-zm-20&linkId=457c254cedf5b7bdb217befb816c8eb2&language=en_US&ref_=as_li_ss_tl) for automated temperature control placed outside of the incubation chamber and connected with [Heating Film](https://www.amazon.com/Propagation-Seedling-Technology-Germination-Beautiful/dp/B06Y19H2LC?&linkCode=ll1&tag=shroomok-zm-20&linkId=0ebdd2414a4079df1b68792dc3068a47&language=en_US&ref_=as_li_ss_tl). Power goes down, the wires for the heater and the temperature controller are put inside
[](https://shroomok.com/en/wiki/File:Thermobox-for-mushroom-growing.png) Temperature controller board outside the box. Power goes down, the wires for heater and temperature sensor are insideYou can use low power heating pad without a thermocontroller, with a simple analog regulator, but it is highly NOT recommended. You can easily overheat your environment if you set it wrong or if external conditions change
> 🔴 Temperature can be adjusted manually. Just set the needed temperature and thermostat will turn on/off when it is necessary to maintain required temperature. I usually set about +25-27°C or 77-80°F for spawn colonization period. Thermostat turn ON the Heat Mat, when temperature drop down to 77°F or +25°C and turn OFF, when temperature is 27°C or 80°F. So that you always have stable temperature within 77-80°F or +25-27°C
4️⃣ I also connected a [PC fan](https://www.amazon.com/Kingwin-CF-012LB-Efficient-Excellent-Ventilation/dp/B002YFP8BK?&linkCode=ll1&tag=shroomok-zm-20&linkId=cac6087971051d51ce81c2545d14bb08&language=en_US&ref_=as_li_ss_tl). It turns on/off with the heating element
[](https://shroomok.com/en/wiki/File:Fan-in-incubation-chamber.png) Fan in incubation chamber for uniform temperature> 🔴 **Why I use fan?** With fan we have uniform temperature everywhere in the box. It helps to spread warm air from heat mat evenly in the box. Without fan temperature always will be higher near heat mat and lower on the opposite side. This influences the colonization process greatly!
>
> 🔴 On other side Fan can be a bad thing if you catch contamination. It helps to spread mold spores in the air
5️⃣ The front wall or door of my incubator made with [Clear PET Plastic Sheets](https://www.amazon.com/Flexible-Plexi-Glass-Protective-Langdon-House/dp/B093PPZR7X?&linkCode=ll1&tag=shroomok-zm-20&linkId=b7c028dc8d265114ab2fe608d6eb0ed4&language=en_US&ref_=as_li_ss_tl) (or thick PET film). You can use [styrofoam panels](https://www.amazon.com/STYROFOAM-99106444-Project-Panels-Pack/dp/B07FPL3LBB?&linkCode=ll1&tag=shroomok-zm-20&linkId=605ae8b1205d1893962f56755841e36b&language=en_US&ref_=as_li_ss_tl) here as well
[](https://shroomok.com/en/wiki/File:How-to-build-automatic-incubator-for-mushroom-cultivation.png) Film or Plastic sheet "door" in incubation chamber> 🔴 Film-door fixed on top with double-sided adhesive tape
6️⃣ Incubation Chamber for mushroom cultivation is ready and loaded with spawn jars and bags. There are grow bags with shiitake and spawn jars with actives
[](https://shroomok.com/en/wiki/File:Incubator-incubation-chamber-for-mushroom-growing.png) Incubation chamber loaded with spawn jars and grow bags#### Incubator modifications for mushroom growing
🔵 The most simple incubator: any cardboard box, bubble wrap inside to retain heat, [Shoe Heater](https://www.amazon.com/gp/product/B01M5IXYXP?ie=UTF8&linkCode=ll1&tag=shroomok-20&linkId=5079a846718eb8e933d817e2c7db9098&language=en_US&ref_=as_li_ss_tl) and Thermometer. Thermostat can be added
[](https://shroomok.com/en/wiki/File:Incubator-for-growing-psilocybe-cubensis.jpg) Simple and cheap incubator for mushroom growing
🔵 Styrofoam incubator, Heat Mat on the side
[](https://shroomok.com/en/wiki/File:Incubator-for-mushrooms-with-heat-mat.jpg) Styrofoam incubator with heat mat on the wallThermostat outside the box
[](https://shroomok.com/en/wiki/File:Styrofoam-box-as-incubation-chamber-for-mushrooms.jpg) Styrofoam Incubator with Thermostat> 🔴 Details about all these cheap modifications: [Simple Incubator for mushrooms and Colonization period](https://shroomok.com/en/wiki/Magic_mushrooms_incubator_control "Magic mushrooms incubator control")
Enjoy your home mycology and have a happy growing!
This guide made with love by **mrzimm** - Tech Guru of Shroomok Growers Community in [Discord](https://discord.gg/ngKhQDmymD)
Promoted by ©Shroomok
## How I built my first laminar flow hood for home mycology
[How I built my first laminar flow hood for home mycology](https://shroomok.com/en/wiki/How_I_built_my_first_laminar_flow_hood_for_home_mycology)
[](https://shroomok.com/en/wiki/File:Laminar-flow-hood-cheap-simple-diy-guide.jpg) Complete guide on DIY laminar flow hood for mushroom growing at home### Cheap and simple DIY Laminar Flow Hood setup for mushroom growing at home
Hey Shroomers!
I am @PsychonautJim, member of Shroomok Growers Community on Discord.
I grew mushrooms for a short time nearly 20 years ago. I had a good experience back then with great flushes. After recently listening to a podcast featuring Paul Stamets, I went down a rabbit hole of information about all the positive benefits of microdosing.
This reinvigorated my interest in growing mushrooms and I was also reminded of how much fun mycology is. I almost have as much fun growing mushrooms as I do eating them!
I promised Shroomok to share my experience and details on how I built my very first laminar flow hood for my amateur mycology hobby. Now I finally have a pleasure to fulfil my promise.
Let's get started!
#### What is laminar flow hood
> **Laminar flow hood** — a fan-powered HEPA-filtered device that produces a laminar flow of air that moves across the workspace allowing for open sterile work without the hassle and inconvenience of a [still air box (SAB)](https://shroomok.com/en/wiki/Still_Air_Box_for_Mycology "Still Air Box for Mycology") or glove box. The air input goes through the HEPA filter and particles less that 0.3 microns in size are filtered out and the sterile air is pushed across the work plane. Flow hood is usually used for manipulations, that require high sterility level: inoculation, working with agar, transfers etc. [Mushroom cultivation glossary](https://shroomok.com/en/wiki/Mycology_Glossary_and_common_Mushroom_Growing_Abbreviations)
#### Why I decided to make a laminar flow hood
I wanted to use a flow hood as opposed to a [still air box (SAB)](https://shroomok.com/en/wiki/Still_Air_Box_for_Mycology "Still Air Box for Mycology") or glove box, because of how cumbersome dealing within the confines of a SAB can be.
On the other hand, I’m building my tek on a budget and have space constraints to consider; and typically flow hoods are expensive and bulky.
So, I began a search to MacGyver my way to a sterile environment.
#### List of stuff for DIY laminar flow hood
My total costs for current setup: $99.86\*
> \*Prices listed are at time of purchase. Current prices may vary
🔶 1. Lasko FF305 Air Flex 2-in-1, 20-inch Box Fan and Air Purifier in one with MERV10 Air Purifying Filter for Cleaner Air and a Cooling Breeze ($59.99). I bought it on Amazon:
[Air Flex 20” Box Fan and Air Purifier in One](https://amzn.to/3Hzqljt) $69.99
[](https://shroomok.com/en/wiki/File:Fan-air-purifier-for-laminar-flow-hood.jpg) Fan with air purifier for DIY laminar flow hood
🔶 2. L brackets with screws. I bought on Amazon ($8.99):
[L Brackets 5" x 3" with screws, 4 Pack](https://amzn.to/3Y1jcPl) $8.89
[](https://shroomok.com/en/wiki/File:How-to-assemble-laminar-flow-hood.jpg)
🔶 3. Two air filters Filtrete 20x20x1, MPR 1500 filtration level. I bought them for $30.88 in Walmart, also available on amazon
[Filtrete 20x20x1, MPR **1500 filtration level**, 2 Filters](https://amzn.to/3HCpNKx) $35.62
[Filtrete 20x20x1, MPR **1900 filtration level**, 2 Filters](https://amzn.to/3jj8pkG) $45.94
[](https://shroomok.com/en/wiki/File:Cheap-diy-laminar-flow-hood-for-mushroom-growing-at-home.jpg)
🔶 4. Some additional tools for assembling components: drill and marker
[Drill Set Bundle with Ryobi 18V ONE+ Drill Driver](https://amzn.to/3XWRtzG)
[](https://shroomok.com/en/wiki/File:Diy-flow-hood-for-mushroom-growing.jpg) Prepare all tools and components for setupThat's it, we are ready for assembling!
#### How to assemble laminar flow hood
⚙️ 1. Prepare all required components are listed above (fan, filters, L brackets, screws) and some additional tools for setup (drill, marker)
⚙️ 2. Lay the fan flat and place the filter on top to get right measurements for the L Bracket placement. Mark the holes to drill with a marker
[](https://shroomok.com/en/wiki/File:Laminar-flow-hood-guide.jpg) Mark the holes to drill with a marker⚙️ 3. Drill holes. Ensure to use a drill bit size that fits with the screws being used to attach the L Brackets
[](https://shroomok.com/en/wiki/File:Simple-diy-laminar-flow-hood-step-by-step-guide.jpg) Drill holes in a fan frame⚙️ 4. Attach the L Brackets using the screws
[](https://shroomok.com/en/wiki/File:Make-your-own-laminar-flow-hood-for-mushroom-growing-at-home.jpg) Attach the L brackets⚙️ 5. Ideally have one L Bracket on each side toward the top facing inward, along with two evenly spaced L Brackets on the bottom facing upward (4 pieces in total)
[](https://shroomok.com/en/wiki/File:Simple-laminar-flow-hood-for-home-mycology.jpg) Attach L bracket on each side
⚙️ 6. Now you have additional slot for air filter
[](https://shroomok.com/en/wiki/File:DIY-laminar-flow-hood-for-mushroom-growing.jpg) Four L brackets on each side create a slot for air filter⚙️ 7. Slide the filter on the backside in the pre-made filter slot
[](https://shroomok.com/en/wiki/File:Filters-for-diy-laminar-flow-hood.jpg) Slide the filter on the backside in the pre-made filter slot⚙️ 8. Slide another one in the slot you’ve created as well
[](https://shroomok.com/en/wiki/File:Diy-simple-laminar-flow-hood-for-mushroom-growing-at-home.jpg) Slide the filter in the slot you’ve created> ❗️Ensure you face the filters the correct direction!
⚙️ 9. Turn fan on and kill stop contaminant monsters! Now you are ready for your mycological journey 😉
[](https://shroomok.com/en/wiki/File:Laminar-flow-hood-for-hobby-mycology.jpg) My DIY laminar flow hood in action#### How my laminar flow hood works
The idea is that doubling down by using two air filters with a high Microparticle Performance Rating (MPR) we will closely mimic the mechanisms of a flow hood. Basically, by working in front of the fan we ought to be blowing away unwanted particulates and spores, thus creating a more sterile work environment free of contamination.
[](https://shroomok.com/en/wiki/File:Laminar-flow-hood-in-action.jpg) My laminar flow hood in action. How I use it for inoculation, working with agar, transfer> Here I forgot about the stand to raise my petri dishes a little bit higher from the table, in front of laminar flow
#### Pros and cons for this setup
**Pros:**
👍 Low cost
👍 Easy assembly
👍 Easy storage, compact, mobile
👍 Open air sterile work, more convenient than SAB or glove box
👍 Has successfully worked in my testing
**Cons:**
🔴 Potentially not as effective as a professional and more expensive setup for laminar flow hood. Although it works great for my home mycology
#### **Possible upgrades for this flow hood setup**
Maybe I'd like to add another unit to direct clean air from two different angles
#### Write it up!
Hope my experience will be helpful and this simple device bring more opportunities for your mycological experiments.
Feel free to ask any questions regarding my flow hood in comments to this post or in [🔧diy-growing-set-up](https://discord.com/channels/868489864310566913/969492581748707359) channel on [Shroomok Discord](https://discord.gg/ngKhQDmymD)
Enjoy your home mycology and have a happy growing!
Made with love by @PsychonautJim 🍄
Promoted by ©Shroomok
## Cooling and heating for mushroom growing with Peltier module
[Cooling and heating for mushroom growing with Peltier module](https://shroomok.com/en/wiki/Cooling_and_heating_for_mushroom_growing_with_Peltier_module)
[](https://shroomok.com/en/wiki/File:DIY-peltier-cooling-heating-for-mushroom-growing.jpg)
DIY cooling or heating for mushroom growing based on Peltier element
### **DIY thermoelectric cooler or heater for mushroom fruiting chamber based on Peltier element**
When it is getting warmer, temperature of fruiting chamber (monotub, growbox, shoebox etc) is getting harder to control. How to maintain proper temperature for mushroom fruiting period? One of the solutions is cooling/heating based on the Peltier module. I had all the components in my garage and decided to play with this DIY project.
#### What is Peltier technology
Due to wikipedia [Thermoelectric cooling with using the Peltier effect](https://en.wikipedia.org/wiki/Thermoelectric_cooling)
> Thermoelectric cooling uses the Peltier effect to create a heat flux at the junction of two different types of materials. A Peltier cooler, heater, or thermoelectric heat pump is a solid-state active heat pump which transfers heat from one side of the device to the other, with consumption of electrical energy, depending on the direction of the current
Briefly the main idea is following. Peltier element can create a temperature difference on their sides if electric current flows through it. The element cools on the one side and heats on the other side (current converter to heat + transferred heat).
[](https://shroomok.com/en/wiki/File:Cooling-heating-process-flow-diagram.jpg)
Scheme 1. Cooling/heating process flow diagram based on Peltier element
This allows to create a compact cooling system almost without mechanical parts. It is often used for very small fridges such as portable car fridges.
Peltier is effective only for small-scale projects where you have compact box (up to 100L or 100Qt) to cool/heat and don't need high temperature difference (10-15°C difference). For instance, if your room temperature about 30-35°C or 85-95°F, then you can cool down your fruiting chamber up to 20-25°C or 68-77°F, that would be great for some mushroom species. The same system works for heating as well (i.g. for incubation chamber), we'll discuss it later as well.
##### Advantages
🟢 no mechanical parts, easy to use and set up, compact and mobile, totally quite system
##### **Disadvantages**
🔴 relatively low coefficient of heat transfer in comparison to high efficient compressor coolers, it becomes even lower when temperature difference rises
🔴 requires very good cooling of the hot side, otherwise you gonna lose in cooling capacity
#### How to make cooling or heating with Peltier element
Let me show you my setup. In the next section I'll show the list of components I use and possible alternatives.
> In fact, we are going to make Mini Fridge for mushroom growing that also can work as Incubation Box (heat box)
**Step 1.** I assembled prototype configuration from the basic items I already had at home (without housing and special mount)
[](https://shroomok.com/en/wiki/File:Peltier-elements-for-monotube-growbox.png)
Test version from scratch. Peltier element for cooling monotub or growbox
I just repeated the *Scheme 1* and connected all components
[](https://shroomok.com/en/wiki/File:Peltier-mvp-setup.jpg)
Basic Peltier setup. Test version from scratch. Peltier element for cooling monotub or growbox
**Step 2.** I put the cooling circuit on the lid of my fruiting chamber. The plastic tub was covered with foam thermal insulation (penofol) from the sides and on the top to retain temperature
> Penofol is a two-layer heat-insulating building material that can be made from one or 2 layers of foil deposited on a base layer of polyethylene foam
[](https://shroomok.com/en/wiki/File:Copper%E2%80%93water-loop-heat-pipes-for-cooling-monotube-growbox-for-mushrooms.png)
Copper water loop heat pipes for cooling monotub or growbox
All other components I put on a shelf next to it. Looks strange, but don't worry, I'll show you each component for this setup in detail
[](https://shroomok.com/en/wiki/File:Thermoelectric-cooler-for-mushroom-cultivation.png)
DIY thermoelectric cooler system
I tested this system and it was able to lower the temperature by 5°C. Not bad, but I'd like to get bigger difference!
I decided to make more effective cooling box and build a styrofoam box with lid (wall thickness = 10 mm or ~1/2 inch). Put a cooling circuit in it along the perimeter of the box
[](https://shroomok.com/en/wiki/File:Polystyrene-foam-box-with-copper-cooling-circuit.png)
Cooling solutions for mushroom cultivation at home. Polystyrene foam (styrofoam) box with copper cooling circuit inside it
Ready styrofoam box with lid
[](https://shroomok.com/en/wiki/File:Polystyrene-foam-box-with-lid-and-copper-cooling-circuit.png)
Thermoelectrically cooled foam box with lid for mushroom cultivation at home
Radiator and all other components are placed on a shelf I made on the side of the cooling box
[](https://shroomok.com/en/wiki/File:Radiator-peltier-components.png)
Radiator and all other components are placed on a shelf from the side of the box
Cold (internal circuit) pipes are covered with pipe insulation to reduce cold loss
[](https://shroomok.com/en/wiki/File:Pipes-of-the-cold-circuit-covered-with-insulation.png)
Thermoelectrically cooled mushroom fruiting chamber. Insulated pipes of the cold circuit
My plastic tub fits inside the styrofoam box
[](https://shroomok.com/en/wiki/File:Monotube-growbox-inside-cooling-box.png)
Mushroom growbox or monotube inside DIY cooling box
Here are my mushroom cakes for testing. I put long flower pot next to it for my spawn jars/bags
[](https://shroomok.com/en/wiki/File:Growbox-monotube-with-mushroom-cakes-inside-cooling-box.png)
Growbox or monotube with mushroom cakes inside DIY cooling box
#### How it works
The room temperature and temperature inside the fruiting chamber without cooling was 30°C (86°F). The system cooled the styrofoam box from 30°C to 21.5°C (from 86°F to 71°F). The temperature inside the plastic box with mushroom cakes was 22°C or 72°F
[](https://shroomok.com/en/wiki/File:Cooling-growbox-test.png)
Cooling growbox test
At this point, the temperature decreasing almost stopped. I run several tests. As a result, the maximum temperature difference was up to 10°C, i.e. from 30°C to 20°C (86°F to 68°F) After switching off the cooling system, the temperature rise by 2°C in an hour.
This setup is the most efficient, but costs a lot. I made it mostly because I already had most of the components.
With such setup it is possible to achieve a temperature decrease in the fruiting chamber by 10°C.
> 💡 This setup works for both **heating and cooling**. If you **change the polarity** on the element, then the system will **heat the box** and **cool the external radiator**. It means you can arrange winter and summer cultivation for any mushroom species. If you add a couple of switching relays, an arduino, a BME280 sensor and a display, you can automate this setup and maintain stable temperature within 1-2°
I haven't tested heating, but heating is more efficient and I assume it is possible to have temperature difference about 15-20°, i.e. if your room temperature 10-15°C or 50-60°F you can use this box as an incubator and maintain temperature 25-30°C or 77-85°F.
#### List of components for Peltier setup from scratch
Here is the list of components I used for my setup described in this guide. Most of these items I already had from my PC cooling and other DIY projects, so it was cheap and for fun. If you have nothing from the listed below it could be costly.
[](https://shroomok.com/en/wiki/File:Peltier-setup.jpg)
Components for DIY cooling
Elements and numbers on the picture match the list numbers below ⬇️
🔷 **1.** **Peltier element module** ([Amazon](https://amzn.to/3JKTGbI) $11.00)
[](https://shroomok.com/en/wiki/File:Peltier-element-module.jpg)
Peltier element module TEC-12710
I tried to use different power modules: 50w (TEC-12706), 100w (TEC-12710) and 200w (2xTEC-12710). The optimal was 100w TEC-12710, 12V, 10A, 40x40 mm.
At this power level is possible to achieve good performance (up to 20°C difference) with moderate power consumption (approximately 120w in total).
You can use smaller elements to achieve the same power level. 2 x TEC-12706 elements produce the same amount of heat transfer in parallel.
🔷 **2.** **Water cooling blocks - 2 pcs.** ([Amazon](https://amzn.to/3LO2gc7) $8.99)
[](https://shroomok.com/en/wiki/File:Water-block.jpg)
Aluminum Water Cooling Blocks
Place the Peltier element between 2 water blocks. The first water block we use to cool the Peltier element (its hot side). The second one to cool the cooling circuit, thus cool down your fruiting chamber.
As a result you have a sandwich: water block -> Peltier element -> water block
> ❗️There is a milled side and a U-shaped side on water blocks. Better to put Peltier module on the **milled side**
If you use 2 x TEC-127**06** Peltier elements in parallel you need 80\*40mm water blocks ([Amazon](https://amzn.to/3K5wHIC))
🔷 **3.** **Power adapter** ([Amazon](https://amzn.to/40eYtZB) $18.99)
[Power Adapter (12V/15A)](https://amzn.to/40io6ZG) $29.80 - this one allows you to connect 2 Peltier modules.
[](https://shroomok.com/en/wiki/File:Power-adapter.jpg)
Power adapter for DIY projects
Choose adapter with some margin, 150-180W (around 12V, 15A). Great if you already have it from your other DIY projects. For example, I use it for my [DIY incubation chamber](https://shroomok.com/en/wiki/How_to_build_automatic_incubation_chamber_for_mushrooms) as well. If you have PC power adapter use it.
Actually use any other adapter that can give out 12V and at least 12+A. In my case, there is a server power adapter I've got as gift from my friend - 12V and 70A, such adapter is costly and too much for such project.
Or use ready Peltier Kit with power adapter 2-in-1 ([Amazon](https://amzn.to/3LS4rLT) $41.09).
And one more option of Peltier Kit like this ([Amazon](https://amzn.to/3JRB21S) $31.36).
🔷 **4.** **Water Pumps 12V - 2 pcs.** ([Amazon](https://amzn.to/408W5U2) $16.99)
[](https://shroomok.com/en/wiki/File:Water-pump.jpg)
Water Pump DC 12V
Fluid in both circuits is pumped by cheap 12V water pumps. More than enough for good circulation.
🔷 **5.** **Water Tanks - 2 pcs.** ([Amazon](https://amzn.to/3LnWNst) 2x$12.99)
[](https://shroomok.com/en/wiki/File:Water-tank.jpg)
Water tank
It is optional, but highly recommended to add buffer water tanks to both circuits. They help to fill the circuits with water (for hot side) and antifreeze (for cooling circuit). Moreover trapped air in pipes will stay in them.
You can proceed without water tanks. Put a tee in the line and fill through it, but it's so awkward.
Water pump should take liquid directly from lower port of the tank, otherwise it will be hard or impossible to fill the system and get it out.
🔷 **6.** **Cooling radiator** ([Amazon](https://amzn.to/40xiOcE) $21.79)
[](https://shroomok.com/en/wiki/File:Radiator.jpg)
Cooling radiator
I use 3-sections radiator for 120 mm fans, 1-2 sections also okay. As an alternative option you can use the heater auto radiator (not clogged of course!)
When choosing a radiator pay attention that some of them have built-in outlets and some have threaded holes for fitting that are purchased separately. Don't forget to buy fittings for the radiator if you choose one with threads
> ❗️It is recommended to use **aluminum radiator** with **aluminum water blocks**. Mixing aluminum and copper heat exchangers lead to faster corrosion since copper and aluminum create a galvanic pair
🔷 **7.** **120 mm** **PC fans for radiator** ([Amazon](https://amzn.to/40aMnR1) $10.99)
[](https://shroomok.com/en/wiki/File:Fan-for-incubation-chamber-for-mushroom-growing.jpg)
PC fan
I use the cheapest. You can use any fans you can connect to the radiator.
🔷 **8.** **Silicone Pipes** ([Amazon](https://amzn.to/3FREZSN) $16.99)
[](https://shroomok.com/en/wiki/File:Vinyl-silicone-pipes.jpg)
Silicone pipes
I used silicone pipes and cover them in foam insulation ([Amazon](https://amzn.to/3ljd1IO) $22.99) to keep them cool (outside the box).
Inner diameter of the pipe 8-10 mm, outside diameter doesn't matter. The length about 10-15ft or 3-5m in total.
🔷 **9.** **Antifreeze** ([Amazon](https://amzn.to/3JobZmz) $14.53)
It is recommended to fill the **cold circuit** with red antifreeze instead of water. You can buy it in any auto store or gas station.
If the heat load for some reason will be low (for example wrapped the cold circuit in thermal insulation or a blanket) or it will be cold enough outside, then the system can lower the temperature below 0°C and water freeze. Red antifreeze can drop to -40°C and no problem.
Note that you should use antifreeze on hot side too if you are going to use the system in reverse (as a heater).
🔷 **10. LC filter (optional)**
[](https://shroomok.com/en/wiki/File:LC-filter.jpg)
LC filter
It's optional and to be honest I'm not sure if there is huge difference for such setup.
This component can extend the life of the Peltier element. It's difficult to find LC filter for such a current. In my setup you can see DIY LC filter. I wound 5 turns of thick wire + 2 capacitors on a ferrite core.
🔷 **11. Cooling circuit** ([Amazon](https://amzn.to/3zxfp2d) $65.00)
As you can see I used cooper pipes for this purpose.
[](https://shroomok.com/en/wiki/File:Polystyrene-foam-box-with-copper-cooling-circuit.png)
Copper cooling circuit inside styrofoam box
A long silicone pipe can be a cheap alternative to expensive copper pipe. However a silicone hose doesn't transfer heat as good as copper. Moreover it's flexible, hard to layout it, hence it can block the water flow if it is bent in the corners. Therefore not recommended.
The best cheap and simple alternative is using a cooling radiator as for hot side, but smaller (the size for 1 fan). This would be enough to transfer heat efficiently.
🔷 **12. Styrofoam shipping box** or **Foam insulation** ([Amazon](https://amzn.to/3FVPvbN)) or use **Insulated Bag** ([Amazon](https://amzn.to/40DfIUj)) or any type of cooler you have on hand
[](https://shroomok.com/en/wiki/File:Polystyrene-foam-box-with-lid-and-copper-cooling-circuit.png)
Thermoelectrically cooled foam box with lid for mushroom cultivation at home
This box/insulation helps to retain the temperature, reduce temperature lose, and make your system more efficient.
> ❗️Your box should be somehow insulated in any way. Otherwise it won't be able to give you any significant cooling effect.
🔷 **13. Temperature Controller** **aka Thermostat** ([Amazon](https://amzn.to/3K644Mw) $28.00)
[](https://shroomok.com/en/wiki/File:Thermostat-for-mushroom-incubator.jpg)
Temperature controller aka thermostat
Optional, but it helps to maintain stable temperature inside the box and turn on/off the system when needed. It is used for other DIY projects for mushroom growing as well (incubation box, fruiting chamber, grow tent).
I'd recommend some cheaper options:
SЕС-1000 ([Amazon](https://amzn.to/3M5zOCP) $9.17) - it works for both cooling and heating, set what you need.
STC-3028 ([Amazon](https://amzn.to/3JYgeG3) $13.82) - this one works as Temperature + Humidity Controller, so you can use it for different types of DIY projects for mushroom growing.
🔷 **Wiring and additional tools**
How to plug everything? It seems a bit scary with all these wires. In fact the whole system connects to the thermostat.
Maybe you'll need some brass fittings to connect pipes, tees, screwdriver, additional electrical wires and stuff like that.
#### Useful notes
⛔️ Don't overload Peltier element, the efficiency drops dramatically.
⛔️ Using PWM regulators is not recommended, pulses reduces element lifetime.
⛔️ Don't turn on the circuit element for more than 1-2 seconds without a radiator, high heat can destroy the Peltier element.
#### Upgrades for cooling box
Peltier is not the most efficient way for cooling/heating, however it's simple and good enough for small projects.
I'm working on another system based on water cooler with compressor. Such setup is more efficient. You use 1 liquid loop for the hot side (water as coolant) and cool radiator connected directly to the element.
The cheapest way is radiators on both sides.
One more option is ready-made modules with radiators on sale.
Note that you need quite **big radiator on the hot side** to achieve reasonable cooling capacity.
As soon as it's ready I'll share a detailed post. Stay tuned!
Made with love by **@mrzimm** - writer and Tech Guru of Shroomok Community.
Promoted by ©Shroomok
If you find this guide helpful, please support with donation on [buymeacooffee](https://www.buymeacoffee.com/shroomok)
## Still Air Box for Mycology
[Still Air Box for Mycology](https://shroomok.com/en/wiki/Still_Air_Box_for_Mycology)
[](https://shroomok.com/en/wiki/File:Still-air-box-for-mycology-SAB-guide.jpg) Still Air Box step by step guide### Still Air Box Guide: why and how
Still Air Box (SAB) is an easy DIY solution for maintaining a high level of sterility in mycological procedures. Building one takes approximately 15 minutes and costs around $15. I suggest using this setup as a cheap alternative to a Laminar Flow Hood or Fan Filter Unit, especially for the first attempts in mycology. However, experienced mushroom cultivators use SAB as well.
#### What is a still air box
Still Air Box (SAB) is a transparent plastic box with limited airflow. It is used in mycology projects, such as working with syringes, grain jars/bags, and agar. The SAB is designed with armholes for accessing and manipulating the materials inside.
[](https://shroomok.com/en/wiki/File:Still-air-box-SAB-guide.jpg) Still Air Box GuideWhile the setup is **not** 100% sterile, it helps to reduce the concentration of contaminants that can be found in the air, such as mold spores, bacteria, and viruses. Although not flawless, a sterile SAB combined with proper handling techniques by the cultivator can significantly enhance the success rate of mycology projects.
#### Do you need SAB
I suggest to use Still Air Box for any contamination risky mycological operations. Mushroom culture is more susceptible to contamination when it is young and weak. Sterility is crucial during the early stages of mushroom growing such as spore germination and mycelium development.
Let's explore some cases when SAB is a must, when it is desirable, and when it may not be necessary.
**SAB is necessary for:**
🔶 Making Spore Syringe from a piece of spore print and spore syringe dilution. [Read more](https://shroomok.com/en/wiki/Liquid_psilocybe_spore_syringe "Liquid psilocybe spore syringe")
[](https://shroomok.com/en/wiki/File:How-to-make-spore-syringe-from-spore-print.jpg) Making spore syringe in Still Air Box
🔶 Grain to Grain (G2G) transfer. [Read more](https://shroomok.com/en/wiki/Grain_to_Grain_Transfer_(G2G) "Grain to Grain Transfer (G2G)")
[](https://shroomok.com/en/wiki/File:Inoculation-grain-to-grain-transfer.jpg) Grain to Grain transfer in still air box
🔶 **Agar work:** pouring hot agar, all types of agar inoculation, contamination test for liquid culture or spore syringe, making Liquid Inoculant (LI) from agar, Agar to Agar (A2A) transfer for selection and strain isolation, Agar to Agar (A2A) transfer for 'cleaning' mushroom culture with contamination.
[](https://shroomok.com/en/wiki/File:Agar-still-air-box.jpg) Agar plates ready for inoculation in still air box> ❗️Use SAB when you need to extract and save mushroom culture from contaminated agar plate by transferring healthy mycelium samples to the new agar plate. In this case SAB is the right tool for the task. Don't use laminar flow hood, you'll spread contamination in the air.
🔶 **Mushroom cloning** on agar and making **mushroom tissue biopsy** with the next liquid culture media inoculation
[](https://shroomok.com/en/wiki/File:Mushroom-cloning-in-still-air-box.jpg) Mushroom cloning in still air box**SAB would be great for:**
🔶 **Inoculation**: grain jars/bags, liquid culture media. [Read more](https://shroomok.com/en/wiki/Inoculation_without_glove_box "Inoculation without glove box")
**SAB not needed for:**
🔶 Making spore syringe in zip bag without opening it. [Read more](https://shroomok.com/en/wiki/Liquid_psilocybe_spore_syringe#Method_1._Making_spore_syringe_in_zip_bag_for_noobs)
🔶 Spawn to Bulk and Casing. [Read more](https://shroomok.com/en/wiki/Making_mushroom_cake,_spawn_to_bulk,_and_casing "Making mushroom cake, spawn to bulk, and casing")
#### Building Still Air Box
SAB implementation is dramatically simple. It consists of two main steps:
\- select appropriate plastic storage box
\- make two armholes in it
That's it! I bet most of the components and needed equipment can be found at home or garage
**Materials needed:**
- 🔹 Large transparent plastic storage box: The larger, the better. I recommend using a box that is 50+ quarts (liters) in size. Choose a box that is wider than the width of your shoulders to ensure convenience while working inside the SAB. You can find affordable boxes at major stores for $15-25, often cheaper than on Amazon.
- 🔹 Permanent Marker and Ruler
- 🔹 Raised wire rack for baking/BBQ/microwave/storage shelf: The height should be around 2-4 inches or 5-10 cm.
- 🔹 Metal tin can (such as a tuna/coffee/soup can, or metal mug) that fits the diameter of your forearm, approximately 4 inches or 10 cm in diameter.
##### How to place holes in still air box
Let's simulate the process of creating armholes in the SAB to ensure they are placed properly.
1. Position the plastic bin on your working table, with one of its wide sides facing towards you.
2. Place a raised wire rack inside the bin.
3. Sit in front of the box in a comfortable position.[](https://shroomok.com/en/wiki/File:Plan-holes-in-still-air-box.jpg) Plan holes in SAB> 💡 Tip: I personally prefer using the SAB upside down. This is because the box often has a frustum shape, resembling a truncated pyramid, where the top is wider than the bottom. By using it this way, I have more space to work with. Furthermore, if the box has wheels, it can be unstable when working in the SAB. However, some growers choose to use a box with the closed lid on top. It's not a mistake; it simply comes down to personal preference and convenience. The choice is yours!
4. Extend your hands forward towards the box, ensuring that your shoulders are lowered and relaxed. Adjust the height of your chair if necessary. To facilitate convenient work inside the SAB, the armholes should be made according to the following guidelines: **1)** Keep the armholes **shoulder-width apart** (individual).[](https://shroomok.com/en/wiki/File:Shoulder-width-holes-in-still-air-box.jpg) Imitate your work in SAB to know the right position of armholes
**2)** Position the **armholes above the raised wire rack.** The recommended height is approximately 2-4 inches or 5-10 cm. In my case, the wire rack's height is around 2" or 5 cm.[](https://shroomok.com/en/wiki/File:Still-air-box-armholes-height.jpg) SAB holes height = the height of the raised wire rack> ❗️Don't place the armholes too high or very close to each other. Doing so will limit your mobility inside the SAB. Remember to keep your shoulders relaxed and, if needed, put your elbows on the table for a short break while working inside the SAB.
5. To outline the placement of the future armholes, you can use a tin can or a mug with a diameter of approximately 4 inches or 10 cm[](https://shroomok.com/en/wiki/File:Tin-can-for-making-armholes-in-still-air-box.jpg) Common armholes diameter for SAB
6. Draw two parallel circles on the box with a Permanent Marker for indicating the locations where the armholes will be made[](https://shroomok.com/en/wiki/File:Drawing-circles-for-armholes-in-still-air-box.jpg)
7. Test the future SAB again to be sure it's right for you. Make any necessary adjustments to the armhole placement if required.
##### How to cut holes in plastic box without breaking it
There are three options available for cutting the holes:
###### Option 1. Hot tin can method
**Materials needed:**
- 🔹 Metal tin can (tuna, soup, coffee, mug) with a diameter of about 4 inches or 10 cm.
- 🔹 Hot plate / Cooktop / Electric Grill
- 🔹 Oven mitt / Towel
- 🔹 Face mask
- 🔹 Sharp knife / Razor Blade / Scalpel / Utility Knife
1. Place the metal tin can or mug upside down on a hot plate, cooktop, or electric grill.[](https://shroomok.com/en/wiki/File:Hot-tin-can-for-SAB-holes.jpg) Metal mug on a hot electric grill
2. Once the rim of the can is hot enough, use an oven mitt or thick towel to hold it.[](https://shroomok.com/en/wiki/File:Hold-hot-tin-can-for-making-holes-in-SAB-with-oven-mitt-or-towel.jpg) Hold the hot tin can with oven gloves or thick towel
3. Press the hot can against the plastic at one of the marked armhole locations. While pressing, twist the can to melt the plastic.[](https://shroomok.com/en/wiki/File:Press-and-twist-hot-metal-can-or-mug-to-melt-the-plastic.jpg) Press hot tin can or metal mug. Twist it clockwise as you press to melt the plastic and create a hole> ❗️Wear a face mask to avoid inhaling fumes from the melting plastic. Perform this process outdoors or with proper ventilation
4. The melted plastic will form a circle that can be popped out, creating a hole.[](https://shroomok.com/en/wiki/File:Melted-circle-still-air-box.jpg) Melted plastic form a perfect hole in still air box
5. Repeat this process for the second armhole.
6. Use a scalpel, sharp knife, razor blade, or utility knife to trim any rough edges around the holes. The edges should be smooth to prevent snagging on gloves or irritating the skin.[](https://shroomok.com/en/wiki/File:Trim-the-edges-DIY-still-air-box.jpg) Make a smooth holes in still air box
7. Your still air box is ready!
###### Option 2. Drill with a hole saw
**Materials needed:**
- 🔹 Drill and Hole Saw Kit ([Amazon](https://amzn.to/46fS18p))
- 🔹 Sharp knife / Razor Blade / Scalpel / Utility Knife
- 🔹 Protective goggles or sunglasses
[](https://shroomok.com/en/wiki/File:How-to-cut-holes-in-plastic-box-drill-with-hole-saw.jpg) Drill with hole saw to cut holes in still air box
1. Assemble the 4-inch or 10 cm hole saw and attach it to the drill bit.
2. Align the drill bit with the marked hole using one hand while holding the box steady with the other hand to prevent it from moving.> ❗️Note: Remember to wear protective goggles or sunglasses to shield your eyes from any debris or plastic particles that may be generated during the drilling process.
3. Begin drilling the hole slowly and steadily. It's important to drill at a slow pace to avoid causing the plastic to crack.
4. Carefully remove the plastic ring from the drill bit.
5. Make a second hole in the box following the same procedure.
6. Trim the edges and remove any jagged edges around the holes using a scalpel, sharp knife, or razor blade. It's important to ensure that the edges are smooth to avoid snagging on your gloves and causing damage to your skin.
7. Ready!
###### Option 3. Dremel rotary tool
**Materials needed:**
- 🔹 Dremel rotary tool ([Amazon](https://amzn.to/3PugVeC))
> 💡 Tip by NightShiftNinja: For cutting hole in a plastic tub for a SAB if a person has a Dremel rotary tool the circle guide will make extremely quick work of it. It took me longer to measure out the spacing than it did to make the perfectly clean cuts
[](https://shroomok.com/img_orig/1b2472/4032_how-to-cut-hole-in-a-plastic-tub-for-a-sab-easy-details-in-description-by-nightshiftninja.jpg) [How to cut hole in a plastic tub for a SAB easy](https://shroomok.com/en/wiki/File:how-to-cut-hole-in-a-plastic-tub-for-a-sab-easy-details-in-description-by-nightshiftninja-510a68)#### Tips for using a still air box
**Materials needed:**
- 🔹 Still Air Box
- 🔹 Raised wire rack for baking/BBQ/microwave/shelf rack, the height ~2-4" or 5-10 cm ([Amazon](https://amzn.to/44aKfuH))
- 🔹 Disinfectant: Ethyl or Isopropyl Rubbing Alcohol 70% ([Amazon](https://amzn.to/3JrXHT2))
- 🔹 Disinfectant: bleach powder for making 1:10 solution or Clorox ready to use solution/spray/wipes ([Amazon](https://amzn.to/3NoBVk2))
- 🔹 Clean non-porous surface (smooth table surface / plastic lid from the plastic box / PE film / aluminium foil)
- 🔹 Optional: Desk Lamp
- 🔹 Optional: Towel
1\. Turn off the ventilation, air conditioning, or fan in the room 1-2 hours before working in the SAB to allow the air to settle. Ensure that the area is free from drafts and vibrations.
2\. Thoroughly wash the SAB inside and outside with dishwashing liquid or a bleach solution (1:10). If using bleach, remember to wear gloves. Rinse well and let it dry.
[](https://shroomok.com/en/wiki/File:Wash-still-air-box.jpg) Wash still air box inside and outside3\. Prepare a sterile non-porous surface for the SAB, such as a table, plastic lid from the box, or cover the table with PE film or aluminum foil. Wipe it thoroughly with 70% ethyl/isopropyl alcohol.
[](https://shroomok.com/en/wiki/File:Plastic-lid-and-raised-wire-rack-for-still-air-box.jpg) Plastic lid wiped with iso alcohol at the bottom and raised wire rack for SAB> 💡 Tip: To protect the bottom of your SAB, you can use a towel or fabric soaked in a bleach solution (1:10). Squeeze out excess liquid and place it at the bottom of your SAB.
> 💡 Tip: You can use soap solution (a few cc/ml per cup of water) to spray the towel on the bottom to help airborne contaminants stick to the soap film.
[](https://shroomok.com/en/wiki/File:How-to-prepare-still-air-box-for-work.jpg) Prepare sterile non-porous surface for SAB or towel soaked in bleach or sprayed with soap solution
4\. Wash your hands, wear a lab coat or clean light clothes, and put on a face mask for contamination protection and to reduce air currents from breathing. Wear disposable medical nitrile gloves and treat them with ethyl/iso alcohol 70%. Remember, the cultivator themselves can be a vector of contamination.
[](https://shroomok.com/en/wiki/File:Gloves-mask-preparation-for-manipulations-in-still-air-box.jpg) Wear gloves, face mask and clean/protective cloth[](https://shroomok.com/en/wiki/File:Spray-alcohol-on-gloves.jpg) Treat gloves with alcohol 70%
5\. Use a raised wire rack to elevate the working surface inside the SAB. Contaminants tend to fall from the air and accumulate mostly at the bottom, so raising the working surface helps reduce contamination risks.
[](https://shroomok.com/en/wiki/File:Raised-wire-rack-for-still-air-box.jpg) Raised wire rack for still air box[](https://shroomok.com/en/wiki/File:Prepare-SAB-for-mycology-project.jpg) Wipe all tools with ethyl or iso alcohol 70%[](https://shroomok.com/en/wiki/File:Raised-wire-rack-still-air-box.jpg) Raised wire rack for SAB6\. Spray or wipe the inside of the SAB with ethyl/iso alcohol (70%).
[](https://shroomok.com/en/wiki/File:Spray-still-air-box-inside.jpg) Spray/wipe the walls of SAB inside with alcohol> 💡 Tip: You can use soap solution instead of alcohol (a few cc/ml per cup of water). Spray the walls of the box (except the front wall) and towel on the bottom to help airborne contaminants stick to the soap film.
7\. Before and after any item enters the still air box, wipe it with ethyl/isopropyl alcohol 70%.
[](https://shroomok.com/en/wiki/File:Wipe-with-alcohol-before-placing-in-still-air-box.jpg) Wipe everything with alcohol before placing in SAB (agar project)[](https://shroomok.com/en/wiki/File:Treat-tools-before-placing-in-still-air-box.jpg) Treat all tools with disinfectant (grain to grain project)
8\. Double-check that everything you need for your current project is already inside the SAB.
[](https://shroomok.com/en/wiki/File:Tools-and-jars-in-still-air-box.jpg) Mycology project in still air box - grain to grain transfer9\. Spray the air inside the SAB with 70% isopropyl alcohol and let it sit for a few minutes. This will cause drops to cling to any contamination and pull it down to the bottom.
10\. Plan your moves and visualize each step of your work inside the SAB. Once your arms are inside the SAB, avoid taking them out until the job is done. In-and-out movements create additional airflows and increase the risk of contamination.
11\. Wipe your gloves with ethyl or isopropyl alcohol (70%).
[](https://shroomok.com/en/wiki/File:Wipe-gloves-with-alcohol-before-entering-still-air-box.jpg) Treat your gloves with alcohol before entering SAB12\. Enter the SAB and start your work.
[](https://shroomok.com/en/wiki/File:How-to-work-in-SAB.jpg) Move in and start your work in SAB13\. Try to work closer to the back wall of the SAB and move smoothly inside. Avoid rushing, but be fast when working with open jars, bags, or agar plates.
[](https://shroomok.com/en/wiki/File:Working-with-agar-in-still-air-box.jpg) Pouring agar plates in a still air box#### Still Air Box mistakes
Avoid using matted opaque plastic boxes as they make it difficult to see what's happening inside your box. If you have such a box, you can create a 'window' as a workaround. However, working with such a SAB is painful and you can't focus on your moves.
[](https://shroomok.com/en/wiki/File:Still-air-box-mistakes.jpg) Not the best SAB for mycologyOpt for plastic boxes without stiffeners and with flat, smooth walls. Thick plastic is unnecessary and can make it more challenging to make clean cuts for the armholes.
#### Still Air Box upgrades
**💡 Tip**: Consider using an additional light source above the SAB or a Desk Lamp ([Amazon](https://amzn.to/3qN57JV)). Transparent plastic can slightly distort your vision, so having extra lighting helps. Relying solely on ceiling lights may not provide sufficient illumination while working in the SAB.
[](https://shroomok.com/en/wiki/File:Working-in-SAB.jpg) Use good light while working in SAB**💡 Tip:** For additional SAB and tools sterilization you can use UV Sanitizer Lamp ([Amazon](https://amzn.to/43VEAsu)). UVC light with a wavelength of 200-280 nm wavelength effectively kills contaminants like bacteria, mold fungus, and viruses in the air and on surfaces.
[](https://shroomok.com/en/wiki/File:UVC-lamp-for-still-air-box-sterilization.jpg) UVC lamp in still air box before manipulations in SAB[](https://shroomok.com/en/wiki/File:UV-light-for-still-air-box.jpg) UV lamp in still air box placed on top> ❗️Be careful when using UV light! Never expose your eyes, skin, plants, pets, mushroom spores and mycelium!
You can make as big still air box as you want with using polyethylene and metal/plastic frame. For instance, such SAB setup by Woolf:
[](https://shroomok.com/img_orig/22882b/4032_did-i-show-you-my-still-air-box-by-woolf.jpg) [Large Still Air Box](https://shroomok.com/en/wiki/File:did-i-show-you-my-still-air-box-by-woolf-3545ca)> **💡** You can find such ready to use [Still Air Box on Amazon](https://amzn.to/43UzqNp)
[](https://shroomok.com/img_orig/e2399e/4032_did-i-show-you-my-sab-for-agar-work-by-woolf.jpg) [Soft Still Air Box](https://shroomok.com/en/wiki/File:did-i-show-you-my-sab-for-agar-work-by-woolf-747681)Although it's cost-effective to make it much cheaper by your own.
#### Can I use flame inside still air box
It is possible to use flame sterilization in a big volume SAB and if you wipe you Still Air Box with soapy water instead of using ethyl/iso alcohol. However, fire creates air currents due to temperature differences inside and outside the SAB, it increases the risk of contamination.
🔥🚫 **Don't use flame in the SAB if you use alcohol inside!** SAB doesn't have a ventilation; in a small volume alcohol fumes can explode and hurt you. Just wipe your tools with cotton pad soaked in alcohol for sterilization instead of fire.
#### Can I use SAB as a fruiting chamber
Yes, it is possible to convert the SAB into GrowBox for mushroom fruiting. Simply close the armholes (PE film or plastic circles that were initially cut for making armholes), close the lid on top, and maintain proper fruiting conditions.
Remember to wash and disinfect the box thoroughly if you intend to use it as a Still Air Box again.
#### Afterwords
During your initial attempts, it's normal to experience uncertain movements in the SAB, which may lead to contaminations.
Keep practicing! With each new project, you'll increase your success rate and advance your skills in mycology.
📸 For more SAB examples check out [Still Air Box photo gallery](https://shroomok.com/gallery/sab-still-air-box)
Join [Shroomok Discord Community](https://discord.gg/ngKhQDmymD) for questions and sharing your experience.
If you find this guide helpful support my work with subscription or one-time donation on [buymeacoffee](https://www.buymeacoffee.com/shroomok)
Have a happy growing!
Peace, Shroomok ❤️
# Mushroom Consumption
## Magic mushroom tea
[Magic mushroom tea](https://shroomok.com/en/wiki/Magic_mushroom_tea)
### Psilocybin mushroom tea recipe for tripping
Do you want to brew an elixir with magic mushrooms but don't know how to prepare it properly?
In this section we explain the most important aspects of making tea with psilocybin mushrooms.
[](https://shroomok.com/en/wiki/File:Mushroom-tea-1.png) Magic mushroom tea recipe#### Common methods of consuming magic mushrooms
Let's briefly discuss the various ways to consume psilocybin mushrooms.
The easiest way to consume is to simply chew whole dried mushrooms and wash them down with water.
But many psychonauts don't like the taste of psilocybin mushrooms. After all, they don't taste like ordinary edible or gourmet mushrooms.
🍫 If you are among such people then you can eat mushrooms in form of mushroom chocolates. You can find how to make them in the Recipe for making mushroom sweets and mushroom chocolate section
☕️ Or you can make delicious mushroom tea or mushroom broth.
#### What mushrooms are needed for mushroom tea?
For making magic tea are suitable:
🔸 fresh whole mushrooms
🔸 dried whole or dry grinded mushrooms (in a coffee grinder)
🔸 frozen whole mushrooms
Fresh and frozen mushrooms have the highest concentration of psychoactive ingredients!
The way of drying/freezing and storing magic mushrooms affects the psychoactive substances content in mushrooms. Therefore, even with proper drying up to 50% of the psilocybin activity is lost.
How to dry or freeze mushrooms for storage and consumption you can find in the next guides
> 🔴 Recommended: [How to dry and store psilocybin mushrooms](https://shroomok.com/en/wiki/How_to_dry_and_store_psilocybe_mushrooms "How to dry and store psilocybe mushrooms")
#### Mushroom tea vs chewing. How does water temperature affect psilocybin in mushrooms?
🌡 Partial decomposition of psilocybin into psilocin starts from +50°C or 122°F. That's why higher temperature isn't recommended for drying magic mushrooms in order to save the psilocybin in the mushrooms for long-term storage.
If heat mushrooms in water from +87°C or 189°F psilocybin is quickly and completely transformed into psilocin.
As we know, psilocin affects the brain and makes a transition into psychedelic trip.
Therefore, if consume mushrooms in the form of tea your body doesn't waste time on this metamorphosis and assimilates it faster. This is the main feature of mushroom tea! Mushroom tea works faster and the entrance to the trip is also faster.
Higher temperatures for making tea are acceptable to speed up the reaction.
However, such product must be taken fresh. It doesn't retain its psychoactive ingredients for a long period of time.
🌡 If heated from +137°C or 279°F or during prolonged boiling psychoactive components of psilocybin mushrooms are completely destroyed. They remain edible, but useless.
#### Simple recipe of mushroom tea
[](https://shroomok.com/en/wiki/File:Shroom-tea-2.png) Ready mushroom tea
1️⃣ Weigh the required dose of mushrooms. Do not exceed the dosage!
2️⃣ Put prepared mushrooms (fresh, frozen or dried) in a thermos, tea pot or thermo-mug.
**Choose magic cups and mugs for your mushroom tea on Amazon:**
[Mushroom Tea Cup](https://www.amazon.com/Mushroom-Glass-Filter-Coaster-Ounces/dp/B09VZM2SV8?&linkCode=ll1&tag=shroomok-20&linkId=6b950472bb39e1cebb019ee7cf5d835b&language=en_US&ref_=as_li_ss_tl) - $15.91
[Mushroom Tumbler](https://www.amazon.com/Mushroom-Tumbler-Lovers-Accessories-Birthday/dp/B09P59XQ4J?&linkCode=ll1&tag=shroomok-20&linkId=4debd9be9a1ce866e318bab19b44c91d&language=en_US&ref_=as_li_ss_tl) - $22.00
[Mushroom Mug for Mushroom Lovers](https://www.amazon.com/MYMISOR-Stainless-Mushrooms-Inspiration-Insulation/dp/B0B1WBRJMZ?&linkCode=ll1&tag=shroomok-20&linkId=b5b8edd6abc03e0e564dfe428132f9d9&language=en_US&ref_=as_li_ss_tl) - $24.95
[Mushroom Tumbler Travel Mug](https://www.amazon.com/Qdkva-Mushroom-Tumbler-Stainless-Travel-Tumbler/dp/B09J1Z1FVT?&linkCode=ll1&tag=shroomok-20&linkId=516461d774b4dcc4edf79f4b500824a1&language=en_US&ref_=as_li_ss_tl) - $23.99
[Glass Teapot with Removable Infuser](https://www.amazon.com/Removable-Blooming-Stovetop-Microwave-Borosilicate/dp/B096LY5S8T?&linkCode=ll1&tag=shroomok-20&linkId=47a8c68a04e165624111b7d28f0bea48&language=en_US&ref_=as_li_ss_tl) - $17.51
3️⃣ Boil clean drinking water.
4️⃣ Pour hot water over the mushrooms (250-350 ml per one serving of mushrooms). **The water temperature within +70°..+90°С or 160-195°F will be okay. But don't boil mushrooms!**
5️⃣ Let mushroom tea brew for 10-20 minutes.
6️⃣ Filter mushroom tea to get clear drink. Mushrooms can be thrown away, because almost all the psilocybin from the mushrooms has already dissolved in water.
**Filters for tea on Amazon:**
[Tea Filter bags, safe natural material - 100 pcs.](https://www.amazon.com/Tinkee-material-disposable-drawstring-100%EF%BC%883-15/dp/B07QRF4PSD?&linkCode=ll1&tag=shroomok-20&linkId=8536f5b8afb07725666806e84ea449ce&language=en_US&ref_=as_li_ss_tl) - $5.99
[Stainless Steel Tea Strainer - 1,2 Pack](https://www.amazon.com/Threaded-Connection-Stainless-Extended-Seasonings/dp/B075K57B73?&linkCode=ll1&tag=shroomok-20&linkId=8e3684bf098910f25816f58fe189353f&language=en_US&ref_=as_li_ss_tl) - $6.99
[Stainless Steel Tea Ball Strainer - 2 Pack](https://www.amazon.com/dp/B09V78VD6W?&linkCode=ll1&tag=shroomok-20&linkId=a8b60a7a63e3d75e4c737a0eb7901e2b&language=en_US&ref_=as_li_ss_tl) - $13.99
7️⃣ If you want rich flavor you can add ginger, cinnamon, vanilla, any spices, sweet syrup, honey etc. It's up to your tastes. Actually mushroom tea itself without any additives tastes really great, like mushroom soup.
🍋 You can also add lemon or orange juice 🍊
☕️ Magic Tea is ready!
🌟 Drink fresh mushroom tea right after preparation or within a few hours
> 🔴 **Check out more recipes and guides: [Mushroom Consumption](https://shroomok.com/articles:mushroom-consumption-recipes-and-tips)**
Enjoy your magic tea 🙏🏻
## Magic mushrooms microdosing
[Magic mushrooms microdosing](https://shroomok.com/en/wiki/Magic_mushrooms_microdosing)
### Psilocybin mushroom microdosing guide
#### **How to prepare mushrooms for microdosing?**
You can check details on mushroom preparation for storage and consumption in the
> Recommended guide: [**How to Dry and Store mushrooms properly**](https://shroomok.com/en/wiki/How_to_dry_and_store_psilocybe_mushrooms "How to dry and store psilocybe mushrooms")
Mushrooms should be dried thoroughly until they crisp like chips.
Also, you can use an **electric fruit/vegetable dryer (dehydrator)** at low power (temperature up to 50°C).
[](https://shroomok.com/en/wiki/File:How-to-dry-magic-mushrooms-in-dehydrator.jpg) How to dry mushrooms in dehydrator**Shroomok's Choice on Amazon from Simple Cheap to Premium:**
[Standard Electric Food Dehydrator, White](https://www.amazon.com/gp/product/B008H2OELY/ref=as_li_tl?ie=UTF8&tag=shroomok-20&camp=1789&creative=9325&linkCode=as2&creativeASIN=B008H2OELY&linkId=cf42d1210f8a406fa239da1a74dbe5aa) - $39.82
[Professional Food Dehydrator Machine](https://www.amazon.com/gp/product/B01DO0ZR7I/ref=as_li_tl?ie=UTF8&tag=shroomok-20&camp=1789&creative=9325&linkCode=as2&creativeASIN=B01DO0ZR7I&linkId=5720d629a5523f9714c54b5b02d00530) - $42.99
[Electric Food Dryer Machine, 5 BPA-Free Trays, Dishwasher Safe](https://www.amazon.com/gp/product/B0828613J4/ref=as_li_tl?ie=UTF8&tag=shroomok-20&camp=1789&creative=9325&linkCode=as2&creativeASIN=B0828613J4&linkId=0a89548b410de3c4817f4c3cba87c470) - $54.99
[Food Dehydrator Machine, Digital Timer](https://www.amazon.com/gp/product/B0947S12WP/ref=as_li_tl?ie=UTF8&tag=shroomok-20&camp=1789&creative=9325&linkCode=as2&creativeASIN=B0947S12WP&linkId=5c6dae7a10a195bd8f1e565e4ac3c567) - $76.89
[Dryer Machine, Overheat Protection](https://www.amazon.com/gp/product/B07MPC7C8G/ref=as_li_tl?ie=UTF8&tag=shroomok-20&camp=1789&creative=9325&linkCode=as2&creativeASIN=B07MPC7C8G&linkId=1be3944f3db8e7f52c2653d0f6ad570e) - $79.99
[Food Dehydrator Machine, Digital Timer - Black, Silver](https://www.amazon.com/gp/product/B07QXNSSJM/ref=as_li_tl?ie=UTF8&tag=shroomok-20&camp=1789&creative=9325&linkCode=as2&creativeASIN=B07QXNSSJM&linkId=47ee6e12b4c9883806215955471fff09) - $87.99
[Premium Stylish Food Dehydrator - Stainless Steel, Led Touch Digital Timer](https://www.amazon.com/gp/product/B093GGCX8Z/ref=as_li_tl?ie=UTF8&tag=shroomok-20&camp=1789&creative=9325&linkCode=as2&creativeASIN=B093GGCX8Z&linkId=9a2fa5f60c80ea97e0a8ab906e7d5362) - $109.99
[Premium Food Dehydrator Machine - Digital Timer, 9 Drying Trays, Stainless Steel, Black](https://www.amazon.com/gp/product/B01M6AZ863/ref=as_li_tl?ie=UTF8&tag=shroomok-20&camp=1789&creative=9325&linkCode=as2&creativeASIN=B01M6AZ863&linkId=5595497f038a836bd9c82e0ccdffbf40) - $114.89
[Premium Food Dehydrator Machine - 6 Stainless Steel Trays, 50 Free Recipes, Silver or Black](https://www.amazon.com/gp/product/B07PY5M579/ref=as_li_tl?ie=UTF8&tag=shroomok-20&camp=1789&creative=9325&linkCode=as2&creativeASIN=B07PY5M579&linkId=897e543a841f2a5f5922260b969c36f9) - $169.99
Or use an oven (temperature up to 50°C). Or simply wrap the mushrooms **in parchment paper** and place them **on a warm radiator for 1-2 days**.
🔴 **If mushrooms are not dry enough, then you won't be able to grind them evenly in a coffee grinder to prepare microdoses!**
You can store dried mushrooms in zip-bags, vacuum bags or in glass jars with tightly closed lids. For convenience Shroomok recommend to divide all mushrooms into 5-10g portions.
[](https://shroomok.com/en/wiki/File:Dried-psilocybin-mushrooms-psilocybe-cubensis-ready-for-storing.jpg) Dried psilocybin mushrooms in zip-bags for storage
Store in a cool and dark place or in the refrigerator. When stored properly, mushrooms fully retain their properties for up to 2 years. After 2 years, they are okay as well, just loose psychoactive potency over the years.
#### **How to prepare psilocybin mushroom microdoses?**
For convenience, you can fill in empty Vegetarian or Gelatin capsules to prepare your individual **[Capsules for microdosing](https://shroomok.com/en/wiki/Psilocybine_magic_mushroom_capsules_for_microdosing "Psilocybine capsules for microdosing").**
[](https://shroomok.com/en/wiki/File:How-to-prepare-capsules-for-microdosing-psilocybe-mushrooms.jpg) Capsules for microdosing with magic mushrooms powder. Preparation process
If you don't like mushroom taste you can make **[Mushroom Chocolates](https://shroomok.com/en/wiki/Magic_mushroom_chocolate_and_psilocybin_candy_recipes "Magic mushroom chocolate and psilocybin candy recipes")**. However, there is also a minus in mushroom chocolate: it does not allow you to measure the required microdose in each candy accurately, because the chocolate is not uniform. This method is great for preparing shrooms for trip.
[](https://shroomok.com/en/wiki/File:Mushroom-chocolate-cooking-process.jpg) Mushroom chocolate cooking process[](https://shroomok.com/en/wiki/File:Mushroom-chocolate-recipe.jpg) Magic Mushroom chocolate sweets recipe[](https://shroomok.com/en/wiki/File:Mushroom-chocolate-simple-recipe.jpg) Chocolate sweets with psilocybin mushrooms#### **Mushroom microdosing schedule**
There are 2 protocols for microdosing: Fadiman protocol and Paul Stamets protocol
[](https://shroomok.com/en/wiki/File:Paul-stamets-protocol-microdosing.jpg) Stamets and Fadiman protocol for microdosing. Credit: Paul Stamets##### Fadiman Protocol for microdosing
Fadiman protocol considered as a standard practice of microdosing.
Microdoses should be taken 1 time in 3 days, i.e. take a microdose 1 day and skip 2 days. This break is important since even on a low dose your body can still build up a tolerance. Hence, you can loose all positive effects of microdosing.
[](https://shroomok.com/en/wiki/File:Microdosing-schedule-eng.jpg) Standard schedule for microdosing psilocybin mushrooms##### Stamets Protocol for microdosing
The Stamets Protocol differs in two main aspects: schedule and combining the psilocybin mushroom with other components.
Starting with the Stamets schedule a person takes their microdose for the first 4 days of the week. Then the other 3 days are a tolerance break.
**Days 1-4: Dose days** --> **Days 5-7: No dose days** --> **Repeat**
The second difference of Stamets protocol is taking dried magic mushrooms (or pure psilocybin) in combination with **Lion’s Mane** mushroom microdosing and **Niacin (vitamin B3 aka nicotinic acid)**.
**Lion's Mane** works as natural nootropic. Supports cognitive performance, memory, nerve and immunity systems. The dosage 5 to 20 grams of fresh or 50 to 200 milligrams of extract. Stamets notes that Lion’s Mane mycelium instead of the mushroom fruiting body, may be most beneficial for microdosing. Lion's Mane is totally legal mushroom and available for purchase or home cultivation.
**Amazon products:**
[Lion's Mane Capsules, 30/60/120 caps.](https://www.amazon.com/Host-Defense-Mushroom-Capsules-Cerebral/dp/B002WJ2ALO?&linkCode=ll1&tag=shroomok-20&linkId=f172d0d84571a09b80a6d07fe5cdc651&language=en_US&ref_=as_li_ss_tl) - from $13.13 - made with Lion's Mane mushroom mycelium
[Lion's Mane Extract](https://www.amazon.com/Host-Defense-Mushroom-Extract-Cerebral/dp/B00J816AIS?&linkCode=ll1&tag=shroomok-20&linkId=4a0e0d4f63908b801aa2fea43c37aea3&language=en_US&ref_=as_li_ss_tl) - $14.96 - blend of Lion's Mane mycelium and fruit bodies
[Lion's Mane Mushroom Powder](https://www.amazon.com/dp/B01DKZZFCE?&linkCode=ll1&tag=shroomok-20&linkId=4f1840e722ced133f983959d63fbd8e2&language=en_US&ref_=as_li_ss_tl) - $26.96 - fruit bodies powder supplement
**Niacin (vitamin B3)** is one of many essential B-complex vitamins. The quantity recommended in the Stamets protocol is 100-200mg up to 500mg. Higher dosages can provoke unwanted side effects. Niacin supports nervous system, digestive system, metabolism and skin.
[Solgar Niacin 500 mg, 250 Veg. Caps](https://www.amazon.com/Solgar-Niacin-Vitamin-Vegetable-Capsules/dp/B0001VUOMM?&linkCode=ll1&tag=shroomok-20&linkId=c43638ca301ad8910df1e5281db84bc2&language=en_US&ref_=as_li_ss_tl) - $24.99
[Niacin 100mg | 300 Veg. Tablets](https://www.amazon.com/dp/B09C92DZM2?&linkCode=ll1&tag=shroomok-20&linkId=f6d6784679397e5c106b9b5415532090&language=en_US&ref_=as_li_ss_tl) - $9.99
[Niacin 500mg, 250 Capsules](https://www.amazon.com/dp/B09ZF7QRT6?&linkCode=ll1&tag=shroomok-20&linkId=21963750aaa167edcb500c7bc279c584&language=en_US&ref_=as_li_ss_tl) - $15.99
[Niacin (B3), 500mg, 220 Caps](https://www.amazon.com/Capsules-Non-GMO-Essential-Vitamin-Carlyle/dp/B09XFJNY95?&linkCode=ll1&tag=shroomok-20&linkId=5c6cddf209c92128d0409fe9115b335b&language=en_US&ref_=as_li_ss_tl) - $19.99
#### Duration of microdosing. When to take microdose
Microdosing course duration **from 3 to 6 months** (due to individual choice and individual feelings). You should take a **1-3 month break** after the course.
**Do NOT take microdoses daily and do not increase your microdose!** It won't be a microdose, it will be a stimulation. As a consequence, a decrease in energy, concentration, and cognitive abilities is possible.
Some adjustments can be made to the microdose schedule, e.g. every other day or every 4-5 days. Adjustment can be due to the physical and psychological condition of the patient.
**Take mushrooms only in the morning**, because they activate the cerebral cortex. Evening intake may cause problems with sleep.
Eating (breakfast) not earlier than **1-2 hours** after taking the microdose.
#### **How to determine your individual microdose**
A microdose is the maximum dose of psilocybin mushrooms, when taken without any change in consciousness or perception (including visual, sound, taste, smell, or tactile sensations).
Individual microdose depends on many factors: your tolerance to psilocybin, metabolism, hormonal background, the variety of mushrooms and their storage time. But it does not depend on your body weight.
Before the course, you should calibrate your individual mushroom dose.
To do this, grind in a **Coffee Grinder** a small portion (about 3-5 or 10 grams) of **dried** psilocybin mushrooms.
**Shroomok's Choice on Amazon:**
[Mueller Austria HyperGrind Precision Coffee Grinder - Compact & Stylish, White](https://www.amazon.com/gp/product/B076FJ92M4/ref=as_li_tl?ie=UTF8&tag=shroomok-20&camp=1789&creative=9325&linkCode=as2&creativeASIN=B076FJ92M4&linkId=a9a0116bd7a6ff7f07848c837b005893) $19.97
[Electric Coffee Grinder - Stainless Steel Blades, Black](https://www.amazon.com/gp/product/B005EPRFKO/ref=as_li_tl?ie=UTF8&tag=shroomok-20&camp=1789&creative=9325&linkCode=as2&creativeASIN=B005EPRFKO&linkId=7adfeccaf26a5afae5d8a2cc06855a33) $19.99
[Stainless Steel Coffee Grinder, One Touch Push-Button Control](https://www.amazon.com/gp/product/B07Z8G97PY/ref=as_li_tl?ie=UTF8&tag=shroomok-20&camp=1789&creative=9325&linkCode=as2&creativeASIN=B07Z8G97PY&linkId=b4658287ac01f4d9119d3471b37e01c3) $19.99
[Stainless Steel Electric Coffee Grinder, Silver](https://www.amazon.com/gp/product/B07P6SGD8B/ref=as_li_tl?ie=UTF8&tag=shroomok-20&camp=1789&creative=9325&linkCode=as2&creativeASIN=B07P6SGD8B&linkId=0d9f8c10adeda8b32776eab0aa82ed2e) $21.20
[Spice Herb Coffee Grinder with Pollen Catcher](https://www.amazon.com/gp/product/B093K75YX1?&linkCode=ll1&tag=shroomok-20&linkId=ce1af201e71a95475b3eca6fe1a3084e&language=en_US&ref_=as_li_ss_tl) $23.99
[Multi-Grind Automatic Coffee Grinder - With chamber cleaning system, Black](https://www.amazon.com/gp/product/B08RQZ39WC/ref=as_li_tl?ie=UTF8&tag=shroomok-20&camp=1789&creative=9325&linkCode=as2&creativeASIN=B08RQZ39WC&linkId=e1ec23fe761f622f69b875a393a23511) $24.99
Use **Medical** or **Jewelry scales** to know the exact dose.
[](https://shroomok.com/en/wiki/File:Weighter-scales-for-weighting-magic-mushrooms.jpg) Scales for weighting mushroom microdose**Shroomok's Choice on Amazon:**
[Digital Pocket Jewelry Scales - Scale Capacity 200 g, Scale Accuracy 0.01 g](https://www.amazon.com/gp/product/B091678KNF/ref=as_li_tl?ie=UTF8&tag=shroomok-20&camp=1789&creative=9325&linkCode=as2&creativeASIN=B091678KNF&linkId=6a106202fe009e78bcebbda93f5fa7b8) - $10.95
[Mini Digital Jewelry Scale - Capacity 500g, Accuracy 0.01g](https://www.amazon.com/gp/product/B07H3CCY59/ref=as_li_tl?ie=UTF8&tag=shroomok-20&camp=1789&creative=9325&linkCode=as2&creativeASIN=B07H3CCY59&linkId=c0230409c605193608d3f1bebfb48d59) - $9.99
[Professional USB Milligrams Scale - Capacity 50g, Accuracy 0.001g](https://www.amazon.com/gp/product/B07XXYHWJD/ref=as_li_tl?ie=UTF8&tag=shroomok-20&camp=1789&creative=9325&linkCode=as2&creativeASIN=B07XXYHWJD&linkId=0e26751f9eea9db98d26e35ffdaf0100) - $22.78
[Kit: Scales, Case, Tweezers, Calibration, Weighting Pans - Capasity 50g, Accuracy 0.001g](https://www.amazon.com/gp/product/B011J88S8M/ref=as_li_tl?ie=UTF8&tag=shroomok-20&camp=1789&creative=9325&linkCode=as2&creativeASIN=B011J88S8M&linkId=162d89981048c3558625cdff8245135c) - $34.99
**In the morning on an empty stomach, take 0.3g of mushroom powder with water.** A clean gastrointestinal tract will allow you to immediately calibrate the necessary dose and determine tolerance.
**How to determine the ideal microdose?** It should not cause any changes in perception and consciousness.
> If you feel any side effects (dizziness, sleepiness, nausea, visual effects, fractals, color spots, amplification of sounds, changes in tactile sensations), then at each subsequent intake reduce the portion with 0.05g step until these effects disappear.
>
> 📉 **Downward scheme: 0.3 > 0.25 > 0.2 > 0.15 > 0.1 > 0.05**
>
> 🔴 Decrease the dose until the effects or side effects are gone at all.
For example, if at 0.3g you have any unusual sensations, decrease the next microdose and take 0.25g two days after the first dose.If at 0.25g you have also mushroom effects, decrease the microdose to 0.2g.
> If you don't feel any changes with 0.3g, you can go with the microdose increase scheme. Increase by 0.05 g until you feel any effects. As soon as you feel changes in sensation, then the microdose should be lowered by 0.05 g. When increasing the microdose stop at the dosage which there is no change of senses.📈 **Increase scheme: 0.3 > 0.35 > 0.4 > 0.45 > 0.5 > 0.55**
Individual microdose can be 0.05 g and sometimes as high as 0.8 g.
The microdose which doesn't cause any change in consciousness or perception at all is considered an **individual** dose for you and it **shouldn't change until the end of the course.** This dosage is calibrated only for this portion of mushrooms (this bag, this strain, this species).
For your next bag of mushrooms, new crop and new strain of mushrooms, you will have to calibrate your microdose again. Because the psilocybin content will vary.
##### How many mushrooms needed for microdosing?
From 0.5g to 8g (3g on average) of dried mushrooms will be enough for **1 month** of microdosing course.
#### **Microdosing tips**
❇️ Grinding the mushrooms in a coffee grinder gives a homogeneous mass and allows you to average the content of psilocybin in the total mass of mushrooms. Because each single mushroom, mushroom stem or cap can contain a different concentration of psilocybin. By taking stem, or cap, or abortion, or small whole mushroom you will take a different dose of psilocybin all the time. **Grinded mushrooms have more stable psilocybin concentration** and you can calibrate precisely your mushroom dose for system microdosing course.
❇️ The most convenient way to take it is to prepare **[Mushroom Capsules for Microdosing](https://shroomok.com/en/wiki/Psilocybine_magic_mushroom_capsules_for_microdosing "Psilocybine capsules for microdosing").**
❇️ It is better to take **the very first microdose on a day off**, so that you can track your sensations. In case you need to go to the toilet or have "entry syndrome", you can not hurry anywhere, be alone with yourself and take time for yourself and your sensations.
❇️ **Don't drive a car** on the first day of taking microdosing.
❇️ Keep a **microdosing diary** where you can make notes about all your sensations (physical and psycho-emotional) and note any changes in the quality of your life on a daily basis (mood, activity, reactions, emotions, etc.)
#### **Positive effects of microdosing**
❇️ Empathy for the people and nature around. The person becomes more social, open, easier to make contact and communicate with people.
❇️ Reduction of aggression, irritability, fears, obsessions. Release from feelings of anxiety, danger, inevitability, guilt.
❇️ Person begins to notice the beauty around yourself.
❇️ Increased productivity of the brain, creativity and design thinking.
❇️ Energy effect, improved mood and vitality that lasts 6-10 hours after intake. Followed by a pleasant relaxation is felt in the muscles and brain (but not drowsiness).
❇️ Increased balance, strength, focus when doing sports.
❇️ Giving up bad habits (alcohol particularly). People note that they begin to see the absurdity in their addictions and give them up easily.
❇️ Eating behavior is normalized. Lack of overeating, excessive appetite. Preference for a healthy and balanced diet.
❇️ Improvement of cognitive functions: memory, speech, communication skills, ability to concentrate, ability to recognize objects (by sight, hearing, touch, ability to make purposeful movements).
❇️ Improved quality of sleep and pleasant dreams.
❇️ Assistance in self-discovery and hidden talents disclosure.
❇️ Establishing balance and harmony within yourself.
Once you've experienced the beauty of at least 1 or 2 of the above items, there's a good chance and temptation to start taking bigger dosage and/or with greater frequency.
⛔️ **DO NOT take microdose every day!**
⛔️ **DO NOT increase your microdose during the whole microdosing course!**
⛔️ "More" and "more often" will lead to a **limbo state** (a state of "neither here nor there", feelings between the start of trip and sober state). It have a stimulating effect on your brain. As a result, you'll get **the opposite effect: drop in energy, state of fatigue, decreased concentration, cognitive deterioration.**
#### **Effects to look out for**
❗️ 1-1.5 hours after taking a microdose you may have soft stools. It often occurs if your diet is dominated by low-quality food (fast food, semi-finished products, canned foods, sausages, etc.). Don't worry, it's okay! In such way mushrooms purifies your body. This is a sign to pay attention to the quality of food in your diet.
❗️ In the first month of taking microdoses, there is a possible "entry syndrome" that occurs 15-30 minutes after taking the microdose. Nausea, cold sensation, salivation, gastrointestinal cramps, dizziness, headache. These conditions are not observed in everyone and disappear quickly within 15-30 minutes.
❗️ No dilation of the pupils is observed with microdoses. The person is fully functional without any changes or abnormalities.
❗️ With microdosing there is no risk of a "bad trip" or strong psychedelic effects cannot be controlled. Microdosing is the ideal way to get a safe and comfortable introduction to the world of psychedelics.
#### **When should microdoses be stopped?**
⛔️ If "entry syndrome" (nausea, feeling cold, salivation, gastrointestinal cramps, dizziness, headache) lasts longer (1 hour or more) during the first 1-2 weeks of microdosing.
⛔️ If the "entry syndrome" doesn't disappear and isn't reduced after 1-2 weeks of microdosing.
⛔️ Decrease of energy and general activity, drowsiness, weakness, dizziness, headache, increase/decrease of blood pressure during the days of taking microdoses.
⛔️ Decreased cognitive functions.
⛔️ Any negative effects of the body (physical and psycho-emotional).
#### **Contraindications for mushroom microdosing**
⛔️ Age under 18 years
⛔️ Pregnancy
⛔️ Breastfeeding period
⛔️ Mixing microdoses with alcohol and any drugs
⛔️ Microdosing in parallel with the use of antidepressants, tranquilizers
⛔️ Rehabilitation period after injury and/or surgery
⛔️ Chronic heart problems (arrhythmia, tachycardia, brachycardia, sinus rhythm disorder, heart failure and others).
⛔️ During exacerbation of gastrointestinal diseases (ulcers, ulcerative colitis, acute gastritis, intestinal obstruction, intestinal adhesions, etc.)
⛔️ In states of acute stress or panic attack
⛔️ Diagnosed mental illness
⛔️ For fun
Microdosing is a responsible process that should be approached with proper preparation and awareness. First of all, answer yourself the question «Why did I decide to start microdosing?
Stick to your individual dosage throughout the entire microdosing course and follow the schedule of intake. Listen to yourself and how you feel.
Make sure you are aware with basic microdosing principles and pass the [**QUIZ**](https://shroomok.com/en/are-you-ready-for-magic-mushroom-microdosing-quiz/)
#### Support Shroomok
If you find my work, articles, advices I've sharing helpful you can support Shroomok in the following way.
🍄 [**Buy Shroomok a mushroom**](https://www.buymeacoffee.com/shroomok) as a donation and say something nice!
Join Shroomok Growers Community, ask questions and share your experience in [Discord](https://discord.com/invite/ngKhQDmymD) and [Reddit](https://www.reddit.com/r/Shroomok/)
Take care!
Peace, Shroomok 🤍
## Psilocybine magic mushroom capsules for microdosing
[Psilocybine magic mushroom capsules for microdosing](https://shroomok.com/en/wiki/Psilocybine_magic_mushroom_capsules_for_microdosing)
[](https://shroomok.com/en/wiki/File:Capsules-with-mushroom-powder-for-microdosing.jpg) DIY capsules with mushroom powder### How to make capsules with mushroom powder for microdosing
Capsules with mushroom powder is the most convenient way for taking mushroom microdoses. This method saves your time and helps to take constant dosage every time, that is very important.
For a conscious microdosing follow the schedule and take a break between microdosing courses. If you don't know exactly your own microdose you can prepare capsules of different weights and determine it experimentally during your calibration period.
> ❗️Check out: [**Mushroom Microdosing Guide**](https://shroomok.com/en/wiki/Magic_mushrooms_microdosing "Microdosing psilocybin mushrooms (psilocybe cubensis)")
Before making capsules for microdosing many questions arise. Let's figure out!
#### How much mushroom powder contains in one capsule? Capsule size for mushroom microdosing
Capsule sizes and approximate content of powder in their volume are given in the table below.
[](https://shroomok.com/en/wiki/File:Common-capsule-sizes.jpg) Table of capsule sizes and volumes for psilocybe cubensis microdoses> \#00 or #0 or #1 are optimal sizes
On the photo below you can see **"0" size hard vegetarian stomach-soluble capsules** we used for preparation mushroom microdoses. This capsule size allows you to adjust the **microdose up to 0.3g** of mushroom powder in one capsule
[](https://shroomok.com/en/wiki/File:Capsules-for-psilocybe-mushrooms-microdosing.jpg) Hard gelatin capsule "0" size (0.68 ml) - 100 pcs. Empty gastric soluble capsules for mushroom microdosingThe weight can be adjusted based on your individual microdose. It's easy to guess if you need 0.4 grams, then prepare 2 capsules 0.2g each.
#### What capsules to choose for mushroom microdosing?
Stomach-soluble or intestine-soluble? Gelatin or Vegetarian?
There are capsules soluble in the stomach and capsules soluble in the intestines. For mushroom microdosing **choose stomach-soluble capsules**, as absorption of alkaloids with the stomach is a standard practice for microdosing.
**Vegetarian** or **Gelatin** capsules is up to you. It doesn't influence on microdosing effects at all. Choose according to your individual preferences and lifestyle.
#### DIY capsule filling for microdosing
[](https://shroomok.com/en/wiki/File:How-to-prepare-capsules-for-microdosing-psilocybe-mushrooms.jpg) Preparation capsules for microdosing psilocybin mushrooms at home**What you need for making capsules for microdosing:**
**1. Dry Mushrooms.** They should crumble easily, like chips. If mushrooms aren't dried enough, you won't be able to turn them into a powder
> 🔴 Recommended: [**How to Dry and Store Magic Mushrooms**](https://shroomok.com/en/wiki/How_to_dry_and_store_psilocybe_mushrooms "How to dry and store psilocybe mushrooms")
**2. Empty stomach-soluble capsules.** Use #00 or #0 or #1.
**Shroomok's Choice on Amazon:**
[Size **00** - Empty **Vegan** Capsules - 100/500/1000 Count - Dif. Colors](https://www.amazon.com/gp/product/B07X5N553Y/ref=as_li_tl?ie=UTF8&tag=shroomok-20&camp=1789&creative=9325&linkCode=as2&creativeASIN=B07X5N553Y&linkId=6fac8d7161d74fce9a8395236f7699d2) - $7.89
[Size 0 - Empty **Vegan** Capsules - 100/500/1000 Count - Dif. Colors](https://www.amazon.com/gp/product/B07X6KT8LC/ref=as_li_tl?ie=UTF8&tag=shroomok-20&camp=1789&creative=9325&linkCode=as2&creativeASIN=B07X6KT8LC&linkId=d92d3177dd8c41b5936b8bcebd841a87) - $6.99
**3. Jewelry** or **Medical** or **Laboratory milligram scales.**
It is important to know the exact weight of each microdose. Never take microdoses on eye!
**Shroomok's Choice on Amazon:**
[Digital Mini Scales - Capacity 200g, Accuracy 0.01 g](https://www.amazon.com/dp/B07XL756FP?&linkCode=ll1&tag=shroomok-20&linkId=23b63fbc9b462bbe7e6ccb7ebbfa07cd&language=en_US&ref_=as_li_ss_tl) - $10.99
**4.** **Coffee grinder** to turn dried mushrooms into powder
**Shroomok's Choice on Amazon:**
[Stainless Steel Coffee Grinder w/Cleaning Brush, Different Designs](https://amzn.to/3IHwzPx) $23.95
**5.** **Tweezers** or **Capsule Filling Tools** for fast and easy capsule filling.
You can also use Capsule Filling Machine for fast filling a bunch of capsules (100 capsules at a time). However you don't need so much at once.
**Shroomok's Choice on Amazon:**
[Capsule Filling Kit for Pill Filler](https://amzn.to/42f9r1R) $9.99 - for filling capsules one by one
#### DIY microdosing capsules
**1.** Grind dried mushrooms in coffee grinder. Open capsule's cap and fill it with mushroom powder. Tamp it with Tweezers or Capsule tamper
[](https://shroomok.com/en/wiki/File:Psilocybe-mushrooms-capsules-for-microdosing.jpg) Preparation capsules for microdosing psilocybin mushrooms. Put grinded psilocybe cubensis powder in a capsule and tamp it down with tweezers
**2.** Close your capsule. Check the weight with **milligram scales.** When weighting a capsule note that the weight of empty capsule is 0.05 grams.
**3.** Store ready-made capsules for microdosing in the refrigerator or dark place at room temperature. Take microdoses according to your schedule
[](https://shroomok.com/en/wiki/File:Ready-to-use-mushroom-capsule.jpg) Ready to use microdoses of psilocybin mushrooms (0,15 gram/capsule) for storing in refrigerator and further consumption according to microdosing scheduleIf you find this guide helpful you can 🍄 [Buy Shroomok a mushroom as a donation](https://www.buymeacoffee.com/shroomok) and say something nice!
Take care!
Peace, Shroomok 🤍
## How to prepare for psychedelic mushroom trip
[How to prepare for psychedelic mushroom trip](https://shroomok.com/en/wiki/How_to_prepare_for_psychedelic_mushroom_trip)
### All you need to know about mushroom trip: preparation, dosage, side effects, contraindications, recovery after tripping
#### Disclaimer
Hey Humanity!
Remember! No one guide save you from facing with yourself and your fears.
Mushrooms are not a silver bullet or pill against all problems. Mushrooms are just a tool.
YOU and only YOU are responsible for the possible consequences when using psychoactive substance.
All materials in this article are only recommendations according to our own experience. They are meant to encourage you to think and take responsibility for your actions.
[](https://shroomok.com/en/wiki/File:Mushroom-trip-guide-2.jpg) How to prepare for psychedelic mushroom trip#### Introduction
Mushroom is a unique tool. It should be used with specific intentions, goals and proper physical and psycho-emotional preparation.
This is not just a way to have fun and look at visual effects. There is much more to it.
In this section we will not talk about psychedelic experiences, because for each person it is a unique, unforgettable and intimate experience.
We'd like to warn you that the effect can be severe or scaring.
Therefore, you should prepare well. Knowing about all the pitfalls you can relax and enjoy magic trip.
Psilocybin mushrooms are powerful stimulant of nervous system. Therefore, in this section we will cover everything you need to remember BEFORE, DURING, and AFTER your psychedelic trip. It will help you to be prepared physically for the trip, maintain emotional balance, and recover after psychedelic experience.
#### Psilocybin mushrooms are contraindicated
⛔️ People under 18 years.
⛔️ Pregnant women and during breastfeeding period.
⛔️ People with epilepsy or latent epilepsy.
⛔️ People with schizophrenia or latent neuropsychiatric disorders.
⛔️ People with chronic heart disease.
❌ Do not consume psilocybin mushrooms if you are sick (including colds), in post-operative period, or just for fun.
❌ Do not combine with stimulants or alcohol.
#### How to take psilocybin mushrooms for a psychedelic trip?
You can simply chew on whole dried mushrooms and wash them down with water.
If you don't like mushroom taste you can prepare chocolates with mushrooms. Take a look at [Magic mushroom chocolate recipes](https://shroomok.com/en/wiki/Magic_mushroom_chocolate_and_psilocybin_candy_recipes "Magic mushroom chocolate and psilocybin candy recipes")
Another option of consumption is Magic mushroom tea. Take a look at [Magic mushroom tea recipe](https://shroomok.com/en/wiki/Magic_mushroom_tea "Magic mushroom tea")
#### Dosage of psilocybin mushrooms for a psychedelic trip
If you have any doubts and fears don't take a trip dose. Your fears are the basis for the Bad Trip.
Check out [**How to deal and prevent Psychedelic Bad trip**](https://shroomok.com/en/wiki/How_to_deal_with_or_prevent_psychedelic_bad_trip "How to deal and prevent Psychedelic Bad trip") section.
Start your acquaintance with mushrooms with smooth and save microdosing.
Check out [**Psilocybin Mushroom Microdosing Guide**](https://shroomok.com/en/wiki/Magic_mushrooms_microdosing "Magic mushrooms microdosing").
Don't push yourself. Don't let anyone pressure you in this process. Don't force this path. Your acquaintance with mushrooms should be mutual and calm.
If you decide to take a trippy dose it is important to know the right dosage.
**Trip dose depends on many factors:**
🔺 Overall tolerance to psilocybin
🔺 Ingestion frequency of psilocybin mushrooms
🔺 Individual features of hormonal and nervous system
🔺 Metabolism
🔺 Different types of mushrooms have different concentrations of psilocybin. For example, Panaeolus is more powerful than Psilocybe Cubensis.
🔺 Terms and conditions of storage of mushrooms. With prolonged storage mushrooms gradually lose the concentration of psychoactive substances.
🔴 The dosage does NOT correlate directly with body weight.
🔴 It is impossible to know and measure the required concentration of psilocybin at home!
Every single mushroom has different psilocybin concentration.
Moreover, small mushroom or mushroom abort can be more powerful than mature mushrooms.
Fresh mushrooms have higher potency than dried. Dried mushrooms can lose up to 50% of psilocybin concentration.
How to store properly, dry and freeze psilolocybin mushrooms you can check in [**How to dry and store psilocybe mushrooms**](https://shroomok.com/en/wiki/How_to_dry_and_store_psilocybe_mushrooms "How to dry and store psilocybe mushrooms")
❇️ For the very first psychedelic experience **1.5 - 2.0 grams** **of dried** Psilocybe Cubensis mushrooms (or 10-15 g fresh) are sufficient. With such dose your trip will be calm. You'll get acquainted with all its charms and be able to control yourself and overall situation. You won't run away in an unknown direction, you will not harm yourself. Even with Bad Trip symptoms you will be able to cope with it (with help of experienced sitter).
❇️ For the next experiments you can take **2.5 - 3.5 grams of dried** Psilocybe Cubensis mushrooms (or 15-25 g fresh). The dosage is individual! It is important to analyze and take into account previous psychedelic experiences. Despite the fact that each trip will be unique and unrepeatable.
❇️ Dosages **from 5 grams of dried** Psilocybe Cubensis mushrooms (or from 40 grams fresh) **and higher** can be completely unpredictable and even dangerous for inexperienced person. This dosage can only be afforded by experienced psychonauts.
Use **Medical** or **Jewelry scales** to know the exact dose.
[](https://shroomok.com/en/wiki/File:Weighter-scales-for-weighting-magic-mushrooms.jpg) Scales for weighting mushroom microdose**Shroomok's Choice on Amazon:**
[Digital Pocket Jewelry Scales - Scale Capacity 200 g, Scale Accuracy 0.01 g](https://www.amazon.com/gp/product/B091678KNF/ref=as_li_tl?ie=UTF8&tag=shroomok-20&camp=1789&creative=9325&linkCode=as2&creativeASIN=B091678KNF&linkId=6a106202fe009e78bcebbda93f5fa7b8) - $10.75
[Mini Digital Jewelry Scale - Capacity 500g, Accuracy 0.01g](https://www.amazon.com/gp/product/B07H3CCY59/ref=as_li_tl?ie=UTF8&tag=shroomok-20&camp=1789&creative=9325&linkCode=as2&creativeASIN=B07H3CCY59&linkId=c0230409c605193608d3f1bebfb48d59) - $10.99
[Professional USB Milligrams Scale - Capacity 50g, Accuracy 0.001g](https://www.amazon.com/gp/product/B07XXYHWJD/ref=as_li_tl?ie=UTF8&tag=shroomok-20&camp=1789&creative=9325&linkCode=as2&creativeASIN=B07XXYHWJD&linkId=0e26751f9eea9db98d26e35ffdaf0100) - $22.78
[All in One: Scales, Case, Tweezers, Calibration, Weighing Pans - Capacity 50 g, Acuracy 0.001g](https://www.amazon.com/gp/product/B011J88S8M/ref=as_li_tl?ie=UTF8&tag=shroomok-20&camp=1789&creative=9325&linkCode=as2&creativeASIN=B011J88S8M&linkId=162d89981048c3558625cdff8245135c) - $37.99
#### Psilocybin mushroom adverse reactions and entry syndrome
Taking mushrooms can cause a variety of physical discomfort. It can be minimized or even avoided by proper preparation for the psychedelic trip. You must be aware of them so as not to panic.
🔴 **Nausea.** With a right diet nausea may be minor or absent. It also depends on the dose.
🔴 **Stomach pain and gastrointestinal cramps.** It would be better to postpone psychedelic trip for a period of exacerbation of gastritis or ulcers.
🔴 **Soft intestinal stool.** When entering a trip there is often a desire to go to the toilet "in a big way." This is a normal reaction. It is also a mushroom hint that after the trip you should also pay attention to some detox for your body.
🔴 **Dizziness.** Normal reaction before starting visual effects.
🔴 **Fever and chills.** This is a normal reaction that lasts about 30 minutes.
🔴 **Increased salivation.**
🔴 **Sweating.** It comes closer to the middle or to the end of trip, when the body temperature drops.
🔴 **Rapid heartbeat and increased heart rate.**
All these are symptoms of the "trip entry syndrome". In general they last up to 1 hour.
After Entry Syndrome all of your senses will be more receptive (sounds, tastes, smells, visuals, tactile sensations).
As you close your eyes you'll see a range of colorful visual effects. Various figures and worlds in the form of mandalas or images of gods and elves. The world will become much brighter.
Everything around begins to move, breathe and the limits of the outer world, the macrocosm, are erased to the borders of the inner microcosm.
#### Trip timing
❓ **When do the first signs of Entry Syndrome appear?**
The magic mushrooms begin to work approximately 20-60 minutes after ingestion. Sometimes the first effects are noticeable within 10 minutes.
**❓ How long does the psychedelic mushroom trip last?**
The psychedelic trip lasts 3-6 hours. After that, the effect of the mushrooms gradually fades away.
The first hour is a "trip entry syndrome", when side reactions appear and a transition to the trip state occurs.
The next 2-3 hours of trip are the brightest and most intense.
#### Preparing for a psychedelic trip
[](https://shroomok.com/en/wiki/File:Psychedelic-mushroom-trip-preparation-set-and-setting.jpg) Mushroom trip preparation, set and settingProper preparation reduce side effects, which usually appear 20-60 minutes after consumption.
**There are 3 important things to take into account before tripping:**
1. **Physical preparation** — nutritional diet and general nervous system preparation.
2. **Human environment** — tripping with sitter, in a group of people or alone.
3. **Set & Setting** — preparation of the space and environment for the trip (home space, trip in nature, walking). Psychological preparation, informational diet, psycho-emotional attitude.
❗️During psychedelic trip your brain will work hard. It engages and uses many vital resources in a very short time.
❗️ It is important to prepare your body for such experience, so that during and after the tripping you won't feel weak and exhausted.
##### **Physical and informational preparation before a psychedelic trip**
This preparation starts 3 days (preferably 1 week) in advance. Perfect if all or some of these points are the foundation of your life style:
✅ Quit alcohol.
✅ Avoid heavy food. Follow lean vegetarian diet. Eat cereals, vegetable soups, fruits, vegetables, dried fruits, juices, tea. Eliminate meat, fat and fried food. Ideally to do a fasting day before the trip, or even go hungry.
Such diet will relieve the digestive tract and liver. This helps ease the nausea during the trip and provide a cushion for the liver to be loaded during the trip.
✅ Start consuming vitamins or food containing **B-vitamins** and **Magnesium**. They are important for nervous and immunity system support. Because your brain will work at its maximum capacity during the trip.
**Shroomok's Choice on Amazon:**
[**Magnesium** 500 mg | Vegan | 100 Caps.](https://www.amazon.com/gp/product/B00A7HDABW?&linkCode=ll1&tag=shroomok-20&linkId=3029817a1dab952190694e8c5b9b1bf8&language=en_US&ref_=as_li_ss_tl) - $9.63
[**Magnesium Complex** Capsules 500mg | 120 Caps.](https://www.amazon.com/gp/product/B094J1N8PF?&linkCode=ll1&tag=shroomok-20&linkId=8a4b1dff7c4c187bec18d91576960db8&language=en_US&ref_=as_li_ss_tl) - $13.95
[**Magnesium 250 mg** | Formulated for Enhanced Absorption | 240 Caps.](https://www.amazon.com/gp/product/B00Y3NPVMC?&linkCode=ll1&tag=shroomok-20&linkId=688b2b3b4b4719662a62a0e1d0ef28a1&language=en_US&ref_=as_li_ss_tl) - $33.47
[**B Complex**, Supports Immune and Energy Metabolism | Vegan | 65 Caps.](https://www.amazon.com/gp/product/B071J572QG?&linkCode=ll1&tag=shroomok-20&linkId=133f8395e4a0d08dd834de088e6537e5&language=en_US&ref_=as_li_ss_tl) - $14.34
[**Vitamin B Complex** (Vitamin B1, B2, B3, B6, B9, B12 Folic Acid) | 100 Caps.](https://www.amazon.com/gp/product/B0006ZNFMO?&linkCode=ll1&tag=shroomok-20&linkId=8dfb00f78399403bbcd5efa5332ad01d&language=en_US&ref_=as_li_ss_tl) - $19.97
[**Vitamin B Complex & Vitamin C** - Immune & Nervous System Support | Vegan | 250 Caps.](https://www.amazon.com/gp/product/B08KGXBF43?&linkCode=ll1&tag=shroomok-20&linkId=89db66bafdc77fe1e191c6f23c94c69b&language=en_US&ref_=as_li_ss_tl) - $14.99
[**B Complex** – Complete Formula for Vitamin B Benefits | Vegan | 60 Caps.](https://www.amazon.com/gp/product/B00DHTQNQ6?&linkCode=ll1&tag=shroomok-20&linkId=1a933311ac409718105aa9bb9739912e&language=en_US&ref_=as_li_ss_tl) - $9.98
[**Super B Complex Vitamins** - B1, B2, B3, B5, B6, B7, B9, B12 Folic Acid | Vegan | 90 Caps.](https://www.amazon.com/gp/product/B07414752B?&linkCode=ll1&tag=shroomok-20&linkId=593084a08b693109e4d8ae9eff50d700&language=en_US&ref_=as_li_ss_tl) - $16.49
✅ Practice information hygiene. Exclude stressful news, social networks for your information diet. It would be better to read a good book, watch a documentary, listen to music, playing music, walking, spend time for hobbies.
✅ Try to avoid stressful situations.
##### Preparation on the day of taking psilocybin mushrooms
You should get a good night's sleep and rest.
It is advisable nothing to eat this day. Psilocybin is more efficiently absorbed on an empty stomach and there will be fewer side effects in the form of nausea. After eating mushrooms your appetite will be instantly reduced to zero.
Better to organize your trip on a weekend. Greta if the next day you have a day-off for rethinking, post-effects, relax and restore your body.
In order not to lose your biorhythms, take mushrooms before 17:00 - 18:00. Then you can fall asleep by midnight. If you take mushrooms in the evening you should understand your trip can drag on for the whole night.
In some situations people specifically take mushrooms at night (silence, nobody disturb you, children sleep, etc.). In addition, in a dark room are always brighter visual effects.
In most ancient cultures the ceremony takes place from sunset to sunrise. A wonderful time of silence when the evening begins and you head out into the night.
If you decide tripping at home, then make cleaning in advance, prepare a relaxing place, candles, calm music, musical instruments, stuff for art etc.
If you are fond of creativity, you may want to draw, play musical instruments, record something during a trip, etc. Have everything you need for a hobby at your fingertips.
Prepare a blanket or warm cloth. During the tripping there will be a feeling of chills due to the increasing body temperature. It can even be during the hot season of the year.
Be sure to prepare mineral water (not soda!) or **water with electrolytes** to restore the conduction of signals from the nervous system. **You definitely need to drink every 30-60 minutes!** This is often forgotten during a trip. You don't need dehydration!
**Shroomok's Choice on Amazon:**
[Coconut Water Powder HYDRATE ORIGINAL | No Added Sugars | Gluten Free | Vegan - 8 oz](https://www.amazon.com/gp/product/B0748ZCLX4?&linkCode=ll1&tag=shroomok-20&linkId=8e6d9887ed25899a458b253292fbf02c&language=en_US&ref_=as_li_ss_tl) - $14.81
[Organic Electrolyte + Mineral Powder, No Added Sugar](https://www.amazon.com/gp/product/B08KGPJJ7D?&linkCode=ll1&tag=shroomok-20&linkId=388d1bcb4ba6475631eac925195f28ca&language=en_US&ref_=as_li_ss_tl) - $14.99
[Electrolyte Supplement Drink Mix | Single-Serving Sticks | Low Sugar - 16 Count](https://www.amazon.com/gp/product/B01IT9NLHW?&linkCode=ll1&tag=shroomok-20&linkId=44f0b695cd5ccf44bebcf75a4a31654c&language=en_US&ref_=as_li_ss_tl) - $23.95
If this is your first time eating magic mushrooms, it is not recommended to go to any parties. Spend this time for observing your feelings. Stay with yourself.
##### Trip with a sitter
If this is your first time taking mushrooms, don't do it alone. The first trip and the experimental high dose mushroom trips are better to take with an experienced sitter.
The presence of sitter gives a sense of calm and wellbeing. Sitter remains completely sober during the trip. Therefore, you can fully focus on yourself.
Sitter is someone who takes care of you during your whole journey and does so discreetly. He observes and notices your needs, so that you are not distracted by trifles.
For example, he/she will give you a glass of water.
Sitter notices when you are cold and cover you with a blanket.
He/she can calm you down if you are confused. The sitter helps you stay calm and fully experience the trip.
Sitter should not act like a psychologist or psychoanalyst. He is silent for the whole trip, calmly observes, does not distract with conversations and questions.
**Sitter shouldn't guide the trip!**
The best option for a sitter is a trusted friend of yours who understands how to trip. Or an experienced psychonaut.
Sitter's role is a passive contribution to your trip.
Sitter can guide, soothe, touch you only if something goes wrong and you slide into a Bad Trip. In other cases sitter is a passive observer.
##### Group trip
If you decide to do a trip with a group of people, do it in a small group. 2-4 people is the best option. Otherwise, you will really interfere with each other and clog the air. Each participant can be on his own wave and it is important not to pull back or interrupt each other.
If no one in the group has experience with psilocybin mushrooms, we suggest choosing a responsible “senior” and that person should take a lower dose than the others.
In a group trip the most important thing is the trust between participants. You must coordinate your actions BEFORE the trip. For example, someone will offer to listen to music, while the other person needs silence. It is important to discuss such things in advance, before tripping.
##### Trip in nature
Make sure to "pack" a few days before the trip. Fill your brain with interesting information from books, documentaries, or just walk around, reflect and write down your own thoughts and questions. Don't litter your head with trash information.
📍 Plan in advance the location for your psychedelic journey.
☀️ Tripping in nature should be during the daytime.
🚴♀️ Don't drive a car! Before starting a trip, you must clearly think about how you will get to your destination and how to come back home.
🌦 Pay attention to weather forecast and arrange in advance what you need to bring with you in case of rain and some insect protection etc. Regardless of the weather forecast take a warm blanket or warm clothes with you.
🧻 Be sure to take a toilet paper. It is not a joke! The mushrooms will help you with "detox" before entering the trip. You must be fully armed!
💧 Take mineral water (not soda!) or water with electrolytes. You can take hot tea with you in a thermos. Remember to drink every hour.
👥 Inform somebody (for example, your close friend) where are you going. Not necessary with details about the main purpose.
##### Surrounding area
[](https://shroomok.com/en/wiki/File:Golden-teacher-effects-and-trip.png) Surrounding area and set&setting for tripping
For most people their first trip is an unforgettable experience. The environment for tripping has a big impact on how you feel during a trip.
The body under the influence of psychedelics has a very subtle sense of nature and space. The weather has a particular impact. Try to eat mushrooms in good clear weather.
The moon and lunar cycles affect the fluids in our body, which make up 80% of our body. Try to refrain from psychedelic trips on the 19-th and 29-th lunar days. You may think this advice is something like esoteric, but it is not. The influence of the Moon on the world's oceans is incredible! So why do you think the Moon does not affect the human body!?
Always start a trip in a pleasant, comfortable and familiar place. It should be calm and safe in this place. Your home is a great place for your first mushroom trip.
You can also go outside, into a garden, park, forest or field.
But the bustling city is not the best place. The tranquility and beauty of nature works much better.
It is not recommended, especially during the first trip, to make contact with the "outside world". For example, appearing in public, calling friends, sticking to the phone, messaging, or going to parties.
Mushroom is not a party psychedelic!
It would be better turn off your phone and do without the Internet, so that you can fully immerse yourself in the atmosphere and focus on your feelings without being distracted.
##### **Set & Setting**
It is not recommended to go on a psychedelic trip after a stressful day or a traumatic event. Why?
A trip can focus on negative emotions and events. This can be an extremely difficult journey called the Bad Trip.
> Check out [**How to deal with or prevent psychedelic Bad Trip**](https://shroomok.com/en/wiki/How_to_deal_with_or_prevent_psychedelic_bad_trip "How to deal with or prevent psychedelic bad trip")
A large group of strange people can occur bad influence. Except the groups are led by an experienced shaman.
Examples of favorable settings: nature, where there is no hustle and bustle of civilization; a clean bedroom with dim lights, a pleasant landscape, or a favorite quiet place where no one will disturb you.
Prepare your favorite music, your favorite blanket and things for psychedelic creativity.
#### Recovering after psychedelic trip
❇️ Drink **mineral water** or **water with electrolytes** to rebalance your body.
**Shroomok's Choice on Amazon:**
[Coconut Water **Powder HYDRATE** ORIGINAL | No Added Sugars | Gluten Free | Vegan - 8 oz](https://www.amazon.com/gp/product/B0748ZCLX4?&linkCode=ll1&tag=shroomok-20&linkId=ccbc7630d1d41f0be71464a3e6453841&language=en_US&ref_=as_li_ss_tl) - $14.81
[Organic Electrolyte + Mineral Powder, No Added Sugar](https://www.amazon.com/gp/product/B08KGPJJ7D?&linkCode=ll1&tag=shroomok-20&linkId=dceb1ecbf2fc385183847b77dabb66a2&language=en_US&ref_=as_li_ss_tl) - $14.99
[**Electrolyte** Supplement Drink Mix | Single-Serving Sticks | Low Sugar - 16 Count](https://www.amazon.com/gp/product/B01IT9NLHW?&linkCode=ll1&tag=shroomok-20&linkId=20796c89a6bc809376db28d1a6541ddc&language=en_US&ref_=as_li_ss_tl) - $23.95
❇️ Add vitamins or eat food with high **vitamin B** for Immune and Nervous System Support.
**Shroomok's Choice on Amazon:**
[Solgar B-Complex (B1, B2, B3, B6) | Vegan | 100 Caps.](https://www.amazon.com/dp/B000RZQNV8?&linkCode=ll1&tag=shroomok-20&linkId=d29d25487b88948f064867813ef841a8&language=en_US&ref_=as_li_ss_tl) - $17.94
[**B Complex**, Supports Immune and Energy Metabolism | Vegan | 65 Caps.](https://www.amazon.com/gp/product/B071J572QG?&linkCode=ll1&tag=shroomok-20&linkId=133f8395e4a0d08dd834de088e6537e5&language=en_US&ref_=as_li_ss_tl) - $14.34
[**Vitamin B Complex** (Vitamin B1, B2, B3, B6, B9, B12 Folic Acid) | 100 Caps.](https://www.amazon.com/gp/product/B0006ZNFMO?&linkCode=ll1&tag=shroomok-20&linkId=8dfb00f78399403bbcd5efa5332ad01d&language=en_US&ref_=as_li_ss_tl) - $19.97
[**Vitamin B Complex & Vitamin C** - Immune & Nervous System Support | Vegan | 250 Caps.](https://www.amazon.com/gp/product/B08KGXBF43?&linkCode=ll1&tag=shroomok-20&linkId=89db66bafdc77fe1e191c6f23c94c69b&language=en_US&ref_=as_li_ss_tl) - $14.99
[**B Complex** – Complete Formula for Vitamin B Benefits | Vegan | 60 Caps.](https://www.amazon.com/gp/product/B00DHTQNQ6?&linkCode=ll1&tag=shroomok-20&linkId=1a933311ac409718105aa9bb9739912e&language=en_US&ref_=as_li_ss_tl) - $9.98
[**Super B Complex Vitamins** - B1, B2, B3, B5, B6, B7, B9, B12 Folic Acid | Vegan | 90 Caps.](https://www.amazon.com/gp/product/B07414752B?&linkCode=ll1&tag=shroomok-20&linkId=593084a08b693109e4d8ae9eff50d700&language=en_US&ref_=as_li_ss_tl) - $16.49
❇️ Add vitamins or eat food with **Magnesium** content.
**Shroomok's Choice on Amazon:**
[Solgar Magnesium with B6, 250 Tablets](https://www.amazon.com/Solgar-Magnesium-Vitamin-250-Tablets/dp/B00020ICAI?&linkCode=ll1&tag=shroomok-20&linkId=92748176288adb780dff64718c02cbb6&language=en_US&ref_=as_li_ss_tl) - $16.82
[**Magnesium** 500 mg | Vegan | 100 Caps.](https://www.amazon.com/gp/product/B00A7HDABW?&linkCode=ll1&tag=shroomok-20&linkId=3029817a1dab952190694e8c5b9b1bf8&language=en_US&ref_=as_li_ss_tl) - $9.63
[**Magnesium Complex** Capsules 500mg | 120 Caps.](https://www.amazon.com/gp/product/B094J1N8PF?&linkCode=ll1&tag=shroomok-20&linkId=8a4b1dff7c4c187bec18d91576960db8&language=en_US&ref_=as_li_ss_tl) - $13.95
[**Magnesium 250 mg** | Formulated for Enhanced Absorption | 240 Caps.](https://www.amazon.com/gp/product/B00Y3NPVMC?&linkCode=ll1&tag=shroomok-20&linkId=688b2b3b4b4719662a62a0e1d0ef28a1&language=en_US&ref_=as_li_ss_tl) - $33.47
❇️ Add vitamins or eat food with high **vitamin C** content to support your body metabolism after tripping. Drink juices and eat fruits with high **vitamin C** content (orange, grapefruit, kiwi, pineapple, broccoli, cauliflower).
**Shroomok's Choice on Amazon:**
[Solgar Vitamin C 1000 mg, 250 Veg. Capsules](https://www.amazon.com/Solgar-Vitamin-1000-Vegetable-Capsules/dp/B00014D1QU?&linkCode=ll1&tag=shroomok-20&linkId=e8cb7582fbc2673b5d1df61844ddb936&language=en_US&ref_=as_li_ss_tl) - $27.81
[**Vitamin C w/Rose Hips, Acerola & Bioflavonoids** | 1000mg | Vegan | 250 Caps. as trip stopper](https://www.amazon.com/gp/product/B006H9RESE?&linkCode=ll1&tag=shroomok-20&linkId=65a477e300c155e1241cd8752c833c7f&language=en_US&ref_=as_li_ss_tl) - $26.09
❇️ **Don't eat too much especially heavy food right after tripping!** Prefer light food, fruits, vegetables and gradually move on to heavier food. The principle is similar to the way out of fasting.
❇️ Give yourself good **rest and sleep**. Healthy sleep is especially important for **nervous and immunity system** recovery.
Remember, preparing for a trip and recovering after tripping are very important for your health!
#### Afterword
Reflect and think about questions you would like to be answered during your trip.
Why do you need this experience?
Prepare and tune in for the trip like a real journey. This will be a journey to another world. Let go control and allow yourself to be observer.
Expect nothing.
Allow yourself to meet with yourself without conditional dividing into micro- and macro-
Be prepared for the thought of the trip and its post-effects to accompany you for about a month. It takes more time for insights, rethinking, changes and conclusions...
> 🔴 **Recommended:** [**Bad Trip: How to stay safe? How to reduce the effect of psilocybin mushrooms**](https://shroomok.com/en/wiki/How_to_deal_with_or_prevent_psychedelic_bad_trip "How to deal with or prevent psychedelic bad trip")
#### Support Shroomok
If you find my work, articles, advices I've sharing helpful you can support Shroomok in the following way.
🍄 [**Buy Shroomok a mushroom**](https://www.buymeacoffee.com/shroomok) as a donation and say something nice!
Join Shroomok Growers Community, ask questions and share your experience in **[Discord](https://discord.com/invite/ngKhQDmymD) and [Reddit](https://www.reddit.com/r/Shroomok/).**
Have a safe trip! Take care!
Peace, Shroomok 🤍
## How to deal with or prevent psychedelic bad trip
[How to deal with or prevent psychedelic bad trip](https://shroomok.com/en/wiki/How_to_deal_with_or_prevent_psychedelic_bad_trip)
[](https://shroomok.com/en/wiki/File:Bad-trip-illustration.png) Bad trip with psilocybin mushrooms### Mushroom Bad Trip experience
#### Disclamer
Hey Humanity, remember! No one guide save you from facing with yourself and your fears.
Mushrooms are not a silver bullet or pill against all problems. Mushrooms are just a tool.
YOU and only YOU are responsible for the possible consequences when using psychedelics.
All materials in this article is only recommendations according to our own experience. They are meant to encourage you to think and be responsible for your actions.
#### Psilocybin mushrooms are contraindicated
⛔️ People under 18 years.
⛔️ Pregnant women and during breastfeeding period.
⛔️ People with epilepsy or latent epilepsy.
⛔️ People with schizophrenia or latent neuropsychiatric disorders.
⛔️ People with chronic heart disease.
❌ Do not consume psilocybin mushrooms if you are sick (including colds), depressed, in post-operative period, or just want to forget and escape from worries.
❌ Never mix Psilocybin mushrooms with alcohol.
#### What is Bad Trip?
Bad Trip — is a slang expression, a state of fear and panic during a psychedelic trip session.
#### Bad trip causes and condition
If you have any doubts and fears don't take a trip dose. Your fears are the basis for Bad Trip.
Don't pressure yourself. Don't let anyone pressure you in this process. Don't force. Your introduction should be smooth, soft and relaxed. The main reason for the "bad trip" can be your own doubts and fears.
Those who take mushrooms for the first time may have negative feelings caused by uncertainty: "What have I done to myself?"
Or fear: "Will I ever get out of this trip?"
Both states are tricks of the mind. Your ego doesn't want to let go of control. This is the situation where panic can take control of you completely and put you in its time loop. You will walk in a vicious circle and be afraid to jump out of it. This state can last for hours.
Another example is when you completely lose control and your sense of time. You can find yourself in a frightening situation that has to do with your past (flashback) or present.
#### When Bad Trip can be helpful
Bad Trip experience can be a meeting with your hurt, pain and thoughts you need to let go. You can meet with real "Me" who can be scary. Or with your real desires you actually ignore and it makes you feel scared and hurt.
Such states are not dangerous. On the contrary, they work to expand your boundaries. The more difficult this process the more work is required of you.
Bad Trips can turn out to be even helpful trips. You acknowledge something, let go of something, understand something, rethink or learn something.
Try to turn this bad trip to your advantage. After all, there is a reason why you had such kind of experience.
#### How to deal with mushroom bad trip
Once the psychedelics start working you can't stop their effects. It is useless to resist! You can only accept it.
Bad thoughts, fears, traumas, resentments, worries and mental wounds cause a bad trip. Emotions that lie on the surface or deep mental wounds can have a particularly negative effect.
Of course, each person accumulates a different set of this junk over the course of his or her life. But what matters here is how far and deep this dump of emotional junk and fears is buried.
In this situation you need to try to calm down, breathe evenly, drink water and take bad thoughts as a process of clearing your mind.
Try not to panic when your mind is full of negative images and thoughts.
Don't look at the clock waiting for the moment when you finally let go.
First, you will have an altered sense of time.
And secondly, you will only concentrate on your fears in this way, thus driving yourself into a repeating and reinforcing loop of experience. This is a system with positive feedback loop. But the word "positive" in this case doesn't describe something good, but something that reinforces itself. There is a risk of sinking very deeply.
If a person slips into a bad trip it is important to have experiences sitter who can guide you in the right direction.
Sitter doesn't ignore pain or trauma. Doesn't walk away from the topic. Sitter is supposed to help the person through this pain.
At the same time, sitter helps not to get stuck in that state until the end of the trip and leads smoothly to the bright side of life.
If you feel you need to call somebody for help, contact someone who has experience with psychedelics. You can make arrangements in advance and warn this person to be your sitter during the trip in person or be available via phone.
Don't call close family members, as these people usually don't know how to help you. They can only make the situation worse by adding their panic. Perhaps even more than you panic.
#### How to reduce the effects of psilocybin mushrooms?
❇️ **Vitamin C** in pills (1000 mg), glass of orange or grapefruit juice can help to reduce the effects of psilocybin mushrooms.
**Shroomok's choice on Amazon:**
[Solgar Vitamin C 1000 mg, 90 Tablets](https://www.amazon.com/Solgar-Vitamin-1000-Mg-Tablets/dp/B000Z8WY3I?&linkCode=ll1&tag=shroomok-20&linkId=782699c35c7b9a131ef0a98016b4efa6&language=en_US&ref_=as_li_ss_tl) - $13.20
[**Vitamin C w/Rose Hips, Acerola & Bioflavonoids** | 1000mg | Vegan | 250 Caps. as trip stopper](https://www.amazon.com/gp/product/B006H9RESE?&linkCode=ll1&tag=shroomok-20&linkId=576710dc8f34514928152b7612066e01&language=en_US&ref_=as_li_ss_tl) - $25.99
❇️ **Valerian** pills are also effective in addition to vitamin C (1000 mg).
[Solgar Valerian Root Vegetable Capsules, 100 Count](https://www.amazon.com/Solgar-Valerian-Vegetable-Capsules-Count/dp/B0001VW3YY?&linkCode=ll1&tag=shroomok-20&linkId=e2b13c5f21dd03c5d35a4cddacdd1c17&language=en_US&ref_=as_li_ss_tl) - $31.80
❇️ **Glucose** pills are also effective in addition to Vitamin C (1000 mg) and Valerian.
[Fast-Acting Glucose Chewable Energy Tablets, Different tastes](https://www.amazon.com/dp/B08DJ67YC9?&linkCode=ll1&tag=shroomok-20&linkId=f797f32da1a608d1f1e4b418a84bbb7e&language=en_US&ref_=as_li_ss_tl) - $26.99
Sweet chocolate and sweet tea reduce the effects.
Sometimes a quiet calm walking can help. But it depends on the outside conditions. Noisy and crowded outside environments, on the contrary, cause anxiety.
Start your introduction to mushrooms with microdosing.
> 🔴 Recommended: **[Psilocybin Mushroom Microdosing Guide](https://shroomok.com/en/wiki/Magic_mushrooms_microdosing "Magic mushrooms microdosing")**
To reduce the risk of Bad Trip always prepare for your journey.
> 🔴 Recommended: **[How to prepare for psychedelic mushroom trip and recovering after tripping](https://shroomok.com/en/wiki/How_to_prepare_for_psychedelic_mushroom_trip "How to prepare for psychedelic mushroom trip")**
#### Support Shroomok
If you find my work, articles, advices I've sharing helpful you can support Shroomok in the following way.
🍄 [Buy Shroomok a mushroom as a donation](https://www.buymeacoffee.com/shroomok) and say something nice!
Join Shroomok community, ask for advice and share your trip report in [Discord](https://discord.com/invite/ngKhQDmymD) and [Reddit](https://www.reddit.com/r/Shroomok/)
Have a safe trips!
Peace, Shroomok 🤍
## Magic mushroom chocolate and psilocybin candy recipes
[Magic mushroom chocolate and psilocybin candy recipes](https://shroomok.com/en/wiki/Magic_mushroom_chocolate_and_psilocybin_candy_recipes)
[](https://shroomok.com/en/wiki/File:Magic_mushroom_chocolate_recipe.jpg) Own mushroom chocolate is a great way to make sure you have total control over its quality. Also, it's another option to store shrooms for a long period### Magic Shroom Chocolate
This option of taking magic mushrooms especially appeal to those who don't like shroom taste and aroma. Chocolate masks it perfectly!
Moreover, chocolate (especially dark chocolate, 70% of cocoa and higher) has some additional benefits as the delivery system for psilocybin; it contains plant chemicals called flavanols (help to protect the heart), caffeine and magnesium (stimulate nervous system and improve cognitive function) and rich in antioxidants.
You can use shroom sweets for [psychedelic mushroom trip](https://shroomok.com/en/wiki/How_to_prepare_for_psychedelic_mushroom_trip "How to prepare for psychedelic mushroom trip") and [microdosing](https://shroomok.com/en/wiki/Magic_mushrooms_microdosing "Magic mushrooms microdosing").
It’s super easy to prepare a mushroom chocolate bar or homemade shroom candies.
#### 5 reasons you should make shroom chocolate at home
[](https://shroomok.com/en/wiki/File:Chocolate-sweets-with-magic-mushrooms.jpg) Chocolate with magic psilocybin mushroomsMaking your own shroom chocolate with your home grown shrooms is a great way to make sure you have total control over its quality.
1. **The quality of magic mushrooms.** As a mushroom cultivator you know everything about the quality of mushrooms you are going to add into chocolate: growing conditions, possible contaminations and diseases during the growing cycle, the quality of harvested mushrooms, how they were dried, storage conditions and how long they were stored before adding to chocolate.
2. **Dosage.** You can add any amount of dried magic mushrooms in chocolate bar and be sure about the dosage you take. It is extremely important for conscious microdosing course and tripping as well.
3. **Type and amount of sugar.** You can replace sugar with honey or syrup; make a low-carb chocolate with stevia; sugar-free chocolate with allulose sweetener or sea salt.
4. **Customize with your favourite add-ins.** Play with different tastes, the possibilities abound! dried fruits: freeze-dried strawberries, crushed banana chips, dried blueberries, candied fruits, coconut flasks; seeds: sesame, chia, hemp; spices: cinnamon, cardamom, vanilla, peppermint extract, a pinch of cayenne, coffee, sea salt; nuts: crushed pecans, pistachios, almonds, walnuts, peanuts or peanut butter.
5. **Vegan, dairy free, additives and allergens free.** Remove/replace any ingredient according to your personal diet and preferences. Create premium chocolate with high quality ingredients.
#### How to prepare magic mushrooms for shroom chocolate
The following steps apply to any mushroom chocolate recipe.
**Step 1. Dry magic mushrooms.**
The best way to dry shrooms is dehydrator ([Amazon](https://amzn.to/43nJa1D)). Set the temperature 95-122°F or +35°..+50°C. Drying time depends the weight of mushrooms and temperature (from 5 to 16 hours).
Properly dried shrooms should crisp like chips and have minimal color changes (not burned black!)
You can also dry shrooms with fan, heat fan, on radiator or in the oven (low heat mode).
> Read more: [How to dry and store magic mushrooms](https://shroomok.com/en/wiki/How_to_dry_and_store_psilocybe_mushrooms "How to dry and store psilocybe mushrooms")
**Step 2. Weigh the necessary amount of dry shrooms.**
Use high precision gram scale, jewellery or medical scales ([Amazon](https://amzn.to/3PXsRWu)).
Weight of mushrooms is up to you. It is based on your goals (for tripping or microdosing).
For instance, for microdosing add **3 grams of dried mushrooms.** Mixed them with chocolate, poured it into an ice cube tray (10 cells), so that on average each chocolate cube = 0.3g of mushrooms, which is average microdose.
For tripping you can add 10 grams of of dried mushrooms. Poured chocolate into an ice tray/mold (10 cells), so that on average each chocolate candy = 1g of mushrooms. You can add less or more, depends on your individual microdose or tripping dose.
**Step 3. Turn dry mushrooms into a powder** in a coffee grinder ([Amazon](https://amzn.to/43pcSU0))
Now your mushroom powder ready to use for any shroom chocolate recipe!
#### **Simple recipe of shroom chocolate**
[](https://shroomok.com/en/wiki/File:Mushroom-chocolate-simple-recipe.jpg) Ready mushroom chocolates##### Ingredients
1. Dry magic mushrooms (follow [Mushroom Growing Guide](https://shroomok.com/articles:grow-mushrooms-at-home-guide) to grow your own shrooms)
2. Your favourite chocolate bar ([Amazon](https://amzn.to/3ru78v5)). I prefer dark chocolate 70% of cocoa and higher. It lasts longer and higher in flavanols; though keep in mind the higher % of cocoa, the greater the bitter flavor.
##### Equipment
1. Gram scales
2. Coffee grinder
3. Ice tray or silicone chocolate/baking mold ([Amazon](https://amzn.to/3risXNV))
4. Cup or mug
5. Saucepan
6. Tablespoon
7. Stove
##### Shroom chocolate cooking
[](https://shroomok.com/en/wiki/File:Mushroom-chocolate-cooking-process.jpg) Psilocybin mushroom chocolate cooking process1. Weigh the necessary amount of dry mushrooms and grind them in a in a coffee grinder.
2. Melt chocolate over a double boiler. Break the chocolate bar into small pieces. Put it in a cup. Fill the saucepan with some water (about 1-2 inches) and put the cup in it. Turn on the stove top and bring the water to a gentle simmer over medium-low heat. In this way chocolate melts slowly and won't scorching. Melt slowly and stir continually. This may be done on a stove top on low heat or in a microwave oven on 50% power.
3. Add mushroom powder in a melted chocolate. Mix thoroughly.> Don't afraid to add shroom powder in warm chocolate, shrooms won't lose their potency. Usually I put shrooms when chocolate is around 60-70C or 140-160F
4. Pour chocolate evenly into the ice tray or silicone chocolate mold. Try to do it fast, because chocolate hardens quickly.[](https://shroomok.com/en/wiki/File:Chocolate-sweets-with-psilocybe-mushrooms.jpg) Chocolate sweets with magic mushrooms psilocybe cubensis
5. Let the magic sweets harden for 1-2 hours in the fridge or 20-30 minutes in the freezer. [](https://shroomok.com/en/wiki/File:Mushroom-chocolate-sweets-cooking-process.jpg) Mushroom chocolate sweets cooking process
6. Release chocolate bar/shapes from the ice tray/mold. Ready](https://shroomok.com/en/wiki/File:Mushroom-chocolate-sweets-for-microdosing.jpg) Mushroom chocolates for microdosing . Each candy has 0,25 gram of psilocybe cubensis
##### How and how long to store shroom chocolate
Store this shroom chocolate in a cool dry place (60-70F or 15-20C) in a tightly sealed food container.
Storing in refrigerator or freezer can promote the chocolate to “bloom,” a whitish coating caused by sugar rising to the surface due to excess moisture. It does not affect the flavor or quality, but does not look appealing. However while storing in freezer you can be sure that shroom chocolates are good.
Such pure dark chocolate lasts longer, than milk chocolate and homemade chocolate with additional ingredients (milk, milk butter, nuts, seeds etc).
If stored in freezer dark shroom chocolate lasts **up to two years.** Maybe longer, but I haven't been storing shroom sweets for longer than 2 years. Anyway, I know for sure from personal experience, that chocolates were good and shrooms didn't lose their potency for this time.
#### Homemade milk and white mushroom chocolate
[](https://shroomok.com/en/wiki/File:Chocolate-sweets-with-magic-mushroom.jpg) Magic chocolate with psilocybin mushrooms##### Ingredients
**for milk chocolate:**
1. Dry magic mushrooms
2. Cacao/cocoa butter or coconut oil ([Amazon](https://amzn.to/44Q8sa1)) - 1/2 cup
3. Unsweetened cacao/cocoa powder ([Amazon](https://amzn.to/44Gxpo6)) - 1/2 cup
4. Powdered sugar - 1/2 cup (use stevia, or erythritol as a substitution for sugar)
5. Dry milk powder or coconut/soy milk powder for a dairy-free version - 1/4 cup ([Amazon](https://amzn.to/3PYQfTj))
**for white chocolate (without cocoa):**
1. Dry magic mushrooms
2. Cocoa butter / coconut oil - 1/2 cup
3. Powdered sugar - 1/4 cup
4. Milk powder - 3/4 cup
> Optional: pinch of salt or sea salt, vanilla extract, spices, seeds, nuts for your choice
##### Equipment
1. High precision gram scales
2. Coffee grinder
3. Ice tray or silicone chocolate mold
4. Saucepan
5. Stir spoon or silicone spatula
6. Stove
##### Cooking
Step 1. Melt cocoa butter or coconut oil over double boiler method.
Step 2. Mix dry ingredients (cacao powder, sugar, milk powder and magic mushrooms powdered in a coffee grinded). Add them to melted cocoa butter. Whisk the chocolate paste.
Step 3. Pour the mixture in the ice tray or moulds.
Step 4. Let it harden in refrigerator for 1-2 hours or in a freezer for 20-30 mins.
Step 5. Remove from the mold. Ready!
##### Storage instructions
Store shroom chocolate in an airtight container in the fridge for 1 month or in the freezer up to 6 months.
#### **Craft mushroom chocolate recipe**
This recipe will appeal to those who want to make 100% craft chocolate from natural ingredients at home.
[](https://shroomok.com/en/wiki/File:Psilocybe-mushroom-chocolate-ingredients.jpg) Ingredients for making magic mushroom chocolate##### **Ingredients**
1. Dry magic mushrooms (Psilocybe Cubensis) - 3-4 grams (for microdoses) or 10-20 grams (for trip doses). In current recipe I added 3 grams of dried mushrooms (for microdosing).
2. Cocoa powder - 70 grams ([Amazon](https://amzn.to/44Gxpo6))
3. Milk butter or cocoa butter or coconut oil — 50-70 grams.
4. Wheat flour — 2 teaspoons.
5. Whole milk (use coconut/almond/soy milk for a dairy-free version) — 3-5 tablespoons.
6. Honey — 2-3 tablespoons (5-7 tablespoons for sweet tooth). Use sugar, cane sugar, stevia or sweetener instead of honey.
7. Pinch of sea salt.
8. Optional for decoration and additional flavor: sesame seeds, walnuts, vanilla extract, cinnamon, coconut flakes etc.
**Total: ~200 grams of mushroom chocolate**
##### Equipment
1. High precision gram scales.
2. Coffee grinder.
3. Ice tray or silicone chocolate/bakery mold
4. Saucepan
5. Stir spoon
6. Stove
7.
##### **Mushroom chocolate cooking**
**Step 1.** Melt the butter on the lowest heat or use a double boiler method.
[](https://shroomok.com/en/wiki/File:Psilocybe-mushrooms-chocolate-cooking-process.jpg) Step 1. Melt butter (70-100 grams)**Step 2.** Add wheat flour to the melted butter. Stir it. Then add honey or sugar/stevia/sweetener. The saucepan should just barely warm up. The temperature of the ingredients up to +70°C or 160°F (this is because I use honey and high temperature bad for honey).
[](https://shroomok.com/en/wiki/File:Psilocybe-mushrooms-chocolate-cooking-recipe.jpg) Step 2. Add flour (1,5 teaspoon). Add honey or sugar (1-3 tablespoons)
**Step 3.** While stirring, slowly pour the milk and mix thoroughly. You may use milk powder or vegan milk as well (e.g. coconut/almond/soy milk)
[](https://shroomok.com/en/wiki/File:Magic-chocolate-sweets-with-mushrooms-recipe.jpg) Step 3. Add milk (3-5 tbsp)
**Step 4.** While stirring all the ingredients slowly add the cocoa/cacao powder. Stir until a smooth mass is formed.
[](https://shroomok.com/en/wiki/File:Mushroom-chocolate.jpg) Step 4. Slowly add cocoa powder ~70 grams
**Step 5.** Add dried psilocybin mushrooms Psilocybe Cubensis. Mushrooms should be grinded into a powder (i.g. with coffee grinder). The weight of the mushrooms is up to you. This mixture can easily consist of 3-4 grams (for micro doses) or 10-20 grams (for trip doses). Stir thoroughly!
[](https://shroomok.com/en/wiki/File:Mushroom-chocolate-sweets-recipe.jpg) Step 5. Add dried grinded magic mushrooms and mix it well
**Step 6.** Prepare ice tray or any molds you have at home (silicone chocolate or bakery molds).
[](https://shroomok.com/en/wiki/File:Handmade-mushroom-chocolate-forms.jpg) Step 6. Prepare molds for magic chocolate
**Step 7.** Pour prepared mushroom chocolate into ice tray/chocolate mold. Then put it in the fridge and let your chocolates harden for 1-2 hours; in freezer for 20-30 mins.
[](https://shroomok.com/en/wiki/File:Mushroom-chocolate-sweets-cooking-process.jpg) Step 7. Pour chocolate with magic mushrooms into ice molds and put to fridge for 1-2 hours**Step 7.** Remove chocolate molds from the fridge. Take out chocolate candies. The chocolate will be soft a little - this is normal. You can roll the chocolates in sesame seeds, chopped walnuts or cocoa powder. The magic chocolate box is ready!
[](https://shroomok.com/en/wiki/File:Mushroom-chocolate-recipe.jpg) Step 7. Ready mushroom chocolateHere are 200 grams of chocolate = **20 sweets** which contain **3 grams** of dried mushrooms = **0.15g of shrooms per 1 sweet.**
If you divide your chocolate into **20 sweets** with **20 grams of dry mushrooms** = **1g of shrooms per 1 sweet.**
[](https://shroomok.com/en/wiki/File:Magic-mushroom-chocolate-candy-sweets-recipe.jpg) Chocolate sweets recipe with magic mushrooms Psilocybe Cubensis. Let's cook together!##### Storage instructions
This recipe includes such ingredients as butter and milk that can't last for a long time. Store this shroom candies in an airtight container in the fridge for 2-3 weeks or in the freezer up to 6 months.
#### Afterwords
Magic chocolates surprise anyone with its look and taste.
Play with different shapes, types of chocolate and ingredients to make unique magic sweets.
[](https://shroomok.com/img_orig/f84be5/4032_micro-and-some-macro-doses-chocolates-by-6u9.jpg) [Micro and some macro doses chocolates by 6~ʏʊƈǟ~9🍄](https://shroomok.com/en/wiki/File:micro-and-some-macro-doses-chocolates-by-6u9-1c3a6f)[](https://shroomok.com/img_orig/ece58b/4032_that-was-the-valentines-day-batch-mushroom-sweets-by-imaghost.jpg) [That was the Valentine’s Day batch - mushroom sweets by I’mAGhost](https://shroomok.com/en/wiki/File:that-was-the-valentines-day-batch-mushroom-sweets-by-imaghost-be0a09)Bon appetit! Take proper microdoses and have save magic trips!
If you find my work helpful support me with subscription or one-time donation on [buymeacoffee](https://www.buymeacoffee.com/shroomok)
Join Shroomok Community on [Discord](https://discord.com/invite/ngKhQDmymD) and [Reddit](https://www.reddit.com/r/Shroomok/) for questions and sharing your experience.
Peace, Shroomok 🤍
# Mushrooms Q&A
## How to store mushroom spore syringe
[How to store mushroom spore syringe](https://shroomok.com/en/wiki/How_to_store_mushroom_spore_syringe)
### How to store Mushroom Spore Syringes for a long time
***Liquid spore syringe*** is a sterile syringe with **mushroom spores** and **sterile water**. It is a fast method for substrate inoculation, agar inoculation or making liquid culture (LC). Spore syringe is easy to make by your own.
> 🔴 Recommended: [How to make Mushroom Spore Syringe](https://shroomok.com/en/wiki/Liquid_psilocybe_spore_syringe "Liquid psilocybe spore syringe")
What to do if you have ready to use spore syringe, but need time for growing preparation or postpone your cultivation process?
#### How long mushroom spore syringe can be stored?
Ready-made mushroom spore syringe if stored properly stay viable for mycological manipulations **up to 12 month** and even more.
#### What temperature should spore syringes be stored?
If you are going to start your mushroom growing process in the nearest 1-3 weeks, no problem to store spore syringe at room temperature **+20..25°C** or **68-77°F** in **dark place** and **airtight zip bag** for additional sterility.
For long term storage spore syringe should be stored in the refrigerator **at +2°..+8°C** or **35-46°F** in airtight zip bag.
#### How to use spore syringe after long term storage?
Shake the syringe thoroughly before inoculation to spread spores evenly in liquid.
> Spores can stick together over time and clot of spores formed. Shake spore syringe every few weeks to avoid it
#### Can spore syringe go bad?
Yes, if spore syringe was contaminated. Mold contamination usually not visible, but bacteria contamination is visible. You can see some kind of slime or turbid solution is formed in syringe.
Healthy spore syringe has transparent liquid!
#### Thin dust like threads in spore syringe. Contamination or not?
Sometimes you can find something like thin dust threads in liquid. They can appear after 2-3 weeks after making spore syringe. There are germinated spores and nothing to worry about. Moreover, such spores colonise substrate faster.
[](https://shroomok.com/en/wiki/File:Germinated-spores-in-spore-syringe.jpg) Germinated spores in spore syringe (like thin dust threads) is not contamination
Sometimes even mycelium is formed in syringe
[](https://shroomok.com/en/wiki/File:Spore-syringe-to-store.jpg) Mycelium is formed in spore syringe
🍄 [Buy Shroomok a mushroom as a donation](https://www.buymeacoffee.com/shroomok), ask a question and say something nice!
Enjoy your home mycology!
## For how long dried Magic Mushrooms can be stored
[For how long dried Magic Mushrooms can be stored](https://shroomok.com/en/wiki/How_long_can_I_store_dried_Magic_Mushrooms)
[](https://shroomok.com/en/wiki/File:Do-shrooms-go-bad.jpg) Do magic mushrooms lose their potency over time or go bad?### Magic mushroom storage and potency loses over time
It is possible to store fresh magic mushrooms in the same way as any edible mushrooms. Cover them in baking paper or plastic bag and put in a refrigerator. But the storage time for fresh mushrooms only 4-5 days, then their tissues start to decompose, decay and shrooms go bad.
You can also freeze magic mushrooms, but improper freezing can spoil your harvest easy.
> Check out: [Does it make sense to freeze shrooms](https://shroomok.com/en/wiki/How_to_freeze_fresh_magic_mushrooms "How to freeze fresh magic mushrooms")
That's why so far **drying** magic mushrooms is the best and easy way **for long term storage.**
> Check out: [How to Dry Psilocybin Mushrooms](https://shroomok.com/en/wiki/How_to_dry_and_store_psilocybe_mushrooms "How to dry and store psilocybe mushrooms")
#### How long can I store dried psilocybin mushrooms?
Properly stored dried psilocybin mushrooms fully retain their properties and psychoactive alkaloids for **up to 2 years.**
#### Do psilocybin mushrooms go bad after years of storage?
After 2-3-4 years properly stored dry psilocybin mushrooms WON’T spoil. WON’T get worse or go bad. Magic mushrooms WON’T become poisonous or dangerous for consuming.
#### Dried mushrooms lose their potency over time?
As time passes, mushrooms slowly lose their magic. It means the main alkaloid's (psilocybin) concentration decreases over time. Therefore, shrooms are still edible, but become useless for [microdosing](https://shroomok.com/en/wiki/Magic_mushrooms_microdosing "Magic mushrooms microdosing") or [psychedelic trips](https://shroomok.com/en/wiki/How_to_prepare_for_psychedelic_mushroom_trip "How to prepare for psychedelic mushroom trip")
Using proper storage techniques of drying process and storage help to keep mushrooms safe and active.
#### Mushroom powder or ground mushrooms lose potency faster than whole mushrooms?
Powdered/ground mushrooms have a shorter life of alkaloids than dried whole mushrooms due to additional contact with oxygen. But with proper storage the lifetime can be pretty similar.
#### How to store dry magic mushrooms
[](https://shroomok.com/en/wiki/File:Dry-psilocybin-mushrooms-to-store.jpg) How long dry magic mushrooms can be storedMain rules for storage dry psilocybin mushrooms:
🔴 Mushroom should be well dried and crisp like cracker or fruit chips.
🔴 Store dry magic mushrooms in **airtight** zip bags, sealed bags or airtight jars. It is important to avoid contact with oxygen in order to keep psilocybin in mushrooms for longer.
🔴 Add food grade silica gel in each bag/jar to absorb moisture and keep shrooms dry.
🔴 Dry psilocybin mushrooms should be stored in a **dark place**. Avoid direct sunlight!
🔴 Dry magic mushrooms should be stored **in the refrigerator or at room temperature (+20°..+25°C or 68–77°F)** in a dark place.
❗️ Throw away mushrooms if you find powdery mold or slime on them!
Join Shroomok Community on [Discord](https://discord.gg/ngKhQDmymD) and [Reddit](https://www.reddit.com/r/Shroomok) for questions and sharing your experience.
If you find this guide helpful support my work with subscription or one-time donation on ☕️ [buymeacoffee](https://www.buymeacoffee.com/shroomok)
Have a shroomy day!
Peace, Shroomok ❤️
## How to store Mushroom Spawn for a long time and postpone Spawn to Bulk
[How to store Mushroom Spawn for a long time and postpone Spawn to Bulk](https://shroomok.com/en/wiki/How_to_store_Mushroom_Spawn_for_a_long_time_and_postpone_Spawn_to_Bulk)
[](https://shroomok.com/en/wiki/File:Spawn-jars-colonisation.png) Spawn jars colonisation### Mushroom Spawn storage
Let's figure out real case and real questions from member of Shroomok Growers Community in [Discord](https://discord.com/invite/ngKhQDmymD)
> Hi Shroomok, please help!
>
> Let me describe the situation.
>
> Spawn jars and spawn bags are fully colonised with healthy mushroom mycelium, everything is okay, I'm happy with results. But I need to keep them and postpone further mycological manipulations (casing or spawn to bulk) for a week or maybe two
[](https://shroomok.com/en/wiki/File:Spawn-to-store.png) Colonised mushroom spawn> ❓Can Mushroom Spawn Jars and Spawn Bags be stored at room temperature (about 27°C or 80°F) in the dark place for 1-2 weeks?
>
> ❓Is it better to store spawn in the refrigerator or even in fridge till it's time for Spawn to Bulk and Casing?
>
> ❓How long can Grain Spawn be stored?
>
> ❓How can I "reanimate" mushroom mycelium for further steps and fruiting period?
>
> Thank you 🙏🏻
☝️**Answer from Shroomok**
#### How to store mushroom spawn in refrigerator?
Spawn Jars or Spawn Bags with healthy mycelium can be stored in the refrigerator **at +2°...+12°C (or 36-54°F)**. Optimal temperatures are **+5°...+8°C (or 41-46°F).**
#### Is it safe to freeze mushroom spawn?
**Not recommended!** It is believed too low temperatures **lower than 0°C or 32 °F** can destroy mycelium cells or even kill mycelium.
Actually, we know a real case when mycelium stored in -40°C or -40°F and its viability was fully retained. Actually, there is no advantage for exposing mycelium to such risks.
#### How long can I store mushroom spawn?
Shroomok can admit from own experience that you can store colonised grain spawn in the refrigerator for 1–2 months and everything will be fine for sure!
Storing in refrigerator is a kind of prolonged **[cold shocking](https://shroomok.com/en/wiki/All_you_need_to_know_about_cold_shock_for_magic_mushrooms "All you need to know about cold shock for magic mushrooms")**. In such way you can slow down the mycelium growth.
This option allows you to plan your growing process and postpone further manipulations if your life circumstances require it. Or if you plan Grain to Grain Transfer (G2G), so that you can easily share a single colonised quart spawn jar for about 5-10 jars via G2G transfer
> 🔴 Recommended guide: **[Grain to Grain Transfer (G2G)](https://shroomok.com/en/wiki/Grain_to_Grain_Transfer_(G2G) "Grain to Grain Transfer (G2G)")**
There are examples of longer storage of grain spawn from our subscribers — 3-4 months and even longer. As a result fruiting and harvesting were successful. There were admitted a slightly slowed down processes of top layer colonisation. Start of fruiting was delayed for a few days.
> Use the mushroom spawn within 2-4 months for the best results
#### How can I reanimate mushroom mycelium before spawn to bulk?
Before Spawn to Bulk and/or Casing small mushroom cakes just leave spawn jars/bags for 1–2 days at room temperature to get mycelium some time to wake up. Then continue your further cultivation manipulations.
> 🔴 Recommended: [How to make mushroom spawn guide. Step 1](https://shroomok.com/en/wiki/Choose_and_prepare_substrate_for_magic_mushrooms "Choose and prepare substrate for magic mushrooms")
> 🔴 Recommended: [DIY Incubator. Grain Colonisation. Problems during colonisation period](https://shroomok.com/en/wiki/Magic_mushrooms_incubator_control "Magic mushrooms incubator control")
🍄 [Buy Shroomok a coffee as a donation](https://www.buymeacoffee.com/shroomok), ask question and say something nice!
Have a happy growing!
## Mushroom Spore Print Storage
[Mushroom Spore Print Storage](https://shroomok.com/en/wiki/Mushroom_Spore_Print_Storage)
[](https://shroomok.com/en/wiki/File:Psilocybe-cubensis-spore-prints.jpg) Mushroom spore prints### Mushroom spore print lifetime and storage
Spores is the best way for mushrooms to save their population in nature. It is also the best way to save collection of species and strains for mushroom cultivator.
#### How long can I store mushroom spore prints?
☝️The guaranteed shelf life for spore prints is up to 5 years. For the first 2 years spores almost completely remain viable. Each spore print contains millions of spores (about 3-5% are capable of continuing life for the first 2 years of storage.
> 🔬 A laboratory case of spore germination after 20 years of storage is known. It means mushroom spores can be viable up to 20 years (maybe more, we know about 20 years experiment so far)
If spore print has been stored for 2 years or more a longer spore rehydration required for [Liquid spore syringe](https://shroomok.com/en/wiki/Liquid_psilocybe_spore_syringe "Liquid psilocybe spore syringe"). It helps to germinate spores faster. Each year of spore print storage increases the time of rehydration by 1 day. For example, 2 years of storage is 2 days of rehydration, 3 years is 3 days of rehydration, etc. Or you can just leave spores in sterile water in syringe for a week to let them wake up before further mycological manipulations.
#### How to store mushroom spore prints properly?
✅ Spore prints should be stored in sealed airtight zip bags in a cool dry dark place, preferably in the refrigerator or room temperature (+20°..+25°C or 68–77°F).
Once you get your first crop you can easily make your own spore prints and provide yourself with mushroom spores for years to come.
> 🔴 How to make spore prints from your own mushroom harvest check out in step-by-step guide [How to make magic mushroom spore prints](https://shroomok.com/en/wiki/How_to_make_magic_mushrooms_spore_prints "How to make magic mushrooms spore prints")
[🍄 Buy Shroomok a mushroom](https://www.buymeacoffee.com/shroomok) as a donation, ask a question and say something nice!
Have a happy growing and magic spore prints!
## Liquid spore vs Liquid culture
[Liquid spore vs Liquid culture](https://shroomok.com/en/wiki/Liquid_spore_vs_Liquid_culture)
[](https://shroomok.com/en/wiki/File:Liquid-culture-vs-spore-syringe.jpg) Liquid culture syringe vs liquid spore syringe### What is the difference between Liquid spore syringe and Liquid culture?
Let's figure out how mushrooms multiply in mushroom cultivator experience.
Hope mycologists forgive me, because in this article we are going to skip scientific terminology and try to explain this process literally on the fingers and analogies.
Newbies always confuse liquid spore syringe and liquid culture (LC). But they are not the same thing!
🍄 For example, we have a mushroom with a cap. Each cap has spores underneath. It's like the seeds for plants. As long as they're under the cap they're moist.
When we have a spore print on our hands, those spores are dehydrated. That is, they are dry. Their cell shells are compressed toward the center to seal themselves. In this way they try to persist. And wake up to germinate if favorable climate conditions.
How can we initiate their awakening?
#### 1️⃣ **Liquid spore syringe aka spore suspension**
[](https://shroomok.com/en/wiki/File:Germinated-spores-in-spore-syringe.jpg) Spore syringe. Mushroom spores in sterile waterThe spore **suspension** is a syringe with mushroom spores and sterile water. This is how they get soaked in moisture and are ready to germinate. Without this rehydration, the spores will not germinate in the substrate.
🔴 This method takes more time for spores germination, mycelium development and substrate colonisation.
✅ But it is the easiest and fastest method for beginners.
✅ It doesn't require any special skills or experience.
✅ No need to use a glove box or [SAB](https://shroomok.com/en/wiki/Still_Air_Box_for_Mycology "Still Air Box for Mycology"). It's optional.
✅ This is a basic skill, which will come in handy for more complicated mushroom cultivation methods.
> How to make spore syringe. How to dilute it and get more material for grain inoculation? Check out: [**Liquid spore syringe**](https://shroomok.com/en/wiki/Liquid_psilocybe_spore_syringe "Liquid psilocybe spore syringe")
#### 2️⃣ Liquid culture aka liquid mycelium
[](https://shroomok.com/en/wiki/File:Liquid-mycelium-sclerotia-magic-mushroom-growing-guide.jpg) Mushroom liquid culture aka liquid myceliumLiquid culture (LC) aka liquid mycelium is already germinated spores that have begun to form mycelium in sterile liquid nutrient medium.
Main ingredients for preparing a liquid culture consists a liquid spore syringe and a nutrient medium (for example, based on honey, dextrose, fructose, potato flakes, corn syrup, grain broth). This nutrient medium becomes a food for mycelium and support its development.
✅ LC has a higher viability than the spore suspension.
✅ A lot of material can be made from it by multiplying LC in nutrient solutions.
✅ Colonization process will start sooner (a few days faster) and more actively if inoculation was done with liquid culture.
🔴 But the process of preparing LC requires time for mycelial development in a liquid nutrient medium.
In fact, it is a ready-made mycelium, which quickly begins to grow in the substrate. It has already germinated. And these sprouts (hyphae) have begun to weave together to form mycelium.
When we inoculate grain substrate with LC colonization is much faster, because mycelium has ALREADY formed and continue its development. It's easier and faster from this point than to start from scratch.
✅ Liquid culture has a higher viability.
✅ The process of colonization of the substrate when inoculated with liquid culture starts several days faster and develops very active.
✅ Liquid culture allows to get ahead of contaminants.
🔴 Liquid culture preparation requires sterile conditions, additional manipulations with sterile liquid preparation and about 2 weeks of time before grain inoculation.
✅ With LC you can inoculate an incredible volume of substrate! And from the same LC you can prepare an unlimited amount of LC by multiplying it in new clean sterile nutrient solution.
> Check out full guide: [How to make mushroom Liquid Culture](https://shroomok.com/en/wiki/How_to_make_mushroom_Liquid_Culture "How to make mushroom Liquid Culture")
**In the next articles we'll get acquainted with other methods of mycelium reproduction:**
🧬 [Grain-to-grain inoculation or G2G transfer](https://shroomok.com/en/wiki/Grain_to_Grain_Transfer_(G2G) "Grain to Grain Transfer (G2G)")
🧬 Growing mycelium on agar or spores to agar (S2A)
🧬 Agar to agar transfer (A2A)
🧬 Cloning mushroom tissue on agar
Enjoy the world of Fungi and home mycology!
## Mycology Glossary and common Mushroom Growing Abbreviations
[Mycology Glossary and common Mushroom Growing Abbreviations](https://shroomok.com/en/wiki/Mycology_Glossary_and_common_Mushroom_Growing_Abbreviations)
[](https://shroomok.com/en/wiki/File:Mycology-terminology-and-mushroom-growing-abbreviations.jpg) Glossary of Mycology Terms and popular abbreviations in mushroom growing communities### Mycology Terminology list and Abbreviations in mushroom cultivation
Here you can find common abbreviations and detailed mycological terminology for your help. They are widespread in mushroom cultivation guides and mushroom growers communities. Also common internet acronyms were added, because they are also used by mushroom cultivators in Shroomok international community.
Use a sidebar to move between paragraphs and letters in glossary or use "Search" to find the exact term faster.
#### Mushroom growing abbreviations
**A2A** = Agar to Agar (transfer)
**A2G** = Agar to Grain (inoculation)
**[AA](https://www.amazon.com/All-American-2-Quart-Pressure-Cooker/dp/B00004S88Z?&linkCode=ll1&tag=shroomok-20&linkId=0b8b32b9fadb0905e42104df0e49d3d8&language=en_US&ref_=as_li_ss_tl)** = All American (company that makes the best pressure cookers)
**[AAPC](https://www.amazon.com/All-American-2-Quart-Pressure-Cooker/dp/B00004S88Z?&linkCode=ll1&tag=shroomok-20&linkId=b87bbe2caede8ebaef837520268d9fcc&language=en_US&ref_=as_li_ss_tl)** = All American Pressure Cooker
[**APE**](https://shroomok.com/en/wiki/Mutant_strain_Albino_Penis_Envy_aint_just_APE_but_King_Kong_of_Magic_Mushrooms "Mutant strain Albino Penis Envy aint just APE but King Kong of Magic Mushrooms") = Albino Penis Envy (P. Cubensis strain)
**AQ** = aqueous, water based
**BE** = Biological Efficiency
**BRF** = Brown Rice Flour
**BT** = Bacillus thuringiensis, (i.e. Gnatrol) kills fungus gnats and other pests
**B&S** = Break and Shake
**cc** = cubic centimeter, 1 cc = 1 ml
**CEV** = Closed Eye Visuals
**CFM** = Cubic Feet per Minute
**coir** = coco coir, coconut fiber
**CO2** = Carbon dioxide
**CV** = coco coir + vermiculite substrate
**CVG** = Coco coir + Vermiculite + Gypsum substrate
**contam** = contamination
**Cubes** = Cubensis
**D&R** = Dunk & Roll
**DNR** = Dunk N' Roll
**DDI** = Double distilled De-Ionized water
**DE** = Diatomaceous Earth
**DEC** = Double Ended Casing
**dH2O** = distilled H2O (water)
**DI** = De-Ionized water
**DT** = Double Tub
**[Dunk](https://shroomok.com/en/wiki/Rehydration_of_psilocybe_cakes "Rehydration of psilocybe cakes")** = submerging the mushroom cake/substrate in water to rehydrate
**EtOH** = Ethanol
**FAE** = Fresh Air Exchange, Free Air Exchange
**FFAE** = Frequent Fresh Air Exchange
**FC** = Fruiting Conditions, Fruiting Chamber or Field Capacity
**FH** = Flow Hood
**Flush** = the development of many fruiting bodies
**FSR** = Free Spore Ring
**[G2G](https://shroomok.com/en/wiki/Grain_to_Grain_Transfer_(G2G) "Grain to Grain Transfer (G2G)")** = Grain to Grain (transfer)
**GB** = Glove Box
**GE** = Gas Exchange
**GGMM** = Paul Stamets' "Growing Gourmet and Medicinal Mushrooms"
[**GT**](https://shroomok.com/en/wiki/The_magic_of_Golden_Teacher_mushroom "The magic of Golden Teacher mushroom") = Golden Teacher, P. Cubensis strain
**H2O2** = Hydrogen Peroxide (3% is the standard available concentration)
**HEPA** = High Efficiency Particulate Air filter is used in [laminar flow hoods](https://shroomok.com/en/wiki/How_I_built_my_first_laminar_flow_hood_for_home_mycology "How I built my first laminar flow hood for home mycology")
**Hpoo** = horse dung
**HWFP** = hardwood fuel pellets
**HW** = Honey Water
**INC** = Incubator
**INOC** = inoculate
**IPA** = IsoPropyl Alcohol
**ISO** = isopropyl/rubbing alcohol
**karo** = a brand of light corn syrup (dextrose)
**KOH** = Potassium (K) Hydroxide (OH), a strong base
**LECA** = Lightweight Expanded Clay Aggregate
**Lime** = hydrated lime, calcium hydroxide
**LC** = Liquid Culture
**LME** = Light Malt Extract
**LS** = Laboratory Strain
**MC** = MonoCulture or Mushroom Community
**MEA** = Malt Extract Agar
**MEAC** = Malt Extract Activated Charcoal agar
**MEP** = Malt Extract with Peptone agar
**MYA** = Malt-Yeast Agar
**ml** = milliliter, 1mL=1cc
**MeOH** = Methanol
**MIC** = Minimum Inhibitory Concentration
**MMGG** = Magic Mushroom Growing Guide
**MS** = Multi-Spore
**MSI** = Multi-Spore Inoculation
**MSS** = Multi-Spore Syringe
**MSS** = Multi-Spore Single Strain
**[MT](https://shroomok.com/en/wiki/Forget_Monotub_Kit._DIY._How_to_make_Monotub_for_Mushrooms_by_your_own "Forget Monotub Kit. DIY. How to make Monotub for Mushrooms by your own")** = MonoTub
**myc** = mycelium
[**myc piss**](https://shroomok.com/en/wiki/Mycelium_metabolites_or_mushroom_pee "Mycelium metabolites or mushroom pee") = mycelium piss, secondary metabolites created by mycelium
**Mycogone** = wet bubble disease
**NOC** = inoculate
**Newb/Noob** = a person who is new to the hobby
**Pans** = Panaeolus aka Copelandia (mushroom genus)
**[PC](https://www.amazon.com/Presto-01781-23-Quart-Pressure-Canner/dp/B0000BYCFU?&linkCode=ll1&tag=shroomok-zm-20&linkId=b9500b3a38dd248ef8bbfc6165ac7583&language=en_US&ref_=as_li_ss_tl)** = Pressure Cook(er)
**PDA** = Potato Dextrose Agar
**PDYA** = Potato Dextrose Yeast Agar
**Peat** = peat moss
**PF** = Psylocybe Fanaticus, creator of the PF-tek
**pH** = potential of hydrogen (scale of acidity)
**Poo** = Poop/Manure
**PSI** = pounds per square inch
**RH** = Relalitive Humidity (%)
**RR** = Roger Rabbit, prominent figure in mushroom growing community
[**SAB** = Still Air Box](https://shroomok.com/en/wiki/Still_Air_Box_for_Mycology "Still Air Box for Mycology")
**SB** = shoebox
**S2B** = Spawn to Bulk
**SGFC** = Shotgun Fruiting Chamber
**Scope** = microscope
**Spawn** = grain spawn (rice, rye, oats, corn, wheat, millet etc.)
**Stickers** = multi spore syringes
**SUB** = Substrate (usually refers to bulk substrate)
**Swab** = cotton swab with spores
**TEK** = Technical Educational Knowledge, used as a short term for "Technique" in mushroom growing
**TiT** = Tub In Tub (Tote In Tote), refers to an incubator consisting of 2 plastic tubs and an aquarium heater
**[Trich](https://shroomok.com/en/wiki/Green_mold_contamination_aka_Trichoderma "Green mold contamination aka Trichoderma")** = Trichoderma mold
**UB** = uncle bens
**Verm** = Vermiculite
**Vert** = verticillium (dry bubble disease)
**WBR** = whole brown rice
**WBS** = Wild Bird Seeds
50/50 = 50% vermiculite and 50% peat moss
50/50 = 50/50 with gypsum/lime, or oyster shell added to buffer the pH
#### Mycology Terminology
##### A
**[Abort](https://shroomok.com/en/wiki/Mushroom_aborts "Mushroom aborts")** — a small pinning mushroom that ceases to grow and never reaches full maturity. The cap of aborted shroom turn black color.
**Acidic** — pH lower than 7.0 indicates acidity level. The lower pH level the more acid substance.
**Adnate** — where the gills or tubes under the cap of a fungus are perpendicular to the stipe or stem at the point of attachment.
**Adnexed** — Where the gills or tubes under the cap of a fungus sweep upwards before being attached to the stem.
**Aerial mycelium** — hyphal elements growing above the agar or substrate surface.
**Agar** — is a gelatinous substance that is extracted from seaweed and processed into flakes, powders and sheets. It is commonly used in Asian cuisines and as a flavorless vegan substitute for gelatin. The agar used in mushroom cultivation and bacteriological labs is usually available in powder form and using sterile preparation poured into a petri dish or slant for spores to be inoculated, cloning mushroom tissue, agar to agar transfers (A2A) etc.
**Agarics** — mushrooms with gills.
[**Air filter**](https://shroomok.com/en/wiki/How_to_make_jars_with_substrate_for_mushroom_spawn#What_is_inoculation_port_and_air_filter.3F "How to make jars with substrate for mushroom spawn") — is a synthetic filter that provides gas exchange during the colonisation period (in spawn jar/bag and jar with liquid culture). It must be protected by bactericidal layer to prevent any competing microorganisms from entering through it. Bactericidal breathing patch, Luer lock syringe filters, and synthetic filter disks are used for this purpose.
**Alkaline** — a pH greater than 7.0 indicates alkalinity in ascending level. The higher the pH the more alkaline the substance.
**Annulus** — a ring of thin tissue left attached to the stem of a mushroom when the veil connecting the cap and stem ruptures as the mushroom cap opens to maturity.
**Antibiotic** — a class of natural and synthetic compounds that inhibit the growth or kill bacterial microorganisms.
**Apex** — the top or highest point.
**Ascomycetes** — A group of fungi that produce their sexual spores inside specialised cells known as asci, which usually contain eight spores
**Aseptic** — sterile environment, sterile condition in which no living microorganisms are present. Usually chemicals, extreme heat or UVC germicidal light are used to make an environment aseptic.
**Autoclave** — a laboratory chamber used to sterilize equipment and supplies by subjecting them to pressurized saturated steam at 121 °C (250 °F) for around 30-60 minutes at a pressure of 15 psi (103 kPa or 1.02 atm) depending on the size of the load and the contents.
**Axenic** — relating to a culture that is free from all living organisms except for the species intended to host within it. Refers to a non-contaminated grow medium.
##### B
**Bacteria** — single cell microorganisms that can invade and easily breakdown and kill healthy tissue. On the other hand there are some bacteria that are needed for the fruiting of fungi. These are present in the bulk substrate, survive pasteurization and have a symbiotic relationship with mycelium.
[**Bad Trip**](https://shroomok.com/en/wiki/How_to_deal_with_or_prevent_psychedelic_bad_trip "How to deal with or prevent psychedelic bad trip") — is a slang expression, a state of fear and panic attack during a psychedelic trip session.
**Basidiomycetes** — a group of fungi which produce their spores externally on basidia. Often four spores are produced per basidium. Many basidiomycetes show clamp connections on their hyphae. Most mushrooms are classified as basidiomycetes, whereas most ***molds are ascymycetes.***
**Basidium (pl. basidia)** — a cell that gives rise to a basidiospore. Basidia are characteristic of the basidiomycetes.
**Biological efficiency** **(BE)** — the definition of biological efficiency in mushroom cultivation is: 1 pound fresh mushrooms from 1 pound dry substrate indicates 100% biological efficiency. This definition was first used by the agaricus industry to be able to compare different grow setups and substrate compositions. Note that this is not the same as true thermodynamic efficiency.
**Biospore tape** — a low adhesive paper type tape with pours approximately 2 nanometers in diameter or even smaller. The pores in the tape make the product breathable.
**Birthing** — removing the fully colonized growth medium (like a cake or its spawn jar) from whatever container it was kept in for colonization purposes and placing in an environment like a bulk substrate conducive to fruiting.
**Bleach bombing** — an industry-used phrase to describe the use of bleach sprayed on the walls and floors. The rooms so treated are usually sealed tight for 24 hours, allowing the chlorine gas to thoroughly disinfect the environment.
**Block** — aka "mushroom cake" refers to a fully colonized bulk substrate in the fruiting phase of cultivation. Also referring to the cube-shaped mass of sawdust substrate contained within plastic bags. Once the mycelium has grown through the substrate, the plastic can be stripped off, and the mycelium holds the mass together. Blocks can be used individually or collectively to build “walls” of mushroom mycelium.
**Bolete** — a group of fungi having tubes rather than gills beneath the cap.
[**Bottle-tek**](https://shroomok.com/en/wiki/Bottle-tek_or_how_to_grow_mushrooms_in_plastic_bottles "Bottle-tek or how to grow mushrooms in plastic bottles") — is a technique of mushroom cultivation, when we use large volume plastic bottles (5-7 liters or even 15-20 liters) as a fruiting chamber for mushroom fruiting period. This is an alternative option for [Grow Box](https://shroomok.com/en/wiki/DIY_Grow_Box_for_Magic_mushrooms._Fruiting_conditions "DIY Grow Box for Magic mushrooms. Fruiting conditions") or [MonoTube](https://shroomok.com/en/wiki/Forget_Monotub_Kit._DIY._How_to_make_Monotub_for_Mushrooms_by_your_own "DIY Monotub for mushrooms") in amateur home cultivation
**Brown Rice Flour (BRF)** — ground brown rice, usually used for making BRF cakes according to PF-tek guide.
**BRF cake, Rice cake** — making a mushroom mix of brown rice flour (BRF) with vermiculite and water, and injecting it with mushroom spores.
[**Bruising or Bruises on mushrooms and mycelium**](https://shroomok.com/en/wiki/Mycelium_Bruises_or_Mold_Contamination "Mycelium Bruises or Mold Contamination")— is the reaction between psilocyn and oxygen. In the presence of oxygen psilocybin is more stable. But psilocyn readily forms bluish and dark-blue decomposition products. The bluish reaction or bluish-green is obvious in the most potent species. The less psilocyn there is in a species, the more subtle the bluish reaction. Bruising is a result of mechanical impact or dehydrated mycelium.
**Buffer** — a system capable of resisting changes in pH even when acid or base is added, consisting of a conjugate acid-base pair in which the ratio of proton acceptor to proton donor is near unity.
**Buffer** **agent** — buffers are necessary to adjust and maintain the pH. Buffering agents can be **salts of a weak acid and a weak base**. In mushroom cultivation buffer agents used on the base of calcium carbonate (CaCO3): Limestone flour (CaCO3), Limestone grit (CaCO3), Dolomitic limestone flour (CaCO3-MgCO3), Marl, Chalk, ground Oyster shell, Hydrated Lime (calcium hydroxide). All these additives increases substrate's pH while helping to buffer it, or keep it within a desirable (and higher) pH range, so that prevent [Trichoderma mold contamination](https://shroomok.com/en/wiki/Green_mold_contamination_aka_Trichoderma "Green mold contamination aka Trichoderma") and support mushroom development
**Bulk substrate** — secondary substrate in mushroom cultivation also called fruiting substrate for producing mushrooms (after spawn added to bulk). Bulk substrate is less nutrient than grain substrate. Fruiting substrate is a source of additional water and ingredients for mushroom metabolism and fruit development.
##### C
**Canopy** — an overhanging protection of the caps of mushroom fruits.
**Cake** — aka mushroom cake, refers to a fully colonized bulk substrate in the fruiting phase of cultivation
**Carbon dioxide (CO2)** — a colorless, odorless, incombustible gas produced from fungi metabolism. Fresh fruiting fungi take up oxygen and produce carbon dioxide. Formed during respiration, combustion, and organic decomposition. A waste product of fungi that when levels of concentration become over 1000 ppm inhibits normal growth and can cause environmental conditions that can create conditions for contamination, [overlay and stroma](https://shroomok.com/en/wiki/Psilocybe_growing_problems_-_overlay,_abortions,_etc "Psilocybe growing problems - overlay, abortions, etc"), [hypertrophic stipes and "fuzzy feet"](https://shroomok.com/en/wiki/Why_Mushrooms_too_Leggy,_Fuzzy_Feet_and_White_Dots_on_Caps "Why Mushrooms too Leggy, Fuzzy Feet and White Dots on Caps"), [secondary metabolites](https://shroomok.com/en/wiki/Mycelium_metabolites_or_mushroom_pee "Mycelium metabolites or mushroom pee") and effect pining from occurring.
**Carpophore(s)** — Commonly known as "mushrooms", the reproductive organs of the truebody of the fungus, formed by the web of mycelium that colonize a substrate.
**Casing** — a layer of water-retentive materials applied to a substrate to encourage and enhance fruitbody production.
> Usually casing materials including peat moss and vermiculite; additives include hydrated lime or limestone flour. Casing should not have any nutrients, it's non-nutrient substrate. Casing layers serve to hold moisture, promote and hold humidity and when pH buffered between 8.0 - 9.0 can create a hostile environment for certain contamination like [Trichoderma mold](https://shroomok.com/en/wiki/Green_mold_contamination_aka_Trichoderma "Green mold contamination aka Trichoderma") to live
**Cellulose** — Glucose polysaccharide that is the most abundant polysaccharide on earth, and common source of nourishment for cultivated fungi.
**Clone** — a population of individuals all derived asexually from the same single parent. Great care should be taken to select a fruiting body (parent) of the highest quality, size, color, shape or any highly desired characteristic.
**Cloning** — in mushroom cultivation placing a piece of mushroom tissue on agar medium in order to obtain growing mycelium. This is not strictly related to the colloquial notion of cloning, and is simply a manipulation of the natural asexual reproduction system of fungi.
**[Cobweb mold](https://shroomok.com/en/wiki/How_to_identify_and_get_rid_of_Cobweb_Mold "How to identify and get rid of Cobweb Mold")** — mold contamination, fungal disease that is commonly seen on the surface of the substrate or parasitizing commercially and home cultivated mushrooms. Can be caused by several related pathogens: *Dactylium spp., Cladobotryum spp., Hypomyces spp*. etc. It is cobweb-like in appearance and first shows up in small scattered patches that have a greyish color. Cobweb is invasive and can quickly run over the entire surface of the substrate.
**Coir** — aka coco coir, a short coarse fiber from the outer husk of a coconut. Used as a bulk substrate usually in combination with vermiculite to grow mushrooms..
**[Cold Shock](https://shroomok.com/en/wiki/All_you_need_to_know_about_cold_shock_for_magic_mushrooms "All you need to know about cold shock for magic mushrooms")** — is a procedure when the colonized mushroom cake with a casing layer is stressed by a sudden drop in temperature for 12-24 hours in the refrigerator at +2ºC to 4ºC (35-39°F) before introducing it to the fruiting conditions.
**Colonization** — the period of the mushroom cultivation starting at Inoculation during which the mycelium grows through the Substrate until it is totally permeated and overgrown. Can refer to either spawn grain colonization or bulk substrate colonization.
**Compost** — selectively-fermented organic material. Compost is one of many desirable substrates for certain species of mushrooms, but may vary in its components. Usually combined with straw, manure and other organic substances and designed for mushroom fruitbody production.
**Coniferous** — pertaining to conifers, which bear woody cones containing naked seeds. Relevant in mushroom hunting.
**Contam Grave** — a hole people dig in their yard to put all their shroom contamination so it’s within a wind gust away from sporulating right back into their grow again. Highly inadvisable.
**Contamination** — undesired organic foreign pathogens that invade the mycelium colonization and begin growing in the host medium. They are frequently bacterial or fungal micro-organisms and often the primary result of insufficient sterilisation, improper sterile technique or not meeting the proper pasteurization times and temperatures for bulk substrate prior to adding grain spawn.
**Cottony** — having a loose and coarse texture. Referred to a mycelium growth pattern of some fungi species or strains.
**[Cropping](https://shroomok.com/en/wiki/Magic_mushroom_harvesting_time,_first_flush "Magic mushroom harvesting time, first flush")** — the time of mushroom formation, development and harvesting.
**Culture** — a sample of a given microorganism, or a spore In mycology that is grown in a culture medium. A culture is ordinarily grown in a nutrient rich (MEA or PDA) agar in petri or a liquid culture medium. Usually a culture is grown for a relatively short period of time before it is put into another grow medium to spawn colonies.
**Culture medium** — the material growth medium upon which a culture is developed. Microorganisms differ in their nutritional needs, and a large number of different growth media have been developed: PDA (potato dextrose yeast agar) and MEA (malt seaweed extract agar) can be used for most cultivated mushrooms.
**CVG** — aka **Coir Vermiculite Gypsum** mix is one of the most commonly used substrates for growing P.Cubensis. CVG can be pasteurized just like any other bulk substrate used for spawning to bulk in open air. coco coir only, Coir+Verm, Coir+Gypsum and Coir+Verm+Gypsum are all usable combinations.
**Cycling the Block** — aka flushing, it refers to the cycling of the bulk substrate when rehydration is introduced by submersion of the block under water immediately after harvest, when flushing of fruit has subsided and a slow in the fruiting cycle has occurred.
##### D
**Desiccant** — an anhydrous substance, usually a powder or gel, used to absorb water from other substances. Two commonly used desiccants are calcium hydroxide and silica gel. Desiccant packs can be placed in dehydrated mushrooms to assist in preserving them for extended periods.
**Dextrose** — a simple sugar used in agar formulations. Synonymous with glucose.
**Dikaryotic mycelium** — the state wherein two individual nuclei are present in each fungal cell.
**Dimitic hyphae** — fungal flesh typified by two kinds of hyphae.
**Dimorphic** — having two forms.
**Diploid** — a genetic condition wherein each cell has a full complement of chromosomes necessary for sexual reproduction, denoted as 2N.
**Disk** — the central portion of the mushroom cap.
**Diffusion** — the movement of suspended or dissolved particles from a more concentrated region to a less concentrated region as a result of random movement on the microscopic scale. Diffusion tends to distribute particles uniformly throughout the available volume, given enough time, and occurs more rapidly at higher temperatures.
**Disinfection** — synonymous with Decontamination. It is a thorough protocol to cleanse a specified area to destroy or prevent the growth of microorganisms (molds, bacteria, viruses). It is usually referring to rubbing, soaking or spraying the surfaces one wants to disinfect with chemicals such as: isopropyl alcohol, lysol, diluted bleach solutions, and other chemical disinfectants and exposure to UVC germicidal light.
**Dwarf Fruit** — a miniature sized mushroom usually characterized by a girthy ballooning stipe. Their veils break and the cap canopies open, due to high CO2 levels for extended periods of time during the fruiting stage. Typically a dwarf will grow to full maturity at about ¼ the stature of a normal fruit. It’s especially common to grow dwarf mushrooms for tent growers or any grow medium without ventilation or windows, such as rooms that had been closets.
##### E
**Endospore** — spores formed internally.
> A metabolically dormant state by which some bacteria become more resistant to heat, chemicals, and other adverse conditions. Given the proper conditions, they will reactivate (germinate) and begin to multiply. Many bacterial endospores cannot be destroyed at boiling temperatures. This is important to mycologists because grains contain a high number of dormant endospores, thus, many grains must be pressure cooked (or autoclaved) to achieve sterilization
**Entheogen** — any naturally occurring substance that, when ingested, produces a profound religious state of mind, often described as God-like.
**Evanescent** — fragile and soon disappearing.
**Enzyme** — a protein, synthesized by a cell, that acts as a catalyst for a specific chemical reaction.
##### F
**Fresh Air Exchange (FAE)** — the act of opening the fruiting chamber and gently wafting fresh air into the tub with the lid or fanning tool. Fresh air is defined by the normal atmospheric air ratios of O2 and CO2 in the free air around us. Fungi consume oxygen like humans do to use for fuel unlike plants that do the opposite. Fresh air exchange is necessary to keep CO2 levels about 600-800 ppm. Fresh air exchange is what is accomplished by natural air flows in monotub, fanning gently with the lid on the tub, fanning with PC cooler, air pump for 24/7 FAE. FAE is a major key to initiating fruiting conditions once the bulk substrate has fully colonized.
**Fermentation** — the state of actively growing microorganisms, usually in a liquid environment. Smell is a good indicator of fermentation, it starts out with a sweet vinegary odor and then turns to a denatured alcohol smell. Fermentation in cultivation is a sign of contamination. The bacteria are breaking down the yeast and causing the fermentation of the tissue.
**Fibrillose** — fine, thin, hair-like filaments.
**Filamentous** — composed of hyphae or thread-like cells.
**Field capacity** — perfect substrate moisture conditions. A good way to test for this is to grab a handful of the substrate mixture and squeeze it in your hand. If you are unable to squeeze out any water, it is too dry. If a light squeeze causes a stream of water to come out, it’s too wet. You want to be able to squeeze the mixture as hard as you can, and only have a few steady drops come out to have a field capacity moisture level.
**[Flush](https://shroomok.com/en/wiki/Magic_mushroom_harvesting_time,_first_flush "Magic mushroom harvesting time, first flush")** — the collective formation and development of mushrooms within a short time period, often occurring in a rhythmic manner. Usually there is a resting period between flushes. A flushing can also refer to the cycling of the bulk substrate when rehydration is introduced by submersion of the block under water immediately after harvest when flush of fruit has subsided.
**[Flushing](https://shroomok.com/en/wiki/Rehydration_of_psilocybe_cakes "Rehydration of psilocybe cakes")** — it refers to the cycling of the bulk substrate when rehydration is introduced by submersion of the block under water immediately after harvest, when flushing of fruit has subsided and a slow in the fruiting cycle has occurred.
**Fruitbody** — a mushroom. The meaty part of the mushroom that grows above ground. The sexual reproductive body of the mushroom.
**Fruiting** — the event of mushroom formation and development.
**Fruiting chamber (FC)** — an enclosed space with high humidity and fresh air exchange where mushrooms may fruit from the substrate under proper conditions ([GrowBox](https://shroomok.com/en/wiki/DIY_Grow_Box_for_Magic_mushrooms._Fruiting_conditions "DIY Grow Box for Magic mushrooms. Fruiting conditions"), [MonoTub](https://shroomok.com/en/wiki/Forget_Monotub_Kit._DIY._How_to_make_Monotub_for_Mushrooms_by_your_own "Forget Monotub Kit. DIY. How to make Monotub for Mushrooms by your own"), [Bottle-tek](https://shroomok.com/en/wiki/Bottle-tek_or_how_to_grow_mushrooms_in_plastic_bottles "Bottle-tek or how to grow mushrooms in plastic bottles") etc.)
**[Fruiting conditions](https://shroomok.com/en/wiki/Fruiting_period._Pinhead_initiation,_mushroom_pinning_and_mushrooms_growth_parameters "Fruiting period. Pinhead initiation, mushroom pinning and mushrooms growth parameters")** — climate parameters for pinhead initiation and mushroom fruiting (temperature, relative humidity, CO2 level, light). These parameters depends on mushroom species.
**Fungicide** — a class of chemical pesticides used to kill fungi (usually mold spores).
**Fungus** — a group of organisms that includes mushrooms and molds. These organisms are decomposers of organic material.
[**Fuzzy feet**](https://shroomok.com/en/wiki/Why_Mushrooms_too_Leggy,_Fuzzy_Feet_and_White_Dots_on_Caps "Why Mushrooms too Leggy, Fuzzy Feet and White Dots on Caps") — when the base of mushroom stems are fuzzy due to lack fresh air exchange (FAE) and high relative humidity level in combination with lack of FAE.
##### G
[**Grain-to-grain transfer (G2G)**](https://shroomok.com/en/wiki/Grain_to_Grain_Transfer_(G2G) "Grain to Grain Transfer (G2G)") — inoculation of grain by already-colonized grain. This procedure involves exposing uncolonized, sterilized grain, and is prone to contamination. As such it should only be performed with a glove box, Still air box, HEPA laminar flow hood, under the most sterile conditions possible.
**Genotype** — the set of genes possessed by an individual organism.
**Gentamicin** — a broad-spectrum antibiotic mixture used to treat gram negative bacterial infections and often used in petri agar and liquid cultures for contamination prevention. The antibiotics are easily obtained at a pet store or online in the aquarium section however knowledge of proper sterilization through microfiltration is necessary prior to use in cultures.
**Germination** — the spreading of hyphae from a spore. It is the initial stage of development in fungus where mycelium forms from a spore.
**Gills** — the tiny segments on the underside of the cap. This is where the spores propagate within the fruiting body.
**Glovebox** — is a device used to Isolate an area for work with potentially hazardous substances or sensetive materials which need to be free from direct contact with the outside environment for any reason. Most glove boxes are tightly enclosed boxes having a glass panel for viewing inside and special airtight gloves attached inward in which a person on the outside can use to manipulate objects inside. Many times this can be made from a large size monotub and differs from a still air box or chamber in that it's a complete isolation chamber.
**Glucose** — a sugar in simple form. Dextrose is a simple sugar made from corn.
[**Golden Teacher**](https://shroomok.com/en/wiki/The_magic_of_Golden_Teacher_mushroom "The magic of Golden Teacher mushroom") — aka GT mushroom is a classic strain of Psilocybe Cubensis magic mushrooms. It is one of the most famous psychedelic fungi in the world.
**Grain substrate** — highly nutrient substrate for producing mycelium (mushroom spawn), usually first substrate for mushroom cultivation.
[**GrowBox**](https://shroomok.com/en/wiki/DIY_Grow_Box_for_Magic_mushrooms._Fruiting_conditions "DIY Grow Box for Magic mushrooms. Fruiting conditions") — a technique for mushroom cultivation, when we use plastic container, aquarium or terrarium as a fruiting chamber for mushroom fruiting period.
**Gypsum** — aka calcium sulfate (CaSO4), a greyish powder often used in spawn preparation and bulk substrate preparation. It prevents the clumping of the grain kernels, support aeration, gives substrate a more optimal texture. Has neutral pH 7.0, may affect pH by half of a point initially.
##### H
**Habitat** — the substrate in which mushrooms grow.
**[Heat Shock](https://shroomok.com/en/wiki/All_you_need_to_know_about_cold_shock_for_magic_mushrooms "All you need to know about cold shock for magic mushrooms")** — is a procedure when the colonized mushroom cake with a casing layer is stressed by raising the temperature for 3 hours at +35°C to +37°C (95-99°F) before introducing it to the fruiting conditions.
**HEPA** — High Efficiency Particulate Air filter is used in laminar flow hoods.
**H2O2** — molecular formula for Hydrogen peroxide.
**Hydrogen peroxide (H2O2)** — a clear aqueous solution usually available in concentrations from 3% to 35% that is easily decomposed into water and oxygen by enzymes like catalase, which is found in desirable mushrooms but not in many bacteria. This makes it capable of selectively destroying some competitors of contamination like cobweb mold, and a tool sometimes used in cultivation.
**Hypha, hyphae** — individual cells of mycelium.
**Hyphal aggregate** — a concentration of mycelium; a 'knot' in the mycelial network which often differentiates into a primordium.
##### I
**In vitro** — from the Latin, in glass, isolated from the living organism and artificially maintained (as in a petri dish, slant or a jar).
[**Incubation** **period**](https://shroomok.com/en/wiki/Magic_mushrooms_incubator_control "Magic mushrooms incubator control") — aka colonization, the period after inoculation (preferably at a temperature optimal for mycelial growth) during which the Mycelium grows vegetatively (mycelium forming in spawn jar/bag).
[**Incubator**](https://shroomok.com/en/wiki/Magic_mushrooms_incubator_control "Magic mushrooms incubator control") — is a special box or cabinet used at the first stage of cultivation - colonisation period of growing mycelium. In the incubator should be DRY, WARM, DARK
[**Inoculation**](https://shroomok.com/en/wiki/Inoculation_without_glove_box "Inoculation without glove box") — introduction of spores into grain substrate, agar media, liquid media.
[**Inoculation port**](https://shroomok.com/en/wiki/How_to_make_jars_with_substrate_for_mushroom_spawn#What_is_inoculation_port_and_air_filter.3F "How to make jars with substrate for mushroom spawn") — aka injection port is an entry point for a syringe needle containing the liquid spore solution or liquid culture to inoculate the sterile substrate or media. Bactericidal breathable patch, butyl rubber self-healing injection ports (aka bottle stoppers) or heat-resistant RTV-silicone sealant is used for this purpose.
**Isolate** — a strain of a fungus brought into pure culture (i.e. isolated) from a specific environment
##### K
**Karyogamy** — the fusion of two sexually opposite nuclei within a singlecell.
##### L
**Lamellae** — the gills of a mushroom.
**[Laminar Flow hood](https://shroomok.com/en/wiki/How_I_built_my_first_laminar_flow_hood_for_home_mycology "How I built my first laminar flow hood for home mycology")** — A fan-powered HEPA-filtered device that produces a laminar flow of air that moves across the workspace allowing for open sterile work without the hassle and inconvenience of a still air box (SAB) or glove box. The air input goes through the HEPA and particles less that 0.3 microns in size are filtered out and the sterile air is pushed across the work plane.
**Language of Mycelium** — The ways in which the colonies as a whole speak. It is a language learned based on years of observation and mycology experience and is similar to sign language. Mycelium speaks by showing us what is stressing or causing it issues by how it behaves and spawns. For instance if Mycelium produces secondary metabolites it is a sign that it is in immediate need of something like FAE, or that a contaminating pathogen has invaded, etc. Learn the language of mycelium and you will have an insight to mycology that can only be learned if you allow mycelium to teach you. Keen observation, strong foundation in mycology, and trusting instinct is key.
**Limestone** — calcium carbonate (CaCO3), hydrated lime, garden lime. A white powder. Used to rise the pH level of the bulk substrate or casing layer.
**[Liquid Culture](https://shroomok.com/en/wiki/How_to_make_mushroom_Liquid_Culture "How to make mushroom Liquid Culture")** — a nutrient enriched liquid solution, similar to agar, where mycelium cells can germinate and multiply producing clones.
**Liquid Inoculant** — abbreviated LI, Liquid Inoculant is a suspension of mycelium in water. This is different from a LC in that the mycelium did not grow in the medium. The most common way to make a LI is to blend up a wedge/dish of clean mycelium on agar with sterilized water. Pore syringes are often referred to as an LI.
**Lux** — a measurement of light received by a surface equal to 1 lumen at a distance of 1 meter over a surface area of 1 square meter.
##### M
**Macroscopic** — visible to the naked eye.
**Maltose** — malt sugar, used for agar media recipes.
**Martha** — Martha Stewart everyday stationary storage closet, a shelf inside a zippered plastic cover
**Martha Tek** — Refers to a fruiting chamber based on a Martha Stewart-brand translucent vinyl closet. Martha Tek is also known as Myco-Tent growing in mushroom cultivation where instead of enclosed monotubs with manual interventions to cultivate, tents with open bins are placed inside the enclosure and the environmental factors, such as, temperature, relative humidity, fresh air exchange, lighting and watering misters, are individually controlled outside the tent and create the conditions necessary to cultivate fungi.
**Mesophile** — an organism thriving in moderate temperature zone, usually between 40–90°F (4–32°C).
**[Metabolites](https://shroomok.com/en/wiki/Mycelium_metabolites_or_mushroom_pee "Mycelium metabolites or mushroom pee")** — aka secondary metabolites or "myc piss". Product of intermediary metabolism released from a cell, such as naturally excreted antibiotic of mushrooms. Secondary metabolites excreted from mushroom tissue indicates a symptom or sign of another problem, and could be signs of lack of enough FAE, nutritional deficiencies or excesses, a sight of trauma or signal that a pathogenic microorganism is getting ready to invade.
**Metabolism** — the biochemical synthesis that turn nutrients into energy for the growth processes that sustain a living cell or organism.
**[Microdosing](https://shroomok.com/en/wiki/Magic_mushrooms_microdosing "Magic mushrooms microdosing")** — involves taking a very small dose of a substance, such as Psilocybin, that is not potent enough to cause a psychedelic trip but has long term subconscious effects. Proponents of microdosing believe that the practice benefits the mind, and research has recently started to explore this possibility.
**Microscopic** — visible only with the aid of a microscope.
[**MonoTub**](https://shroomok.com/en/wiki/Forget_Monotub_Kit._DIY._How_to_make_Monotub_for_Mushrooms_by_your_own "Forget Monotub Kit. DIY. How to make Monotub for Mushrooms by your own") — is a type of fruiting chamber for mushroom cultivation. The volume of such tub can be from 6 Qt for mini-monotube (aka shoeboxes) to 32, 54, 80 Quart sizes and even bigger. Average tubes are considered optimal.
- [**Modified MonoTub**](https://shroomok.com/en/wiki/Forget_Monotub_Kit._DIY._How_to_make_Monotub_for_Mushrooms_by_your_own#Modified_MonoTub "Forget Monotub Kit. DIY. How to make Monotub for Mushrooms by your own") — consists of plastic transparent tub that has been modified with holes and closed tightly with transparent lid. These holes (air vents) on the proper distance and height help to create air flow, fresh air exchange (FAE) and maintain humidity due the basic laws of physics: temperature changes inside and outside tube, temperature differences on the bottom and on the top of tub create air flow and influence on the relative humidity.
- **[Unmodified monotub (neglect-tek)](https://shroomok.com/en/wiki/Forget_Monotub_Kit._DIY._How_to_make_Monotub_for_Mushrooms_by_your_own#Unmodified_MonoTub "Forget Monotub Kit. DIY. How to make Monotub for Mushrooms by your own")** — is a plastic transparent tub with lid, but without air holes. For fresh air exchange (FAE) during fruiting period the lid is flipped upside down or just don't close tightly. This creates air gaps around the lid locks which is important for allowing air exchange as well as substrate moisture regulation.
- [**Double tub** or **Twin tub**](https://shroomok.com/en/wiki/Forget_Monotub_Kit._DIY._How_to_make_Monotub_for_Mushrooms_by_your_own#Double_Tub_or_Twin_Tub "Forget Monotub Kit. DIY. How to make Monotub for Mushrooms by your own") — consists of two plastic containers and connected to each other by the container tops. This configuration has a doubled volume of fruiting chamber and this is the main advantage for fruiting period. Can be made with air-holes (for average volume bins).
- [**Shoebox tek**](https://shroomok.com/en/wiki/Forget_Monotub_Kit._DIY._How_to_make_Monotub_for_Mushrooms_by_your_own#Shoeboxes_tek_or_Mini-tub "Forget Monotub Kit. DIY. How to make Monotub for Mushrooms by your own") — usually 6Qt plastic shoeboxes use for such fruiting chamber. Can be made with air holes for fresh air exchange in the same as for modified monotub or without air holes, where air gaps between two bins support air flow and FAE.
**Multispore** — refers to an inoculation where multiple germinations and matings occur due to the use of various spores, as in a spore solution (e.g. spore syringe) and as opposed to an isolate. Liquid cultures may sometimes be called multispore (though they contain no spores) if they were produced from a spore solution, rather than an isolate.
**Mycelium (pl. mycelia)** — a network of hyphae; the white and often filamentous and fuzzy portion of the mushroom that grows under and on the surface of the ground. They are similar to a plant's roots in that they deliver nutrients and O2 gas to fungi. Mycelium networks can be huge. The largest living thing in the world is a single underground mycelium complex. There are two types of Mycelial growth: Rhizomorph and Tomentose.
**[Myc Piss or Myc Pee](https://shroomok.com/en/wiki/Mycelium_metabolites_or_mushroom_pee "Mycelium metabolites or mushroom pee")** — an abbreviated term for Secondary Metabolites referring to an yellowish-orange oily appearing secretion mycelium produces when under stress or attack of contamination.
**Mycology** — the study of fungi.
**Mycophagist** — a person or animal that eats fungi.
**Mycophile** — a person who likes mushrooms.
**Mycophobe** — a person who fears mushrooms.
**Mycorrhiza** — a symbiotic state wherein mushroom mycelium forms on or in the roots of trees and other plants. Mycorrhizal mushrooms impossible to grow at home (for example, Amanita Muscaria aka Fly Agaricus).
**Mycosphere** — the environment in which the mycelium operates.
**Mycotopia** — a term coined by Paul Stamets to describe an environment in which fungi are actively used to enhance and/or preserve ecological equilibrium.
##### N
**Natural culture** — the invitro cultivation of mushrooms by transplanting living mycelium, usually from a natural habitat
##### O
[**Overlay**](https://shroomok.com/en/wiki/Psilocybe_growing_problems_-_overlay,_abortions,_etc "Psilocybe growing problems - overlay, abortions, etc") — a condition of the casing where mycelium been allowed to completely cover the surface. Overlay is cause by prolonged vegetative growth temperatures, high CO2 levels and excessive humidity. Or dry casing, high CO2 level and/or low humidity and failure to meet the proper fruiting conditions once the bulk substrate is colonized. Overlay, if overwatered, becomes mated. Overlay shows little or no inclination to form pinheads.
**Oyster shells** — see calcium carbonate or hydrated lime. Used as a pH buffering agent.
##### P
**Parafilm tape** — a semi-transparent, flexible film composed of a proprietary blend of waxes and polyolefins. It is a self-sealing thermoplastic non adhesive tape used in laboratory procedures to seal petri dishes from contaminants entering and cultures escaping.
**Parasitic** — organisms that grow by taking nourishment from other living organisms.
**Pasteurization** — heat treatment applied to a bulk and casing substrate to destroy unwanted organisms utilizing a reduced concentration of heat while keeping favorable microorganisms alive. The temperature range is between 140-180°F (+60..+80°C). The time required for pasteurization is variable dependent upon temperature, which is anywhere from 30-90 minutes. The treatment is different from sterilization, which aims at destroying ALL organisms in the substrate.
**Phenotype** — the observable physical characteristics expressed from the genotype.
**Photosensitive** — sensitive to light.
**Phototropic** — growing towards light.
**Peat moss** — aka sphagnum moss, unconsolidated soil material consisting largely of slightly decomposed, organic matter accumulated under conditions of excessive moisture. Used as a casing ingredient in mushroom culture due to its ability to hold more than 10 times its weight in water and lack of nutrients.
**Perlite** — is a very light mineral, often found next to the vermiculite in gardening stores. It has millions of microscopic pores, which when it gets damp, allow it to 'breathe' lots of water into the air, aiding in humidification, which is beneficial to mushroom fruiting.
**Petri dish** — a round glass or plastic dish with a cover to observe the growth of microscopic organisms. The dishes are partly filled with sterile growth medium such as agar (or sterilized after they have been filled). Petri Dishes are used to grow cultures and produce isolates.
**PF** — Psylocybe Fanaticus. The original spore provider and originator of the PF-Tek, one of the original home growing techniques on which many others are based today
**pH** — A measure to describe the acidity of a medium. pH 7 is neutral; higher than 7.0 pH is Alkaline, lower than 7.0 pH is Acidic
**Pileus** — the cap of a mushroom.
**[Pin, Pinhead](https://shroomok.com/en/wiki/Fruiting_period._Pinhead_initiation,_mushroom_pinning_and_mushrooms_growth_parameters "Fruiting period. Pinhead initiation, mushroom pinning and mushrooms growth parameters")** — a term to describe a very young mushroom, so-named for the pin-sized developing cap. Synonym with "primordium".
**Polyfill** — a synthetic polyester fiber, used as a filter medium for monotubs, growbox and spawn jars to allow for air exchange.
**Pressure cooker (PC)** — a pot with a tight locking lid in which things can be cooked quickly with steam under higher pressure. The reason for it is that at 15 PSI (pound per square inch) pressure the water boils at a higher temperature (250°F or 121°C) than at ambient pressure. In mushroom cultivation a PC is used to thoroughly sterilize substrates, agar media, liquid media and cultivation tools.
**Primordium (pl.primordia)** — the initial fruiting body, the first recognizable but undifferentiated mass of hyphae that develops into a mushroom fruitbody. Synonym with "pinhead".
**Primordial growth** — The first point at which the development of a mushroom fruit body is visible to the naked eye. Primordia often appear as a balling up of mycelium strands which will eventually develop a cap. They are often referred to as knots and form the hyphal knots in the bulk substrate of a fruiting block.
**Psilocybian** — having psilocybin and/or psilocin. (Not necessarily belonging to the genus Psilocybe).
**Pure culture** — an isolated culture of a micro-organism, uncontaminated with others. Pure cultures are essential to the production of spawn because a culture is sensitive to contamination.
##### R
**[Rehydration](https://shroomok.com/en/wiki/Rehydration_of_psilocybe_cakes "Rehydration of psilocybe cakes")** — aka Flushing or cycling of the mushroom cake/block that includes submersion the entire block substrate in cold water and allowing waste products to flush out and the bulk substrate to rehydrate with water in preparation of the next cycle. This creates a shock to the block that stimulates now mycelial growth to flush again. Often aborts and secondary metabolites will appear after a block cycle rehydration.
**Rhizomorphic mycelium** — cord-like or strand-like hyphae. "Root-like" outward flat growing mycelium characterised by a round shaped growth with filamentous extensions on the outer edges. An adjective used to describe the rhizomorphic mycelium is taken as a sign of fast colonization and qualities desirable for fruiting. It is more optimal type of mycelium and usually targeted for cloning.
**Rice cake, BRF cake** — many of the growing methods involve making a mushroom "cake" of brown rice flour (BRF), vermiculite and water, and injecting it with mushroom spores.
**Rye Berry Seed** — a hardy annual cereal grass related to wheat *(lat. secale cereale)*. In mushroom cultivation rye grain is used as a popular spawn grain medium.
##### S
**Saprophyte** — a fungus that lives on dead organic matter. A decomposer.
**Scratching** **(aka fork-tek)**— ruffling of the substrate or casing surface in order to maintain an open, porous condition conducive to primordia formation.
**[Sclerotium](https://shroomok.com/en/wiki/How_to_grow_magic_truffles_Psilocybe_Mexicana_and_Tampanensis "How to grow magic truffles Psilocybe Mexicana and Tampanensis")** — A hard surfaced resting body of fungal cells resistant to unfavorable conditions, which may remain dormant for long periods of time and resume growth on the return of favorable conditions.
**Secondary metabolites** — product of intermediary metabolism released from a cell, such as naturally excreted antibiotic of mushrooms. Referred to as, "myc piss" in modern day culture. Secondary metabolites excreted from mushroom tissue indicates a symptom or sign of another problem, and could be signs of lack of enough FAE, nutritional deficiencies or excesses, a sight of trauma or signal that a pathogenic microorganism is getting ready to invade.
**Selective medium** — Medium that allows the growth of certain types of organisms.
**Slant** — a test tube with growth medium, which has been sterilized and slanted to increase the surface area of a spawn culture.
**Soy Hulls** — the "skin" of the soybean which comes off during processing. These hulls make an excellent nutrient rich substrate for mushroom growing.
**Sphagnum** — aka **sphagnum moss**, **peat moss**, **bog moss** and **quacker moss.** Used as a casing ingredient in mushroom culture due to its ability to hold more than 10 times its weight in water and lack of nutrients.
**Spawn** — culture of mycelium on grain used to inoculate the final substrate called bulk substrate or fruiting substrate.
**[Spawn to Bulk](https://shroomok.com/en/wiki/Making_mushroom_cake,_spawn_to_bulk,_and_casing "Making mushroom cake, spawn to bulk, and casing")** — transfer grain spawn to secondary fruiting substrate (bulk) for further bulk colonisation and mushroom fruiting.
**Spawn run** — the vegetative growth period of the mycelium after spawn to bulk substrate.
**Species** — Fundamental unit of biological taxonomy. Generally spoken, two individuals belong to the same species if they can produce fertile offspring.
**Spore** — a minute, typically one-celled, reproductive unit capable of giving rise to a new individual without sexual fusion, characteristic of lower plants, fungi, and protozoans.
**[Spore print](https://shroomok.com/en/wiki/How_to_make_magic_mushrooms_spore_prints "How to make magic mushrooms spore prints")** — A collection of spores taken from a mushroom cap, often collected on sterile card stock, aluminum foil, biofilm or some other flat surface.
**Spore Swab** — cotton sterile swab with spores.
**Spore Reproduction** — spores thus differ from gametes, which are reproductive cells that must fuse in pairs in order to give rise to a new individual. Spores are agents of asexual reproduction, whereas gametes are agents of sexual reproduction.
**[Spore syringe](https://shroomok.com/en/wiki/Liquid_psilocybe_spore_syringe "Liquid psilocybe spore syringe")** — a solution of spores in sterile water collected in a syringe, usually scraped from a spore print under sterile conditions. It is one of the fastest and easiest method for transporting spores to a sterile substrate, agar media or liquid media ([inoculation](https://shroomok.com/en/wiki/Inoculation_without_glove_box "Inoculation without glove box")).
**Spore Washing** — a procedure in which cells are sterilized from a print in preparation for inoculation to a petri or slant agar, LC or syringe. There are several ways to wash spores, one uses several sizes of micron syringe filters in combination with UVC germicidal lights. This process is also known as **spore cleaning** or **spore sterilization**.
**Stem** — the stipe or stalk of a growing mushroom.
**[Sterilization](https://shroomok.com/en/wiki/Substrate_sterilization_before_adding_psilocybe_spores "Substrate sterilization before adding psilocybe spores")** — any process that eliminates and kills all forms of life, including transmissible agents such as viruses, bacteria, fungi and spore forms. Usually involves a process using heat, chemicals and/or UVC germicidal light. Objective is to create an environment or condition free from pathogenic microorganisms.
**[Still Air Box (SAB)](https://shroomok.com/en/wiki/Still_Air_Box_for_Mycology "Still Air Box for Mycology")** — an enclosed area to do semi-sterile culture work in. It has a window so you can see into and two holes in the front to put your hands through. Inside the still air box is still. The particles that encounter still air lose their velocity quickly and tend to fall straight downwards. Thus by cleverly working in a SAB and never moving any non-sterile things over the top of sterile things you can achieve great success.
**Stipe** — the stem or stalk of a fungus.
**Strain** — a race of individuals within a species sharing a common genetic heritage, but differing in some observable features of no taxonomic significance. A genetic line considered to have common traits, usually identified for artificial selection
> Many strains of P. Cubensis have geographical names (e.g. Ecuador, Amazonian, Tasmanian etc.), but point of natural origin is not necessarily the source of the name. Remember that strains are a human notion. Vendors often differentiate between stocks that are not visibly different to everyone, but which have been perceived to have different characteristics, whether visual, chemical, or behavioral (relating to the mushroom's response to environment, colonization speed). There must be a differential characteristic between the numerous variety of strains that makes it unique to the others
**Straw** — the dried remains of fine-stemmed cereals (wheat, rye, barley etc.) without seeds. Used as a spawn substrate and in the bulk substrate by the agricultural mushroom industry.
**[Stroma](https://shroomok.com/en/wiki/Psilocybe_growing_problems_-_overlay,_abortions,_etc "Psilocybe growing problems - overlay, abortions, etc")** — (aka overlay) a dense, cushion-like aggregation of mycelium forming on the surface of composts or casings and indicative of somatic (vegetative), not generative growth.
**[Substrate](https://shroomok.com/en/wiki/Choose_and_prepare_substrate_for_magic_mushrooms "Choose and prepare substrate for magic mushrooms")** — whatever you're using for spawn (grain substrate: wheat, oats, rye, millet etc) and grow the mushrooms on (bulk or fruiting substrate: coco coir, hay, straw, seed hulls, sawdust etc). Different varieties of mushroom like to eat different things. Different techniques involve inoculating substrates with spores than allowing the spawn to bulk substrate and casing substrate.
**Super-pasteurization** — prolonged pasteurization utilizing steam. Super-pasteurization typically is for 12–48 hours at or near 100°C (212°F) at or near atmospheric pressure. Super-pasteurization is a method commonly used to render sawdust substrates, in bulk, into a form usable for the cultivation of Shiitake, Oyster, and/or similar mushrooms.
##### T
**Taxon (pl. taxa)** — a taxonomic unit, usually in reference to a species.
**Tek** — short for technique in mushroom cultivation. Often prefaced with something to tell you what type of tek (PF-Tek, BRF Cake-Tek, Martha-Tek, Poor Boi Tek, UB-Tek, [Monotub-Tek](https://shroomok.com/en/wiki/Forget_Monotub_Kit._DIY._How_to_make_Monotub_for_Mushrooms_by_your_own "Forget Monotub Kit. DIY. How to make Monotub for Mushrooms by your own"), [Bottle-Tek](https://shroomok.com/en/wiki/Bottle-tek_or_how_to_grow_mushrooms_in_plastic_bottles "Bottle-tek or how to grow mushrooms in plastic bottles") etc) are all varieties of different methods. The PF-Tek is one of the original home growing techniques on which many others are based.
**Thermogenesis** — the process of heat generation by microorganisms.
**Thermophile** — an organism thriving in 75-140°F (+24°..+60°C) temperature zone.
**Through-spawning** — mixing spawn evenly throughout the substrate.
**Top-spawning** — placing spawn as a layer on the top of a substrate.
**Tissue culture** — is the simplest way to obtain a mycelial culture. Tissue culture is essentially a clone of a mushroom, defined as a genetic duplicate of an organism. The basic procedure is to remove a piece of the mushroom cap or stem, and place it on an agar plate. After 7-10 days mycelium grows from the tissue and colonizes the agar. Great care should be taken to select a fruiting body of the highest quality, size, color, shape or any highly desired characteristic.
**Tomentose mycelium** — a fuzzy cotton-like appearing type of mycelial growth lacking the characteristics of the other type of mycelia: rhizomorphic growth.
**Tub in Tub (TiT)** — refers to an incubator modification consisting of 2 plastic tubs and an aquarium heater
**[Trichoderma](https://shroomok.com/en/wiki/Green_mold_contamination_aka_Trichoderma "Green mold contamination aka Trichoderma")** — a common green mold in the fungi family that is the number one contamination enemy in mushroom cultivation. This mold is saprotrophic and pathogenic fungus with an invasive growth pattern that starts to appear white but then turns green quickly and spreads. Trichoderma Harzianum won’t grow in pH levels above 8.0.
**[Trip](https://shroomok.com/en/wiki/How_to_prepare_for_psychedelic_mushroom_trip "How to prepare for psychedelic mushroom trip")** — psychedelic mushroom journey happens when you take your cultivating hallucinogenic varieties. With psilocybin species a trip tends to last from three to six hours. May range from mild visual effects and lightly enhanced perceptions, to a totally altered state of consciousness and deep philosophical thinking. Generally, this can be controlled to some degree by mindset, setting and dosage.
**Tyndallization** — aka fractional sterilization or discontinuous heating, is a form of sterilization that involves boiling substrate in jars for about 20 minutes a day, for three days in a row. Tyndallization can be used to destroy the spores (bacterial and molds). But it is not considered completely reliable — some spores may survive and later germinate and multiply. It is not often used today, but is used for sterilizing items that cannot withstand pressurized heating, such as plant seeds.
##### U
**Umbonate** — used to describe a cap with a raised central area above the point where the stipe meets the pileu.
##### V
**Variety** — a sub-species epithet used to describe a consistently appearing variation of a particular mushroom species.
**Vector** — the pathway through or carrier on which an organism travels.
**Veil** — when a mushroom is growing the edges of the cap are joined to the stem. As the mushroom grows larger, the cap spreads and the edges tearaway, often leaving a very paper thin veil of material hanging from the stem.
**Vermiculite** — a highly absorbent material made from puffed mica that is sold in different grades of coarseness. The mycelium likes room to breathe and grow and vermiculite is the “V” in a CVG or CV bulk substrate in which it serves as a moisture-retentive medium for growing mushrooms in the fruiting stage. Vermiculite serves as a great casing layer due to the lack of nutrients within it.
##### W
**Wedge-transfer** — the cutting of triangular-shaped sections of mycelium from agar and their transfer into other vessels or substrates.
**Wild bird seed (WBS)** — millet-based birdseed; used as spawn and substrate in mushroom cultivation.
##### Z
**Zonate** — having a band-like region darker in color or diferent in form than the surrounding tissue.
#### Common internet acronyms
**abv**. = abbreviation
**AFA** = As Far As
**AFAIK** = As Far As I Know
**ATM** = At The Moment
**BFE** = Bum-Fuck Egypt
**BTW** = By The Way
**ETA** = Estimated Time of Arrival
**FOAF** = Friend Of A Friend
**GJ** = Good Job
**GL** = Good Luck
**IDK** = I Don't Know
**IIRC** = If I Remember Correctly
**IMAO** = In My Arrogant Opinion
**IMHO** = In My Humble Opinion
**IME** = In My Experience
**IMO** = In My Opinion
**IYE** = In Your Experience
**KISS** = Keep It Simple Stupid
**LMAO** = Laughing My Ass Off
**LITFA** = Leave It The F\* Alone
**MYG** = Mega You Grow
**mod** = moderator
**OMG** = Oh My God
**OTOH** = On The Other Hand
**PITA** = Pain In The Ass
**ppl** = people
**pwn me plz** = own me please (asking to be put in their place)
**RTF** = Read The FAQ
**RTFM** = Read The F\*cking Manual
**SWIM** = Someone Who Isn't Me
**TC** = Take Care
**TIA** = Thanks In Advance
**TLC** = Tender Loving Care
**TY** = Thank You
**UTFSE** = Use The F\*cking Search Engine
**wot** = what (that extra letter is just too much)
**WTF** = What The F\*ck
**YMMV** = Your Mileage May Vary
## How to freeze fresh magic mushrooms
[How to freeze fresh magic mushrooms](https://shroomok.com/en/wiki/How_to_freeze_fresh_magic_mushrooms)
[](https://shroomok.com/en/wiki/File:Can-you-freeze-magic-mushrooms.jpg) How to freeze fresh magic mushrooms and save potency### How to freeze psilocybin mushrooms properly
#### Can I freeze fresh magic mushrooms
It is common question we get and the short answer is YES. Freezing has been widely used as an alternative to drying. (for edibles as well).
Proper freezing allows you to save alkaloids in mushrooms. This is the main advantage of such storage method.
However this method has disadvantages as well, because it's easy to spoil the harvest with improper freezing and all magic disappears.
#### How freezing can spoil your magic mushrooms
Water, which makes up to 90% of the mass of the fungus, crystallizes when freezing. Thus, frozen mushrooms will retain their shape with ice crystals instead of their own cellular structure.
Since ice expands during crystallization, cell walls are destroyed and loose alkaloids.
Frozen mushrooms after defrosting can turn into a shapeless mass and have zero effect.
[](https://shroomok.com/en/wiki/File:Magic-mushrooms-wrong-freezing.jpg) Magic mushrooms after improper freezing (extreme bruising, shapeless and they lost their potency
One more example how you can spoil your magic mushrooms.
[](https://shroomok.com/en/wiki/File:Mushrooms-after-improper-freezing.jpg) How freezing magic mushrooms can spoil your shrooms and ruin their potency#### How to freeze fresh magic mushrooms and save potency
Remember, the faster and deeper mushrooms are frozen, the less and smaller ice crystals are formed in them. Thus, the structure of mushroom cells is preserved better.
🔵 Don't wash your shrooms!
🔵 Don't cut mushrooms, whole fruits save more potency.
🔵 Pack them in plastic sealed containers or airtight zip bags for freezing (available [on Amazon](https://www.amazon.com/gp/product/B00CQG5QUA?&linkCode=ll1&tag=shroomok-20&linkId=4f59b918f6c790e0f24253d627441758&language=en_US&ref_=as_li_ss_tl))
🔵 Put them in the freezer at -4°F (-20°C) and lower temperatures. **Don't freeze mushrooms if you have higher temperatures!** If we freeze fresh shrooms at 14-23°F (-5..-10°C) then we can move them to trash bin from the start, they will loose potency for sure.
❄️ **Ideal is «quick dry freeze» mode at -4..-22°F (-20°..- 30°C).** This temperatures work good for freezing mushrooms
> ❗️If you are not sure about freezing conditions don't use this method, just dry mushrooms. Check out: [How to dry and store psilocybe mushrooms](https://shroomok.com/en/wiki/How_to_dry_and_store_psilocybe_mushrooms "How to dry and store psilocybe mushrooms")
❗️**Defrost mushrooms before consumption only!**❌ Psilocybin mushrooms shouldn't be frozen again after defrosting. This is the main disadvantage of this storage method. Since any sudden shutdowns of the refrigerator can ruin the frozen crop. Therefore, drying mushrooms is still preferable method.
> 💡 In case of using **liquid N2** for freezing we don't have water crystallization, don't ruin cell walls and don't have oxidation. However it's not an easy way to implement at home
#### Freeze-drying method
Freeze-drying is used in industrial scale.
**Freeze-drying (aka lyophilisation or cryodesiccation)** [read more on Wikipedia](https://en.wikipedia.org/wiki/Freeze_drying "wikipedia:Freeze drying") — is a low temperature dehydration process that involves freezing the product, lowering pressure, then removing the ice by sublimation.
In contrast to dehydration by most conventional methods that evaporate water using heat. This is the best and most expensive method that totally preserves mushroom structure, shape and color.
#### Can I freeze dried magic mushrooms
Yes, it's safe for mushrooms, because they already dehydrated. For dry mushrooms freezing slowing chemical kinetics of reaction and preserves the mushroom tissue better.
Although you can store dry mushrooms at refrigerator or room temperature in dark place and airtight bags/jars for 1-2 years.
#### Can I freeze magic mushroom chocolate with dried mushroom powder
Yes, you can freeze magic mushroom chocolate (chocolate with dried mushroom powder). Make sense to do this if you want to prolong chocolate expiration date. Such magic chocolate don't lose potency in freezer and can be stored for 1-2 years.
> 🔴 Check out: [Magic mushroom chocolate recipes](https://shroomok.com/en/wiki/Magic_mushroom_chocolate_and_psilocybin_candy_recipes "Magic mushroom chocolate and psilocybin candy recipes")
Have a shroomy day!
## Sterilization vs Pasteurization for bulk substrate
[Sterilization vs Pasteurization for bulk substrate](https://shroomok.com/en/wiki/Sterilization_vs_Pasteurization_for_bulk_substrate)
This discussion happened on the [🆘**contamination-id**](https://discord.com/channels/868489864310566913/967276105126015016) channel on [Shroomok Discord Community](https://discord.gg/ngKhQDmymD)
**The main topics are:** mold contamination, possible reasons, what is better sterilization or pasteurisation for bulk substrate.
In all the quotes, the original spelling and punctuation has been retained.
Let's get started and check out important points from the members of Shroomok Growers Community!
🟣 **learnhouser1:** Anyone know what happened here any way to bring it back or should I throw this all out ! 1st time
[](https://shroomok.com/en/wiki/File:Comtamination-id.jpg) Photo for contamination idYou never learn all the way until you fail!
Too much humidity maybe? Or I just need to be allowing more air and fanning more often?
[](https://shroomok.com/en/wiki/File:Tub-with-mushroom-cake.jpg) Fruiting period conditions
🟠 **Shroomok:** It's mold contamination. RIP, sorry. Toss it immediately!
More about this contam: [Green mold contamination aka Trichoderma](https://shroomok.com/en/wiki/Green_mold_contamination_aka_Trichoderma "Green mold contamination aka Trichoderma")
So great example of marshmallow texture around green area
🟡 **GT:** That is Trich… either toss it or bury it in the yard.
🟣 **learnhouser1:** Thanks guys ! Any idea what could have caused it?
🟠 **Shroomok:** I think problem with: poor bulk substrate pasteurization, poor FAE or you caught mold spores from the air. Really huge area of contamination
🟣 **learnhouser1:** I bought the bulk substrate from \*\*\*! Looks like I’ll never buy that again thanks for the response I really appreciate it
🟠 **Shroomok:** We don't discuss vendors/shops here. Check out the other reasons also, bulk sub is the 1st vector of contam
🟣 **learnhouser1:** Well I’ll just try again. Gonna go toss this somewhere in the woods
🔵 **ʂƙı℘ɬཞı℘℘ıŋ:** Did you do your own spawn or buy the grains pre made?
**learnhouser1:** I purchased the grain and the bulk substrate . Everything was fine this is about 2 months in. Grain spawn pure white then moved it to the max yeild bin mixed in bulk substrate and everything has looked good for 3 weeks in the bin pure white. I just turned the light on couple days ago and now this. I may have waited to long to induce pinning . Trial and error I’ll just try again ! 😇😇
🔵 **ʂƙı℘ɬཞı℘℘ıŋ:** Did you iso wipe bin before using?
🟣 **learnhouser1:** Oh yes multiple times thank you. I opened the bin a couple times to take a picture other then that it’s been closed for weeks
🔵 **ʂƙı℘ɬཞı℘℘ıŋ:** If you had a PC you could sterilize substrate again to make sure it was good
🟣 **learnhouser1:** Good idea re sterilization of the bulk substrate I’ll do that!
🟡 **GT:** You CAN sterilize, but I prefer to pasteurize. Think of your sub as a sponge… an empty sponge can suck up more stuff (good and bad), but if you pasteurize, you are left with some good and no bad with less room for the bad to propagate. Ya feel?
🟣 **learnhouser1:** A real big nice pressure cooker and bal jars are gonna be my best friend soon seems like ! Perfect thank you sir
🔵 **ʂƙı℘ɬཞı℘℘ıŋ:** In my opinion cubensis doesn’t benefit from any of the leftovers from the pasteurizing process . Why leave any competing organisms. Cubensis will colonize a sterilized substrate easily with no issues or competition.
Why take the risks
Pasteurizing has inherent risks as the person may not eliminated the organisms that will grow as competition for food or growth sources
Not saying it won’t work but there are better options
🟣 **learnhouser1:** Interesting 🧐 I think I may have just not had any fresh air exchange. I’m gonna hook up a air pump next time so the air isn’t so stagnant.
🟠 **Shroomok:** We can use sterilized and pasteurized bulk substrate - that's true
> **Sterilization** is a rendering of substrate free from viable microorganisms (bacteria, fungi, mold spores) as by the use of a high temperature in pressure cooker for heat sterilization (250°F or 121°C at 15psi for 90 mins).
>
> **Pasteurization** or pasteurisation is a process of preservation in which substrate is treated with mild heat, usually to less than 212°F (100°C), to eliminate pathogens and extend shelf life.
However we usually use pasteurization for bulk, because 140F (+60C) for at least 30 mins kill molds (trich particularly) and we save useful microorganisms in soil, that support mushroom grow and inhibit molds For spawn we use sterilization only, because not enough to kill molds in grain. We need to kill bacteria and endospores of bacteria. It is possible with high temperature for a long time (to increase temp we increase pressure)
🔵 **ʂƙı℘ɬཞı℘℘ıŋ:** Yes both methods can be used. I have done plenty each way and my experience shows me that the pasteurized substrate has shown more contamination issues than my sterilized batches so given the evidence by experience I go with sterile methods and give my mycelium a blank canvas to start with then taking the risk. Like I said my opinion.
🟠 **Shroomok:** any sterilized soil/grain unprotected and so "sweet area" for all microorganisms, they try to be the first settlers and they fight for a place to be the first
🔵 **ʂƙı℘ɬཞı℘℘ıŋ:** Just the same you wouldn’t just pastuerize grains you want them sterile.
🟠 **Shroomok:** Here we have only one way (I mean for grain)
**ʂƙı℘ɬཞı℘℘ıŋ:** You don’t want the competition either way. You want your mycelium to be the winner so why not give them the best chance at winning the fight.
🔵 **ʂƙı℘ɬཞı℘℘ıŋ:** Yes you want sterile environment no competition
I see a lot of new people to the hobby and their failure rates are high because of improper technique. If they are to pastuerize then they need to know the process to do it for a successful grow
If you are just doing coir only with no additional nutrients than pasteurizing will be fine. Even commercial growers have to sterilize any nutrient rich/ hardwood substrate to eliminate all other competitive organisms.
🟠 **Shroomok:** I also used both options for bulk/casing and both work for me
It is supposed that sterilisation treatment due to high temperature and the cooking effect, released nutrients that benefited the green mold.
> It is also considered that the reduction of the natural microbial flora of the substrate by the sterilization action increases Trichoderma sp. opportunities to colonize the substrate because of a lower presence of competitive micro flora which reduces the possibility of mycelial growth. Bacterial strains can inhibit the growth of Trichoderma sp by production of volatile organic compounds (Mackie and Whetley, 1999) or by releasing antibiotics (Nielsen et al., 2000)
And remember about pH adjusting for bulk and casing, because trich love acid soil. More about it here: [How soil pH affect Trichoderma](https://shroomok.com/en/wiki/Green_mold_contamination_aka_Trichoderma#How_soil_pH_affect_Trichoderma)
Rehydration in alkaline water also can be a preventive measure
🔵 **ʂƙı℘ɬཞı℘℘ıŋ:** Yes sterilizing produces a clean slate. Afterwards any competition can take hold of it but that being said at that point there is no trichoderma or anything there . You would have had to introduce whatever contamination or mycelium for it to take hold. If your spawn is clean then rapid colonization of the sterile substrate would occur.
🟠 **Shroomok:** Yeah, clean state and clean environment is the main difference with natural environment. That's why we keep everything sterile just for one microorganism we'd like to get
Or a crowd of other 'guys' will occupy everything
🟣 **learnhouser1:** Well I’ll go ahead and try both then sterile and pasteurized bulk substrate. I just bought a pressure cooker. So hoping this will never happen again. Also my air in the bin was extremely stagnant. I basically made the perfect environment for trich to grow. Next I will be placing a glass cup and water with air stone and air pump. When I’m ready to induce pining I’ll turn it on couple times a day for a couple minutes or so. Excited to see my next run and if I can beat the trich! Thanks guys !
I have a picture from just 5 days ago and everything was fine. It’s crazy how fast things can turn !
5 days ago ⬇️
[](https://shroomok.com/en/wiki/File:Mushroom-cake-5-days-before.jpg) Mushroom cake 5 days before
🟠 **Shroomok:** You already had trich 5 days ago on the area without mycelium, it's so common case
Keep us updated and good luck **🤞**
## What is the best ratio of spawn to bulk for mushroom growing
[What is the best ratio of spawn to bulk for mushroom growing](https://shroomok.com/en/wiki/What_is_the_best_ratio_of_spawn_to_bulk_for_mushroom_growing)
Let's discuss how spawn to bulk ratio influences the speed of mycelium growth and overall results!
🔴 **User 1:** I have a question, when it's time to mix with the bulk substrate, is there a disadvantage/advantage to use a sub 1:1 spawn:bulk ratio? Or 1:2?
[](https://shroomok.com/en/wiki/File:Spawn-to-bulk-optimal-ratio.jpg) What is the best ratio of grain spawn to bulk substrate - Shroomok Growers Community on [Discord](https://discord.gg/ngKhQDmymD)
🔵 **User 2:** Not necessarily bad but typically 1:2 - 1:3 is ideal.
🔴 **User 1:** First of all, thanks for answering, I have gathered info on multiple forums and they all recommend anywhere between 1:1 and 1:4, but the definition of ideal is a bit blurry for me. Ideal in the sense that we can 'dilute' the spawn into larger volumes of bulk without affecting too much the yield of a single tub, effectively meaning I would 'waste' spawn if my spawn ratio is higher? Or ideal in the sense, that it's the ratio that maximizes the yield in any given tub?
I have also read that much higher bulk ratios increase the risk of contamination by increasing the time of colonization post spawn-to-bulk transfer, so that's a no go since my environment isn't as sterile as I would like it to be...
🔵 **User 2:** Well your theory on that is correct, the longer it takes for your myc to colonize the higher chances something else can grow first. If you are using coir it's borderline impossible to contam the sub by itself, now if your spawn isn't clean, well that's a diff story. What im saying is that typically contam is introduced via spawn since coir has little to no nutrients for contam to thrive on. Now in regards to your question regarding the ratio of spawn look at it this way....the whole point of using a 1:3 for example over a 1:1 is that your cakes/spawn provides enough nutrients for your tub. The increased amount of sub gives your mycellium more surface area to colonize. More mycellium means you can bear more fruits. On the low end (1:1) you get less mycellium area but faster colonization as compared to 1:3, etc. The opposite is true for higher ratios. You get more surface area to colonize but it colonizes slower. I typically do 1:2 or 1:3 as I find it is a good mean choice between colonization speeds and surface area. Hope that answered all your questions.
Also I would like to mention that colonization speed is primarily determined by genetics, but when I refer to colonization speed in this sense it is simply due to it having to colonize more area to achieve full colonization, however the rate of colonization is the same.
Ex. ) 2 cars traveling at the same speed but different distances will reach their destination at different times
🟠 **User 3:** Agree with the 1:3
🔵 **User 2:** I use 1:5 sometimes. But mind you higher ratios, you HAVE to have good technique, as higher ratios allows much more leniency for contamination to take over before full colonization. Regarding all your discussion of additives, you could always try compost experiments are fun, but coco coir has already tried and true been used and it is for a reason! It is inherently not able to be contaminated (until nutrients and water are added). But basically just remember your substrate is there to provide a scaffold or surface area for the mycelium network to expand and to provide and hold water. Typically with ratios your nutrients are already in excess.
🔴 **User 1:** Thank you, I get your point. So as long as I can cover the whole surface area with the right depth requirement for fruiting to occur, I should be good no matter the ratio, as long as it stays in the accepted ranges. The question was asked because I have 'too much' spawn compared to what is typically used in a 66 qt mono tub. What I have seen is people using 3 lbs of spawn + 3-6 lbs of bulk for this size of tub, since I have 4.5 lbs of spawn, I was just wondering if using 3 lbs of bulk (on the low end) was problematic, from what I understand, it shouldn't be.
🔵 **User 2:** I dont think it would necessarily be problematic, more so a waste of spawn at that point.
🔴 **User 1:** Exactly what I thought, might just use some to inoculate my next spawn bags and use one of my tubs with the extra spawn to see if there's a difference
To clarify, I have three bags destined to three tubs, one would be the experiment
🔵 **User 2:** Send it
🔴 **User 1:** Sure will, if everything won't crash in my face until the end, I will share my results with you guys! Oh that gives me an idea, maybe we can start a spreadsheet with everyone's experiments and draw our own analysis for optimal growth! Data is my specialty
🔵 **User 2:** That's been done already not here but there is a journal like that
🔴 **User 1:** Alright! Will look it up, thanks!
