
Guide on how to build your own cooling & heating device for incubator, growbox, monotub
written by @MrZimm

DIY thermoelectric cooler or heater for mushroom fruiting chamber based on Peltier element
When it is getting warmer, temperature of fruiting chamber (monotub, growbox, shoebox etc) is getting harder to control. How to maintain proper temperature for mushroom fruiting period? One of the solutions is cooling/heating based on the Peltier module. I had all the components in my garage and decided to play with this DIY project.
What is Peltier technology
Due to wikipedia Thermoelectric cooling with using the Peltier effect
Thermoelectric cooling uses the Peltier effect to create a heat flux at the junction of two different types of materials. A Peltier cooler, heater, or thermoelectric heat pump is a solid-state active heat pump which transfers heat from one side of the device to the other, with consumption of electrical energy, depending on the direction of the current
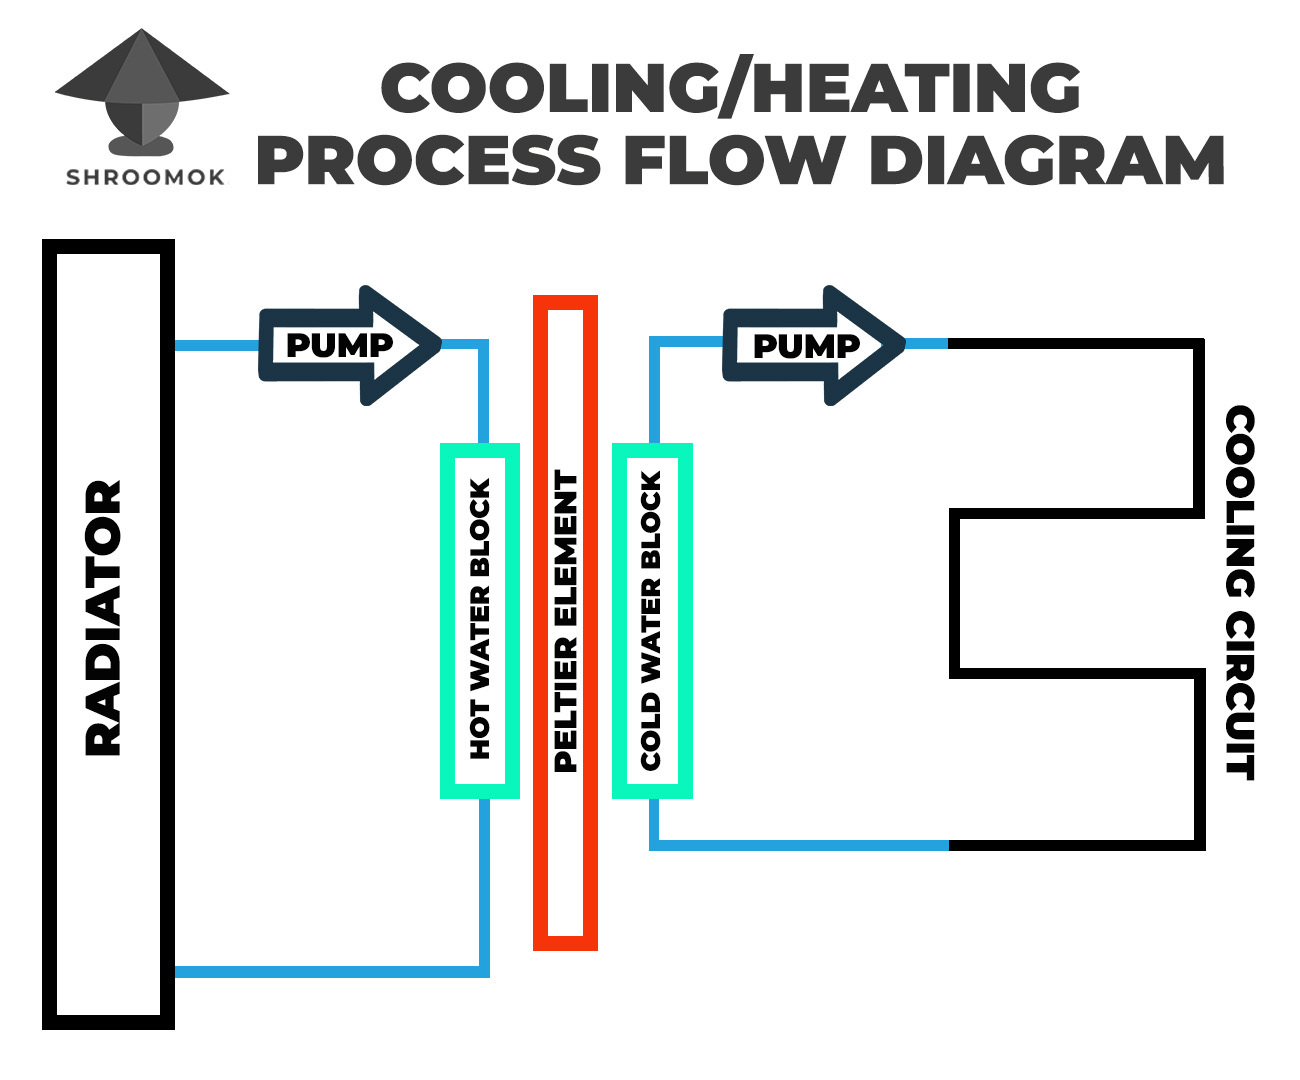
Briefly the main idea is following. Peltier element can create a temperature difference on their sides if electric current flows through it. The element cools on the one side and heats on the other side (current converter to heat + transferred heat).
This allows to create a compact cooling system almost without mechanical parts. It is often used for very small fridges such as portable car fridges.
Peltier is effective only for small-scale projects where you have compact box (up to 100L or 100Qt) to cool/heat and don't need high temperature difference (10-15°C difference). For instance, if your room temperature about 30-35°C or 85-95°F, then you can cool down your fruiting chamber up to 20-25°C or 68-77°F, that would be great for some mushroom species. The same system works for heating as well (i.g. for incubation chamber), we'll discuss it later as well.
Advantages
🟢 no mechanical parts, easy to use and set up, compact and mobile, totally quite system
Disadvantages
🔴 relatively low coefficient of heat transfer in comparison to high efficient compressor coolers, it becomes even lower when temperature difference rises
🔴 requires very good cooling of the hot side, otherwise you gonna lose in cooling capacity
How to make cooling or heating with Peltier element
Let me show you my setup. In the next section I'll show the list of components I use and possible alternatives.
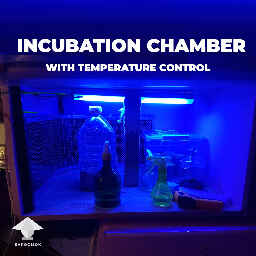
In fact, we are going to make Mini Fridge for mushroom growing that also can work as Incubation Box (heat box)
Step 1. I assembled MVP configuration from the basic items I already had at home (without housing and special mount)
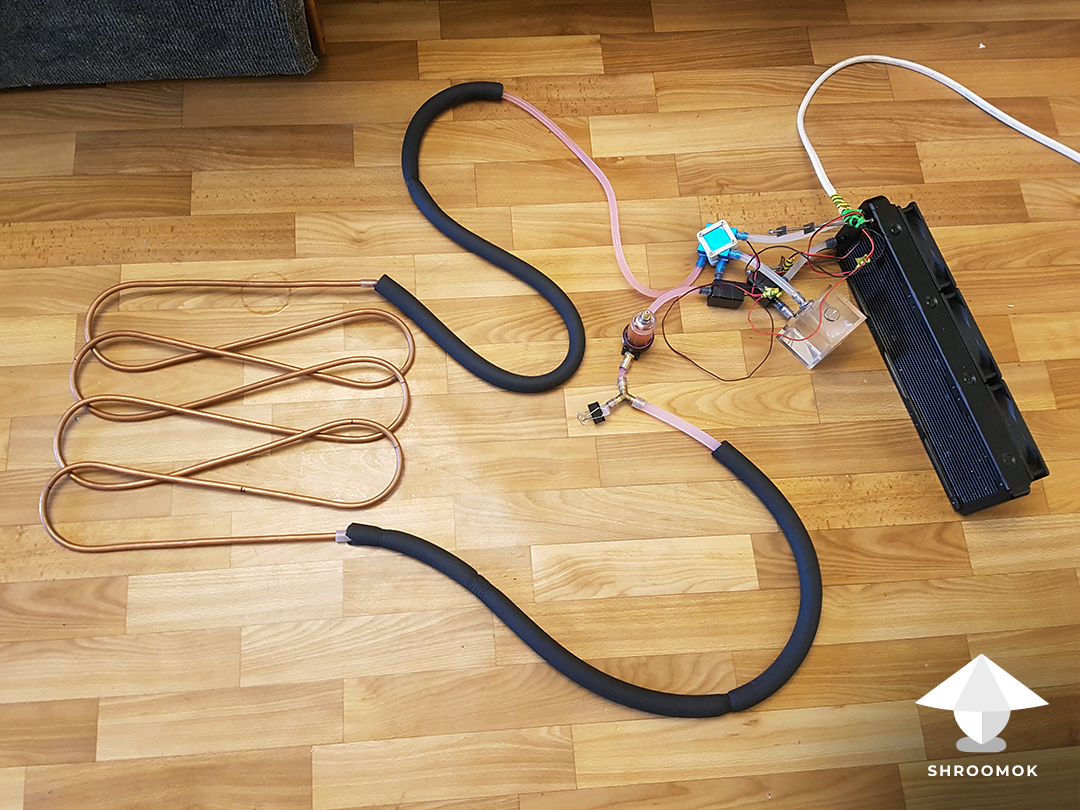
I just repeated the Scheme 1 and connected all components
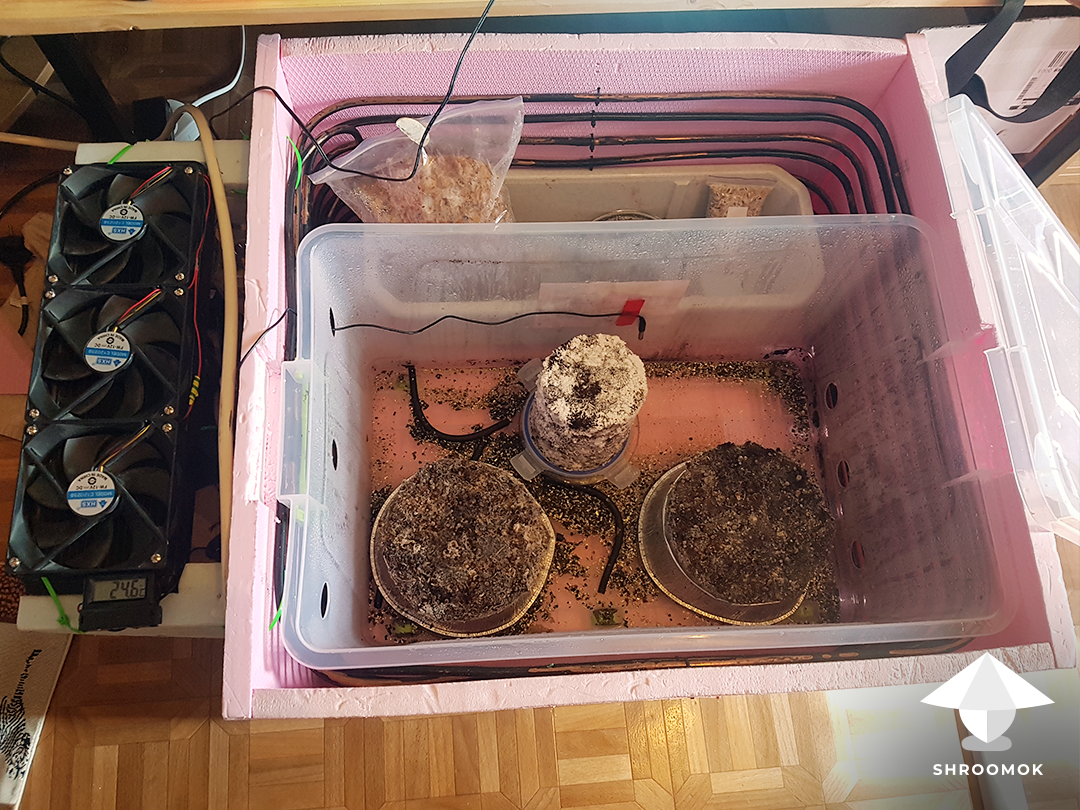
Step 2. I put the cooling circuit on the lid of my fruiting chamber. The plastic tub was covered with foam thermal insulation (penofol) from the sides and on the top to retain temperature
Penofol is a two-layer heat-insulating building material that can be made from one or 2 layers of foil deposited on a base layer of polyethylene foam

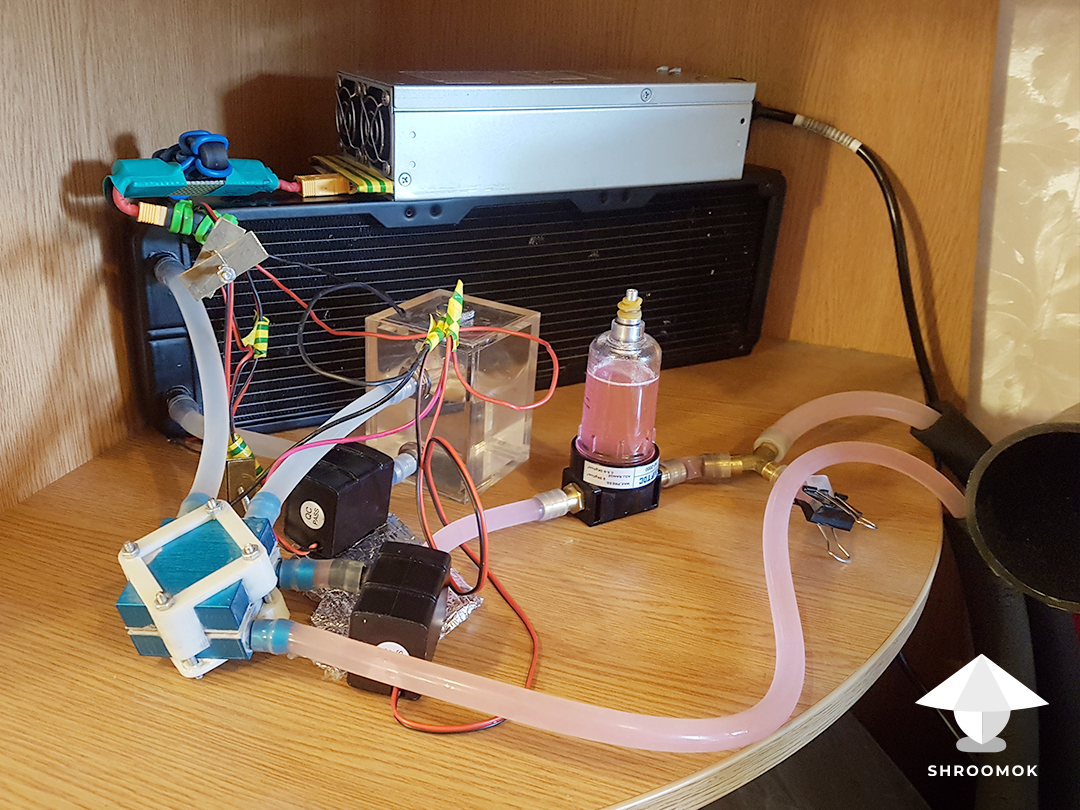
All other components I put on a shelf next to it. Looks strange, but don't worry, I'll show you each component for this setup in detail
I tested this system and it was able to lower the temperature by 5°C. Not bad, but I'd like to get bigger difference!
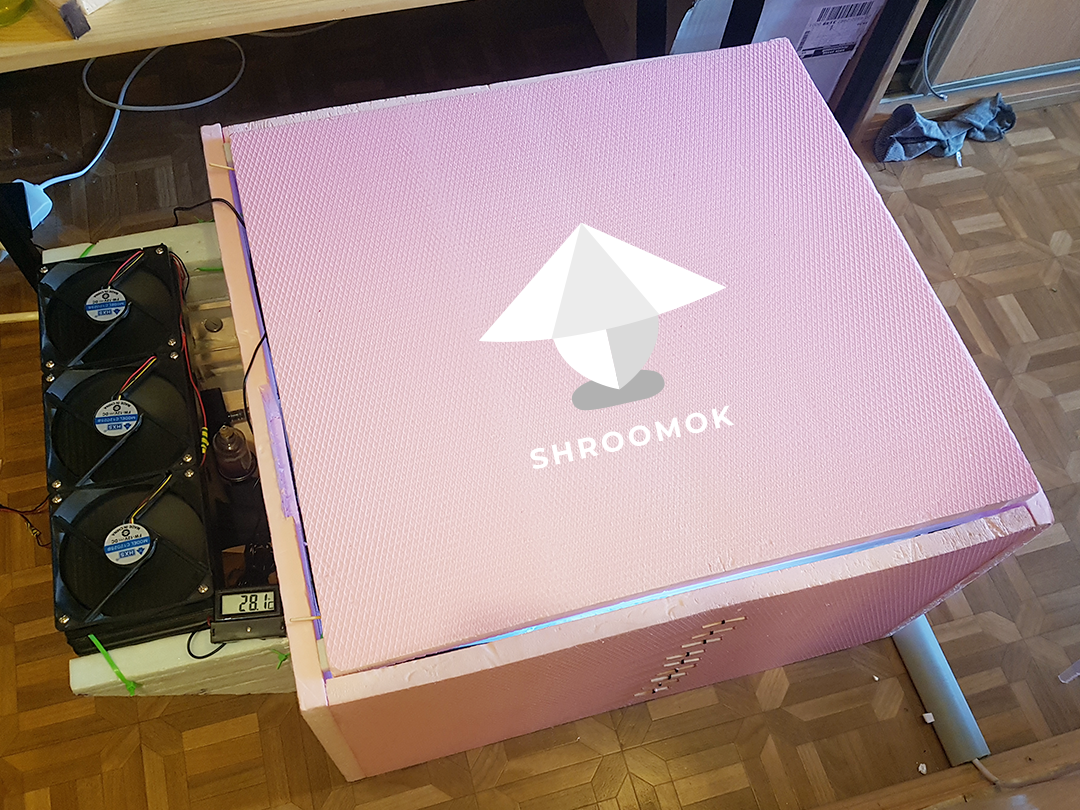
I decided to make more effective cooling box and build a styrofoam box with lid (wall thickness = 10 mm or ~1/2 inch). Put a cooling circuit in it along the perimeter of the box
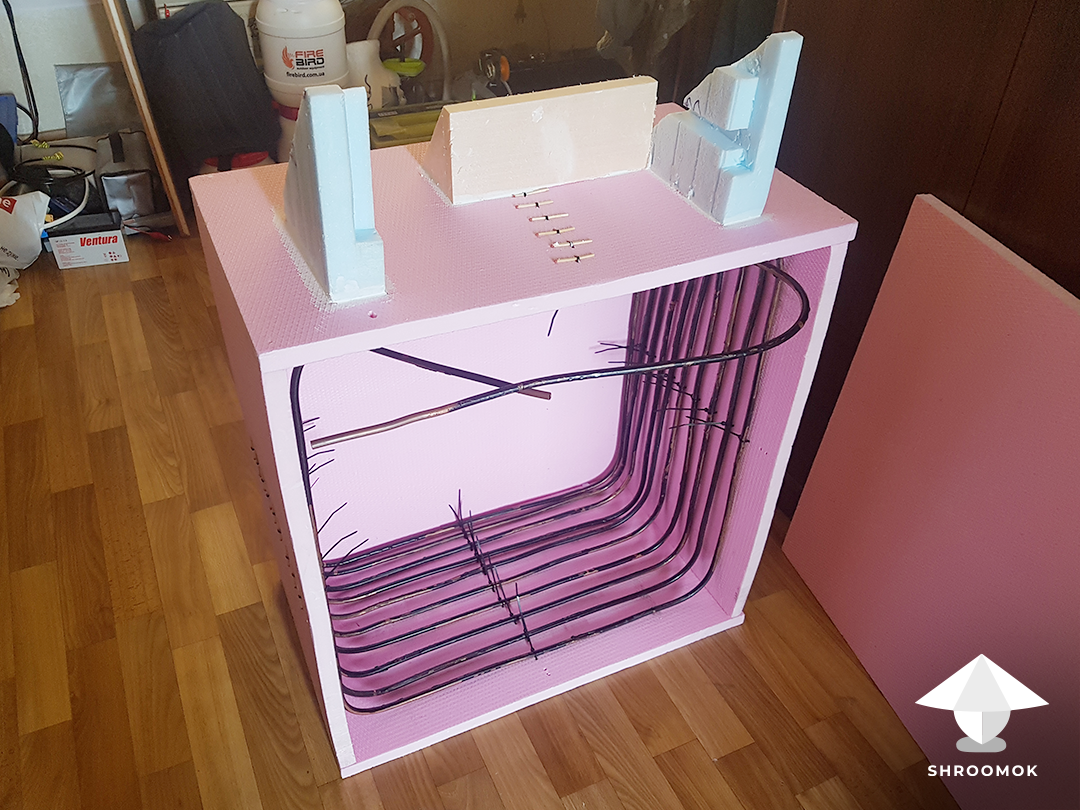
Ready styrofoam box with lid
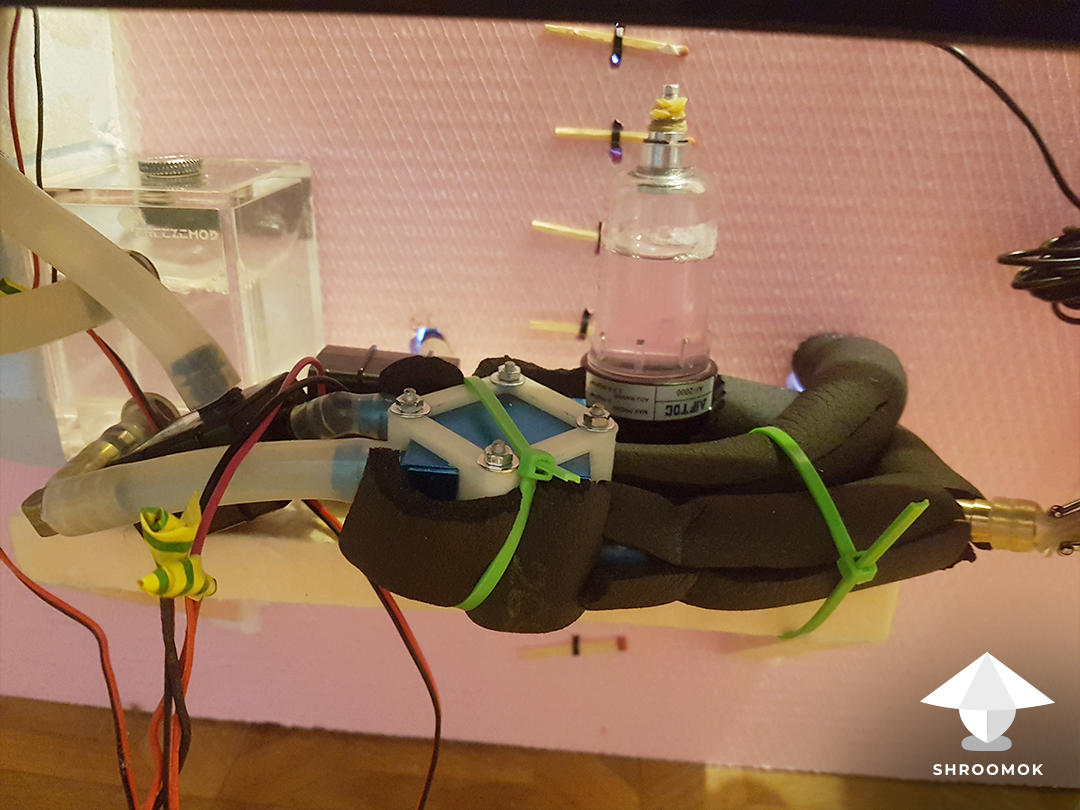
Radiator and all other components are placed on a shelf I made on the side of the cooling box
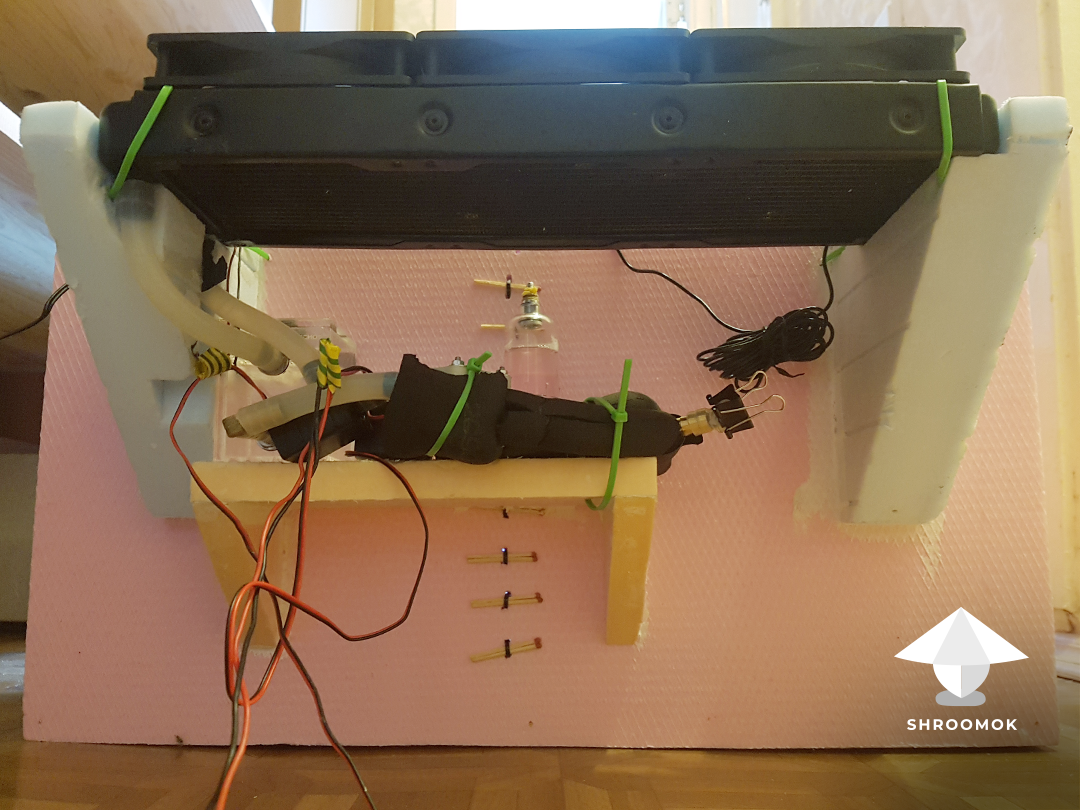
Cold (internal circuit) pipes are covered with pipe insulation to reduce cold loss
My plastic tub fits inside the styrofoam box
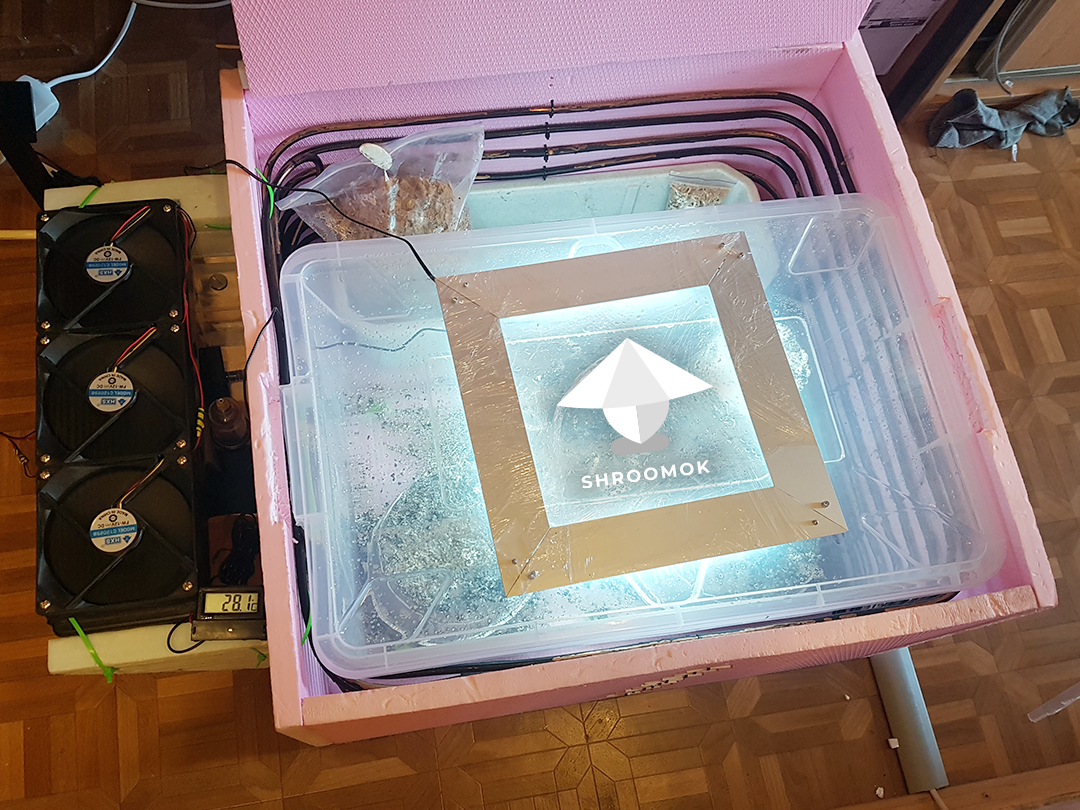
Here are my mushroom cakes for testing. I put long flower pot next to it for my spawn jars/bags
How it works
The room temperature and temperature inside the fruiting chamber without cooling was 30°C (86°F). The system cooled the styrofoam box from 30°C to 21.5°C (from 86°F to 71°F). The temperature inside the plastic box with mushroom cakes was 22°C or 72°F
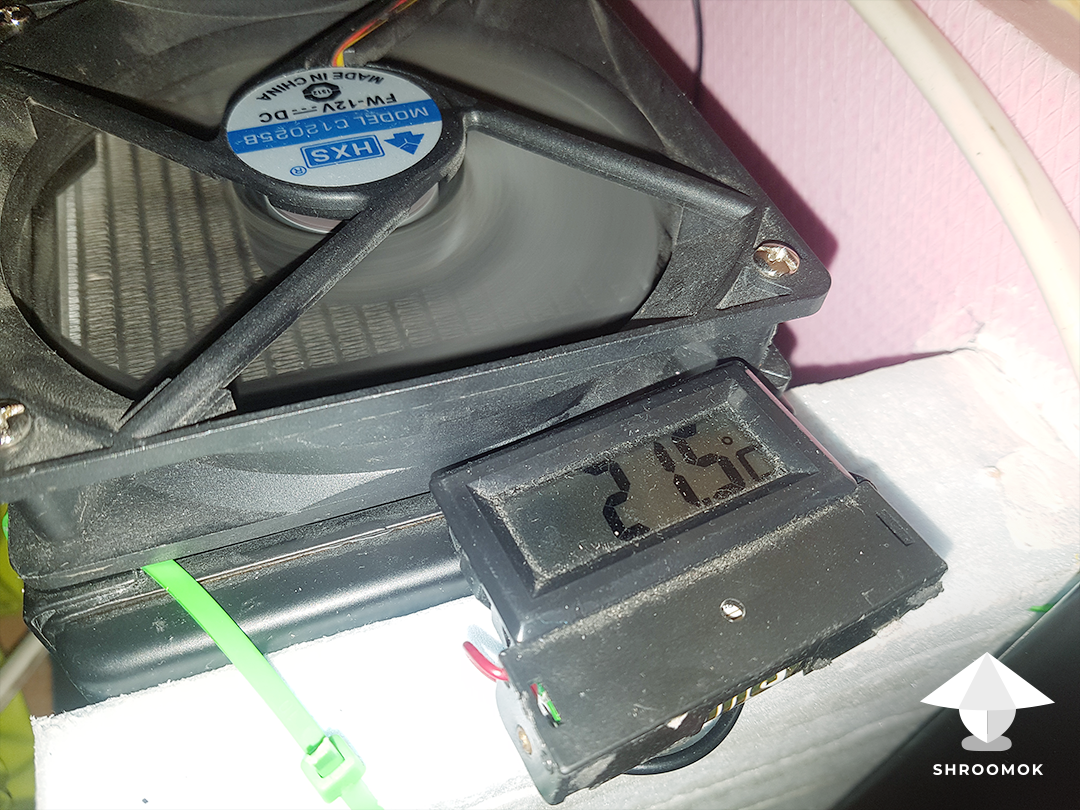
At this point, the temperature decreasing almost stopped. I run several tests. As a result, the maximum temperature difference was up to 10°C, i.e. from 30°C to 20°C (86°F to 68°F) After switching off the cooling system, the temperature rise by 2°C in an hour.
This setup is the most efficient, but costs a lot. I made it mostly because I already had most of the components.
With such setup it is possible to achieve a temperature decrease in the fruiting chamber by 10°C.
💡 This setup works for both heating and cooling. If you change the polarity on the element, then the system will heat the box and cool the external radiator. It means you can arrange winter and summer cultivation for any mushroom species. If you add a couple of switching relays, an arduino, a BME280 sensor and a display, you can automate this setup and maintain stable temperature within 1-2°
I haven't tested heating, but heating is more efficient and I assume it is possible to have temperature difference about 15-20°, i.e. if your room temperature 10-15°C or 50-60°F you can use this box as an incubator and maintain temperature 25-30°C or 77-85°F.
List of components for Peltier setup from scratch
Here is the list of components I used for my setup described in this guide. Most of these items I already had from my PC cooling and other DIY projects, so it was cheap and for fun. If you have nothing from the listed below it could be costly.
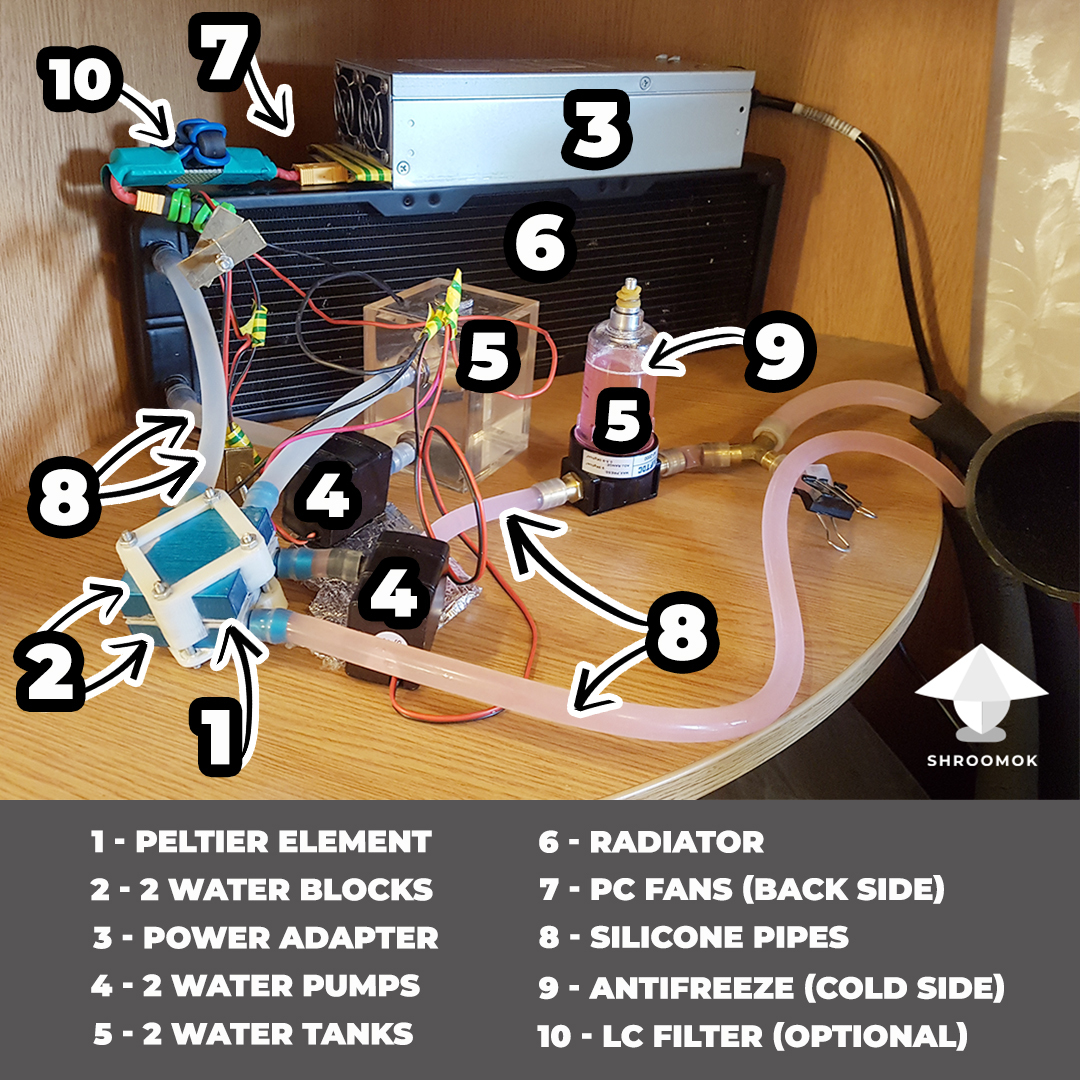
Elements and numbers on the picture match the list numbers below ⬇️
🔷 1. Peltier element module (Amazon $11.00)
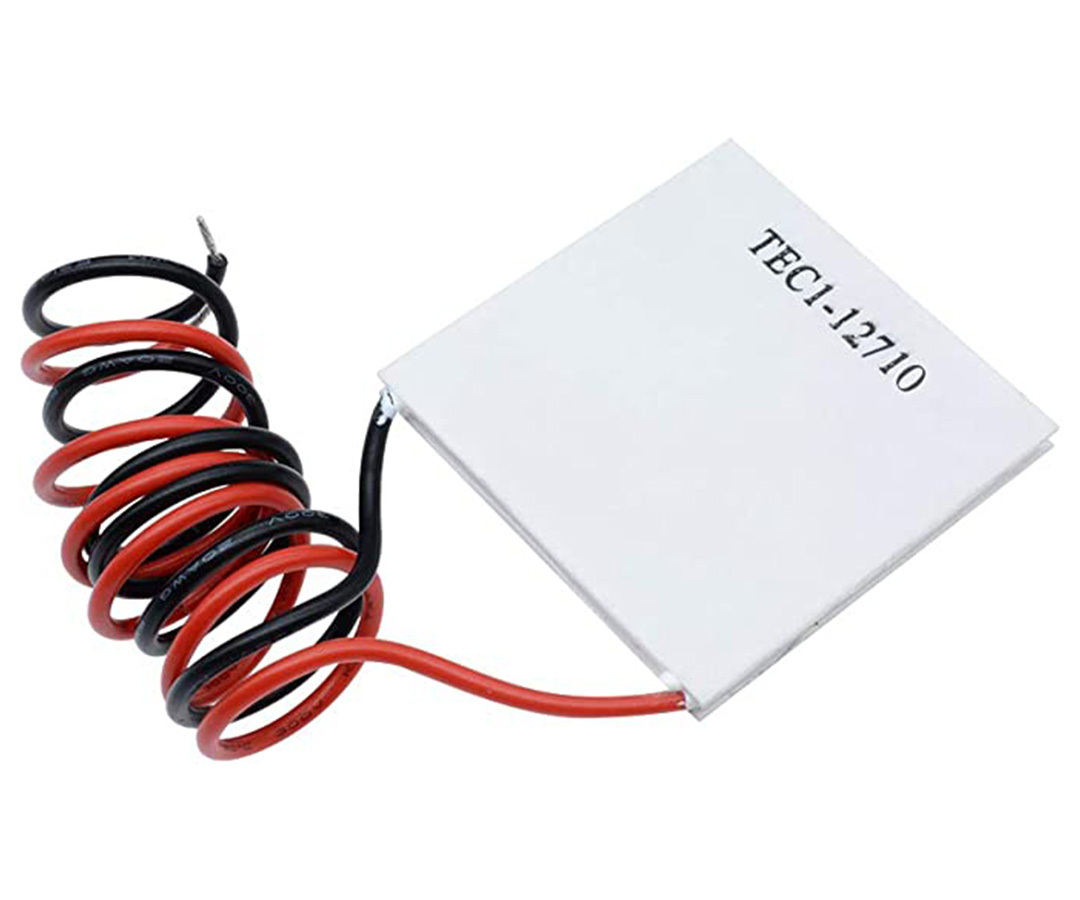
I tried to use different power modules: 50w (TEC-12706), 100w (TEC-12710) and 200w (2xTEC-12710). The optimal was 100w TEC-12710, 12V, 10A, 40x40 mm.
At this power level is possible to achieve good performance (up to 20°C difference) with moderate power consumption (approximately 120w in total).
You can use smaller elements to achieve the same power level. 2 x TEC-12706 elements produce the same amount of heat transfer in parallel.
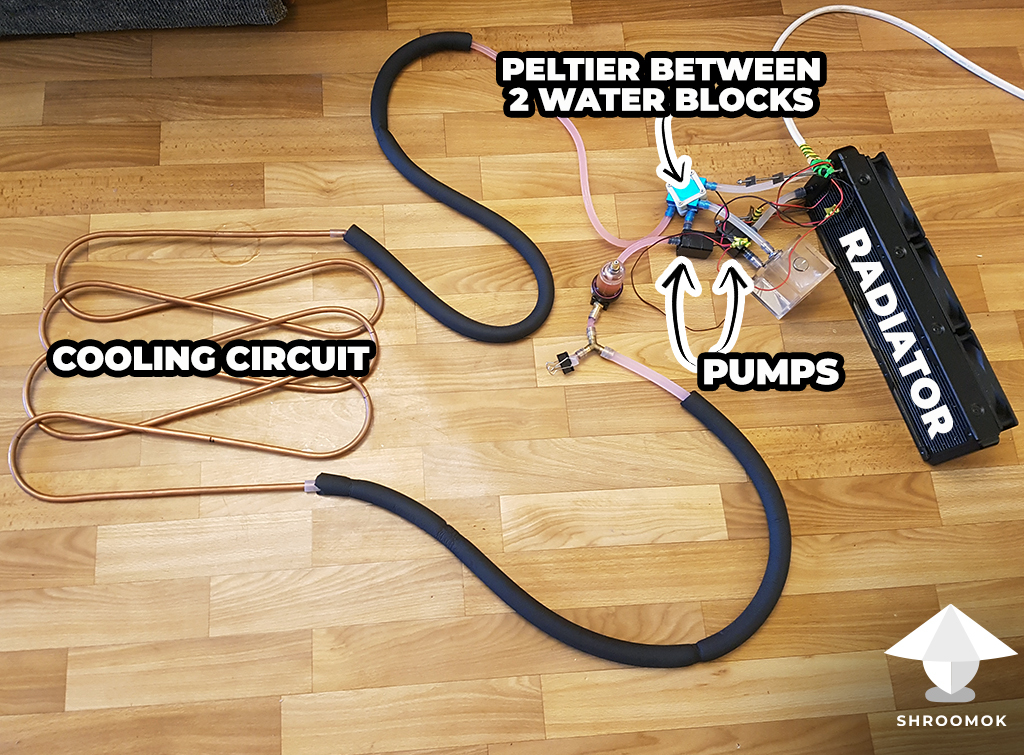
🔷 2. Water cooling blocks - 2 pcs. (Amazon $8.99)
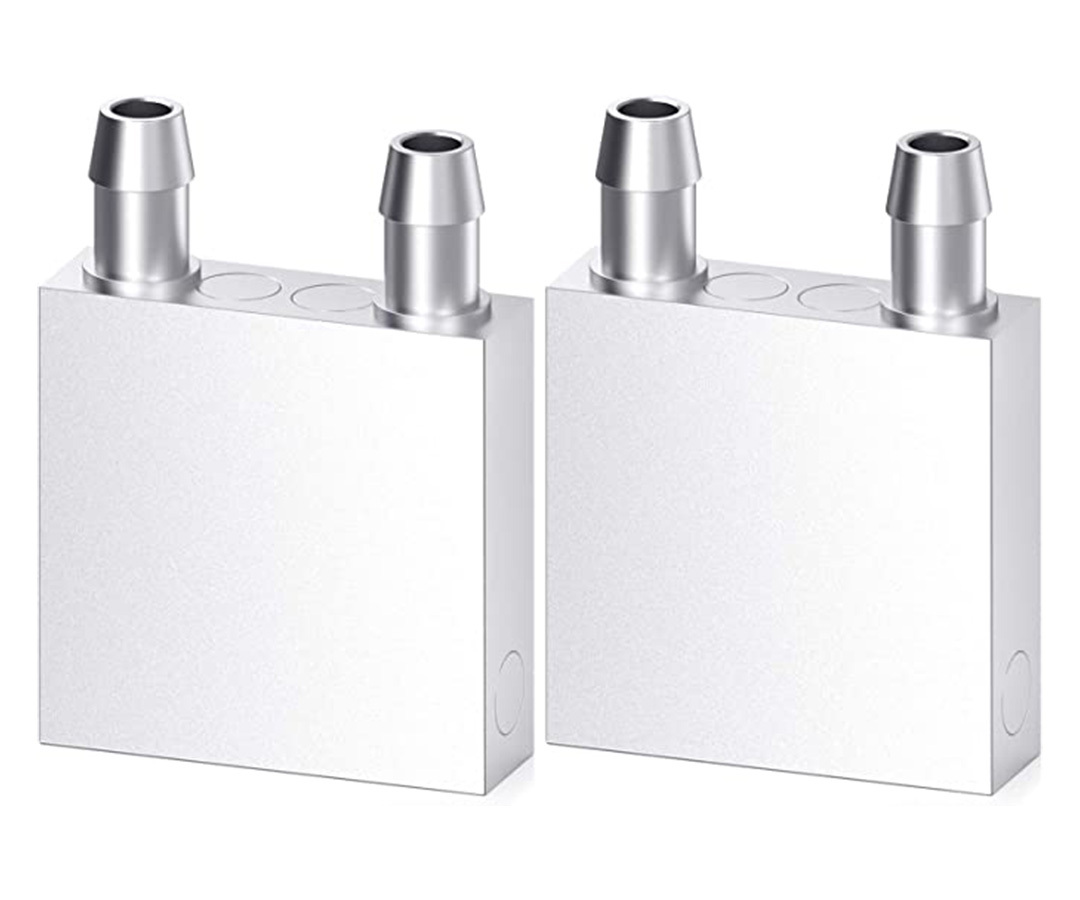
Place the Peltier element between 2 water blocks. The first water block we use to cool the Peltier element (its hot side). The second one to cool the cooling circuit, thus cool down your fruiting chamber.
As a result you have a sandwich: water block -> Peltier element -> water block
❗️There is a milled side and a U-shaped side on water blocks. Better to put Peltier module on the milled side
If you use 2 x TEC-12706 Peltier elements in parallel you need 80*40mm water blocks (Amazon)
🔷 3. Power adapter (Amazon $18.99)
Power Adapter (12V/15A) $29.80 - this one allows you to connect 2 Peltier modules.
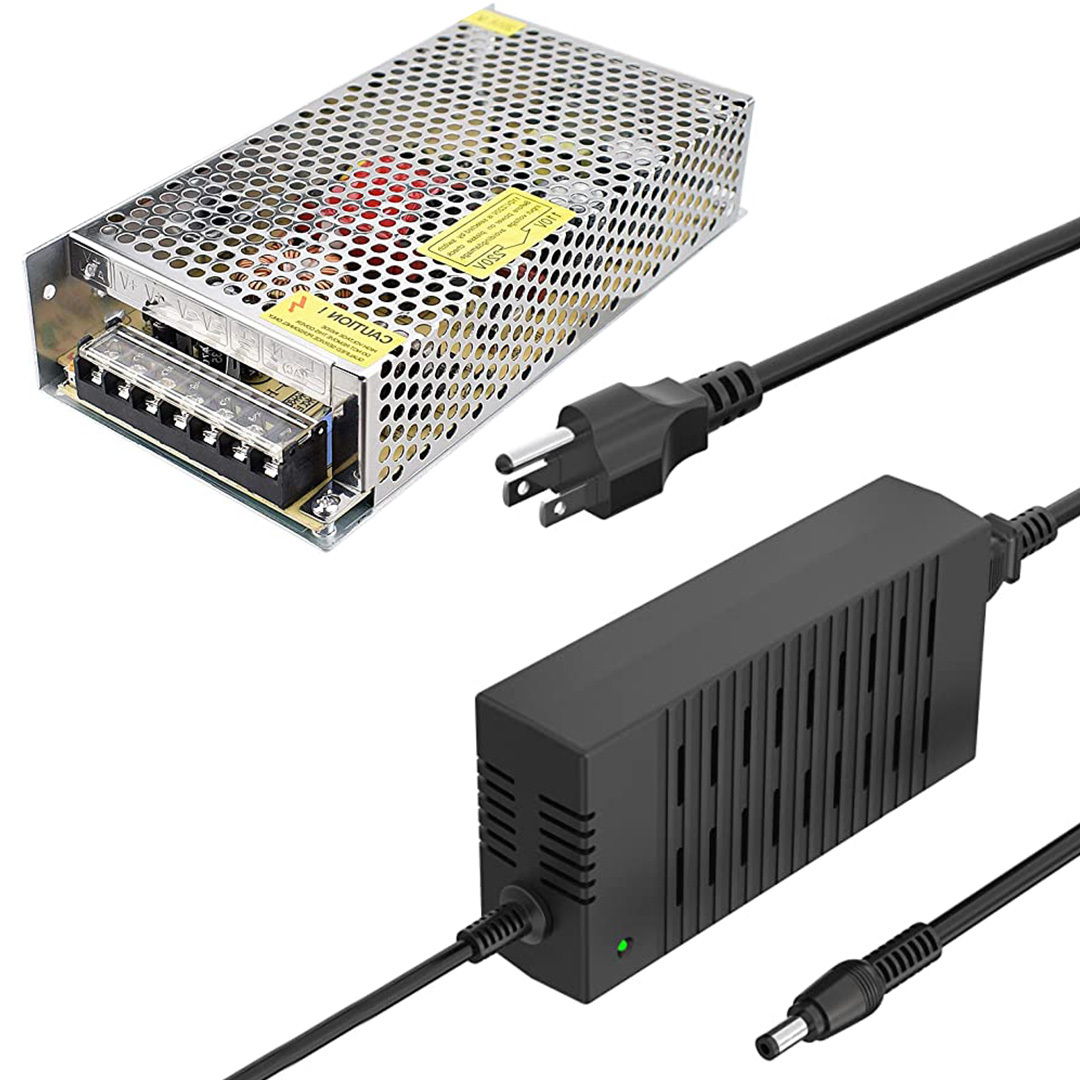
Choose adapter with some margin, 150-180W (around 12V, 15A). Great if you already have it from your other DIY projects. For example, I use it for my DIY incubation chamber as well. If you have PC power adapter use it.
Actually use any other adapter that can give out 12V and at least 12+A. In my case, there is a server power adapter I've got as gift from my friend - 12V and 70A, such adapter is costly and too much for such project.
Or use ready Peltier Kit with power adapter 2-in-1 (Amazon $41.09).
And one more option of Peltier Kit like this (Amazon $31.36).
🔷 4. Water Pumps 12V - 2 pcs. (Amazon $16.99)

Fluid in both circuits is pumped by cheap 12V water pumps. More than enough for good circulation.
🔷 5. Water Tanks - 2 pcs. (Amazon 2x$12.99)
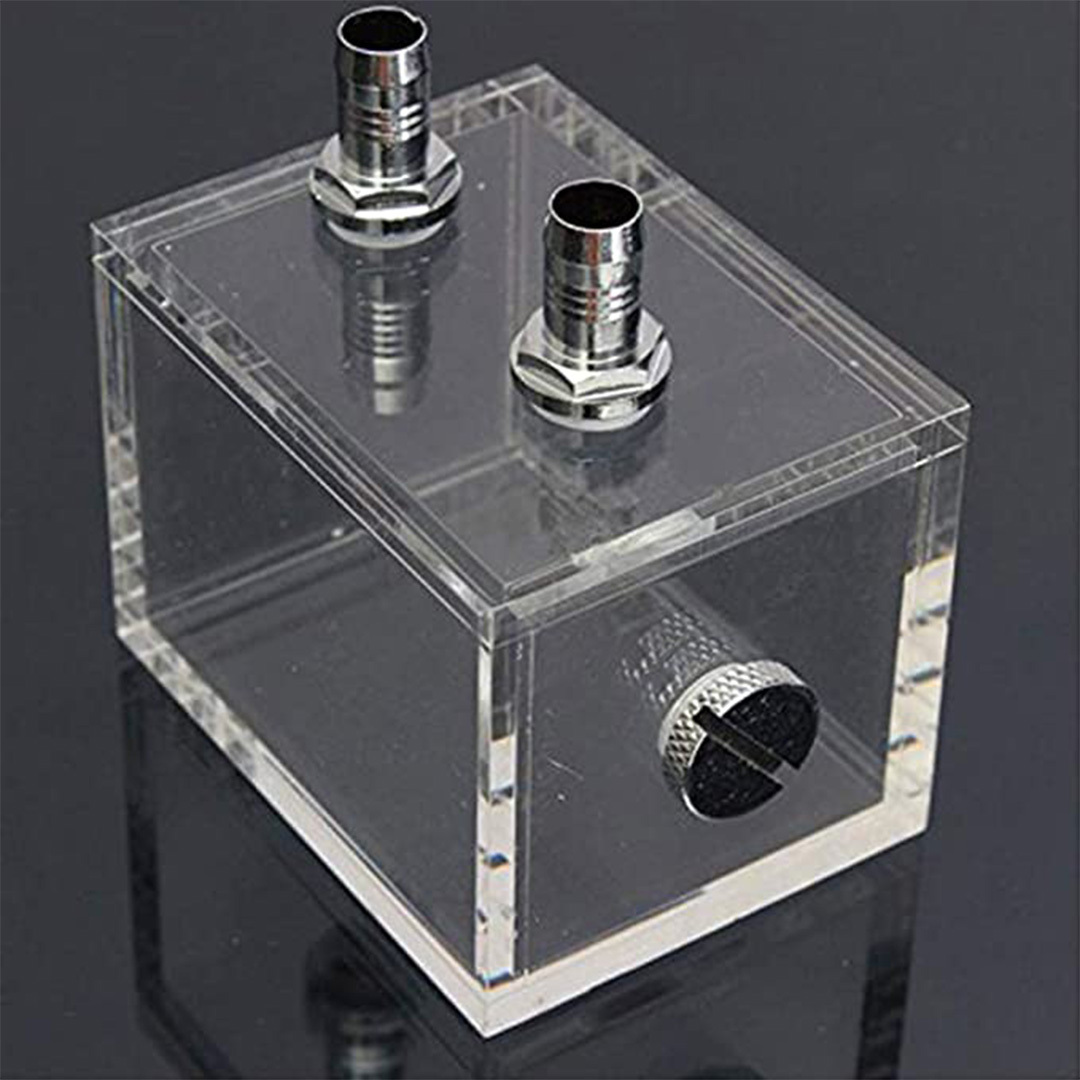
It is optional, but highly recommended to add buffer water tanks to both circuits. They help to fill the circuits with water (for hot side) and antifreeze (for cooling circuit). Moreover trapped air in pipes will stay in them.
You can proceed without water tanks. Put a tee in the line and fill through it, but it's so awkward.
Water pump should take liquid directly from lower port of the tank, otherwise it will be hard or impossible to fill the system and get it out.
🔷 6. Cooling radiator (Amazon $21.79)
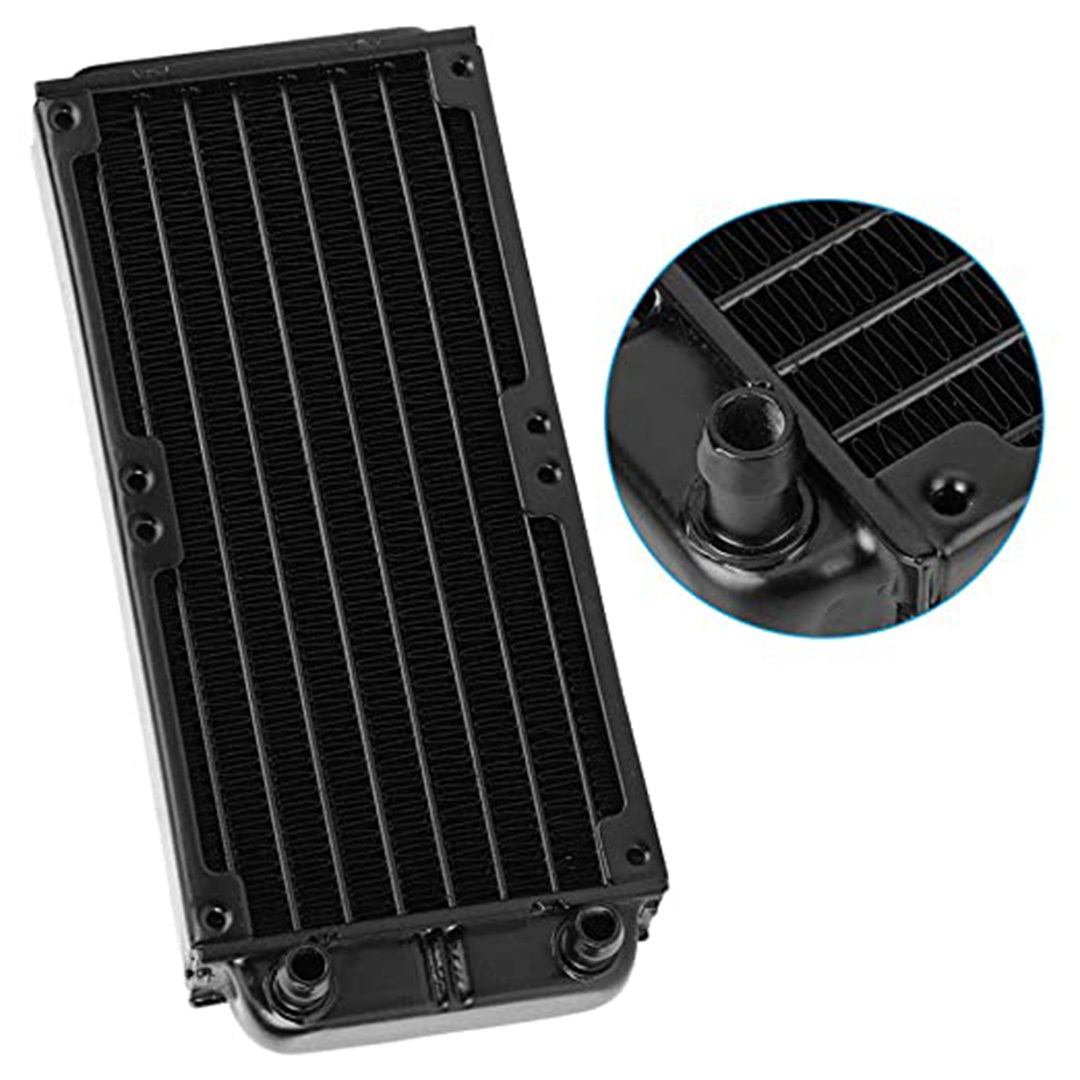
I use 3-sections radiator for 120 mm fans, 1-2 sections also okay. As an alternative option you can use the heater auto radiator (not clogged of course!)
When choosing a radiator pay attention that some of them have built-in outlets and some have threaded holes for fitting that are purchased separately. Don't forget to buy fittings for the radiator if you choose one with threads
❗️It is recommended to use aluminum radiator with aluminum water blocks. Mixing aluminum and copper heat exchangers lead to faster corrosion since copper and aluminum create a galvanic pair
🔷 7. 120 mm PC fans for radiator (Amazon $10.99)
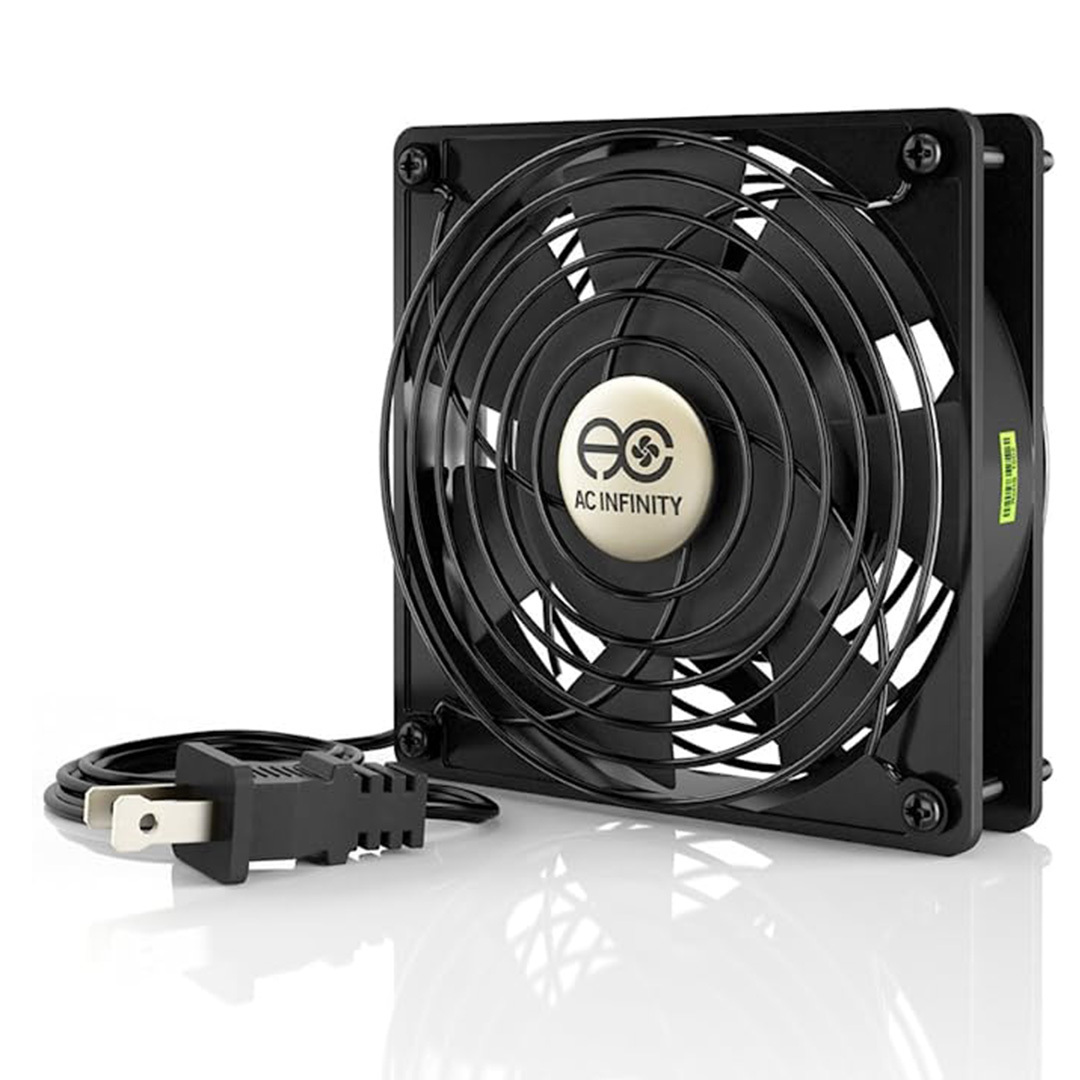
I use the cheapest. You can use any fans you can connect to the radiator.
🔷 8. Silicone Pipes (Amazon $16.99)

I used silicone pipes and cover them in foam insulation (Amazon $22.99) to keep them cool (outside the box).
Inner diameter of the pipe 8-10 mm, outside diameter doesn't matter. The length about 10-15ft or 3-5m in total.
🔷 9. Antifreeze (Amazon $14.53)
It is recommended to fill the cold circuit with red antifreeze instead of water. You can buy it in any auto store or gas station.
If the heat load for some reason will be low (for example wrapped the cold circuit in thermal insulation or a blanket) or it will be cold enough outside, then the system can lower the temperature below 0°C and water freeze. Red antifreeze can drop to -40°C and no problem.
Note that you should use antifreeze on hot side too if you are going to use the system in reverse (as a heater).
🔷 10. LC filter (optional)

It's optional and to be honest I'm not sure if there is huge difference for such setup.
This component can extend the life of the Peltier element. It's difficult to find LC filter for such a current. In my setup you can see DIY LC filter. I wound 5 turns of thick wire + 2 capacitors on a ferrite core.
🔷 11. Cooling circuit (Amazon $65.00)
As you can see I used cooper pipes for this purpose.
A long silicone pipe can be a cheap alternative to expensive copper pipe. However a silicone hose doesn't transfer heat as good as copper. Moreover it's flexible, hard to layout it, hence it can block the water flow if it is bent in the corners. Therefore not recommended.
The best cheap and simple alternative is using a cooling radiator as for hot side, but smaller (the size for 1 fan). This would be enough to transfer heat efficiently.
🔷 12. Styrofoam shipping box or Foam insulation (Amazon) or use Insulated Bag (Amazon) or any type of cooler you have on hand
This box/insulation helps to retain the temperature, reduce temperature lose, and make your system more efficient.
❗️Your box should be somehow insulated in any way. Otherwise it won't be able to give you any significant cooling effect.
🔷 13. Temperature Controller aka Thermostat (Amazon $28.00)

Optional, but it helps to maintain stable temperature inside the box and turn on/off the system when needed. It is used for other DIY projects for mushroom growing as well (incubation box, fruiting chamber, grow tent).
I'd recommend some cheaper options:
SЕС-1000 (Amazon $9.17) - it works for both cooling and heating, set what you need.
STC-3028 (Amazon $13.82) - this one works as Temperature + Humidity Controller, so you can use it for different types of DIY projects for mushroom growing.
🔷 Wiring and additional tools
How to plug everything? It seems a bit scary with all these wires. In fact the whole system connects to the thermostat.
Maybe you'll need some brass fittings to connect pipes, tees, screwdriver, additional electrical wires and stuff like that.
Useful notes
⛔️ Don't overload Peltier element, the efficiency drops dramatically.
⛔️ Using PWM regulators is not recommended, pulses reduces element lifetime.
⛔️ Don't turn on the circuit element for more than 1-2 seconds without a radiator, high heat can destroy the Peltier element.
Upgrades for cooling box
Peltier is not the most efficient way for cooling/heating, however it's simple and good enough for small projects.
I'm working on another system based on water cooler with compressor. Such setup is more efficient. You use 1 liquid loop for the hot side (water as coolant) and cool radiator connected directly to the element.
The cheapest way is radiators on both sides.
One more option is ready-made modules with radiators on sale.
Note that you need quite big radiator on the hot side to achieve reasonable cooling capacity.
As soon as it's ready I'll share a detailed post. Stay tuned!
Made with love by @mrzimm - writer and Tech Guru of Shroomok Community.
Promoted by ©Shroomok
If you find this guide helpful, please support with donation on buymeacooffee