


Step 11. Day 32-33. How to make spore print?
The excited day of The first Psilocybe Cubensis harvest is coming. But before cropping let's make spore prints for the future cultivation and mycological experiments.
Here is a video demonstration: How to make a Spore Print
What flush is the best for spore prints
There is no consensus which flush is better for spore prints. Some growers state you should gather spore prints from the first flush, some growers note that from the second flush or the most powerful flush or even from the last flush.
We decided to make spore prints from each flush and check them experimentally. It's so great to know you have your own spore print and you can start growing process any time.
When you look at the smallest cap under a microscope you can see a lot of spores on the mushroom blades of the caps.

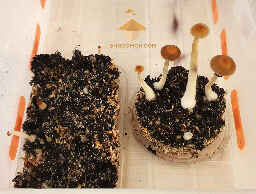
From flush to flush spore prints are different as mushrooms yield different as well. We'd like to demonstrate how spore prints differ on the most modest 1st flush of fruiting and on the most powerful 3rd flush of fruiting.
There are spore prints from the 1st flush:


At first glance such spore prints are not perfect. But if we examine the poorest print under a microscope you can see it has poured so many spores that you could inoculate a dozen jars with them.


Now let's compare spore prints on The Third flush of harvesting: powerful, fulfilled, large and beautiful!


The most powerful mushroom was grown on The third flush of fruiting and harvesting period (Psilocybe Cubensis Golden Teacher). Here is the biggest spore print of our growing.


What you need for preparing mushroom spore prints
To make spore prints you need to prepare:
1. Healthy mature mushrooms on the cake right after torn veil.
2. Scalpel, blade or a sharp thin knife.
Shroomok's choice on Amazon:
Surgical Grade Blades - 10 pcs. - $6.99
Disposable Scalpel Blades, #20 Sharp Carbon-Steel Blades - Pack of 100 - $13.50
Premium Scientific Labwares Essential Lab Tools Starter Pack - $34.99
3. Pair of tweezers.
Shroomok's choice on Amazon:
Curved Stainless Steel College Tweezers - $4.95
4-Piece Hobby Tweezers Set - $7.95
4. Scissors.
5. Aluminium foil.
6. Small zip bags for spore print long-term storage.
Shroomok's Choice on Amazon:
Small Clear Poly Zipper Bags - 2''x 3'' - 100 Pack - $6.99
Resealable Aluminum Foil Ziplock Bag, Rainbow Color (2.8 x 3.9 inch) - 100 Pack - $9.59
Clear Plastic Zip Bags, 3 Assorted Sizes: 2x2 2x3 5x5 Inch - 500 Pack - $12.99
7. Growers outfit: gloves, cap, gown.
Shroomok's Choice on Amazon: 10 Gloves and 1 Mask Bundle - $6.99
8. Ethyl alcohol (70%).
Shroomok's Choice on Amazon:
Isopropyl Alcohol 70% USP Grade - One Quart Spray - $21.99
Isopropyl Alcohol 70% - 1 gallon & a 32 oz Spray Bottles - $37.98
9. Cotton pads.
Shroomok's Choice on Amazon: Cotton Rounds Organic, 100 Count - $3.79
10. Plastic box with lid or a glass.
Shroomok's Choice on Amazon:
Aluminum Pan with Dome Lid, Environmentally Friendly - 2.25 Lb - 14 pcs. - $5.49
Reusable Lunch Boxes with Lids, BPA Free, Stackable - 28 oz - 20 pcs. - $16.99
Durable Food Container Sets with Lids - BPA Free - Reusable Plastic - mix 26oz-40oz-70oz - 15 pcs - $19.99
Food Container with Lid - Black Box - Stackable - BPA Free - Reusable Storage - 38 oz - 50 pcs. - $27.99
1.1. Water in a spray-bottle (boiled chilled water).
1.2. Germicidal lamp, Glovebox or SAB — optional.
Step-by-step process for preparing mushroom spore prints
Ideally, all manipulations should be carried out in the glovebox or still air box (SAB).
Without glovebox your spore prints are not sterile. They are prepared in relatively clean conditions. When you decide to make a liquid spore syringe from such prints antibiotic is must have to use!
Germicidal lamp is not necessary in this process. But it will help you get more clean prints without glovebox. You can do the same thing without the lamp, but don't forget about antibiotic in liquid spore syringe before substrate inoculation.
Now let's move on the step-by-step instructions:
1. Wear a face mask and gloves before manipulations. Wipe the table and all tools with alcohol.
2. Cut rectangular pieces from the foil, so that they are fit the zip bags size. We used 6 cm by 8 cm zip bags. The foil pieces were about 5 cm by 6 cm. It's better to use thick foil. Wipe both sides of each piece of foil with alcohol.
3. Wipe the plastic box and its lid with cotton disk soaked in alcohol. Put the box under the germicidal lamp for 5 minutes (optional, if you don't have a germicidal lamp).
4. Wipe the lid from the plastic box with alcohol. Stick the foil to the lid. It glues itself easily after wiping it with alcohol. Put the lid with foil pieces under germicidal lamp for 5-10 minutes to sterilize the surface for spore prints (optional, if you don't have a germicidal lamp).


5. 5-10 minutes after put the lid with foil pieces on the table.
6. Choose the most beautiful mushrooms on the cake. They should be the largest, most powerful. The veil under the cap should have torn.
7. Wipe the blade or scalpel and tweezers with alcohol.Carefully cut the cap from the stem at the highest possible point. Be sure not to touch the spores with scalpel. Use the tweezers to help with cap.

8. Place the cap on the piece of foil with the spores facing down.

9. Spray the plastic box (or clean glass) from the sprayer (1-3 times) with chilled boiled water. Cover prints with it.
Why is it needed? As you know, mushrooms are 90% consist of water. Caps become dry rapidly after we cut them off. Dry caps will shrink and won't throw spores. So we need to help them and keep humid environment. As a result, more spores will be accumulated on your spore print.


10. After 24 hours under the box most of the spores will have fallen down. Remove the box. Remove the caps from the foil with tweezers. Take care not to smudge the prints.


1.1. Prints will be moist a little, so you need to let them dry. For less contamination from the air we cover the prints with a dry box and let them dry for 10-15 minutes. In the meantime, you can put the zip-lock bags under a germicidal lamp for extra sterility.
1.2. Pick up the spore printed foil with a pair of tweezers. Put it in a zip bag, close, sign with strain, flush, date. Zip bags are excellent to use here. It is very important the bags are 100% airtight. Ready!
How long can spore prints be stored? Storage conditions for spore prints
Spore prints in zip bags should be stored in a cool and dark place, preferably in the refrigerator.
The guaranteed shelf life of spore prints is up to 5 years. During the first 2 years spores almost completely retain their viability.
If the spore print has been stored for 2 years or more then the spores will be dehydrated. Such spores need a longer hydration in water when preparing a liquid spore suspension. Each year of storage increases the duration of rehydration by 1 day. 2 years of storage - 2 days of rehydration, 3 years - 3 days of rehydration, etc. or you can simply leave them in water for a week.
Such liquid spore syringe should be stored in a refrigerator at +2°..+8°C or 36-46°F.
Although each fresh spore print contains millions of spores. Only 3-5% of them are viable. The percentage of viable spores gradually decrease over time.
Now it's time for the most excited moment!
Comments
Add comment