

The story about growing Albino Penis Envy mushroom on coffee substrate
Hey Shroomok Community!
@D!ngo here — Magic Warrior of Shroomok Discord
I've been growing mushrooms for about a year now and have done some very interesting experiments along the way. The most recent my experiment was a coffee only inoculation, and I am very excited to share the results so far and the steps I took to make them happen.
How I came up with idea to make coffee substrate experiment
The reason I came up with the idea in the first place was because of the simple fact that I ran out of grain and while I was waiting for my order to arrive, I wanted to know if there was anything else in my house I could use for the time being.
I started researching normal household items that mushrooms love, and I came across this reddit post/photo

Also I've found one article on medium "Using Coffee Grounds to Grow Magic Mushrooms" about possibilities of using coffee grounds as a substrate for growing magic mushrooms.
My interest in this peaked and I began looking for more information on it, but all I could find was articles on mixing coffee grounds with worm casings, cardboard, popcorn kernels and straw. With this I was convinced that I may not need any filler because I remembered the time I've seen mold patches grow on coffee itself, and if mushrooms loved the properties of coffee, then what harm could be done?
List of stuff I used
🔸 The main ingredient I used for this experiment is 1 cup of coffee grounds (I used Folgers Colombian medium blend)
🔸 Coffee maker and clean drinking water (for pasteurization and acid lowering process)

🔸 Wide mouth mason jars and modified lids with air filter and injection port mentioned on Shroomok website in the section DIY Spawn Jars and Bags

🔸 Pressure cooker for coffee substrate sterilization

🔸 Still Air Box (SAB) for more sterile inoculation process and colonized agar plate with Albino Penis Envy strain. You can use a liquid culture or spore syringe, but it takes longer to show signs of growth with how dark coffee is

Ready! Let's go 🚀
How I prepared coffee substrate for mushroom growing step by step
Step 1. The first step I did was get all my materials together, then brewed some coffee for substrate and for coffee break ☕️

The reasons for brewing first is because coffee grounds are initially too acidic for mushrooms to grow on, and the brewing process cuts down on the acid as well as hydrates the grounds and pasteurizes them.
I used a big pot and filled the water up to make 12 cups ☕️
Step 2. Fill mason jars with spent coffee grounds and close with modified lids

Step 3. Cover the lid with foil, fill PC with water for further pressure cooking spent coffee grounds

I prefer to do this part right after brewing to cut down on chances of contamination. I've seen you can just use the grounds directly after brewing because its already pasteurized, but since coffee is known to be more prone to contamination, I wouldn't take any chances and be sure to pressure cook for at least 45 minutes. I made sure to loosely pack the jar

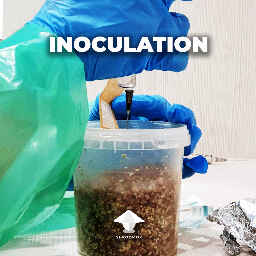
Step 4. The fourth step I took was to let the jar cool and put it in the SAB along with agar plate and scalpel. Let the air sit for a few minutes after closing the lid
Step 5. When everything is ready, cut wedge from plate, drop into coffee grounds and close the lid. I normally give the jar a little shake to move the agar closer to the middle of the jar.
Check out the process in my video: Coffee substrate inoculation with Mycelium on Agar in Still Air Box
Colonization period and progress on the way
I've noticed that at first it looked like the mycelium was dead or just not there at all because of how dark the coffee is. After about 4 days I noticed the mycelium came back and was really white and fluffy.
As always, patience is key here!
Let's check the progress!
Here is 4 days after inoculation with agar

Another side, same jar, 4 days after inoculation

Day 6 after inoculation

Active coffee substrate colonisation. Jar from the all sides and points of view
Day 19th after inoculation

Almost colonised at the bottom, 19 days after inoculation with agar

Let's check jar from the sides (19 days after inoculation)

And one more from another angle

Let's wait for a few days more, to be sure that it is fully 100% colonised.
So far colonization step is totally successful, but experiment hasn't finished yet, because we need to get mushrooms.
I'm going to mix it with coco coir and vermiculite or CVG substrate, maybe I'll add casing to see what happens.
I'll keep you updated here. Stay tuned!
To be continued...

Comments
Do you use, used coffee grounds, right from the pot of done coffee? ❤
@Robin Yes, USED coffee grounds, right from the pot of done coffee!
Coffee grounds are initially too acidic for mushrooms to grow on, and the brewing process cuts down the acid.
❤
How's this going in the CVG?
Just came across this article today and I'm curious that see how this turned out for you You got any updates you can share please?
OMGoodness yeah mind blown and also makes perfect sense.
Would love update pics @D!ngo !
That's pretty interesting. Don't forget share the experience with this experiment!
Add comment