


DIY Magnetic Mixer for home mycology
A magnetic stirrer aka magnetic mixer is often used in labs for buffer solutions that require constant stirring for long periods of time and of course in mycology: for preparation media for liquid culture, agar media and for stirring liquid mycelium.
Laboratory magnetic stirrers can be expensive. If you are using it rarely for home mycology it can be cost-effective to build your own mixer from scratch. Believe me, it's super easy!
The short video below describing the components needed and the steps to build it. Check it out!
Video on YouTube: DIY Magnetic stirrer for liquid culture
Looks easy, isn't it? Now let's check the list of necessary materials and I'll add important notes to each step of the video.
List of materials and supplies needed for magnetic stirrer
I'd like to share components I've used in the video from Amazon. Maybe most of these materials you already have at home and DIY magnetic stirrer can save your money!
🔶 Laptop or PC fan/cooler with plug. I used 90 mm cooler and AC/DC adapter. You can use coolers from 80 to 120 mm with adapter already to save money.
- 120mm Fan with AC/DC Adapter $18.99
💡 This fan also can be used for incubator and automatic incubation chamber during colonization period. Also for additional fresh air exchange in GrowBox and MonoTub for fruiting period.
🔶 Powerful neodymium rectangular magnet block. 20-25 mm is optimal for such version, smaller magnets can be weak for your device
🔶 PTFE bar magnets.
🔶 Platform for stirrer. Small square of plastic, plexiglass or even strong cardboard as a platform for jars.
🔶 Strong fast glue or Hot Glue Gun for crafting to stick the magnet. I have BOSCH hot glue gun, it's extremely great quality for long-term use, but costly. There are many good cheap alternatives. They are all +/- the same quality
How a magnetic stirrer works
The main principle of magnetic stirrer is interaction between two magnets. The rotating field created by a rotating magnet placed beneath the vessel with the liquid.
The magnet bar in the stirrer are attracted to the one on the fan, and so when the fan spins, the magnet bar spins in the solution, with no physical contact required.
How to assemble magnetic stirrer
Here I'd like to add more important details to my video guide.
Step 1
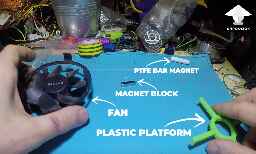
Prepare all needed components are listed above: PC fan/cooler, neodymium magnet block, PTFE bar magnet, plastic stand, power adapter, glue gun or fast glue, jar with water for testing.
Step 2
I've cut two edges on my fan, because they interfered with the plastic platform installing. It's just a specific of my cooler. In your case this may not be necessary!

Step 3
Glue the magnet block to the PC fan. One of the hardest tasks is mounting the magnets correctly. That's why don't hurry up!

Magnet should have its poles looking sideways. I've found these sides experimentally (bigger side on the top) and made black mark between poles. So that, right and left sides of the magnet create magnetic field.

❗️Important note: If you use round neodymium disc magnets (8-10 mm) you need to use two magnets. One magnet should have its north facing upwards and the other its south facing upwards. The magnets should be positioned directly across each other

Step 4
Add the platform. I printed it on 3D printer. If a 3D printer isn’t available you can use any flat surface for such podium: plastic plate, strong cardboard or plexiglass square

❗️Important note: spacers are needed to sit between the fan and the top platform due to the extra height (3 mm) created by the magnet(s). Coins can be used here or additional small pieces of plexiglass on the corners of the fan
Step 5
Powering your magnetic stirrer. The magnetic stirrer can be powered by any voltage source the fan is rated to. Either battery holder, or AC/DC Adapter. Your fan should have two wires (red for positive and black for negative). If it has three wires, just skip the third one.
Put PTFE Magnetic Stir Bar in the jar with water, switch it on and test. Ready!

❗️There is no option of speed control if you use battery holder. With AC/DC adapter your magnetic stirrer will be more reliable, convenient and speed control here is available. That's why I recommend to use AC/DC adapter for your magnetic stirrer
Ready to use magnetic stirrer
If you don't want to spend time for assembling or you need to order ALL components for such device you can check ready to use magnetic stirrers on Amazon:
INTLLAB Magnetic Stirrer with 7 pcs. stir bar set $39.99
ANZESER Magnetic Stirrer Hot Plate, 100-2000rpm Lab Stirrers $59.95
If you find this guide helpful, please support us with a cup of coffee on ☕️ buymeacoffee
Join Shroomok Community on Discord and Reddit for questions and sharing experience.
You can also leave your comments on this page below ⬇️
Have a happy growing!
Made with love by @mrzimm - Tech Guru of Shroomok Growers Community on Discord.
Promoted by ©Shroomok

Comments
Add comment